How to draw a Russian beauty and a guy. Drawing in the preparatory group on the topic “Doll in national costume”: specifics of the lesson
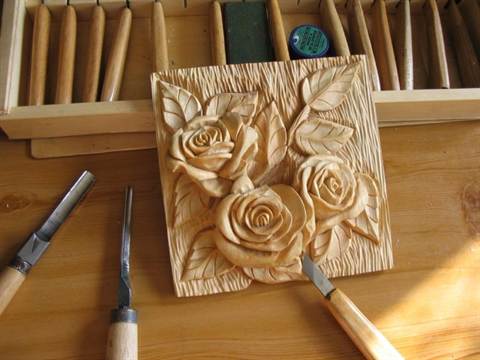
Wood carving for beginners - interesting and exciting activity, which is not particularly difficult. You don't have to have it artistic skills for creating ornaments and patterns. Now ready-made sketches and video tutorials come to the aid of a beginner.


Most even accomplished masters are inspired by the work of other people, so be sure to carefully look at the stencils, diagrams and drawings of other amateurs.
Types of techniques
Sculptural carving is the most complex, requiring certain skills. There are many books on this technique.
The incised carving features a fully processed background and beautiful ornamentation. It is performed with a jigsaw, knife, and finishing can be done with a chainsaw.
Geometric carving will help you learn the technique.
In order to perform artistic carving, it is easier to copy a ready-made sketch than to create your own.

But most ready-made patterns are distinguished by a certain intricacy, so a novice master can try his hand at creating his own simple sketch.

Creating a Sketch
When designing a sketch you need to perform the following sequence of steps:
- The workpiece for work is selected;
- The sketch indicates the main elements and places where the thread will be applied;

- Using drawing supplies, the picture is redrawn onto graph paper or tracing paper with scale markings;
- If any elements are repeated, then creating a single stencil is enough.
With the skills to work in the simplest graphic editors(for example, Paint) you can create a sketch there, and then simply print it on paper at the required scale.

Stencils are usually used repeatedly, so it is advisable to make them from a relatively dense material (cardboard, plywood).
Here are some details of transferring the design from the template to the tree:
- The sample is fixed directly to the base with a milling cutter, cutting is carried out directly along its contour;
- The contours of the stencils are transferred to the wood with a simple pencil;
- You can transfer a sketch from paper to a board by placing tracing paper underneath it. After drawing the outline of the sketch, a trace from the carbon paper will remain on the wood;

- The most simple patterns can be transferred by pricking (with a needle, knife or awl).
Stages of work
When the sketch is transferred to the base, the most interesting process begins - the actual processing of the wood.

If you are working using the through-thread technique, the first step is to make starting holes in each element. This is usually done using an electric drill. A saw is then inserted into the holes and part of the wood is sawed out. Next, the edges are aligned and the decoration begins.
Flat-relief and volumetric carvings are performed a little differently.

First, the contours of future patterns are made with a knife. Next, the cutter cuts through the deepest central part. All other recesses are formed from it.
Small details are made using a chisel.
Sometimes additional tools may be required (such as a mallet for harder woods).

Deep relief is made with a chisel with a curved blade. Upon completion of the work, all edges are processed to eliminate roughness and chips.


Wood carving is an amazingly beautiful and very popular type of hand-made wood processing these days. The carved interior details captivate with their magnificent appearance and reflect rich national traditions.

Creative people who are simply itching to do something very interesting and useful should pay attention to wood carving. Girls and women may think that this is only a man's activity. And they will be wrong, because there are no fewer women woodcarvers than men.

About wood carving for beginners
Can be used to decorate indoor and outdoor spaces different kinds carvings and techniques for implementing the plan. If you are interested in this type of needlework, then you must understand that you need to master the methods and techniques of wood processing, acquire necessary tools and improve your carving skills.
In the modern world of smartphones and tablets, a wooden stand decorated with wood carvings looks very original.


Skillfully executed carvings in the form of simple and ornate patterns and ornaments seem to enliven the world and endow it with sophistication, charm, emphasizing the taste of the owner of luxury items and the talent of the craftsman.


The works of the best carvers decorate the temples. Pay attention to the photo of the iconostasis of the upper Church of the Savior of the Image Not Made by Hands, which is located in Moscow, in the Church of the Intercession Holy Mother of God in Fili.

Modern masters with delicate taste, create real masterpieces.

And thanks to finishing and protection technologies finished product from the destructive effects of mold and insects, these wood carvings have served people for hundreds of years.
Pay attention to the magnificent carved pieces of furniture:


Stylish doors:

Delightful handmade figurines:


Very often, connoisseurs collect handmade carved items. Wonderful chess that is worthy of any collection.

Perhaps, over time, your wood carving masterpieces will be carefully preserved by collectors or decorate temples.
Types of wood carving
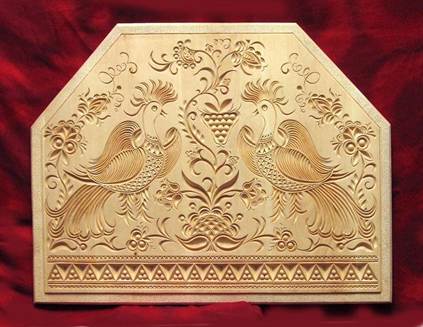
Of all types of wood carving, it is very interesting openwork or through thread on wood, which is characterized by some transparency, in which only the image remains, without a background. An example is an applied carving - this is an ornament that is attached to a finished background after production by a craftsman.

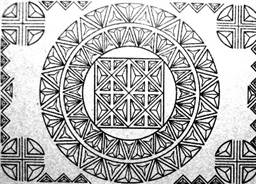
Geometric carving woodworking – This is a type of carving in which the pattern is formed using many simple geometric shapes(a diamond is often used).

Oriental carving on wood it is distinguished by its whimsical shapes. Egypt is the cradle oriental type wood carving.
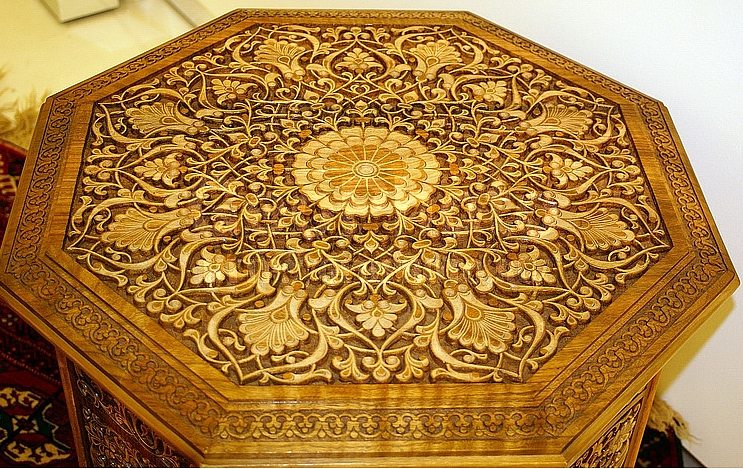

Relief carving on wood. In this technique, the image is located above the background or at the same level with it. These are carved panels various shapes with a three-dimensional image.

- This is a flat-relief carving, but distinguished by an abundance of carved and stucco decorations, various colors, curls, leaves, figures of people in unnatural poses, fabulous fantastic animals.

Originated in the village of Kudrino. Well-known products in this type of carving are boxes, vases, dishes, ladles, and home decor items. The main element is floral ornament: rosettes, curls and twigs.

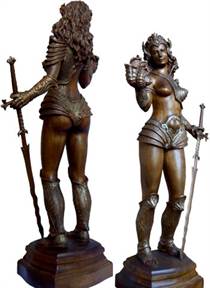
Volumetric (sculptural) carving Great for making sculptures, animal and human figures, toys. - a subtype of volumetric thread. This is the main industry of the village of Bogorodskoye in the Moscow region. The famous Bogorodsk toys are figurines of animals and people made of linden and alder.

Most often used to decorate wooden Scandinavian churches. Wood carvers decorated the inside and outside of church buildings with images of Gods and various animals.

- the simplest and most unique type of carving. On a flat background, the master cuts out grooves - grooves, forming a pattern. Carved landscapes - images of landscapes on wood.


All these types of carvings are quite conventional. Each master chooses the most suitable one, taking into account work experience, quality of wood and creative inspiration.
What can be decorated with carvings?
The simplest staircase is transformed, decorated with carved balusters. Balusters- these are figured columns in the form of columns, a stylish and noble decoration of the staircase. Wooden balusters look organically with a spiral wooden staircase.

Bas-relief. Another name is "low relief". This sculptural image on surface. Most often these are figures of people and animals .

Choosing tools for wood carving
As in every business, wood carving has its own secrets and nuances, which allow one to reveal the beauty of wood in a wonderful ornament. It is necessary to select special tools for wood carving and stock up on the necessary blanks and sketches for wood carving, which will be embodied in the form of drawings, borders, lace or genre scenes.
Basic tools
Very high demands are placed on the quality of carving tools. Of course skill plays a role important role, but well-selected and sharpened tools will help bring your idea to life. Experienced carvers will tell about its quality at first glance at a tool, but beginners get lost in the store because of the huge selection.
The basic set for wood carving includes:
- several knives and chisels;
- needle files;
- hacksaws for metal;
- vice;
- sandpaper;
- drill with several types of drills;
- bars.

Knives should be made only from high quality steel. It is better to purchase them in specialized stores for creativity. Although on initial stage Just sharply sharpened knives will do. An excellent start would be knives from Tatyanka, Narex, Kogatana, etc.
It is not necessary to choose an expensive foreign-made instrument, because domestic instruments can be the same good quality but much cheaper
As your skill grows, you may need a set of tools, a milling machine, a drill, etc.

Chisels for carving
Sometimes, instead of a chisel, a sharpened screwdriver or file is used for wood carving.

Flat chisel- This is a long rod, at the end of which there is a flat cutting edge. Very often it is used for primary wood processing.
Semicircular chisel- this is one of the most important tools for work. They differ somewhat in the degree of roundness, that is, they are medium, round and sloping.
It still happens V-shaped version of chisels. It can be useful for geometric wood carving, which we will introduce you to below.
Beginners need only a small wood carving set of good quality to immediately get used to the correct movements and pressure.
In this video there is a wonderful master A. Yuriev shared with us which tools to choose for carving.
How to protect yourself from injury when carving wood
Any tool of a master carver can be compared to a straight razor, therefore, when working with it, you must strictly follow safety precautions. The material must be positioned so that you can work freely with a knife or chisel, eliminating the possibility of the sharp edge hitting your hands.
The work place should be comfortable and clean. All the extra ones in this moment tools must be carefully folded, because they are very sharp and can cause injury.

Materials for work
Each type of wood for carving has its pros and cons. Soft wood is easy to work with, but there can also be a lot of defects. These are aspen, linden, birch. For beginners this wood fits better Total.

Oak, boxwood, mahogany are more expensive and complex wood. It is hard and durable, so it is difficult to carve from such wood. Very often there are troubles when working with such types of wood. Either the instrument or the craftsman may be harmed.
An experienced carver can easily work with a variety of woods, including juniper. Well, for beginners it is better to use inexpensive materials - spruce, pine, pear or birch.
Whatever tools are chosen for wood carving, safety precautions must be strictly observed!
Geometric carving technology
Geometric wood carving is considered the simplest and is perfect for beginners. To create the intended design, you need to have a small set of wood carving tools and clearly follow the design. In geometric wood carving, symmetry and repetition are of utmost importance. This achieves great game light and shadow.


Cutting boards using this technique and wooden panels look wonderful in the kitchen.

Geometric carving consists of sequential cutting out of simple geometric shapes: rectangles, triangles, squares, rhombuses. But the result is a wonderful ornament that looks different in different lighting.
Execution Sequence any wood carving is like this:
- First, a wooden blank is made (board, deck, blank).
- Next is rough leveling of the surface of the workpiece, during which all defects and roughness are removed.
- Then a decorative relief is formed using special cutters.
- After the main carving is completed, the finishing process is grinding, impregnation, painting, varnishing.
You cannot work with a workpiece on your knees! The master must have a table to work on.
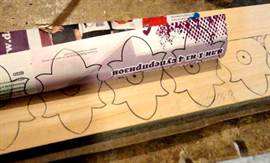
Master class “Geometric wood carving on a cutting board”

Tools. You will need 2 knives for wood carving: a triangular jamb knife and a feather knife, a ruler, a compass, a pencil.

A triangle jamb knife is necessary for cutting triangular shapes of various configurations, as well as for cutting long straight lines. A pen knife is used to cut long lines such as a petal or groove. Carving knives should be sharp and comfortable.
First stage. We make a sketch of the pattern on the board. It can be applied using a compass and ruler. Or you can print out carving patterns taken from the Internet and use carbon paper to transfer them to a prepared cutting board.

Second phase. Cut out the petals. We use a pen knife.

During work thumb presses tightly to the board, and forefinger touches wood easily. This will help regulate the depth of the knife into the surface and the angle of inclination. And your thumb will help you move the blade smoothly. First, we cut in one direction at an angle, then we turn the board over and cut on the other side.

If the shavings curl like a rope, the knife is good and sharp. It must be periodically sharpened with a piece of leather with GOI paste.

Third stage. We cut out the triangles with a blunt knife. Using the heel, at an angle of 45 degrees, we cut the knife into the wood, not reaching the edges of the pattern on three sides. The slots should meet on all sides in the shape of a pyramid. The sliver falls out and forms a beautiful triangle.


Fourth stage. What we couldn’t cut, carefully clean it so that the edges are frequent and even. Using the same principle, we cut out grooves and triangles around the perimeter of the board.
Fifth stage. We polish everything sandpaper, treated with natural impregnation. All! The work is done. We decorate the kitchen with a useful and beautiful cutting board with wood carvings.
Wood carving designs
To perform wood carving, photographs, drawings and sketches are simply necessary. A large pattern for wood carving is used for large-scale products: for the facades of houses, interior decoration with carvings of churches, windows.
For interior items and furniture, carvers use small patterns that are carefully worked out by the craftsman.
YOU WILL NEED IT
We offer you an archive from . Choose, print, create.
Video master classes on wood carving for beginners
Of course, the wood carving looks especially impressive in the video. Channel "HAND WOOD CARVING" shows the features of geometric carving for beginners.
A woman's view of wood carving. Channel tatianacarving shows us how to make flower petals and leaves.
Konstantin Belyaev on his channel he talks in detail about wood carving cutters.
And in this video Ivan the Builder shows how to make relief-planar carving:
We will be very glad if this article inspired you to take up wood carving!
Having barely learned to hold objects in their hands, little man a craving for creativity manifests itself. Over time, he will have the opportunity to try himself in various types of crafts: needlework, modeling, origami, wood carving, drawing. Of course, certain skills that the child received in school will be useful for this. early childhood. Sometimes a simple hobby gradually turns into a hobby, and then becomes the work of a lifetime. So many centuries ago in Rus', one of the main types of creativity was wood carving. And in the 21st century it still arouses genuine interest among people.
Popular types of intricate art
 For a long time, people decorated their homes with wooden carvings. Various kinds of paintings, kitchen utensils, religious objects, and children's toys were considered valuables for any family. Perhaps this is why various types of wood carvings appeared. The most popular options are:
- geometric;
- flat-notched;
- slotted;
- sculptural;
- embossed;
- openwork;
- invoice.
Fortunately, the list does not end there, because this type of creativity is widespread throughout our vast country. Let's look at just a few of them.
 Geometric wood carving involves the use of various figures. These are triangles, circles, squares and polyhedra. It is used for the manufacture of furniture elements, household utensils, and wall crafts. The oldest type of such carving is triangular-notched carving. This is one of the most simple methods, since it is performed with only one tool - a knife with a jamb. For such wood carving you will need a simple set of items:
- lime board;
- special knife-jamb;
- ruler;
- pencil.
First, sketches from geometric shapes or a ready-made ornament. Beginners should not use it complex drawings so that the work turns out flawlessly. For the first work, material from deciduous trees, since it is more convenient to carry out straight lines with a sharp knife.
The wooden surface should be as smooth as possible. This is achieved by planing the board. At the same time, it does not need to be sanded with sandpaper. Otherwise, the carving will not turn out clear and neat, and the tool will quickly become dull.
The flat-pit method is used to cut out depressions of various sizes and shapes on a plane. These can be oval contours and all kinds of convexities.
 The slotted type of carving is also considered quite simple. It is performed using a jigsaw. A sketch of any figure applied to a wooden plane is cut out along the contour. The result is some cute crafts. Slotted threads are used to make background objects through which other planes are visible. It is often called openwork carving, and is used to decorate furniture in the Baroque style. These can also be elements of cupboards, window frames, doors, and sometimes decorative screens. If crafts are attached to a special base, then this type of carving is considered overhead.
The process of working with the slotting method begins with a sketch, which is applied to a pre-polished workpiece. It is transferred to the surface using a special template or transparent white paper. Then holes are made on the contours and cut out on the work table using a thin jigsaw file.
 Relief carving includes two main methods: flat and blind. In addition, the blind option implies a low or convex relief. The bottom line is that the pattern is formed due to the main background of the surface.
 The flat-relief method is performed in such a way that the pattern and the surrounding background are made at the same depth over the entire area of the base. Blind carving is characterized by a convex pattern that does not have flat outlines. Such products are valued for their high decorativeness and richness of composition. After all, a unique miniature landscape with hills, depressions and depressions is created on the plane. To create such masterpieces, craftsmen use elements of almost all types of wood carving. Therefore, beginners should master each method separately in order to apply the skills with more.
The first steps on the path to mastery
 History shows that wood was traditionally used to decorate living spaces. Nowadays, various photographs, drawings and sketches of wood carvings are exhibited in local history museums or printed publications. This suggests that smart people who are willing to learn can master this art form. Wood is a wonderful natural material from which you can create decorative compositions, paintings, furniture elements and kitchen utensils. Having mastered the basics ancient art, some became real masters of wood carving, devoting their entire lives to it.
Popular wisdom says: “The hardest trouble is the beginning.” This is how it is if you do nothing. Practical wood carving tips for beginners open the door for brave people to the world of magnificent DIY crafts. First you need to prepare your tools and understand the basic nuances of the craft.
It is advisable for beginners to choose high-quality and durable equipment for work in order to acquire valuable craftsmanship skills.
 For wood carving you need to prepare the following tools:
- sharp knife;
- chisel;
- jigsaw;
- bit;
- drill;
- needle files;
- spoon cutter;
- bars;
- milling machine.
Of course, it will be enough for beginners to purchase special set wood carving tools, which includes a knife, jigsaw and awl. With their help it is very convenient to master the skills of ancient craftsmanship.
The next step is the selection of raw materials. The quality of the product depends on this. There are two types of wood in nature: hard and soft. The first group includes mahogany, oak and beech. For the second - aspen, pine, spruce, birch. Of course, it is easier to work with soft wood, but with one wrong move it quickly deteriorates. Despite this, it is considered the most suitable raw material for beginners.
Hardwoods are used by professionals because they are very expensive.
In addition to the strength of the material, the color of the wood also plays a key role. A suitable raw material for learning the skill is birch. It lends itself wonderfully to cutting and drilling in any direction. When choosing patterns for wood carving, you should keep in mind that birch wood darkens over time. Despite this, she is very easy to work with. 
When the pattern is selected, it must be transferred to a wooden blank. In the age of technology, you can use ready-made photographs or drawings provided by specialists. The subjects of the images are very different, but each has its own unique beauty. When everything is ready, you can start creating your own masterpieces. Thematic wood carving lessons are an invaluable aid for beginners.
Master class on simple crafts
 When you look at the finished crafts, you get the impression that making them is not at all difficult. Therefore, many lovers folk craft took the instrument into their hands and got to work. To cut an ordinary flower you need to prepare the following set of items:
- wood blank;
- double soft pencil;
- tracing paper;
- chisels.
Please note that only special chisels for wood carving are suitable. They should be v-shaped, narrow and semicircular. The next stage is drawing. It can be taken from the Internet. To do this, apply a sheet of paper to the screen, redraw the diagram, and then apply it to a wooden plane. 
Start working from the central part of the sketch, carefully cutting out a circle. Then, using a v-shaped chisel, cut out the petals along the contour. Wood waste between them is removed as work progresses. If you don’t have such a chisel, professional knives for wood carving will do, as they are just as good to use in this craft. 
Using a semicircular chisel, cut out the outer part of the petal. It looks like the outline of a heart, but it's not scary. Then cuts are made in the inner part of the petal, connecting it to the center of the flower. All that remains is to round it off and the flower is ready. Now you can admire the first creation of your own hands. An invaluable aid for beginners is a themed woodcarving video that encourages them to get started immediately.
Modern technology for experienced craftsmen
In the modern world, many works have been carried out for a long time mechanically. Applied crafts are not lagging behind in this. The use of technology allows craftsmen to save their energy and precious time. Wood carving machines make it possible to quickly and efficiently prepare the raw material for work. The only drawback of such devices is their high cost, but people for whom carving is not just a hobby are ready to purchase them.
Pantograph
 The device is designed to work with any wooden surfaces. It performs operations of various kinds, both volumetric and on a plane. The pantograph is used to process arched, bent or rotating parts. So, with the help of a machine, various elements of furniture, statues or panels are cut out.
Drill
 An excellent device for working with hardwood. It is important to take into account the properties and location of the fibers natural material. Using a drill, craftsmen sharpen tools, polish wood, and, if necessary, polish it.
Tree species with dense wood that do not have a tendency to chip are suitable for working with a drill.
CNC milling machine
 This technique is mainly used for the production of wooden furniture with carved decoration. The machine is designed to work with any type of plywood and wood. It is distinguished by high functionality and technical capabilities. When working on such equipment, it is important to use special protective equipment - goggles and gloves. Also follow the operating instructions for the device.
 As practice shows, such machines simplify the process of wood carving. They make it possible to create great amount products in a short time. The devices are used not only in industry, but also for personal workshops.
In any case, handmade products bring true satisfaction to a person. They create a pleasant atmosphere in the house, help express the master’s feelings for his loved ones, and serve for the benefit of the household for a long time. Wooden crafts retain their properties for a long time natural beauty and never go out of style. Wood carving is an art that is passed down from generation to generation. It is available to anyone who wishes to master this craft. The main thing is not to be afraid of failures, but to be willing to learn, pick up tools and create masterpieces.
Wood carving video tutorial for beginners
In a similar way, the table of contents (top) for the icon cases in the photo below were made.
To enlarge the image, click on it with the mouse.
First, a sketch of the table of contents in real size is drawn on paper, in accordance with the size and proportions of the future icon case. It is determined where the wood carving will be located, and the sketch of the carving itself is first drawn.
Then the drawing is transferred to a sheet of fiberboard or plywood and carefully, as accurately as possible, cut out with a jigsaw at low speed, without turning on the pendulum stroke. Fine tooth file (I use BOCH T101 AO or Gepard T101 AO files)
Thus, we made a template according to which, using a router, we will make the very top (crown, table of contents) of the icon case.
There are two in the photo below ready-made templates: The first of the fiberboard is the table of contents wall, the background on which the wood carving will be attached. The second plywood template is the cornice, the arched frieze of the icon case, it will be made of wood.
All bends, curves, and template lines are carefully sanded with sandpaper. The appearance of the finished table of contents of the icon case in the future depends on how symmetrical, even and neat our template will be.
The following photos are a template for the lower and upper parts of the icon case
We place the fiberboard template on a sheet of plywood and trace it with a pencil.
After this, we cut out with a jigsaw close to the drawn line, but without touching the line itself.
We screw the template into the plywood blank.
Using a router and a straight copy cutter with a bearing, we go around the workpiece along the contour.
The bearing on the cutter moves along the edge of the template, and the cutter removes excess material from the workpiece.
In this case, the workpiece exactly copies the profile of the template.
We also outline the arched cornice with a pencil on a wooden board.
Cut with a jigsaw, roughly, without touching the line.
We attach the template to the workpiece and repeat the previous operations.
We attach the template using self-tapping screws to reverse side parts, not on the front - so that no traces of self-tapping screws are visible on the finished element.
Although if you make a mistake, putty will help.
We repeat the same thing when making an element for the lower part of the icon case.
Using an edge molding cutter, select the desired profile from the front side of the cornice.
Then select a shallow (5-8mm) groove inside the cornice.
We connect the cornice with the wall of the table of contents.
You can immediately glue two parts together and then paint them together, but I find it more convenient to varnish and tint these two elements separately.
View from the front and back.
Sketch, wood carving template
25.01.2019, 06:50
Making carved decor for the table of contents of a floor icon case.
The top (or table of contents, crown) of the floor icon case is an arch with applied wood carvings.
Inside the arch there will be an Orthodox eight-pointed cross with carved decor.
First, we draw the arch itself on a scale of 1:1 and then the cross around which our wood carving will be placed.
Initially, the sketch is drawn “by hand”; the accuracy of the lines and the smoothness of the curves do not play a significant role at this stage. The main thing is to place the pattern evenly around the cross, observing general outline proportions, create a logical and complete design of floral ornament.
After this, using patterns, we align the hand-drawn lines, achieving smooth transitions, roundness of curls, and adding small parts to the sketch.
We draw, as usual, only one left part of the pattern - the right one will be strictly symmetrical to it.
In order to understand what the finished thread will look like, you can attach a mirror along vertical line(walking along the cross). Will be reflected in the mirror right part sketch of the carving, that is, we will see the entire pattern as a whole.
With a pencil I shade out those parts of the sketch that will be cut with straight chisels. Unshaded areas - semicircular incisors.
Some craftsmen cut out the sketch and glue it onto a piece of wood. Then, along the lines of the sketch, using a jigsaw, unnecessary parts of the pattern are removed and cut with cutters directly on the paper and on the workpiece at the same time.
With this method, the sketch template is not saved, and if you later need to make exactly the same decor, you have to re-create the drawing.
I do it differently: I laminate the sketch drawing with simple transparent tape on both sides. I then carefully cut it out using the cutters to create a carving template that can be used over and over again. You can call it a stencil.
I attach the template to the workpiece and trace it with a sharpened pencil or pen. Using a jigsaw, I remove everything unnecessary and get a blank for carving. Externally, this is a house slotted carving, but we still have to work on itcutters and chisels. In order for me to understand where, what and with what to cut, I transfer the sketch drawing onto the wooden part. Also with the help of patterns.
After processing with cutters, the finished decor is manually sanded with fine sandpaper.
We use sandpaper to remove scorch marks from the jigsaw file, and smooth out uneven surfaces after work with chisels.
By turning the thread over, you can trim the reverse side of the pattern with cutters in some places. In this way we will, as it were, lift and separate our carved decor from the background to which it will be attached.
On the following photos The wood carving is coated with clear varnish.
The wooden board for the workpiece was glued from different plots - this can be seen from different colors planks. IN in this case it doesn’t matter - the finished carved decor will be painted with gold paint.
The varnish plays the role of a primer and several applied layers will allow you to get smooth surface before gold plating.
Wood carving on the icon case painted “gold”.
Floor-standing icon case with wood carvings
14.09.2018, 04:29
Transferring a wood carving sketch onto a linden board using a template
If the overhead thread is symmetrical in the horizontal or vertical plane, then only half of the sketch (template) is drawn
"Spruce and Drill" - handmade wood carving workshop in Belarus
12.09.2018, 06:50
We make panels only from wood: ash, oak, birch, alder. Most often, of course, from linden.
If necessary, we will do the finishing: tinting with stain or stain, varnishing.
All wood carvings are carved only by hand.
A drawing, sketch, sketch of a carved ornament is discussed in advance. As are the sizes.
Carved panels can be used as overlay wood carvings for church furniture, for example, for a floor icon case or a church iconostasis.
08.09.2018, 07:57
Hand-carved decorative wood panel
At the first stage of work on the panel, a wooden panel made from identical linden slats (lamellas) is glued together.
A sketch for wood carving is marked on the shield and all unnecessary parts of the ornament are removed using an electric jigsaw. The result is a slotted or through saw thread.
Decorative panel can become an element of a furniture facade
In our case, wood carvings (carved panels) were made for the door of a wooden altar in an Orthodox church.
You can order production from us and buy an altar with a canopy, in the form of a floor-standing icon case.
06.09.2018, 07:36
Wood carving - from sketch to finished product
Creating a sketch or drawing is the first step in making carved decor.
The sketch is drawn on a scale of 1:1.
This takes into account not only the external, aesthetic appearance of the future product, but also the capabilities of the carver, his skill, the availability of the necessary cutters, the complexity and size of the carved decor.
To enlarge the picture, click on it with the mouse.
The next step, after creating a wood carving sketch, is to laminate it (for example, with ordinary transparent tape) and cut out a template along the contour of the drawing.
With this method, the thread template can be used repeatedly if several carved patterns are to be cut.
Just trace the template along the contours with a pencil.
The next step is cutting out the slotted pattern with a jigsaw.
We remove everything unnecessary, leaving what we will work with with cutters.
In principle, this is already the so-called house carving.
A simple incised overlay wood carving used for home decoration.
Using patterns or “by hand,” we apply cutting lines and designs to the workpiece.
After working with cutters, sanding, tinting and painting, you get this kind of wooden carved decor.
This applied cross with a carved pattern was cut out for a church lectern made in our workshop.
You can see his photo and description in the "Analoi" section.
When copying images and reprinting an article, a link to the site is required!
21.05.2016, 07:50
Wood carving for the front part of a church lectern.
Step-by-step production.
Transferring a drawing or sketch to the board.
You can transfer the pattern to the workpiece using a carbon copy or using a cut out template.
With the second method, a template once made and cut out, for example, from thick cardboard, can be used many times if you need to make many identical products.
The finished slotted pattern is processed with cutters and chisels of various shapes.
At the final stage, the wood carving is sanded with fine-grained sandpaper before painting or coating with oil, wax, or stain.
26.03.2016, 09:19
Sketching a carved pattern
Transferring the design to a linden board and cutting out the outline with a jigsaw
Finished work... Then sanding, tinting, painting...
Great Krakotka on the Polish map and on the Schubert map
There is a legend among local residents that tells why the village has such a name: they say that once upon a time a small unknown village burned down near Slonim. Two residents of this village - two brothers who bore the surname Krakot - descended along the Jordanka River to these places. The first brother settled in the upper reaches of the Jordan River, and the other went down the river. The place where the elder brother settled was called Great Krakotka, and where is the youngest - Malaya Krakotka. Today, these two Krakotkas are still located next to each other....
Here's another story from that time
One day they decided to bring the boyars living in Great Krakotka to the common daily work which was carried out by the peasants. The boyars then began to resist, saying that digging the earth and hauling hay were duties and activities for peasants. And theirs, the boyars' business, is military service. We got offended and went to the capital - Warsaw, to the king himself ZhigimontVase.
He listened to the boyars and said that no one would do this to them again and gave them a paper in which it was written that the boyars should not be involved in any other work other than military service. The kings did not give offense to their subjects and tried to adhere to ancient laws.
After three sections of the Polish-Lithuanian Commonwealth, Krakotka found itself in Russian Empire in Slonim district. There is evidence that in 1798 there were 31 men living in the village. The fact is that before this there was a liberation uprising under the command Tadeusha Kosciuszko.
In the 18th century, our country was almost entirely Uniate. Uniates lived then and in Great Krakotka, and Little Krakotka, behind which there has long been a Uniate cemetery.
At the Krakotki cemetery
Attractions
The village is famous for its natural monuments.
On the very outskirts of the village is the Republican Geological Geomorphological Natural Monument "Krakotskaya ridge". Scientists say that it appeared 220 thousand years ago in glacial period! Such ridges, they say, appeared from sand, stones, in the openings of water streams in ice cracks.
The famous Krakota boulder
When the ice melted, a man came here.
On the outskirts of Krakotka, in the forest, there is a very beautiful juniper grove. If someone has been to Crimea, then he has seen such juniper groves. Such groves are rare in Belarus.
On the outskirts of the juniper grove, an ancient cemetery has been preserved, along which stones are scattered. The fact is that according to local ritual, when they buried someone who took his own life, a stone was placed above the head and at the feet, where a wooden cross was also placed. It is believed that when the day of judgment comes and everyone goes to God’s judgment, it will be easier for him to get up holding the cross. Now these stones have been destroyed because the cemetery was plowed up and planted there.
About the holy healing spring
In the village there is a holy spring with healing water, which has been known since ancient times.
There is a local legend about the krinichka.
They say that this land once belonged to Mr. Skurat, who had a daughter, she had a very poor eyesight. One day an old man came to the village and stopped near a mountain from which water flowed.
The elder drank this water, rinsed his face, and immediately his eyes began to see better. He came to the village, told the people about it, who told everything to Pan Skurat. Pan began to take this water and treat his daughter, rubbing her eyes - the girl was cured. Then Pan Skurat dug a well on the mountain and from that time on this little spring began to be called Pan Skurat's spring.
Now the krinichka is consecrated in honor Forerunner and Baptist of the Lord John. They say that on holidays the water here is drawn to the bottom, but it quickly fills up. Water helps against eye and stomach diseases. There are examples of people being cured with this water. But it is known that water helps those who believe.
The Holy Krinichka is located near a river with the interesting name Jordanka. It was deeper and wider until land reclamation was carried out. And when the reclamation was carried out, it became a small stream. The name of the river is mysterious. Legend says that once in these places they killed a man who called himself Jordanas. Or maybe there is a connection between the Jordan River and the famous Jordan River, in which John the Baptist baptized Jesus Christ?
Water blessing prayers are held here, with special solemnity - on the day of the Nativity of John the Baptist (July 7). Water from this source is taken not only local residents, but also pilgrims, travelers from near and far abroad.
Famous personalities of Great Krakotka
In the part of the village that was formerly called Malaya Krakotka, Ivan Solomevich, a Belarusian literary critic, folklorist, bibliographer, translator, and encyclopedist, was born.
He signed his works with the pseudonym Krakotsky or Yan Solomevich.
The writer was born in Malaya Krakotka, and went to school in Velikaya.
By the way, the famous Belarusian Grigory Okulevich was born in Great Krakotka. During the occupation in Polotsk, he was an active figure in the Belarusian national liberation movement. He was also one of the organizers of the BKRG and TBS. When the Poles began to hunt Okulevich, he was forced to emigrate to Canada to avoid arrest. But he did not abandon his Belarusian activities there, and together with his friends he created the first Russian newspaper in Canada, which had its own Belarusian page on Belarusian language. And when World War II began, Grigory Okulevich volunteered for the war. After the war, he became the chief secretary of the Russians in Canada Federation in Canada, and later became the editor-in-chief of an emigrant newspaper. In Canada, Okulevich wrote and published two books: “50 years of the Belarusian Republic” and “Russians in Canada.”
In Great Krakotka, Grigory Okulevich and his friends created a Belarusian library on the basis of the TBS and named it in honor of Yanka Kupala. But the Poles didn’t like everything that was Belarusian, they didn’t like the local Belarusian movement, so the Poles closed the library. All Belarusian books taken out of the library. Only in 1939 was the Belarusian library of Yanka Kupala renewed in the village.
The Second World War began and the library was destroyed, but in 1946 the Yanka Kupala Library in Velikaya Krakotka was born for the third time. Yanka Kupala’s wife, Vlada Frantsevna Lutsevich, corresponded with this library.
Yakub Kolas, Arkady Kuleshov, Kondrat Krapiva, Ivan Shamyakin, Mikhail Lynkov sent books with their autographs to the library. In 1970, a new library named after Yanka Kupala, but today it no longer exists. Active participation Pavel Tavlay, the father of the famous Belarusian poet Valentin Tavlay, took part in the construction of Yanka Kupala.
Tavlay began writing poetry in early age. When he studied at the Slonim Teachers' Seminary, during the census he registered as a Belarusian, but wrote Belarusian as his native language, for which he was expelled from the seminary. 2014 marked the 100th anniversary of the birth of the poet Valentin Tavlay. He suffered for 7 years in Polish prisons for his Belarusian activities, but, fortunately, he did not fall under Soviet repression and did not rot in Stalin's camps, he died of natural causes in 1947. His fellow countryman wrote a lot about Valentin Tavlaya, researched his work, and dedicated many poems to him. Belarusian poet Mikola Arochka.
Mikhail was born in neighboring village, but he loved to come to Velikaya Krakotka, he loved these places. The village is proud of its fellow countryman-poet.
The Great Patriotic War
In 1941, near Velikaya Krakotka, a strong battle. On the German side, Gulden's regiment fought here against the Red Army. 160 German soldiers died here and were buried on a mountain near the church. And in 1944, when the Germans were retreating, they dug up the remains of each of their dead soldiers, put them in new coffins and took them to Germany.
Today no one can say how many Red Army soldiers died. Only 1,600 soldiers were captured; they were marched through the streets of the village. In the middle of the village of Velikaya Krakotka, 17 known and 338 unknown Red Army soldiers were buried in a mass grave in the middle of the village. And how many of them still lie buried in craters and trenches?
A house was recently built in the village and the remains of 4 more Red Army soldiers were found. They were brought to mass grave and buried there.
On the outskirts of the village and in the forests there are still amateurs studying the history of the Great Patriotic War, the history of Great Krakotka is found in objects from those times, testifying to strong, bloody battles.
One of the old finds, a cross was found on the road leading to the temple in Malaya Krakotka
Search at the monastery lake (formerly Lake Shkolnoye)
Solidus 1663. A lot was found along the road near the temple in Malaya Krakotka
ring
10 pfenings
Program "Amateur's Journey" and "Hope for the Village"
Interesting and educational program BT has finally visited our village!
Velikaya Krakotka is rich in interesting sights and people.
The story about them and much more is in the video report offered to you.


