How to draw a Christmas tree on colored paper. How to draw a spruce: master class
Good afternoon, we continue our series of articles on the topic “How to draw the New Year - 48 ideas and 10 lessons”. And today I’m adding TREES to the general collection of New Year’s drawings. We will draw Christmas trees using DIFFERENT TECHNIQUES. I will show you how to create simple drawings of Christmas trees, and how to create a real Christmas tree with your own hands with drawing of pine needles and glitter reflected in glass Christmas balls.
So, let's see what ways to draw Christmas trees I have collected for you in this article.
METHOD No. 1 – ZIGZAG
The easiest way to draw a Christmas tree is with a zigzag that expands downward. It can be painted with a toasty brush (left photo) or a thin brush (right photo below).

How to draw a Christmas tree
METHOD No. 2 – BASICLE.
This method is also quite simple for drawing with children's hands. You just need to draw on a piece of paper straight line(or slightly inclined if the tree tilts).
This line will serve the central axis of the tree- her spine. And then with paints - to the left and to the right of this axis - we will draw our bunches of panicles. You need to draw from the bottom rows of the tree to the top. This is important so that our upper tiers lie on top of the lower legs of the tree.

That is first we draw lower tier Christmas trees(a series of sweeping strokes-branches from below), then the second tier above the bottom (we put the strokes overlap to the edge of the bottom row), and then, one by one, tier by tier we go to the top.
Then on this Christmas tree you can draw snow.

Here in these pictures below also a Christmas tree painted using the BASCOLE technique. Note that, after we paint the New Year's balls on the tree, you need to take the green paint on the brush again and apply a few pine strokes ON OVER THE BALLS so that the balls seem to be peeking out from under the paws.

You can draw using the same technique Christmas trees in winter landscapes. The background for such a New Year's landscape can be circular snowstorm from shades of blue gouache. And we also paint the flying spruce branches themselves in SEVERAL shades of blue, turquoise and white.

It also looks beautiful when this technique used in drawing WATERCOLOR ON WET PAPER. We get fuzzy blurry silhouettes of a Christmas tree. And already New Year's balls on such a tree can be drawn clearly and clearly with perfectly straight edges.

Such a New Year's tree-broom can be decorated with dots of beads, bows, New Year's candies, and round spots of balls.

To make the ball perfectly round (as in the picture above), It’s better to paint it not just with a brush, but with a stencil. You just need to cut out a round stencil-hole from cardboard - it’s better to have several holes for different sizes of balls.
To do this, trace several glasses of different diameters on a sheet of cardboard, pierce each circle with scissors and cut out the inside along the circle line - and we will get round hole templates. We put them on the Christmas tree - the desired hole-circle in Right place Christmas trees. And carefully paint the hole with a thick and rich color. You can do this without a brush, and with a sponge- that is, in a piece foam sponge for dish washing. Using a sponge, the paint will lie evenly - since the bristles of the brush can crawl under the stencil and ruin the perfectness of the circle.
Now, look at the pictures below. Here we see our STROKE technique being performed. in the other direction. Here the strokes are not placed in a downward direction from the axis-trunk of the tree, but on the contrary, the lines of the needles are laid semicircular vector up. And we are already getting new silhouette New Year's tree. That is, a different type of Christmas tree.

CONCLUSION: The main thing in this technique is AXLE-BARREL(we base our brush strokes on the branches from it). And most importantly SEVERAL PAINT COLORS— strokes should be made from paints of different shades of green (or different shades of blue). Then our tree will look voluminous, textured and close to its real natural beauty.
How to draw a Christmas tree
METHOD No. 3
silhouette bicolor
This method is also very simple. Little children adore him. First we draw the usual Christmas tree silhouette– shaggy (left picture below) or geometric with sharp triangular corners (right picture below), as you like.
Paint over silhouette in green color. Let's dry it. And on top of the dried background we draw Christmas tree decorations. Or we immediately place Christmas tree decorations, and then separately paint the spaces between them green.

The silhouette of a Christmas tree can be the SIMPLE one - an ordinary rectangle. Stars, balls, and the stem of the trunk make any triangle look like a Christmas tree.

And here in the photo below are another examples of SILHOUETTE Christmas trees, but with DOUBLE PAINTING. Here the silhouette is divided into ZONES - each zone is painted in its own shade of green.
The zones are drawn with a pencil on a dry green background - and then painted over with a new shade of green. Let's dry it. We draw decorations, beads, ribbons and a star - and the Christmas tree is ready.

How to draw a Christmas tree
METHOD No. 4 – LEVELED.
Tiered Christmas trees We all knew how to draw in kindergarten. When were tiers made of triangles built? different sizes. Here in the pictures below I present to your attention variations of this technique Christmas tree images.
Tiers may have rounded corners And smooth lines floors (as in the left picture below). Or tiers may have sharp corners And broken lines floors (as in the right picture below).

Tiers can have a CLEAR SYMMETRY (as in the left picture below).
Or each tier can be UNSYMMETRICAL - not the same on the left and right (as in the right picture below).

Each tier can be painted over in your shade of green. From dark to light, or alternating dark and light in turn (as in the picture of Christmas trees below).

Along the edges of the tiers of the New Year's tree, you can lay out lines of SNOW, or lines of a TREE GARLAND.

A tiered Christmas tree can have an interesting stylization - like, for example, these Christmas trees in the pictures below - the edges of their legs twisted into curls of varying degrees of coolness.


Drawing a Christmas tree
METHOD No. 5
drawing shadow areas.
And here are the New Year trees, which no clear tiers– but hints of tiering are given drawing shadows under the spruce paws. That is, due to the fact that on the silhouette of the tree we highlight BROKEN UNEVEN LINES and paint them with a darker shade of green - due to this we get silhouettes of shadow zones on the tree - and the tree becomes textured, with clearly defined coniferous legs (as is done in pictures of Christmas trees below).

Above the shadow areas, you can whiten out the snow in some places (as in the New Year's picture below).

And below is a drawing of a New Year tree, where shadow areas are presented in the form of ROUND LINES.
That is, we draw with a pencil on the green silhouette of the Christmas tree rounded lines and loops. That is, coniferous paws are depicted in the form of sort of flat cakes.
And then we draw along these lines dark green tassel. Let's dry it. And here and there we put light spots of light green on the green paws - this gives the tree paws a visual bulge.

How to draw a Christmas tree
METHOD No. 6 MOSAIC.
This method works well on gift wrapping, cards and as interesting work for the competition New Year's drawing At school.
We start by drawing on a piece of paper with a pencil draw a triangle. And then with paints fill in this triangle is the most different figures (Christmas decorations, flowers, birds, snowflakes and other patterns, etc.).


Draw a stylized Christmas tree.
METHOD No. 6
Horizontal lines.
But the way to draw a Christmas tree is perhaps the simplest - we draw the outline of a triangle on a piece of paper with a pencil. And then we put it inside this drawn triangle horizontal lines different color. According to your taste, the lines can be - straight, wavy or broken lines as in the picture below. They can be placed horizontally, vertically or diagonally.


An easy way to draw a Christmas tree.
METHOD No. 7 CURLS.
Here we draw a triangle on a piece of paper. And then place a large drop of light green paint anywhere in the triangle - next to it is a drop of dark green paint. And just use your finger to mix these two drops into a round rosette curl. As a result, the paint of two shades is mixed and we get a two-color roll. We repeat the same procedure in another place of the tree. And again and again until we fill the entire field of the outlined triangle.

How to draw a Christmas tree.
METHOD No. 8
CONIFEROUS FEET.
And here is a way to draw a New Year tree using the drawing of pine legs.


Let's use the example below to look at how exactly such an image of a New Year tree is created on a sheet of paper.
To get such a Christmas tree, we must first draw a triangle with a pencil. Then paint it over with a dark green background color. And then, on top of the background, draw lines-bones of future coniferous legs. And then grow green needles on these seed-twigs.


We draw Christmas trees shining with lights.
METHOD No. 9
A RAY OF LIGHT.
And now I want to show how unusually beautiful the Christmas tree we painted looks if you think about the BACKGROUND in advance. The background you start drawing the Christmas tree on can make your drawing shine.
That is, if you make the background not a solid one color, but make a wide background stripe in the center of the sheet that is a tone lighter than the rest of the background area of the sheet. Thus we get something like a pillar of light within which our Christmas tree will shine.

And in this light beam (when the paint has dried) we will paint our Christmas tree in any chosen way. And in the end we will get a tree of shining, unearthly beauties. In the picture above you can see how impressive this background looks. The tree seems to be illuminated by heavenly light.
And the pattern of the Christmas tree itself is a jumble of spots of different colors (essentially stuck with a finger). But the illusion of an unearthly radiance of the picture is created - due to the fact that 1.) the background of the leaf in the center is whitish light shade 2.) scattered throughout the tree except for colored spots White spots.
Let's now look at a detailed master class on drawing a coniferous Christmas tree, for which we will use the SUCH BACKGROUND DEVICE - as a “pillar of light”.
How to draw a bright Christmas tree
METHOD No. 10
THICK NEEDLES.
And in this figure below we also see the same technique for background preparation of the sheet. The sheet was painted bluish in the center and yellowish along the edges (it is better to paint the background not with a brush, but with a sponge or dishwashing sponge).
Using the same example, we learn how to draw light glossy highlights on Christmas balls.

Please note that this Christmas tree (in the picture above) is drawn in a technique similar to the BROOM. Only here not alone there is no central axis from which our brush strokes dance (as in method No. 2) - here the axes for the panicle needles are multiple axis lines, chaotically scattered in different directions.
Let me draw you step-by-step MASTER CLASS , With detailed diagram stages of drawing such a Christmas tree.
(I'm too lazy to get paints and a brush, so I'll paint computer mouse. This will slightly distort the similarity with the original, but will still convey the essence of the technique itself. So…
STEP 1– make a general background, glowing in the center with a bluish spot.
STEP 2– in a luminous background we set a dark background for the future Christmas tree.

STEP 3– We draw on top of our base and around it axis lines of future spruce legs. We draw chaotically and, most importantly, not very thickly (so that there is more air between them). And the main thing is that they look down and slightly apart.
STEP 4– Take light green paint on the brush. And we begin to cover the LOWER TIER of the TREE with long panicles and needles. It is important to start drawing the legs of the Christmas tree from the bottom up - mentally divide the tree into 4 tiers and floors and start from the bottom, gradually moving upward. Then the tree will look natural (where the upper legs cover the lower ones - just like in nature). In this master class, in order to save my time, I will show only one lower tier.

STEP 5– We take just green color on the brush – and between the light needles we make rich green needles. It’s also chaotic - we make brush strokes here and there.
STEP 6– take light brown gouache on brushes. And we also use this color to make brown pine needles here and there. Finished with the LOWER TIE.

STEP 7- Let's move on to the second tier - and do the same thing - draw needles alternating brushes with light gouache, rich gouache and brown gouache.
STEP 8- take it with a brush dark green color(the darkest shade) and here and there we add dark strokes with a brush - drawing the needles that are in the shadow under the paws. We draw anywhere. Without hesitation.

AND MORE continue with the third tier and the fourth tier at the top of the tree. Until the entire tree is covered with coniferous branches. I will no longer draw here to the very top - computer mouse not the most convenient drawing tool.
Now let's figure out how we will draw decorations for this Christmas tree.
STEP 9– using a round stencil (a hole in the cardboard) we draw circles of the SAME COLOR anywhere on the tree – but preferably under the legs – that is, we place each ball between the branches. It is important - to make the balls look natural(then in the last step we will slightly cover them with needles from the legs hanging from above the ball).

STEP 10– on the brush we put a color of the same shade as the ball itself – only a few shades darker. And on the ball we draw curls of this dark color.
STEP 11– on the brush we take another NEIGHBORING C DARK shade colors. And next to the first dark curl on the ball we put another one, also dark, but of a different shade.

STEP 12– take a light (but not white) shade of color onto the brush. And put a spot in the center of the ball light color- a spot of a round shape, or in the form of a thick curl.
STEP 13- take it with a brush White color. And in the center of the ball we place a thick white dot. And in the lower side of the ball we make a white semicircular stroke. Thus, our balls sparkled like real glass ones.

STEP 14- Now we take a stick with a round tip, with which we will draw BEADS DOTS. A simple pencil with a round erase on the end will do. Pour thick liquid into a saucer white gouache– poke the end of the pencil into the saucer and draw a chain of beads between the balls. White beads and red.
STEP 15– And now we need to push the Christmas tree needles onto the balls a little bit. To do this, we again take the green color on the brush - and put a few sharp needle-smears on the tops of the balls. We alternate shades of green – a couple of strokes light, a couple dark. This way our balls will be slightly covered with pine needles and will look natural hanging under the legs of the tree.

By the same principle you can draw any of the Christmas trees presented below.
This Christmas tree, for example, is painted entirely first with a DARK GREEN BRUSH, and then, after drying, we take a LIGHT SHADE OF GREEN onto the brush and paint light legs on top of the dark needles.
But please note: We draw light branches without repeating the dark contours - that is, dark branches stick out not the same ones sides that are light.

But here (picture of a Christmas tree below) it’s just different. Here the light branches of the pine needles are drawn on OVER the same dark branches. Only lines of light needles are applied a little out of order with dark ones.

On such a dense tree you can place very few toys. The main thing is to make sure that after drawing the balls you don't forget again take a green brush and again draw the needles of coniferous paws, which with their edges RUN OVER Christmas tree decorations . To the New Year's balls as if partially drowned in dense needles and looked out from it with their glossy smooth sides.

It also looks good on a Christmas tree like this a garland of bright multi-rayed stars.
To make the stars glow with LIGHT FROM INSIDE (picture below), we use cunning way. We use flat brush(where the bristles are lined up in a row, and not in a round bunch), and onto the palette we drop a light yellow drop of paint and a dark yellow one next to it. We apply a brush to this paint so that one edge of the bristle row of the brush takes light paint, and the other dark.
And now like this two-color brush draw rays of stars. The rays are simply brush marks - we print the brush in a circle, placing its light colorful edge in the center of the circle, and the dark colorful edge of the brush on the outer side of the star circle. (Look at the stars in the picture of the Christmas tree below - their rays are yellow towards the center and darker at the edges). After the rays have dried, place a round spot of white paint in the middle of such a star.

And a white artificial Christmas tree you can draw thick ones using the same technique spruce branches. To do this, on a bluish background with a gray brush, draw the same legs of the Christmas tree (shaggy branches). And then we draw white shaggy branches on top of their gray outlines. And we get a picture where the white needles stand out against the background of the gray pine shadow (as was done in the picture of the Christmas tree below).

How to draw a winter tree
METHOD 11
snow-covered Christmas trees.
And here is another nice snow-covered evening tree, hallowed by a lantern. I tried to draw this Christmas tree step by step using a computer mouse. Of course, this is not as convenient and revealing as brush strokes, but still this master class conveys general principle creating a drawing in this style. Here it is shown how the mosaic arrangement of tiers of the legs of a Christmas tree is conveyed with simple, sloppy strokes.


Many are created using similar technology snowy images of painted Christmas trees.

Let's take a closer look at how at home to a simple unprepared person (without art education And life experience waving a brush on paper) to create a masterpiece himself in one evening using a brush and a jar of paint unfamiliar to his hand.
Here is one of tricky ways draw a Christmas tree with your own hands in a short time. First, draw the outlines of a triangle on paper.
On the triangle, be sure to draw the central line of the axis (this is necessary in order to know in which direction - left or right - to turn the tip of the brush).
Take black paint onto the brush. An important condition is that the shape of the brush should be flat (not a round tuft) and the bristles should preferably be stiff. The second important condition is that the paint should not be too wet. That is, we dilute a thick, dryish black mixture and dip an equally dry brush into it. And we print it to the drawing - this way we will get imprints of the fibers of a natural contour that is not blurred by excess moisture (similar to the contour of real needle needles).

And then you can take it and apply it to the tip of the same black brush dryish white gouache(Same thick gouache smear it on a saucer, dip the edge of the bristles of a flat brush and place its prints along the tiers of the tree - in even rows.

Here's another quick way to draw a Christmas tree. Everything is even simpler here. This method is similar to the very first one zigzag method in our article. Only with the addition of white snow.

And here is the way where the Christmas tree is painted with a wet brush, she was dipped in dark green paint, and then the tip of the same brush dipped in white gouache. And immediately this white tip was sealed to the bottom of the drawn oval tree leg. This way we will get a foot where the bottom edge has a pure white outline, and then white-green streaks go up from it.

And here is a real jewelry way of drawing the needles of a snow-covered Christmas tree. Here it is drawn subtly and gracefully every large needle on the needles. Here we see with our own eyes a method where the brush is dipped in paint on both sides.

And with such a brush we apply pine needles along the drawn branch. First the left row (like on a comb), then the right row (like on a comb), and then (!!!) definitely as many as three central rows of needles(so that the coniferous branch gets volume).

You can draw such experimental Christmas trees in gouache in one picture at once, placing them into a single winter landscape.

These are the ideas for drawings of a New Year tree that I have collected for you today in one Family Heap on our website. Now you can choose any way to draw a Christmas tree, based on the materials available and faith in your abilities.
Go for it. Take aim at artistic masterpieces. And may everything work out for you.
Olga Klishevskaya, especially for the site ""
If you like our site, you can support the enthusiasm of those who work for you.
Happy New Year to the author of this article, Olga Klishevskaya.
I have chosen carefully several schemes for drawing a Christmas tree various levels of difficulty. Choose the one you like best.
Some of the schemes are in this video!
Method 1
Although the method is the most difficult, but this Christmas tree quite cute. And considering that all kinds of gifts are conveniently nestled under it, it’s absolutely wonderful. This diagram demonstrates how to draw such a Christmas tree step by step.
Method 2
And this is the real one forest beauty, lush, luxurious and so beautiful! I hope the diagram won't be too complicated for you.

Method 3
Here is another New Year tree with big asterisk. You shouldn’t forget about her either. This decoration has already become traditional!


Method 4
This diagram shows in great detail the process of creating a small New Year's masterpiece. First you need to draw a triangle, and on its top a beautiful star.


The Christmas tree needs to hold on somehow. I suggest putting it in a bucket.

All that remains is to add some decorations, toys, bows and, of course, color. Carefully color the Christmas tree. That's all!

Method 5
This tree is based on a large triangle. Attached to it stand, branches, decorations.

Method 6
Another good scheme and again with gifts=)

Method 7
And this one is not bad, slender, curvy, easy to perform. But it's your choice!)

Method 8
The last diagram will help you learn how to draw a Christmas tree in the most naturalistic form.

It seems we have sorted out the Christmas trees. If you don't really love paint, you can make it from paper, cardboard or fabric. Interesting tips regarding how to do this you will find in.
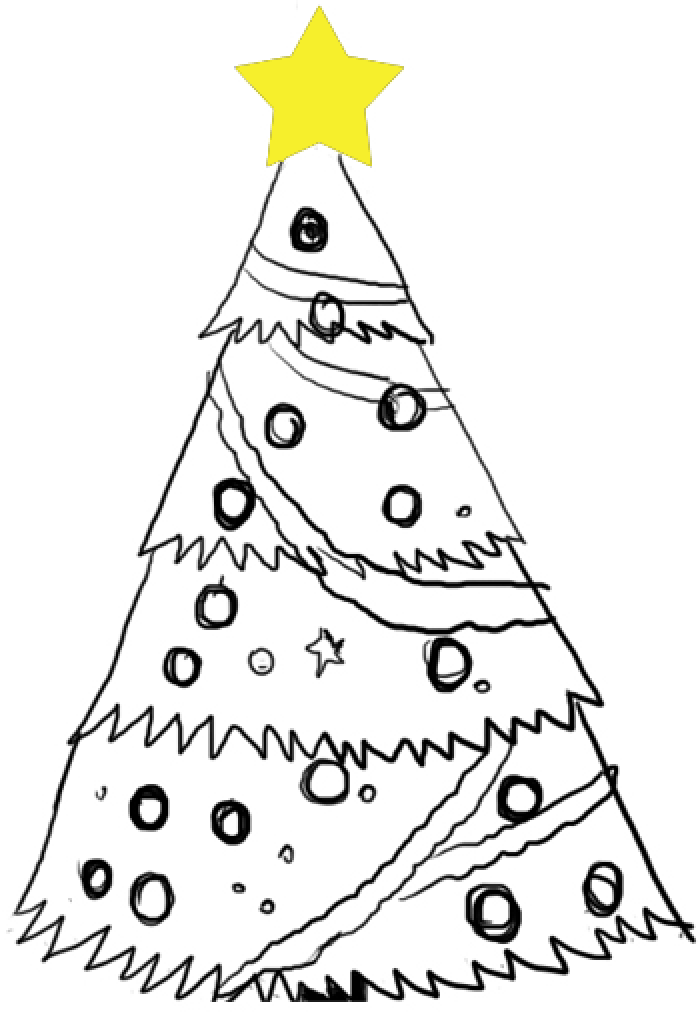
Approaching New Year 2018, and in all homes, kindergartens and schools, they are preparing to welcome it: they decorate Christmas trees, hang toys and garlands on the paws of fluffy beauties, cut out snowflakes, and make drawings. Of course, not all kids know how to draw a Christmas tree quickly, easily and beautifully. Often they end up with sticks and squiggles that bear little resemblance to a spruce. That is why we decided to publish the best pencil and paint drawing master classes for beginners. Having learned to draw a New Year's tree step by step, the children will later draw Christmas trees without the help of diagrams.
How to draw a Christmas tree with a pencil step by step easily and beautifully - The best master class for beginners for the New Year 2018
In order to explain how you can draw a Christmas tree with a pencil step by step easily and very beautifully, we offer everyone best master class for beginners. Artists are not born, but fine arts you can learn, which is what we suggest you do.
We draw an elegant Christmas tree with toys using a pencil and a simple step-by-step master class
If you are ready to learn how to draw a Christmas tree with a pencil step by step easily and beautifully, the best master class for beginners on this page is for you! Follow his instructions and you will end up with a very cute Christmas tree.
- Start your drawing by creating a triangular "skirt" shape with a pointed top, as shown in the picture. Then draw a tree trunk at the base.

- Now draw four curved lines inside the “skirt”.

- Ruffle each of the four lines created earlier.


- “Scatter” circles - toy balls - throughout the Christmas tree.

- It's time to hang garlands on the Christmas tree.

- Now the most pleasant moment has come - coloring your drawing. Use markers, watercolors, pencils or gel pens.

How to paint a New Year tree 2018 step by step - Watercolor and gouache drawings for beginners
Beautiful Christmas trees are the most frequent “guests” of children’s drawing albums. It would seem that everyone already knows how to draw a Christmas tree with paints step by step, and drawings of Christmas trees in watercolors and gouache even for novice artists come out just fine. However, they spend a lot of time on such work. We will tell you in the master class how to portray a beautiful Christmas tree paints quickly.
How to draw a New Year tree 2018 with paints - Master class with explanations for beginners

Before you draw the Christmas tree with paints step by step - you can find watercolor and gouache drawings for beginners (examples) here - you will have to outline the outline of the Christmas tree with a pencil. There is nothing complicated about this - carefully study the photo below the text.
So let's begin...
- Draw first isosceles triangle. Draw a line inside it that goes down to the base of the future tree.

- Using a pencil stroke, make the spruce “paws” (see photo).

- Paint over pencil drawing first with dark green, then with light green paint. This will give the image volume.

- Continue working with the brush, making strokes using 2-3 shades of green.

- Add shadows to the Christmas tree - gray, green-blue and even black colors.

- The spruce turned out to be alive!

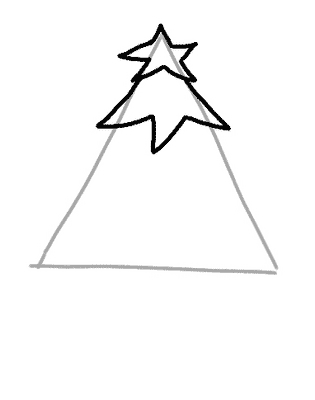
How to draw a New Year tree with toys for kindergarten or elementary school
Before the New Year, educators and elementary school teachers always invite children to draw a Christmas tree. For some children, the green beauty does not turn out as beautifully as they would like. We are sure: when boys and girls learn how to quickly and easily draw a New Year tree with toys, in kindergarten or primary school their work will be recognized as the best.

How to draw an elegant Christmas tree with toys - Master class for children

Having learned in detail how to draw a New Year tree with toys in kindergarten or elementary school, children can learn to draw a Christmas tree quickly and in no more than 15 minutes. The master class will help them with this.
- First, draw a triangle with a curved base.

- Repeat the previous step - the second triangle, located above the first and overlapping it, should be smaller.

- Draw another triangle on top with a slightly elongated vertex.

- Paint on the trunk of the future Christmas tree.

- Decorate the top of the Christmas tree with a star and its paws with balls.

- Erase all auxiliary pencil lines with an eraser.

- Color the drawing.

- Add more balls to the tree and draw a shadow from the tree. Now you're all set!25
How to draw a Christmas tree for a child with a pencil step by step and quickly
Learn how your child can draw a Christmas tree with a pencil step by step and quickly using the following simple, illustrated instructions. This Christmas tree is perfect for making a wonderful festive Christmas card for your family and friends.

Quick step-by-step drawing of a Christmas tree with a pencil - Master class with photos

Looking at the image under this text, you will understand how a child can draw a Christmas tree with a simple and then a colored pencil step by step and quickly. Explanations for the master class in the photo are attached.


- Start with an image of a triangle curved at the bottom. It should look like a slice of pizza.
2 - 5. Draw smaller “pizzas” on top of each other as shown in the pictures.
- Draw a "W" at the top of the tree.
- Draw block letters "L" on the sides of the tree. Also draw a top "L" on the top of the tree above the "W" sign.
- Draw connected “W” signs—zigzag lines—on the wood.
- Add a star to the top of the tree and tinsel by simply adding curved lines, going diagonally to the drawing.
- Start drawing the base of the spruce tree - the trunk in the pot.
- Finish drawing the pot.
- Color the drawing with pencils.
Now that even beginners have understood how to draw a Christmas tree easily and simply, you can explain to your child step-by-step work above the image Christmas tree with toys. Save our drawing master classes to your computer - you will definitely need them in the future.
New Year 2018 is coming soon, which means that each of us will receive gifts, albeit small, but made with love. Of course, surprises from parents will be much more “weighty” in every sense than funny children’s drawings, but the latter will be able to warm you with the warmth of their sincerity and childish efforts. Well, what can boys and girls portray in winter? Of course, everything related to New Year holidays- Santa Claus, spruce, Snow Maiden, snowman, forest covered with snow. If your children are still small and do not know how to draw a Christmas tree easily and beautifully, watch with them the videos and photos of the master classes presented here. They show how even a beginner, using pencils and paints, can gradually depict a Christmas tree decorated with garlands and toys. Carefully executed, neat, bright drawing will receive prize place on creative competition crafts in elementary school or kindergarten.
How to draw a Christmas tree with a pencil step by step easily and beautifully - Master class for beginners
If you want to learn more about how to draw a Christmas tree with a pencil step by step easily and beautifully, use the tips from the master classes for beginners presented here. Similar works You can also do it with felt-tip pens, but to create a sketch of a drawing you should always use a simple pencil.
Methods for drawing a Christmas tree with a pencil: examples in the photo

Christmas tree is one of the most simple drawings, but you can create it different ways. A selection of these photos will help you understand how to draw a Christmas tree with a pencil step by step easily and beautifully, and you will find a master class for beginners in the video.
The first method is a Christmas tree made of cones
Take a close look at the diagram step by step drawing ate. Start to depict it by drawing a cone-skirt. At the end of the work, when everything is erased auxiliary lines, the Christmas tree can be decorated with garlands and toys.

The second method is a tree-stick
Here's yours artistic creativity you need to start with the image of a single vertical stick. The branches of the tree and its foliage - needles - are already “attached” to it.

Method three - Christmas tree on a stand
In this case, the basis of the picture is a triangle on a “stand” - a horizontal rectangle. Small wavy triangles are attached to the large triangle on the sides - spruce paws.

How to paint a Christmas tree step by step - Photo and video master classes for beginners
The brightest, most realistic-looking Christmas trees are made by artists who use paints in their work. Undoubtedly, novice creators first use a pencil - such sketches can be easily corrected by erasing them with an eraser. And yet, a drawing made in watercolor or gouache always attracts more attention. These photo and video master classes for beginners will tell you how to paint a Christmas tree step by step.
Painting a Christmas tree with paints - Photos with explanations

Even the most inexperienced artists can learn to depict with one stroke Christmas tree without using pencils. Learn how to paint a Christmas tree step by step: photos and videos of master classes for beginners will tell you how to work with a brush.
Herringbone zigzag paint

Here the artist, using brushes of different widths, drew a zigzag line, gradually widening downwards. After that, he used paints of a different color to “hang” the balls on the Christmas tree.
Herringbone-broom paint

First, the artist drew a straight line from top to bottom - this is how he depicted the tree trunk. To the left and right of him he applied strokes of paint different shades green, yellow, and then white. The strokes were applied in layers of different colors - from the bottom to the top so that the Christmas tree at the bottom was wide and pointed at the top.

Afterwards, the master painted snow on the Christmas tree with white paints.
How to draw a New Year tree with toys and garlands for elementary school and kindergarten
Before the onset of 2018, many children will want to know how to draw a New Year tree with toys and garlands for school and kindergarten. Of course, most of them already know how to depict Christmas trees in the form of a stick and twigs, but this master class will teach them a little more complex technology drawing.
How to draw a Christmas tree 2018 with decorations step by step

The drawing diagram located here will help you figure out how to draw a New Year tree, decorating it with toys and garlands, and submit your work for a drawing competition in elementary school and kindergarten.
- Start by drawing at the bottom of the sheet a small square and a triangle “planted” on its upper edge.
- Add “legs” to the Christmas tree by drawing small zigzags on the sides of the large triangle and processing the “skirt” of the tree.
- Start decorating the Christmas tree by placing a garland diagonally and hanging balls on the branches.
How a child can draw a Christmas tree step by step with watercolor or gouache
If you want to learn how a child can draw a Christmas tree step by step with watercolors or gouache, check out the master class presented on this page, watch a video tutorial explaining the features of working with paints, and finally, invite your daughter or son to paint a Christmas tree together.
Drawing a Christmas tree with gouache or watercolor - Master class with photos

After you have read everything about how you and your child can draw a Christmas tree step by step using watercolor or gouache, get to work. Prepare everything you need for this:
- Paints;
- Whatman;
- A jar for water;
- Brushes of different sizes;
- palette;
- Simple pencil;
- Eraser.
- Schematically depict the base of the tree, the stick on which you will attach the branches.

- Finish drawing the “skeleton” of the Christmas tree.

- Mix blue, white and green paint. Start “stringing” the needles onto the tree using strokes.

- Draw the spines carefully, not forgetting a single branch of our future Christmas tree.

- If you want to make the spruce more fluffy, add more branches, covering them with needles as described in the previous paragraph.

- Use brown watercolor or gouache to draw the tree trunk, and blue to fill the entire space of the sheet not occupied by the drawing.

We hope that now, after you have learned how to draw a Christmas tree with a pencil or paints step by step, you and your child will draw a 2018 New Year tree with toys and garlands. Master classes with videos and photos posted on this page are also designed for beginning artists of all ages.
For some people, depicting objects on paper is a problem. If a person does not know how to draw a Christmas tree, this article will be of help. Detailed master classes will help solve this problem.
Christmas tree made of geometric shapes
For beginning artists, there are many options for how to draw a Christmas tree. Most often, geometric shapes are used in symbolic drawings.
Several partially overlapping triangles arranged in a pyramid with a small brown rectangle at the bottom (trunk) perfectly symbolize the Christmas tree.
Since you can draw a Christmas tree in a more simplified version, you should consider using one triangle in the image. The corners can also be smoothed or sharpened and elongated.
There is another option for how to draw a Christmas tree symbolically. For such an image, geometric shapes are not used. It is enough to draw branches using straight segments that are directed either downward at an angle or upward.
Symbolic Christmas tree for postcards, making interior items and decorating clothes
Here the designer simply needs a way to depict a tree using geometric shapes. You can even smooth out the corners of the tree’s outline or, conversely, sharpen it and slightly stretch it, lift it from above. After all, any tree in early period growing branches stretch towards the sun.
The contours of such a Christmas tree can be used as appliques for decorating clothes and making rugs, for developing patterns for making jacquard patterns on knitted products, for sewing sofa cushions and creative Christmas trees from pillows, making patterns for wallpaper and many other interesting options.
Master class for kids
Usually children easily cope with the task of depicting a Christmas tree. But if difficulty still exists, you can also teach drawing to children using this master class. It gives a clear idea of how to draw a Christmas tree with a pencil step by step.

- First, several triangles are drawn so that each one located above is slightly smaller than the previous one. Usually three figures are enough.
- For very tiny artists, the process of learning to draw the outline of a Christmas tree can be completed at this point and they can begin painting the object. If adults show how to draw a Christmas tree step by step for older children, for example, 3-4 year olds, then the task can be made more difficult. Let the child make the sides of the triangles concave inward, and the base curved outward.
- The eraser removes auxiliary lines.
- A rectangle is drawn below, which represents a tree trunk.
- Next comes the application of color to the object. You can only use one shade of green and brown for the trunk. But you can make each top triangle lighter than the previous one.
- If desired, the tree can be decorated with toys and beads. Then the drawing will be in the New Year's version.
Naturalistic image of a spruce
For drawing serious paintings with a pencil - for example, landscapes - you need to know how to draw a Christmas tree step by step. The interesting thing is that they begin to depict the object in the same way as in children's master class, from the auxiliary triangle. Then, inside the main contour sketch, “rows” of branches are made - these are pyramidally arranged smaller triangles that partially overlap each other.

The bases of the triangles should be made “torn” and uneven. Yes, and the sides need to be transformed. Let them become not continuous straight lines, but consisting of interrupted segments that have a slightly different angle of inclination. By applying shading to the spruce in this way, the artist creates the effect of tree thorns.
Particular work should be done on the barrel. First it is drawn in the form of a rectangle. Then the lower part is slightly expanded, turning it into a trapezoid. The lower base of the trapezoid is made “torn”.
Now you need to apply the final shading so that in the middle the tree is lighter than at the edges. Some branches may “break out” from the main contour - these are young branches that have not yet sagged under the weight of their weight, reaching towards the sun. A sharp branch-top sticks out from above.
Winter landscape
More often coniferous trees attract artists in winter. After all, everything around in the forest is bare, and only the evergreens stand, as if cold and snow do not exist for them. Such landscapes look beautiful both in black and white and in color.

How to draw a Christmas tree with a pencil step by step was described in detail in the previous master class. Having mastered this algorithm, the artist can depict a winter landscape where snow caps and collars lie on the branches of fir trees. Making tree “robes” is quite simple. You just need to make an outline of a snowdrift on a ready-made spruce, and then remove all excess with an eraser.

Sometimes another option is used to depict fir trees. It is suitable for drawing large perennial trees. Spruce trees are not drawn with solid shading, but are made more “transparent” by drawing each branch or group of branches separately.