Draw a spruce with a pencil. How to draw a Christmas tree
New Year is coming, and before you decorate your Christmas tree at home, learn how to draw it with a pencil and paints.
“A Christmas tree was born in the forest, it grew in the forest...” - who didn’t sing this wonderful New Year’s song as a child? For the New Year, everyone: both children and adults, wants a holiday and New Year's miracles.
One of these miracles can be drawing a Christmas tree, although if you know how to draw, you can do it without any tips. But if you are not such a great artist, or want to have a fun, New Year’s-like time with your child, then the drawing lesson offered here is just for you. So, let's draw a Christmas tree
How to draw a Christmas tree step by step easily and beautifully with a pencil for beginners and children?
There are several options to start drawing a Christmas tree.
For example, the first option:
- A sketch is made - a large triangle and a square at the bottom, where there will be stands for the Christmas tree.
- Then the legs of the Christmas tree emerge from the triangle, because the New Year’s beauty should be fluffy. You can make three rows of them.
- Now you need to paint a few branches in the foreground of the tree, so it will look more voluminous.
- The time has come to draw toys, cones, balls, candies and garlands on the tree, that is, to decorate the New Year tree.
Another option:
- Start again with a sketch. This time you only need a vertical line, which will indicate the trunk of the tree, and again the base is a square.
- A star is drawn at the top point of the line; this is the star at the top of the tree.
- Next, several rows of triangles with teeth are drawn relative to the vertical line.
- The last stage is decorations on the Christmas tree - balls, stockings, garlands, lights.


The simplest option:
- Just draw a triangle on a small square at the base.
- With the help of teeth on the sides of the triangle and on its area, the appearance of volume and splendor of the tree is created.
- At the last stage, you can move on to drawing decorations on the Christmas tree.
- If you paint such a Christmas tree, make multi-colored toys on it and make the lanterns shine, then it will look very festive!

 Simple drawing of a Christmas tree: stage 1.
 Simple drawing of a Christmas tree: stage 2.
  Simple drawing of a Christmas tree.
 VIDEO: HOW to simply draw a TREE with a pencil?
How to draw a Christmas tree step by step easily and beautifully with paints?
In addition to pencil drawings, you can immediately draw a Christmas tree with paints.
But it’s still better to start such a drawing with a pencil sketch of a triangle on a stand leg.
Afterwards, the fluffiness of the Christmas tree is painted on with a brush and paints.
IMPORTANT: Before moving on to the next stage of painting, you need to make sure that the previous layer of paint has already dried.
At the last stage, with different touches of the brush, New Year's decorations are drawn on the tree, and under it there are gift boxes of different sizes.
 Drawing a Christmas tree with paints: stage 1.
 Drawing a Christmas tree with paints: stage 2.
  Drawing a Christmas tree with paints: stage 3.
  Drawing a Christmas tree with paints: stage 4.
 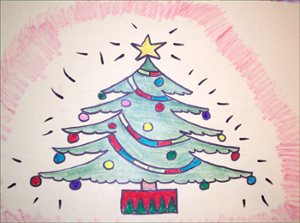 Christmas tree drawing with paints.
 You can also try drawing a Christmas tree by drawing circles around the line of symmetry with a brush. You will get an original Christmas tree, which can also be decorated to the best of your imagination.


IMPORTANT: You can draw a New Year tree and leave it in nature, as if it was decorated right in the forest or in the yard. To do this, in addition to the tree itself, you need to draw a background for it. The background can be snow-covered snowdrifts or air painted with light, thin colors. At different times of the day, the air will have different shades - from blue to pinkish-violet.
VIDEO: Let's draw a Christmas tree. How to draw a Christmas tree for children?
Drawings of a Christmas tree with pencil and paints for children to draw
By drawing a New Year tree in different ways, the child will practice before decorating a real forest beauty. The holiday decor options are endless!
It's time for a festive mood. Preparing for the New Year holidays is a pleasant bustle and the smell of tangerines. Now we will talk about the main symbol of the New Year holidays - the Christmas tree. It has become an ingrained tradition of most people on earth. In every city, this evergreen tree becomes the center of cultural events. It pleases the eye, gives mood, brings back pleasant childhood memories and brings people together, because there is no better family tradition than the process of decorating a Christmas tree.
All over the world there are many types of holiday trees and ways to decorate them. Some people, when decorating it, resort to design solutions, while others like to decorate this symbol of the holiday with rare Christmas tree decorations that have been passed down from generation to generation.
Fortunately, the good traditions do not end there, because during this period children often wonder: how to draw a Christmas tree? Yes, it is on the eve of the New Year holidays, Christmas and after these wonderful dates that children are asked in schools or in creative circles to depict this beautiful and evergreen tree. Very often the desire to draw a Christmas tree comes along with a festive mood. Adults have to think about how to teach a child to draw this or that thing, but every child should be able to draw a Christmas tree. Children must develop creatively. That is why I will show you several easy ways to draw a beautiful Christmas tree.
What you will need for this:
- a sheet of white paper (you can use a sketchbook or sketchbook);
- a simple pencil;
- eraser;
- colour pencils;
- Christmas mood!


- Consider the following fun way to easily draw a Christmas tree. Take a simple pencil and draw a line in the form of a zigzag with rounded corners. Try to repeat the same broken line shape as in picture “1”. Below we draw a “tail” - it will be the trunk.
- We begin to draw another similar line to the right of the one we already have. We connect this zigzag to the upper and lower ends of the already drawn line and we get such a thick, uneven zigzag in the shape of a herringbone (try to follow the example in the picture). Draw a star on top.
- To decorate the Christmas tree, I took a green pencil and outlined the edges with dark green. The star can be decorated in any color. Yes, yes, this is an easy way to draw a Christmas tree.


A real New Year tree with garlands and toys looks beautiful not only in person, but also in children’s drawings. Depicting it in lessons at school, in the garden or at home, children can not limit their imagination and decorate the tree in an original way with toys, balls, and garlands. You just need to choose simple instructions with photos and videos and follow the indicated steps when depicting a Christmas tree. For example, with the help of the master classes listed below, even novice artists will be able to easily and beautifully depict a New Year's beauty. They describe step by step how to draw a Christmas tree with pencils or paints, what techniques can be used to create the most realistic picture.
How to draw a Christmas tree with a pencil step by step easily and beautifully - a master class for beginners

Simple drawing of a Christmas tree using pencils allows both children and novice artists to easily create cool drawings on the eve of the holiday. At the same time, coloring a picture can be done not only with pencils, but also with watercolors and gouache. The colorful drawing can be used to decorate your home for the New Year 2018 and will be an excellent gift for loved ones and friends. The following master class for beginners will help you learn how easy and beautiful it is to draw a Christmas tree step by step using pencils.
Materials for drawing a beautiful Christmas tree by novice artists using pencils
- A4 sheet of paper;
- pencils;
- eraser;
- ruler.
Photo from a master class on drawing a beautiful Christmas tree with pencils for beginners
- Draw a pyramid on a piece of paper using a ruler. Mark its center with a vertical line. Add a small oval at the bottom.

- Draw a star on the Christmas tree. Draw fir branches along one of the outer lines of the pyramid and in its lower part.

- Draw the spruce branches on the opposite side. Draw garlands and balls. At the bottom draw a tree trunk and the snow surrounding it.

- Remove the auxiliary lines, color the Christmas tree and add a colored background.

How to paint a Christmas tree step by step - video lesson for beginning artists and children

Drawing with paints is considered a rather complex process, since paints can spread and mix when depicting figures. You can make the task easier and easily draw a Christmas tree with garlands using bright gouache. Thick paints will help you create an original drawing without much difficulty. The following video tutorial will tell you how to paint a Christmas tree with these paints step by step for a novice artist.
Master class with a video of step-by-step drawing of a Christmas tree using paints for a child and a novice artist
Using the instructions below, both novice artists and children of any age can easily draw a beautiful Christmas tree. You just need to follow the instructions and carefully listen to the author’s advice and recommendations.
How to draw a Christmas tree with toys in pencil - a step-by-step master class with photos

Usually, on the eve of the New Year, children are given the task of drawing a thematic drawing for school or kindergarten. And in order to surprise all classmates and teachers, the child only needs to depict an unusual and as realistic picture as possible. For example, using the instructions below, you can learn how to draw a New Year tree with toys and balls. If desired, such a picture can be colored with pencils or paints: gouache, watercolor.
List of materials for drawing a Christmas tree with toys with pencils
- pencils;
- A4 sheet of paper;
- eraser.
Master class with step-by-step photo pencil drawings of a Christmas tree decorated with toys
- Conventionally, depict a Christmas tree by drawing the edges of the fir branches. At the bottom, mark the ground line (for ease of drawing the background). Also, under the tree, you can conventionally depict toys and gifts.

- Draw several layers of fir branches, then remove the auxiliary lines. Draw toys, balls, a bow and a star at the top on the Christmas tree. Clearly draw toys and gifts under the tree, erase the auxiliary lines.

- Color the picture and draw snow.

- Shade the left side of the picture to make the picture more realistic.

- Color the background, and then use light pencils to highlight the balls and some areas of the spruce branches.

How to draw a Christmas tree step by step for a child with a pencil - a simple master class for children

It’s quite possible to create a beautiful Christmas tree with garlands and balls in just 20 minutes. And even children in kindergarten and students in elementary school can do this kind of work. Using the proposed master class, every child can easily and quickly portray a real New Year's beauty. To do this, you just need to study the simple instructions and find out how, step by step, your child can draw a Christmas tree with festive decorations.
Materials for step-by-step pencil drawing of a Christmas tree by a child
- A4 paper;
- eraser;
- regular and colored pencils.
Photo from a master class for step-by-step drawing of a Christmas tree by a child using pencils
- Draw a small triangle-herringbone.

- Draw the trunk of the Christmas tree and the stand in the form of a bucket.

- Draw a star on the top of the Christmas tree.

- Draw balls and garlands in the Christmas tree triangle. Color the picture with colored pencils.

Using the proposed master classes with photos and videos, both children and novice artists will be able to easily and beautifully draw an elegant Christmas tree for the New Year 2018. Children can work with both pencils and paints. Simple instructions will help you understand how to correctly depict the basis of the picture and how best to color it. For example, using the lessons suggested above, you can learn how to draw a Christmas tree with colorful balls, garlands and toys. All that remains is to choose the appropriate instructions and get to work.
There is less than a week left until the most important holiday of the year, so more and more people are getting creative and creating a New Year's mood for themselves. And it is for such people that below are several master classes on how novice artists can draw a Christmas tree with a pencil step by step.
Before you get started, you should have the following things in advance:
- white sheet A4 or even larger;
- simple soft pencil;
- eraser;
- sharpener (just in case);
- colored pencils or paints if desired.
And here are the main stages of work:
A large triangle is drawn on the sheet - its size determines what the future Christmas tree will look like at the very end. If necessary, you can use a ruler to make the lines as straight as possible.

Afterwards, the top of the future tree is drawn in the form of wavy lines, as shown in the figure below.

Now it’s worth drawing the branches below in exactly the same way. They should not be a single whole, but seem to be scattered.

At the next stage, the most magnificent part of the tree is completed and the auxiliary triangle is erased. This must be done as carefully as possible so as not to erase too many necessary details. Of course, after that they will need to be completed again.

Straight lines draw a short but reliable tree trunk. Since the Christmas tree is not on the street, it is transplanted into a pot that appears on paper at the same stage.

Now comes the interesting part. The tree needs to be decorated with garlands, as shown in the example below. But you can also use your imagination and decorate the Christmas tree at your own discretion.

At the last stage, New Year's toys, snowflakes and any other New Year's attributes are drawn at the artist's discretion.

All that remains is to decorate the resulting drawing so that it becomes “alive” and looks more interesting in a frame on the wall.
Now you know how to draw a Christmas tree with a pencil step by step, but this is not the only lesson for beginners in our article today.
Little Christmas tree
The next option is a little lighter than the previous one, and the festive tree looks very cute and attractive. Even children can handle this drawing.
So, in order to show all your drawing capabilities, it is enough to go through the following steps:
The A4 sheet is placed vertically and a straight vertical line is drawn in the middle of it. Its size will correspond to the height of the future Christmas tree, so this point should be thought through in advance. In the same way, you can draw several small Christmas trees on one sheet.

At the very top, just where the depicted line ends, a Christmas star is drawn. It will become the main decoration and should be quite large. Also, for fun, you can add eyes or a funny face on it.
If I may say so, the tree will have three tiers that complement each other. At this stage, the upper level begins to be drawn on paper in the form of a mountain with jagged ends.

Then the next part of the New Year tree is drawn. Everything is done exactly the same as in the previous step, only this time the “mountain” should be a little larger.

The penultimate stage is a detailed drawing of the lower part of the tree. Of course, it will be larger and more magnificent than all the previous ones. Now you need to finish drawing the visible trunk and horizon line below so that the tree does not “hang in the air.”

At the very end, all kinds of New Year's decorations and garlands are drawn, which will sparkle with multi-colored lights.
Most often, for beginning artists, it is important not only how to draw a Christmas tree with a pencil step by step, but also what color scheme it will be presented in. So it's time to pick up pencils and trust your inner voice.
Christmas tree from the cartoon
During Soviet times, many holiday cartoons dedicated to the New Year were produced. And we all probably liked the festive spruce, whose branches were crushed with snow and decorated to such an extent that sometimes it dazzled our eyes.
It’s very easy to draw a similar Christmas tree yourself. And you can do this in just 4 steps:
According to a familiar pattern, a triangle is drawn on a sheet of paper. An auxiliary horizontal line is carefully drawn from its very top. With its help, you will be able to harmoniously draw a tree trunk, stars and a stand for a spruce tree.

It's time to start drawing the left side. To do this, smooth lines with pointed tips are drawn on paper. Sometimes they bifurcate, sometimes they remain united. This way the branches will look more harmonious. At the same stage, a pointed star is drawn on the top of the tree and its lower branches.

Using the same pattern, the right side of the New Year tree appears on the paper and both sides are connected to each other by wavy lines. All that remains is to finish drawing the trunk and stand, as well as New Year's toys or a small amount of snow.

After the step-by-step principle of drawing a Christmas tree with a pencil for beginners has become clear, all that remains is to erase the additional lines and paint the resulting masterpiece with paints or pencils.

Such a drawing can be a good basis for a homemade New Year's card or a gift for parents. You can also hang it in a frame on the wall or send it to a creative competition for young talents.
The latest holiday version of the drawing
Whatever it may seem at the very beginning, there is nothing difficult about drawing a Christmas tree yourself with a pencil. How to do this step by step will be shown below for beginning artists.
To do this, you only need a pencil, paper, an eraser, a little time and self-confidence. And even if it doesn’t work out the first time, this is not a reason to quit creative activities.

So, let's start with the simplest:
- A straight horizontal line is drawn in the middle of the A4 or A1 sheet. To do this, you can use a ruler.
- Based on the example below, a star is carefully drawn, which will become the main decoration on the festive Christmas tree. It can be supplemented with interesting elements.
- Now two arc-shaped lines are drawn from the star - they should smoothly diverge to the sides and be connected to each other by a zigzag stripe. There is no need to rush at this stage.
- A similar element is drawn below, which should start from the second zigzag on the right, and then on the left side.
- The third part of the tree is drawn using the same principle, but is larger in size. Then the trunk visible from under the branches is drawn.
- All that remains is to decorate the New Year's beauty with green paint and the drawing will be complete. For harmony and an “interesting image”, it is recommended to decorate the upper part of the tree with light shades, and the rest with dark tones.
- As soon as the paint has dried, you can paint holiday toys on the branches of the tree with multi-colored paint, as well as create a beautiful background with snow.
Now everyone can draw a Christmas tree and even use different variations for this. But don’t stop there – use your imagination and don’t be afraid to be original.
Spruce? It is very difficult to find a person who has never drawn this tree in his life. But if you don’t know how to do this, our article will teach you this simple task.
Spruce is a symbol of the holiday!
Spruce is something that everyone certainly associates with the holiday, the New Year! This evergreen coniferous beauty becomes a real green fairy for children, delighting them on the morning of January 1 with gifts hidden under the branches. Does your child ask you to draw a Christmas tree? Or perhaps you need to make some kind of composition with it for a children's party or a garden party?
We will be happy to provide you with several simple master classes that will teach you how to draw a spruce step by step.
Method number 1: from top to bottom
The first method, which we will consider in our article, will be based on drawing a tree from its top. Learn to draw such a spruce. And then it won’t be difficult for you to create an entire forest on a piece of paper!
So, how to draw a spruce, starting from its top? Everything is very simple!

Method number 2: from bottom to top
The first method of depicting a spruce is not bad, but, you see, it is much more convenient to draw from the bottom up, and not vice versa. This makes it much easier to adjust and plan the height of the tree.
How to draw a spruce from bottom to top? Now we'll show you!

Method number 3: as easy as shelling pears!
How to draw a spruce in the simplest and most unpretentious way? We know it and will definitely share it with you. Using this method, even a small child can draw a Christmas tree.

How to draw a spruce branch
But what if you don’t need the whole tree, but, for example, only one branch? Well, we'll tell you about that too. Arm yourself with a pencil and paper, let's get started!

The drawing is ready!
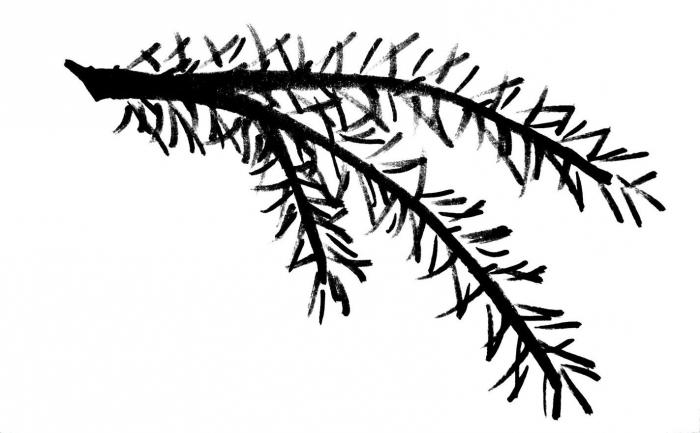
Now you know how to draw a spruce branch yourself. You can even teach this, for example, to your child.
Using the methods described above, you can draw a branch of a coniferous tree or the spruce itself with a pencil, felt-tip pens and even paints. The tool in this case does not matter much. Draw, create yourself and together with your children.