Draw any toy. How to draw Christmas tree decorations
The most delicious homemade ice cream is in our selection! Prepare what you like - ice cream, creamy, chocolate!
- cream from 33% - 200 ml;
- milk - 100 ml;
- egg yolks - 2 pcs.;
- sugar - 60 g;
- vanilla pod - 1 pc.

Mix milk with sugar in a small saucepan with a thick bottom. Using a knife blade, cut the vanilla pod along its entire length, remove the seeds and also add to the milk mixture. Thanks to vanilla, the ice cream will be filled with a delicious natural aroma, but in the absence of this ingredient, you can get by with a bag of vanilla sugar or a pinch of vanillin. Heat the mixture until hot, but do not bring it to a boil.

In another container, gently beat the egg yolks using a whisk. IN in this case we just need to achieve homogeneity - we should not beat the mass, otherwise foam may form on the surface, which will complicate the process of preparing the ice cream.

Pour hot milk into the mashed yolks in a thin stream, continuously stirring the mixture.

Pour the resulting mixture into a saucepan, place on low heat and cook until slightly thickened. It is important not to overheat the milk, otherwise the yolks may curdle! To avoid this trouble, choose a thick-bottomed pan for cooking the cream and cook over low heat. Also, do not forget to continuously stir the cream, especially at the bottom (it is most convenient to use a silicone spatula for this).

We check readiness as follows: run your finger along the silicone spatula. If the mark remains clear and does not float with cream, immediately remove the pan from the heat.
Tip: if the yolks still curdle, you can grind the mixture through a fine sieve or puree with a submersible blender. However, unfortunately, it is no longer possible to avoid the eggy taste of the ice cream. In this case, it is better to remove the pan from the heat sooner rather than later.

Cool the freshly prepared cream to room temperature. At the same time, whip the cold cream until thick.

Add the cooled cream to the whipped cream mixture and mix. Chill the mixture in the freezer for 3 hours. During this time, it is necessary to remove the container 5-6 times and mix the mass thoroughly to avoid the formation of ice crystals and to obtain a smooth and uniform texture.

When the consistency of the mixture becomes similar to soft ice cream and is difficult to mix, transfer the mixture into a silicone mold, cover with a lid and put it in the freezer for another 3-4 hours (you can leave it overnight).

Before serving, let the frozen ice cream sit for a while at room temperature. Then scoop up the slightly melted mixture with an ice cream spoon and form into balls. If desired, complement the dessert with chocolate chips, mint leaves or berries.

Recipe 2: homemade ice cream - creamy ice cream
- 500-600 grams of whipping cream (fat content from 30%)
- 100 grams of powdered sugar (or fine sugar)
- a pinch of vanillin

Place chilled cream, powdered sugar and a little vanillin in a deep bowl. Beat until fluffy and stable foam is achieved, 4-5 minutes.

Place the whipped mixture in a plastic container.

Place in the freezer overnight.
We take out the ready-made ice cream, let it thaw a little and you can put it in bowls.

This ice cream can be made in different ways - with the addition of cocoa (carob), frozen berries - it is especially tasty with honeysuckle (only the berries must first be pureed with a blender, and then added to the whipped mixture and beat again).

Recipe 3: how to make homemade ice cream sundae?
The recipe for homemade ice cream sundae can be reproduced at home, it will turn out very tasty, natural and taste like the Soviet ice cream.
- egg yolks (4 pcs.);
- milk (300 ml);
- cream (33%, 300 ml);
- powdered sugar (180 g);
- vanillin (½ teaspoon).

So, first of all, bring the milk to a boil and then cool it to approximately 30 degrees.
Add powdered sugar and vanilla sugar to the yolks.

Whisk.

Pour in milk. Beat again.

Place on low heat and stir until the mixture thickens. As everyone around advises, you can check the thickness by running your finger along the spatula - if a clear mark remains, the mixture is ready.

Let cool to room temperature and then chill in the refrigerator.
Meanwhile, whip the cream.

Mix with cooled cream.

We transfer the entire mixture into a container in which it will be convenient for us to mix the future ice cream with a blender.

Then take it out and quickly (so that the ice cream does not have time to melt) mix with a blender.

Place it in the freezer again for 2 hours. We repeat the procedure 2-3 more times with an interval of 30-60 minutes. Thanks to the blender, the ice cream will have the desired structure. A blender allows you to crush ice crystals and form an airy mass.
When the ice cream is completely frozen, take it out and use a special spoon to make balls. You can first put the ice cream in the refrigerator for about 15 minutes so that it melts a little - this will make it much more convenient to make balls.

Place the ice cream in bowls and sprinkle or top with whatever you like. I - grated chocolate. Homemade ice cream tastes just as good as store-bought ice cream, and its content is guaranteed to contain no “extra” additives. Recipe tested.

Recipe 4: homemade ice cream and milk ice cream
- milk - 1 glass;
- butter - 25 grams;
- egg yolk - 1 piece;
- sugar - ½ cup;
- vanilla sugar - 5 grams;
- starch - ½ teaspoon.

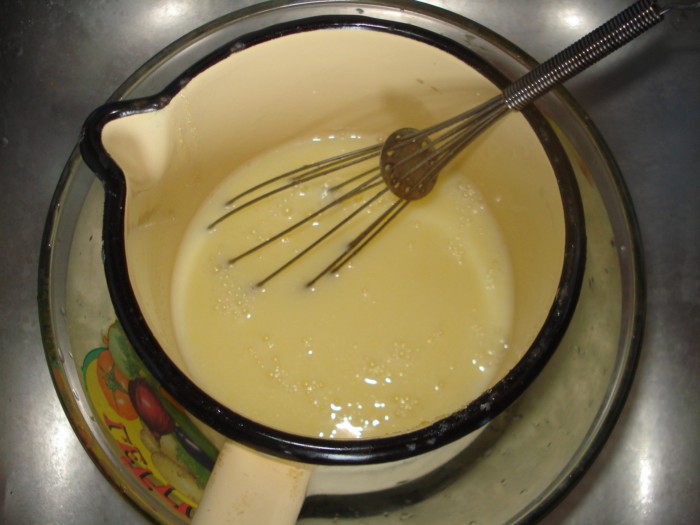
In a deep, convenient container, mix sugar, starch and vanilla sugar.

Add one egg yolk.

Grind the mixture until smooth. Pour in a little milk.

Place the remaining milk on the fire. Add 25 grams butter. The butter must be real, consisting of 100 percent cream from cow's milk. Bring the mixture to a boil.
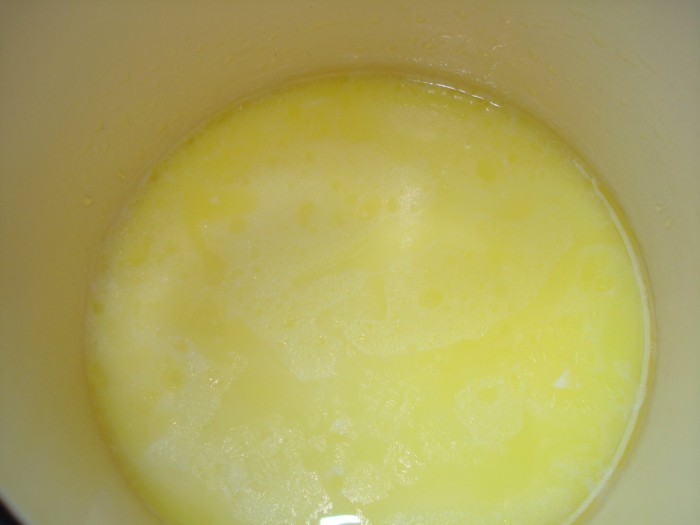
Pour the egg mixture into the boiled milk. Stirring, bring to a boil. Remove from heat and send to cold water. Cool, stirring occasionally.
Pour the cold mixture into molds. It can be a large form or small portions. I have a large silicone mold and molds for small cars.

Place the molds in the freezer for a couple of hours.

Ice cream from small molds will be ready in 30-50 minutes. Taking it out of the silicone molds is very easy.
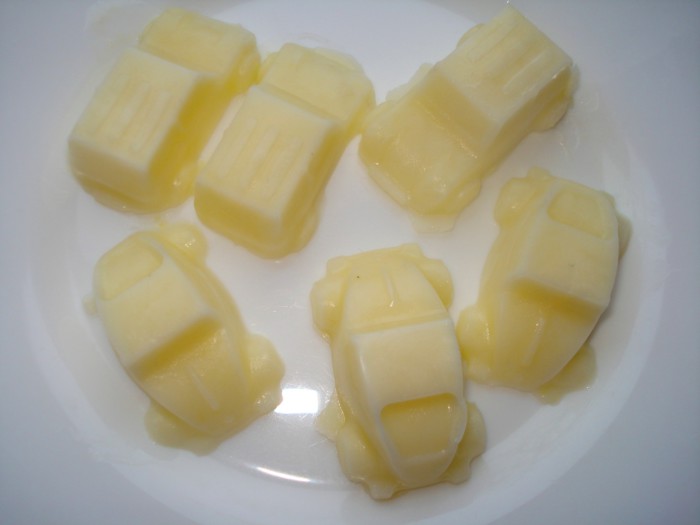
From large shape, spoon ice cream onto serving plates. It is incredibly tasty, tender and aromatic.
Recipe 5: how to make ice cream at home
- 0.5 liters of cream (the higher the fat content, the tastier the ice cream will be)
- ¾ cup sugar
- 4 chicken eggs
- Chocolate chip cookies (or other flavors)

Break eggs into a bowl and add sugar.
Beat well with a fork and grind the sugar. Pour in the cream and mix well again.
Pour the resulting mixture into a small saucepan and place over very low heat. Stir constantly, do not bring to a boil, otherwise the eggs will curdle. Remove from heat when the mixture begins to thicken; the consistency should resemble liquid sour cream.
In total, the pan will spend 15 - 20 minutes on the fire. Well, you can also find out the readiness of the desired consistency by running your finger along the spoon. If the spoon is covered in cream and a fingerprint remains, the mixture for homemade ice cream is ready.
After removing from the stove, pour the mixture into any container convenient for freezing. In general, any food-safe plastic container can be used.
Add any filling (in this case, crushed cookies, or you can use berries, chocolate chips or pieces of fruit).
Let sit for about an hour until the mixture cools slightly (the mixture will cool faster if you place the container in a sink with cold water). Then transfer the container with the mixture to the freezer. Homemade ice cream will harden and gradually thicken. The thickening time can range from 5 to 6 hours, so it is better to do it at night or in the morning so that you can enjoy it by the evening.
Before serving, remove the container of homemade ice cream with cream from the freezer and place in the refrigerator for 20 minutes. Roll the prepared ice cream into small balls using a tablespoon (if you don’t have a special ice cream spoon) and place in tall glasses, bowls or plates. Ice cream can be decorated with grated chocolate or berries. Serve immediately. Bon appetit!
Recipe 6: how to make ice cream from milk? (step by step photos)
- milk - 2.5 cups
- sugar - 1 glass
- vanillin - to taste

Pour the milk into a homemade saucepan, bring the milk to a boil, then remove the saucepan from the stove and let the milk cool to a temperature of 36 degrees.

Add sugar and vanillin to the egg yolks (if you want to make vanilla ice cream and not a regular ice cream). Mix well and grind the mass. You can use a blender for this.

Stir the resulting mass constantly, pouring milk into it in a thin stream.
Heat the final mixture over low heat, while continuing to stir. The mixture should become thick.

Cool the resulting mixture and our cream first, then place it in the refrigerator.
Pour the cream into a separate bowl. Whip the cream until it becomes thick.
Add whipped cream to the cooled cream and mix the mixture.

Transfer the mixture into a plastic container, cover with a lid, and place in the freezer for one hour. Then we take out the slightly frozen mixture, beat it with a mixer and place it in the freezer again. We repeat the procedure again.

Then we leave the mass of future ice cream in the freezer for 3 hours. Now our ice cream is ready. To soften the ice cream slightly, place it in the refrigerator for 20 minutes before serving.
Today we’ll look at a basic recipe for ice cream at home. Making this chilled dessert yourself is not at all difficult if you carefully follow the recipe and take into account all the recommendations.
Homemade creamy ice cream is very tasty, with a delicate and smooth texture, as well as a pleasant vanilla aroma. At the same time, unlike store-bought ice cream, our dessert consists only of natural products, without all kinds of chemical flavor enhancers, so you can safely please your little sweet tooth with a serving of chilled delicacy.
Ingredients for 2-3 servings: 
- cream from 33% - 200 ml;
- milk - 100 ml;
- egg yolks - 2 pcs.;
- sugar - 60 g;
- vanilla pod - 1 pc.
Homemade ice cream recipe with photo
- Mix milk with sugar in a small saucepan with a thick bottom. Using a knife blade, cut the vanilla pod along its entire length, remove the seeds and also add to the milk mixture. Thanks to vanilla, the ice cream will be filled with a delicious natural aroma, but in the absence of this ingredient, you can get by with a bag of vanilla sugar or a pinch of vanillin. Heat the mixture until hot, not boiling.
- In another container, beat the egg yolks with a whisk. There is no need to vigorously beat the mixture until it becomes foamy, just to achieve homogeneity is enough.

- Pour hot milk into the mashed yolks in a thin stream, continuously stirring the mixture.

- Pour the resulting mixture into a saucepan, place on low heat and cook until slightly thickened. It is important not to overheat the milk, otherwise the yolks may curdle! To avoid this trouble, choose a thick-bottomed pan for cooking the cream and cook over low heat. Also, do not forget to continuously stir the cream, especially at the bottom (it is most convenient to use a silicone spatula for this).

- We check readiness as follows: run your finger along the silicone spatula. If the mark remains clear and does not float with cream, immediately remove the pan from the heat. Tip: if the yolks still curdle, you can grind the mixture through a fine sieve or puree with a submersible blender. However, unfortunately, it is no longer possible to avoid the eggy taste of the ice cream. In this case, it is better to remove the pan from the heat sooner rather than later.

- Cool the freshly prepared cream to room temperature. At the same time, whip the cold cream until thick.

- Add the cooled cream to the whipped cream mixture and mix. Chill the mixture in the freezer for 3 hours. During this time, it is necessary to remove the container 5-6 times and mix the mass thoroughly to avoid the formation of ice crystals and to obtain a smooth and uniform texture.

- When the consistency of the mixture becomes similar to soft ice cream and is difficult to mix, transfer the mixture into a silicone mold, cover with a lid and put it in the freezer for another 3-4 hours (you can leave it overnight).

- Before serving, let the frozen ice cream sit for a while at room temperature. Then scoop up the slightly melted mixture with an ice cream spoon and form into balls. If desired, complement the dessert with chocolate chips, mint leaves or berries.

Vanilla ice cream at home is ready! Bon appetit!
Nowadays you won’t surprise anyone with ice cream, whatever you can find in stores. But still, the most delicious ice cream was in distant Soviet times. The taste of that Soviet ice cream (who remembers) will never be forgotten. So tender, soft, aromatic and very tasty.
Let's make homemade ice cream today. But not simple creamy ice cream, but ice cream made from cream and condensed milk, without adding eggs. This ice cream is prepared very quickly, except for the time when it is frozen.
Be sure to check out these recipes:
But, that’s why it’s ice cream, it needs to be in the freezer. And, the process of making homemade ice cream, in this case ice cream, is incredibly fast. We won't heat or cook anything. In this recipe, by the way, with step by step photos(for your convenience), we only beat the products.
Well, are you ready to make the most delicious homemade ice cream - ice cream made from cream and condensed milk? Then let's first see what products we need for this.
Homemade ice cream recipe
Products used:
- cream (30-33%) - 200 ml.,
- condensed milk - 70-100 ml.,
- vanilla sugar - 1 packet.
How to make homemade ice cream:
If you have never made ice cream, then I urge you to do it today. Some of you may say, well, I’d rather buy it at the store. Ah, I want to answer you that it’s not better. Still, try to make your own. I’m sure you won’t want store-bought stuff later.
As I already said, you and I will whip all the products. Take something tall, maybe a blender bowl, or a jar, for example. Pour the chilled cream into it. Before preparing ice cream, cream and condensed milk should be kept in the refrigerator for 2-3 hours.

Beat with a whisk until stable foam. Well whipped cream increases in volume.

How to check? Turn the container in which you whip the cream upside down. Nothing is flowing, which means the cream is well whipped.

Add vanilla sugar and condensed milk to the whipped cream. The recipe says 70-100 ml, why, you ask? This is for those with a sweet tooth, if you want it sweeter, add more condensed milk. If you don't like it too sweet, add less.

We take the whisk again and beat again.

Now we need to take a form that is suitable for the freezer. Place the whipped cream in it while it is still there. By the way, to help the ice cream freeze better, try to place the whipped cream no more than 3 centimeters in height. If you are making a large volume of ice cream, then place the ice cream in several containers.

We carefully and beautifully level everything with a spatula. Place in the freezer for 30-40 minutes.

Take it out and mix it with a spoon or even a spatula. We remove it again, but for about 5 hours. Maybe someone’s ice cream will freeze faster, check. The main thing is that it has a uniform consistency. And if there are ice crystals, then mix again and put it in the freezer again.

We take out ready-made, in our case, frozen homemade ice cream. We take a bowl if you have one; if not, take whatever you want. We put in as much of the most delicious homemade ice cream as will fit in it.

If you want, you can add chocolate chips to the ice cream according to your taste - this is grated chocolate. Fresh berries, syrup, any jam, preserves, canned fruits or berries, whatever you want. Or, if you don’t want to, eat plain ice cream and enjoy...

That's all, homemade ice cream (seal), everyone's favorite, very tasty delicacy, is ready for children and adults. The ice cream really turns out fantastically delicious, and is very reminiscent of the taste of Soviet ice cream. So tender, aromatic, well, I can’t describe this taste, you should try it. Definitely do it! I am sure everyone in the family, both children and grandchildren, will be very happy. Bon appetit!
When there is no one around, but you really want a hug, you can take a simple teddy bear. And if there is no such thing, then you can draw it. I’ll tell you more about this now, you will learn how to draw a toy. Raising a child is not a science, it is an art. No less responsible than visual arts. There is no need to use different therapies, sessions, different techniques. Instead, attention and patience are required, nothing more. And to do this, you just need to give a soft, cuddly plush toy and your child will be delighted.
About the soft plush friends:
- It may seem as if Stuffed Toys have always existed. Even in ancient times, funny stuffed animals were made.
- Smart people have created an interesting device - a bracelet called PINOKY. It is put on the doll's paw, or ear, or other visible part, and it begins to move randomly. Good way revive old toys rather than buy new and expensive ones.
- To prove the delusional nature of modern plush dolls, I’ll tell you about Erwin the Little Patient. This is a complex toy in which the belly opens, and there are soft insides. And tell me, will this teach children to be surgeons or rippers? He goes out into the street, sees a cat, and what? He will think: oh, another interesting toy.
Let's start drawing.
How to draw a toy with a pencil step by step
Step one. First, let's create a blank form that looks like a small bottle. And let's put a cute bear there. Step two. Using round shapes we create all parts of the bear’s body and add a bow. Step three. We outline everything a little tighter, removing unnecessary lines. For decoration, add a butterfly to the neck of the toy. Shade out the nose and eyes. Step four. Let's delete auxiliary lines, applied earlier.  Step five. Let's add shading throughout the body to make it more realistic.
  Don't forget to show your drawings of toys later. You can attach them below in the comments, and also write to me what other lessons I can prepare for you. You can do this on the orders page.
Instructions
Prepare a sheet of paper and a simple pencil. Arrange the sheet as you wish, horizontally or vertically. By using a simple pencil start sketching. Just below the middle of the sheet, draw an oval - the body of the bear cub. Next, at the top of the sheet, draw a circle that will slightly “overlap” the body. This will be the head of the toy. Draw vertical midlines on the head and body. Don't erase with eraser invisible lines At once.
Draw four paws in the form of “sausages” for the bear cub so that they slightly overlap the body. If they are slightly crooked, then it’s okay, it will add a cute clumsiness to your toy. On the head, mark the muzzle with a small circle. When creating it, be guided by the middle line on the head.

Continue drawing the toy's body parts. At the top of the head, mark the ears with two circles. On the lower paws, draw the bear’s feet using small ovals. Next we move on to clarifying the details.

In each ear, draw a semicircle, thereby indicating the inner side of the ear. Mark the location of the eyes with dots and draw a nose on the muzzle. Also mark the “palms” and “heels” on the paws. Specify the body of the toy, draw a straight back.

Using an eraser, erase all invisible and auxiliary lines, draw the bear’s mouth (in the circle that marked the muzzle) and “naive” eyebrows. To prevent him from being left alone on the sheet, surround him with cubes or other small toys. Or draw a forest around it, in general, come up with a background as desired. Decide on the material to work in color. When working with paints, the drawing may turn out to be more saturated. Before working in color, determine from which side the light will fall. “Heels”, “palms” and inner side the ears will be lighter than the bear's body. Try to apply strokes according to the shape of the body. The plush is ready!

note
Today's lesson is dedicated to the touching teddy bear Teddy, a favorite of children and adults. Just a few simple steps will help you easily portray a slightly clumsy, but so cute and dear little bear. How to draw a Teddy bear with a pencil step by step. First stage. Draw the head - a large circle. Below, closely draw a larger circle - this is the torso.
How to draw from life: It’s not at all scary if you don’t have a teddy bear, because you can use whatever your heart desires. And don't overdo the dark areas. Worried because that teddy fell from the tree? The doctor assured that in a few days he would make a full recovery and go to school. With a friendly and helpful teddy bear and a little imagination, you can draw anything you want.
Sources:
- Teddy bear
- how to draw a teddy bear with a pencil
Beginning artists need to have a basic knowledge of all the basics of drawing. You should not look at the paintings of great artists - you will be able to understand them later, but for now try to understand the drawing itself. The cube contains the opportunity to see the space of the drawing as a whole. The cube is the basis of the three-dimensional image of any sketch. It has both horizontal and vertical, and depth. This is where you should start working.

Instructions
Sit at an easel, attach half a sheet of Whatman paper to it and draw a cube, assigning not only the front edges, but also designating. The cube has 8 corner points, 12 edges, and the aspect ratio is 1:1:1. To make a cube seem credible, determine from what point it will be convincing in . When viewed from above, the base of the cube is like a diamond. It is from the bottom square, taking into account the laws of perspective, that the cube should begin. Vertical edges are built from the vertices of this square, top points which are connected by four lines.
The closer the sides and corners are to the viewer, the more contrast they are. And those that are in the depths must be less clear. This is one of the basic laws of perspective - the further away an object is, the more it tends to fade away, as the density of the surrounding air increases.
Draw another one behind this. This will help you understand the drawing space. Use the same law of perspective. Because the first cube is closer to you, having more defined corners and edges, the second cube will have less defined edges than the furthest edges of the first cube. It is important to clearly understand this in order to understand the basics of spatial vision. Moreover, you need to select not the whole face, but the corner and edges closest to you.
Do not try to form a cube by placing its edges parallel to the sides of the sheet. Let them “fly” in space in any position. This exercise should be performed until you have fully mastered spatial vision. And they will help you with this.
Video on the topic
Helpful advice
When drawing cubes, do not use lined notebook sheets or drawing tools. This will prevent you from mastering writing. geometric shapes on clean slate paper.
Naive and cute children's drawings are incredibly touching; parents keep them for years, putting them in separate folders. Often an adult who masters the technique and skill of drawing fails to create such simple, but at the same time brilliant works. Try working with your child and create a picture in the style children's drawing.

You will need
- - paper;
- - paints and brushes.
Instructions
Kids depict objects, phenomena, animals and people familiar to them. They perfectly manage to capture the very essence of the subject, its character traits. Without being distracted by small parts, children are able to show with a drawing their attitude to what they depicted.
Try to take advantage of this child’s ability to “see to the root.” Take a sheet of paper and draw a picture on your favorite children's theme - "". Horizontal line separate heaven and earth from each other. In the upper corner of the picture, using a round soft brush with clean yellow paint, draw a circle and rays extending from it - the sun.
Next to the luminary, draw a pair of blue fluffy clouds with semicircular brush strokes. There must be a home for your family in the background. It doesn’t matter if it’s slightly crooked, because that’s what it does drawing similar to ! Draw a square, a triangle on top - a roof, on it a long rectangle of a pipe with clouds of gray smoke.
Do not try to display the real proportions of the building; children draw characteristic details larger than they actually are. A window and door can take up an entire wall of the house. Draw a tree next to it, draw the trunk either in the form of a cone, or simply with a wide brush stroke with brown paint. Children usually draw branches with straight, upward-pointing lines. The crown is an outline outlined in green paint.
There should be a couple of bright large flowers under a tree or on the lawn. Take red, blue and yellow paints and paint plants with large oval petals. The stem is a green stick.
People's heads in children's drawings are always larger than in reality. Therefore, draw a large circle with a stick neck at the bottom. Mom's body consists of a triangular dress, arms sticking out of it with fingers spread out, and legs. Draw the limbs using stick strokes, make the feet look in different directions.
Dad's body consists of a rectangle - a T-shirt and two elongated rectangles - pants. The parents' palms should touch. Children usually draw hairstyles with a few strokes coming from the head. Dad has a short “hedgehog”, mom has long spirals. Draw the eyes large and round, surrounded by short eyelashes. The nose is a round button. Mouth – wide red smile.
Don't forget about animals, if you have them. Draw them too using simple shapes, the body is an oval, the head is a circle, the ears are triangles, the paws and tail are thick lines. Now your picture is ready in the style of a child's drawing.
Teddy bear from the USA
By American version The famous teddy bear owes its appearance to the famous American President Theodore Roosevelt. One of his main hobbies was hunting. One day, in November 1902, a tiny bear cub appeared under the president. Roosevelt refused to shoot the baby and ordered him to be released into the forest.Of course, such an event could not go unnoticed by the press. On the pages The newspapers The Washington Post published a publication about the president's unsuccessful hunt and a cartoon depicting Roosevelt and a bear cub. Moreover, the bear cub was depicted so touchingly that it immediately won everyone’s love. The president’s action found a response in the hearts of ordinary Americans, and the image of the bear became a symbol of kindness and mercy.
The case with the bear cub became the reason for numerous jokes and cartoons in the American press. One of them was seen by an emigrant from Russia, Morris Michton. Before that, he was the owner of a candle shop and had nothing to do with toys. But, seeing the growing popularity of the bears, Michton suggested that his wife sew some articulated bears for sale. The bears were originally named "Theodore's bear". Michton later received permission to use diminutive name Roosevelt and named the bear Teddy. The teddy bear's date of birth was October 27, like the president's.
The success of the toy was so great that a year later Michton closed his shop and founded a toy manufacturing company.
Teddy bears from Germany
The Germans tell a completely different story about the birth of the teddy bear. In the small German town of Geingen lived a woman named Margarete Steiff. As a child, she contracted polio and was confined to prison for the rest of her life. wheelchair. But Margaret had enviable tenacity and love of life. She learned to sew amazingly beautiful soft toys, which became a huge success among the city residents. Soon Margaret's parents opened a small family business producing soft toys.In 1902, Margarete's nephew Richard Steif developed new toy– a teddy bear with moving legs and head. Initially, Richard created bears that were as similar as possible to real animals. However, gradually they began to acquire fabulous features, which only contributed to the growth of their popularity.
To this day, it is not known exactly who owns the palm in the manufacture of teddy bears. But for millions of their fans around the world, this is not so important. The main thing is that the bears never tire of delighting and delighting them.