The girl's face is half open, drawn in pencil. How to draw a person's face with a pencil step by step

Drawings of a person's face, a portrait is the most complex look visual arts. Learn to draw a portrait of a person correctly, even with a simple pencil, requires not only time to learn, but also talent. The difficulty of drawing a portrait of a person lies in the ability to convey emotional condition a person, his facial expressions, depth of gaze, etc. To do this, you need to correctly draw the eyes, accurately repeat the shape of the person’s lips and other features of his face.
How to draw a portrait of a person if you have no experience? It is quite possible to learn a simple technique for drawing a person’s face on your own, but first you can try draw a person's face step by step, with a simple pencil. Perhaps not the first time, but when great desire, you will definitely be able to draw a real portrait of a person.
1. The overall contour of a person’s face is most important.

To draw correctly portrait of a man It is important to accurately make the first contour, the contour of the face. Without pressing hard on the pencil, repeat this oval of the person's face in your drawing. You may have to draw it several times, repeating this step again. Do not spare paper, draw until this outline is the correct shape and symmetrical. If you want to draw the same portrait as in my drawing, be patient and diligent.
2. Marking the main parts of a person’s face

Exactly in the center, draw a horizontal line dividing the portrait into two parts, and just below another parallel line. From the center of the bottom line, draw a perpendicular line and mark where the tip of the nose will be located on the face. When drawing these lines, do not press hard on the pencil. Don't forget to draw the ears.
3. Eyes are the main part of the portrait

Drawing a person's face step by step is simple and fun. The main thing is to definitely take the first steps. At this stage it will be much easier to draw, but you need to be extremely careful and careful. We probably need to sharpen the pencil sharper, we will now need to make thin lines.
The eyes on a person's face are the most important part of a portrait. So let's start drawing this portrait step with them. Draw the eyes using smooth, oval lines, but first place marks (dots) for the lateral, upper and lower borders of each eye. Draw the pupils, the line of the mouth and the initial contours of the hair.
4.Draw the outlines of the eyebrows, mouth and lips

This step will be the most difficult, but after it the portrait of the person will be almost complete. Draw something that is easy to draw first. Draw the eyebrows and finish drawing the outline of the hair. Now let's draw a little more complex element human face - lips. It’s easier to draw the lower lip, so let’s start with it, and the upper lip will be mirror image the bottom one, only it is divided in half in the center. Don't draw too wide a mouth or thick lips.
Start drawing the nose from its tip, in the form of a “tick”, and two arcs along the edges. Now draw a line from the right eyebrow, slightly deviating to the right.
Using an eraser, carefully remove from your drawing of a person's face extra contour lines and look, it turned out to be a real portrait of a person.
5. The drawing of the man's face is almost finished

If you have reached this stage and are quite happy with your drawing of a person, then you a real artist and apparently you can draw a lot of other beautiful things. Starting from this step, you have earned a rest, and therefore you will not have to draw any more difficult things in your portrait of a person. You will only need to draw eyebrows, eyelids, hair and draw the ears in more detail.
6. Portrait of a man. Creating shadows in a drawing

Now you have a real drawing of a person’s face, all that remains is to make a portrait, as real artists do. That is, add shadows to the drawing with a soft simple pencil, making the picture of the face three-dimensional. This effect can only be achieved by creating shadows and contrasts.
On the face and hair, many areas need to be shaded with darker and denser light. This effect will give the face greater realism and depth.
Now you know how draw a portrait person and you can try to draw a portrait from a photograph. Don’t try to draw a portrait of a person “from life”, only artists can do this. If you manage to convey the main similarities and express them in your drawing main feature human - that's already good. And if the portrait resembles the person in the photo, then you can be sure that you have real talent.
The lesson on how to draw a portrait of a person is an addition to the lesson on how to draw a person in full height. Draw first standing man, and then, using this lesson, you can draw a person’s face in detail.
The drawing of a person's face is, first of all, the eyes. It is this element of the portrait that needs to be given the most attention. In this lesson you can learn how to draw eyes in detail.
Every person has a nose unique features, therefore, it is impossible to give precise advice on how to draw the nose of a girl, child or man. You can only make an abstract or, as they say, “academic” drawing of the nose.
If you decide to draw a person's face, it is important to achieve a similarity in the person's portrait and accurately draw any facial features. But eyes and lips are the most important elements face drawing.
It is difficult to draw a ballerina, because you need to convey the grace and elegance of the dancer’s movements. To make it easier for you to draw a ballerina, this lesson done step by step.
Let's try to draw a hockey player in motion, with a stick and a puck, step by step. You might even be able to draw your favorite hockey player or goalie.
In this lesson we learn how to draw anime comics in manga style with a pencil. Every anime fan wants to be able to draw manga, but it is not easy for everyone, since drawing a person is difficult, especially anime in motion.
The eyes of a human face drawing in anime style are the basis of this style. The eyes always have a distorted, enlarged size, and the person's facial features bear only a rough resemblance to real face person.
There are probably no people in the world who have not picked up a brush or a pencil at least once in their lives.
The activity is exciting and interesting, but not easy. And depicting a person on canvas is perhaps one of the most difficult tasks.
Types of portraits
To better understand how to draw a portrait, you should first understand the classification - what are they?
| By genre | By composition | By format |
|---|---|---|
| Historical | Portrait painting | Full length |
| Psychological | Portrait walk | Generational |
| Costume | Front | Up to the hips |
| Mythological | Half-dress | Waist-high |
| Family | Group | Chest-deep |
| Portrait of a man, woman, children | Doubles | Shoulder-deep |
| Self-portrait | Individual | In a quarter turn |
| Estate-social | Chamber | Full face |
| Cartoon, caricature, miniature | To profile | |
| By photo | Half turn | |
| At three quarters |
Historical - the painting depicts a person famous in history. Often such images were made according to surviving descriptions of contemporaries.
Costumed - a person appears in some form. This can be either the outfit of a fictional character - the hero of myths, films, comics, books - or the image real personality, as a rule, known. In former times, it was precisely such portraits of the nobility and rulers that were made ceremonial - that is, in full growth, against a bright background, with all the paraphernalia.
But the costume can be more modest, just reflecting the occupation - this is a military, class-social portrait - when trying on the costume of a peasant, merchant, etc. This look was usually half-dress - that is, with a more modest background and not in full height.
Mythological - a fairy-tale creature is painted from a living person.
Costumed, psychological and historical portraits often take the form of a walking portrait or a painting portrait, where the characters are presented in a certain atmosphere and environment.
Psychological - the main goal of the artist is to convey on canvas inner world, the hero's experiences.
Group, pair - depicts a group of people related to each other in some way - for example, a family portrait.
Individual - the entire composition is dedicated to one person.
Self-portrait - the artist paints his face.
Cartoon, caricature, miniature - simple drawings, usually done in pencil, ink or watercolor. Such sketches resemble sketches, since the draftsman captures only the main features of the face without detailed drawing. Caricature and caricature are humorous and satirical in nature with the purpose of ridiculing the object.
From photography - portrait from photo is a fairly new direction, not recognized at first.
Chamber - the most common type. Neutral background, careful drawing of details, the human figure is depicted from the waist, chest or shoulders.

To profile


Half turn

At three quarters

What do you need for drawing?
 Before you start drawing lessons, you need to get everything you need. Firstly, this is the work surface.
Ideally, this should be an easel, but for the first time a regular table may be suitable.
Easels come in metal and wood.
It is better to choose one with a stand for accessories.
To secure the sheet to the easel, you need push pins for wooden ones and magnets for metal ones.
Now what we will draw on is the canvas.
The first sketches can be made in a regular album, but for a full-fledged drawing you will need A3 sheets.
For paints, it is advisable to purchase your own type of paper:
- Whatman paper - acrylic, gouache, tempera, oil;
- thick paper for watercolors;
- tinted - for pastel, sanguine, charcoal;
- paper for drawing, whatman paper - for working with a pencil.
Tools:
- Stationery knife or sharpener. Professional artists To sharpen pencils, a stationery knife is used - this makes the tip of the lead extremely sharp and thin, which allows for clear and straight lines. It’s not difficult to learn how to sharpen with a knife - you need to move the blade away from wooden base to the tip of the stylus from all sides, without pressing too hard on the knife.
- You need a palette to mix colors.. The best one is plastic, it is easiest to wash off the paint. You can buy it in a store - but plastic lids from cosmetics, etc. will also work as a palette.
- Brushes. For watercolor - squirrel or columnar. For gouache and tempera, synthetics, bristles, and natural material. For acrylic, oil - bristles and synthetics.
- Palette knife. Spatula for applying and scraping paint, great option for acrylic and oil.
- Bucket for water, rags for brushes and hands.
Materials:
- Pencils. You will need a set art pencils for drawing of different hardness.
- Paints. The most basic ones are gouache and watercolor. Acrylic and tempera are bright and dense and are often recommended for children. Oil technique is the most difficult.
- Crayons. Pastel - for color works, sanguine and charcoal - for monochromatic drawings.
Where to start learning?
Mothers can teach their children the basics of drawing themselves - it is not as difficult as it seems at first glance. The main thing is to devote time to your work every day, and the result will not be long in coming.
Training stages:
- First of all, you need to try to work with all the materials. Each of them has its own composition, texture, and characteristics - a gouache stroke lays down tightly, watercolor stains spread smoothly, a soft pencil draws a thick, rich line and is easily smeared, a hard pencil almost scratches the sheet. Take an album or notebook and try everything there is to your heart's content.
- The next step is to learn how to hold a brush and pencil correctly. There are all sorts of options on this topic, but everyone keeps it the way it is convenient for him. One general rule: the pencil does not need to be held like a pen when writing, so that your hand does not block the drawing. In this case, the instrument should “fly” in the hand - up and down, and in all directions. Therefore, we clamp not at the base, but slightly lower, almost in the middle, while the index and thumb lie freely on the cone.
- Now about how to draw with a simple pencil:
- First we just draw the lines. Straight, oblique, wave, semicircle - gradually the lines will come out clear and confident. The main thing here is training.


- Hatch. First, we draw strokes in one direction, then in different ones, and then we combine, for example, vertical and horizontal, but without overlapping one on top of the other, but place them perpendicular to each other. The next step is to draw simple geometric shapes.

- . The concept of perspective is that objects become narrower as they move away from a certain point towards the horizon. The ability to draw in perspective is necessary when you need to depict a figure sideways or turning its head. See her in environment It’s not difficult: it can be a corridor, a room, a street. If you pay attention, you will notice that all the lines run diagonally from the viewer and connect at one point. To get acquainted with a perspective image in practice, we start with the simplest: a road, a corridor, etc., and then we also draw geometric shapes.

- First we just draw the lines. Straight, oblique, wave, semicircle - gradually the lines will come out clear and confident. The main thing here is training.
- Mix on the palette different colors to obtain shades. It is believed that there are only three primary colors - red, yellow, blue, and all other colors are shades, the result of mixing. When working with paints, with the exception of watercolors, we use white.
- Finally, you can try drawing a face. We copy from pictures - at first from the simplest, cartoon ones, gradually moving on to more complex ones.
Learning to draw a portrait - a step-by-step guide for beginners
In this lesson we will draw woman's face. This drawing scheme is universal; you can use it to make a portrait of both a boy and a girl.
Construction of the head and general outline:


Working with planes
Now let's draw the planes in the form of geometric shapes. Let's start with the nose - outline the back and wings of the nose with a rectangle. Then we select the plane of the cheekbones in the shape of a trapezoid, and mark the eyes and lips with a circle. 
We have divided the future drawing into main parts. You can draw the forehead, eyebrows and chin in the same way.

Facial detailing - eyes, eyebrows, nose, lips, ears
Eyes and eyebrows:
- Draw the contours of the upper and lower eyelids. Please note that the eyelids are different from each other, draw very carefully so as not to miss a single detail.
- We draw the entire iris - that is, and the part that is hidden by the upper eyelid.
- We denote the pupil and glare (reflected light).
- We move on to shading the mirror surface of the eye. Leave the highlight unpainted. The iris of the eye is darker at the outer edge and along the contour - in the center and at the pupil it is lighter.
- We work on the eyelids and the area around the eye. We designate shadows - on the crease of the upper eyelid, lower eyelid, at the bridge of the nose. The ciliary edge of the lower eyelid remains light, and the white of the eye is darker along the contour at the edge of the eyelid. The shadow from the upper eyelid partly falls on the eyeball.
- We create volume using a stroke, painting the entire area - from the eyebrows to the lower eyelid.
- Drawing eyebrows. We draw the main line and start drawing from it soft pencil every hair, all in the same direction. We also draw eyelashes.


- Outline the main parts - the back, wings of the nose, nostrils. Draw the outer and inner edges of the nostrils in detail.
- Mark the shadows. Conventionally divide all planes into three - shadow, transition, light part (we don’t shade it).
- Detailed shading.

- Let's sketch general outline. First of all, let's draw a line between the lips. To do this, draw three circles - two at the bottom, close to each other, in place of the lower lip, and one at the top, in the middle between the lower ones, so that the circle falls into the hole between them. The line where all three circles connect will be the line between the lips. We trace the contour of the lips in circles, draw in the corners, and give the upper lip the shape of a bow. Don't forget that the lower lip is slightly larger than the upper lip.
- Shading. The upper lip is always darker. Pay attention to the side shadows.
- We give volume using shading, working out in detail the corners, side shadows and the line between the lips.

- We carefully draw all the parts - curls, ear canal, fossa, lobe.
- Apply shadow and do shading, especially concentrating on small details, transitions from light to shadow - the ear is the most difficult in this regard.

Hatching and halftones
As already mentioned, the volume depends on the stroke. To draw a beautiful an expressive picture- you need to be good at shading techniques.
Ideally, you need to have a full set of pencils of different softness. This is important not only for the saturation and depth of the shade (soft ones give a dark deep tone, hard ones give light and light lines) - it is also important in technical terms, and for conveying the density and structure of the object.
A sketch is made with a hard pencil without shading, because it is easily overlapped and will not be visible in the final version.
A soft pencil and draws smoothly. It is ideal for shadow, as well as for visually conveying the softness of the depicted nature - it is good for drawing hair and clothes.
The shading technique involves combining strokes of different lengths and directions.
All the strokes are applied evenly, neatly, one to the other, the stroke should not be “shaggy” and disorderly, there is no need to apply too many layers of shading in one place - otherwise it will just turn out to be dirt.
To create smooth transitions, for example, to indicate a fold - apply short strokes at the transition point, in other places using a longer stroke.
When you need to create a transition from dark to light, to create halftones - first we shade the entire plane with the most in a light tone, and then use a softer pencil to paint over the shadow.
In certain cases, you can lightly shade the transition area with your fingertip - for example, when drawing shadows at the bridge of the nose.
An example of creating a portrait step by step in the photo:
Highlight and darken
Darkening is not done with a hard pencil. To ensure that the stroke is not visible and that the transitions are smooth, the strokes must be very small.
In darker places, we deepen the tone as much as necessary, applying several layers of shading. Bright places Either we don’t hatch at all, or we take the hardest one.
You can also use an eraser to create a highlight.
Video tutorial on drawing a portrait from a photo:
Portraits for sketching
Working with nature is very difficult. Before doing this, it is advisable to take an already drawn portrait and repeat it on paper. This practice will help you get better at learning the technical side of the work, as well as study the techniques that artists use.
How to learn to draw portraits with paints?
We've figured out how to draw with a pencil. Now we will talk about painting with paints. This video will talk about different techniques, completely different - and about watercolor painting, and about working with oil. Everyone can choose what they like.
Drawing with watercolors. Video tutorial:
Oil painting, basics for beginners. Video tutorial:
In conclusion of the article, it is worth noting that the most important secret to success in drawing is perseverance and daily practice. Don't give up if you don't succeed the first time. Try again and you will definitely succeed in drawing a portrait.
Every aspiring artist strives to depict a variety of objects, and portraits are especially popular. The first hesitant strokes will turn out to be correct if you take the advice of the masters. The main rule: we work, moving from the whole to specific features.
Many people are interested in: Professionals recommend creating an image step by step, A for beginners a number of useful tips. Preparing materials
Creativity requires total immersion. Therefore, in order not to be distracted by annoying little things, you should prepare all the materials and equipment that may be useful in the process. The list is small. You will need:
- Pencils of different degrees of hardness: H and HB. The first marking will allow you to draw thin and light lines. You will need it for outlining a contour, drawing lines over shaded areas - for example, highlighting strands in a hairstyle. HB is a universal option, hard-soft (translated as hard-black). Both options are useful if you are interested how to draw portrait of a girl pencil.
- Professional eraser. You should prefer the white segment of the product. The eraser should bend easily without breaking.
- Simple A4 office paper with a smooth (non-porous!) surface. Draw a portrait of a girl on the page of a children's school album is difficult: when using an elastic band, the loose surface becomes unpresentable.
- A pencil sharpener that's easy and quick to use.
- Experts recommend taking a special tablet for convenience. But this equipment is not necessary; any planes can be used.
Having at hand necessary materials, let's get to work: consider How draw a face attractive girls simple pencil step by step(instructions are helpful for beginners) in every detail.
Step by step drawing of a portrait of a girl
Drawing an oval face
To draw graphic portrait of a girl, take pencil H and hold it correctly: approximately 45 o in relation to the sheet. Further:
- We visually indicate the alignment. Place the oval of the face.
- The emphasis is on the shape and smooth curves of the chin.
- The contour of the neck is outlined schematically - we draw two smooth curved lines.
So, initial outline ready.

Figure proportions
For realistic portrait Approximate proportions must be observed:
- We divide the resulting oval of the face into three equal parts, this is the only way to get a pretty picture. We draw horizontal lines through the marks - these are the lines of the eyebrows (upper strip) and the tip of the nose (lower).
- To portrait of a girl in pencil turned out to be close to the actual vision, an axis of symmetry should be drawn. This vertical line, passing through the contour of the face and dividing it into two halves.
We get an approximate diagram for further drawing.

Hair in a portrait of a girl
Let's start simple:
- First let's designate the hairstyle smooth lines to the shoulder.
- The contour of the hairstyle somewhat covers the oval of the face.
We will return to detailing this segment later. Impossible draw a girl's face, without amazing hair.

Draw eyebrows, lips, nose
Facial features can be as close as possible to the real object. If the drawing is stylized, then we adhere to the general rules:
- The spread of the eyebrows is drawn above the top line. A fairly wide line will give greater expressiveness.
- Lips: start with the closure strip, outline the upper and lower parts. Moreover, the upper lip is somewhat smaller.
- We outline the location of the wings of the nose and enter the rounded nostrils.
Pencil drawing of a girl requires light pressure and smoothness.

Marking the eyes in a portrait
- We carry out curved line under the vertical markings. This is the axis on which the eyes are located.
- We raise perpendicular lines from the wings of the nose, so we find the place where we place the corner of the eye socket (on the sample the lines are marked as a stroke).

Drawing the axis of the eyes in the portrait
We display it on the curved axis of each eye. The shape is a uniformly expanding and contracting leaf.
We begin to understand how to draw a portrait of a girl gradually, step by step, and move on to the main action.

Processing the face with an eraser
- You should use an eraser to remove the initial guidelines - lines (then they will only get in the way).
- Let's start detailing the object.

Making your eyes come alive
- We draw eyelids.
- We designate the iris and pupil inside.
- Small rounded highlights on the dark pupil add realism to the image.
Now the charming girl is looking at you from the page.

Light and shadow on a girl's face
Working with the designation of light and shadow
Let's continue draw a portrait of a girl and make it animate:
- Shade the pupils with a pencil of hardness HB.
- Draw the eyebrows with short strokes.
- Apply a light shadow under the eyelids.

Bringing the image to life in a portrait
- Shading the lip area, leaving a highlight on the lower part.
- This way we get visual volume.

Shadows on the face
- We place a shadow on the sides of the nose.
- The nostrils are shaded tightly, with darkening.
Generally, portrait of a girl, created step by step with pencil has already become a three-dimensional image.

Gradual darkening of cheekbones
The face doesn't look realistic yet.
- Use hardness H to shade the cheekbones (the brand leaves a light mark).
- We shade physiological shadows under each eyebrow and under the chin at neck level according to the drawn forms.

Drawing the hair
Select the curls and visually distribute them. Then the nearest strand that slightly covers the face is drawn and shaded.

Reworking a girl's hair
Healthy hair shines with highlights bright light, so you can lightly wipe the shaded curls at the bends with an eraser. This emphasizes volume and adds a special charm. portrait of a girl. So, everything is simple: a strand, a highlight, and darken the remaining space.
You can simply darken individual sections of your hairstyle to make your curls look voluminous.

Portrait of a girl in pencil
We meticulously examine the image and finalize it:
- Add a shadow above the upper lip.
- Shade the hair going behind the neck.
Now each of you can draw a girl's face with a pencil step by step.

Good day, aspiring artists!
Now we will learn how to draw a person’s face with a pencil step by step. People believe that depicting a human face is a task only for experienced artists. But if you follow simple rules, any beginner can handle this task with the ease of a professional. Knowing the proportions and the correct arrangement of all elements are the keys to unraveling the secret of “how to draw a person’s face.”
Centerlines and proportions
Each element can be thought of as a line. They are called axial. It is impossible to depict a correct, proportional face without using them. At first, until a certain skill appears, they need to be used constantly.
To begin with, using light, barely visible strokes, we apply a grid of axial strokes. This will simplify and speed up work on the contour.
Next, working with the axes, you can begin to depict human emotions. When a person is happy or angry, his facial features change, followed by a change in the direction of the axial grid.
Horizontal lines
Step 1 Oval
First, we create an approximate oval; we don’t need precision yet. It will be adjusted further. It is needed to understand the amount of work and create the correct proportions of all elements.
Step 2 Axial symmetry and eye position
The oval must be divided into four parts by horizontal and vertical segments. Horizontal line- this is the axial eye. Vertical is needed to correct the symmetry of the image. Don't try to do this without a ruler. Accuracy is important here; the correct placement of parts of the face depends on them.
Step 3 Eyebrows, nose, lips and hair
Next we draw our vectors for the eyebrows, nose, and hair. To do this, you need to divide the oval into three and a half parts, these will be the hairline, eyebrows, and the base of the nose. 
To depict the lip line, divide the lower third, from the nose to the chin, horizontally in half. There will be a lower lip.
It is important to remember that in the initial marking you only need the main line of the lips. Their shape depends on the gender, race and age of the person. It will change in future work.

Step 4 Ears
The auricle, like a fingerprint, is unique to each person. Oddly enough, the correct position of the ears is often the most a big problem when depicting a portrait.
To avoid such misunderstandings, you need to remember that top part The ear is located on the axis of the eyes, and the lower one is located on the axis of the nose. Regardless of size or shape, ears are correctly depicted within this fragment.

Vertical lines
Step 5 Eyes
We return to the horizontal line of the eyes. It must be divided into eight parts. Each eye will occupy two of the eight parts. This way they will look proportional. The distance between them is equal to the length of one eye. There should be one eighth left to the outline of the head on each side. The corners are always on the axial.

Do not forget that lips, eyes, nose, ears are different for each person. Here's how to draw the average person's face. After proportionally placing the parts, they can be brought into line with the original.
Step 6 Nose and mouth
If the model is looking straight, at the same vertical level are:
the inner corners of the eyes are the wings of the nose;
corners of lips - pupil.
After carrying out all the axial lines, we should get the following mesh:

We have drawn a basic backbone that can later be shaped to give it its own personality.
Step by step model of drawing a human face.
The article tells you how to draw a face quickly, symmetrically, and accurately calculate proportions. As soon as novice artists feel the strength, they can begin to perform more complex artwork. With experience, the need to construct a complex contour mesh will go away.
First you need to determine whether we will portray a man or a woman. They have significant differences. For example, we will draw a man's face.
You can learn how to draw a girl’s face from the video master class offered below.
Step 1 Shape
We draw an oval and the first two axial ones - horizontal (eyes), vertical (to determine symmetry).

Step 2 Details
With light movements we apply, along the pre-defined axes, the eyes, nose, eyebrows, lips. At this stage, it is important to outline the details; we will adjust them further.
The pencil should not be pressed too hard into the paper. Otherwise, dents will remain on it, and then it will be difficult to correct the flaws.

Step 3 Detailing the shapes
Now we begin to transform the sketch into a drawing. We add and complement all the elements:
we finish drawing the eyelids, pupil, eyelashes;
carefully draw the eyebrows, bringing out each hair. Very painstaking work that requires attention and perseverance;
We come up with a hairstyle for the model. Depicting hair correctly is the most difficult task;
We pay a lot of attention to the nose. Carefully draw out the nostrils;
for beginners it is easier to make the lips closed or in a half-smile;
We tighten the jawline.

Step 4 Add Shadows
The final touch is shading! Apply shadows in small, light strokes to the eyes, nose, mouth, cheekbones and neck.
The shading can be shaded with a piece of paper or your finger. This will make the picture closer to the original.

Lesson completed. Our model is designed for the entry level. But with diligence, the level of skill will increase with each new painting.
The next step is to learn the nuances of drawing facial expressions and depicting emotions. The main thing is to train!
Today we will try to draw a woman's face in all its glory. Human face– a very complex structure in nature. And not only from a physical point. Think for yourself, the eyes are the mirror of the soul, the shape is the character of a person, and the mouth will tell you how pleasant a person is when he smiles. When drawing a person, the face is always the most difficult part.
It may be a secret to many that human body asymmetrical (that is, the halves of the body are not equal in structure). One leg is longer than the other, the fingers on one hand are shorter than the others, the ear sticks out more, etc. There is the same problem with the face, and everything is connected with the fact that the two halves of the brain are responsible for different parts, and, at the same time, some functions of the halves of the brain differ from each other. So, we, creative people, rely more on right side, how much the left is responsible for logical thinking and calculations.
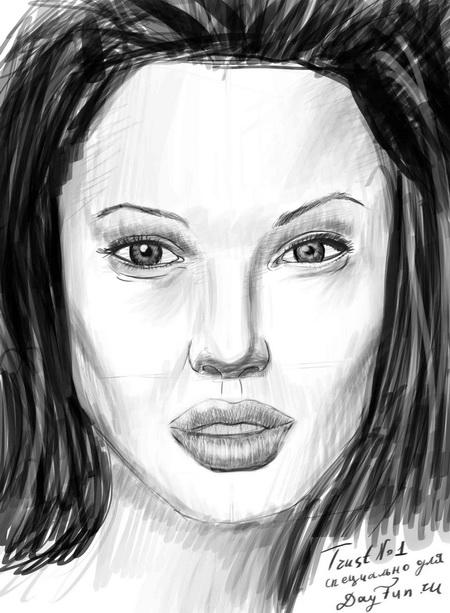
Now let's take the risk of drawing a woman's face. Among all the possible ones, I chose Angelina Jolie, because for many men (and women) she is the ideal of beauty and femininity. This is very important lesson for everyone, so let's get started.
How to draw a woman's face with a pencil step by step
Step one: let's start simple and draw an oval with lines, under it, using the same lines, draw the contours of the neck.
 Step two: now we add hair, erase the oval lines and neck lines, making the structure more even, draw a line in the middle, which will indicate half of the face.
  Step three: now we use the same lines to mark the places where the eyes and nose will be located.
Step four: be careful not to make your facial features too big or small. To do this, we precisely designate the places for eyeballs, use lines to draw the nose and part of the mouth.

Step five: now, based on the work done, carefully and accurately draw the lines of the eyebrows, then the eyes and mouth. We also add nostrils to the girl’s nose.

Step Six: If all the previous steps are done well, then the hardest part of the lesson has already been completed. We erase all unnecessary lines, give the eyebrows more elegance, draw the pupils, bridge of the nose and trim the lips.

Step seven: apply shadows to the face, sketch out the eyes, lips, and sharpen the eyebrows even more.
 Step eight: now the only thing left to do is fine-tune everything so that the drawing looks more like Angelina Jolie’s face. Let's add color to the hair, sketch out the eyes and lips more carefully.