Drawing lines in Photoshop. Rectangular Marquee Tool
IN Adobe Photoshop There are a huge number of built-in functions that can be used to create various objects, retouch photos and more. A novice user who has just begun to comprehend the basics of this program would do well to consider the problem of how to draw a straight line in Photoshop. And those who have been in this environment for a long time may be interested in remembering the basic ways of drawing a straight line. One method or another will be useful in individual cases.
How to draw a straight line in Photoshop?
There are many ways and techniques of drawing different lines and elements. But before you draw a straight line in Photoshop, you need to keep in mind that there are three main and quick ways line images: Brush, Pen, and Line tools. Despite their simplicity, it can be assumed that everyone has their own drawing technique and each user chooses the tool himself, guided by his preferences and the task that faces him.
Brush tool
The simplest and most understandable method is drawing using the Pencil and Brush tools in Photoshop. It is worth keeping in mind that these tools draw and do not create some kind of object, so the image of the lines will be on the selected layer itself. You can avoid this situation and draw the line on a separately created layer. In this case, you can edit the brush mark without restrictions without harming other layers.

To draw a line, just select the Brush or Pencil tool. Then click on the left mouse button and use the cursor to set the direction of the line. In addition, you can use the right mouse button to open an auxiliary window with settings, where you can select the type of brush, determine the hardness and shape of the tip.
A straight line can be drawn using the tool in question using the method of multiple magnifications of the image. The closer the image is, the greater the chances of drawing a more or less straight line manually. A perfectly straight line can be created by holding down the Shift key and using the same Brush/Pencil tool. By activating the right tool, hold down the left mouse button and the Shift key - we observe the construction of a straight line, controlled by the cursor.
Line tool
There is another way to draw a straight line using the Line Tool in Photoshop. The quick access panel includes a block that combines a number of geometric tools, including the one in question. The created lines will be distributed into new layers, which will be formed automatically after constructing a straight line.
Before drawing a straight line in Photoshop, you need to select the tool of the same name and click on the left mouse button at the point where the beginning of this element will be. To complete the construction, you need to click on the LMB again.

The convenience of this method is that lines can be combined into a common layer and provide full editing of a group of constructed elements. The merged layer, after finishing work on it, can be rasterized, but it will no longer be possible to work with the merged elements in vector graphics format. You can format a rasterized layer in the same way as others. Another advantage is the fact that you can edit the lines themselves without losing quality. The vector line editing menu is located at the top of the program - its header. Here you can set the line color, its outline, shape and thickness.
Pen tool
A universal tool for creating shapes of varying complexity. With this function and the multiple magnification method, you can select new figure hard-to-reach areas in the image. So, for example, you can draw both straight lines in Photoshop and curves. Mastering this tool is extremely important - it is used everywhere in many creative works when you need to cut out an image or create a new one graphic interpretation.
How the Brush and Pen Tools Work Together
Using a pen, you can easily draw a straight line in Photoshop. To do this, you must first select the "Brush" tool, where using the right mouse button, a dialog box opens and the desired hardness, size and color are entered. future line. Now you should activate the Pen tool in the quick access panel (in addition to the regular pen, there are other types of the Pen tool in the block, but we won’t need them). Let's put it first reference point in the place where the beginning of the line should be. Then we put another point - the end of the line.

The Pen tool does not create a work object, but only a path. In order for the user to turn the path into a real object, he needs to stroke the path. The Paths panel is located by default in the lower right corner, where layers are usually located. In this window, select the "Contour" tab, where you can see our work contour. Right-click on the outline and select "Stroke Outline". In the Photoshop window that appears, the brush is in the box by default - you don’t need to change anything, just confirm the action.
Not uncommon when designing text documents there is a need to draw a line, for example, in order to separate one part of the text from another. In a text editor Microsoft Word There are several possibilities for solving this problem.
In this article we will look at three of the most simple ways draw a line in Word. The material will be relevant to everyone modern versions Word. Including Word 2007, 2010, 2013 and 2016.
Method No. 1. Inserting a dash or underscore.
Perhaps the easiest way to draw a line in Word is to use a dash or underscore. Inserting in a row a large number of such signs, you will get a horizontal line. For example, to draw a line using a dash sign, simply hold down the CTRL key and, without releasing it, press the minus key on the additional keyboard block. Then hold this key combination until you get the line of the length you need.
In a similar way, you can draw a line using an underscore. To do this, hold down the SHIFT key and the underscore key. Then you need to hold down these keys until a line of the desired length is drawn.

This method of creating lines is convenient because such a line is easy to draw and easy to remove. If the line turns out to be unnecessary, then it can be deleted just like any other text.
Method No. 2. Inserting a finished line.
Another way to draw a line in Word is to use the button to create borders. This button is located on the “Home” tab and it allows you to quickly draw a line anywhere in the text. All you need to do is place the cursor where you want the line to be, click on the button and select “Horizontal Line”. As a result, a horizontal line.
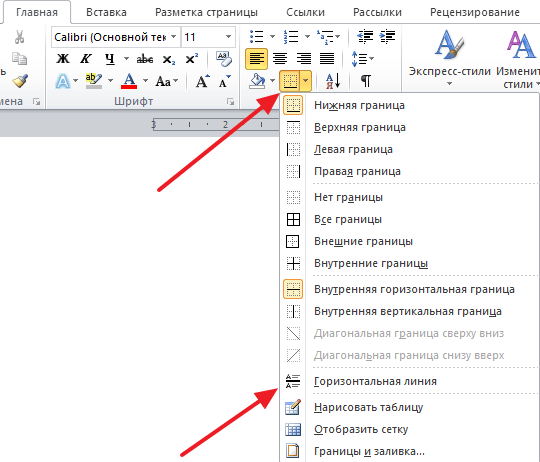
The advantage of this method is that the line drawn in this way can be changed. The line can be made thicker, thinner, longer or shorter. To do this, you need to select the line with the mouse, after which its size can be adjusted by moving its corners. In order to delete such a line, you just need to select it and press the Delete key.
Method number 3. Inserting a shape.
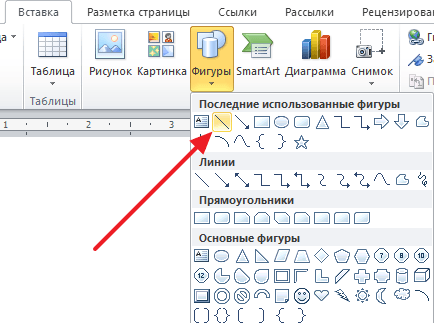
On the Insert tab, there is a Shapes button that allows you to insert shapes into your document. various figures. Among other things, there is a figure in the form of a line. To insert it into the document, click on the “Shapes” button, select the line and draw a line of the length you need in the document.
The advantage of this method is that such a line can be placed at any angle. In order to delete such a line, you just need to select it with the mouse and press the Delete key.
As you probably already understood, the Word text editor is a multifunctional program, and, perhaps, at first it is very in vainly underestimated by many users. Of course, in some cases it is still better to use the same Excel, but, in general, Word is able to cope with many tasks.
With its help, you can always draw up a document beautifully, making it seem deliberately businesslike, or, conversely, making it informal. You can work with tables, change the text style, etc. In addition, the Word interface is thought out to the smallest detail; it allows you to find in a matter of seconds necessary tool for work. By the way, you can even draw a line in Word if you suddenly need it. Actually, we’ll talk further about how to draw a line in Word.
Method one
In fact, in almost any controversial situation that arises in Word, there are several options for getting out of it. And this is very good, because each user can choose what he likes and suits him best. So, let's start with the first method, in my opinion, very simple and understandable to everyone.
Let's imagine that you have typed some text and you need to highlight it with an underscore. To do this, we do this: select the text, then in the “Home” tab on the toolbar we find the “Font” block. There are three buttons: bold, italic and underlined, and if you also need it, you can do this through another menu. Accordingly, just click on the last button, as shown in the screenshot below.
Method two
This method is even more functional. It will come in handy in situations when you want to draw one or more lines in any area of the sheet, and it doesn’t matter whether it’s horizontal, vertical, crosswise, or something else. Do this:
- There is an "Insert" tab in the toolbar, open it.
- There is an “Illustrations” block, which has a “Shapes” button.
- By clicking on it, find a straight line among the proposed ones. Click on it the moment you need to insert a line into the text. Note that you will have to specify two points: where it will start and where it will end.

Method three
This text editor provides another tool that is useful for quick creation lines. To draw a line, place the cursor in in the right place, then click on the “Borders” button, which is, again, in the “Home” tab. After this, a horizontal line should appear across the entire width of the sheet. 
I hope you liked one of these ways to draw a line in Word. Choose any one and feel free to experiment!
Video to help
Of course, one of the simplest and most frequently used elements in drawing is the line. Adobe program Photoshop is no exception. Especially if you plan to seriously study the field of website design.
One of the advantages of the Photoshop program is the interchangeability of actions. You can achieve the same result with many different different ways. Now we will study several options for command sequences with which we can make a line in Photoshop.
Let's start by creating a new document. A document of 1000 by 1000 pixels is quite suitable for us. Detailed description Creating a new document in Photoshop can be found here.
Let's start with the line tool. We will find it on the tank panel.
Now let's set the characteristics of our future line.
Let's set the line thickness. I decided that a thickness of 4 pixels would suit me. If you wish, you can choose its style. I'll make do with the simplest ones.

Let's decide on the color. You will also find the primary color selection icon on the sidebar. By clicking, a window for choosing a color is called up.

Well, that's it now! Let's draw. Click on the work area and draw a line with the mouse.

Now our line is a smart object. You can turn it into a regular layer in the layers window using the “rasterize layer” command.

The line is ready. As you can see, drawing a straight line in Photoshop is very easy. We have discussed an elementary method, which, despite its convenience, has a number of limitations. Let's take the second one apart and draw a line using the pen tool.
It should be noted that in in this case It’s worth changing the settings of your brush or pencil to the appropriate ones in advance, because your line will repeat these outlines. Therefore, let's set up the pencil tool together. Select it in the sidebar. And click on the work area.

Set the following pencil settings. How to choose a color is mentioned above.

In the sidebar, look for the pen tool.

We make two clicks on the work area. It should be noted that if you want to make the line smooth and strictly horizontal or vertical, hold down the shift key while clicking.

Click on the line with the left key. In the drop-down list, select the “outline outline” command.

We trace the outline and click again with the left mouse button. Select the “delete contour” command.


So, the line is ready! In just five minutes we learned two ways to draw a straight line in Photoshop.
How to draw a line?


Lines are one of basic elements drawing. These are the walls of the house, and the edges, and the horizon line. First lessons in classical drawing or graphic design dedicated to the technique of creating this element.
Drawings in AutoCAD
Drawing a straight line in this program will not be difficult if you follow our recommendations:
- In the top menu, select the “Drawing” tab, find the “Segment” function and select it.
- Use the left mouse button to mark the beginning of the segment. Drag the mouse towards the end of the segment. The boundaries of the line will be marked with dotted lines. Left-click to mark the end of the line.
- To finish drawing, press the ESC or ENTER key.
Drawing lines in Photoshop
In this graphic editor you can draw a flat or wavy line.
Straight line
- To draw a straight line, select the straight line icon “Line” (“Line Tool”) in the left panel. Or call the tool using the U key.
- Click with the left mouse button at the beginning of the segment. While holding the button, draw a segment of the required length with the mouse and release it. You managed to draw a straight line.
Wavy line
If you want to draw a wavy line, do the following:
- Using the Pen Tool (“ Pen Tool», hotkey P) draw a straight line in the same way as we did with “Line”.
- Place the cursor over the line until the “+” sign appears.
- Draw a line, it will take on a wavy look. You will have an additional straight line with which you can adjust the curve by changing the slope and length.
- Press ENTER.
Lines in Word
The text editor also allows you to draw lines.

Draw with a pencil
Artists need to be able to draw straight lines without using a ruler:
- First, let's practice drawing lines through the air with our hands. Let's remember this movement. It must be fast and confident.
- We fix the sheet of paper vertically, like on an easel. We take the pencil by the very tip with the large one and index finger. Wherein thumb should lie on the index finger. And we repeat the same movement as in the air. With a little practice you will be successful.
In this way you can draw different kinds lines.