How to draw a double line in Word. Draw a line in Word in four different ways
Excel for Office 365 PowerPoint for Office 365 Excel 2019 PowerPoint 2019 Excel 2016 PowerPoint 2016 Excel 2013 PowerPoint 2013 Excel 2010 PowerPoint 2010 Excel 2007 PowerPoint 2007 Less
You can add lines to connect shapes or highlight data, as well.
Notes:
Drawing a line with connection pointsconnecting line called a line at the ends of which there are connection points used to attach it to shapes. There are straight, curved and stepped connecting lines. When you select a connecting line, dots appear on the outline of the shape. They show where the line can be attached.
Important: In Word and Outlook, connection points can only be used when the lines and the objects they are attached to are placed on canvas. To insert a canvas, on the Insert tab, click the Shapes button and click New Canvas at the bottom of the menu.
To add a line that attaches to other objects, follow these steps:
Drawing a line without connection pointsTo add a line that is not attached to other objects, follow these steps:
Line duplicationIf you need to add the same line multiple times in your document, you can quickly do this using the Lock Drawing Mode command.
Instructions
To draw a horizontal straight line on the wall, use a spirit level. This is a special ruler with a water level; it has a small container in which a ball-level indicator floats. Place the spirit level against the wall, level it so that the level indicator coincides with the line of the water surface, draw a line along the side of the device.
To draw a vertical straight line, take a thread and weigh it down with a weight at one end. Hang the free end of the thread on a nail in the wall, wait for the thread to stop oscillating if it has swayed. Draw a straight line along it. Or you can paint the thread itself, then it will leave a mark on the wall.
In graphic editors, there is a special “Straight Line” tool, which allows you to draw straight lines with two mouse clicks. Simply select this tool, click the mouse at the start point of the line, click the mouse a second time at the end point of the line. Holding the ctrl and shift keys will give you the opportunity to draw a strictly vertical (horizontal) line or a line at an angle of 45°. Which specific key is used for this depends on the editor settings.
To draw straight lines without any tools, by hand, you will need a lot of practice. Start by trying to repeat a straight line drawn along a ruler, drawing many parallel lines to it. In this case, success comes only with experience.
Video on the topic
Helpful advice
Instead of a ruler, you can use other objects with a straight side: calculators, pieces of paper, calendars, etc. In fact, you just need a straight line template.
Sources:
- Drawing Basics
- how to draw a hand and its lines
A dotted line is a universal means of highlighting certain information in text, on a diagram, or on a map. A dotted line can indicate one route, while another is already indicated by a solid line. However, you can apply it in any way - all you have to do is draw it.
Instructions
Firstly, it is necessary than. It all depends on your goals, preferences or conditions by which you are bound. Whatever you draw with, the principle will be the same: you need to draw a line consisting of many short segments. These segments can be of different lengths (this is also a matter of taste): from dots to short lines two to three centimeters long. In any case, this set of segments should give the impression of a single line, and not separate, unrelated dashes.
This dotted line is only for those who (or are forced for some reason) to use a pencil. You can draw a solid line and erase those areas that will be the spaces between the individual segments. You should only use this method if you have a good eraser, otherwise the edges of the segments will be blurry.
If your line doesn't need to be curved, use a ruler. You can, by placing a pencil against a ruler, draw short segments at once, or you can, as with the second method, first draw one line, and then use an eraser to break it into parts.
The same can be done on a computer. There are many graphic editors in which you can draw as many dotted lines as you like. Drawing capabilities vary from program to program. For example, in some you have to erase parts of the line, in others you can immediately create a dotted line.
You can resort to one more method. Take a punch card (a sheet of thick cardboard with identical holes punched in it) and draw a line so that it goes along a row of holes. The pencil mark will pass partly on the cardboard, partly on the paper, and a dotted line will remain on the paper. But it is unlikely that you will resort to this method if there are other, easier to implement ones.
Video on the topic
A dotted line is a broken line that consists of dots located close to each other. A dotted line is also a line that consists of short dashes or combinations of dots and dashes. You can draw it in several ways.

You will need
- - album sheet,
- - pencil,
- - ruler,
- - eraser.
Instructions
Draw a dotted line. To do this, draw small dots, placing them very close to each other. The line can be either straight or depict any figure. You can do this dotted line in many ways. You need to place two or three points in a row, and between groups of points make the distance larger than usual.
Draw a dotted line. To do this, draw small even strokes located horizontally at equal distances. The length of the strokes may vary, depending on the scale of the drawing.
Draw a dash-dot line. This is a line in which short horizontal segments alternate with small dots. The spacing between characters must be the same. To depict it with two points, draw short horizontal segments. They must take turns with two points in a row.
Use a ruler to draw dotted lines. Using short jerky movements, draw the selected dotted line.
The volumetric dotted line consists of parallelograms. Drawing the shadow plays a key role. To do this, first make shavings from the core of a simple pencil. Then use an eraser to spread it evenly over the entire surface of the figure. Leave the top side like that. Divide the front side of the parallelogram into two parts. Make the left one lighter, and darken the right one a tone deeper. Shade the visible side part very strongly, and then use an eraser to make the outlines less sharp.
Now draw a dotted line in the form of a volumetric ball. Leave it white initially. Gradually expanding the area, darken it. Use pencil shavings and an eraser to create the background again. Then, repeating the outline of the circle, strongly shade a not very wide strip. Correct the shading with an eraser. Please note that the line of contact with the plane should be light.
Sources:
- Drawing and deleting lines
The Bezier curve is a tool originally developed for the design of automobile bodies, but over time it has migrated to various graphics editors. In particular, in Adobe Photoshop CS5, where its descendant was the Pen tool. At first glance it seems very complex, but you only need to understand it a little to appreciate it.

You will need
- - Russified version of Adobe Photoshop CS5
Instructions
Launch the program and create a new document by clicking the “File” menu item, then “New” (or the Ctrl+N key combination), specifying, for example, 500 in the “Width” and “Height” fields (the remaining parameters can be left unchanged) , and clicking “Create” again.
Select the Pen tool (hotkey P) and, left-clicking, place two points on the work area at a small distance from each other, but enough to create a noticeable segment. When placing the second point, do not release the mouse and drag it somewhere to the side. The straight line will turn into , and its curvature will depend on how you position the guide - the line that appears after you drag the mouse, creating the second point.
Right-click on “Pen” in the toolbar and select “Angle” from the drop-down menu (used if, after creating an anchor point, you do not create a guide afterwards). Hold the left button on the very first point and drag the mouse to the side. The same guide will appear near the point. By changing its coordinates, you can manipulate the parameters of that part of the curve that originates from the first point. Thus, the resulting curve can be conditionally divided into two parts: one originates at the first point, the other at the second.
You can continue creating the curve by placing a few more points and changing them in the same way as described in the previous steps of the instructions. To create an anchor point inside a line, use the Pen+ tool to delete - Pen-. Each line you draw in this way will appear in the “Paths” tab of the “Layers” window (if it is not there, press F7).
If you want to save the result, press the key combination Ctrl+Shift+S, specify the path in the window that appears, write a name, specify Jpeg (if you want to get a picture) or Psd (if you want to save the entire project) in the “File type” field and click "Save".
If a person has the ability to draw, then it manifests itself in childhood. However, many adults who never reach for a canvas and a brush sometimes have to face the need to create a wavy line. What's the best way to do this?

You will need
- pencil, circle pattern, compass, pattern, Paint program.
Instructions
Prepare, it is much easier to recreate waves on paper or fabric. In this capacity, it can be used, having a round base, which will form the basis of the scallop of the wavy line. In order to maintain symmetry, you can draw a straight beam, and place the round workpiece with the center towards it and circle it alternately. In this case, the result will be smooth with equal scallops on both sides.
You can create fancy shapes drawn using wavy lines using patterns. It is a curved ruler that can be purchased at any office supply department. To create a wave, place the shape on the paper and trace it.
Take a compass. It will also help you draw a wavy line using the same principle as using the pattern. Do it . Determine the center of the wave crest and place the leg of the drawing tool at this point. Then draw a circle carefully and with minimal pressure. If it lays down according to plan, then outline the part of it that is necessary to create a wave. Erase unnecessary strokes with an eraser.
To draw a wavy line in Photoshop, you must have at least basic skills in working with the program. For beginners, Paint will be much more convenient in this regard. There, the wave is drawn using the following algorithm: On the toolbar, select the appropriate wavy line icon; Place the cursor on the screen in the place where it will originate, click the left mouse button; While holding the button, move the cursor to the end point, then release; It should be straight; Visually mark 2 points on one or both sides of the line where the wave crests will be directed; Move the cursor to those places one by one and use a single left-click to create a wave (no need to hold the button).
Video on the topic
note
Insert - Shapes - Lines - Curve - click where you have the bends of the line, double click at the end.
Helpful advice
The two points will connect to each other. Keep doing this until you have a W shape like the one in the picture. To draw a new line, click on the Selection tool (black arrow icon), then click on the Pen tool again. Closing a Path. To close the path, click on the starting point. Draw a Wavy Line. Click on the line and drag to make the line curved. Changing Path Directions.
The most common problem in geometry is drawing a straight line. And this is not without reason; the construction of more complex figures begins with a straight line. The coordinates required for the construction are found in the equation of the line.

You will need
- - pencil or pen;
- - paper;
- - ruler.
Instructions
In order to draw a straight line, two points are needed. It is from them that the line is built. A point on a plane has two coordinates: x and y. They will be the parameters of the equation of the line: y = k*x ±b, where k and b are free, x and y are the coordinates of the points of the line.
To find the y coordinate, you need to set some value for the x coordinate and substitute it into the equation. In this case, the value of the x coordinate can be any of the entire infinity
When designing text documents, it is not uncommon to need to draw a line, for example, in order to separate one part of the text from another. In the Microsoft Word text editor, there are several options for solving this problem.
In this article, we'll look at three of the easiest ways to draw a line in Word. The material will be relevant for all modern versions of Word. Including Word 2007, 2010, 2013 and 2016.
Method No. 1. Inserting a dash or underscore.
Perhaps the easiest way to draw a line in Word is to use a dash or underscore. By inserting a large number of such characters in a row, you will get a horizontal line. For example, to draw a line using a dash sign, simply hold down the CTRL key and, without releasing it, press the minus key on the additional keyboard block. Then hold this key combination until you get the line of the length you need.
In a similar way, you can draw a line using an underscore. To do this, hold down the SHIFT key and the underscore key. Then you need to hold down these keys until a line of the desired length is drawn.

This method of creating lines is convenient because such a line is easy to draw and easy to remove. If the line turns out to be unnecessary, then it can be deleted just like any other text.
Method No. 2. Inserting a finished line.
Another way to draw a line in Word is to use the button to create borders. This button is located on the “Home” tab and it allows you to quickly draw a line anywhere in the text. All you need to do is place the cursor where you want the line to be, click on the button and select “Horizontal Line”. As a result, a horizontal line will be drawn at the selected location on the page.

The advantage of this method is that the line drawn in this way can be changed. The line can be made thicker, thinner, longer or shorter. To do this, you need to select the line with the mouse, after which its size can be adjusted by moving its corners. In order to delete such a line, you just need to select it and press the Delete key.
Method number 3. Inserting a shape.
On the Insert tab, there is a Shapes button that allows you to insert various shapes into your document. Among other things, there is a figure in the form of a line. To insert it into the document, click on the “Shapes” button, select the line and draw a line of the length you need in the document.
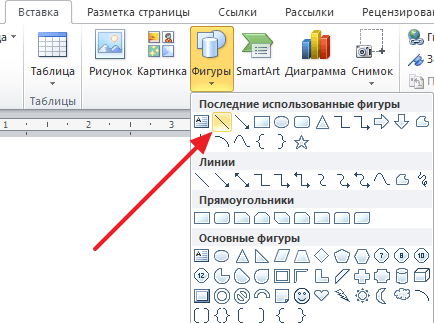
The advantage of this method is that such a line can be placed at any angle. In order to delete such a line, you just need to select it with the mouse and press the Delete key.
As you know, working in Word mainly involves the use of office text documents, contracts, official forms and forms, in which sometimes you need to leave an empty underlined space for signature. In general, the user’s needs may not be limited to just this. The scope of application of such underscores is much wider. But now we will talk specifically about how to make a line in Word for a signature. In the editor itself, you can use several simple tools that every user knows about.
How to make a line in Word for a signature? The simplest methodAnyone who has at least once encountered the Word text editor knows that a regular line can be created using keyboard symbols.
To do this, you just need to hold down the Shift key and then the hyphen (“-”) key. In this embodiment, the line can have an arbitrary length. The main thing is not to get carried away, otherwise when you move to a new line, it will automatically be converted to a bolder one and fill the entire width of the sheet.
Using tabsAnother simple way to solve the problem of how to make a line in Word for a signature involves using the so-called tabulator, in other words, the Tab key.

To create a continuous line, you must first set the underline by clicking on the corresponding button on the main panel (it is marked with the underlined letter “Ч” in the Russian version of the editor), or use the combination Ctrl + U, which is the same thing. Now it's a matter of small things. You just need to hold down the Shift key, click on the tabulator several times and create a line of the required length. It is worth noting here that such a line has a fixed length (this depends on what setting for tabulation is set in the parameters).
How to make a line under text in Word using a table?Although the above methods allow you to create the necessary components in the form of lines, it is nevertheless impossible to enter text above them.
To create empty underlined space, you can use tables divided into several cells. For example, in the case of three cells, text may be entered on the right and left, and in the center there will be empty space for a signature or for entering additional text.

To make it look exactly like a line, all table borders need to be removed, leaving only the bottom border on the desired cell. Here it is worth paying attention to the fact that when inserting a table in the middle of the text (when it is located both above and below), the vertical space between the cells will automatically be increased, which can lead to a deterioration in the readability or appearance of the document. Therefore, it is recommended to make such inserts at the end or use empty lines by pressing the enter key (similar to the type of divided paragraphs).
Graphical toolsFinally, the problem of how to make a line in Word for a signature can be solved using the drawing tools that are available in any version of the editor. To do this, use the appropriate section in which you select the straight line drawing tool.

In the text, it is enough to place the cursor at the starting point, then move it while holding down the left mouse button to the final position and release the button. You can change the length of the line by highlighting the element you are looking for, with a four-arrow icon appearing, and placing the pointer on one of the dots until a double arrow appears. The change is then made by stretching or compressing.
Instead of a totalIn principle, as you can already see, creating a continuous line for a signature is not that difficult. Some, however, try to use the regular “-” symbol without holding down the Shift key, which only results in the line being dotted, vertically positioned strictly in the middle, and simply spoiling the appearance of the document. Therefore, it is better to use the above methods. If you don’t need to enter text in the empty space, a keyboard symbol or tabulator for lines of the same length will work fine, but if you need to enter additional symbols or letters, you can’t do without a table.
When using Microsoft Word, you need to know how to draw a line in Word. For these purposes, you can use the Borders function in word.
word boundariesYou are typing text and there comes a time when you need to draw a line separating it in the document. How to make an underline in Word without text?
One way: place the cursor in the desired place, press, without releasing, the shift key and at the same time, press the dash. Here you can choose the stroke length you need. This can be done automatically using Word boundaries.
They can be used in tables. To do this, place the cursor in the required place. Next, you need to click on Borders (in the formatting panel). Here we select - Lower border.
If you click on the top border, the line will be below the text. You can also click on "Add horizontal line", which will create a gray line in a horizontal position.

By selecting the Outer Border command, we will create a frame in which we can type text.

If you no longer need the frame, place the cursor inside it and click on “Remove borders”.

Option 1. How to make a line directly under the text in Word? You have typed the text and now you need to draw a line under it. In this case, select all this text and click on the Ch icon in the panel, all the text will become underlined.
Option 2 - here we will learn how to make a line in Word without text. If you need a line anywhere in the text, and it can be not only horizontal, but also vertical, oblique, etc., then you need to go to the tab - Insert and select “Shapes” there, select the icon with the image of a straight line and install it in the required place, specifying its starting and ending points.
How to write above the line in word?
The good thing about the Microsoft Word office program is that one task can be solved in different ways.
Method one: you need to go to Page Layout, then click on the function - “Horizontal Line” and select the one you need, there are many options: wavy, flat, bold or dotted.
The second way is to draw using the "Drawing" tab. Select - Shapes - Lines. We select the option we need and install the line in the place we need.
Also, the third method has already been described above - we use the underscore.
These simple methods will make your work in Microsoft Word easier.


