How to draw on the walls in an apartment. Painting apartment walls - an original design solution
1. I choose acrylic for painting on walls.
Acrylic markers have become a real discovery for me: they are convenient for drawing straight lines, they do not flow, do not leave strokes, allow you to easily control color saturation and reduce drawing time. What I liked most were the Molotow markers: their refills are guaranteed not to fray; I can’t be so sure with other manufacturers. Look, I drew cyclists and a dandelion with markers.

If you want something more alive, not like this straight line, strokes and other creativity, then I choose acrylic in tubes and flat brushes. This type of work takes more time and is more difficult to draw, but there is pleasure in it. Here is an example of a wall with a drawing outlined with a brush.
2. What walls should I paint on?
Acrylic fits well on almost any surface. I tested walls with wallpaper to be painted and directly painted walls. Soon I will have to draw on fairly textured wallpaper, I have already tried the marker on a small piece - it turns out well.
I don’t treat the walls with anything in advance. Of course, if they are very dirty, it is better to wipe the surface first and let it dry. I also don’t cover the acrylic itself with anything: it’s very sticky and durable.
3. The projector is the savior of the artist
If you need to transfer to the wall complex drawing with many details, for example, cyclists from the example above, my advice to you: rent or borrow a projector from a friend. This will really make your life easier. Just display your picture on the wall and trace it with a pencil: less time, less nerves, and the result is better and smoother.
Tip: If you are right-handed, move from left to right so as not to block your view.

Before I was told to take a projector, I was thinking about giant carbon paper and translation by squares. Thank God I didn't have to use them. Although for a future project I am going to translate the map of Europe exactly by cells.
4. Creativity is not only creativity, but also calculations
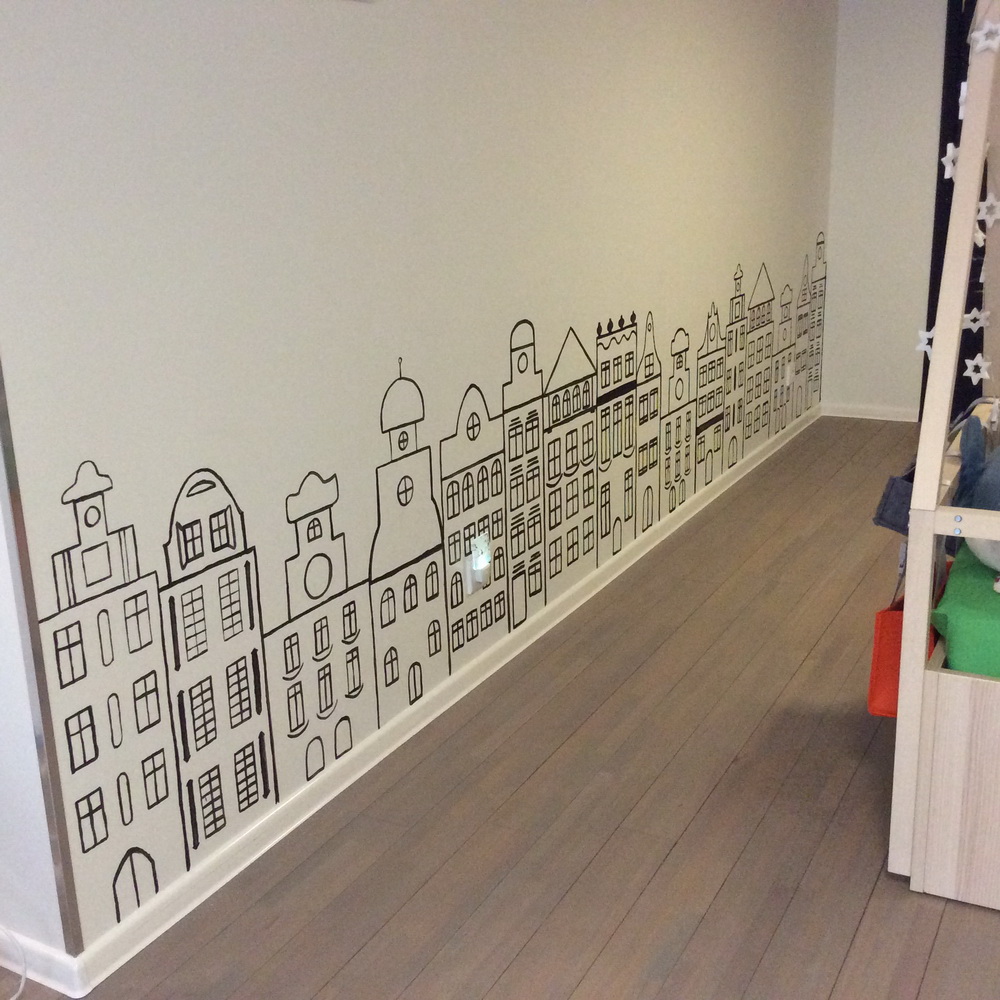
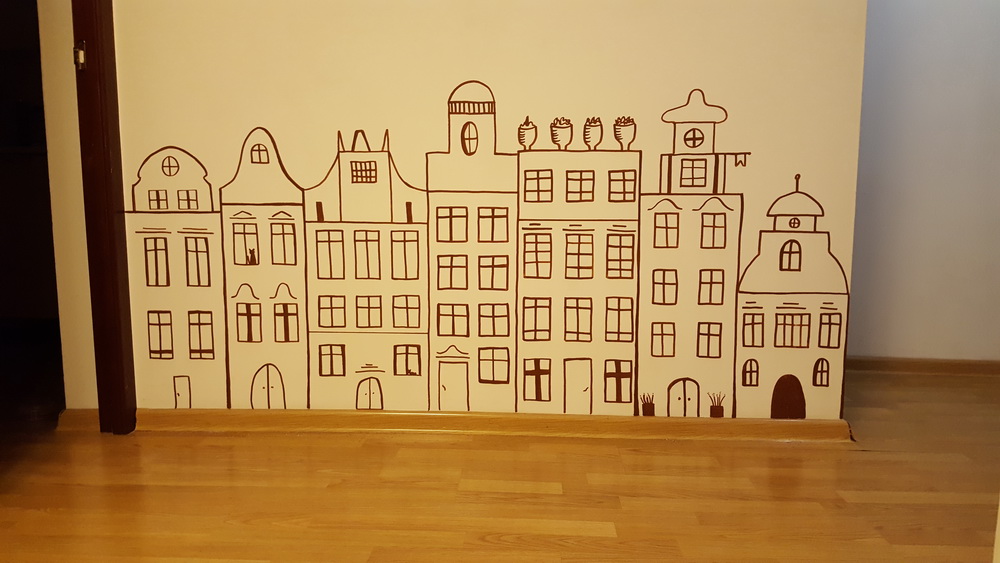
If the pattern you've chosen for the wall is geometric, like my little houses, you'll need not only some creativity, but also a level, ruler, compass, and an idea of scale. I print out the houses on paper (initially I drew them in vector), measure each line and translate it to the required scale. I do this part of the work in advance - it is small and requires quite a lot of time.

By the way, drawing on the wall is also not a very fast process. For example, recent houses (but I draw not only them!) on a wall only 1.9 m long took 4 hours - and this is just a sketch in pencil.
5. You don’t have to start with something complicated.
If you want to draw on the walls and definitely do it yourself, but you’re not sure yet, then try starting with simple ones. geometric designs(but don't forget to take a level!) - Even a few lines on the wall can make a big difference in the look of a room.

I have collected for you several pictures from wall-art on Pinterest: look, there are very simple, but very effective designs. By the way, I highly recommend this site for inspiration!
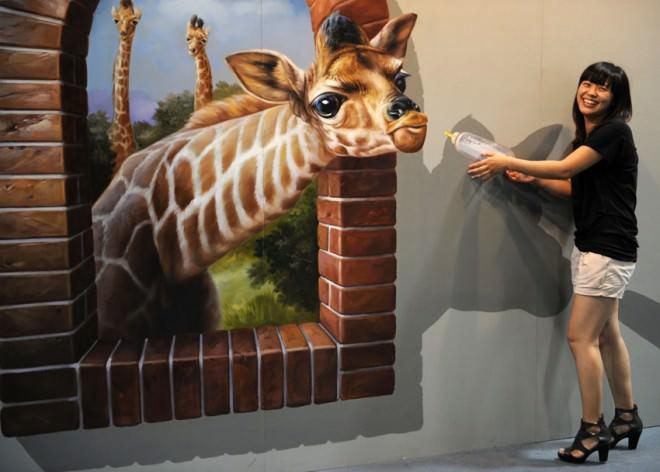
The new is the well-forgotten old. Wall painting, which is popular today, is not a newfangled invention at all. Also in Soviet times In the absence of wallpaper, it was customary to stencil images on the walls. Now interest in wall painting has returned, because it allows you to create truly unique interiors that no one else has. Kitchen - quite appropriate place for experiments. So, how to decorate the walls with your own hands and make a three-dimensional drawing?
What materials will you need?
 For drawing you will need:
- brushes;
- pencil for sketching;
- sponge;
- transparencies.
In addition, you need to choose the right paints for painting. Can be used:
- acrylic paints;
- alkyd;
- water-based paints;
- liquid wallpaper;
- structured paints;
- car spray paint.
A drawing on a wall away from the work area in the kitchen can be safely applied water-based paints. Grease and soot will not get here, so there will be no need for wet cleaning of the walls. If the drawings are supposed to be placed in the kitchen not on one wall, but along the perimeter, then it is better to pay attention to moisture-resistant paints - acrylic and alkyd. Acrylic paints They are optimal - they have no odor, are perfectly diluted with water to the desired thickness, mix well and last a long time.
Important: For creating volumetric drawings in style 3D: Structured paint and plaster are best.
Definition of composition
Before you make a three-dimensional drawing on the kitchen wall, you need to choose a springboard - that is, the wall/walls itself. A drawing can perform several functions:
- decorate the wall;
- hide her defects
Often it performs two functions simultaneously. It should be remembered that the drawing always attracts the eye and thereby focuses attention on itself. Therefore, its composition must be carefully thought out.
 Remember: the larger the relief, the more “deep” and realistic the image will appear.
A pattern with large elements on the kitchen wall will visually make the room smaller. Such catchy and bright elements can only be painted in kitchens big size. Small drawings applied to the walls make the room visually more voluminous and larger, but they are more difficult to draw with your own hands without the appropriate art education. Therefore, it is best to rely on a composition of medium-sized elements, which are quite simple, without complex details.
Important: When thinking about the composition, pay attention to the corners of the wall - you need to arrange the drawing so that there is no feeling of empty corners. In the kitchen, images of fruits and vegetables, culinary themes, and tree branches with flowers and fruits will look good. If the kitchen is made in folk style, then you can actively use a combination of drawing and interior items - make a painting in the Gorodets or Khokhloma style and fix it in in the right places shelves with samovars and clay and wooden utensils.
How to transfer an image to a wall
 An image can be applied to a wall in different ways:
- by hand;
- using a stencil;
- using transparent film
In fact, hand drawings can be made not only by those who know how to draw. There is a simple way to transfer an image to large planes that does not require any abilities - the wall in the kitchen must be divided into squares. The selected pattern is also divided into exactly the same number of squares. Now all that remains is to simply draw an element from the square on the sample in each square on the wall - you get a very accurate enlarged image.
In the same way, small elements can be copied onto transparent film, and then the redrawn drawings can be applied to the wall and transferred.
Important: If you have a projector, it will make it easier to carry. Send the image you like enough through the projector onto the wall. All that remains is to trace the elements projected onto the wall with a pencil. The drawings on the wall will be so accurate and professional that then no one entering the kitchen will believe that they were made by themselves and are not the work of a professional artist!
You can simply make or find stencils on the Internet and apply images on them. This is the easiest way.
How to make a three-dimensional drawing on the kitchen wall with your own hands

- prepare the wall: remove all coverings from the wall down to the base. Then the wall is plastered, if necessary, leveled;
- a primer is applied to the wall;
- the wall is covered with the main background - as a rule, it matches the color of the rest of the walls. But it can also contrast if this is intended by design;
- make a sketch of the drawing - the composition is applied using any of the methods described above;
- color the drawing. First to be painted large parts, the last parts are small and located on top of other elements.
Important: It is best to dilute paints as thinly as possible - thick paints do not adhere well to the wall and will create a sloppy appearance of the design.
If the design is applied through a stencil, then the stencil must be secured to the wall with masking tape first. Stencils must be removed from the wall immediately after painting - otherwise it will dry out or paint will leak under it.
Important: A volumetric 3D drawing is obtained if you actively use the effect of shadows, perspective and optical illusions. Examples of such drawings can be found on the Internet and you can make them yourself, copying them exactly.
Three-dimensional drawings on kitchen walls made of plaster or plaster


Some elements can be made from natural elements: dried leaves, flowers, stems, trunks are covered with gypsum. They can then be used as finished elements.
How it's done:
- The drawing is applied to the wall, and duplicates are prepared in parallel - stencils of the elements;
- Starting putty is placed on the wall, reinforcing the mesh, and gypsum elements are molded on top of them or prepared elements are attached using gypsum or plaster;
- You can simply put a stencil on top of the putty and cut out the necessary elements using it;
- Coloring the composition.
Three-dimensional drawing on the wall (video)
Want more photos? Then watch the video below, remembering to set the quality to better:
So, as you understand, you can make your kitchen unique with your own hands. To do this, you just need to not be afraid to experiment. Anyone can master the wisdom of applying three-dimensional drawings, even those who do not have artistic abilities.
Attention, TODAY only!
Are you planning a renovation? Are you looking for original ideas to implement them with your own hands? Then you will like the technique that allows you to apply drawings on the walls in your apartment. Of course, you need to have certain skills, abilities and knowledge. They will help you create a unique and creative element of your interior design.
Beautiful drawings on the wall will decorate any interior, enliven it, and give the room unique comfort. In order to create beautiful wall in the apartment, you can turn to professional designers for help or simply make stencils and decorate your home with your own hands.
Typically, this technique is used to decorate a wall or to hide defects on the surface. When starting work, first decide which wall you will use. It is important that it attracts attention and also acts as the main decorative element in the room.
Attached to this article are photos of options for decorating walls with drawings that will help you spark new ideas and flights of fancy, enjoy viewing.
The procedure for painting a picture with your own hands
 When creating such decorations on the walls in your apartment, strictly follow the stages of technology. Let's start, as usual, by preparing the wall. This is the easiest stage. It is necessary to clean the surface, paint and plaster. At the next stage, you must re-plaster this wall and select materials for painting - a brush and paint. Regarding the latter, professional designers insist on using acrylic-based water-dispersion paint. It is easy to apply and washes off easily.
Next you need to apply the general background. Usually it coincides with the rest of the walls of the room. We draw the outline of our future drawing on it, preferably with a pencil, so that we can correct the drawing if necessary. We do this in stages. We drew a piece and looked at it. Like? If yes, then we continue; if not, we erase and draw again. The final stage was painting the wall itself. Large elements paint with a wide brush and the details with a thin brush.
Choosing ideas for drawing
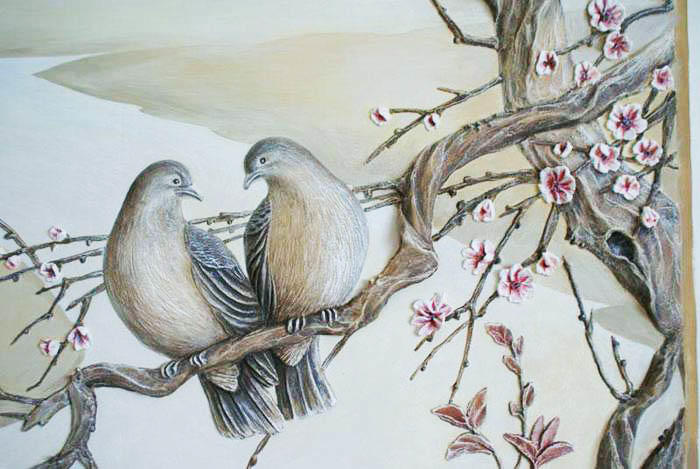
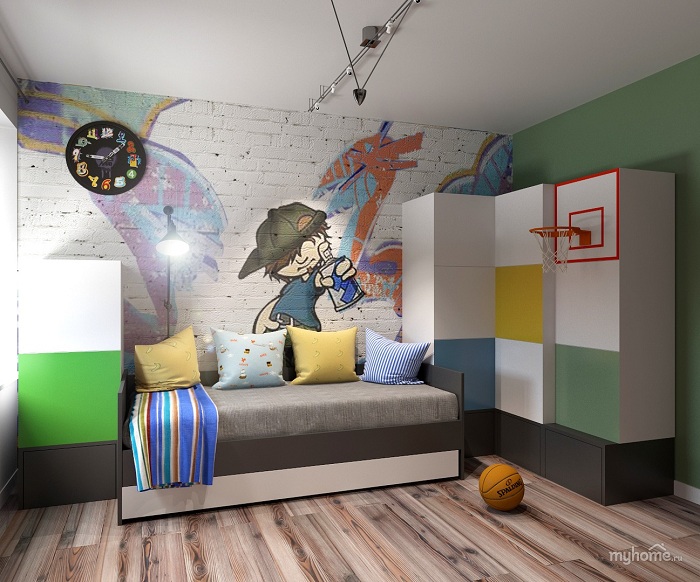
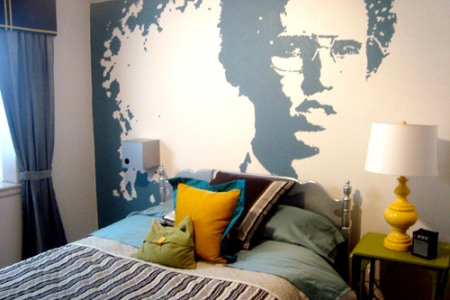
Approach the choice of your design with care and scrupulousness. IN end result, the wall should fit harmoniously into the overall interior of the apartment and match the style. What is usually used? The image of a dandelion opposite has become widespread front door. It's fashionable and relevant. Black and white squares will please the eye in the living room, branch cherry blossoms is appropriate in the bedroom, and in the children's room, drawings on the walls in the style of wood with ladybugs or cartoon characters (pictured). Night city Bachelors will like it.

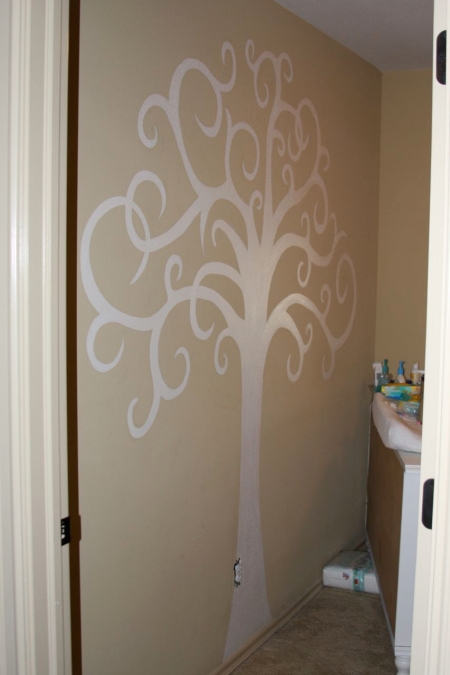
You can also paint trees on the walls of your apartment. Designers are very fond of this particular plot, for the reason that it can be used both in the living room and in the bedroom, etc. Why? You can choose any wood pattern you like that will fit beautifully into the overall concept of the room. In the bedroom, flowering trees or trees in the Art Nouveau style are painted, and in the living room, trees under a gust of wind are suitable. The children's room looks great with drawings of birch trees and animals, birds in the trees.
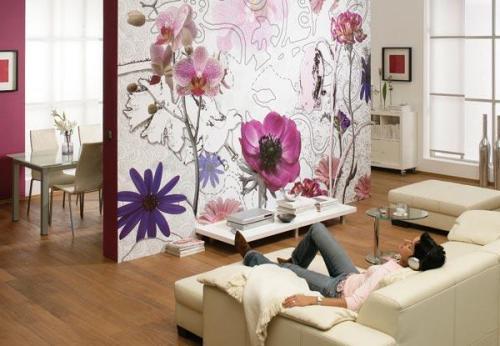
If you love the sun and warmth, then you can draw bright flowers. They are appropriate in the kitchen and living room. Using flowers in the overall interior design, you will create a feeling of comfort, reliability and security.

Be mindful of color combinations. It helps with this. There is a range of colors that are created for each other, and there are also ones that are absolutely incompatible. Numerous photos and videos on the Internet will help you combine color and tone.
Drawings on the walls in the apartment photo ideas
3D drawings on walls are especially incredibly popular now. Such three-dimensional art can enliven and embellish any apartment interior beyond recognition. And its use in composition with will exceed all expectations.
Drawings on the walls in the children's room
This technique deserves special attention when creating. This is where you can fully use your imagination and fantasy and come up with a new, original solution. You can make a drawing on both the wall and furniture. Children really like these drawings. This could be a character from your favorite cartoon or fairy tale. But there are some nuances. We must remember that children do not like monochrome and contrast. They can cause fear and your baby will become skittish. But we have no use for it.

Therefore, all characters without exception should look colorful, be positive and kind. Drawings on the walls in the apartment are well suited for the design of a small and narrow bedroom. This simple method will allow you to visually expand it and get a unique design.
Drawings in a children's room photo ideas
Choose carefully. For example, too dark or bright burgundy shades have a negative impact on the baby’s behavior and psyche. It is better to paint the nursery in light, pastel colors.
Stencil painting of walls in the apartment
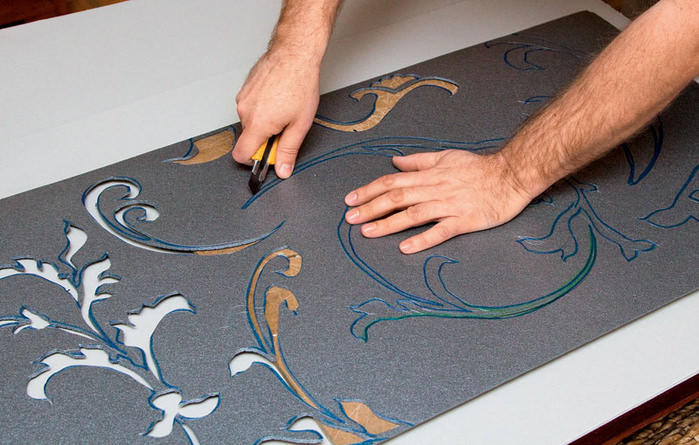
 Most of us, unfortunately, do not know how to draw something beautifully on our own, or turn to specialists and designers for help, which can sometimes be very expensive. In such cases, stencils will help you. You can make them yourself or purchase them in a store.
A special sheet on which various decorative elements and shapes are cut out is called a stencil. One of their advantages is their repeated use. With the help of stencil painting, you can easily apply drawings to the walls, without spending a lot of time on it. And it doesn’t matter whether they are painted or wallpapered.
The stencil is very easy to use; you can do all the drawing work with it even with your own hands. The application technique is to apply paint through a hole in thick cardboard.
You don't have to be an artist to paint something on your wall. Correctly selected screen painting will allow you to get bright drawings and hide the imperfections of the walls in the apartment.
What and where to paint on the walls?
If you choose the right pattern, you can get a decorative function as well. Drawings in the apartment carry different meanings in different rooms.

Wall decoration in the hallway photo idea
In the kitchen, scenes with still lifes and old cities performed well. This creates additional comfort. Drawing in the bedroom should relax and calm you down. You can draw angels or flowers. Seascapes. Panoramic views will please your guests from the first minutes of their stay in the living room.
How to make a drawing on the wall: video master class
Remember that wall art isn't something new in the design world, but it does give you a... unique solution when creating an apartment design. A painted wall can create a special atmosphere, show your character and personality, and the apartment or house itself will become more comfortable and cozy. The most important thing remains the fact that you can become the only person with such an interior, because any idea for wall painting is exclusive and unique in its implementation.
Perhaps you have found yourself in a situation where you want to give the room some kind of newness, but at the same time your budget is limited and you would not want to spend money on repainting the walls. If you are in such a situation now, do not rush to despair - enough creative approach and a little diligence to make your own drawings on the walls. Of course, this method of decorating rooms is not suitable for every room in your house - drawings located on each wall will look tacky and will deprive the room’s interior of its uniqueness. Therefore, it makes sense to use this decorating method in moderation and wisely.
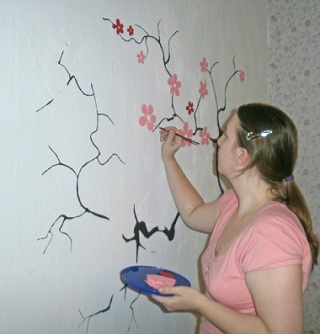
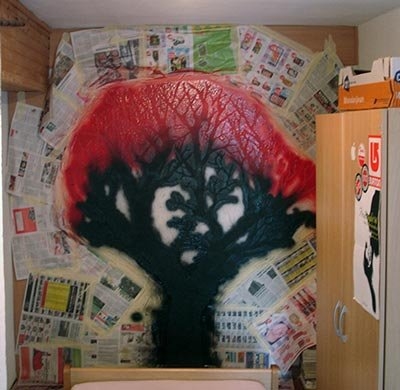
Master class No. 1: drawing a tree on the wall
The most obvious way to make a wall art is to draw it and paint it. For this you will need:
- simple pencil
- dye
- thin brush.
Draw your drawing on paper or find a suitable one on the Internet. For example, such a simple tree can be an excellent decoration for a child’s room.

Then transfer your drawing to the wall using a pencil.

After this, all that remains is to carefully color the drawing. The entire work should not take you more than two to three hours.
Once the work is completed and the paint has dried, use an eraser to remove pencil marks where necessary. Ready!
Lesson #2 - Using a Projector
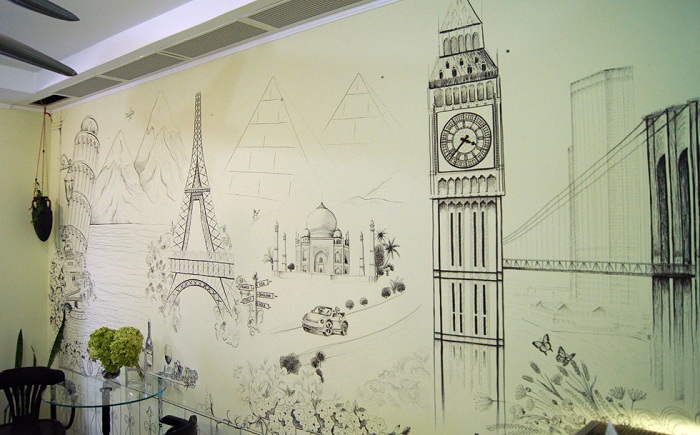
If you are not very good at drawing or such a simple drawing is not what you would like to depict, a projector comes to the rescue. Its use allows not only to facilitate and speed up the process of creating wall drawings, but also to depict the most complex paintings that claim to be the real thing. wall painting. Find suitable drawing online or draw it yourself on paper and scan it. Dim the light in the room and then use a projector to project your image onto the wall.

After that, simply outline the drawing with a brush, using paint of the desired shade. In order to depict such birch trees on the wall, it took paint a couple of tones darker than the color of the wall.

Master class No. 3
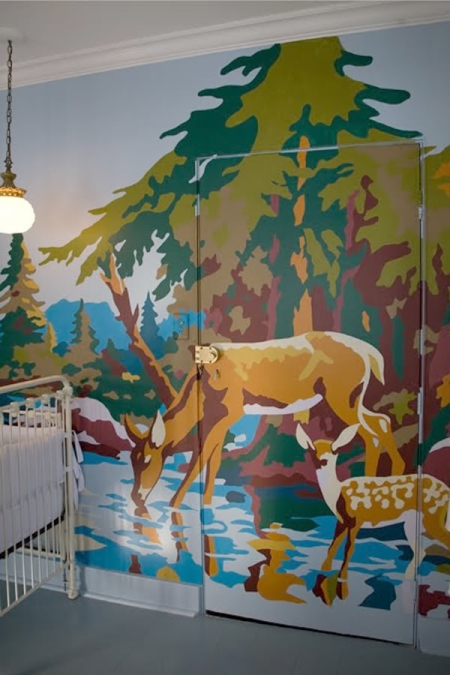
You can make a more complex drawing. To do this, you need to use so-called coloring by numbers - you can buy it in a store, download it on the Internet, or do it yourself: there are special programs, which transform any image into a kind of mosaic.
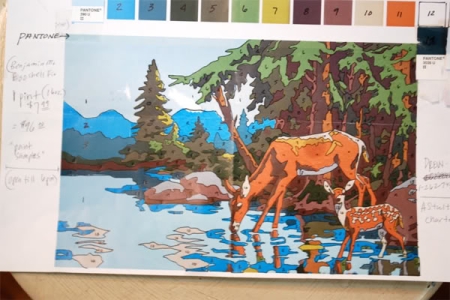
When you have decided on the picture and palette, using a projector and a pencil, trace the outlines and arrange the numbers as in your sample drawing.

Then you can start coloring according to the color numbers.

Idea #4: Using a Sprayer
In order to draw a more complex and large pattern on the wall, in which there are transitions and gradations from color to color, it is impossible to do without a sprayer. Before using it, you need to take care of protecting the entire room and furniture by covering everything with oilcloth or newspaper. It is also necessary to open all windows to ensure access fresh air. Do not forget that you only need to wear safety glasses and a mask when working with the sprayer.
We used this one:

So, to, for example, depict a beautiful sunset, as in the photograph, you will need dark red, orange and yellow paint. First, apply dark red paint in a thick layer, moving from the corners to the center, gradually the layer of paint should become thinner. Then we apply orange paint, adding a little dark red to gently mix the colors, and finally painting the yellow middle. Then you can start painting small parts: Use a thin brush to paint over the right space, bounded by pencil lines.

For this work we also used a protector when we painted the shore, palm trees and other details of the picture over the sunset.
Idea No. 5
Thus, with the help of a projector and the use of some graphic programs, you can depict the most intricate drawings on the wall, and not only landscapes, but also portraits! For example, take the photo you need.
Then, using Photoshop programs edit the image by enhancing the contour lines and weakening the background. To do this, you need to change the color of the picture - make it gray (Image - Mode - Grayscale), then increase the contrast, and then switch to bit mode.
After this, we transfer the image to the wall using a projector, outline it with a pencil and fill it with paint.


Master class No. 6
What to do if you can’t use a projector? Masking tape comes to the rescue.
To depict, for example, such a realistic tree on the wall, you will need:
- masking tape
- stationery knife
- black marker
- primer for wall treatment
- newspaper to protect the wall from paint
- dye
- thick brush.
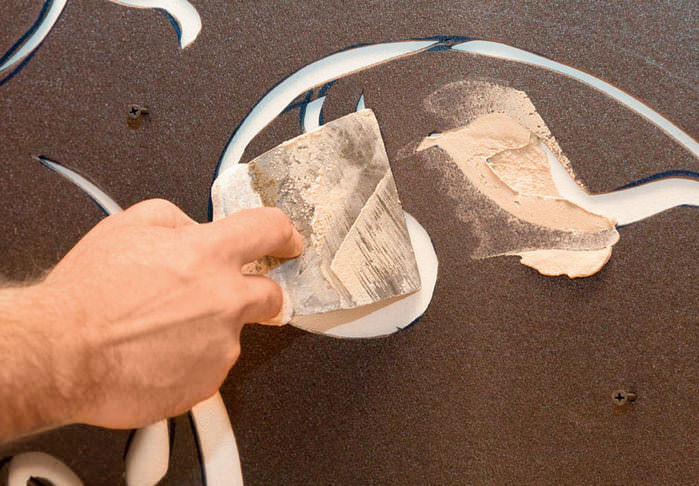
First you need to mark the outline of the future tree on the wall using masking tape.

Then the entire space inside the outline is filled with masking tape and on top of it we draw the future tree. It is better to outline the contours of the resulting tree with a black marker for clarity.

After this, using a stationery knife, carefully cut out the design along the contour. Before you start painting, you should, firstly, protect the wall around the future drawing from paint. The easiest way is to use newspapers for this purpose.
The area of the wall that will be painted must first be treated with a primer so that the paint adheres better. After the primer has dried, apply the paint using a brush. Ten hours later, when the paint is completely dry, you can remove the newspapers and peel off the masking tape: your drawing is ready.

Video of drawing a picture on the wall of a room
In the video you can watch a quick recording of drawing a picture on a wall:
Today, designers offer sophisticated and amazing options for decorating rooms. For example, drawings on the walls in an apartment are now quite popular. Thanks to this simple technique, apartments become vibrant and unique.
This technique is very valuable because it makes it possible to create an apartment that lives in the imagination, perhaps from childhood. One problem is that not everyone can afford such luxury. That's why many people start working in literally rolling up my sleeves. After all, it turns out that such decor - painting the walls in an apartment - can be done with your own hands.
It’s worth saying straight away that such a technique requires certain knowledge and skills. One more thing - it is important to correctly find the wall on which the painting will be painted. Sometimes they approach this issue from the exact opposite side and try to disguise some defects.
DIY drawings on the walls in the apartment
First you need to properly prepare for applying drawings to the walls.

At this stage there is a little work to be done. First, determine which wall to decorate with painting. Then you should choose a drawing that will form the basis of this painting. This is where the vast expanses of the World Wide Web come to the rescue. Drawings and pictures are a dime a dozen here. You can also turn to a professional if your wallet allows.
At the same time, the most important thing for you should be your personal taste, and not anything else. However, you need to sensibly assess your strengths and capabilities. It is very difficult to make a complex pattern with your own hands without an artistic education. So it’s better to stop your gaze on something more concise. It looks interesting and simply depicts flowers, a tree branch or sedge growing on a pond.
After you have sorted out the choice of design, you need to apply the first sketches.

It is very important to properly prepare the wall on which you will apply the pattern. To do this, you will need to try and completely eliminate all old materials that have ever been used on the wall for decoration. And if the wall is poorly plastered, you will even need to clean it off and re-plaster it.
Plastering work requires a lot of effort. By the way, you can apply painting even on wet plaster. True, here you need to be very scrupulous in detail. You must act with lightning speed and apply before the surface dries.
Although this method is very complex, it produces juicy fruits in the future. Let's say, with changes in temperature and humidity, the paint still won't go anywhere. But if you apply the image in a different way, then the plastered wall will also need to be primed. Acrylic gel is suitable for this.

The painting will look more voluminous thanks to proper game light and shadow.
Now you will need to buy paints and brushes. When purchasing dyes, give preference to those based on acrylic. Buy better water-dispersion paints. These are easier to apply and, if necessary, to correct any blemishes - rinse off. Or even if suddenly you decide to change the decor!
You don’t need to start drawing on the wall right away. Sketch your intended picture on paper first. After all, no one, even a highly professional designer, works without sketches! Did you like? Then you can get started!
First apply the background. As a rule, it is the same as the rest of the walls of the room.
Now make the outlines of the future image, that is, sketches.
Note: sketching is not done. regular pencil, because if you need to wipe something, unsightly marks and stains remain. Better take a colored one.

It is best to make sketches on the wall in stages. We applied part of it and looked at it from afar to see how it looked. Is something not as you imagined? You can simply erase and redraw.
And now The final stage which requires a responsible approach. It's about about coloring drawing. Artistic painting– this is a creative matter. And every little thing is really important. Therefore, do not forget that the paint must be diluted well. Bring it to the consistency of store-bought sour cream. If the paint is very liquid, then under the influence of the law of attraction it will leak. And a very thick one will form uneven strokes. You're not an impressionist artist, are you?
To begin, take a wide brush and paint the largest details. Then leave the wall to dry and rest yourself. After a certain point, go back to work. And take a smaller brush. It can be used to walk through the small pieces of this puzzle in detail. And the painting will eventually be completed.
However, it is worth mentioning here that the method is suitable only for those who by nature creative person, who has artistic perception. Or, more simply put, if you know how to draw beautifully. And if you have no talent, but really want to original decor with your own hands? Then use to apply the image. They can be cut out according to drawings from the same Internet. And stores now sell ready-made ones, so there will be no problems here.
Another way of applying a picture to the wall will suit inventive people. For example, if you found a picture, but it small size, and you don’t know how to draw, use a projector. With it, any pattern can be adjusted.

Stages of work
1. You need to prepare the wall, paint it with the desired background.
2. Prepare a drawing for the projector. Place acetate film on top of the drawing and trace the outlines with a thin felt-tip pen.
3. A sheet of film – install it in the projector. You need to install it so that the image appears on the wall at a certain angle.
4. Now dip the brush in paint so that the tone is slightly lighter than the main background, or make a sketch with a pencil.
5. Carefully trace the drawing according to the projection. Make light strokes that connect to each other.
6. When everyone has finished tracing, the device can be turned off.
7. Then you can proceed to more detailed study paintings. Inner part fill with free strokes. Don't fill everything inside completely. It will turn out very original!
So, the main thing is to choose the right design and, using any possible means, but always taking into account the dimensions, apply it to the wall. And the slightly careless filling even has a certain charm.
Tricks that will help even an amateur apply an image
The projector will open up almost endless possibilities for creativity inside your own apartment. Drawing a simple tree is not at all difficult. You just need to find the drawing that you like, in books or magazines, on websites. Little advice– choose pictures that do not have small details.
It’s great to enlarge and transfer plant motifs to the wall; not only trees, but also leaves and gorgeous flowers look great. This painting will look great in a classic or modern style room.
However, if you are a fairly gifted person with artistic abilities, choose any pattern you like, even detailed ones. Let it be a landscape that inspires you or just beautiful Foto, which you personally made when you vacationed in exotic places. Then, of course, you will have to do a little work beforehand. In particular, make sketches on paper to determine color scheme and make the detailing somewhat easier. And in the end you should end up with a simpler template than a photo. But it will carry the main idea, an inspiring mood.

Drawings on the walls in the apartment - really unexpected decision, which is suitable for almost any room. This picture will look incredibly beautiful in the living room or bedroom. Here you can show your imagination and even creativity.

If you have small children, then in the nursery a wall decorated in this way will become a real magnet for them. You can paint it as a birthday gift, for example, if children are under 6 years old. In this case, you can choose a lawn with a tree and animals drawn schematically to make it easier for you. And from this drawing, small children can be taught to know the world. And with older children you can even create such a miracle together. The main thing in this case is to explain to them how and what to do and give simple instructions.
Whatever design you choose, remember that it is very important that it matches your taste and embodies your ideas of beauty. And then it will be nice to return to the apartment after a difficult working day. After all, even the walls will set you in a positive mood and evoke only positive emotions.
Just remember that drawing can quickly become boring, so try to choose something neutral. And be sure to coordinate your choice with family members. It is important that everyone is pleased and happy to look at such walls.

As you can see, all this is very inexpensive and certainly not as difficult as it might seem at first glance. And there is no need to call professionals when today there are such opportunities to spend time usefully and interestingly and get gorgeous drawings on the walls in your apartment with your own hands.