How to draw a cartoon person. "we draw semi-realistic portraits"
I will try to express my thoughts accurately and simply, despite the fact that I am aware of my stupid habit of explaining everything in too much detail :)
So. These are the three who were ruthlessly chosen to become victims of my artistic abilities. I apologize in advance.
3 golden rules in drawing:
Find images of the person you will be drawing from different shooting angles. Despite what you may think, a face can change a lot depending on the angle you look at it from!
- Find distinctive features your character! Eyes are always the most important part when determining character, but the nose, mouth, and other facial features are also equally important. Think about it: what makes your character so unique? Since you will be simplifying his or her face, it is very important to emphasize who he or she really is.
- Compare with another character. For example, if you are unsure about the process of drawing his/her eyes, try comparing his/her eyes with the eyes of another person! Believe me or not, you will immediately notice the differences and then working with the character will become even easier.
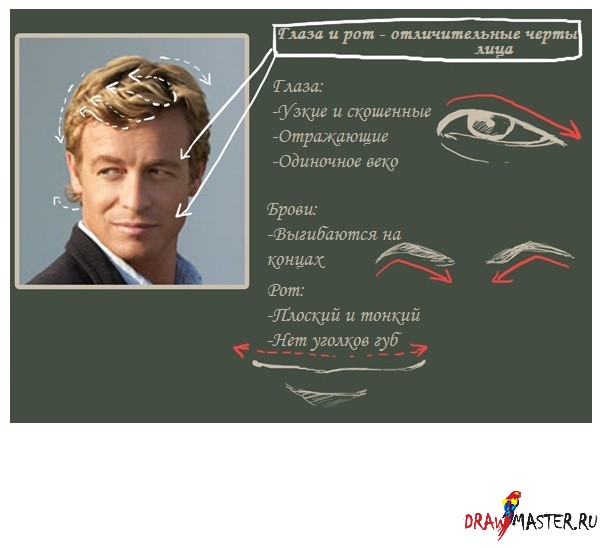
Cillian Murphy / Robert Fisher Jr.
Set of images. Collect photos from different perspectives.

And for God's sake, look for BIG photos. These images were taken as an example for the lesson, I actually can hardly see his face in these pictures :)
Identify facial features!

Rest:
Light shadow under the eyes
-Eyes and eyebrows are set close together
-The bridge of the nose is straight. Triangular.
-An angular back of the head
Make a sketch
Not forgetting everything described above, start drawing a sketch. Since this is NOT realism, don't be afraid to highlight or exaggerate certain aspects. In this case, I made his eyes larger and his cheekbones more pronounced.
Also: don’t forget about emotions! A person’s face sets the initial perception of him by others. Murphy's Fisher looks serious, cautious, and perhaps even a little tired and worried. In order to convey all this, I arched his eyebrows a little, the line of his lips is vague, and his eyes look tired.

Lineart and shadows
It's very difficult for me to get the right facial expression without applying eye shadow.
I use shadows to make his eyes more expressive (make them sunken), highlight his cheekbones, hair movements, triangular nose, etc. Oh yes, and his lips :)
I can say that the work is more or less finished. You ALWAYS need to concentrate on the eyes, I don’t even know how else to convey the importance of this xD I repeat that it is the eyes that define a person, regardless of how well or poorly drawn the rest of the facial features are. If you ruin the eyes, you will ruin the whole portrait.

Benedict Cumberbatch / Sherlock Holmes
I've already described the process, so I won't go into detail this time unless it's absolutely necessary.
Collect photos.

Identify facial features

Rest:
Rounded nose
-Hair is quite curly
-The face is significantly lengthened and narrowed
Make a sketch
In this particular case, Benedict as Sherlock looks confident, anxious (mostly due to his intense gaze) and perhaps a little cynical. And so if I draw him with a cheeky grin, it will match his character. Extend your lip line a little to highlight it!

Lineart and shadows
Something is wrong here, maybe I edited his eyes poorly.
Or is it because I went too far with the shadows and that's why he looks a little older than usual xD
When I think about it, it starts to make sense: Benedict has a natural fair skin. I'm not even talking about the fact that he's not that old. This means that the number and thickness of lines must be kept to a minimum, otherwise too much shadow will create the appearance of wrinkles.
I was in a bit of a hurry here, so it looks a little rough. Perhaps if I traced it again, the portrait would look better =v=

Click on the picture to view the image in full size and 100% quality.
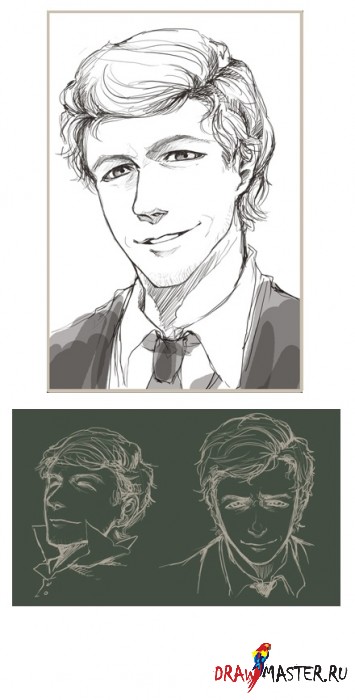
Simon Baker / Patrick Jane
This place was originally reserved for Hugh Laurie (House) :), but I thought that I was drawing too many men with high cheekbones, not to mention House's character, which is LITERALLY 99% COINCIDENT WITH BENEDICT'S CHARACTER >_>
So here's Simon Baker. I love his smile.
Collect photos.

Identify facial features
Rest:
When she smiles, bags appear under her eyes
- Dyed hair (creates a noticeable contrast)
- The hair on the back of the head always curls
Make a sketch
Baker's Patrick is quite open, friendly, cheerful, and based on the fact that he smirks rather than smiles, he looks ironic and cunning.
And if I make his smile a little lopsided, it will only enhance this effect.
Don't forget that he has a beard (at least draw it on his cheeks), even though it is so light that it is practically invisible. If I don't draw a beard, he will look too young.

Lineart and shadows
In the end, I didn't draw the stubble above the lip. Everything looks great anyway, so I left the drawing as it is.
Also, since his smile is perhaps his business card, don’t be afraid to add folds on the sides of the lips. This is such an outstanding feature of his face >u
In general, that's all.
Did I mention that I adore his smile?
Click on the picture to view the image in full size and 100% quality.
Of course, if I had more time, I would give more examples xD If you have questions, ask them and I'll see how I can help you!
Oh and I apologize for not including in this lesson female portraits. Perhaps if any of you are interested, I will tell you about them another time.
Thanks for reading! Hope this helps you!
One last note for everyone, especially for those who draw in anime style:
In general, those of you who want to learn how to draw realism, you need to get rid of the fear that you are afraid of “distorting the characters.” And I am sure that many of you understand what we are talking about, especially those who preferably draw in the anime style.
That is, no matter how beautiful a person is, HE WILL NEVER BE PERFECT. What I mean is that if you don't draw folds or wrinkles or anything else, he or she will look like a 10 year old :)
I know this can be very difficult to adapt at times as it MAY look wrong if you add such natural details. But remember that it's all about practice. At first, I was just like any of you, too cautious when it came to drawing real people. But once I realized that Leonardo DiCaprio looked like he'd had botched plastic surgery somewhere in Korea because I neglected the shadow under his bottom lip...well, I finally realized it.
The old saying never goes out of style: the master's work is feared.
So as long as you can accept that not everyone looks like Sephiroth or Cloud, then you can draw adequately =v=
And guess what? I think I'm on a roll, so I'll expand on my thoughts a bit below:
Make the mistake of looking at human face and ASSUMING that this is the so often drawn standard oval face.
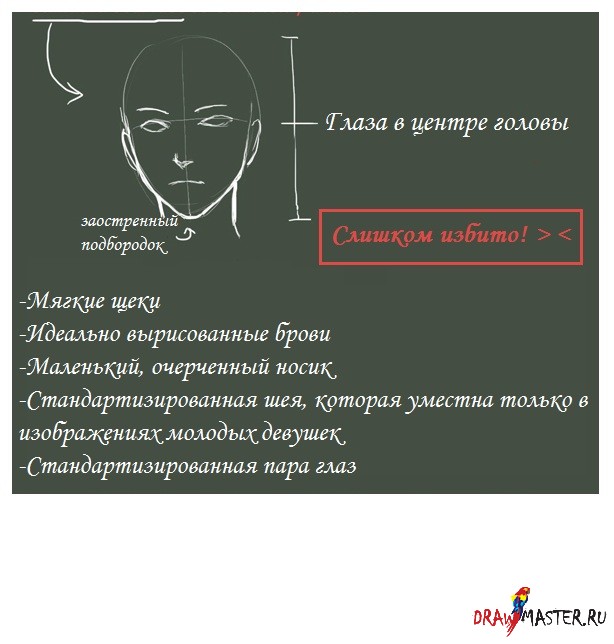
"But but but... it would look pretty weird if I drew him the way he really is. I mean, if I draw a very long face or pronounced cheekbones or..."
Perhaps if you imagine Benedict Cumberbatch with such a standardized face as shown above, you will understand what is REALLY wrong with him. He will look like a teenager!
“I can’t draw a nose the way it is in reality! This prevents me from adding a hump/nostrils and the nose turns out ugly and completely different from the one I copied from.”
Surely most people will agree with me that the nose is the most difficult part in realistic drawing and even I am not good enough at drawing it. If you don't control how much pressure you apply to the handle, especially on the sides of your nose, you'll end up with a very strange nose. Again, the usual thing: practice, practice and more practice!
If you want, you can start by copying my method for drawing noses, in which you shade the dark area under the nose. In this case there is no need to draw wings. This will only work for semi-realistic drawings. Of course, it's always better to find your own way of depicting realism, but never avoid them completely!

Children are the main audience for watching various kinds of cartoons. A good cartoonist is one who can extract the main features of an object or person and simplify them to attract a child's attention. Masters such as Walt Disney, Hanna and Barbera, Chuck Jones, Jim Henson, Walter Lantz and many others, by studying children's opinions and perceptions, achieved the charm of the whole world with their magical and eternal characters. IN this lesson we will look at how to easily and correctly draw cartoon characters, which both children and adults will be delighted with.
The final version will look like this:

Lesson details:
- Complexity: Average
- Estimated completion time: 2 hours
Understanding Human Perception
Man is a creature who has very interesting feature- we can transform parts that form a very complex structure or object into a fairly simple form.
Can you tell that the two images below represent the same object?

It may seem strange that you can look at an image and say it's a car.
What happens to most people, except artists, who cannot retrieve from their memory all the details of a car, the appearance of a dog, or the facial features of a child? They begin to associate very simple and primitive shapes with specific features of each object. So, for example, how many children came home from school with a piece of paper like that in their hand and said, “This is Mom and Dad!”?

You don't want to draw like that, do you? If you don't want to, let's pick up a pencil and start drawing!
1. Creating your first character
The basic shape of a cartoon shape will be a circle. A circle is all it takes. From the circle you can determine the basic proportions of the character's head.

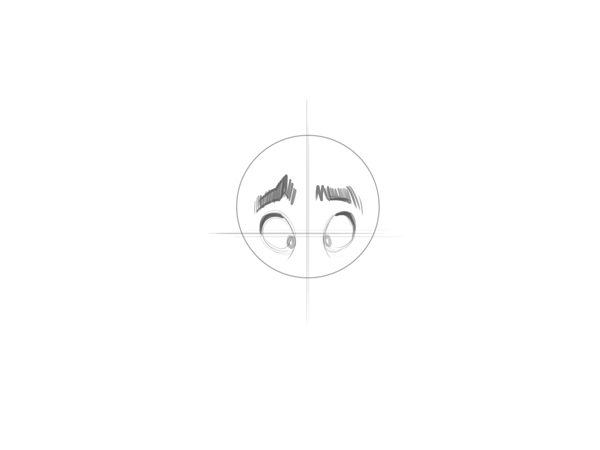
Swipe vertically and horizontal line, which intersect in the center of the circle, as in the picture below:

Step 1
We draw oval-shaped eyes with a slight slope on the sides. Necessaryleave a gap between the eyes about the same size as the eye.

Step 2
At the top of the eye ovals, lightly mark the character’s eyelashes. Draw above the eyelasheseyebrows that convey a kind of surprise. Draw the shape of the eyebrows that you get, in the future you will adapt to your own style.
Draw the pupils so that they are centered (this is a very effective tactic used by cartoonists to make characters look more likable).

Advice: To give more life eyes, you can draw a small line under them to simulate wrinkles.This is another very interesting tactic that gives a special flavor to the character’s facial expressions.

Step 3
Now the most interesting point lesson. It is at this stage that we will determine what our character will be: thin, fat, young, old. Our character will be young.
Drawing the jaw:

Step 4
The nose will be from the front. In order not to use a lot of details, let's draw it in general outline. Quite often the nose is drawn in detailon one side of the face due to the fact that the light falls on only one side.

Step 5
Our character is a child. Making a mouth - something simple and with an expression of innocence.
Please note that cartoon style children, regardless of gender, have quite simple form mouth without lips.

Step 6
The shape of the ears is quite simple.

Step 7
Finishing the boy's haircut.

I don't know how to draw hair. Help!
To draw perfect hair you don't need to be a designer or stylist. No the right way draw hair, so you should try until you get the right one for the occasion. Just remember that hair shape can convey certain personal qualities character. Oddly enough, hair can express age, rebellion, conservatism. Incredible, right? What's your hairstyle?
Accurate and quick way Drawing hair for cartoons is all about finding the appropriate photo on the Internet! Once you've found the perfect style, place an example image next to your tablet or piece of paper and start designing a simplified version of it.
First character completed successfully! Congratulations!
Now let's work on a different character using the same template as for the boy.
2. Creating an older character
Step 1
Let's start with the eyes. This time we will draw faster, adding wrinkles, eyebrows and eye pupils. Please note that we didn't change much, but we just widened the eyebrows a little. Older people have thicker eyebrows, which take up more space on the forehead. We draw eyelashes in the same way as in the previous version.

Step 2
The chin will be slightly larger than the previous character.

Step 3
Create the nose. The shape is completely different. Please note that the nostrils are located very close to the bottom of the eyes. The idea is to get a good result by slightly exaggerating the body parts.

Step 4
Instead of a mouth, draw a large mustache.

Step 5
Add the same ears as the boy. However, the hair will be of a different shape - we will add a little on the sides, and leave a bald patch on top.

Our character is like a mad scientist.
3. Creating a female character
Creating a sister for a boy:

How did it happen so quickly? Very simple... Women have a thinner facial structure. Consider some features:
- thin eyebrows;
- larger and more expressive eyelashes;
- thinner chin;
- small nose with fewer details;
- long hair.
That's all! Once you start to feel more confident, you can draw a few more characters with different details.

4. Facial expressions
Let's draw a girl after receiving the news that the school holidays have come to an end.

Now let's go back to the boy and ask his opinion on this matter:

It feels like he's up to something!
Notice the changes in the boy's face:
- one eyebrow lower than the other;
- eyes half closed;
- added a smile (one side is higher than the other, in line with the eyebrows);
- the pupils moved under the eyelashes.
That's all! Everything is as simple as shelling pears!
5. Draw in profile
Let's draw two circles.

We will create a boy and a girl in profile:

The ear remained in the center of the circle.
Pay attention to these details when composing male and female characters:
- the boy has thicker eyebrows;
- the girl's chin moves forward a little;
- the girl's nose is thinner and sharper;
- A boy has no eyelashes, while a girl has large and thick ones.
6. Playing with angles
Eyes, nose, mouth, ears - all these details make the face change its shape if you look at them from different angles. You can often observe this in cartoon characters.

Notice how real eyes simplified when converted to cartoon.

The actual shape of the nose is made up of several cartilages. His form is radically simplified in the cartoon.

Understanding how the mouth behaves from different angles is important. Remove excess details and try to maintain only the basic shape of the lips. The ears are also greatly simplified.
Now we will put into practice everything we have learned. Below are circles with arrows that show the direction of view. We can practice our drawing skills in different positions:

Let's mark the eyes for each of the circles:

Now let's add various shapes jaws:

You can complete the drawings yourself, based on the knowledge that was provided to you in this lesson. Remember:
- the face needs to be simplified and rounded;
- exaggerate certain parts of the face and its expression.
Once you have managed to mark the direction of the eyes and select the corresponding chins, try using your creative potential and finish the drawing. If you draw for at least 10 minutes a day using the rules presented here, you will be able to draw cartoon faces as easily as breathing.
Let's summarize the drawing of characters:
- Draw a circle for the skull;
- We set the direction in which the character will look;
- Make an oval eye contour;
- Draw the pupils of the eyes that look at the nose if you want to create a cute character. Don't forget the eyelashes;
- Choosing the right eyebrows depending on age and gender;
- Create the corresponding jaws;
- Add simple ears without unnecessary details;
- We search for the required hairstyle on Google and use it in our sketch;
- Let's celebrate!
Here's what happened:


An example of how to use the same template to create different emotions. Notice that only the eyelashes and eyebrows have been changed. Nothing more!
7. Nationality Research
We are approaching the end of the lesson. I would like to encourage you to continue to experiment with facial expressions and, if possible, explore more of the face. Learn how the eyes and mouth behave in different situations. Take a look at different nationalities and learn their key features.

For example, African Americans have a slightly flattened nose and rounder cheekbones.
Whenever possible, try to draw your characters more realistically. Watch on people's behavior in real life. Look at photographs, study the style of your favorite artist, or look online for inspiration. TOWhen we look at real life, we can extract quality information for our sketches.But remember: observing the real world does not mean copying it!You want your character to be unique and not a copy of the real thing, right?
Great job!
Now you know the basic methods that are used by the best animators around the world. Good luck!


We hope you enjoyed the lesson.
Explore other techniques for drawing cartoon characters' heads.
The sky is the limit!
Translation - Duty room.
Each of us is surrounded by thousands of people. It would seem that we have learned the proportions and features of the human body down to the millimeter. But here's the paradox - draw a person much more complicated than anything you have ever seen.
Sometimes when you draw someone, you are amazed - not a person, but some kind of alien. If you also can’t draw people, as they say, don’t pass by - here you will find a lot of useful and interesting things for yourself.
And the very first thing is this video that will show you how to draw a boy and a girl.
Even ancient artists, when drawing a person, tried to divide his body into equal parts, so that it would be easy to correctly recreate the proportions of the figure. After all, knowing the relationship between individual parts of the body and the figure as a whole, you can easily draw a person. At the same time, of course, we must not forget that all people have their own characteristics.
So, drawing a person, We take the head size as a unit of measurement.
The height of an adult man or woman is equal to 8 head sizes, the height of a teenager is 7, a student is 6, and a baby is only 4 head sizes.
Proportions of people of different age groups

Before drawing a person, remember a few important nuances:
- arms should end at mid-thigh,
- elbows are at waist level,
- knees - strictly in the middle of the legs.
Did you know that the height of a person is equal to the length of his arms spread to the sides, and the length of his legs fits four times the height of his head?
But what amazed me even more was the size of the human foot. It turns out that its height is equal to the height of the nose, and its length is the length of the forearm.
Look how a man and a woman should be drawn correctly in different positions.


And now I will show you how to draw people step by step. I assure you, with the master class from Pustunchik it will be easy and simple.
How to draw a boy
If you need to draw a boy, use the following diagram. And I will tell you how and what parts of the body you need to draw step by step.
1. Draw an oval for the boy’s head, then a small neck and a rectangle for the body.

2. Draw another rectangle from below, divide it in half. These are the legs. Draw rectangular arms. On the upper large rectangle, make curves from the neck to the arms - these are the shoulders.

3. Erase the extra lines on the shoulders. Draw the neck of the sweater, the seam lines (but not all the way), where the sleeves connect to the main part of the sweater. Draw the fly and folds on the pants in the form of a slingshot. Now draw the shoes and hands. See the detailed diagram showing how to draw hands on the right.

4. Let's start drawing the head. First, draw a cross - it will point to the middle of the head and determine the location of the eyes. Two arches, two dots and one small arch at the bottom of the head are the top of the eyes, the future nose and lips. The ears will be located at the level of the nose and eyes.

5. Draw the eyes, in place of the dots draw small circles - nostrils. Now move on to the eyebrows and hair.

6. Erase the extra lines and, with light pencil movements, outline the folds on the clothing. Add details. Congratulations! The boy's drawing is ready.
How to draw a baby
This drawing is perfect for some comic book, and you can also draw it for kindergarten or for a student junior classes. The funny little one will also be a godsend for a school exhibition of young artists.
1. Draw an oval, indicate the eyes with dots, and show the baby’s nose and mouth with two bent arcs.

2. Mark the corners of the lips, draw ears and hair.

3. At the bottom of the head, draw a trapezoid - the boy’s body. Don’t forget to separate the blouse from the pants with a straight horizontal line, and show the pants with a vertical line.

4. Draw the sleeves.

5. Now draw the child’s arms and legs.

6. Divide the fingers with lines. That's all! The little mischief maker is ready for some pranks :)

Drawing girls
Three beauties on one sheet at once. Would you like to have such fashionistas in your album? Then hurry up and draw these little cuties!
1. Draw sketches of your friends.

2. Design their hairstyles and draw clothes.

3. Add details: belt, lace sleeves, leg warmers, handbags and so on.

4. Draw the girls’ faces, make folds on clothes, highlight accessories. Add a unique touch to each of your friends' shoes.

Great job!
You will learn more about how to draw a girl’s lips, nose, and eyes from the following video. I warn you, the master class is not for beginners, so be careful not to miss important details.
Draw the girl's face. Part 1
Draw the girl's face. Part 2
How to draw a guy
Every girl at least once in her life tried to draw the guy of her dreams. It is, of course, different for everyone. But for now let's just draw a guy with glasses and a cool T-shirt. Go?
1. Make a template of a person.

2. Using auxiliary lines draw the head and arms.

3. Draw hair, nose, lips. Put the guy's glasses on.

4. Trace the contours of the guy's body. Draw the hands. Add shadows using dashed lines. Mark the neck of the T-shirt.

5. Remove unnecessary lines. Make the contours of a man's body clearer.

Here you go! A macho man with a serious look and cool glasses is ready to win hearts!

The main audience is children when we're talking about about caricature. A good cartoonist is one who can highlight the main details of an object or person and simplify the figure so that a child can recognize and be attracted to what they are viewing.
Your role here is that you understand how to correctly assemble this puzzle and definitely learn how to construct any drawing using this technique. I guarantee you'll be shocked at how easy it is to create cartoon characters that kids (and adults) will love!
Understanding Human Perception
The human being has a very interesting feature: We can synthesize the parts that make up a structure or object in a very difficult relationships in the most basic and simple. Thus, we can represent any type of thing through several curves and geometric shapes.
Can you tell me if the two images below represent the same object?

Strange as it may seem, you can look at two photographs and say, "that's a car."
It happens that, unlike artists, most people cannot tell from memory all the parts that make up a car, a dog or even a child. Therefore, they begin to associate basic and primitive shapes with specific characteristics of each object. How many 4, 5 or 6 year old children came home from school with two circles and some sticks on a piece of paper and said, “Here are mommy and daddy!”?
1. Let's create our first Character
The basic shape of a caricature is a circle. The circle is everything you need (besides love, of course). This is from a circle that indicates the basic proportions of the character's head.

Once the circle is ready, it's time to trace the axis of the face. Draw a vertical and horizontal line intersecting in the center, like in the picture below:

Step 1
For the eyes, draw an oval shape with a slight slant to the side at the top. Repeat on the opposite side. It is important to leave a gap between them approximately the same size as the eyes. Since we are in the editorial phase, you can make another eye in the center to serve as a measuring stick.

Step 2
At the top of the circle, slightly thicken the line, which will be the eyelashes of our character. Place your eyebrows slightly above your eyelashes to create a distinctive expression of surprise. The shape of the eyebrows is free and over time you will adapt to your own style.
Draw the eyes pointing towards the center (this is a very effective tactic used by major cartoonists whose sole purpose is to make our characters look cuter).

Tip: To give more life and "realism" to our eyes you can draw a small line underneath them to simulate the look of wrinkles. This is another very interesting tactic that gives a special flavor to our facial expressions.
Step 3
We approached in the most creative freedom of the entire course. Think of it this way: In cartoon style designs, the main facial structure is the character's skull and eyes. It is at this stage, where you define identification with the outside world, IE, that it is already clear to people that you are drawing a character.
Now when we come to the jaw, we will decide what kind of character we want. Maybe an old man, a young man, and so on. My character will be young. So, let's design a proper jaw for it.

Step 4
When designing the nose, we look at it from the front; it is general so as not to use a lot of details. If you only draw its tip, it is likely that it already achieves a convincing effect. It is also a very common method to draw in detail only one side of the nose, away from the idea that it is the opposite side of the world.
Let's draw the right nose for our character.

Step 5
Since our character is a child, we'll make a cartoon mouth: something simple to simply represent an expression of innocence.
Please note that when composing the mouth small child, lips should not be done! In cartoon style, children, regardless of gender, have quite simple lips. A good and expressive trace already does its job.

Step 6
The ears are visible from the facial side view (because our hero is standing in front of the camera), so internal cavities will not appear. Then we will only do a simple shape using some basic perspectives (more on this later).

Step 7
The shape of our skull is already determined by the circle we made at the beginning, isn't it? So, we need a very simple and childish haircut to give life to our boy. Let's do it now.

I don't know how to draw hair! Help!
No one needs to be a stylist or fashion designer to get perfect hair. There is no right way to draw hair, so you'll have to try until you create the perfect haircut you want. Just remember that hair is responsible for defining the personality of our heroes. Oddly enough, hair can express age, conservatism... By the way... how's your hairstyle?! Oh never mind
An accurate quick and easy way to draw cartoon hairstyles is to find a photo online! I do this all the time: pick up a fashion magazine or search on Google. After finding the perfect style, place an example image next to your drawing board and start making a cartoon and simplified version.
Well, it seems we have completed our character successfully! Congratulations!
Children are the main audience when it comes to cartoons. A good animator is the only one who can extract the basic details of an object, or a person, and simplify them to such an extent that a child can understand and relate to what he is looking at. Children's perception studied by such masters as Walt Disney, Hanna and Barbera, Chuck Jones, Jim Henson, Walter Lantz and many others who were able to charm us with their magical characters.
My task is to help you find the right path, put together the puzzle and learn how to create any character using the presented technique. I guarantee you'll be shocked at how easy it is to create cartoon emotes that kids (and adults) will love.
Understanding Human Perception
Man has a very interesting feature: he can generalize details very complex object into something simple and understandable. Thus, a person can imagine any thing through several geometric shapes and curves.
Can you tell me that these two pictures show the same object?
And even though it’s strange, when you look at both of these pictures you’ll say, “this is a car.”
In fact, unlike artists, most people cannot name from memory all the parts that make up a car, a dog, or even a child. Therefore, they begin to associate very simple and primitive forms with specific characteristics of each object. How many 4, 5 or 6 year olds come home from school with pictures of two circles and some toothpicks and say, “That's Mommy and Daddy!”?
You probably don't want to draw like that, do you? So let's get our hands a little dirty and draw some cartoon faces! 1. Creating your first character
The basic cartoon shape is a circle. The Circle is Everything You Need (besides Love, of course). It is from the circle that you determine the basic proportions of your character's head.
After drawing the circle, you need to outline the axis of the face. Draw vertical and horizontal lines intersecting in the center as shown in the image below:
Step 1
To make the eye, draw an oval with a slight slant to the side at the top. Repeat on the opposite side. It is important to leave a gap between them approximately the same size as one eye. Since we are making a sketch, for accuracy of construction we can draw another eye in the center.
Step 2
Upper part make the circle bold, these are the eyelashes of our character. Place your eyebrows slightly above your eyelashes to create a surprised expression. The shape of the eyebrows is arbitrary, and with practice you will come to your own style.
Draw both pupils closer to the center (this is very effective technique, used by major cartoonists who want their characters to look cute).
Advice: To add more life and "realism" to the eyes, draw a small line underneath them, sort of like a wrinkle. This is another very interesting technique, which will add a special zest to facial expressions.
Step 3
We've reached the most creative part of our course. Think of it this way: in cartoon sketches, the main facial structure is the character's skull and eyes. It is at this stage that you determine features, i.e. it is already clear to people that you are portraying a hero.
Now when we come to drawing the jaw, we need to determine whether the character will be thin or fat. Do we want to create him young, old, etc.? My character will be young. Let's draw a suitable jaw for him.
Step 4
When we draw the nose from the front, it is important not to add too much detail. If you only draw the tip, the nose already starts to look convincing. Also, very often only one side of the nose is drawn in detail, based on the idea that this is the shadow side.
Let's draw the right nose for our character.
Step 5
Since our character is a child, we will draw a cartoon mouth: something simple to convey an expression of innocence.
Please note that when drawing a small child's mouth, you don't need to draw the lips! In cartoons, children of both sexes have quite simple mouths. Good enough expressive feature.
Step 6
The ears are visible from the front (since our character is looking at the camera), so we will not depict the internal cavities. We'll draw a simple shape using basic perspective (more on this later).
Step 7
The shape of our skull is already determined by the circle we drew at the beginning, right? Now we need to draw a very simple childish hairstyle to make our boy come to life. Let's do it.
I don't know how to draw hair! Help!
Calmly! There is nothing to be afraid of. You don't have to be a stylist or fashion designer to draw perfect hair. There is no right way to draw hair, so keep trying until you get the look that's perfect for you. Just remember that hair reflects the personality of our characters. Oddly enough, hair can express age, rebellion, conservatism... incredible, isn't it? By the way, what kind of hair do you have?! Okay it does not matter..
An accurate and fast way to draw cartoon hair is by searching for photo references on the Internet! Do this all the time: flip through fashion magazines or search on Google. Once you've found the perfect style, take the image as a base, place it next to your drawing board (or tablet), and start drawing the cartoon and its simplified version.
It looks like we have successfully finished drawing our character. Congratulations!
Now let's play around a little more and draw a completely different character using the same template we used to create little Tommy (yes, I gave him a name).
2. Creating an Elderly Character
Step 1
As usual, let's start with the eyes. This time we will draw faster, adding wrinkles, eyebrows and pupils.
Please note that we didn't change much - we just widened the eyebrows. In older people, eyebrows are thicker and take up more space on the forehead. Eyelashes don't matter to men; they are always drawn the same way.

Step 2
This time we will lengthen the chin a little. Try it like this.
Our character already looks different! Great. Let's try to find him the perfect nose.

Step 3
Following what we did before, let's create the nose. This time I'll draw it completely differently:
Notice that the tips of the nose are located very close to the corners of the eyes. This is an effective technique for creating wider and larger noses. The idea is to exaggerate the features to get a good result!

Speaking of exaggeration, we won't be drawing our character's mouth in favor of another object.
Step 4
IN in this case I decided to use a different technique: instead of drawing a mouth, draw a large mustache to create best image our character.
Ready! A big, expressive mustache for an old friend.

Step 5
Remember when I said that hair helps determine a character's age and personality? Take a look.
We added hair on the sides and left a bald spot on the top of the head. It’s amazing how the view immediately changed, isn’t it? Please note that I drew the same ears as Tommy, our favorite boy. This is the advantage of working with templates. This is the magic of cartoons!
 I think ours new friend- mad scientist!
 3. Creating a female character
I don't even know... I think Tommy needs a sister! He's so lonely. As if by magic, we will create a sister for him:

Hey! How did you manage to do it so quickly? Very simple.. Women have a more refined facial structure. Follow step by step instructions:
- Thin eyebrows;
- Longer and more expressive eyelashes;
- Neat chin;
- Small nose with fewer details;
- Long hair(draw based on a real image and using any style you want).
That's all. These are all the changes that need to be made. Apart from them, I used all the same details that I used when drawing Tommy, her brother. After all, they are brother and sister, right?
As you feel more confident, you can gradually add more "realistic" details to your characters. Such as pupils bigger size..

4.Facial expressions
We're ready to add some emotion to our dear Lucy (yes, that's her name). Let's draw her after she found out that the school holidays are over..

Once again we create something completely different by simply adding two elements: tears and new uniform mouth! Amazing, isn't it?
Now let's go back to Tommy and ask what he thinks about this:
 Hmm.. I have a suspicion that Tommy is up to something!
 Please note that I completely changed his facial expression following these rules:
- Made one eyebrow lower than the other;
- He half-covered his eyes with his eyelashes;
- Added a smile (one corner of the mouth is higher - follows the eyebrow);
- He raised his pupils, leaving them covered by his eyelashes.
That's all! We got the desired result with just a few changes. The hair, ears, nose, chin and round shape of the eyes remained unchanged! How simple!
5. Side view
Draw the template again. Now we will learn how to draw Tommy and Lucy in profile:

Let's draw both faces:
 Note that in profile the ear is located in the center of the circle.
 Keep in mind the major differences in facial structure when comparing them side by side. Pay attention to these details when drawing women and male characters:
- Tommy's eyebrows widen
- Lucy's chin juts out slightly
- Lucy's nose is thinner and more pointed;
- Lucy has long, feminine eyelashes.
6. Play with angles
Eyes, nose, mouth, ears... all the details of the face change shape when the angle changes. Cartoon characters are constantly looking in all possible directions from different angles as they need to react to situations and objects around them. This makes them more realistic!
 Please note that in cartoons the structure of the eye is simplified. Cartoon eyes are drawn in red. Compare their oval shape to the round shape of real eyes.
  The real nose is made up of several cartilages. Notice how significantly simplified it is in the cartoons.
  It is necessary to understand how the mouth behaves from different angles. Remove excess details and try to maintain only the basic shape of the lips. The ears are also greatly simplified.
 Now we will practice drawing all the details we have learned. Below is a basic template (just circles and guides) where we can learn how to draw different positions:

Note the eyes looking in different directions on each of the circles

Now let's add arbitrary jaws different sizes and forms

The choice is yours. I guess you can work on your own and learn the techniques I gave you to complete the drawing. Remember the two main rules of animation:
- Simplify facial details using rounded shapes;
- Make facial expressions exaggerated.
Once you've learned how to sketch out the direction of the eyes and choose suitable chins, try using your creativity and drawing as many faces as you like. You can be sure that practicing the above techniques for at least 10 minutes every day will make drawing cartoon faces as familiar as breathing.
Let's summarize! To consolidate the material in this textbook, let's remember right steps in drawing cartoon faces:
- Draw a circle that will be the character's skull;
- Determine the direction where the character will look and draw guide lines;
- Sketch out oval shaped eyes;
- Draw the pupils (bring them closer to the nose if you want to create a cute character). Don't forget about eyelashes;
- Choose the right eyebrows, depending on the character’s age and gender;
- Draw a suitable jaw;
- Draw simplified ears;
- Search for hairstyles on Google (or a magazine) and use them as sketch templates;
- Celebrate!
My version:

 An example of how to use one template to draw different emotions. Please note that only the eyelashes and eyebrows have been changed. And nothing more!!!
 7. Study different ethnic groups
The guide is coming to an end. As a final piece of advice, I would like to encourage you to continue experimenting with facial expressions and putting more effort into exploring faces as much as possible. Learn how the eyes and mouth behave in different situations. Take a look at the representatives of different ethnic groups and them distinctive features.
 For example, black people have slightly flattened noses and rounder cheekbones.
 Whenever possible, try to make your characters as realistic as possible. Observe people's behavior in real life. Browse photos, study your favorite artist's style, or search the Internet for inspiration. From real life we can extract quality information for drawings. But remember: watch real world does not mean copying! You want to make your character unique and not a copy of reality, right?
Great job! That's not all!
Now you know basic techniques, which were used by the best animators in the world. There is much more to come, and this guide is just a small part of the tutorial I have prepared for you. Let's dive deeper.
 Explore different styles and structures of the skull. There is no limit to perfection!