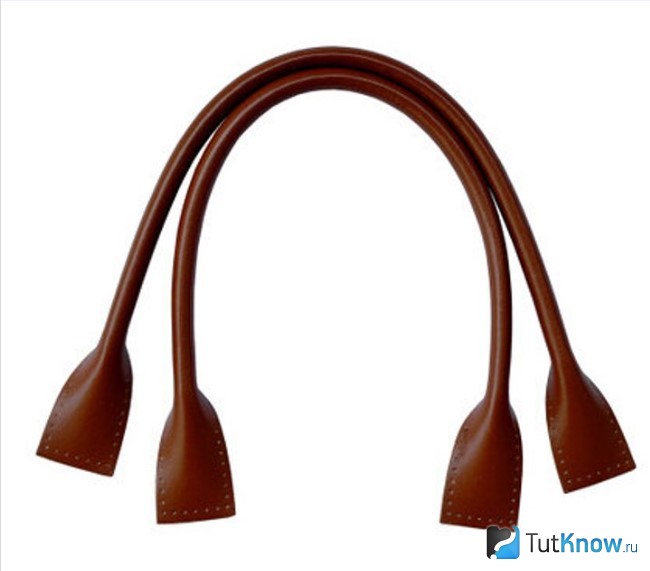
The handles on the new bag are torn. Replacing handles on a leatherette bag
You have a problem with the handles of your favorite bag. Indeed, the handles of bags wear out much faster than the bag itself. For some, this is an extra reason to buy a new one; for others, it’s a headache about additional expenses. The solution I propose to solve this problem will probably suit both of them. It is quite possible to cope with the repair of a bag handle within the capabilities of beautiful white-handed women and even You can show your irrepressible imagination not only with shabby pens, but also with completely new ones . For example, you can trim the handles to match gloves, accessories or shoes. The idea is the old way wrapping the handles with braid or strips of leather. The trick is that not a single knot or connection is visible anywhere, and this is with excellent structural strength and at the same time its flexibility. The question of durability is determined only by the quality of the material used.
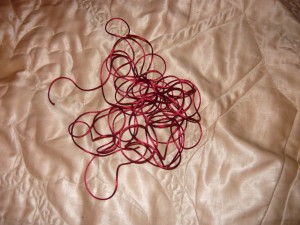
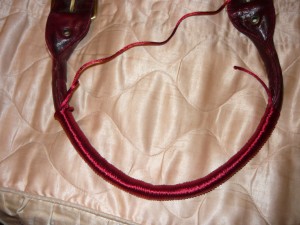
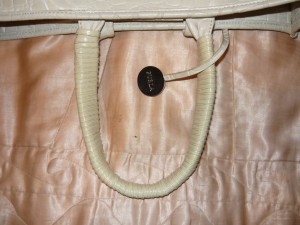
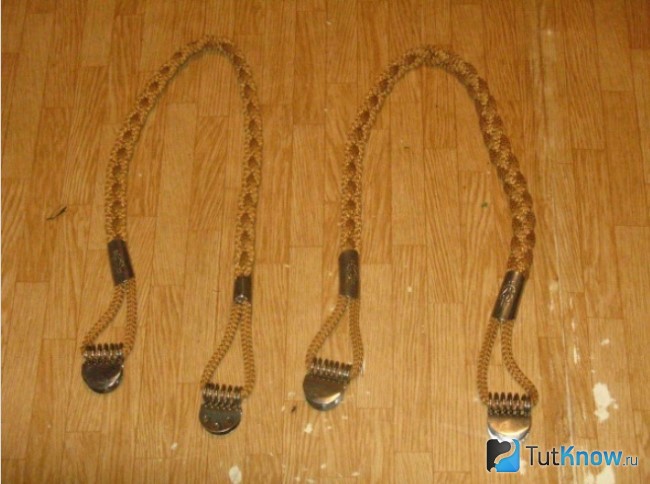
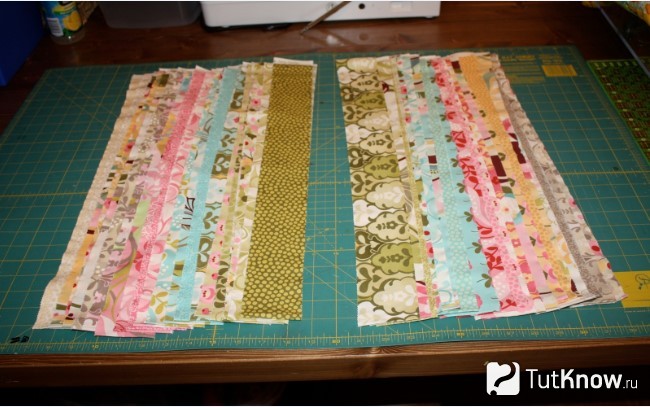
So, here is the bag with the ill-fated handles:
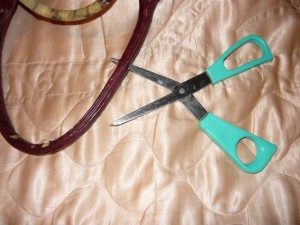
In order to start taking action, you need to pick up a tape suitable color or lace. For these handles, a 12-meter long cord was used for both handles. A similar one can be purchased at a store that sells jewelry:
Before starting work, you need to determine where we will start wrapping the handle, step back a little towards the middle and pierce a hole with scissors. If a hard core is inserted inside the handle, then you don’t have to pierce a hole:
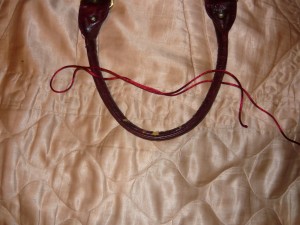
Then you need to insert one end of the lace through the hole made and fold it in a loop to the opposite end of the handle and back so that the free end protrudes about 10 cm beyond the hole.
This operation must be done very carefully, because the entire success of the business begun depends on it:
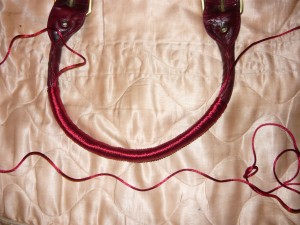
Now we begin to wrap the handle along with the laces.
Important: leave the free end on the right, first wind the entire lace into a ball so that you can pass it freely through the handle, wrap both laces with the handle at once. In addition, I advise you to wind it very tightly, periodically move the turns to the right and keep the lace under tension all the time:
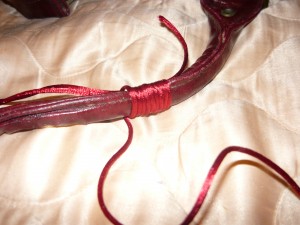
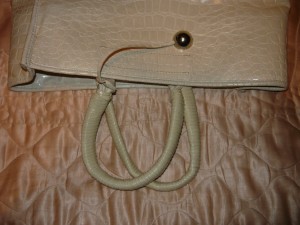
After you have completely tied the desired part of the handle, you need to insert the remaining end into the resulting loop:
Now you have to, holding the end of the lace threaded through the loop with your left hand, and the other end with your right hand, pull the loop under the winding two to three centimeters. If you can’t do this, then you need to grab the right end with pliers and pull. In the end, you can do this operation together. This is what it should look like:
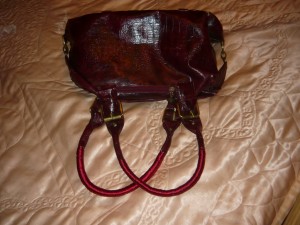
The protruding ends of the lace need to be cut flush so that they are not visible, then you will get a handle like this. With the second handle you need to do exactly the same procedure:
I hope that this method of repairing bag handles will help you in solving similar problems. In the future, when you master the skills of this wrapping method, you can get creative and simply decorate the handles of any bags to your taste. You can also read a similar article: or
HOW TO DECORATE YOUR BAG HANDLES
Using another bag as an example, I want to show how this method can be used in decorative purposes, namely, change the appearance of the bag handles as you wish:
In this photo you can see that the bag has normal handles and that there is absolutely no need to repair them, at the same time they are clearly too thin for such a bag and have shabby look. This bag was matched with leather braid in a color that almost perfectly matches the color of the bag itself. To strengthen the handles of the bag, we will need blue tubes of cream or toothpaste, as well as medical plaster of any size:
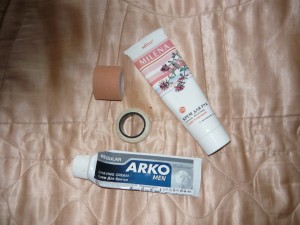
tubes and patch
Then we take any tube and cut off the end part from it, then the head part and cut it along the middle. As you can see from the photo, there was still enough cream left in the head of the tube that it was no longer possible to squeeze it out. The same picture will be with dental plaque and any other contents, i.e. We simply throw away part of the paid products, although we can cut off the head part and part of the tail, and then close it like a lid. This method can save from 5 to 10% of the contents of the tube:
![]()
Since the handles are very soft, we reinforce the area where the braid will be wound with pieces from the tube and wrap them with adhesive tape, the handles are prepared for decoration:
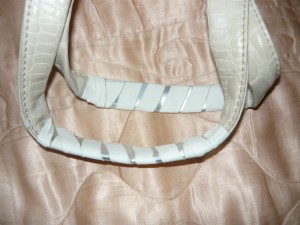
Next, we consider the option of completely wrapping the handle, while such a handle requires 5 meters of leather braid; first, cut strips from the material of the tubes are wrapped with adhesive tape along the entire length and wrapped:
The fact is that the handles are very soft and when wrapped they would immediately curl into tubes and the decorating effect would not be the same, but in this case the handle looks like it has a flat shape:
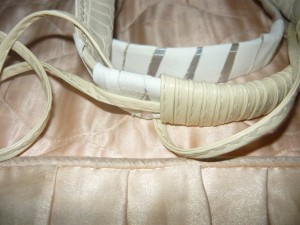
We do the same with the second handle, then you should get something like this type of handle:
Dear women, unfortunately, I cannot fulfill your orders for repairing or decorating handles, because I am not engaged in this type of income - this is firstly, and secondly, I have absolutely no time for this. Try it yourself or with someone’s help and I am sure that you will definitely succeed.
Now there is another article on repairing bag handle holders, if anyone is interested, they can look at the link
Sincerely, Vladimir.
Not everyone is involved in restoring bags. Not every bag can be revived and sometimes it’s easier to throw it away and buy a new one than to make alterations. But, if this is possible, then why not try to repair it yourself, especially if it concerns only individual parts.
It often happens that for some reason the handles become unusable. The same story happened with my friend's bag. Being practically new, it remained unclaimed only due to the deterioration of the handles, on which creases, abrasions and cracks appeared. They needed to be changed urgently. Fortunately, they were fastened with buckles and were completely removable. This made the situation much easier.
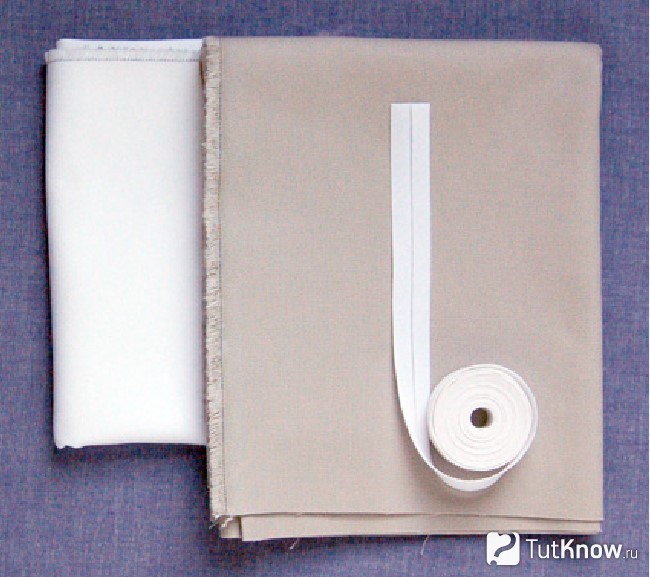
Previous handles were made using factory technology with sealed edges. Of course, this option was not suitable for me, and I had to use another method. In the store we picked up leatherette of the same color as the “original” handles, but the quality was quite soft and in order to make strong, full-fledged parts from it, we had to strengthen it.
I should note that there are materials and methods for making handles a large number of, and they are all significantly different from each other. The option I used is perfect for soft materials that need to be compacted.
MATERIALS FOR MANUFACTURING HANDLES FROM imitation leather
Leatherette
Adhesive dublerin
Glue web
Threads to match
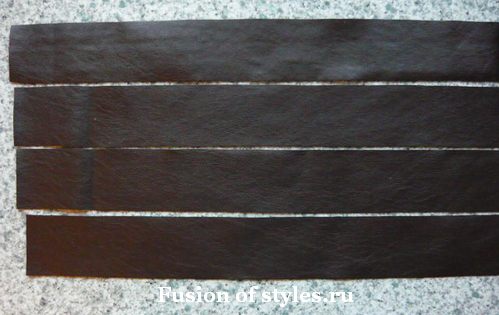
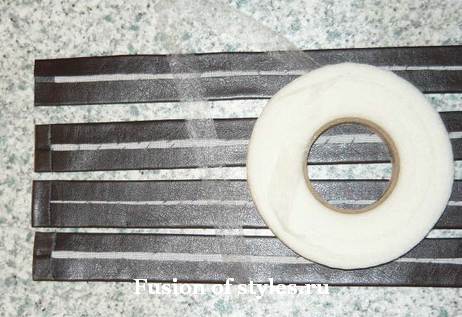
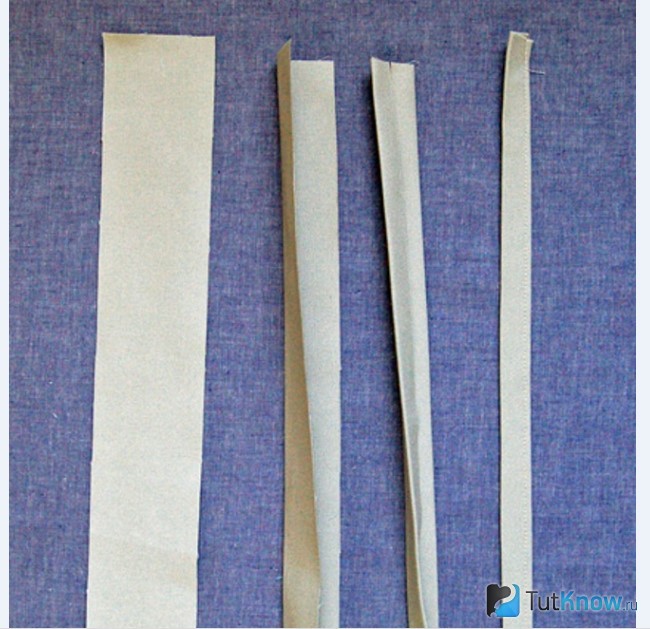
The width of the handles was 2.5 cm, length 73 cm. These dimensions corresponded to the dimensions of the previous parts. This is exactly the size I cut out four strips of adhesive dublerin.

Next, I cut out four strips of leatherette. On the long sides it gave an increase of 1 cm, and on the short sides - 0.7 cm.
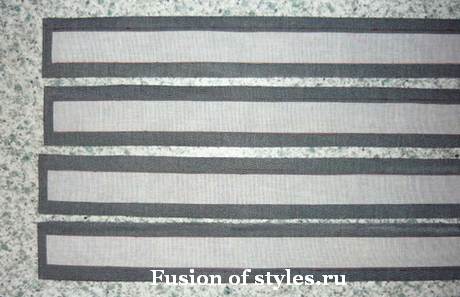
After that, I glued duplerin to the inside of the leatherette using an iron. It significantly compacted the material. The iron should be hot, but I did not apply a cloth, since the reverse side of the leatherette is a cotton base. But it’s still not worth keeping it in one place for a long time.
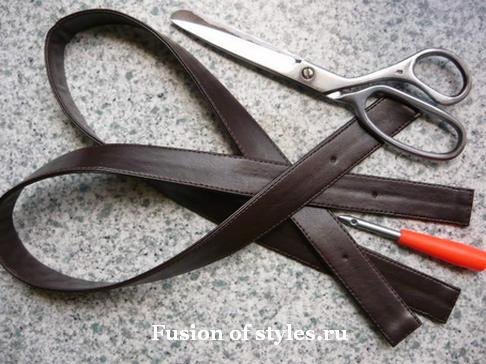
Next came the most labor-intensive and time-consuming part of the entire process. Using adhesive web, I secured all the leatherette allowances, folding them onto the inside of the future handles. I also did this using an iron, but with a cloth.
This procedure must be performed very carefully, since it will be very difficult to peel off an unevenly folded seam allowance. In the case of ordinary fabric materials, allowances can simply be swept in, but with leatherette you need to work differently. The needle may leave holes on it, so basting will not help. Moreover, the adhesive web will well fix all the allowances, which will make further work much easier.
After all four pieces were ready, I started gluing them together in pairs. For this I again needed a glue web. Laying it along the inside of one of the parts in two rows, I placed the second part of the handle on top, covered it with several layers of cloth and heated it with an iron. It is necessary to carefully ensure that the leatherette does not overheat too much and does not begin to melt, otherwise its surface will remain on your rag. Carefully align all corners.
After the parts were ready, all that remained was to add finishing stitches along the edges of the handles for fastening and beauty. I did this using a special plastic foot with a slippery coating.
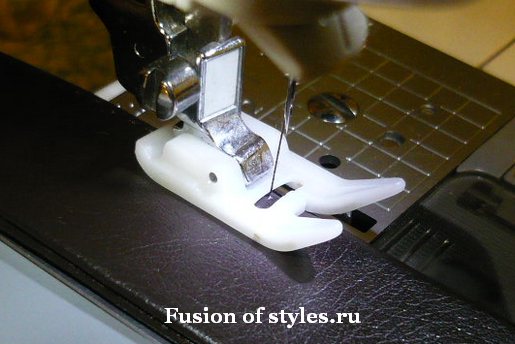
And on final stage It was necessary to make holes through which the handles would be threaded into the buckles on the bag. I made the holes using a special tool that makes holes in such materials with ordinary pressure. It came with all the tools when purchasing a sewing machine.
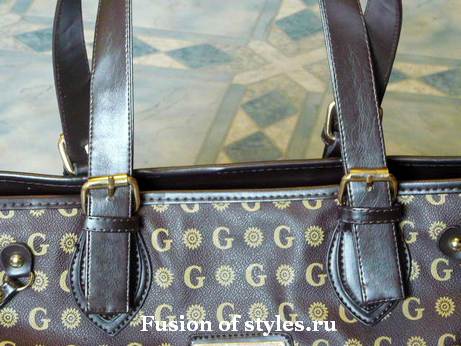
This is how you can sew handles for a bag with your own hands. The bag looks brand new and is ready to use again. The friend was happy). And I got another experience working with leatherette. To my joy, my machine coped with this task perfectly.
The bag performs not only a utilitarian function, allowing us to carry necessary things with us. This is also a spectacular accessory that helps in creating an individual stylish ensemble. However, even very high-quality things tend to break and lose their attractiveness.
Over time, the bags' fittings fail, the lining and top covering material cracks, tears, and the handles wear out. However, the problem is not always solved only by buying a new bag. Sometimes you can fix your favorite item yourself.
Do-it-yourself minor repairs
The most vulnerable element of any bag is the handles. If one of them comes off the bag under the influence of gravity, there will be no problems with repairs. You need to find a thread of a similar color and sew the handle to the bag along the holes from the old seam.
Often in bags (especially in school backpacks and daily used bags) the material on the handles cracks. This occurs from constant friction of the material against the shoulder or palm. To eliminate this defect, you will have to select the appropriate color scheme leather or fabric products. Next, the old parts should be torn off and new blanks made in their likeness. They are sewn on with a needle and thread along the old seams. Sometimes the abrasion area can be disguised with a patch.
If the metal zipper on the bag begins to come apart, carefully go over its teeth with a hammer and press the slider with pliers. If this does not solve the problem, try replacing the slider. To do this, carefully open the beginning of the zipper, remove the worn part and insert a new one in its place. Then sew up the ripped area using threads that match the color.
If we're talking about about more serious damage or about an expensive product - for example, business bags for women - it is better to contact a workshop, where the repair will be carried out using professional equipment by a qualified specialist.
Types of repairs that are best left to a professional
Replacing the zipper. Sometimes home zipper repairs don't work. Of course, walking with an unzipped bag is unsafe, not to mention that it looks unaesthetic. Removing an old zipper is unlikely to be particularly difficult. But only a specialist can sew a new one carefully.
Elimination of cuts and holes. If a hole has formed on a fabric bag, the workshop can sew you a beautiful and neat patch. On leather bags such defects are eliminated by gluing with inside or using liquid skin. Thanks to large selection special compositions and materials, which are presented in a specialized studio, the product after repair will look like new.
Replacement of lining that has lost its freshness. This part can be washed in a textile bag. But if we are talking about a leather product, it is usually worn or dirty inner part can only be replaced. The new lining, sewn in the studio, will be made in exact accordance with the design and shape of the bag.
Edging repair. Worn and cracked edging looks sloppy and automatically reveals the “age” of the accessory. However, this defect cannot be dealt with at home. The workshop will offer replacement options and carefully sew on the edging using the same technology as before. As a result, you will be able to return the items to their salable condition.
Replacement of metal or plastic decor. Such repairs are carried out using special clamps. They allow you to quickly change eyelets, rings and other parts without damaging the material from which the bag is made.
Replacing wheels and retractable handles in suitcases. These parts in travel bags bear the main load and therefore break quite often. It is difficult to repair a retractable handle; it is more rational to completely replace the mechanism. The same goes for wheels. If at least one wheel breaks, it is better to change everything. If the wheel is different in color from the others, it will cause damage appearance products. Moreover, even a slight discrepancy in size will create difficulties when transporting the bag.
As you can see, high-quality and professional repairs today are a service quite accessible to a wide range of consumers, with the help of which you can return a product to its original appearance and functionality. If it is no longer possible to restore your favorite item, purchase a new item only from reliable organizations.
In the company "Alex" you can buy quality laptop bags, business bags women's bags and briefcases, school bags from various materials. Our product range includes many various products, among which everyone can find an accessory with the ideal set of characteristics.
A bag can be made from old jeans, ties, umbrellas, and the handles can be made from beads, a chain, or a scarf. Detailed master classes will teach you this in a few minutes.
DIY bag repair
Usually the handles of bags wear out first. There are a lot of ideas that will tell you how to make new ones. Here are some of them. Convert to this part Can:
- one or two waist belts;
- neckerchief;
- pieces of leather, fabric;
- braid;
- chain;
- beads, etc.
If the handles are thoroughly worn, then replace them with 2 identical waist belts, measuring and cutting them to size. This idea is also good because you can adjust the length of the handles, which is very convenient.

If your bag has one long handle, then use one strap, sewing it on with a thick needle and strong thread.
If the material is dense, make punctures for stitches with an awl. To avoid injury, work carefully - place the required part onto a wooden board and only then make holes.
If you have strips of leather or strong braid, then wrap the handles with any of these materials, gradually lubricating them with glue.
Leather handles and chains
To implement next idea you will need:
- pieces of leather;
- 4 or 2 rings (depending on whether there are two or one long handle on the bag);
- large chain;
- scissors;
- needle;
- strong thread.
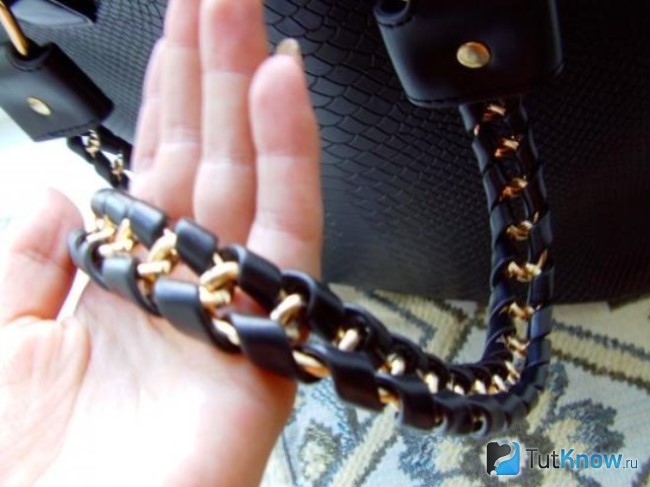
You can buy a metal chain at a hardware store. Pre-measure its length so that the seller can cut the piece you need. If there are two handles, then ask him to split the chain in two and you won't have to do it at home.
Cut the leather into strips of equal width and sew them together using a machine or by hand. Then coat the inside with glue and fold in half. Once the glue has dried, you can start designing.
First wrap them around one and then the other side of the chain. The second handle is made from leather and chain in the same way.
To attach them to the bag, thread the 2 loose ends of the leather tape through the ring, fold them over and stitch at this point. To attach a ring with a handle to a bag, take a wide leather strip, thread it through the ring so that it is in the center of the strip, and sew it to the bag.
You can also use a simpler option. For it you will need:
- leatherette;
- foam;
- needle and thread;
- wire;
- scissors.
Cut out strips of the desired length. Their width should be 2 times larger than desired, plus seam allowances. Fold the first handle in half lengthwise, step back 5 cm from the end, stitch to the edge from the wrong side. Leave the same amount unsewn on the other side of the workpiece.
Turn the handles right side out. Place a strip of foam inside, helping yourself with a piece of long thick wire with a curved edge. Using an awl, make holes on the two unsewn sides of the handle. Passing the needle through them will sew them to the bag.
You can immediately put foam rubber between the two sides of a leather strip folded in half and sew them together, delaying them along the edge on the front side.
DIY designer accessories
Fashionistas pay a lot of money to buy things that are made in a single copy. And you can, by repairing bags at home, turn them into stylish designer works. Here's one idea.
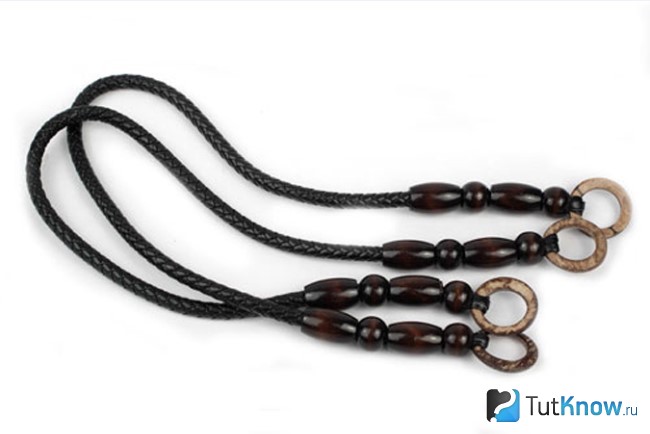
You can turn ordinary bags into designer bags by replacing old handles with original ones like these. They consist of:
- lace;
- beads;
- rings
To prevent the edge of the cord from fraying and to make it convenient to put on beads, lubricate it with glue or varnish. When these products have dried, you can begin the main work.
String beads onto decorative ropes so that the handles of the bag are identical. Tie a ring to the free ends of the lace, hiding the knot under the thread. Next, the rings are attached to the bag using strips of leather, as was described above when talking about how chain-based leather handles are made.
You can create an interesting designer item if you use a silk scarf. They wrap old pens with it, thus hiding flaws.
If the handles are not very worn, then make turns at a short distance from one another so that the material can be seen between them. Tie knots on the right and left, then the scarf will not slip off.
If you have a bag with handles that are in very bad condition, open them. Attach 2 scarves in their place. Tie the corner of the first one on the ring on which the first handle was attached. Do the same with the opposite corner, securing it to the second ring. In the same way you will create the second handle.
If you intertwine 3 cords, they will also make a new long handle for the bag. If you make two smaller ones, they will also perfectly replace the old reticule parts.
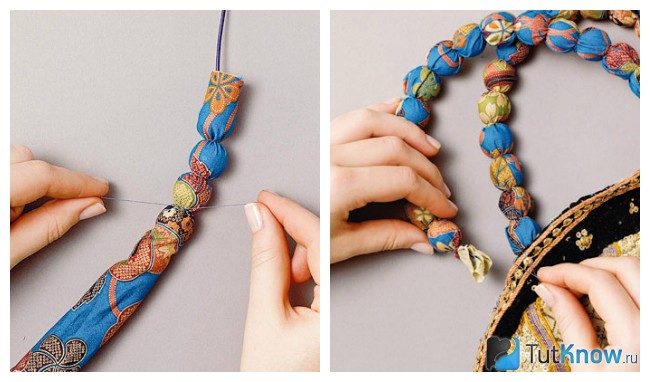
If you have old wooden or plastic beads with the same round pieces, they will come in handy when you... old bag you will make a new one.
Take a strip of fabric, wrap it around the beads, trim off the excess, leaving a seam allowance. Stitch the 2 edges of the fabric together, thread the beads inside the resulting roll. Separate each one from the next, marking the spaces between them by tying them with thread. All that remains is to sew the handles into place and praise yourself for making a new one out of an old bag.
That's how many ways you've learned to transform a well-worn women's accessory into a new, designer one. If the item can no longer be restored, then try to sew a bag from various materials yourself, focusing on models that look impressive and are simple to make.
With such a handbag you can go outdoors or go to the store. It is very roomy; when needed, you can unfasten the buttons on both sides, increasing the size of the bag.
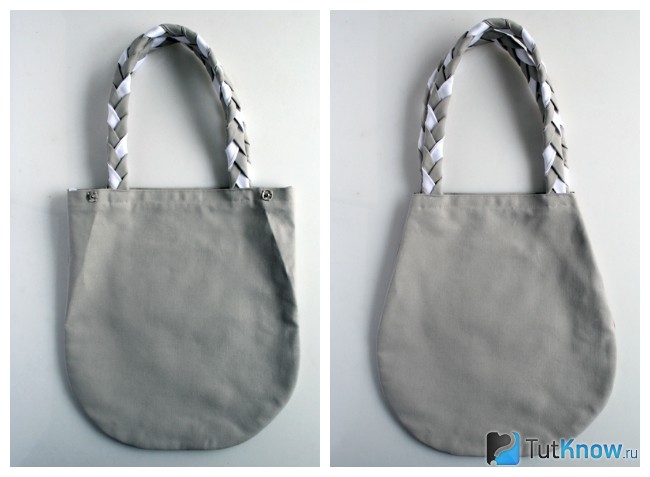
To sew a fabric bag, take 2 contrasting materials. IN in this case gray and white were used. In addition, you will need:
- edging tape;
- matching threads;
- scissors.
Let's start cutting out. Cut 2 large blanks from dark fabric. You can make a fabric bag with a rounded bottom or make it rectangular.
In addition to the two canvases, cut out from the main fabric:
- rectangle for pocket measuring 17x28 cm;
- 4 handles for a bag made of dark fabric measuring 5x76 cm;
- 2 white canvas handles of the same size.

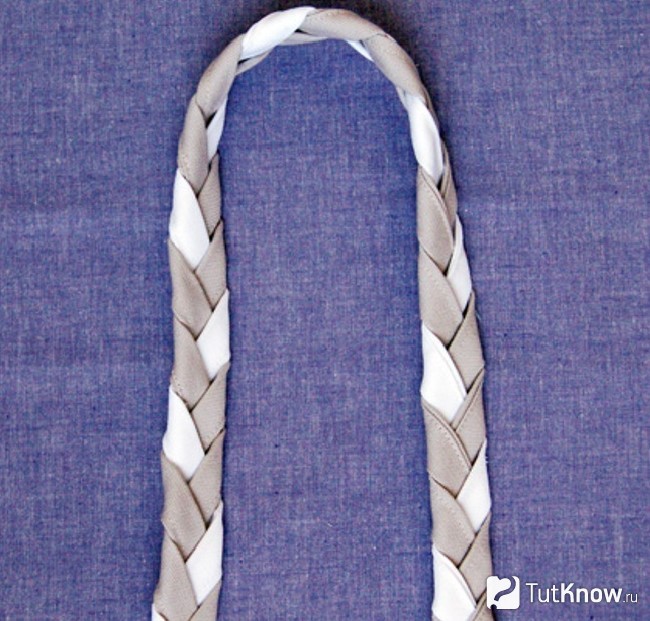
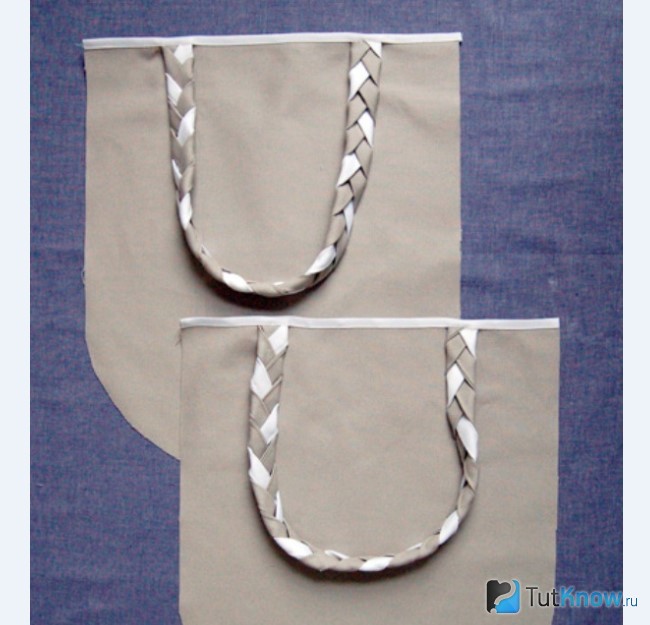
Fold the strips of fabric for the handles as follows: first, lengthwise in half, then fold the edges inward. Iron the blanks or sew on a machine so that the ribbons do not unravel.
Now take 2 strips of dark and one of light fabric, weave the first braid from them. Create the second one in the same way.
Align the edges of these parts, trim off any excess, and stitch along the edges. You should have 2 handles, the length of which is 58 cm.
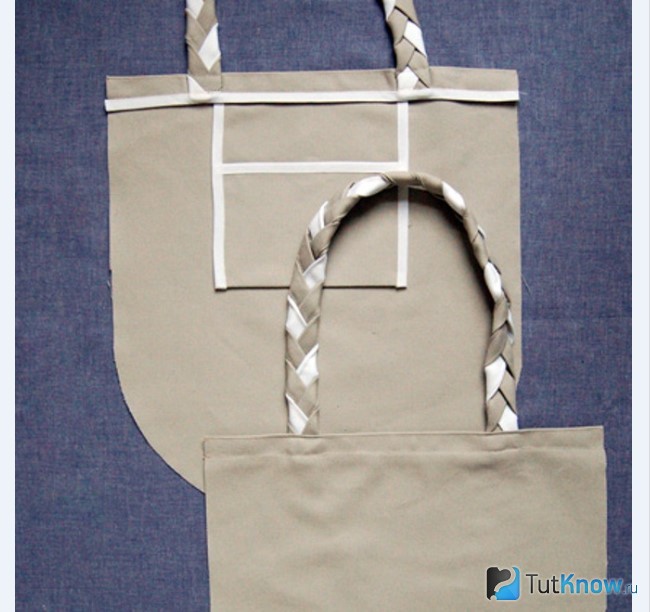
Take the pocket piece, frame it with edging tape, and pin it in place.
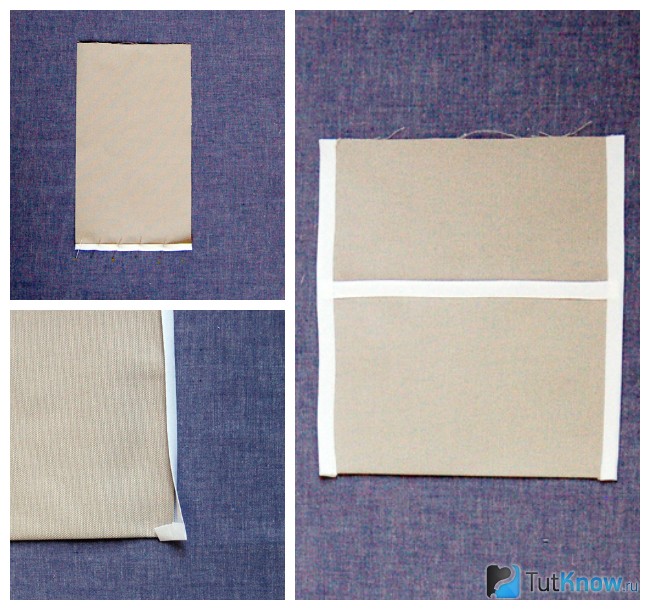
Once you have finished the pocket, pin the edging tape to the top of the fabric. Place 2 edges of one handle between the edging and the fabric, pin them, and stitch using white thread. In the same way, edge and attach the handles to the second fabric of the bag.
Before sewing the handles to the bag, check that they are not twisted. Otherwise, you will have to rip out the seam, so it's better to do it right right away.
Attach a pocket to the wrong side of one of the canvases of the knapsack, using pins for now.
Bend the top edge of the first and second sides of the bag inward by 2.5 cm, make 2 parallel lines, the first along the edge, and the second will be located 2 cm below and pass through the light edging.
Fold the 2 canvases of the knapsack with the right sides facing each other, decorate the edges and bottom with edging tape, and stitch.
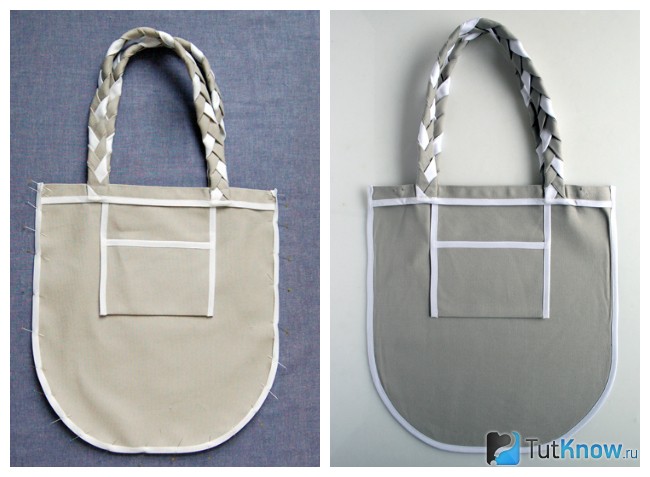
This is where we finish creating the bag with our own hands. All that remains is to iron the sides of the top, sew buttons on them, and a roomy, comfortable designer item that will always come in handy is ready.

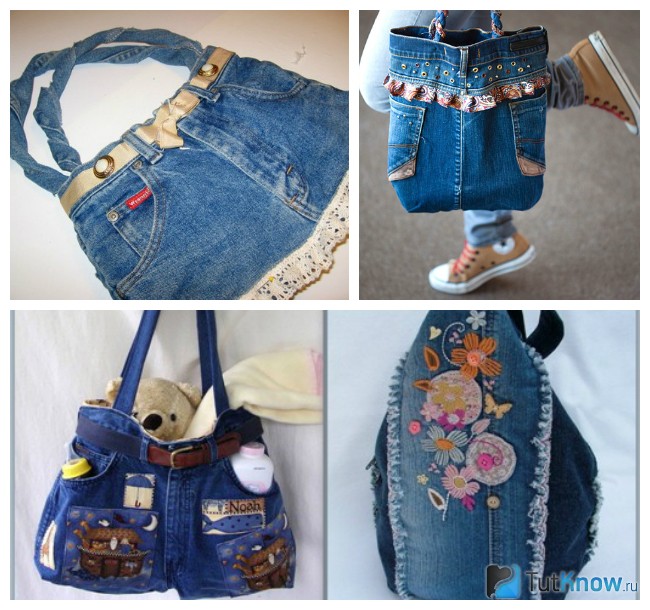
Bags and purses made from old jeans
Well, of course, a reticule, simple pattern will help with this. You can create a new item from trouser tops. Having spaced them out, cut out a rectangle with sides 28 and 42 cm. Then set aside 7 cm from the larger side down, and 2 cm on the left and right. Cut out a semicircular “tongue”. Fold the larger side 2 times to create a small denim handbag. One and the second canvas have dimensions of 28 x 17.5 cm. Close the clutch by fastening it with a button with an eyelet.
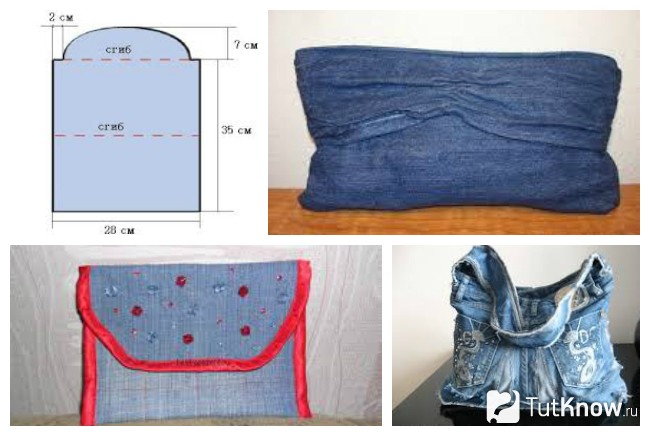
You can sew one long handle to the bag, and cut it not from the trouser leg, but from the back with pockets. The result is a comfortable and original thing.
But such a bag can be made from jeans, very worn from time to time, or from several trousers. Strips are cut out of whole pieces and intertwined with each other. If the ribbons are small, connect them when weaving with reverse side, sewing
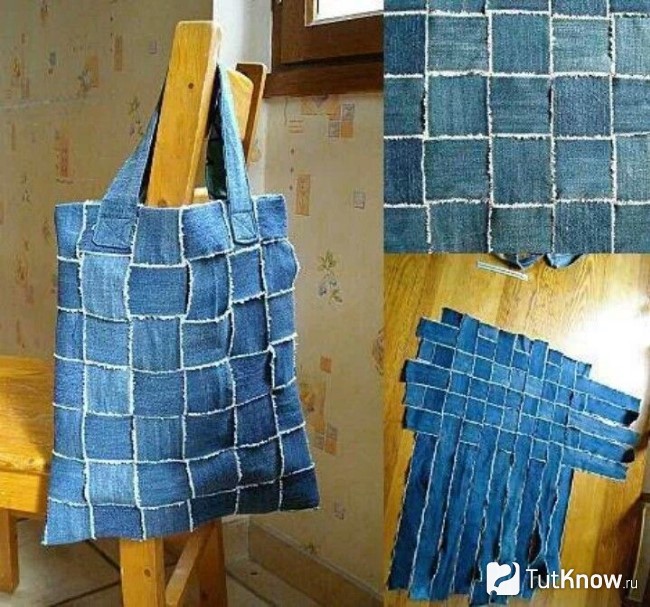
For such a bag made of jeans, created using checkerboard weaving, the fabric is folded in half and sewn on the sides. Then you need to sew on the handles, and another fashion accessory is ready.
Denim bags can be made not only from trousers, but also from a vest or shirt. In the latter case, the sleeves of this item must be cut off.
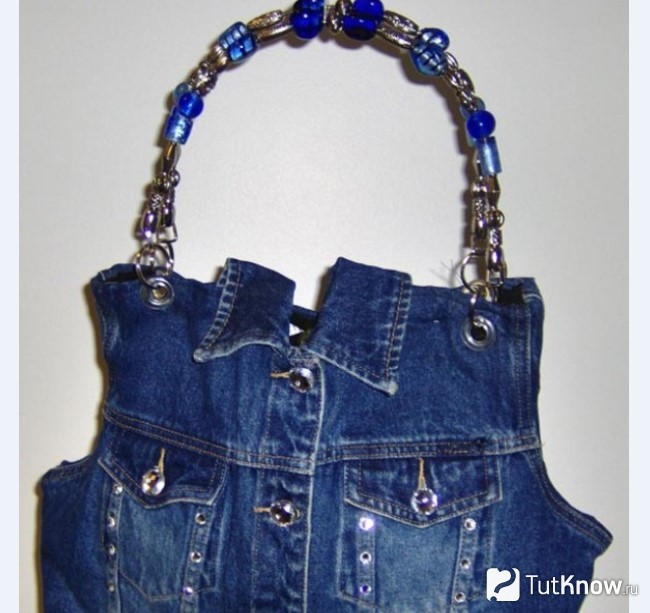
Cut the vest to the desired length, sew the front and back together at the bottom, as well as the armholes together. You will make such an original long handle for the bag from a piece of wire. Beads are strung on it, and metal rings are fixed at the ends, which are secured to the bag in the holes. They can be framed with wide rings in a metal repair shop.
If you do this part of the work yourself, then sew on the handles using two strips of strong braid or leather. They are pushed through the rings of the handles and then sewn to the bag.
Check out some other ideas for inspiration, maybe you'll want to make the same denim bags right away.
Patchwork style handbags
Fabric scraps will also help in creating a stylish designer accessory. It can be created from denim. For this thing you will need:
- pieces of jeans;
- wide decorative braid;
- lace;
- textile;
- 2 wooden beads.
Attach it to the fabric, cut it to the size of the jeans blank. Fold the fabric in half, stitch on the wrong side, and turn it right side out. Do the same with the not yet fully prepared denim bag. Place a fabric bag into it, stitch the edges of these two blanks.
Stepping back 7–10 cm from the top, sew the braid onto the front side. Thread a cord into it, put a bead on the ends of it so that they do not fall, tie the rope with a knot on this side.
All you have to do is stitch on the handles, and you have one more new thing made from old ones. Now you know how to sew a bag from jeans of this style.
The flaps will help us create another model in the patchwork style. The stripes can be horizontal.
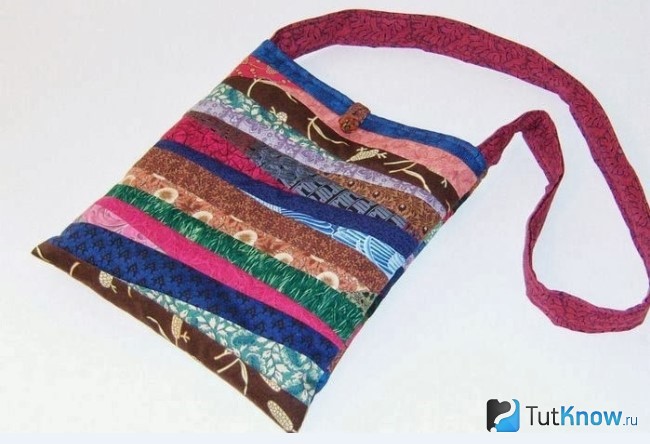
But on our model they will be located vertically.

Cut strips of fabric measuring 3–5 x 50 cm. Sew them together using a machine from the wrong side. Then place the padding polyester on the wrong side and iron everything together. Make stitches on the right side along the seams of the fabric ribbons.
To sew a fabric bag further, we move on to cutting out the handle. Cut a strip of 4 x 30 cm from a dense material. From a colored fabric - a ribbon of 10x30 cm. Wrap the flight strip thick fabric, fold the side edges inward and stitch.
Make a lining according to the size of the bag, sew on handles, a zipper, and the work is completed.
You can sew a bag not only from jeans and fabric, but also from leather. It’s nice to create, for example, such a model with your own hands.
In conclusion, we offer you useful video materials that will tell you how to sew a bag from jeans, from a broken umbrella; how to make new handles for it:
Handbags and handbags in stores today are not cheap. Alas, high cost in our realities does not guarantee excellent quality. Leatherette bags, which are easy to care for, can also peel off quite quickly. This often happens if they “come from” warm countries and are not designed for our frosts.
Perhaps every woman has a couple of bags that have lost their appearance gathering dust in her closet. It often happens like this: the “insides” of a thing are kept in perfect condition, but its “top” made of artificial leather cracks and peels off. It’s a shame to throw it away and impossible to wear. Let's try experimentally to find a way out of this common ladies' problem and extend the life of your favorite handbag for some more time. The author of the article decided to turn a bag that was once classic into an “informal” summer one.
This is what the bag ended up looking like:
And this is what the bag looked like before the transformation began (in its peeling and “plucked” form):
I also have a photograph with that same handbag during her “youth”. Since then, her life has been pretty battered :)
To transform you will need: a fairly shabby handbag, a can of silver paint (or another paint you chose as the main color): in our case, it is based on acrylic polymer. Spray paint can be found in art departments, hardware stores, and hardware stores. Also prepare art acrylic paints (these can be found in office supply departments and art stores). Of course, you can use others instead. But the advantage of “acrylic” is that it is not afraid of water. These paints are also available for painting a wide variety of surfaces: from ceramics and glass to fabric and leather. If you don’t know which ones to choose, you can choose universal ones. They are also convenient for beginning artists, as they are sold ready-to-use. In addition to paints, you will need ideas for painting the bag. It is better to make sketches in advance or find examples of ornaments in books about art or on thematic Internet sites. In this case, the source of inspiration was materials about national creativity Indians
So, let's begin.
STEP 1. It is necessary to free the entire handbag from the peeling top layer of artificial leather. As a result, its dense, strong base will remain. Often made of fabric. It will fall on her new paint.
HELPFUL ADVICE. If the leather of your bag has peeled off just a little, in some places, try to refine the item “spotwise”. Without peeling off the top layer, but removing only pieces of exfoliated material. And then masking the damaged areas. To do this, you can buy some lace or guipure that matches the color (or paint the existing ones in the desired color of the same acrylic paint). Then cut out fragments from them and attach them to the bag with glue like “Moment”.
STEP 2. We cover the entire bag with spray paint. It is better to do this more than once, in a thick layer. And two or three times, in thin layers, letting them dry thoroughly. Before painting, do not forget to zip up all the pockets of the bag, otherwise the paint will get on the lining. If you are painting a bag at home, it is better to do it on the floor, first covering it with newspapers, since aerosol paint is sprayed over a considerable distance. In general, it would be a good idea to carefully read the instructions on the can.
HELPFUL ADVICE. Women's bags often come with two belts. For example, one is long. The other one is shorter. As a rule, only one is constantly carried with the bag (and becomes unusable along with it). The second one is kept “in reserve” and retains a “store-bought” appearance. You can either “pluck” the loose skin from the worn-out belt and then paint it along with the bag. Or use a well-preserved strap with an updated bag. It's okay if it's a different color from the updated bag. Simply use paint in the color of the belt to paint it. In this way, color balance will be found.
STEP 3. We paint the bag with acrylic paint. This can be done either by immediately “working” with brushes on the bag, or by first drawing the contours of the future drawing with a pencil. It is not forbidden to translate it using carbon copies.
HELPFUL ADVICE. You can draw whatever your heart desires: landscapes, portraits, Frost patterns. If you are not good at drawing, it is better to stop at geometric patterns or primitive drawings (like those found in rock art). Even beginners can handle them. A uneven lines and other “roughnesses” in them will pass for features of style. Such painting will look stylish on a bag.
I used Indian ornaments to decorate the bag. Here are examples of links where you can find them:
http://www.bibliotekar.ru/ornamenty/2.ht m
http://mesoamerica.narod.ru/american_ind ian_ornaments5.html
http://blog.kp.ru/users/3612344/post1346 84528/
http://www.tatu.announcements.ru/display image.php?pos=-3561
Wear it with pleasure!
P.S. I made this “handmade” page for the newspaper “Abakan” (www.abakan-gazeta.ru).