Draw the national one. How to draw Maslenitsa? Drawing a spring holiday with children
Artistic wood carving always looks very impressive. Most people have no idea how such products can be made. It seems that this requires enormous physical strength, and in addition, artistic taste and education. However, cutting out a beautiful ornament is not as difficult as it seems, you just need to learn a little technique and, as they say, get better at it. We will show popular drawings for learning wood carving techniques that will be useful for beginners and masters!
It's no secret that for manual creative work it is necessary not only to have the skills of this art, but also have inspiration, desire and, of course, time. In order for all these parameters to come together, the master can use drawings to study simple wood carving. Not only drawings help to generate an idea, but also photographs of the work of other craftsmen.
There are sketches for various types wood carvings, and here you can find a suitable sketch for yourself completely free of charge.
We analyze drawings for wood carving: sketches for geometry
Drawings for geometric carving are well suited for beginning craftsmen. This is an easy and effective type of wood carving. To do this, you just need to determine for yourself which areas are convex and which are concave, in which case the correct picture on the tree will come out.
Boards in geometric and flat-relief techniques.
Stencil.

Stencils can be changed - for example, reducing the number of elements, or, conversely, adding details for a more interesting result.
Stencils for slotted carving.There are other types of artistic carving. One of the simple cutting techniques, provided you have the right tool, such as a router, is slotting. It is also called openwork because ready product, made accurately and accurately, looks like lace. It has no background - it is cut out of the pattern. Hence the name. To practice this type of wood carving, you need to have a steady hand and cut clearly along the contour of the stencil. Under a product made using this technique with a milling cutter or jigsaw, place contrasting color fabric or foil. Examples are visible in the photo finished works, as well as sketches suitable for this technique.

Contour carving is different in that it is cut out on the tree. outline drawing. You can do a lot with this technique. various paintings, it is not necessary to take a ready-made stencil for carving. To decorate a nursery, you can outline the coloring book and use it as a sketch. Also, if you don’t know how to draw, you can take any sketch made in pencil and transfer it to wood. This technique produces good images of animals, birds, as well as landscapes and still lifes. The images clearly show examples of what can be carved on wood using this technique.

Black varnish carving is a type of contour carving, where a light contour is cut out on painted wood.
Examples and stencils for flat-relief wood carving.This type is different in that the drawing is above the background. In this case, the pattern has the same height. The background can be textured or smooth. The edges of the cut out pattern are usually rolled over, that is, it is carefully sanded so that they are smooth, as if oval. This technique requires a little more skill than others, but the products made this way look amazing. The photo shows examples and sketches for carving in this style.

Drawings for boxes can be distinguished as a special type. They can be made using various techniques: slotted carving, placing a base of fabric, foil or noble varieties of wood under the design suitable color; flat carving, which includes geometric and contour, or another subspecies. It differs in that indentations of the same depth are made in a flat background. In the case of geometric techniques, the recesses, as a rule, have the shape of triangles or quadrangles. In addition, there is also a staple carving, which is also a type of flat carving and is well suited for decorating boxes. In the images you can see boxes made in various styles.
Artistic wood carving always looks very impressive. Most people have no idea how such products can be made. It seems that this requires enormous physical strength, and in addition, artistic taste and education. However, cutting out a beautiful ornament is not as difficult as it seems, you just need to learn a little technique and, as they say, get better at it. We will show popular drawings for learning wood carving techniques that will be useful for beginners and masters!
It's no secret that for manual creative work it is necessary not only to master the skills of this art, but also to have inspiration, desire and, of course, time. In order for all these parameters to come together, the master can use drawings to study simple wood carving. Not only drawings help to generate an idea, but also photographs of the work of other craftsmen.
There are sketches for different types of wood carving, and here you can find a suitable sketch for yourself completely free of charge.
We analyze drawings for wood carving: sketches for geometry
Drawings for geometric carving are well suited for beginning craftsmen. This is an easy and effective type of wood carving. To do this, you just need to determine for yourself which areas are convex and which are concave, in which case the correct picture on the tree will come out.
Boards in geometric and flat-relief techniques.
Stencil.

Stencils can be changed - for example, reducing the number of elements, or, conversely, adding details for a more interesting result.
Stencils for slotted carving.There are other types of artistic carving. One of the simple cutting techniques, provided you have the right tool, such as a router, is slotting. It is also called openwork because the finished product, made precisely and accurately, looks like lace. It has no background - it is cut out of the pattern. Hence the name. To practice this type of wood carving, you need to have a steady hand and cut clearly along the contour of the stencil. A contrasting color of fabric or foil is placed under a product made using this technique with a router or jigsaw. The photo shows examples of finished work, as well as sketches suitable for this technique.
Contour carving is different in that a contour pattern is cut out on the wood. You can make a lot of different paintings using this technique; it is not necessary to take a ready-made stencil for carving. To decorate a nursery, you can outline the coloring book and use it as a sketch. Also, if you don’t know how to draw, you can take any sketch made in pencil and transfer it to wood. This technique produces good images of animals, birds, as well as landscapes and still lifes. The images clearly show examples of what can be carved on wood using this technique.
Black varnish carving is a type of contour carving, where a light contour is cut out on painted wood.
Examples and stencils for flat-relief wood carving.This type is different in that the drawing is above the background. In this case, the pattern has the same height. The background can be textured or smooth. The edges of the cut out pattern are usually rolled over, that is, it is carefully sanded so that they are smooth, as if oval. This technique requires a little more skill than others, but the products made this way look amazing. The photo shows examples and sketches for carving in this style.

Drawings for boxes can be distinguished as a special type. They can be made using various techniques: slotted carving, placing a base of fabric, foil or noble types of wood of a suitable color under the design; flat carving, which includes geometric and contour, or another subspecies. It differs in that indentations of the same depth are made in a flat background. In the case of geometric techniques, the recesses, as a rule, have the shape of triangles or quadrangles. In addition, there is also a staple carving, which is also a type of flat carving and is well suited for decorating boxes. In the images you can see boxes made in various styles.
Wood carving is a real art, complex and fascinating, requiring a steady hand, patience and some artistic skills. With great inspiration and desire, it is quite possible to master basic simple techniques, and then take on more complex ones. The work will require special tools, with the help of which the carving process will be more comfortable.
A selection of wood carving sketches
The basic tools for wood carving also include sketches, templates and. It will be much easier and clearer for a beginner to navigate a ready-made diagram than to try to create sketches on their own.
Before creating a wooden craft, you need to decide on a design or pattern. On the Internet you can find many ready-made stencils for wood carving from simple patterns to real paintings. You shouldn’t choose, and options of medium complexity can be simplified at first by removing overly complex elements.
When creating a sketch, you need to do the following:

Stencils can be made using a text editor, which allows you to develop your own sketches, as well as add or remove details from the finished drawing. All that remains is to enlarge the sketches to the desired scale and print them out.
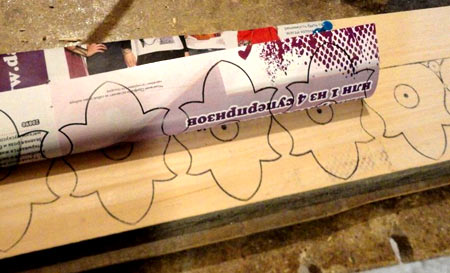
Next, the paper patterns are attached to wooden base and copied by anyone in a convenient way, for example using carbon paper. If the template will be used repeatedly, the finished paper stencil can be transferred to a thicker cardboard or other surface. 
Stencils for slotted carving are usually used more than once, so it is advisable to make them from dense material: cardboard, plywood, hardboard, plastic panels.
If you have to make a lot of sawn carved parts, for example, when decorating a house or to build a fence from a carved picket fence, you can use a milling machine.
For it, special ready-made stencils made of metal or polymers are used. Such a rigid template is installed on the workpiece and limits the movement of the machine strictly according to the pattern. Such templates are quite expensive, so it is not advisable to purchase them for single products.
Transferring an image to wood
There are several ways to transfer a drawing from a template:
How to choose a template for wood carving
It must be remembered that for large wooden products, for example for or, you need to choose the appropriate stencils. Small elements will simply be invisible. And for crafts such as boxes and frames, you can choose more complex patterns with small details.
Also, for different carving techniques you need to choose the appropriate patterns and templates:

Sketches and stencils for wood carving have a special place, and it is rare that a master can do without such an assistant. The beauty of a wooden craft will largely depend on the accuracy of the stencil and no matter how complex the pattern.
Wood has traditionally been a material used for exterior and interior decoration of residential premises. And today it’s openwork wood carvings, photographs, drawings and sketches which can be found in colorful art publications and on the Internet, amaze the imagination with its beauty and grace.
People who love to make decor with their own hands are able to master the art of artistic cutting. Wood allows you to create genre paintings And decorative compositions that can be used to decorate own house and give to friends. A favorite skill in the hands of a connoisseur of the beauty of natural materials can become the main profession. The demand for wooden carvings today is higher than ever.
Tools for work
In order to get started, you will need to select special tools and study the features of the technology. This matter has its own nuances that make it possible to more fully reveal the beauty of wood in the ornament.
You also need to stock up on suitable blanks and sketches that will be repeated on wood in the form of patterns, lace, compositions or genre scenes.

For his work, the carver uses a large set of tools:
- knives;
- jigsaws;
- needle files;
- chisels;
- electric drill;
- drill;
- bars;
- chisels;
- spoon cutters;
- milling machine;
- drill.
Advice for a newbie:When choosing tools for work, you need to focus on the quality and durability of such products. In the first stages, you can get by with a small number of devices.
Designed for beginners special set tools. It will be enough to master the basics of artistic processing of wooden blanks.

You will also need raw materials from certain species. The quality of the product will depend on this. There are hard and soft varieties of trees. Each type has its pros and cons; in each specific case, a specific processing technology is selected.
Soft breeds include:
- Linden;
- birch,
- aspen
- pine;
- juniper.
Soft material It is easier to process, but it is easier to ruin it with one wrong movement of a knife or chisel. Another thing is hardwood. These include:
- Red tree;
- boxwood
Solid raw materials are expensive, but products made from them are beautiful, durable and in demand. They work with expensive breeds experienced craftsmen who know how to handle a hard surface without breaking the tool or getting injured. Therefore, beginners should start with cheaper and more amenable material.

To select raw materials, it is necessary to take into account not only the hardness, but also the color of the wood. For beginning carvers, birch is an ideal choice for creativity. She can cut herself in different directions, lends itself well to drilling and cutting. When choosing a design for a product, it is necessary to take into account that over time, light birch wood may darken.
Coniferous species are suitable for products with a large number of slots. The soft material of pine, spruce, and cedar allows you to apply large designs and create intricate patterns. Beginners can start with conifers, as well as linden, birch and aspen.
A novice carver must master the basics of craftsmanship with simple ornaments. For the first job you will need a small set of tools. First, you can get by with a jigsaw, an awl and a knife.

Before you start cutting, you should organize your workplace with good lighting. Having selected a suitable workpiece with a flat surface and without knots, you need to transfer the selected pattern onto the surface of the workpiece. You can use tracing paper for this. When the stencil is transferred, it is coated with varnish on top so that it does not disappear or deteriorate during work.
A beginner will need knives, chisels, and an awl. For through slots, it is better to use a jigsaw or a manual milling machine, this will save time and effort.
The carver must master all the techniques that he will then use in his work on the product. Using a variety of decorative wood processing methods, you can create artistic masterpieces.

Artistic themes and uses
The carver uses various sketches in his work, from which he takes an image and transfers it to the surface of the workpiece. Today, for this it is not necessary to use an image made by hand with a pencil. Modern technical advances allows you to use photographs and scanned digital images that can be taken from the Internet.
Sketch of the ornament
Samples for artistic wood processing are distinguished by their decorative and thematic variety. On the Internet, on sites dedicated to this applied craft, there is big choice topics for cutting. The facade of a wooden house is decorated with wooden patterns. This decor will look great on doors and walls. Artistic cutting is used for the production and finishing of furniture and tableware.
Kitchen utensils and interior wooden products decorated with intricate openwork are very popular among buyers. In each specific case, the master selects the material, creates a sketch of the future product and begins to work.

The drawings come in a variety of themes. Geometric ones are used plant motifs. Often the wooden surface is decorated with genre scenes depicting animals, people and trees. Wood is a very plastic material, and in the hands of an experienced carver it turns into a real artistic canvas.
For each type of artistic cutting, a special surface treatment technology is used. Using different techniques, the master creates a voluminous canvas on which you can see the most the smallest details Images.

Variety of techniques
Various technologies are used for artistic wood processing. In each specific case, the choice of method determines the product itself, its purpose and the type of wood from which it will be made. During the existence of this applied type Several cuttings stood out:
- flat-relief;
- embossed;
- excavation, or geometric;
- slotted;
- contour;
- volumetric.
The pattern can be through, flat, relief, volumetric, small and large. The choice of finish directly depends on the size and functional purpose of the wooden product. For large items, such as decorative carvings for house facades, a large pattern is used. For interior items and furniture, craftsmen apply small patterns to the product, which are carefully worked out.

Flat creased pattern
This image has a slight relief. The image has the shape of a silhouette, and all the details are located in the same plane. For execution, an oval contour, a cushion pattern and a selected background of the pattern can be used.
How subtypes of this technology are distinguished:
- contour,
- stapled
- geometric (triangular).
To perform the contour technique, in-depth lines running along the main background are used.

Staple technology uses special notches in the form of staples to create the finish. When using geometric carving, the master applies the outline using triangular pyramids and pegs. Repeated many times different options This type of cutting allows you to create a variety of relief decors that are slightly recessed into the overall background. This technique is characterized by numerous compositions from geometric shapes in the form of rhombuses, triangles, honeycombs, swirls, etc.

Openwork or through technique
When creating openwork images, it is used complete removal wood from the center of the product. This drawing has no background. This type of thread technology is called through. It can be simple and openwork. With openwork design, the decor is made of different heights.


