Technique for drawing a tree in the senior group. Methods of drawing trees and people in senior and preparatory schools
I. Using various materials while drawing, you can achieve interesting effects:
1. to get blurry outlines, drip water (or vodka) onto a sheet covered with watercolors. This is a good way to depict a sky overcast with clouds;
2. effect "cereals", snowflakes, "ice crust" can be obtained by sprinkling salt on the applied watercolor image;
3. chaotic uneven retouching turns out thanks to crumpled paper;
4. drawing with a stencil has many options. Try placing the cut out figure on a piece of paper and covering them with watercolors. Now remove the stencil, allowing the paint to spread out. The outlines of the stencil image will be blurry, and the color will intensify from the center of the figure to the periphery;
5. interesting texture can be achieved using sandpaper;
6.emerging "second" layer possible with multilayer image. Draw crayons or candle something on a piece of paper and cover watercolor paints. In those places where something is drawn with chalk or a candle, the paint will not lie smoothly, and the image will show through from under it;
7. "scratching" paint paintings. Draw something crayons or candle on paper (or just color the sheet with crayons). Now cover the sheet of paper with the image with a thick layer of paint (gouache) and let it dry. After the paint has dried, you can start scratching out the image. In those places where there is chalk, the paint will come off well, in other places it will remain an even background;

8. one more interesting way drawing crayons and gouache can be called " m1st image". Wax crayons An object is drawn on paper, and the entire space around it is also painted over with crayons. Now we carefully crumple this sheet, straighten it and cover it with gouache. Now quickly wash off the gouache using a sponge and water. The paint should remain only in the places where the paper is folded;
9. interesting effect comes from drawing sponge. Invite your child to “draw” the crown of trees or the sea with a sponge;

10. give "fluffiness" image can be used using gauze or cellophane. It works well to use this effect with stencil. Cut out an animal figure from cardboard and attach it to a sheet of paper. Now we dip gauze or cellophane into paint diluted with water and lightly move along the contour of the stencil. When you remove the stencil, you will see a clear figure of the animal, and its outline will look soft and fluffy (for example, like a bear drawn with gauze by Valeria Koryavikova).
Next to it is a drawing made according to the same principle, only without a stencil, and instead of gauze was used polyethylene bag;

11. try using it as an additional drawing tool threads. Good at drawing winding lines using woolen threads from a loose product;

12. amazing colorful circles are obtained if you paint not with a brush, but electrical toothbrush or massage brush.

II. "Punching": the child might like it" stamp" objects or in this way "draw" something. You can "stamp" any objects, these can be cubes (a set geometric shapes) or elastic band back side pencil: 

Prints can be made natural materials, For example, spruce branch or a large leaf from a plant:


III. The baby may like to draw on a sheet if it lies on some convex surfaces. You can make a curly one yourself stencil For "imprints", for example, like this:
IV. If you draw over a wet watercolor drawing back of the brush, then you get " grooves", as in the picture with the trees.  So you can “draw” on the wet one with scissors, in which case the “grooves” will be the same and two at a time.
V. Spray: Interesting effects and images can be created by spraying paint from a brush or toothbrush onto a sheet of paper. The same can be done by placing an object on the sheet. Then there will be a “dotted background” around the object, and the image of the object will be colorless.

With help splash you can paint the whole picture:

VI. Blots: drop and let the paint spread over the sheet. You can blow into the center of the blot through a straw. You can make images from blots mirrored, if you first fold the sheet in half (or twist it), then straighten it and drip paint onto it. Now fold the sheet again and press lightly. Next is a matter of your imagination. See what the blots look like and add the necessary details. Below is a mirror drawing from a blot by Yulia Mitko. 
VII.Monotype. This technique works well for postcards.Apply multi-colored stripes or patterns to glass (or any other material that does not absorb paint). Now place a sheet of paper on top and press down lightly. Remove the sheet of glass and examine the printed design.
 |
 |
VIII.Foam drawing.
1. Whisk foam and pick it up with a sponge. Now squeeze out the sponge so that the foam ends up in the paint container. Stir and use a brush to apply foam and paint onto the paper. When the drawing is dry, the excess foam can be blown off.
2. For creating effect use different shades take the colors shaving foam and gouache of the color you need. Mix shaving foam and paint in a bowl and apply it to the drawing with a brush.
IX. Drawings with glue
1.Glue lining.Draw an object on the sheet with a pencil. Through small hole In a tube of stationery glue, squeeze the glue along the contour of the image and leave it to dry. Then fill in the space inside the outline.
There is a wide variety of trees in nature, as well as a wide variety of animals or birds. All this huge variety is classified according to different criteria. But features are important for an artist appearance tree. And in order to learn how to draw it, you need to observe the shape of the trunk, the shape of the branches, leaves, and the shape of the entire crown of the tree. After all, each breed has its own characteristics. Therefore, we will discuss these features in 6 types of trees - maple, birch, pine, spruce, willow and oak (but I recommend reading first).
Maple.
- The maple trunk can bend and branch, which gives it a sinuous shape.
- Bark dark color, is generally similar to the bark of most trees.
- The top of the crown of this tree is rounded, but may also have an irregular shape.
- The maple leaf is known to have a pointed shape, similar to a star. Large masses maple leaves create a “spiky” texture of the crown surface.
- When shading the crown, you can also use longitudinal strokes, but to show the character of maple foliage, it is better to add a “clumsy” or “prickly” textured stroke to the drawing, similar to maple leaves (I wrote about the texture of shading). The same principle should be followed in painting, painting the canvas with strokes that would create the illusion of foliage. Given that leaves and branches combine to form separate groups, the texture of shading and painterly strokes should be varied.
Birch

- Birch comes in different varieties. In the middle zone, the trunk of birches is usually straight and “slender”. In other areas, a birch trunk can form a “slingshot”, bifurcating at the root.
- The crown of a birch often has an elongated shape, directed upward. However, there are also birches with a spreading, squat crown.
- Birch bark is white on the surface. But it has dark “strokes”, which are essentially cracks through which the dark inner layer is visible. The closer to the ground, the more often these “strokes” appear on the bark. “Black lines” are present on the trunk at the base of the branches, i.e. in those places of the trunk from where the branches grow. They can have a triangular or rectilinear shape.
- Small birch branches are so thin and flexible that they hang down, rushing down. The leaves growing on these branches form vertically directed rows. The branches bending towards the ground bend, giving the appearance of birches a special awe and lightness.
- In pencil drawing or painting, the graceful character of birch trees can be conveyed by longitudinal vertical shading or appropriate strokes of paint. Pencil movements or brush movements can follow the movement of the branches described above.
Pine

- The pine trunk is straight. However, there are pine trees with a trunk that bends at the top and have a “stocky” character. Often there are ship pines in which the crown is located at the top of the tree, and the trunk is straight and tall.
- The bark of this tree has a red color, which, as it approaches the ground, becomes much darker, turning into gray-brown. In the middle of the trunk, the pine bark resembles a flaky, scaly structure. Closer to the ground it becomes coarser and forms a dense, cracking layer.
- The crown of young pines has a triangular, cone-shaped shape. But the crown of mature trees will already be more rounded.
- The branches of perennial old pine trees can be twisted and gnarled. As a rule, pine branches do not point very upward. IN to a greater extent they are directed away from the trunk.
- Pine needles are longer than spruce needles. Therefore, they create the feeling of a fluffy crown, which needs to be displayed graphically, or painterly techniques, if it is not a drawing, but a painting. It is necessary to use a textured stroke or appropriate strokes in painting. Each branch has light and shadow, so the artist needs to think about how to draw the volume of individual branches in the overall mass of the crown.

- Spruce and pine have much in common, but this different trees, with its own characteristics. For example, if the trunk of a spruce tree is as straight as that of a pine tree, then the nature of the branches will already differ from the nature of pine branches. The branches of the spruce are slightly curved upward. IN lower tiers old branches droop down and resemble “paws”.
- Spruce needles are shorter than pine needles, so the overall texture of the crown of this tree will differ from that of pine.
- The crown of the spruce tree is shaped like a triangle or a cone and consists of tiers.
- When an artist paints a landscape, he paints trees in volume. To do this, you need to monitor how the entire tree is illuminated and how individual branches or tiers of branches are illuminated. For example, going inside the crown, the spruce “paw” plunges into the shadow. From the outside, it can remain light because it receives more daylight.
- The color of spruce needles is dark and rich. Therefore, both individual spruce trees and the array spruce forest in general, will differ in color from other types of trees.

- Willow trees can look different depending on the variety. For example, at weeping willow the branches are more flexible and plastic than those of ordinary willow. Because of this, its branches hang down, rushing to the ground.
- Willow is characterized by constant branching of the trunk, as well as large branches.
- Willow leaves are narrow and oblong. This greatly affects the appearance of the tree. That's why this feature you need to be able to reflect it through shading or brushwork in painting.
- The color of willow foliage is complex. On one side of the leaf the color is green. And on the other - light, gray-green. Therefore, the overall color of the tree is distinguished by gray-blue shades.
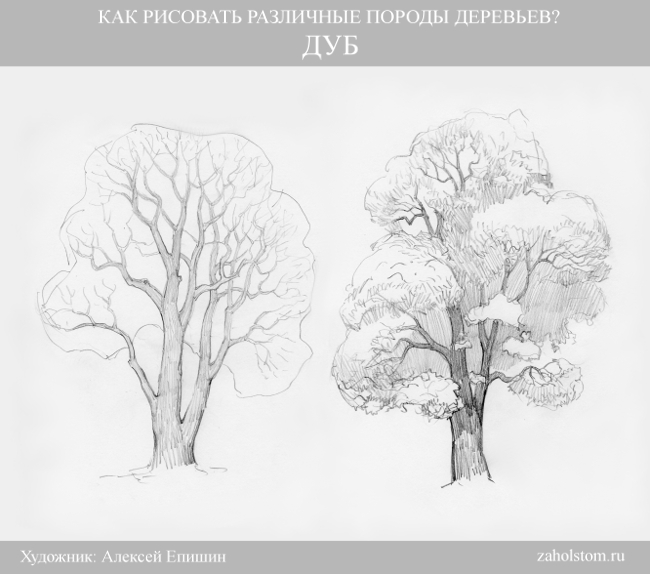
- The oak trunk is powerful. In old trees at the base it can reach large diameter. But in dry areas, oaks can be less stocky, looking like slender young oaks.
- The branches and trunk of the oak tree are twisted and gnarled.
- The shape of the leaves is wavy. That's why general form the foliage as a whole will be “gnarled and curly.”
- The bark is rough and dense.
- The foliage color is dark green, rich.
Here I looked at the appearance features of only six varieties of trees. In nature there are a huge variety of trees and other plants. How can you learn to draw, if not all of them, then at least a couple of dozen varieties? To do this you need to develop observation skills. If an artist has a good eye and good powers of observation, then it doesn’t matter what he draws. The main thing is to understand nature and notice key points. And what points you need to pay attention to are discussed in educational material. For those who want to learn how to draw landscapes with trees well, it will also be useful to study the diagrams and technique called (I mentioned it at the beginning of this article).
Hello, dear friends!
I am sure that almost all of you are interested in the topic of creating landscapes. Landscapes can be very different, showing beautiful and interesting views various corners of our planet, in many of them you come across the task of depicting trees. How to draw a tree that is alive, beautiful and natural is the topic of our lesson today.
Trees are not difficult to draw, but sometimes they come out too drawn or flat.
Basic mistakes
The main mistakes in drawing trees are:
Lack of volume
The lack of volume in a drawing (in color or black and white) is achieved by using paints of different tones and intensity. Even on a cloudy day, some part of the crown and trunk will be more shaded, and some less. The colors are always darker in the thick of the foliage. Think of a tree as a ball (crown) and a cylinder (trunk) to understand how shadows form on this complex shape.
Almost always, when drawing any landscape, a tree appears as the main or additional object, and sometimes even more than one. Before you start drawing an entire grove or even a forest, you need to learn how to draw a single tree, and also practice drawing different types of trees.
In this tutorial I want to demonstrate how to draw trees different types paints using different techniques. It is very important that the colors are good quality. Using low-quality paints will make it difficult for you to control your work with paint, and in general the whole process will not bring much pleasure, and the result will most likely be extremely mediocre.
So, I'll show you how to paint a winter spruce with paints, deciduous tree, as well as the technique of painting wood with a sponge. Let's start.
How to paint a spruce with paints
First, let's designate the trunk. It shows in which direction the side branches grow. Important - if you paint not with gouache, but with watercolor, then you will need to make a preliminary sketch with a pencil and start painting from the light areas, then wait until the paint dries and move on to the dark details. If you don't do this, all the paint will mix and you'll end up with a very messy, unsightly painting. By the way, here is a detailed description of the technique of painting flowers with watercolors.
After you have completed the branches, we outline the main color of the coniferous foliage of the tree. In some places the paint will be a little lighter. Draw the darkest areas in green with the addition of blue - you should get a sea green color.

To add snow to the spruce branches, wait until the paint is completely dry. We paint snow with white paint with the addition of a blue or light blue tint.

How to paint a deciduous tree with paints
Again, we start drawing from the trunk, from which the branches are directed as shown in the image below.

Here for the foliage we will use a warmer green - you can get this color if you add to the usual green color a little yellow - this way you can adjust and change the shade. The more shades of green there are in your drawing, the more interesting it will look. final result. We paint the shaded areas with dark green and turquoise.

Individual, strongly illuminated petals can be designated yellow. Don't forget to draw the trunk with dark and light shades brown. Also draw the soil, grass and flowers at the base of the tree.

How to paint a tree with paint and sponge
This method is especially popular with children and novice artists. It will require paper, paint and a small piece of sponge or foam rubber.
We start drawing from the trunk. Light movements using fine brush draw branches.

After this, you need to dip the sponge a little in green paint and carefully leave prints on the paper in the place where the tree crown should be located. You can practice on a rough draft. Adjust the amount of paint and pressure to get the best effect.
Description of the presentation by individual slides:
1 slide
Slide description:
Drawing trees in kindergarten MDK 02.03. THEORETICAL AND METHODOLOGICAL FOUNDATIONS FOR ORGANIZING PRODUCTIVE ACTIVITIES OF PRESCHOOL CHILDREN
2 slide

Slide description:
2 youngest When drawing a tree trunk, children draw only a line, leading it from top to bottom. The branches are drawn from the trunk, using an inclined line. Moreover, their length does not differ from each other. The location of the branches is symmetrical. In addition to the task of fixing the shape of the spruce, a new task is set - by pressing on the brush, the thickening of the trunk (the brush is flat) and the fluffiness of the needles of the spruce branches are transferred
3 slide

Slide description:
2nd junior group Branches can be depicted in two ways: - the branches are located horizontally parallel to each other, with the upper ones being short and the lower ones longer. They are depicted with a single line with a flat brush. -the branches located on both sides of the trunk are straight, without bending, and have a slope from the trunk to the ground (like the roof of a house). There are few branches (3-4 tiers), they are located at the same distance from each other. The trunk and branches are green.
4 slide

Slide description:
2nd junior group It is advisable to teach children to draw trees on the ground line. When drawing a tree, children should pay attention to symmetrical arrangement branches. We draw the branches obliquely to the trunk, from top to bottom. The tree is depicted without leaves. The tree crown can be drawn in a round shape and painted over.
5 slide

Slide description:
Middle group There are several ways to depict a spruce tree: Green branches are attached to a long, straight trunk. They are not straight, like a young Christmas tree, but bend slightly. First, the trunk is depicted. Then, from one point on the top of the trunk, several branches in the shape of a skirt (umbrella) are drawn flat with separate, long brush strokes. Stepping back a little, the next tier of branches is depicted, but larger in size, then the third.
6 slide

Slide description:
Middle group Generalized method: only the crown and base of the trunk. First, the crown is depicted; in the shape of a triangle, two points are drawn flat from one point with a brush. slanted lines, the space between them is painted over with broad strokes from top to bottom, the length of the strokes is the same. Then the lower side of the triangle is drawn flat with a brush. It may be straight, or it may bend slightly towards the ground. A short trunk is drawn below brown
7 slide

Slide description:
Middle group A variant of the generalized method is: an image of a Christmas tree made of several triangles that come out of one another (the triangles can overlap each other and can be joined.
8 slide

Slide description:
Middle group Colors convey seasonal changes in nature. Drawing a tree conveys its generalized image. When drawing an apple tree, only the crown and trunk are depicted, without drawing individual branches. The crown is round in shape, painted flat with a brush. green. Red or yellow apples are depicted against a dried crown background. From below, a brown trunk is drawn flat with a brush.
Slide 9

Slide description:
Middle group. Stages of drawing Stages of drawing trees (image of a poplar): -1- a trunk is depicted: starting from the tip of the brush, you need to draw a line down to the “brush flat” position; -2- the main branches are depicted, which are slightly thinner than the trunk; -3- additional branches are shown (1-2 on each main one). They are thinner and shorter than the main ones, and are done with the tip of a brush. Use brown color.
10 slide

Slide description:
Middle group. Stages of drawing -4- foliage is drawn. There are 2 possible ways to depict foliage: -1- dabbing method: the brush is completely saturated with beauty. The strokes are dense and can overlap each other. Each stroke is applied directly to the branch. -2- method of stuffing: performed with a vertical movement from top to bottom, semi-dry glue brush(only the tip is saturated with paint).
11 slide

Slide description:
Senior group Learn to convey the characteristic and individual characteristics of plants, namely: -high and low; - old and young; -tree in motion; - various breeds trees, flowers, fruits, vegetables, berries of the Far Eastern region. Particular attention should be paid to the expressiveness of the color of the plant, namely: -plants in different time year and day; -plants in light and shade


