Modern crafts techniques for paintings. Video master class: DIY leather painting
Making interior paintings with your own hands is very exciting. In this case, the most accessible materials are used, such as: buttons, paper, lemon, feathers, balloon, cupcake packaging.
DIY interior paintings
Feather painting
Feel real contemporary artists, creating an amazing canvas. It will be light and airy, as it is created from feathers.

Here's what you'll need to make these interior paintings:
- feathers;
- spray paint;
- frame;
- large bead;
- glue;
- sheet of cardboard.

Then on another surface you need to paint the feathers using spray paint.

As you can see, shades of the same color look great. Therefore, you can take dark and light blue paint. Glue the feathers first on the outside of the circle, and then make rows closer and closer to the center.

When this entire surface is filled, glue a large bead in the middle.

After the glue has dried, you can frame finished work and hang it in the bedroom or living room or present it dear person as a souvenir.

This picture looks great in the interior, like the following ones.
Paper painting
Floating butterflies will certainly lift your spirits.

To create such beauty, you don't need a lot of materials. You will only need:
- colored paper in pink and white shades;
- sheet of polystyrene foam or expanded polystyrene;
- glue;
- whatman;
- scissors.

- Cut strips of pink colored paper to the desired width. The distance between the sides should be what you want the wingspan of this insect to be.
- Attach the butterfly to the beginning paper strip, roll the tape several times so that the insect has enough space in the square allocated to it. Outline the butterfly and cut out along the contours. You will get not one, but several insects at once.
- In the same way, folding the paper sheets into a stack of squares, cut out the remaining butterflies. Use dark pink, pink and light pink paper for this.
- Using double-sided tape, you need to cover a sheet of foam or polystyrene foam with whatman paper. Draw the outline of the future figure on it using a washable marker or chalk. Start gluing butterflies, filling this shape with them. When the work is completed, you can use it for its intended purpose.
Just like in the presented photo, make the left outline of the picture fuzzy, as if it were hovering butterflies that were gradually landing here.
Such works look especially beautiful when sunlight. You can not glue the foam, but tint it using a sponge and paint. Then glue the butterflies using double-sided tape.

You can create interior paintings by making cardboard frames with your own hands. And so that butterflies are visible on the canvas, draw their outlines on a sheet of cardboard and cut them out using a stationery knife. But the bottom of the base should be more contrasting color so that the butterflies are clearly visible.

You can leave them snow-white or paint them.
Get busy with it interesting creativity with kids. After all, they can also create with you original paintings. Each butterfly can be painted and glued to the canvas.

To make a wall panel, use heart-shaped figures. For the next work you don’t even need a frame, you only need:
- double-sided cardboard;
- scissors;
- fishing line;
- bar;
- dye;
- awl.
You should have several rows of hearts. Paint the block and tie the top parts of the fishing lines to it.
Now you can hang this beautiful panel above the bed in the bedroom or on the wall in another room.

The creative impulse should not be restrained by the lack of some material, for example, paper. If you don't have one, use newspapers you read. Cut out hearts from them and glue them to a paper base, make a frame for your work.

If you still have ceiling tiles, this material will make wonderful interior paintings.

For these you will need leftover colored paper. By using the template presented above or creating your own, you will make such a cheerful panel.
Pictures made from buttons and corks
The following design solutions will suggest waste material. After all, wine corks are usually thrown away, but you can make a lot of interesting things out of them. This is the kind of work created based on this material.

For the first picture, you need to cut each cork in half, and if you have a lot of such material, then use whole elements. First draw the outline of the future masterpiece onto the base, and then fill it with blanks. If you want the picture to take on a rainbow tone, then pre-paint them.
To get such beautiful interior paintings, you can only use:
- bottle caps;
- rope;
- awl.
For next picture no frame needed. You simply glue the corks in rows onto the main surface and you can attach a card here to congratulate your loved one.
If you have a lot of unnecessary buttons accumulated in your household, then you can also make interior paintings from them.

For the next one we will use:
- buttons green shades and brown;
- glue;
- wooden plank;
- pencil.
The following will also decorate the interior.

You can put the first letter of your loved one’s name with buttons, glue them to the base and give the masterpiece to him. The motive can be very different. Make the outline of an animal or an anchor out of buttons; such works will also certainly be appreciated.
You can confess your love in the most unexpected way. Paint the wooden surface, when dry, glue pink heart-shaped buttons here. Seeing such a sign of attention, the person dear to you will certainly be happy.

Paintings in the interior can be very different. If you want to capture dark time days, then pre-paint the background brown paint. It is not necessary to make it even. Spread the paint with a sponge, then it will turn out like this mysterious.

A black marker will help highlight the contours of the branches and trunk, and a rainbow crown can be made from buttons of a wide variety of colors.
If you prefer bright hues when take white base, draw a trunk here with a marker or brown pencil. You can give it to your creative imagination will and lay out this part of the tree using threads of this color. Glue buttons that will turn into colorful leaves.

Nature itself will help you paint interior pictures. Check out the following interesting ways their creation.
Method of printing interior paintings
Just dip a daisy or other flower in paint and it will turn into a wonderful printing tool. You will lean the plant against a white sheet of paper and create original designs.

Lemon can be used for more than just its intended purpose. Dip half of this fruit into paint and print on paper.
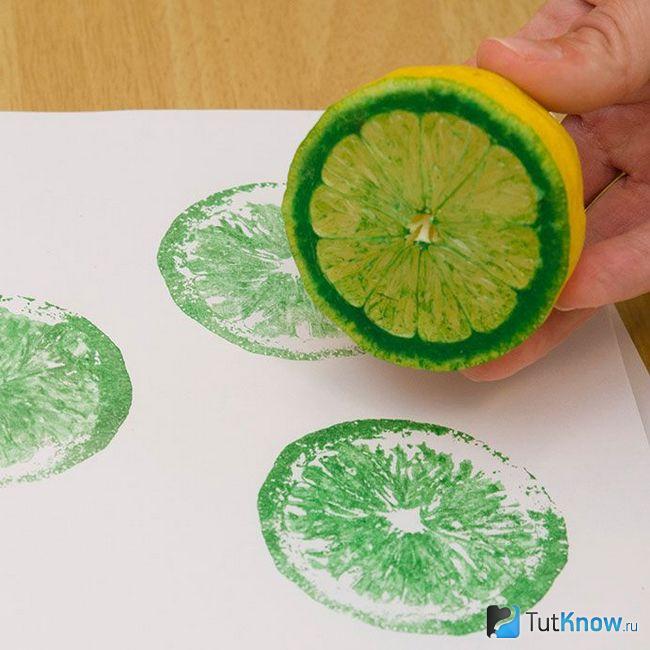
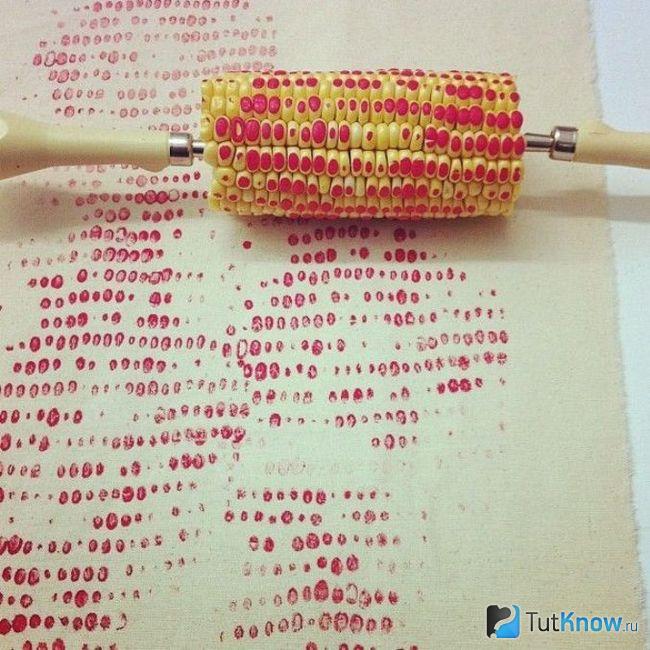
This kind of art therapy will certainly lift your spirits. You can use a wide variety of fruits and vegetables to create interior paintings. If you have an ear of corn, then cut a fragment of the required length from it, prick it on both sides with forks or other sharp objects and print to your health.
If you don’t have fruits and vegetables or don’t want to use them to create pictures, then you can take a balloon.

Pour paint into a bowl. And if you want the prints to be more interesting, then add paint in other shades. Dip the ball into this mass, then lift it and print the patterns that you come up with on a sheet of paper.
If you want to draw your loved one Teddy bear, but you can’t do it, then you can make an impression. To avoid damaging the toy, use water-washable paint. Dip the bear here and place it on a piece of contrasting paper.

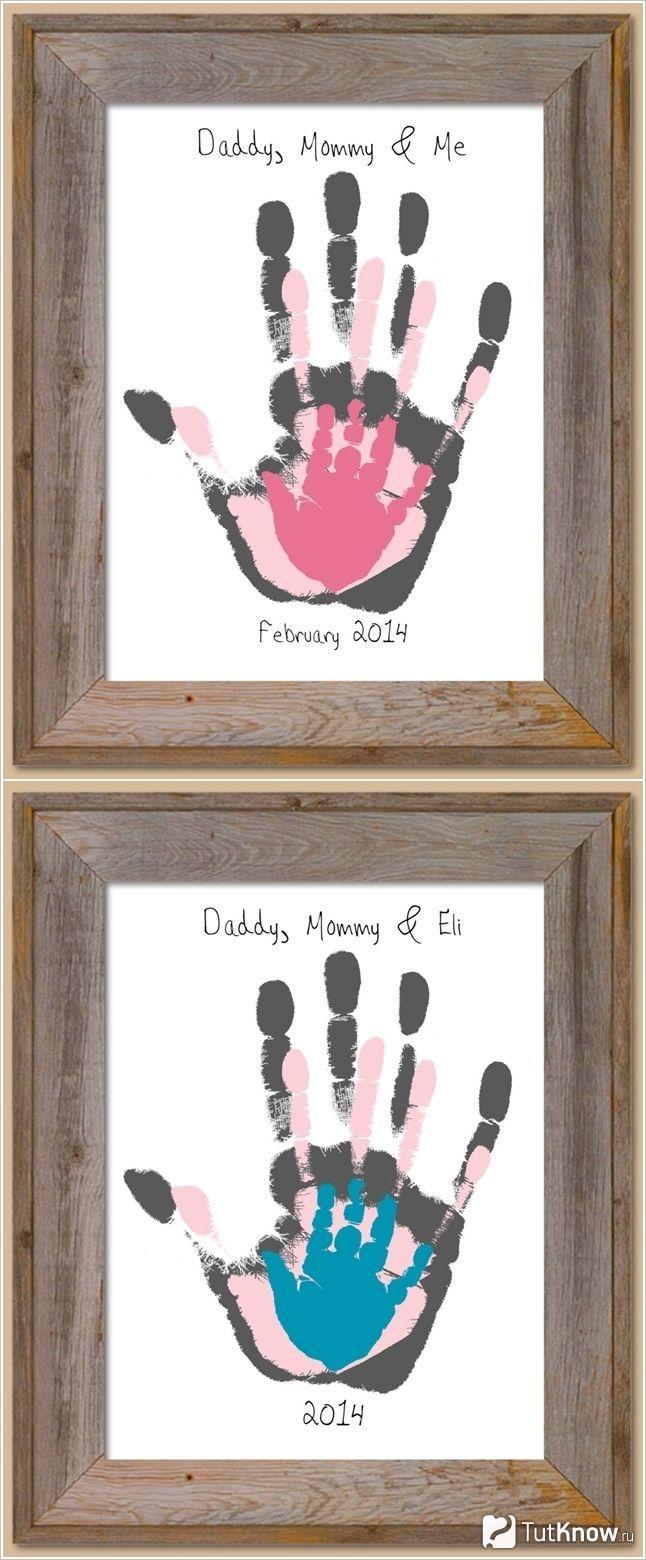
If there are no such consumables, then you can even use your own palm. Dip it into a bowl of paint and press it against the paper base.
If you want to make a picture as a keepsake, then invite all family members to do similar manipulations. In this case, the largest palm should be printed first, and then the next ones are arranged in decreasing order. Use paint different colors so that every print is clearly visible.
It remains to look at a few more ways that will allow you to create interior paintings. To make such masterpieces, you will need very little time.
Interior paintings on the wall in 15 minutes - master class
That's how long it will take to create your next masterpiece.

Also for the interior painting you will need:
- planks;
- dye;
- brush;
- glue;
- Pictures.
You will create the next painting just as quickly. Such works will appeal to lovers of glamor.
Step-by-step master class, detailed photographs will help you quickly understand interesting idea. First you need to prepare:
- a simple pencil;
- scotch;
- glue;
- sparkles.
If you don't have glitter, then you can shred the broken Christmas ball. To do this, cover it with a cloth and gently knock on top with a hammer.
Remove the tape after the glue has dried. Where there was adhesive tape, you need to paint it using a brush. After some time, the work can be glued to the wall using double-sided tape.
If you liked these interior paintings, then create the next one using almost the same principle.
To do this you will need to take:
- picture;
- self-adhesive letters;
- white acrylic paint.
If you have even less time, then you can make a panel in the same minimalist traditions as Malevich’s black square.

To do this, cover a white sheet of cardboard with black paint using a rough brush. All you have to do is hang your masterpiece on the wall and wait for approving responses from home and visiting guests.
Even leftover fabric will give you interesting ideas.

Wrap rectangles and squares pre-cut from cardboard with such flaps. Fold the fabric over from the other side and secure it here. Make a loop and hang your masterpiece using it or double-sided tape. You can create interior paintings so that you have a whole exhibition or make one or two. It all depends on the amount of free time and availability of material.
If you have small scraps left, then you can make a voluminous flower like this.

Using the template, cut out the petals for it. Slightly bending the edge of each, glue it to the prepared surface. This can be a sheet of polystyrene foam or cardboard with non-woven material, wrapped in fabric. First create the outer circle of petals, then the next one, arranging them in a checkerboard pattern. As you move toward the center, complete your work. In the middle the petals are slightly smaller and point upward.
If there is some braid left over from needlework, you can also use it. See what kind of interior paintings you can create with it.

To do this, you need to cut these tapes into strips of the same size and glue the end and beginning of each. Then you need to pull the resulting circles from 4 sides to the center, and you will get four-petal flowers. You can also quickly make a panel from cupcake and cookie packaging. Glue these paper molds to the prepared surface, see what a delicate and airy picture you get.

By applying a template of leaves to paper, you can cut out such blanks of the same size quite quickly.

All that remains is to glue them next to the paper branches and frame the finished work.
Here's what interesting works art can be created in minutes from available materials. If you want to see how others make interior paintings, then your wish will be granted right now.
Do not deny yourself the pleasure and see how you can make a picture whose surface will resemble marble:
Handmade paintings will perfectly complement any living space design. Of course, who can feel and emphasize the mood of a house better than its owners? Made using a variety of techniques, such details will make even a standard design special, transform a simple kitchen or living room, inspire rainbow emotions and bring coziness.
Abstraction
Do you have a lone chair in a rich lemon color in your room? Support the accent with a laconic picture painted yourself!
We are witnessing the triumph of abstract art, and in most galleries we encounter canvases that seem to have come from the brush of either a child or a dolphin. So if the difference is not significant, why not try writing your own creation? Drawing classes bring incredible pleasure, and the result simply cannot be bad or wrong!
A simple and elegant option is a gradient image. You don't need instructions to play it. Take a few minutes of your time, stock up on a roller or brush, two paints (main and white) – a few movements, and the bright accessory is ready.
Draw broken horizontal stripes, they will resemble visualized sound waves or complex graphics, and therefore it will always be interesting to examine them. Golden foil or paint will help to dilute the severity of the lines. You can leave empty seats, and strokes should be done in one motion. It is best to combine gold with a white background, as well as contrasting rough materials - concrete or brick.
In general, images can be anything. It is not necessary to draw something intricate - even children’s blots, circles and triangles, diamonds and waves when selecting the right colors will become real poetry.


Wood paintings
Natural materials are at the peak of popularity. Small tree pictures or huge panels will complete the current modern interiors in loft, modern, eco, country, rustic style.
As a base, use thin dried boards made of natural wood or light panels, for example, plywood. Decorate the bars with stencils, garlands, crystals, paint them or give them a fancy configuration.
Panels made from wood cuts will help bring the atmosphere of a fresh forest into your home. Sketch out a sketch and get to work. It is best to select elements of different textures and sizes - this will add naturalness to the composition. Sand the sides that will be adjacent to the base and fix the bars, leaving the front parts in relief. Fix the finished result with glue and varnish for brightness and better preservation.


String art
Carnations and threads are not the most romantic and cute items at first glance, but you can use them to make very cute crafts. The composition of this non-standard tandem will become original decor premises. You are unlikely to find such a picture from someone else - after all, you made it yourself.
Consider creating a product that says “OK.” The basic materials for its manufacture you will need: light wooden board or plywood 50x50 cm; White paint; roller or brush; sketch; small carnations; threads for knitting or embroidery different shades, close to each other; duct tape; pencil.
If the wood background is uneven, sand it with sandpaper. Apply the paint in long strokes twice. You can vary the sketch yourself or find it on the Internet and print it, group the sheets with tape. Cut the edges with scissors. Place the stencil on a dry board and secure with adhesive tape. Drive the nails into the dotted areas, starting from the top edge. Important point– they should be approximately at the same height level and create parallel straight lines. Carefully remove the template and any remaining pieces of paper.
It's time to start weaving. To understand where to start and where to lead the thread, refer to the sketch. Tie the silhouette of the letters with black thread. Wrap the first carnation twice and make a knot, and cut off its tip. Each thread will be located in the middle of the nails. Stretch the thread and continue to outline the image, making one turn around each nail.
When you have completed the letters, move the thread away from the last nail and wrap it around the other nails. The point is that there is no clear order of nails here, choose the path of the thread randomly. When one color runs out, take another, but similar shade. Finally, fill the void inside the letter "O" and secure finished composition on the wall.


Pictures from wallpaper
Many beautiful wallpapers with intricate patterns are so expensive that it is easier to glue banknotes instead. We won’t go that far, but using wallpaper as a spot decoration is a completely rational compromise. Moreover, the beautiful patterns in large quantities may ripple, but we will carefully avoid these potential troubles.
So, patterned wallpaper itself is a finished canvas, so it is enough to place it inside spectacular frames. It’s good if the design and individual colors resonate with other interior details. Look for sales of leftover wallpaper; one roll will still be enough. Moreover, you can purchase several types of this material to create modular compositions.


Button paintings
Ordinary buttons are a very convenient material for creativity. With their help, original crafts are created by sewing or attaching with glue. This technology is universal and suitable for creating unusual paintings.
You can use the fittings to “outline” the silhouette of a letter, tree, butterfly, elephant, owl or any other object you can think of. In a sewing accessories store, select buttons in different configurations and colors, and at home, lay them out on a template and fix them on the prepared base. Cheerful works will be a wonderful and somewhat ironic addition to the design of a kitchen, living room or nursery.


Textile
One more extreme easy idea for an express painting - take an interesting scarf or piece of fabric with suitable pattern and cover it with a wooden board. Textiles are fastened with flat buttons or small nails.
You can cut out individual intricate elements from thick fabrics such as flannel or felt. Combine different textures, use thematic details - lace and braid, buttons.
Handicrafts will look best in the kitchen or nursery, as well as country-style rooms, which are characterized by cozy simplicity. Calm motifs are suitable for the bedroom.


Stencils
Using stencils, you can easily apply images to any surface. Thick cardboard or plywood are best suited as a base. To make the background look harmonious, you need to use a shade to fill it that is contrastingly different from the color of the picture. Clear gold or silver patterns on a white background look very original.
Compositions applied with paint can be monochromatic or multi-colored. You can use flowers and leaves or a lace napkin as a stencil. Also use stick-on stencils, they will add volume to your painting.
Prepare the base and fill the background with paint if desired. After this, holding the stencil, carefully paint over the empty areas.
When the paint is dry, remove the pattern or move it and apply the next pattern using this or another pattern.


Photo printing, framed quotes
The most realistic picture- This is, of course, a photograph. To make your photos look intricate, frame them in spacious mats and hang them like an exhibition in a fashion gallery. Such an installation will be an excellent addition to a long hallway.
Another way to hang pictures is to create a structure from fasteners and cords. Use paper clips instead of frames.
You are probably aware that photographs can be enormous in size. Contact the nearest printing house or photo studio and print out photographs of your child, the sea coast, rare black and white photographs or a photo of an ordinary light bulb; it will look very stylish in shades of gray.
Ironic and motivational quotes are at the peak of popularity. Print several of your favorite sayings at once in a current elongated font and place them in laconic contrasting frames “for solidity.” Framing will give additional meaning to each word.


Eco paintings
IN modern design eco-style occupies one of the first positions in demand. Naturel is made from both living and dried plants. Vertical gardening systems, panels of succulents and stabilized moss will help revitalize the interior.
To dry leaves and flowers, use an iron, press or oven. In the summer, you can completely dry the parts on outdoors. If you want to get a voluminous herbarium, use express drying, so the vegetation will retain its natural shape. Place the most impressive exhibits one at a time. Iron the sheets between the layers of non-woven fabric and sandwich them between two panes of glass. The decor will look as if it was suspended in the air. The beauty of a herbarium is that it is easy to make yourself and update over time.
By the way, real masterpieces can be created from dry and fresh objects of botany research. It will not always be possible to fix them so that they look as grandiose as you intended, and therefore it is best to try to make something simpler or take a photo of the applique and print it. For inspiration, we selected several photographs of the work of the creative family tandem of Vicky and Brooke, who lay out unusually beautiful floral portraits from flowers and stems - by the way, without a drop of glue, and therefore they only record their work on cameras for calendars and other souvenirs.


Do you have a blank wall in your home with nothing to hang on? Scarlet pillows on the sofa look lonely and require another one bright accent? Just take a canvas and paint a picture that suits you!
We live in an era of triumphant abstract art, when about every second gallery work one would like to say that even a child could draw it. So why not put aside your fears and forget about it for a while? realistic art to create your own little masterpiece? Drawing is fun and abstract painting It’s simply impossible to draw badly or incorrectly! All you need is a canvas, paints, courage, a few hours of free time and perhaps a nice group of collaborators to create a unique work of art that is perfect for your interior. This is much more interesting than just buying a poster from IKEA! If you agree with us, we offer you a selection the best technicians and master classes for creating your own painting.
Gold and concrete
The most favorite color of everyone who undertakes to make stylish picture with your own hands - gold. You just need to add a little leaf foil or just paint to any background, even a plain one. Gold looks good and not too provocative with an uneven gray concrete color.
Photo: JenniferFlanniganart / etsy.com
Sound waves
Horizontal uneven lines always reminds me of some kind of graphs or visualization sound waves, in general, something important, and therefore interesting to look at. To dilute the boring monochrome of the image, you can, like the author of this master class, add a little (or a lot!) of gold.

Geology
Have you noticed how beautiful the cuts of stones are? This is a drawing with a story, a story about changes in climate, relief, and wildlife. You can create your own beautiful specimen of the rock: simply take a vertical canvas and apply horizontal stripes of different widths and different color. Invite the children to draw with you - let them come up with the story of a fictional world in which such a beautiful cut could appear.

Photo: BrennaGiessen / etsy.com
Peas
Polka dots are a magical pattern: you can paint them on anything and it will turn out beautiful. You don't even need to have a brush on hand - just make a stamp from a wine cork or the bottom of a glass. If you use thicker paint (as in this case), the pattern of the prints will resemble a coral pattern!

Colored peas
If you want something more complex, then make a print with a colored pattern. In this master class, in order for the peas to be even, they are cut out with a special hole punch and then pasted onto canvas.

Blot
One way to create an abstract painting is to step back from the work as much as possible and let the paint do everything for you. For example, pour a large blot and then tilt the canvas so that the paint flows picturesquely down it. You can make such a picture together with your child; you don’t even need a brush for this.

Photo: CelineZiangArt / etsy.com
Stencil
Tested: any abstract spots look cooler if their edges are very smooth. This contrast effect can be achieved by painting through a stencil, or pre-reserving part of the canvas using masking tape, or applying white borders using a stencil later, as in this master class.

Scribble
Make squiggles of any color on any color canvas, inspired by famous works, or relying only on your own inspiration - there are no boundaries or laws here, doodle art is a very democratic direction! You can, like blogger Michelle, create many layers, achieving a complex texture, or you can paint with pure color on white. The main thing is to relax your hand and not forget that this is pampering, and a bad option can always be painted over.

Color samples
Pictures with careless horizontal lines look as if they were a sample of colors from the desk of a Pantone Institute employee or a palette from a fashionable makeup artist. The secret to success here, as blogger Julia demonstrates, is to leave enough white space and apply the paint in one motion. Colors can be any.

Ombre
Gradient, or ombre, is a very simple and very beautiful effect. To repeat it, you don’t even need a master class. Two paints - main and white, a brush or roller, five minutes of time spent, and the picture is ready. An excellent solution if your bright apartment has a bright accessory that requires color support.

Vanguard
There is nothing easier than making a print in an avant-garde style. Draw straight lines using tape, like in this tutorial, and use bright paint straight from the can. My only advice is to take the time to make a few sketches in advance.

Stamps
The most budget-friendly paintings do not even require the purchase of brushes: just take the first object that comes to hand and use it as a stamp. You will be surprised what stylish thing you can draw using an ordinary glass!

Impressionism
And the last painting idea for today is an impressionist canvas painted with large strokes. Artist Ashley Sturgill shows how to write a bright picture with gold accent.

Get inspired and experiment, and we will help you with this!
Paintings were once a luxury available only to the wealthy. Today everyone can decorate their interior with paintings. There is no need to buy them at all. By using available materials and with a rich imagination you can produce a dozen paintings, even if you are not Modigliani.
1. Geometry
- Geometry is an extremely popular pattern in interior decor today. And it's not difficult to draw. Having drawn the canvas into squares, and the squares into triangles (we color the latter as the heart desires), we get a fashionable, stylish and bright picture.
2. Prints
- By playing with color contrasts and using natural “stamps” or stencils (for example, fresh flowers), you can “paint” unique canvases that will definitely be in a single copy. Try printing on a white canvas rich colors asters - the result will pleasantly surprise even connoisseurs of high art.

3. Stencils
- Any branch can become a stencil for your future painting. Place it beautifully on the canvas, fill the canvas with spray paint, and remove the stencil. And don’t tell anyone where such luxury is sold.

4. Fabrics
- However, who said that a picture needs to be painted? Cut beautiful fabric will not hurt your wallet and will become a cozy addition to the interior of a nursery or kitchen, where simplicity is always valued. To decorate the living room, choose more expensive fabrics - for example, silk or velvet.

5. Buttons
- Where there are fabrics, there are buttons. In general, buttons are a grateful material. And they are inexpensive, and the decorative possibilities are wide - they can decorate both a dull rag bag and a boring interior. And a picture with a button heart will melt the very heart of absolutely everyone.

6. Wallpaper
- Similar to fabrics, wallpaper can act as paintings. It would be good if there were several such paintings in a row. A lone piece of wallpaper in a frame looks strange, to say the least. Ornaments and floral prints look great against the background of plain walls.

7. Threads and nails
- Threads stretched over nails look extremely impressive, although it is difficult to imagine more incompatible things. Nevertheless, the paintings from them turn out to be masterpieces. The trend even has a name - string art.

8. Modules
- Any “doodles” and abstractions, divided into modules, will look fashionable. Cover several picture frames with fabric, place them next to each other to form a single canvas, give them a few careless strokes of the brush, separate them and hang them on the wall.

9. Beans
- You can use creativity natural materials, including food items such as beans. Before gluing the beans, color the sketch of the future picture with paints. Choose a simple plot, use beans in contrasting colors.

10. Branches
- Nature is rich in materials that are widely used in creativity. Dry branches have more than once become the heroes of crafts. We suggest attaching pre-painted dry branches to back side frames What then? All! The picture is ready. It looks no more strange than many world-famous paintings.