Drawings for painting with paints. Unusual ways to draw
Not only children dream of learning to draw, especially since many adults have talents that remain unrealized. There are various easy techniques that allow you to make drawings with paints for beginners. The easiest way to learn creativity is with gouache; you can also use watercolors or oil paints, but working with the latter requires certain skills.
Artist's kit - components
To learn to draw, you cannot do without paints. It’s better to buy high-quality paints right away, because too cheap paints adhere worse, and therefore the learning process will be less productive. A beginner should not spend money on a professional set: to start drawing from scratch, all you need is basic colors:
- titanium white;
- yellow (lemon, medium yellow, yellow ocher);
- red (carmine, cadmium);
- blue;
- emerald and light green;
- black.
It is easiest to work with gouache, but an adult or schoolchild can easily cope with watercolor. The ideal option is not an ordinary children's one, but a watercolor for artists, which is of the best quality. Budget sets of 24 colors cost 400-500 rubles. In principle, five tones (red, blue, yellow, white, black) are enough for an artist, and the rest can be created by mixing. To combine paints, you need to immediately buy a palette. The shape and material can be any. There are round, oval, square palettes, wood and plastic products on sale. The size of the palette is also left to the user’s choice.
It is equally important to choose a good brush. For beginners, three brushes of different sizes are enough. You can also additionally buy a thin brush for making dotted drawings and small details. The most popular are squirrel brushes - they absorb water well, release it longer, and therefore paint without spots or streaks. This brush is good for glazing or creating clear contours.
A kolinsky brush – round, with a sharp tip – is also suitable for a novice artist. It is also convenient for working out thin contours and elegant details using the technique of painting with watercolors. The kit must include a flat, wide brush for filling. It is used to create a background or stripes over a large area of canvas or sheet of paper. Over time, fan, linear, and retouching brushes are usually added to the collection of brushes. It is important to inspect the brushes for the reliability of the connection between the bristles and the handle - it should be very strong.
Other accessories in the artist's kit:
- Paper. For watercolor paints, you should buy special paper with low absorption, which will not allow water to wet the sheet before it is completely dry. On plain printer paper, watercolors tend to bleed. The best option is hot-pressed paper; it additionally has a very smooth surface.
- Thinners. Special solvents will be required to dilute oil paints. Typically, linseed oil or turpentine is used for this. It is not recommended to use organic solvents - they spoil the structure of oil paint and remove the beautiful shine. However, to clean paint from brushes you need to buy turpentine and white spirit.
- Canvas. Typically used for painting with oils or acrylics. The stores have ready-made canvases on stretchers made of linen, cotton, and synthetics. Natural fabrics are dense, sag little, and patterns look more beautiful on them. You can also make your own canvas. To do this, you need to buy a stretcher, cover it with fabric, and then prime it. As the primer dries, drag the canvas a little tighter.
- Easel. It is recommended to purchase it if you plan to take up drawing seriously. The easel is placed at eye level, which gives an excellent overview of the painting, helps to work correctly and quickly look for flaws. For small canvases, mini easels are available for sale.
- Protective varnish. It is advisable to coat the painting with varnish, this will help protect it from ultraviolet radiation and make the colors richer.
Also, to create an artist’s kit, you need to buy jars for brushes, wet wipes, and cotton rags. To work with oil, you will need a palette knife - a spatula for thick paint, removing dried material and applying beautiful strokes. It is also worth buying oil cans with clips (single or double) that contain paint and are easily attached to the palette.
Watercolor painting techniques
You need to learn different drawing methods step by step, moving from the easiest to the most complex. At first, most artists use sketching, then they begin to show imagination and create their own masterpieces. It is recommended to start learning to work with watercolors with the techniques described below.
Painting with a flat brush
If the drawing is invented, you should follow these steps step by step:
- Draw a square or rectangle to indicate the beginning and end of the layer. Use a dark shade to draw a thin line from the top left corner to the top right corner.
- Wet the brush with watercolor. Make the second stroke from the bottom edge of the first line, covering the paint that has accumulated below. You need to work quickly to avoid watercolor drips, or carefully wipe them off with a cloth.
- Repeat this action again with the next line. It is better to use the flat edge of the brush for strokes, which will make the bottom of the stroke smoother. Intermittent strokes must be re-drawn immediately.
- Completely fill in the outlined outline, repeating the steps in the same way. It is important to maintain an even tone of paint and not change the brand of watercolor. On paper that is too thick, the strokes may be uneven. Then it is recommended to lightly sprinkle the sheet with water, blot it, let it dry, and only then start drawing.
At the end of the work, you need to rinse the brush, squeeze it dry, and use it to remove all clumps of paint at the bottom of the last stroke, avoiding discoloration of the drawing. To give the picture some texture, you can leave it to dry on an angle.
Gradient
First, you also need to work out a square or rectangle (in the future this will be the drawing required by the artist). Then the following steps should be taken:
- dip the brush in a dark shade of the required color, draw a vertical or horizontal stroke;
- wipe the brush with a cloth or paper napkin, dip it in a lighter shade of the same color, draw a stroke overlapping part of the previous one;
- rinse, wipe the brush, make another stroke (lighter, darker or a completely different color);
- repeat until the figure is filled;
- rinse the brush, dry it, pick up the remaining paint.
Using a gradient, you can create very interesting transitions that form the basis of a future painting.
Watercolor glaze
The glaze technique requires the artist’s imagination; with its help, landscapes, images of autumn and summer, and landscapes come out well. Description of the technique using the example of a landscape:
- paint the sky above and the river below using blue watercolors;
- dilute the paint with water, draw a waterfall;
- make pink clouds in the sky;
- decorate the bottom of the picture and the mountain in yellow;
- let all layers dry thoroughly;
- use dark blue to shade the horizon of the mountain and its top, and you can also use it to beautifully decorate a waterfall;
- make the banks of the river orange, shade the sky a little;
- as the drawing dries, draw bubbles on the waterfall in purple;
- you can draw trees along the banks of the river - trunks in brown, leaves in green;
- tint the sky and water blue;
- Draw the grass in blue and green;
- you can depict trees and fruits under them.
The point of glazing is that all layers of paint interact with each other, overlap one another and, when overlapped, give even more interesting effects.
"Wet" technique
Before drawing, you need to moisten a sheet of paper with water. Of course, you need paper that is thick and does not sag. Wetting is done using a sponge, having previously wrung it out. The moisture should be evenly distributed over the sheet and not shiny, otherwise there will be too much water on it.
- first draw the background, choosing any light shade;
- draw a vase;
- draw leaves in a vase using yellow, red, orange;
- Apply each new shade after the previous one has partially dried, the blurriness of the lines creates very interesting effects;
- at the end of the work, you can place accents using brown, dark brown, burgundy, and create shadows;
- Use a wet, clean brush to blur the edges a little, but do not overdo it to avoid the sloppy appearance of the drawing.
You should not combine cold and warm tones in one drawing, this will create visual dissonance.
Dry brush painting
It is not difficult to draw using this technique. You need to take the paint on a dry brush, then make a stroke on paper. It is recommended to first sketch in pencil. At first, the sketches will be quite rough - for example, the outlines of the sky, trunks and branches of trees, a river. After the first layer has dried, details are added, shadows are created, and texture is drawn. Then they create a background around it and place the necessary accents.
When drawing, you need to change the pressure on the brush, which will allow you to add or remove texture. It is important that the brush does not remain too wet after rinsing and blotting. Otherwise, the paint will not give a textured effect and will look flat.
No excess moisture
The technique is well suited for drawing clouds and streams of light. Before you start, you need to prepare several sponges or facial sponges. First, strokes are made with a dry or wet brush, then they are rubbed with sponges. It is important not to rub the sheet too hard to avoid damaging the paper. Highlights can be done with paper towels. Afterwards, if necessary, the contours of the drawings and accents are drawn with a thin dry brush.
Discoloration of dried paint
In this case, the already dried drawing is lightened. The desired areas need to be moistened with a cloth and gently wiped with a dry brush. It's best to use brushes with stiff bristles that can scrape up a bit of the paint. Actions must be careful, otherwise there is a risk of damaging the paper. Instead of using a cloth, it is permissible to spray the paper with a spray bottle, and then moisten the moisture with a paper towel. Another option is to carefully rub the design with sandpaper, then you do not need to wet it first.
Gouache for beginners
It is usually recommended to learn to draw with gouache in childhood - from 4-6 years old. It is very easy to apply, does not float, and is much easier to work with than watercolor. Gouache drawings can be very diverse - nature, animals, flowers and trees, fruits, etc. Adults paint real landscapes with gouache.
You can make drawings not only on paper, but also on canvas, plywood, wood, fabric, even on stones and pebbles. For this purpose, it is better to purchase not children's gouache, but artistic gouache, which is of high quality. First, a pencil sketch is made, then it is painted over. Start with dark colors, gradually moving to light ones. You need to mix paints taking into account the color wheel, otherwise the result will be a gray tone.
Features of oil paints
Experienced artists greatly value oil paints, which are available in a wide range in specialized stores. The paints contain minerals, organic and synthetic components. They are diluted not with water, but with linseed oil, which gives brightness and richness of tone. Paints take a long time to dry, but the design can be adjusted over a period of time. To dilute dried, thickened paint, a special oil is also used, which is sold in art departments.
Types of oil paints
There are three types of oil paints:
- Highly artistic. They are usually used for professional painting. The price of the material is high due to the excellent quality of the components. For decades, paints do not lose color or fade.
- Sketchy. Suitable for beginners, inexpensive, can be used in different techniques.
- Studio. They have an intermediate price between the two listed options and are suitable for artists and beginners.
Oil paints can also be transparent or opaque. The latter are denser and do not allow light to pass through. If the packaging is marked with an “*”, this material is very durable and lasts a long time. The more stars, the higher the quality of the paint.
Rules and techniques of drawing
The oil painting looks very beautiful. Each stroke looks on its own, although achieving such an effect is quite difficult. There are two main techniques: one coating (alla prima) and several layers. To apply multi-layer paints, you will have to try - work quickly, do not dilute the material, know its properties and how one tone will look on top of the second. Oil consumption for multi-layer application is usually large.
A single-layer pattern has its disadvantages. So, over time, brushstrokes can crack due to paint shrinking, so most professionals dry the first coat and apply at least one more. This way material costs can be reduced.
- the lighting must be good, otherwise there is a risk of creating unnecessary shadows in the drawing;
- First you need to draw a contour, then apply oil strokes along the lines;
- colors can be mixed, knowing the basic principles of combining tones;
- Usually they paint pictures starting with bright elements, highlighting the darkest and lightest points;
- after completing the sketch, outline the contours and details, make the necessary accents;
- the finished painting should be allowed to dry for three days, but on the second day you can make some edits;
- After drying, the canvas should not be rubbed or touched with hands.
Acrylic paints combine the properties of oil and watercolor; they do not fade and are not afraid of water. You can apply layers directly on top of the previous ones without waiting for them to dry. To begin with, it is better to buy a set of 6 colors, then expand to 18. You should paint with acrylic on paper, canvas, fabric, glass, plastic, stones. Dilute the paint with water and solvents. The following techniques are used:
- dry – on paper, canvas;
- wet - on a dampened canvas;
- glazing - applying a thick layer and then shading it;
- impasto - painting with clearly distinguishable strokes.
To give the drawing a complete look, you can apply individual strokes with felt-tip pens, markers, pencils, and pastels. First they do simple pictures, then they move on to still lifes, views from the window, and portraits. For learning, it will be useful to use the abstraction technique - making spots and adding details, giving them an image.
Tips for working with acrylic are:
- You should have a spray of water nearby to wet the quick-drying paints;
- by adding water, you can make a more transparent material from acrylic paint;
- Do not add too much water; after drying, the paint may crumble;
- Before wetting the brush in paint, you need to dry it;
- adding a solvent rather than water will help slow down the drying of the material;
- To preserve the design, it is coated with varnish.
Drawings on fabric
It is quite difficult to make fabric drawings; it is better to practice on a different basis. If you have experience, it is quite possible to paint on silk, synthetics, and natural fabrics. First, the fabric needs to be washed, ironed, stretched over a frame or placed on a flat base. Place oilcloth under the fabric and make a drawing with a special felt-tip pen for fabric. Then do artistic painting. The easiest way is to work using ready-made stencils, but you can make a drawing yourself. After a day of drying, you need to iron the product, after 2 days it can be washed.
Paintings on canvas
For acrylic, canvas is the ideal base. The paints must be prepared in advance and diluted with water. If mixing is planned, it is better to use a special solvent, otherwise the material will dry out quickly. The palette should be periodically sprayed with water. They begin to draw the largest details, and as they draw smaller lines, change the brushes to thin ones. The norm for diluting paints with water to create more transparent tones is less than 20%. 
Drawings on paper
It’s worth trying drawing on paper for the first time. Since the structure of the paints is dense (it is, in fact, liquid plastic), ordinary thin paper will not work. It is better to take cardboard or special thick paper. Drawings can also be done on paper wallpaper that is already pasted on the walls. This is a popular design technique that allows you to decorate a plain material and give the room an original look.
Glass painting
Pictures on glass look very beautiful, reminiscent of finished stained glass. The outlines of the future drawing are made with a thin marker according to the sketch, which is placed under the glass. Afterwards, paint is applied in layers, forming the desired color combinations, accents, lighter and darker areas. At the end of the work, acrylic varnish is applied to the painting.
Colors give endless scope for imagination. Learning to draw is not difficult. Even without talent, you can make beautiful drawings with enough diligence and perseverance.
Drawing with paints is not only very interesting, but also educational. A landscape executed in different techniques calms, gives positive emotions and instills in the artist a sense of beauty.
From our lesson you will learn how to draw a landscape step by step and what you will need for this.
Landscape
Painting with watercolor or gouache provides a wide choice of landscapes.
For example, one of the most impressive subjects for drawing is mountains. They can be either smooth, like a mountain range, or sharp. By depicting mountains, you have the opportunity to show the contrast between sky and earth, high plains and slopes.
Another significant point is the weather. It’s very exciting to paint winter mountains: you can “play” with shadow and light, with different shades and reflections on the white snow. Ultramarine, yellowish, turquoise, ocher or burgundy color - all this is quite appropriate on the snow cover. The main thing is to choose the right color scheme.
A summer landscape depicting mountains will be no less interesting for novice artists. Picturesque and beautiful: warm shades of grass or cool colors on pine branches, a riot of greenery and colors. At the same time, you do not need to carefully draw them - the bolder and freer the brush lies in your hand, the easier and more relaxed the picture will be.
Important: landscape is not only nature, but also a certain atmosphere, into the creation of which we invest our mood and emotions.
Where does the landscape begin?
Any drawing must begin with a layout on a sheet of paper. Make the sky smaller than the earth or vice versa. Please note that these parts do not have to be the same.
If you are drawing mountains, be sure to think about which peak will be higher and which will be lower. You should not depict identical mountains, although this happens in reality. It is best to make them different compositionally, which will add a certain dynamics to your drawing.
Pay special attention to objects located in the foreground - what is closest to the artist, that is, to you. The foreground is always drawn more diligently and in more detail than the background.
Now let's try to draw a mountain landscape in gouache.
Landscape in gouache step by step: drawing mountains

Stage 1
Take special A3 drawing paper and make a preliminary sketch, mixing white and blue gouache, paint over the sky. While it is still wet, paint clouds with white gouache, using a circular motion with the brush to create a mixture of colors. Using this technique will make the sky cloudy and a little fantastical. 
Stage 2
Let's move on to the image of the mountains. Mix white gouache with blue, add a little purple and completely paint over the mountains. Mix the same color with white and immediately paint over the areas of the mountains that are located in the light. In order not to disturb the aerial perspective at the base of the mountains, make the color light.
Now comes the fun part! You want to learn how to draw a landscape step by step for beginners in a variety of options? Then let's draw snow-capped mountains.
Stage 3
Using a palette knife, scoop up some whitewash and, pressing lightly until the paint is dry, use the tip of the palette knife to make slits on the mountain. Paint the shadow areas in the same way, only with a bluish tint of gouache.
Important: do not use a large amount of gouache and do not mix it with water - the paint should be thick. Practice first on a separate sheet of paper and only then start drawing. 

Stage 4
Mix white with blue gouache, and then use smooth strokes to walk at the foot of the mountains.
Stage 5
Now mix blue paint with green and paint a forest. Add ocher or other shades of yellow and green to depict a forest. Use the same colors to paint the ground.


Stage 6
Paint the lake by mixing white and blue gouache and adding a little green. 
Stage 7
The final step. Again, mix the blue and green paint, and then, making large strokes, paint over the future bushes. 
Stage 8
Using light ochres and greens, complete the bushes. 
Landscape in watercolors step by step: painting a sunset

Next we will look at how to paint a sunset using watercolors. All you need in this case is watercolor and watercolor paper. Shall we get started?
Stage 1
Without making a preliminary sketch and after moistening the sheet a little with water, start painting the sky. To do this, take blue, purple, pink and orange watercolor colors. You can draw the clouds the way you like, mixing colors and creating unusual transitions. 
Stage 2
While the paint is still wet, mark the background with a darker color - it should be different from the sky. And a little closer to you, using a dark purple tint, make the plan even darker. Also draw a small fluffy tree and leave the work until completely dry. 
Stage 3
Using a dark purple hue, paint the tree trunk, adding burgundy splashes in some places. Paint the ground with the same color to make it look as much like the roots of a tree as possible.
Then, using a thin brush, slowly draw tree branches of different widths and lengths: thick and thin, long and short. Make the branches a little lighter in the background and darker in the foreground. 
Ready! You yourself painted a colorful and very beautiful sunset.
There are many techniques to paint a landscape with paints. But if you are a beginner artist, then step-by-step drawing will be easier using gouache. It is easy to use: it has no specific odor, easily mixes with water and washes off. Any brushes are suitable for working with gouache, but it is best to give preference to pony or synthetic brushes.
This technique is also suitable for beginners because if you make a mistake, it can be easily corrected by painting it with another layer of paint. In addition, the next layer applied to the dried pigment will not mix with the previous one. The main difference between gouache and acrylic and oil paints is that you can paint with it more freely, without fear of making a mistake.
It doesn’t matter how you draw parts of the picture - all at once or separately. For example, you can first paint over the ground and sky with gouache, and then paint the foreground, trees and clouds.
Note: to speed up your work, apply paint to objects immediately, without leaving it “for later.” Agree, it is much easier to do everything in one stage, rather than wait for the painting to “dry”.
This option for painting a landscape is no less interesting and is also quite suitable for beginning artists. You can easily master the watercolor technique if you know some tricks and important rules.
— Painting with watercolors is, first of all, working with layers. The paint is translucent, which means mixing each new layer with the previous one cannot be avoided.
— Errors are excluded - that’s what anyone who picks up watercolors needs to know.
— The key to success is thick paper. The rough special surface perfectly absorbs watercolor paint and guarantees a good effect.
— Nearby objects must be painted with bright colors, everything else must be mixed with water and pale. Unlike oil, acrylic or gouache, watercolors are written “liquidly”.
— When working with watercolors, it is best to use brushes with natural squirrel or pony bristle.
And, of course, do not forget that painting a landscape with paints in several stages is a rather difficult task for a beginning artist. Many questions arise here: how to arrange everything on a sheet, how to get a certain color, how to highlight this or that object, etc. Answers come only with experience.
The best advice that can be given to all beginners in painting is to practice more - draw the most ordinary objects. Remember that the sooner you understand that realism directly depends on highlighting some details and creating contrast, the sooner everything will work out.

So what is landscape? This is good training for any artist, which does not allow you to escape from the main theme of the image and at the same time gives freedom of imagination.
With watercolors you can paint anything - from a realistic portrait to imaginary alien worlds. Many people think watercolor is a complex artistic tool. But all you really need to learn how to paint with watercolors is to just start. We have selected 11 tips for you, thanks to which you will become 11 steps closer to understanding the art of watercolor drawing.
1. Don't be afraid to get your hands dirty!
If you've never drawn before, it's time to get started. Open the album, create interesting textures and stains with watercolors so as not to freeze in front of a white sheet of paper. Start from them in search of a plot. Color pages can be bright and exciting or create a calm, melancholic mood. Color or texture may suggest the next step - or maybe you're itching to paint without it.
Illustration from the book “The World of Watercolors”.
2. Find your watercolor paper
The result of the work largely depends on the quality of the watercolor paper. Go to a bookstore and select 5-10 different sheets of watercolor paper to try out. Be sure to make notes on each sheet (type, weight of paper and results of working with it). A suitable paper weight for beginners is 300 g/m2, some professionals prefer 600 g/m2. There are other types of watercolor paper, such as NOT paper and rough texture paper, or cold pressed paper.

3. Use professional paints
Even novice artists should purchase professional watercolor paints. Unlike cheap analogues, artistic paints lay beautifully and spread on paper.
“I prefer tubes rather than pans: firstly, you don’t have to wait for the paint to soften and become workable, and secondly, it’s easier to create rich, dark mixtures with tube paint.”Billy Showell
It is true that artist paints are more expensive, but they will also last longer. They dilute better and therefore are not used up so quickly.
Advice. Try new paints and other art materials as often as possible. Experiment. Don't become a hostage to one habit
4. Observe and consider before you take up the brush
Before drawing, study the structure of the object. Look at it as if you were seeing it for the first time, look carefully, take notes, sketches, get familiar with textures and details that you have never paid attention to. For example, observe the spiral arrangement of the leaves or the whorls along the veins of the stem.

You get double benefits from drawing plants - first you meditate while looking at it, and then you get real pleasure from drawing. Isn't it wonderful? @miftvorchestvo
Try to mentally break down what you see into its components. Select the main shapes. See how they overlap each other. Imagine the landscape as a stage set. Pay attention to what is closest and what is further away.
5. Learn to mix paints
Try mixing colors to get an idea of what shades you can achieve with your paint set. Mix two colors first, then add a third to them. Experiment!
You will love creating such beautiful colors and variations of shades and tones, the number of them is almost inexhaustible.
Focus on yourself. You can make either very realistic drawings or very non-trivial ones. Your task is to collect paints whose properties you will know, which will allow you to create the desired shades with a guaranteed good result.

By mixing pure pigments, you can create cool, warm or grayish variations of the same color. Illustration from the book “Song of Colors”
6. Start with sparing expression
If you make pencil sketches or sketches, you can diversify your watercolor drawings by adding accents. You don't have to color the entire page; sometimes a few well-placed brush strokes create the most powerful effect.

Careless dotted watercolor strokes in sketches are the signature style of Felix Scheinberger. Illustration from the book “Watercolor Sketching”
7. Use liquid primer for watercolors
Liquid primer for watercolors is applied to the paper before starting work and allows you to easily remove dried paint if necessary. This is especially important when working with intense or persistent pigments: you don’t have to worry about “staining” the paper in the area of highlights. Before using it, practice in a sketchbook, as the surface for drawing will be quite slippery.
To remove paint from those areas where it was not needed (you accidentally went beyond the edges or you need to create highlights), simply wash off the paint with a clean, dampened brush or sponge.
8. Learn the art of glazing
Artists call glazing a technique for obtaining deep iridescent colors by applying translucent paints on top of the main one. The glazing technique is an excellent way to convey the finest color gamut. The paints are applied very delicately, layer by layer, and after drying the details of the last layer are worked out.

Illustration from the book “Song of Colors”
9. Dry brush technique
This technique can be used to draw animal fur or small hairs on fruits such as kiwi.
Apply paint to the brush and remove excess with a napkin. Straighten the brush hairs. Apply paint to a dry surface previously painted in the background color. Work in small strokes in one direction, imitating hairs on the surface.

Kiwi using dry brush technique. Illustration from the book
From the article you will learn how to paint flowers with gouache and create picturesque village and mountain landscapes. At the end, useful tips are given to help make the work easier and do it as carefully as possible.
The content of the article:
It's nice to look at paintings created by artists. Many people like to admire the paintings and mentally transport themselves to where the plot takes place. But not everyone knows that if you wish, you can become a painter and create canvases for yourself, your family, and give them to your friends. If you like this type of creativity and will be able to transfer scenes onto canvas, then this activity can be profitable if you sell paintings. So let's draw, and perhaps you will be so captivated and enjoy this activity that it will become your favorite hobby and even a source of income.
How to draw flowers with gouache

This is one of the most spectacular types of paint. Paintings made using this technique look voluminous and look great. Sometimes a pencil sketch is first made, then the contours are painted over - the dark elements are done first, then increasingly lighter ones.
If you need to draw a landscape in which most of the sky is occupied, then using the filling method, its background is painted, and then the details are drawn.
If you want to reproduce poppies like this on canvas, start your drawing by creating a background. To work you will need:
- gouache;
- palette;
- paper for watercolor or gouache;
- brushes;
- cloth;
- jar of water.
So, before depicting flowers in gouache, starting from the upper right corner, touch up a sheet of paper with straight diagonal movements, not reaching the bottom. Here, paint it with light green paint.
Now mix green and yellow colors in the palette, draw a few light blades of grass in the foreground of the canvas. Add yellow highlights. Watch the video at the end of the article, which explains step by step how to draw flowers with gouache.

Now in a cell of the palette, mix white paint with a small amount of emerald and add a few light highlights to the canvas.

Now make a light pink paint, adding a little white to the red, and use a thin brush to apply highlights to the flowers.

To paint with watercolors, you can use various brushes, each of them has its own number. The thicker the brush, the higher the number. To draw the background, use voluminous wide brushes, and thin ones to depict small details.

Next you need to mix green and white paint to paint the buds and petals. Now draw the core of the poppy in black. Add a little green to the white paint and paint highlights on the buds and stems.
Here's how to paint flowers with gouache to make them look as realistic as possible. With the help of this paint, picturesque paintings are also created.
How to easily draw a winter landscape with gouache

For beginners, such a drawing should not cause difficulties, since it is very easy to create.
For work take:
- a set of artistic gouache, consisting of 12 colors;
- sheet of A 3 format;
- 2 flat pig bristle brushes No. 9 and 18;
- palette;
- a jar of water.
A palette knife is used to apply thick paint to the canvas, as well as to mix and clean the palette. Using it, paint is applied in relief or even strokes.
This is the tool you will need to draw mountains. If you don't have a palette knife, then replace it with a small, dull knife. You can adapt the most unusual objects, for example, use a slightly sharpened ice cream stick, or make a palette knife from an old business card holder.
Mix purple, blue and white paints. Using diagonal movements from right to left, apply several confident strokes on the canvas. The paint in this place should be in a thick layer. Let it dry and apply over white. Then continue painting the landscape with gouache.

Now mix dark green and purple and use the resulting paint to paint fir trees on the left side of the canvas. To do this, make horizontal strokes with a large flat brush, they should be longer at the bottom than at the top. Draw the tops of the Christmas trees.
Next, use whitewash to make them snowy. Also draw white clouds in the background. On the right you can depict another Christmas tree. Below the line of the mountains, draw the outlines of the forest and create snowdrifts in the foreground using white paint. She will also help you draw them in the center of the landscape.
Here's how to paint with gouache so that you get such a picturesque canvas. If you liked the theme of mountains, you can create several more landscapes, first making a pencil sketch.
How to draw a landscape step by step

If you have never done this before, then you can enlarge the presented pencil drawing, attach a sheet of paper to it and simply redraw it.
Here we see all the necessary outlines:
- clouds;
- foreground vegetation;
- bushes

Draw the clouds using white. Apply a few strokes of the same light paint to create white highlights in the sky.
For the mountains you will need a brown tone, here you can use some green strokes to paint the vegetation.
Using the same paint, depict a meadow. Dark green strokes will fall on the canvas in the form of bushes. The same paint will help you paint the stems of plants; you will paint flowers using yellow.
How to draw nature with gouache

We will also start creating nature with a pencil sketch. To simplify the task, also attach a piece of paper to the screen and redraw. Now use green to depict the forest in the center and left in the background. While this paint dries a little, apply blue to the sky and the flowing river.

Apply a light green tone to the lower part of the forest. Now let's work with the yellow paint. With this tone, gild the tops of the trees and the lower part of the forest on the left.
Cover some trees with dark green paint, as shown in the photo. When it dries, apply a yellow or light green tone to make the painted trees more realistic.

Paint the coastal rocks dark purple, then apply gray and crimson tones here. Add small details to the trees, and the gouache painting, depicted in stages, is ready.
You can draw a beautiful landscape by watching the video. A step-by-step lesson will help you create a different picture.
Village landscape in gouache

This is what you will get as a result of your work. But first you need to work a little. Paint the sky with blue, white and burgundy paint. Mix it directly on the sheet, adding water.
While this part of the painting is drying, wash your brush. You need to use it to draw the trees located in the background and the ground. Use dark brown paint to depict a tree trunk, and a thin brush to depict branches.

But what is a rural landscape without rural houses? Draw them in the background using orange, black and brown.
You will create foliage using the following interesting method. Take a brush with round bristles, dip it in yellow, burgundy, green and tap the paper to paint the foliage.
Draw the flowers in the same way, but using red, yellow, and pink paint.

You've got a colorful village landscape that will decorate a wall in your room or become a much-needed gift. You have learned how to paint with gouache. In conclusion, check out some useful tips that will help you do it correctly and accurately.

When using gouache, follow these tips:
- Gouache is sold in tubes and small jars. Buy it in the packaging you like best.
- You don't have to buy a lot of flowers at once. The main thing is to purchase the necessary ones: white, blue, black, yellow, red, brown. You can create some others by mixing these paints.
- Before you apply colors to the canvas, even if you don't mix gouache, apply it to your palette first. This way you won’t make a mistake in color and can make the paints of the desired thickness by adding the required amount of water.
- If the gouache cracks, add a little gum arabic to it and stir well.
- Wait for them to dry before adding additional coats of paint on top of the first or lower ones.
- Since gouache is water-based, when you're done and the paint is dry, coat it with varnish. It is better to process each color separately, thoroughly rinsing the brush, which will absorb the paint.
Having learned useful tips and read about how to paint flowers and landscapes with gouache, you will be able to create amazing paintings using this paint and have a pleasant time doing an interesting activity.
10 simple magic techniques for children's creativity
1. Monotype
Essence: imprint of paint on paper from a smooth surface. What do you need: a piece of glass or tile, paper, watercolor, soft brushes, water. Process: We wet the glass, apply spots of paint on it, put a sheet on top, carefully turn it over and remove the glass. What happens: very picturesque stains that give room for imagination: “Look, mom, these are clouds! And here is the forest... And here are the waves!”Of course, God himself then ordered that what he saw among the spots be supplemented with details. Using this technique, you can make a background, and draw a graphic image on it, using a thin gel pen - when it dries.

You can create targeted prints, including symmetrical ones: paint is applied to one half of the sheet, then we fold it and get the second half of the picture!
You can “print” with paint from different forms - for example, from leaves or templates cut out of cardboard. Then it is better to take thicker paints - gouache or acrylic.

Or pre-apply cut-out simple stencils to the sheet - then the background will be colorful and the images will be white.

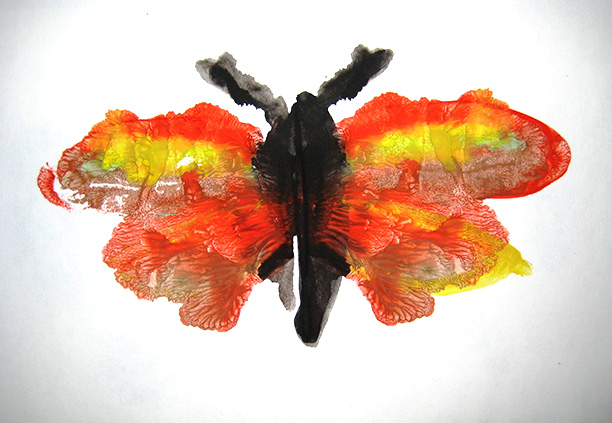
2. Blotography
Essence: You can “inflate” original figures from colorful blots. What do you need: thick paper, thick brush, gouache, drinking straws. What happens: we drip paint onto the sheet, then we blow on it through a straw, making lines. Then, depending on what we see, we complement the image with a drawing or appliqué.
This technique is especially great for drawing trees - the branches come out very naturally curved.

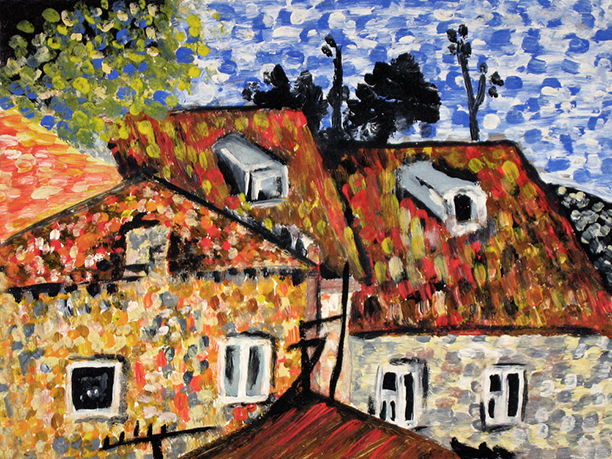
3. Fun dots
Essence: For professional artists this is a separate style, called “pointillism”. What do you need: paper, gouache, palette, cotton swabs. What happens: We apply paint of different colors to the palette, dip the sticks - and tightly cover the space with colored dots. For convenience, we’ll first make a light pencil sketch.
You can draw with dots using brushes, but, unlike sticks, you will need to be careful about washing them. Another cool dots are fabric outlines, but you should work with them carefully so as not to squeeze out too much and make puddles.
4. Spray
Essence: What children love is to splash. And doing it with paint is much more fun, and even meaningful! What do you need: paper, liquid paint, stencils (silhouettes cut out of cardboard), old toothbrushes. What happens: We put our stencils on the leaf - and with the help of a brush we “spray” the paint on the surface, then we remove the cardboards and see the pictures. You can apply several layers - both contour images and paints.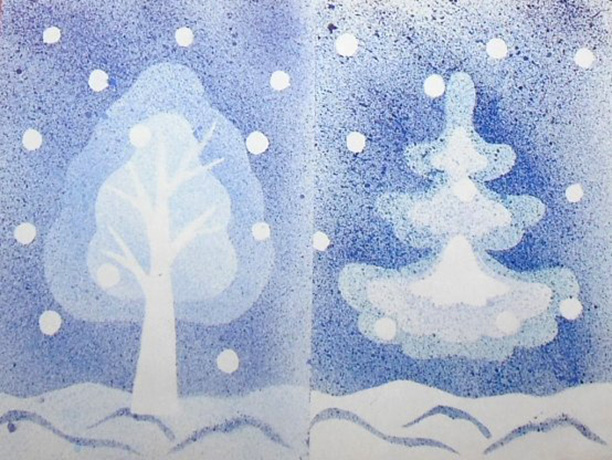
5. Scratches
Essence: This technique goes by the elegant French name “grattage”. What do you need: wax pencils, gouache, paper, liquid soap, a candle and a thin stick (for example, a knitting needle or a used rod). What happens: We color the sheet with pencils, then rub it with a candle, and cover it with a layer of dark gouache mixed with soap (so that it lies evenly). When the paint dries a little, scratch the design on it. It turns out very unusual and mysterious, especially the night and space scenes.
6. Candle arts
Essence: the drawing magically appears - white lines on a colored background. What do you need: paper, candle, watercolor paints and a wide brush. What happens: We draw the outlines of some objects or creatures on paper with a candle, like a felt-tip pen. Then we cover the sheet with watercolors. As the paint flows off the paraffin or wax, the outlines they draw remain white or dotted.
7. Paper mosaic
Essence: Ancient artists decorated temples and palaces this way, and we can do the same at home. What do you need: a sheet of thick paper, a glue stick, colored paper, scissors. What happens: We cut colored paper into strips and then into small squares. We draw the outline of the drawing with a simple pencil, carefully cover the sheet with glue and sculpt a mosaic on it. It turns out beautifully when the slightly visible background is dark.