The abstraction genre is a modern solution for the interior. Abstractions in painting
In this Photoshop tutorial you will learn how to create your own unique abstract portrait in space style. The techniques used in our lesson are applicable to any portrait photograph and open up wide possibilities for your imagination. Begin!
Preview of the final image:
Step 1.
Create a new document in Photoshop (Ctrl+N) size 800X800px. We insert into it the image of the nebula from the lesson materials (Ctrl+A (highlight), Ctrl+C (copy), Ctrl+V (insert)) .

Step 2.
The stars look quite blurry, so let's sharpen them using the Unsharp Mask filter. (Filter> Sharpen> Unsharp Mask). We carry out the settings from the screenshot below: Quantity (Amount) 70%, radius (Radius) 1.5 pixels, Isohelia (Threshold) 0 levels.

Step 3.
We want to add some light to our background. Create a new layer (Ctrl+Shift+N) and call it “Central Light”. Selecting the Gradient Tool (Gradient) with radial style color from white to transparent (white to transparent) and stretch it from the center of the canvas to its edge.

(Overlay).

Now create a new layer (Ctrl+Shift+N) called “White Highlights” and, repeating the previous lightening process, create several small radial gradients in color from white to transparent. Blend Mode Overlay (Overlay).

Create a new layer (Ctrl+Shift+N) and call it “Rainbow Flares”. Create some small radial gradients from white to transparent, then open Layer Styles (the “fx” icon at the bottom of the layers palette or double click on the layer thumbnail) and add the “Gradient Overlay” option (Gradient Overlay). We configure the option by selecting a rainbow gradient from the default set.

Change the blending mode of this layer to Overlay (Overlay).

Finally, lower the opacity (Opacity) layer up to 5%, which gives a subtle lighting effect.

Step 4.
Create a new layer (Ctrl+Shift+N) called "Vignette". Use a large soft brush (Brush) black with opacity (Opacity) 60% on the edges and corners of the image.

Step 5.
Roughly cut out the model from the background and paste it into our document (Ctrl+C, Ctrl+V).

Next, apply a “Levels” adjustment layer to the face layer. (Layer-New Adjustment Layer-Levels or click on the black and white adjustments icon at the bottom of the layers palette). Make the settings from the screenshot, then add a clipping mask to this layer (click on the layer thumbnail and select Create Clipping Mask).

Create another adjustment layer “Color Balance” (Layer-New Adjustment Layer-Color Balance) also with clipping mask (Clipping Mask).

Let's create a smoother outline around the girl's face using the Pen tool (Pen Tool) . Create a contour selection (Ctrl+Enter or right-click on the outline and select “Make Selection”), then click on the layer mask icon (Add Layer Mask) at the bottom of the layers panel to remove excess. You can see the resulting facial outline in the Contours panel. (Paths), which is located next to the Layers palette.

Next, download a set of abstract brushes from the lesson materials and install them in the program through the menu Edit-Manage Sets-Brushes (Edit-Preset Manager-Brushes). Select any brushes from the set, setting their color to black and, activating the layer mask with the face, create several patterns on the girl’s face. We create such a technique interesting effect fragments of the face. Choose your brush design carefully so that it harmoniously matches the image of the heroine. You can change the angle of the brushes and their position in the settings panel (F5). If suddenly you don’t like something, use a brush white and paint over the defect on the mask.

Step 6.
Now load the splash set from the lesson resources and select the red splash. Opening (Ctrl+O) it in the new document.

Next, we isolate the splash from the black background. Duplicate this layer (Ctrl+J) and temporarily hide the duplicate (click on the thumbnail eye). On the original layer, go to the menu Image-Adjustments-Levels (image>adjustments>levels) to make the splashes stand out more against the background.

Go to the menu Selection-Color Range (select>color range) and with the leftmost eyedropper click on the black background of the image.

Click OK and we will select the background. Then, invert the selection (Ctrl+Shift+I or select>inverse) to select only the splash. With the selection active, go to the menu Selection-Modification-Compress (select>modify>contract) and set the compression radius to 2 px (this helps get rid of jagged edges). We don’t remove the selection yet.

Now, turn on the visibility of the duplicate splash (click on the eye again) and activate this layer. This is exactly what we will need, since the original has become too contrasty and is not suitable for our composition, we used it only for highlighting. Copy (Ctrl+C) and paste (Ctrl+V) duplicate splashes into the composition.

Step 7

Add a mask to this layer (click on the mask icon at the bottom of the layers panel “Add Layer Mask” or Layer-Layer Mask-Reveal All) and a soft black brush (Brush) medium size with 20% opacity (Opacity) remove the edge of the lower part of the splash so that there is a soft, imperceptible transition to the face.

Apply several adjustment layers to the splash layer with a clipping mask for each (click on the correction thumbnails and select Create Clipping Mask). Add a Hue/Saturation adjustment layer (Hue/Saturation Adjustment Layer), by clicking the black and white circle icon at the bottom of the layers panel. We make the settings from the screenshot:


And a “Color Balance” adjustment layer (Color Balance):

As a result we get the following:

Step 8
Now we select a few more splashes from the set and insert them into our work. Repeat the process with the deformation and mask, hiding the edges of the splashes on the face. We carry out the correction settings from step 7.

Step 9
Now repeat steps 7 and 8 for another splash, but place it on the right side of the girl's face.

Let's create the illusion of depth in the picture using a simple technique. Add a Gaussian Blur filter to the layer with the big splash. (Filter > Blur > Gaussian Blur) with a radius of 2.8 px.

Step 10
Duplicate the splash (Ctrl+J) on the right and increase its size using Transform (Edit-Free Transform or Ctrl+T). Rotate it so that it covers the bottom left corner of the image. Add even more depth by applying a Gaussian Blur to this layer. (Filter > Blur > Gaussian Blur) with a radius of 7 px.

Step 11
Create a new layer (Ctrl+Shift+N) and call it “Shadow Details”. Select a black soft brush (Brush) 2 px in size and carefully draw it along the edges of the cuts on the face, imitating a certain volume in the recesses of the pattern. For this procedure, we enlarge the image (Ctrl+) to see all the cutouts clearly.
Here's what the shadows look like up close:

I reduced the opacity (Opacity) up to 70% to make the shadow effect more subtle.

Step 12
Create a new layer (Ctrl+Shift+N) and call it “Blik”. Fill in (Edit-Fill or Shift+F5) black layer (#000000) and change the blending mode of this layer to Screen (Screen), hiding the black background. This will allow us to work with the flash effect in a non-destructive way.
Go to the menu Filter-Rendering-Highlight (filter>render>lens) and add a highlight above the model’s left eye. Reducing the opacity (Opacity) this layer up to 80%. Below is how the highlight should look under normal conditions. (Normal) blend mode and screen mode (Screen).


Now let's add a highlight to the left side of the composition next to the girl's right eye. Repeat the process of creating a highlight as in step 12 (on a separate layer, of course).

Step 13
Create a new layer (Ctrl+Shift+N) and call it “Backlight Colorization”. Create some vibrant radial gradients (Radial Gradient) colors from neon to transparent. Try to choose shades that complement the overall picture.

Now change the blending mode of this layer to Overlay (Overlay) with opacity (Opacity) 10%.

Step 14
Create a new layer called "Dodge/Burn". Fill it 50% gray (Edit-Fill) and change the blending mode to Overlay (Overlay). This will allow you to non-destructively highlight the shadows and light in the composition.
Select a soft brush (Brush) black color and enhance the shadows by dragging over the dark areas of the image. Then, take the Brush (Brush) white and highlight the light areas. Use this stage not only to enhance shadows and highlights, but also to better blend visual elements.
This is what a layer looks like with a normal blending mode and an Overlay blending mode. (Overlay).


Step 15
Finally, add a Gradient Map adjustment layer. (Layer-New Adjustment Layer-Gradient Map) to the entire composition. In the Options dialog box, click on Gradient Editor (color scale) and set the colors from purple to green (#9400e1 to #00601b). Reducing the opacity (Opacity) of this layer up to 7%, leaving only a subtle shade.

And we did it! Congratulations!
I hope your work was successful and you are happy with the result. I look forward to your comments and completed work. Good luck!
Abstractionism is a style or direction in painting. Abstractionism or abstract genre implies a refusal to depict real things and forms. Abstractionism is aimed at evoking certain emotions and associations in a person. For these purposes, the paintings in abstract style trying to express the harmony of colors, shapes, lines, spots and so on. All forms and color combinations, which are located in the perimeter of the image, have an idea, their own expression and semantic load. No matter how it may seem to the viewer, looking at a picture where there is nothing except lines and blots, everything in abstraction is subject to certain rules of expression.
Today, abstraction is so broad and diverse that it itself is divided into many types, styles and genres. Each artist or group of artists tries to create something of their own, something special that would in the best possible way could reach a person’s feelings and sensations. Achieving this without using recognizable figures and objects is very difficult. For this reason, abstract paintings that really evoke special sensations and make one marvel at the beauty and expressiveness of an abstract composition, deserve great respect, and the artist himself is considered a real genius of painting.
It is believed that abstract painting was invented and developed by the great Russian artist. His followers were also, who not only explored the philosophy of abstract art, but also developed a new direction in this genre - Rayism. further “improved” the technique of abstraction, achieving complete non-objectivity, which was called Suprematism. No less famous abstract artists steel: Piet Mondrian, Mark Rothko, Barnett Neumann, Adolph Gottlieb and many others.
Abstract painting, which literally blew up the art world and became a symbol of the beginning new era. This era means a complete transition from frameworks and restrictions to complete freedom of expression. The artist is no longer bound by anything, he can paint not only people, everyday and genre scenes, but even thoughts, emotions, sensations and use any form of expression for this. Abstract art, as painting of personal experience, is also for a long time was in the underground. It, like many other genres of painting in history, was ridiculed and even condemned and censored as art without any meaning. However, over time, the position of abstraction has changed and now it exists on a par with all other forms of art.
V. Kandinsky - Several circles

V. Kandinsky – Composition VIII

Willem de Kooning - Composition
Beautiful women attract the attention of not only men, but also other women. Who, if not they, is able to appreciate the grace, elegance, attractiveness and beauty of their, perhaps, friends, and perhaps even rivals? Abstract portraits of a French artist Pascale Pratt just dedicated beautiful women. That's what the exhibition is called - " Les Filles".
Unfortunately, little is known about Pascale Pratt herself. As a very young child, she began her career making postcards. self made, and already at the age of 10 she made money by selling her products, first in Old Montreal, and then in Belgium. Seeing how talented their daughter was, the parents sent the girl to study painting, and as an adult, Pascale Pratt gained new fame as an artist.


This artist has a very recognizable style and manner: they create the impression that the picture is painted on the wall, on top of old, crumbling plaster. And there is something philosophical in this. Feminine beauty it is also short-lived if you do not take care of it, but one way or another, it is impossible to fight against old age for a long time, which sooner or later will take its toll, leaving only a trace of its former attractiveness on the face. Therefore, the main beauty should be concentrated inside, and everything that is outside is plaster, appearance. It crumbles and it's a lost cause...


Pascal Pratt says about his paintings: “I am inspired by their femininity to create these colorful characters. Sensual, gentle, and sometimes strong, these women follow the path of emotions. My emotions, since they are all within me, and are part of my being.” . The artist’s work can be found on her personal website.
Double exposure is a cool effect that has been around for a long time. When shooting with a film camera, this effect was created by developing the negative twice in different scenes. Now this effect can be easily created and decorated with a few simple techniques in Photoshop. I'll show you how below in this simple tutorial.
Step 1. Collecting photos
To begin with, we need nice pictures to create our double exposure effect. For the portrait, I chose an image from deviantArt, by TwiggXStock, the link to which you can find in the archive for the lesson.

For the landscape image, I chose a beautiful photo of the Northern Lights from UnSplash.

Step 2. Separating the portrait from the background
Create a new document in Photoshop. My document is 1970 by 2680 pixels. Paste both selected images into the document on separate layers. For now, you should hide the layer with the landscape photo. Using whatever method you like, separate the portrait from the background. I used QuickMaskMode (Q) (Quick Mask Mode) to “paint” the selection area. I also turned the portrait into black and white by pressing keys Ctrl/ cmd + Shift + U.

Step 3: Create a Double Exposure Effect
Switch to panel Channels(Channels) and then press Shift and click on the channel RGB. This will select the area with the portrait.

Switch back to the layers panel and turn off the visibility of the portrait layer. Now select the landscape layer and restore its visibility. With the portrait area still selected, click on the button Mask(Add Mask) at the bottom of the layers panel.

Finally, select the mask from the layers panel, and click Ctrl/ cmd+ I to invert it.

Step 4. Decorate the effect
This is my favorite part. For this step I used a free brush set from WeGraphics called Mixed Media. You can find a link to it at the beginning of the lesson.
Choose a brush from this set. Make sure the color foreground(primary color) white is selected. Start clicking on the layer mask to hide parts of the portrait. Change the foreground color to black and continue adding splash parts.

Use different brushes, change their size and rotate them to create an effect like mine.

Step 5: Adding Texture and Lighting


That's all! This effect looks very complicated, but is actually quite easy. There are an unlimited number of ways to use it to obtain different images. Go ahead and create!
In the last century abstract direction became a real breakthrough in the history of art, but quite natural - people were always in search of new forms, properties and ideas. But even in our century, this style of art raises many questions. What is abstract art? Let's talk about this further.
Abstract art in painting and art
In style abstractionism the artist uses a visual language of shapes, contours, lines and colors to interpret the subject. This contrasts with traditional forms arts that receive more literary interpretation subject - convey “reality”. Abstractionism goes as far as possible from the classical visual arts, as much as possible; is objective world not at all like in real life.
Abstract art challenges the mind of the observer as well as his emotions - to fully appreciate a work of art, the observer must free himself from the need to understand what the artist is trying to say, but must feel the response emotion for himself. All aspects of life lend themselves to interpretation through abstract art - faith, fears, passions, reactions to music or nature, scientific and mathematical calculations, etc.

This art movement emerged in the 20th century, along with cubism, surrealism, dadaism and others, although the exact time is unknown. The main representatives of the abstract art style in painting are considered to be such artists as Wassily Kandinsky, Robert Delaunay, Kazimir Malevich, Frantisek Kupka and Piet Mondrian. About their creativity and important paintings the speech will go further.
Paintings by famous artists: abstract art
Wassily Kandinsky
Kandinsky was one of the pioneers of abstract art. He began his search in impressionism, and only then came to the style of abstractionism. In his work, he exploited the relationship between color and form to create an aesthetic experience that embraced both the vision and the emotions of the viewer. He believed that complete abstraction provides scope for deep, transcendent expression, and copying reality only interferes with this process.

Painting was deeply spiritual for Kandinsky. He sought to convey the depth of human emotion through a universal visual language of abstract shapes and colors that would transcend physical and cultural boundaries. He saw abstractionism as an ideal visual mode that can express the artist's "inner necessity" and convey human ideas and emotions. He considered himself a prophet whose mission was to share these ideals with the world for the benefit of society.
"Composition IV" (1911)
Hidden in bright colors and clear black lines depict several Cossacks with spears, as well as boats, figures and a castle on top of a hill. Like many paintings from this period, it imagines an apocalyptic battle that will lead to eternal peace.

To facilitate the development of a non-objective style of painting, as described in his work On the Spiritual in Art (1912), Kandinsky reduces objects to pictographic symbols. By removing most references to the outside world, Kandinsky expressed his vision in a more universal way, translating the spiritual essence of the subject through all these forms into a visual language. Many of these symbolic figures were repeated and refined in his later works, becoming even more abstract.
Kazimir Malevich
Malevich's ideas about form and meaning in art somehow lead to a concentration on the theory of abstract art style. Malevich worked with different styles in painting, but was most focused on the study of pure geometric shapes(squares, triangles, circles) and their relationship to each other in pictorial space.

Thanks to his contacts in the West, Malevich was able to convey his ideas about painting to artist friends in Europe and the United States, and thus profoundly influence evolution contemporary art.
"Black Square" (1915)
The iconic painting “Black Square” was first shown by Malevich at an exhibition in Petrograd in 1915. This work embodies the theoretical principles of Suprematism developed by Malevich in his essay “From Cubism and Futurism to Suprematism: New Realism in Painting.”
On the canvas in front of the viewer there is an abstract form in the form of a black square drawn on a white background - it is the only element of the composition. Although the painting appears simple, there are elements such as fingerprints and brush strokes visible through the black layers of paint.

For Malevich, the square signifies feelings, and the white signifies emptiness, nothingness. He saw the black square as a god-like presence, an icon, as if it could become a new sacred image for non-figurative art. Even at the exhibition, this painting was placed in the place where an icon is usually placed in a Russian house.
Piet Mondrian
Piet Mondrian, one of the founders of the Dutch De Stijl movement, is recognized for the purity of his abstractions and methodical practice. He quite radically simplified the elements of his paintings in order to reflect what he saw not directly, but figuratively, and create a clear and universal aesthetic language in their canvases.

At its most famous paintings Since the 1920s, Mondrian has reduced forms to lines and rectangles, and the palette to the simplest. The use of asymmetrical balance became fundamental in the development of modern art, and his iconic abstract works remain influential in design and are familiar to popular culture today.
"The Gray Tree" (1912)
"The Gray Tree" is an example of Mondrian's early transition to style abstractionism. Three-dimensional wood is reduced to the simplest lines and planes, using just grays and blacks.

This painting is one of a series of works by Mondrian that were created with a more realistic approach, where, for example, trees are represented in a naturalistic manner. While more late works became increasingly abstract, for example the lines of a tree diminishing until the shape of the tree becomes barely noticeable and secondary to general composition vertical and horizontal lines.
Here you can still see Mondrian's interest in abandoning the structured organization of lines. This step was significant for Mondrian's development of pure abstraction.
Robert Delaunay
Delaunay was one of the most early artists abstractionism style. His work influenced the development of this direction, based on the compositional tension that was caused by the opposition of colors. He quickly fell under the neo-impressionist coloristic influence and very closely followed the color scheme of works in the style of abstractionism. He considered color and light to be the main tools with which one can influence the reality of the world.
By 1910, Delaunay made his own contribution to Cubism in the form of two series of paintings depicting cathedrals and the Eiffel Tower, which combined cubic forms, the dynamics of movement and bright colors. This new way The use of color harmony helped to separate this style from orthodox Cubism, receiving the name Orphism, and immediately influenced European artists. Delaunay’s wife, artist Sonia Turk-Delone, continued to paint in the same style.
"Eiffel Tower" (1911)
Delaunay's main work is dedicated to Eiffel Tower- the famous symbol of France. This is one of the most impressive of a series of eleven paintings dedicated to the Eiffel Tower between 1909 and 1911. It is painted bright red, which immediately distinguishes it from the grayness of the surrounding city. The impressive size of the canvas further enhances the grandeur of this building. Like a ghost, the tower rises above the surrounding houses, in figuratively shaking the very foundations of the old order.
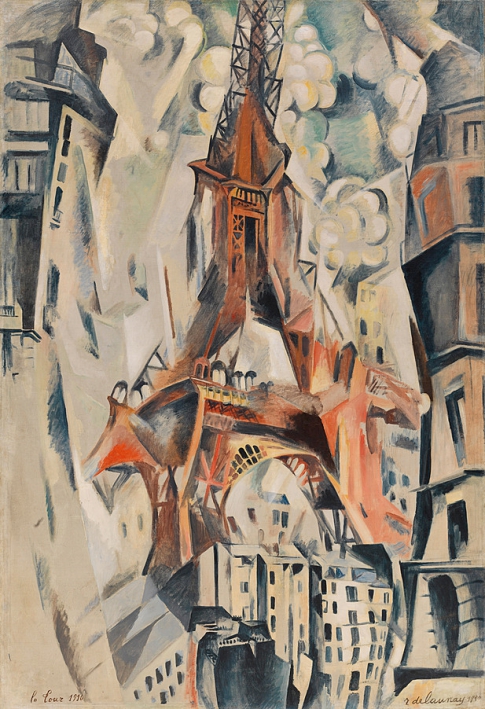
Delaunay's painting conveys this feeling of boundless optimism, innocence and freshness of a time that has not yet witnessed two world wars.
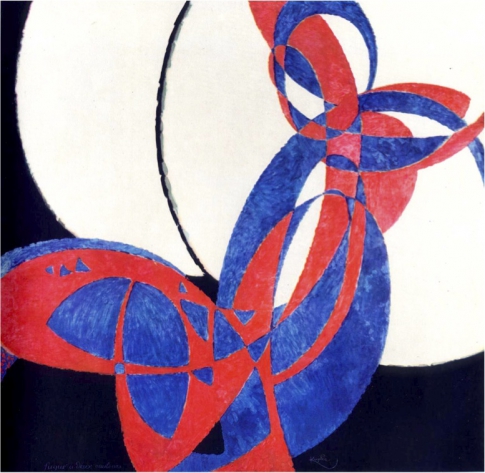
Frantisek Kupka
František Kupka is a Czechoslovakian artist who paints in the style abstractionism, graduated from the Prague Academy of Arts. As a student, he primarily drew on patriotic themes and wrote historical compositions. His early works were more academic, however, his style evolved over the years and eventually moved into abstract art. Written in a very realistic manner, even his early works contained mystical surreal themes and symbols, which continued when writing abstractions.

Kupka believed that the artist and his work take part in a continuous creative activity, the nature of which is not limited, like an absolute.
“Amorpha. Fugue in two colors" (1907-1908)
Beginning in 1907-1908, Kupka began to paint a series of portraits of a girl holding a ball in her hand, as if she were about to play or dance with it. He then developed more and more schematic images of it, and eventually received a series of completely abstract drawings. They were made in a limited palette of red, blue, black and white.
In 1912, at the Salon d'Automne, one of these abstract works was exhibited publicly for the first time in Paris.
The style of abstractionism does not lose its popularity in painting of the 21st century - lovers of modern art are not averse to decorating their home with such a masterpiece, and works in this style go under the hammer at various auctions for fabulous sums.
The following video will help you learn even more about abstractionism in art: