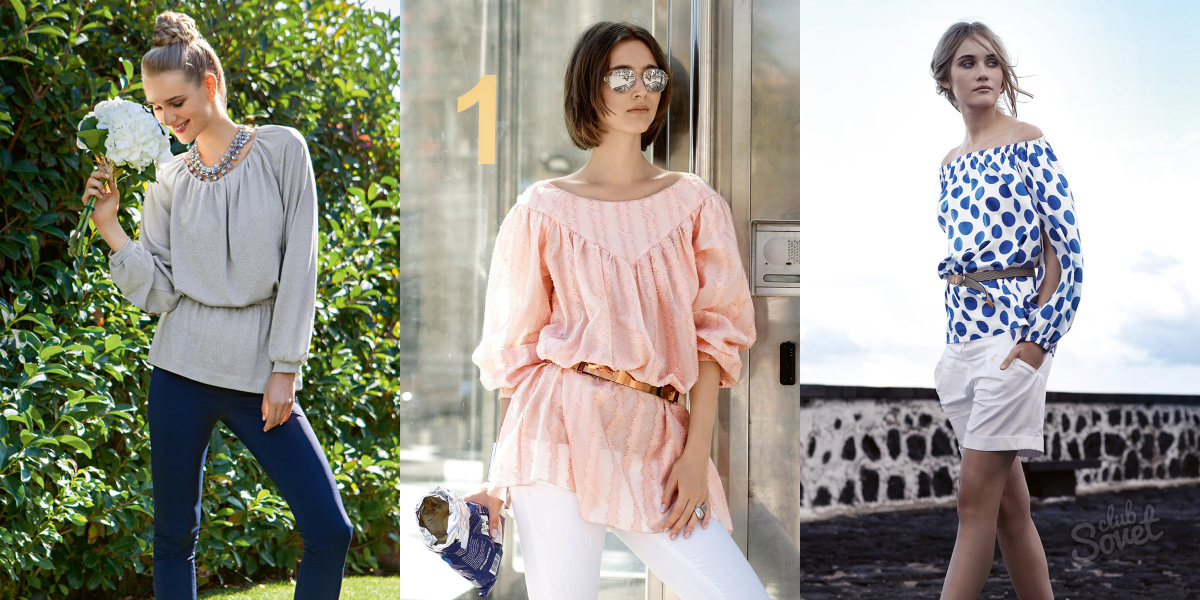
Do-it-yourself sewing fabric blouse. Blouses of different silhouettes.
If you go shopping for branded clothing, you will notice that almost half of the clothes are cut according to the simplest patterns. The t-shot silhouette is extremely popular today. What is a t-shot? This is a one-piece blouse whose shape resembles the Russian letter “T”. Cutting and sewing a model using this pattern is not at all difficult.
Fabric selection
In order for an item to be worn for several seasons, you should be especially careful when choosing the material from which you are going to sew. First of all, you should avoid colors that do not suit your appearance and type. It is equally important to determine for what occasion the blouse is intended, what items in the wardrobe it can be combined with, and how practical the fabric is to care for. Also pay attention to whether it is too difficult to sew. If you do not have extensive experience in cutting and sewing, then do not buy capricious fabrics such as velvet or chiffon, with sequins or beaded embroidery, loose fabrics and complex prints. 
Taking measurements
Building with one-piece sleeve begins with taking measurements and determining the size of the product. The main measurements for this case:
- chest circumference. It is measured at the most protruding points of the chest and shoulder blades. Half of this value is used for construction;
- length of the product. Measured along the back from the seventh to the expected bottom of the product;
- the length of the sleeve. From the point of articulation of the forearm with the shoulder. 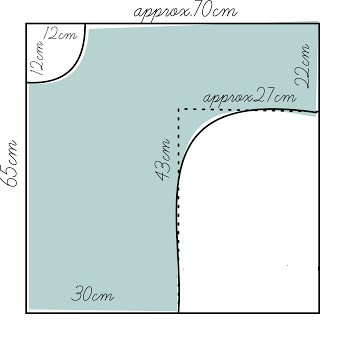
Look at the photo of the pattern. This is what any, even the most avant-garde and trendy blouse with one-piece sleeves looks like. The pattern should work for everyone. It can be built in a reduced form on a sheet of school notebook. After clarification, modeling and checking, transfer the drawing in full size onto a large sheet of tracing paper or This pattern and use it to cut the fabric. The most daring dressmakers draw the model directly on the fabric. This usually applies to cases where the figure is slender, the style does not require a tight fit, and the material does not have a complex pattern.
When constructing, allowances for freedom of movement should be taken into account. For thin, flowing fabrics it should be large enough - 10 cm or more. For dense or poorly draped materials, respectively, no more than 10 cm. The standard shoulder bevel is 2-2.5 cm.
Seam allowances are:
- along the neck - 1 cm;
- at the bottom - 4 cm;
- at the seams - 1.5 cm. 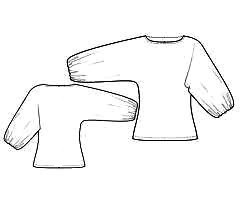
Perfect shoulder fit is the key to model success
With custom tailoring, even a simple blouse with a loose silhouette can be perfectly tailored to your figure. Everyone's shoulder slope is individual, and consumer products use average figures. This also applies to the length of the neck circumference. The ideal depth and shape of the neckline is different for each person.
Because one-piece blouses short sleeve can serve for a long time and become the basis for many things, it is better to make a good and accurate pattern with an ideal shoulder and neckline. Take any shoulder item without shoulder pads as a basis. If there is a dummy with your indicators, work on it. If not, then call someone who has some understanding of cutting to help. It is impossible to try on and adjust clothes on yourself. To create the correct shoulder line, you should wear or a blouse - an item that can be used to create the perfect pattern. Pin along the lines of the sides, middle back and front so that it sits tightly on the torso. After this, pin the shoulder line with pins, not across, but along, that is, the way you will lay the seam. Mark the base of the neck and the junction of the shoulder and arm with chalk. Focusing on the reflection in the mirror, draw a line for the neckline. Trim the excess around the neck and shoulder line. Leave a shoulder seam allowance of 1-1.5 cm. 
There should be no allowance along the neckline on the layout. This way the most advantageous shape of the neckline is better visible.
Side line and short sleeve
Now you can loosen the side seams. Determine how loose the blouse should be at the chest, waist and hips. Pin the side seams again. Fix the side seam lines with chalk. Trim off excess fabric. Carefully remove the model from the mannequin. Extend the side seam lines upward until they intersect with the shoulder lines.
This completes the construction of a blouse pattern with a short one-piece sleeve. The layout can be used as ready-made pattern, or you can redraw it on paper. Based on such layouts, not only blouses are modeled, complicating them with cutting details, grooves, fasteners and yokes, but also dresses and even coats. 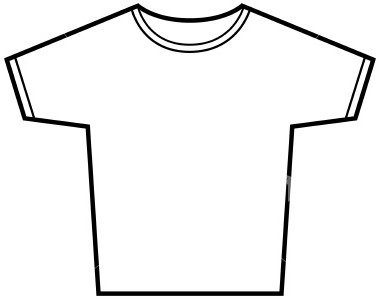
Extending the sleeve
To create a blouse pattern with a one-piece long sleeve, increase the size of the allowance for a loose fit, and mark the starting point of the armhole on the side seam. The depth of the armhole in the case of a one-piece sleeve should be several centimeters lower than for a set-in sleeve. By extending the shoulder line, you get the line of the upper seam of the sleeve. From the bottom point of the armhole, draw a line parallel to the line of the top seam of the sleeve. Sleeve cut is a line connecting the upper and lower seams of the sleeve and forming right angles with these lines. If desired, the sleeves can be made narrower or wider, decorated with cuffs or a drawstring with frills.
Our universal pattern is very easy to work with when it is made from construction paper and made in duplicate. This is convenient for modeling and when working with fabrics that have complex padding. 
Big size
Ladies of corpulent size, with a physique that requires adjustment, should pay attention to models complicated by undercut details, in particular, yokes. Basic pattern for a blouse with one-piece sleeves big size is constructed, focusing, in addition to the above values, also on the circumference of the abdomen, hips and forearm. The width of the blouse is determined based on the widest part of the figure. A loose blouse made of thin cotton gauze or an office blouse made of silk satin will be decorated and presented in in the best possible way and plump ladies. You just need to think through and choose the right finishing elements.
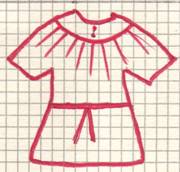
Modeling a blouse with a round yoke
The pattern of a blouse with a round yoke and a one-piece sleeve is modeled as follows. Looking at the reflection in the mirror, determine the location line round yoke. The landmark lines are drawn with chalk. Transfer them to a paper pattern. Cut from the base paper pattern along the drawn line.  The yoke is used for cutting unchanged. Only 1.5 cm is added along its entire perimeter - seam allowance. This detail is cut out twice from the main fabric, since the yoke should be more rigid than the entire blouse and better hold its shape. After the yoke is cut off from the main pattern, lines are extended on the whole pattern of the front, back and sleeves, increasing the width of these parts as much as you wish and as much fabric stock allows. Before joining the yoke, this excess is folded or gathered by machine stitching. Having aligned the length of the cut of the top of the lower part of the blouse with the length of the lower edge of the yoke, they should be connected by chipping or sweeping together. During the joining process, you should try on and make changes to the location of the excess fabric. They should be distributed evenly, taking into account the characteristics of the figure. The yoke and the gathers of fabric underneath it always give the appearance of femininity and softness. For a thin woman, these elements add fullness, while for a fat woman they neutralize the excess.
Differences in patterns for blouses made of knitwear and textiles
When choosing fabric, you could choose knitwear. In this case, you might have a logical question: “Will it make a beautiful and comfortable blouse with one-piece sleeves?” A pattern designed for woven fabric is almost always suitable for knitwear. And our pattern - even more so. There is no need to worry about this. Usually problems arise when they do the opposite, that is, using a pattern designed for sewing a tight turtleneck worn over the head, they sew inelastic satin. The pattern of a knitted blouse with a one-piece sleeve requires very small allowances for a loose fit or even no allowance at all. A one-piece sleeve will not tear in the armhole area due to the good plasticity of the knitted fabric.
Do not forget that you should cut along the grain thread, in extreme cases - along the transverse thread, and only in the most exceptional cases - along the bias. 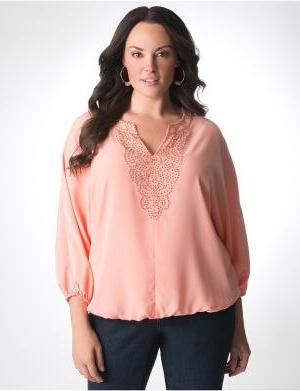
Gusset for better fit
Our convenient and simple pattern has one drawback, not even a drawback, but a problem area. It is located under the armpit. The problem is that the full-sleeve blouse we love the pattern for has a lot of tension in these areas. Seam allowances at curved areas wrinkle the fabric unsightly. If you make cuts, the risk of tissue rupture in this particular place increases. If the blouse has short sleeves or is made of elastic fabric, then you will not even realize the existence of this dangerous tension. But when sewing things with long sleeves, and even large ones, the risk increases many times over. To ease the tension, sew a gusset into this place, that is, a piece cut from the main fabric in the shape of an elongated diamond. This rhombus has two opposite angles that are obtuse and two other opposite angles that are acute. When sewn into armholes, the tops of the sharp corners are directed towards the bottom of the blouse and sleeves, and the tops of the blunt corners are aligned with the corners where the sleeves join the front and back parts. 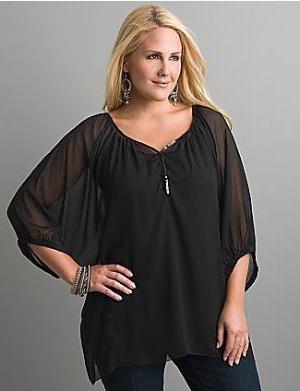
Fabric decating
Before cutting the fabric from natural fibers It is advisable to decatify, that is, to shrink. To do this, the material is ironed with a hot iron through a damp cloth. You can cut it after it is completely dry. Forced shrinkage is done so that the finished blouse does not shrink after washing, but remains the same as it was sewn.
Beautiful and original clothes, which took very little time to create, will bring you a lot of pleasure and allow you to be deservedly proud of your skills. Why waste effort on creating a pattern and developing parts? We offer you simple and effective recommendations, following which you will turn a piece of fabric into a work of sewing art in a couple of minutes.
Seamless blouse without pattern
Gaining enormous popularity summer blouses, created without a single seam. They drape interestingly and fit the figure, are simple to perform and anyone can do them. It is advisable to choose a light fabric for them, such as chiffon, and also select suitable accessories - beads, belts, ribbons - to complete your look. The piece of fabric can be square, rectangular or even asymmetrical - depending on the shape of the bottom edge you want to get in the end. Fold the fabric in half so that the free edges remain on the sides of the figure. On the fold line, exactly in the center, cut out the neck of any shape. All that remains is to trim the edges of the fabric with piping - and the blouse is ready to become part of your wardrobe. Using a similar pattern, a circle skirt is created without seams.
Square cape blouse without pattern
A slightly improved version of the previous point is a pareo or cardigan made from a square of fabric. We also fold the material in half, cut out the neckline, and from it in the center of the chest there is a place for fasteners or ribbons. The “sides” are sewn together, all free edges are overcast. If desired, you can add a hood or patch pockets to the product, also cut from a whole square of fabric.
Romantic blouse with ruffle neck without pattern
For ladies with standard clothing sizes from 42 to 48, you will need 1 meter 10 cm of fabric for a blouse in length and 1 meter 50 cm in width. Fold this rectangle in half and cut it. We set aside 15 centimeters from the top so that we can assemble the neck afterwards. From the armhole in the same way - 30 cm each. We process the edges of the fabric, including the hem and neckline (the latter having been previously tucked). To add a “zest” to the blouse model, measure 5 cm from the top of the neckline and fold the fabric along its width. We stitch it, then insert an elastic band about 35 cm long, which will effectively gather the ruffles around the neck.

Simple peasant blouse with lace without a pattern
To sew such a blouse you will need cotton fabric, lace and braid. From the fabric we cut out 2 rectangles with sides 110 by 80 cm and sew them on the sides, simultaneously finishing the edges with an overlocker. Along the bottom edge we set aside 25 cm from each side, and from them up another 45 cm. We cut the longitudinal lines. This way we get shelves and sleeves at the same time. We process the seams and connect the sides. Now we turn up the edge of the neckline by 10 cm and stitch it twice to make room for the drawstring. We decorate the edges of the sleeves and the bottom of the product with lace or braid. The belt can be tightened with a belt worn over the top.
The examples listed above can be easily combined. They can be diversified by applying a pattern, beads or rhinestones, lace details or elements from another type of fabric.
Representatives of the fair half of humanity take care of themselves in order to always look perfect and beautiful. The image truly becomes feminine thanks to clothing. There's something in every woman's wardrobe! We suggest trying to sew blouses with your own hands quickly and easily. Their patterns are varied - from simple to designer models.
A piggy bank of creative ideas
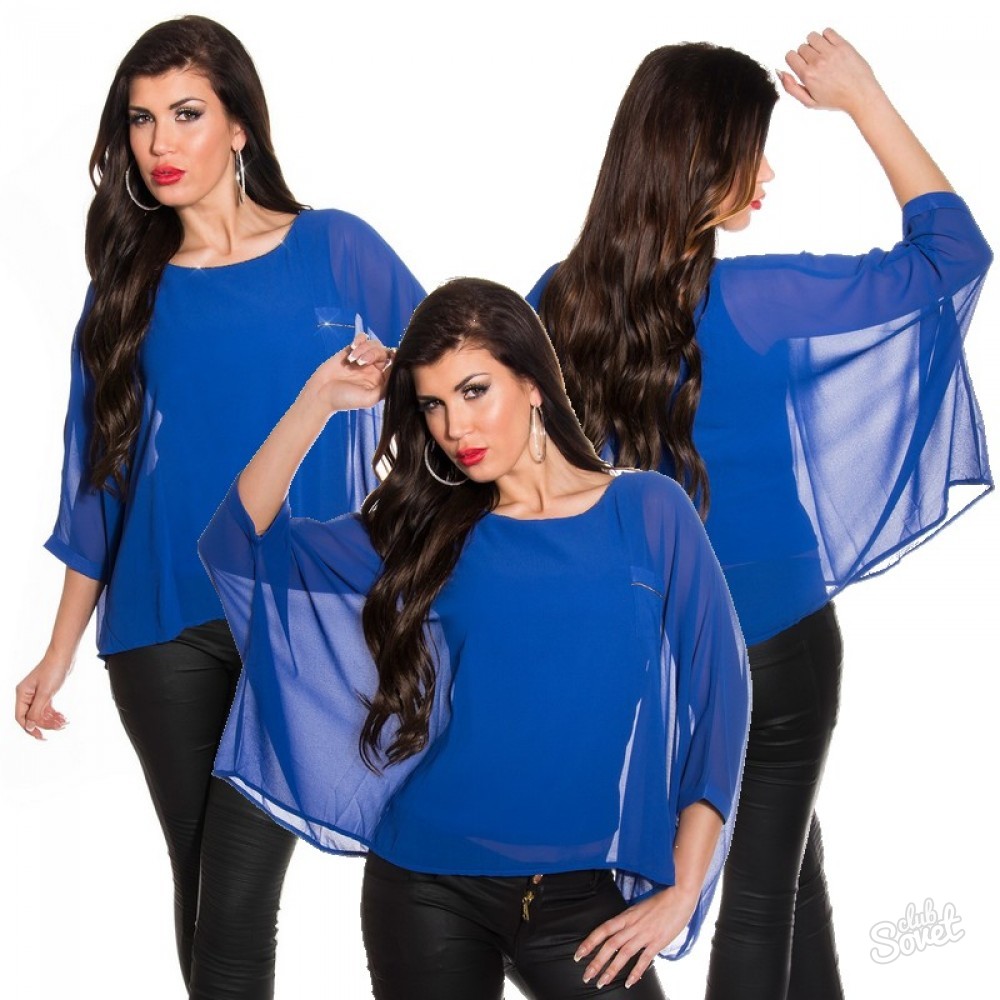
If you like to create masterpieces in your free time from work and household chores, then you simply need to update your wardrobe. How about a DIY chiffon blouse? You can even come up with patterns yourself, the main thing is to first take all the measurements and calculate the amount of fabric. Chiffon - lightweight material. In such a blouse you will always look like a soaring, loose bird with a sophisticated silhouette.
Choose a pattern according to your body type. For example, blouses with peplum are suitable for girls with rounded hips. But women with a pear body type need long, straight-cut shirts. And if you also have your spouse’s shirts lying around in your closet, which he no longer wears, then this is an excellent springboard for creativity. Remaking is sometimes easier than creating something from scratch.
Before we start creating an elegant piece, let's learn a few useful tips:
- First we transfer the pattern to the wrong side of the fabric;
- to draw a pattern on the fabric, you can use bar soap or chalk;
- Be sure to make seam allowances of approximately 10 mm;
- all seams are first basted, and only then machine stitched;
- blouses created with your own hands can be decorated with buttons and embroidery, brooches, beads, rhinestones;
- if you wear a belt or a wide belt, the blouse will immediately change and look new.
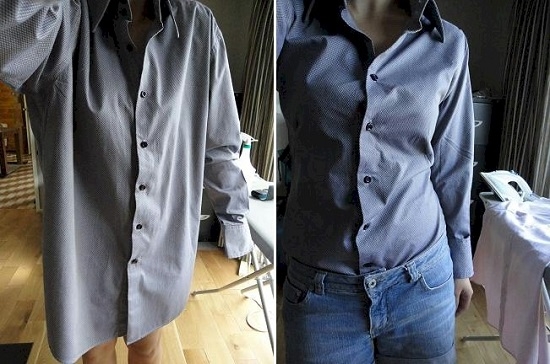
Let's give the shirt a second life
Remember the movie " The Diamond Arm"? The hero Andrei Mironov's trousers turned into elegant shorts. And we will make beautiful, fashionable, stylish and, most importantly, exclusive blouses from men's shirts with your own hands. The models of men's shirts are mostly straight, and we need to sew a fitted and cropped blouse.
Necessary materials:
- men's shirt;
- threads;
- needle;
- sewing machine;
- ruler;
- measuring tape;
- scissors.
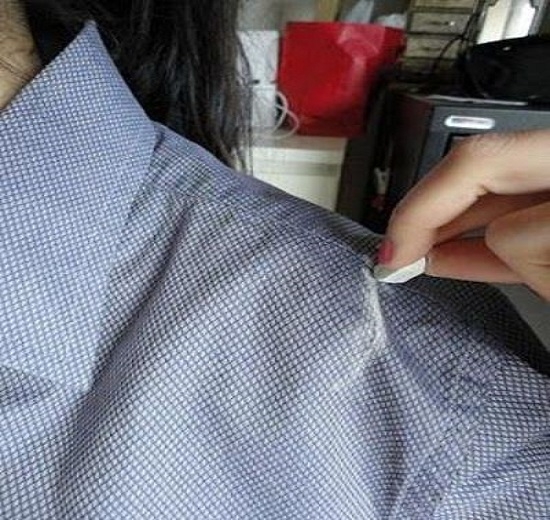
New blouse - well forgotten old one
There is nothing more pleasant for a woman than to lose weight and then put on her old thing and with joy realize that it is great. But what if this shirt was your favorite thing? It's easy to transform. Of course, you can look for blouse patterns for beginners. Simple patterns with their own hands will help you create an exclusive item. And if you are not comfortable with a sewing machine and cannot sew a shirt yourself using a pattern from a piece of fabric, it is better for you to work some magic on an old thing.

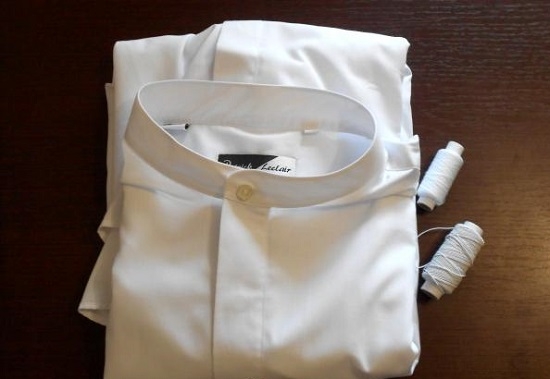
Necessary materials:
- shirt;
- threads;
- thin elastic band;
- pencil or chalk;
- ruler;
- sewing machine.
Step-by-step description of the creative process:
778629
Photo gallery: Blouse pattern simple cut short-sleeve
It is not always possible to find in a store exactly the item that you think will fit perfectly into your wardrobe and emphasize your individual taste. And sometimes even a simple thing costs much more than its “real” cost, which completely discourages purchasing it. Then cutting and sewing skills come to the rescue, which will allow you to simply and quickly sew beautiful blouse or a skirt. Let's learn how to sew a blouse, having a minimum of relevant skills and experience behind you.
Photos of types of blouses
Depending on the design features, blouses are divided into 4 types:
With set-in sleeves;
"Raglan".
With one-piece sleeve.
Without sleeves.
At the same time, the named classification is not the only one, because there are many options for sewing them: neck cuts, collars, cut-off yokes, decor and much more. The blouse can be romantic, office, casual or any other style, have an A-shaped, fitted silhouette, be asymmetrical or have a variety of trims. Therefore, it is worth determining for yourself what exactly you would like to see in the end - a summer blouse for every day in the style a la "Carmen" or an option for the office - a strict American one.
Blouse patterns by types of sleeves
Things with set-in sleeve especially appreciated among women who prefer convenience and simplicity. Pattern of such a blouse:
Raglan sleeves are characterized by seams running from the armpits to the neck. American armhole - second popular name this cut women's blouses, tops and dresses. American pattern:
A blouse with a one-piece sleeve looks very laconic, gives a feeling of lightness and can visually expand the shoulder line, so this option is well suited for women with wide hips and narrow shoulders. Pattern for such an item of clothing with a chest dart and a one-piece sleeve:
A sleeveless blouse is best for summer: such a chiffon item in women's wardrobe will be indispensable in the summer heat.
All provided patterns can be downloaded for free and printed at suitable sheet tracing paper to make it easier to transfer them directly onto the fabric.
Step-by-step description: how to sew a short-sleeved blouse
We offer the simplest option for sewing a blouse with a short one-piece sleeve in a T-shot silhouette. It is with this model that you can start sewing things for yourself. By choosing the right material, you can get a product for any season.
Another simple master class on sewing a blouse with short sleeves and a dropped shoulder can be seen in the following video.
Master class: how to sew a blouse with your own hands
Is it possible to sew a simple cut blouse without using patterns? You can, and now we’ll look at how to sew a new thing in just 1-2 hours. To do this, it is better to purchase a flowing blouse fabric (chiffon, staple or another of your choice) measuring 60x150 cm. It is better to choose a more interesting color, since the style of the product itself is very simple. The sewing principle is as follows:
It turned out like this interesting thing for the warm season:
Tips on how to avoid mistakes when cutting and sewing a blouse
Many novice dressmakers have noticed that even with strict observance all pattern parameters and step by step wizard classes, the product does not always turn out to be the right size. To avoid such mistakes, you should know some tricks:
- learning to sew is worth using simple fabrics: wool, poplin, linen;
- You need to sew the product only after trying it on: this step makes it possible to adjust the parameters of the parts and adjust them to your figure;
- take any pattern as an idea, and always draw the diagrams yourself, calculating the parameters of the parts based on the characteristics of your figure;
- Before cutting, treat any fabric with a hot iron under steam - the material will shrink a little;
- We must not forget about the margin for freedom of movement - there are allowances for this;
- Before sewing any parts, their seams must be ironed again with steam - without this manipulation, the item will look sloppy after sewing.
Sewing a blouse with your own hands is a simple task that you can cope with even without relevant experience. The main thing is not to lose confidence in success and complete your plan to the end.
All measurements of the circumference and width of the backrest are taken completely. and are written in half size. All length measurements are taken and recorded in full.
OS- measured at the base of the neck, OG- this measurement determines the size of the figure. The measuring tape should pass at the level of the armpits, along the protruding parts of the shoulder blades on the back and along the highest points of the mammary glands. FROM- measured at the narrowest point of the figure. ABOUT= measured around the figure horizontally, from the back along the high points of the buttocks, from the front along the bulges of the abdomen. Shsp- measured from the articulation of one arm with the body to the other horizontally along the shoulder blades. DSP- from the seventh cervical vertebra to the lace at the waist. For publication from the seventh cervical vertebra down, holding the sant. tape at the waist to the desired length of the product. L pl- from the base of the neck to the shoulder joint. For hands- from the shoulder joint through the elbow to the hand, with the arm slightly bent. Hands around- around the arm near the armpit, the measurement is recorded in full. Obx zap At the base of the hand, the measurement is written down completely. High chest measured from the highest point of the shoulder seam to the protruding point of the chest. Dl. Yu from the lace to the waist down the side to the desired length.
Measurements: OS=18 OG=48 FROM=38 ABOUT=52 L pl=13 For hands=58 Hands around=31 Obx zap=18 Sh.S.=18
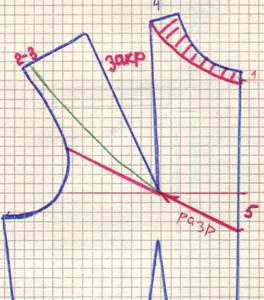
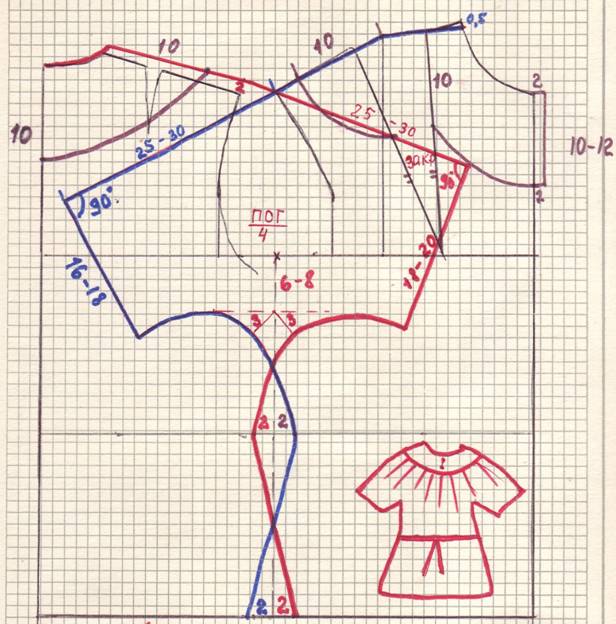
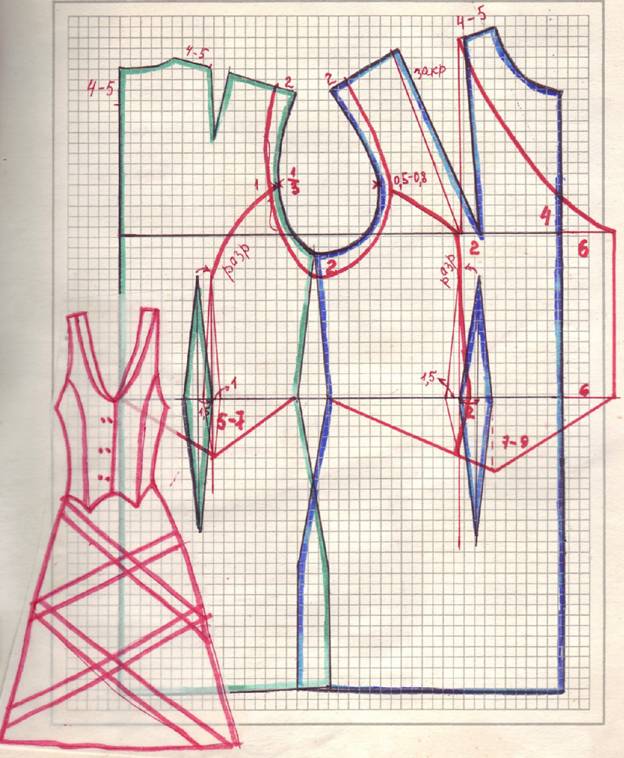
Description of the blouse drawing
net
1. Mid-back line and neck line Two lines are drawn at right angles - horizontal and vertical
2. From the line of the middle of the back to the right, OG+4 is measured along the line of the neck. A vertical line is drawn down from the resulting point.
3. Chest line OG/3+3 is measured from the neck line down along the mid-back line and a horizontal line is drawn through the resulting point.
4. Waistline From the neck line down along the middle of the back, the length of the back is measured according to the measurement. The resulting point is connected by a horizontal line to the middle of the front.
5. Hip line. From the waist line down along the line of the middle of the back, 1/2 of the length of the back is measured according to the measurement and a horizontal line is drawn from the resulting point.
6.Back width line. To the right of the middle of the back, the width of the back is measured along the chest line using a measurement of +0.5. A vertical line is drawn from the resulting point. line to neck line
7. Armhole width From the back width line to the right along the chest line OG/4
8. Armhole projection. A vertical line OG/8 is drawn upward from the armhole width point.
9. Side seam line The width of the armhole along the chest line is divided in half. From the resulting point, 2 cm is set aside to the left and a dotted line is drawn down to the hip line.
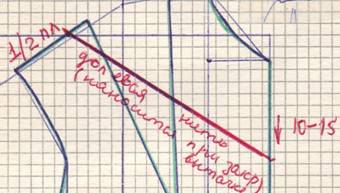
1) From the line of the middle of the back to the right along the neck line, measure OSH/3+0.5 - the width of the sprout. From the resulting point upward, draw a line 2.5 cm long - the height of the sprout. From the point of height of the sprout, draw a concave line to the point of intersection of the neck line with the line of the middle of the back. It turns out sprout line.
2) From the neck line down along the back width line, measure 1.5 cm - for normal shoulders (0.5-1 cm for straight, 2-3 cm for sloping). This is the point at which the backrest's shoulder tilts. From the top point of the height of the sprout, draw a straight line from the point of inclination of the back shoulder inclined line length equal to the length of the shoulder according to the measurement + 1.5 cm (1.5 cm is given for fit or dart) we get back shoulder line
3) Divide in half the segment located between the points of inclination of the shoulder and the chest line. From the back width line to the right along the chest line to the right, 1.5 cm is set aside (for large sizes 2cm). From the point of the middle of the armhole width down 2 cm (armhole depth) and draw the resulting points back armhole line
4) From the place of the side seam to the left along the waist line we measure 2 cm, and to the right, along the hip line - 1/2 of the difference in OB_OG. Then, from the point of intersection of the armhole line and the side seam line, we draw side seam line backrests
5) Down, from the line of the hips along the line of the middle of the back, measure 1 cm and the resulting point is connected to the line of the side seam of the back with a slightly concave line downwards - bottom alignment line.
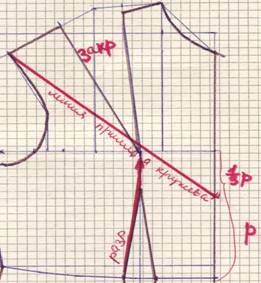
1) From the protrusion line of the armhole to the right along the chest line OG/8 - an auxiliary point for determining the depth of the dart is drawn upward from the resulting point vertical line length OG/2-0.5 - auxiliary line for determining the depth of the dart
2) from the neck line down along the back width line, measure the OG/8 point of inclination of the front shoulder. The top point of the auxiliary line is connected to the point of inclination of the shoulder in front of a straight inclined line and the length of the shoulder is measured along it from the auxiliary line according to the measurement front shoulder line
3) Draw a dotted line from the end of the shoulder to the protrusion of the armhole and measure 0.5 cm perpendicular to the right. From the line of the protrusion of the armhole along the chest line to the left, measure 1.5 cm and from the auxiliary points from the end of the shoulder and the point of protrusion of the armhole, draw a concave line to the point of depth of the armhole. This front armhole line. From the end of the shoulder down the front armhole, measure 1 cm and connect the resulting point with top point auxiliary line- shoulder bevel.
5) to the right of the side seam line along the waist line 2 cm. to the left along the hip line 1/2 (OB=OG). From the point of intersection of the armhole line with the side seam line, draw front side seam line.
6) Along the mid-front line down the hip line, add 2 cm. Conduct line of alignment of the bottom front.
7) From the line of the middle front to the left along the chest line, measure OCR = OR/3 + 0.5. From the resulting point, draw a vertical line upward - OG/2 - neck height. Draw from the top point of this line horizontal line to the right to the middle of the front. From the point of intersection of this line and the middle of the front, we lay down OSH/3+1.5 cm - the depth of the neck. This point is connected by a dotted line to the neck height point and 2 cm is set aside from the middle of it to the left. The resulting points are connected by a smooth line - head line
8) From the protrusion line of the armhole to the right along the chest line, 2 cm and the distance from the resulting point to the middle of the front is divided in half. The resulting point is high point breasts From the top point of the auxiliary line along the front shoulder line to the left, measure 4-5 cm (1/3 of the shoulder length) and put a dot. From the top point of the neck height to the left, measure the same distance (4-5 cm) in a straight line. We connect the resulting points with straight lines to the high point of the chest - we get the outline of the dart. We measure the left side of the dart and place it from the VTG up the right side of the dart. We connect the alignment point with the upper point of the neck height - we get dart alignment line.
| Name | Style | Drawing | |
|---|---|---|---|
| Blouse English type |
 |
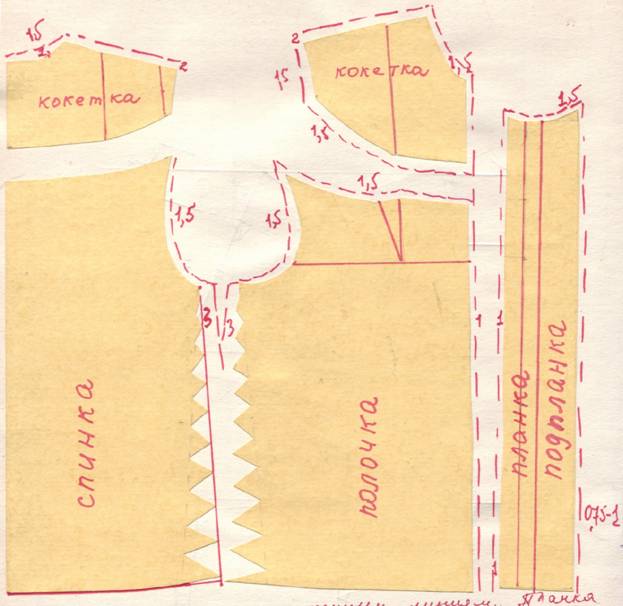
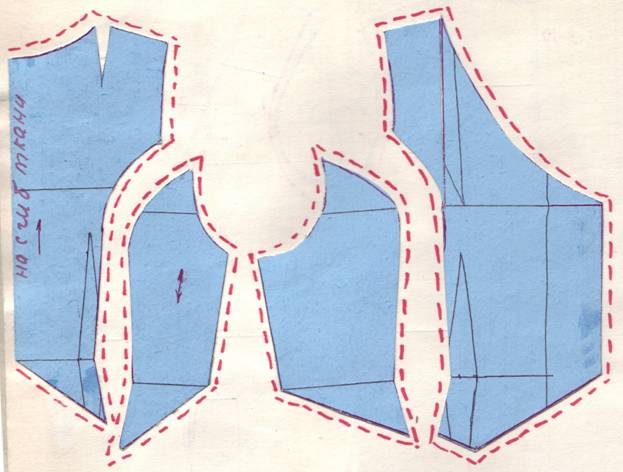
Cut the pattern of the back and shelf along the contour of the drawing at the place where the parts transition to each other, cut with teeth. The back is placed on the fold of the fabric on the dart pattern, cut. On the front pattern, the chest dart is transferred to the side seam: we make an undercut from the side seam to the VTG and close the dart. The waist dart is cut out on the pattern. To process the fastener, cut out a pickguard. |
|
|
Cut English style blouses |
|||
 |
|||
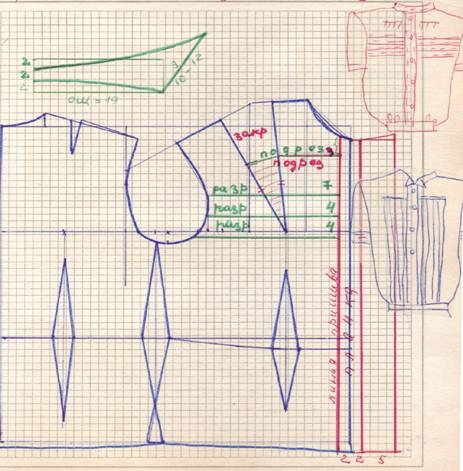
| Name | Style | Drawing | |
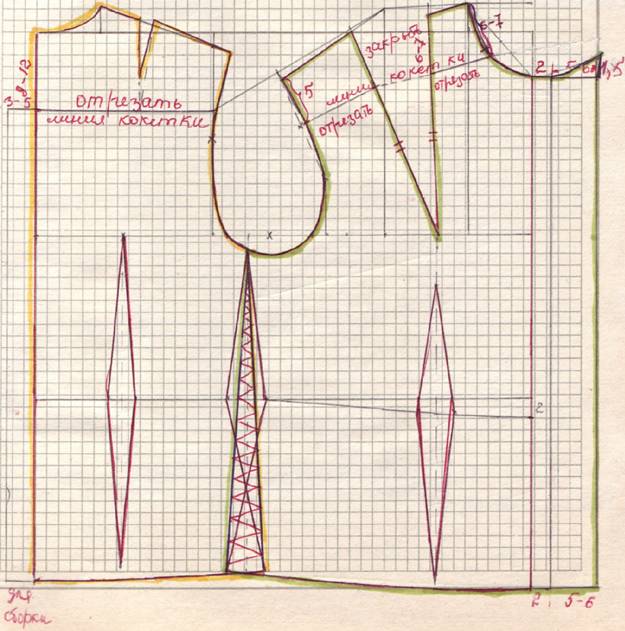
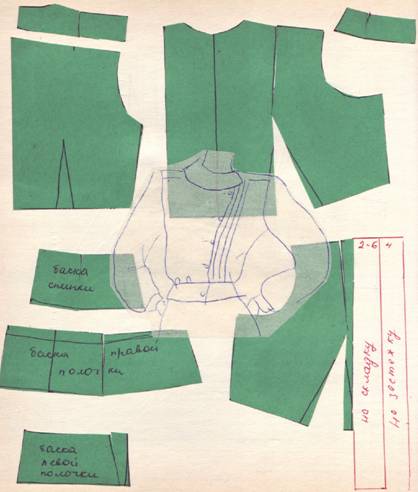
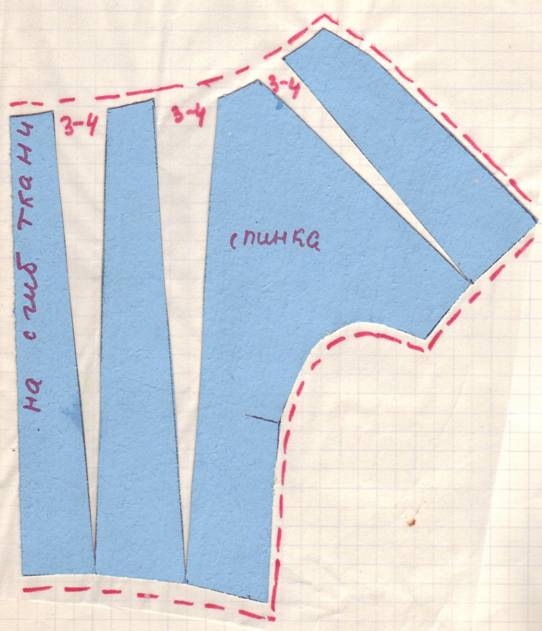
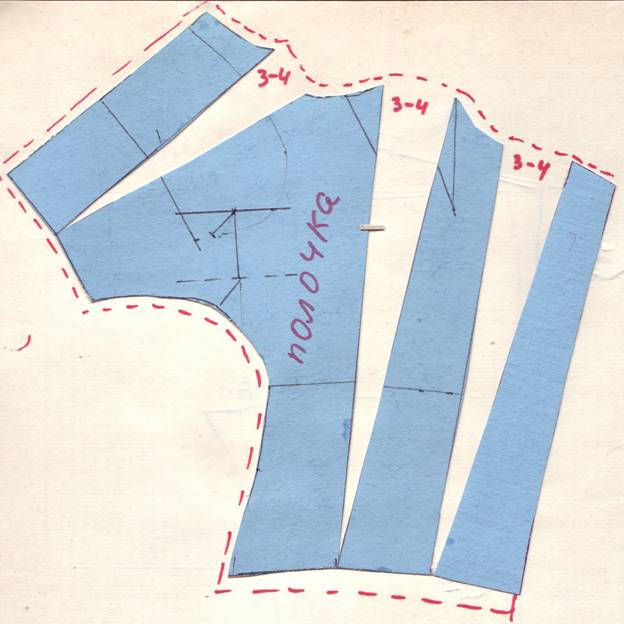
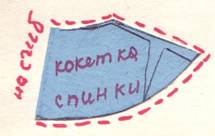
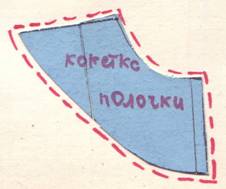
| Blouse with gathered yokes and one-piece placket | Cut the back and shelf pattern along the contour of the drawing along the drawn shaped lines. The back yoke is cut onto the fold of the fabric. the back is moved 3-5 cm away from the fold of the fabric for assembly. The front yoke is cut with a closed dart. The lower part of the chest dart on the shelf is saved for assembly. To process the fastener, you can cut out a pickguard. If the fastener is designed on a strip, then add 1/2 of the width of the strip to the fastener; to process the strip, add +1 cm to the width of the strip |
 |
|
|
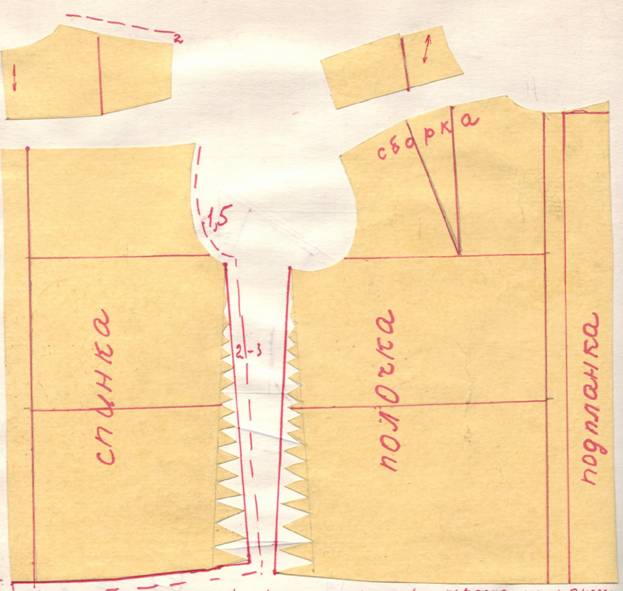
Cut blouses with gathered yokes and one-piece placket |
|||
 |
|||
| Name | Style | Drawing | |
| Blouse with an oval yoke |
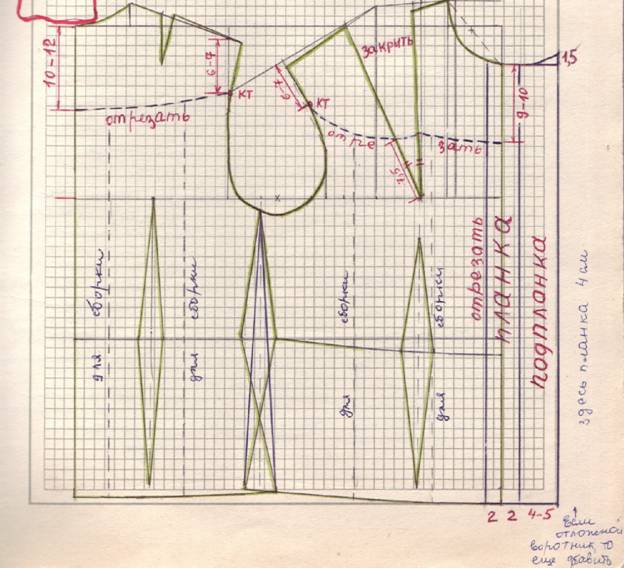
Cut along the contour along the drawn lines. The placket is cut with an allowance for processing the fastener with the substrap. The front yoke is cut with the chest dart closed. The lower part of the chest dart is saved for assembly. The back yoke and back are cut onto the fold of the fabric. The back and shelf are cut and moved apart for additional assembly)2-4). |
 |
|
|
Cut blouses with oval yoke |
|||
 |

Cut out the blouses
We cut the pattern along the outline of the drawing, at the location of the darts, along the side seam. At the point of transition to each other, the side seam is cut with cloves. The lining is cut with a cutter onto another piece of paper. The back is cut on the fold of the fabric. When cutting, leave 1-1.5 cm at the collar line, side seam 2-3 cm, bottom line 3-5 cm.
At the front at the edge line 1-1.5 cm, neck 1.5 cm, shoulder 2 cm, armhole 2.5 cm, hem line 3-5 cm, side seam 2-3 cm.
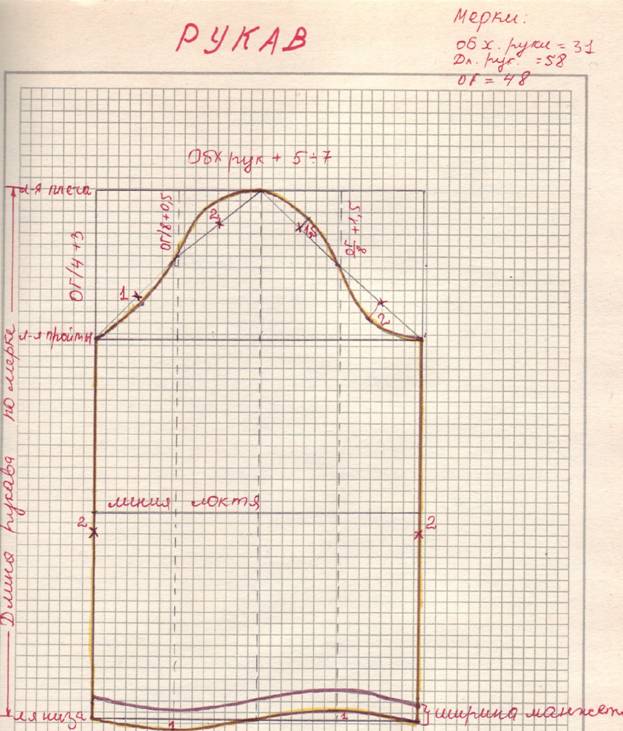
Sleeve: piping 1.5 cm, side seam 2 cm, bottom of the sleeve 1.5-2 cm. The high point of the piping is transferred to the material with colored thread. hem the wedge to the bottom of the sleeve. The collar and cuffs are cut on the fold of the fabric of the transverse thread. With the exception of striped materials, we leave 1.5 cm on the seam. The lining is cut along the bead line along the grain thread. We leave 1.5 cm on the seam. The snares are laid along the contour of the pattern, along the darts, along the shaped lines, along the waist line and along the middle front line.
Preparing for fitting
When basting, the upper fabric is placed on the hands, and when sewing by machine, the lower fabric is placed. The darts are sewn from top to bottom and ironed into stitching. Shaped darts are ironed towards the side seam. The waist darts of the back and front are ironed towards the middle of the back and the middle of the front.
Shoulder seams are basted along the back and stitched along the front. The side seams are basted along the front and sewn down the back. Before stitching, you need to pull out the snare. The side and shoulder seams are covered with flannel stitching. The border is basted along the collar and sewn along the blouse. The chinrest at a distance of 20 cm is seated 1 cm from top to bottom.
Collars, cuffs, are ground along the lower half. The line of the pick-up line is hemmed with a flannel seam. The bottom of the blouse is hemmed with a hidden seam. The collar is basted to the neck of the blouse, aligning the middle of the neck with the middle of the collar. And the depth of the neckline on a blouse with point 2 on the collar. On the other side, a pick-up liner is swept to the collar. Everything is stitched together by machine.
Rules for sewing sleeves to a blouse
the high point of the sleeve cap is strengthened to the shoulder seam, the armhole of the product from the side seam is divided in half. The side seam of the sleeve is attached to the resulting point. The fit is distributed along the edge of the sleeve and it is advisable to iron the top. before sewing, pin off the left one and right side products.
Rules for sewing cuffs
The sleeve is folded from the side seam and 4 cm is measured from the fold to the bottom of the sleeve. We make a notch. We measure 3 cm from it, make the 2nd notch. From notch to notch, the sleeve is gathered with thread. A cuff is sewn to the finished, assembled seam.
Place of loops on a blouse
We retreat 1.5 cm from the edge of the side. Down 1/2 the diameter of the button and cut a loop across the diameter of the button, 1 button at the neck, one at the chest line and at the waist. The distance is divided in half - the distance between the buttons is no less and no more than 8 cm. Notes. Baste and cut only on the table. Check control points. Make the snares with two seams. The line of snares remains in the middle. It is better to assemble the back with a yoke from the middle to the edge. Always sift the middle of the front. Iron the stitched product. When basting, check the coincidence of the waist lines, which also need to be basted. If the material is thick, then the yoke can be folded along the seam line before sewing. Next, baste the yoke and check whether the border is straight or not; if not, then you need to lower the yoke, mark the sewing line with pins and reassemble the blouse using 2 threads. If the back is loose, sew the shoulder seam 1 mm lower and vice versa. It is better to lay the snares with darning or 60-thread in 2 threads. It is better to sew with number 50.

PROCESSING A STANDARD COLLAR
The collar is cut out double, with a seam allowance of 1 cm. Using this pattern, you can cut out a lining for the collar from more thick fabric(fleselin). Place the lining on the inside of the upper collar and baste it on four sides. Place the top collar with the right side on the front side of the lower one and place a basting at a distance of 2 cm from the cuts. Place a basting along the line of the stand 1 cm from the cuts. Then baste the upper collar again, slightly placing it in the snare. baste with small stitches. Machine stitch along it. Make notches from the seam side to the machine stitch. Cut off the gasket from the seam side to the machine stitching. Trim the seam, trim the corners, turn the collar right side out. Along the line of the stand, the seam should be on the fold. Along the departure line, the seam should move towards the lower collar by 2 mm. Mark and iron the collar. then place the collar on the table, carefully straighten the lower part of the collar, carefully, and cut it along with the spacer by 0.4 cm. Place the middle of the collar to the middle of the back of its lower part along with the gasket. Place the edges of the collar to the line of the fastener. Place the collar into the neckline along the seam allowance line. Then machine stitch. Trim the gasket on the seam side to the machine stitch. Bend the seam towards the collar. Fold the cut of the top collar along the seam allowance line. Baste to the neckline and hem so that the stitches are invisible and the machine stitching is not visible. Iron everything. Sew the side and collar. The collar can be sewn between the top and bottom sides (English).
Removal of measures OK. Building the basis of a blouse pattern. Styles, drawings and cuts of blouses
| Name | Styles, description | Cutting drawing | |||
|---|---|---|---|---|---|
|
Striped blouse fabrics with soft folds below the line breasts |
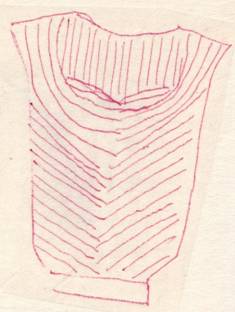 |
Blouse made of striped fabric, chest dart is moved to the middle of the front in soft folds. The upper part of the front is cut out on the fold of the fabric in a shared arrangement of strips on the lower part of the front. The stripes form a herringbone pattern |
|
 |
|
|
Striped blouse fabrics with whole-cro with this strap |
 |
Blouse made of striped fabric - the chest dart is carried into soft folds at the placket. Having placed a tuck fold under the bar, stitch the inner edge of the bar. Treat the side with a picker |
|
||
|
Extended |
Baste to the bar. Place soft folds. greatest number make folds at turns. The end of the frill is bent to the wrong side of the strip by 2 cm. On the front side, 2-3 cm of trim is applied to the strip. When finished, a bow made from a roll is sewn onto the strip |
|
|||
oval forms |
 |
|
 |
||
| Coquille | The mold is cut onto the fold of the fabric without seam allowances. external seams are treated with twisting or lace. the folds are laid one on top of the other on the right and left sides separately, directing them with folds towards the middle, fastening them from the inside manually (this is for an elongated frill) |
|
|||
| Figaro |
|
||||
|
Whole- tailored blouse with one-piece short sleeves |
|
||||


| Name | Styles, description | Cutting drawing | |||
|---|---|---|---|---|---|
|
Blouse with flounces |
We spread the front pattern along the line of sewing the flounce on the fabric to twice the width of the seam. Shuttlecocks are cut out. The length of the flounce is equal to the length of the sewing line, 15 cm for assembly. Shoulder load the dart moves to the side seam Sewing- process the cut of the shuttlecock with a twist by machine or manually. The sewing line of the flounce is assembled, the flounce is sewn down with the blouse from the inside out. The underlay is hemmed with a hidden seam. |
 |
|||
 |
|||||
|
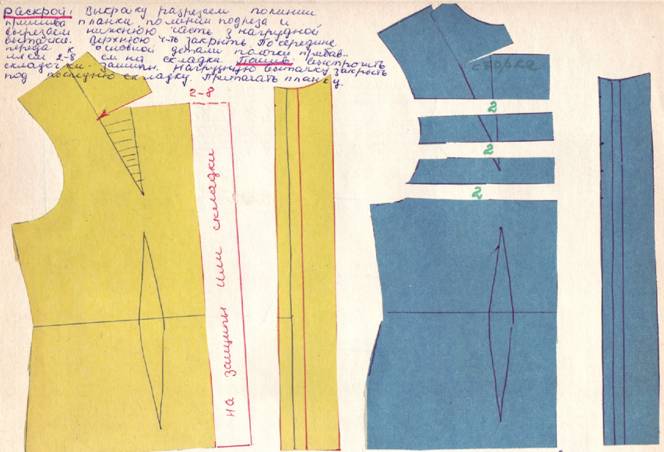
Blouse with undercut at the neck with lobar, transverse pleats and tucks. |
|
We cut the pattern along the sewing line of the placket, along the undercut line, and cut out the lower part of the chest dart. Upper part close. In the middle of the front to the main part of the shelf we add 2-8 cm for folds. Sewing: Sew pleats and tucks. Sew the chest dart under the last fold. Sew the bar. |
|
||
|
The dart is inserted under the last fold _____Similarly, the rest of the dart is under the chest The undercut is assembled and stitched Folds, stitched strap |
|||||
|
Blouse with oblique frills |
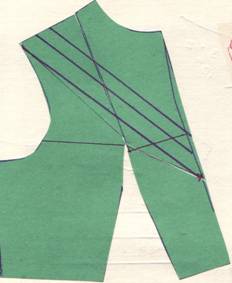
Close the chest dart at the shoulder line or bring it to the waist line. On the bodice pattern, lines for stitching lace or frills are applied. the distances between the lines are made equal to the width of the lace or frill - 1 cm. After sewing the frills, sew the seam along the line of the middle front with an internal seam. One-piece sleeve, short  |
|
|||
|
Blouse with oblique folds-tucks |
Move the shoulder chest dart to the waist line. Apply a control line to the pattern, which should determine the direction of the grain thread for the folds. When cutting shelves, fold the fabric right side inward. Leave 3-5 cm around for pleats and tucks. Sewing. Sew the folds along the grain thread on both shelves. The folds are sewn on the left shelf from top to bottom, and on the right - from bottom to top... iron the folds from top to bottom, and then correct (cut) according to the shelf pattern. The dart at the waist is not sewn in, but remains loose or gathered under an elastic band. |
|
|||
|
Blouse from silk fabrics with a small fitted peplum |
Blouse made of silk fabric, the clasp is shifted to the left. The asymmetry is emphasized by a group of folds-tucks on the left shelf. The collar is a bias collar. - we move the chest dart to the waist line. The pattern is applied to the wrong side of the material. Sewing: stitch the folds along the left shelf. Decorate the fastener with support strips - details Set-in sleeves with low armhole. |
|
|||

| Name | Styles, description | DrawingCutting | ||
|---|---|---|---|---|
| 1 | Blouse with one-piece sleeves and yoke |
 |
|
|
| Vest |
|
|||
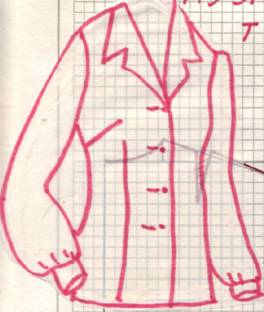
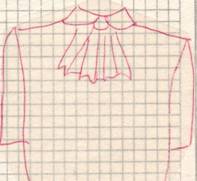
BLOUSE WITH FACTORY TURN-DOWN COLLAR AND PICKLES
(size 48)
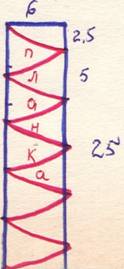
In Fig. 1 shows a blouse with a turn-down notched collar, pintucks and short sleeves
Before cutting out the blouse, you need to cut off the length of the front and sew up the pintucks at 0.5 cm intervals.
The number of pintucks should be equal to the distance of the end of the collar, i.e. 7 cm. Before the first pintuck, step back 4 cm from the middle of the front. In order for the pintucks to be even and not skewed, it is necessary to pull the thread from the warp at the site of the first pintuck. Then stitch along the mark, and the remaining pintucks will be equal to the first one.
The neckline is cut along the collar. Collar processing is indicated in the description straight dress, and the sleeves are in the description of the blouse. After the tucks are stitched, apply the pattern and trace the outline of the blouse. The blouse is cut out according to the pattern of the previous blouse.
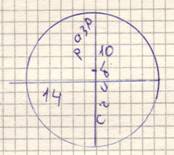
The drawing of tuck lines and the construction of the collar for the blouse are shown in Fig. 2.
The pattern drawing for a collar for a blouse without a fastener, over the head, is based on the following calculations: 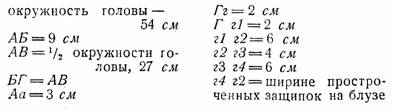
A blouse with a turn-down loose blouse collar is sewn according to the loose blouse rule.
FORM OF DRAWING OF A BLOUSE WITH MIXING OF CONSTRUCTION POINTS
In order to avoid any omissions in sewing products, it is necessary to then check what kind of physique the human figure has.
In Fig. Figure 3 shows how, with the same size, but with different body types, the position of the points and the direction of the lines change.
A thick solid line shows the lines of a normally built human figure; for a stooped figure, a thin solid line is used in the drawing. It can be seen that the depth of the armhole decreases, therefore, the length to the back waist in measurements for stooped people also decreases. The width of the back increases, the shoulder lengthens. The position of the neck moves lower, the width of the chest decreases due to the width of the back.
For a curved-folded figure, the movement changes in the opposite order (in the drawing there is a dotted line): the height of the back sprout decreases, the depth of the armhole increases, the width of the back becomes narrower, and the tight cell is wider, the waist height is shorter, the front shoulder is higher than normal. All movement of construction points and lines occurs within the range of 1 to 1.5 cm from the normally folded figure.
ONE-PIECE SHORT SLEEVE BODY WITH SHOULDER DART
(size 48)
In Fig. 198 shows a bodice model with a one-piece short sleeve and a dart from the shoulder. Stand-up collar with a bow at the ends. For the collar, take an oblique strip of fabric 12-14 cm wide and 108 cm long (neck circumference 36 cm plus 72 cm for the bow). With this bodice it is good to use a skirt with a fan pleat in the middle of the front (the skirt is shown in figure 250).
To draw a drawing of a bodice with a one-piece short sleeve, you need to take the following measurements (in cm):
neck circumference (ОШi)—18
chest circumference (CH) -48
waist circumference (WC) - 38
back width (ShS)—18
waist length (WT) - 39
sleeve length with shoulder (DR)—2О
front waist length (DPT) - 52
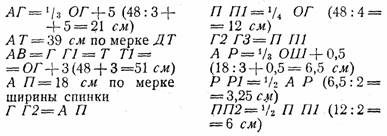
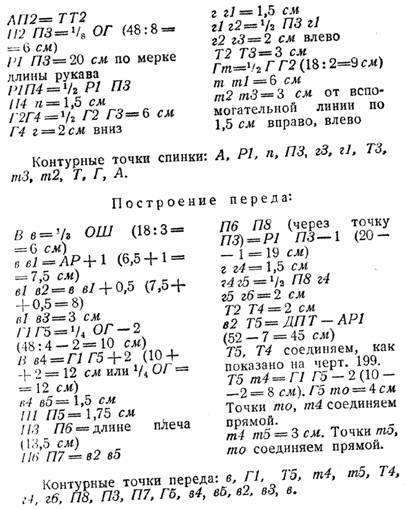
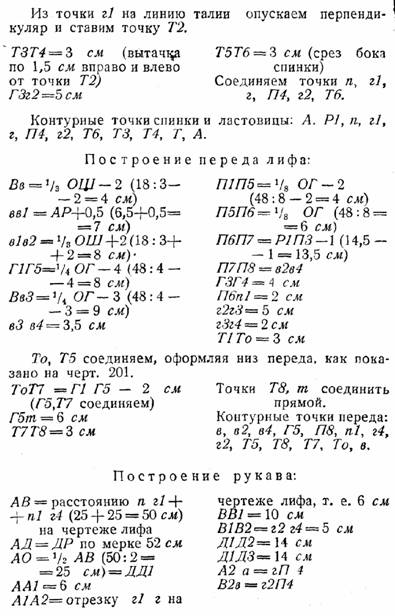
The construction of a drawing of a bodice with a one-piece short sleeve and a dart from the shoulder is made according to the following calculations:
Back construction:
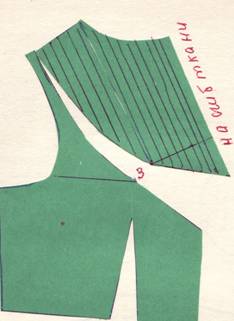
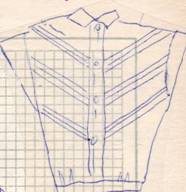
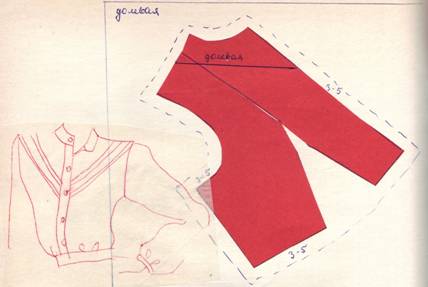
BODY WITH RUSSIAN ARMHOLE
(size 48)
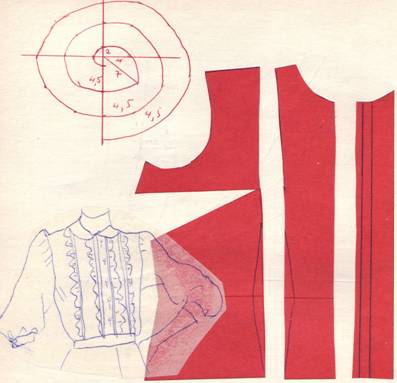
On the base of an ordinary bodice with a dart in the shoulder, we apply an extended armhole with a one-piece gusset.
To the middle of the front add 3 cm for the fastener (see dotted line). The side along the line of the front darts is cut off and stitched into a small fold. The folds are stitched along the base and ironed. The barrel pattern is applied to the stitched material so as to create a Christmas tree (see cutting baby dress, section 4). Straight skirt, with counter fold in the middle of the front and pockets. Collar - shawl (lower and upper collar).
To construct a drawing of a bodice with a Russian armhole, you need to take the following measurements (in cm):
neck circumference (NC) - 18
chest circumference (CH) - 48
waist circumference (WC)—38
waist length (LT)—39
sleeve length (LR)—52
back width (ShS)—18
The construction of a drawing of a bodice with a Russian armhole is carried out according to the following calculation data:
Construction of the back with gusset:
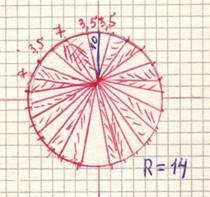
We construct a right angle with the vertex at point A.

We connect point O with points A1 and B1, divide each side into three parts and place points O1, O2, O4, O5. ![]()
Form the sleeve cap at points B1, O2, O3, O, O6, O5, A1.
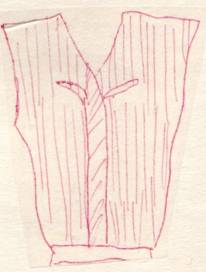
ONE-PIECE SHORT SLEEVE BODY WITHOUT GUSPET, WITH BUST DOT
(size 48)
In Fig. 3 shows a model of a bodice with a one-piece short sleeve without a gusset. The front dart on the bodice is under the bust. Before cutting, small tuck folds are sewn on the chest line. In the middle of the front there is an overlay bow 6 cm wide and length equal to the length of the blouse. The collar is damned. 219. For this bodice, you can use a skirt that is tapered downwards.
To draw a drawing of a bodice with a one-piece sleeve, you need to take the following measurements (in cm):
neck circumference (NC) - 18
chest circumference (CH) - 48
waist circumference (WC)—38
length to waist (WT)—39
sleeve length (DR)—26
Table for constructing a drawing of a bodice with a one-piece sleeve without gusset, size 48
Back construction:
We construct a right angle with the vertex at point A.
We connect points P3, G1 with an auxiliary line and plot the length of the sleeve through points P1, P3. 
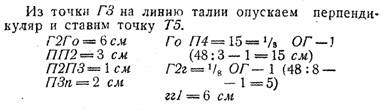
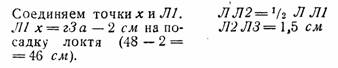
A1, G connect the auxiliary one, divide it in half and put a dot g1, from point g1 we make a notch.
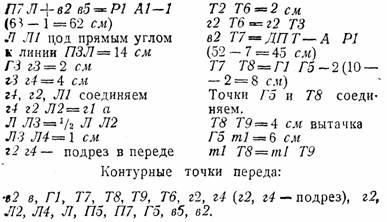
1st==1.5 cm T1T2=2 cm GO=1/2 GG2 TT3=GO
About mo=4 cm
m1m=3 cm from point T3 in both directions 1.5 cm
Back contour points: A, P1, x2, PZ, A1 , th, g, T2, m1, m, T, G, A.
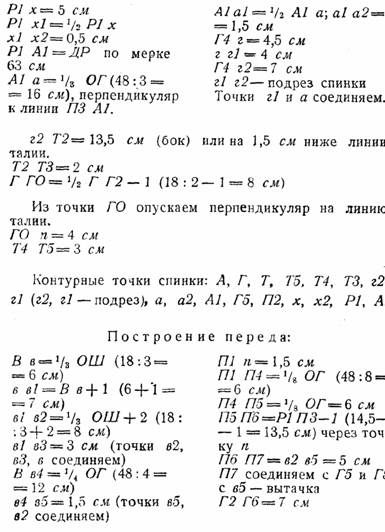
Front build: 
From point G1 at right angles to line b1 T4 we set aside 1/4 OG-2 (48: 4 - 2 = 10 cm) and place point G5.
T4m2=G1G5-2 (10-2=8 cm). (Segment T4m2 is laid at right angles to line b1 T4).
We connect G5 and m2.
From point G5 we lower a perpendicular equal to G5m2 and place point ‚m3. This is a dart, the width of which is equal to 1/2 the difference between OG and OT + 3 cm = 8 cm.
Front contour points: Pb, v1, G1, T4, m2, mZ, T5 , g2, g4, P7, P5, n, x4, P6
Dotted line shows short sleeve.
UKRAINIAN RAGLAN BODY SHAPE WITH BUST DOT
(size 48)
Figure 1 shows a model of a Ukrainian raglan bodice with a dart under the bust. The blouse has a narrow long sleeve. The bodice is accompanied by a straight skirt, folded at the waist with soft folds in the shape indicated for the girl in the description of the sailor suit.
To construct a drawing of a Ukrainian-shaped bodice, you need to take the following measurements (in cm):
neck circumference (NC) - 18
chest circumference (CG)—48
waist circumference (WC)—38
length to waist (WT)—39
sleeve length with shoulder (DR)—78
The construction of a drawing of a raglan bodice of the Ukrainian form is carried out according to the following calculations:
Back construction:
We construct a right angle with the vertex at point A. 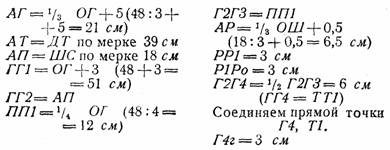
Connecting the points Rho and G and at the intersection with the back width line we put P4.
Connecting the points with an arc G, R5, P4, RZ, Ro.
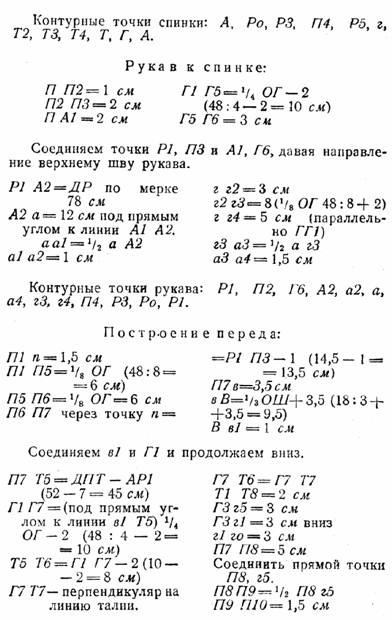
Front contour points: P8, v1, G1, T5, Tb, T7, T8, g, go, g5, P10, P8.
Construction of the front sleeve
We connect points P7, Pb, G2
We connect points A1, G2 and continue the line down, giving direction to the sleeve. 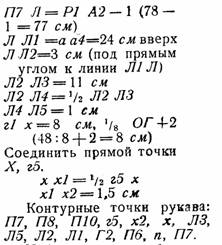
The numbers indicated without calculation are constant for all sizes.
RAGLAN BODY WITH SHOULDER DOT
(size 48)
In Fig. Figure 3 shows a model of a raglan bodice with a dart from the shoulder. Dress with long, wide sleeves, which at the bottom may have tucks in the form of a cuff. There is a fastener at the front, for which you need to add 3 cm to the middle of the front. A flared skirt with two wedges in the front. To draw a drawing of a raglan bodice with a shoulder dart, you need to take the following measurements (in cm):
Neck circumference (OS)-18
Chest circumference (OG) 48
Waist circumference (OT)—38
Waist length (WT)—З9
Front waist length (LWL)—52
Sleeve length with shoulder (LR)—78
Back width (ShS)—18
Table for constructing a drawing of a raglan bodice with a dart from the shoulder (size 48)
Back construction:
We construct a right angle with the vertex at point A.

Front contour points: v3, v, G1, T5, T6, T7, T8, g, th, G 5, P10, G5, v8, v3.
Sleeve contour points: P7, v7, P10, g5, x2, x, L1, LZ, L, G2, Pb, n, P8, P7.
COMBINED BODY
(size 48)
In Fig. 1 shows a model of a combined bodice. On the front of the bodice there is a raglan sleeve that goes into the neckline; back with one-piece sleeves.
To draw a drawing of a combined bodice, you need to take the following measurements (in cm):
neck circumference (NC)— 18
chest circumference (CH) 48
waist circumference (WC)—38
back width (ShS) - 18
waist length (WT) - 39
front waist length.
(DPT)—52
sleeve length with shoulder (DR) -78
Table for constructing a drawing of a combined bodice (size 48)
Back construction:
We construct a right angle with the vertex at point A.
Sleeve contour points: P7, P8, P10, G 5, x1, x, L2, L4, L, Pb, n, P7.
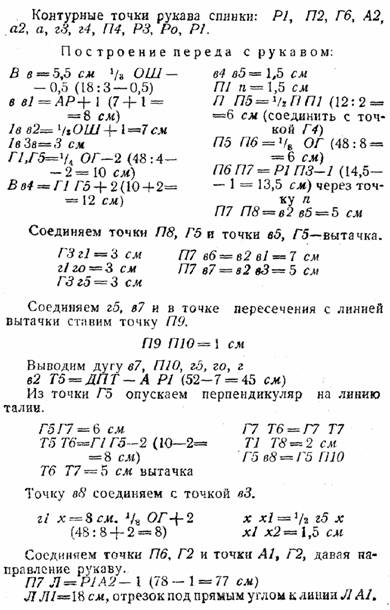
Front build:
V 1, G1 we connect and continue downwards arbitrarily.
P7 T2 = DPT - ARI (52 -7 = 45 cm)
G1 G6 = 1/4 OG -2 (48: 4 -2 = 10 cm) at right angles to line B1 T2.
T2m4=G1Gb-2(10-2=8 cm) at right angles to line b1 T2.
m4m5=1/2 of the difference between OGiOT+3=8 cm.
Gbm4=Gb m5
T1 T3 =2 cm
G2 G 4 =2 cm
G 4 G 2=6 cm
g3 gb=2 cm
Shelf contour points:
P8, v1, G1, T2, m4, m5, T3, G 4, G 2, g6, r5, P10, P8.
BODY WITH ONE-CUT SHORT SLEEVES,
WITH A FORMED UNDERCUT
(size 48)
In Fig. Figure 3 shows a bodice model with a one-piece short sleeve formed by an undercut. In the middle of the front of the bodice there is a fastener, on which it is necessary to add 3 cm to the middle. A 6 cm wide strip is sewn along the neck, a length equal to the neckline, ending with a cape. The upper collar is cut according to this shape. Straight skirt with attached tabs.
To draw a drawing of a bodice with a one-piece short sleeve, you need to take the following measurements (in cm):
neck circumference (NC) - 18
chest circumference (CH) - 48
waist circumference (WC) - 38
waist length (WT)—39
sleeve length (DR)— 37
Front waist length (FWL)—52
back width (ShS)—18
Table for constructing a drawing of a bodice with a one-piece short
sleeve formed by an undercut (size 48)
Back construction:
We construct a right angle with the vertex at point A. 
We connect points P1, P3 and direct the line to point G1 (size 48)
In Fig. 1 shows a model of a bodice with a one-piece sleeve with a gusset that goes into the sleeve.
To draw a drawing of a bodice with a one-piece sleeve, you need to take the following measurements (in si):
neck circumference (NC) - 18 chest circumference (CG) - 48 waist circumference (OT - 38 length to waist (LT) - 39 sleeve length with shoulder (DR) - 63 front waist length (LPT) - 52 back width (SB) -18
Table for constructing a drawing of a bodice with a one-piece sleeve and a gusset included in the sleeve
Back construction:
To construct a drawing, we construct a right angle with its vertex at point A. 
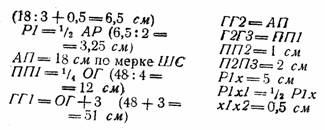
G1 G2==AP=18 cm
G2GZ==P P1=12 cm P2 GIZ==2 cm
PP1=1/4 OG (48:4-2= 12 cm) PP2=1 cm
G2 G4 = 1/G2G3 (12:2=6 cm); (G4 T2—perpendicular to the waist line)
G1 G5=1/4 OG—2 (48:4—2=10 cm) 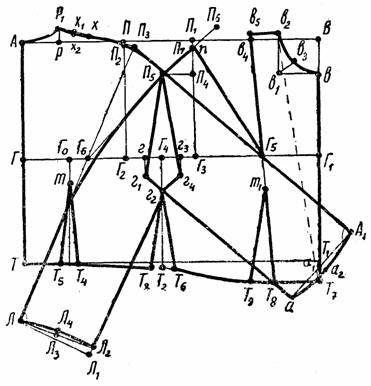
We connect points P1, P3, G5 and continue the line, giving direction to the sleeve.
P5 is connected to point G6 and P3 to G6, giving direction to the sleeve.
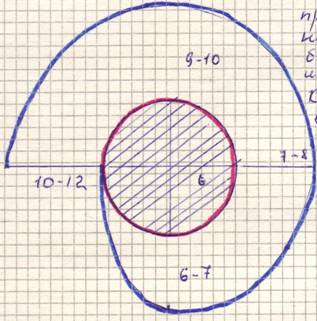
Gusset
Connecting the dots G 1, P5 and G 4, P5.
Gusset contour points: P5, G 4, G 2, G 1, P5.
Note. The numbers without calculation are constant for all sizes.
BODY WITH ONE-PIECE 3/4-LENGTH SLEEVE AND SIDE GUSSET
(size 48)
In Fig. 2 shows a dress model with one-piece sleeves ?
length and a gusset that runs along the side of the bodice. The shape of the bodice is elongated (see dotted line on drawing 215). The bodice has a bust dart. The pockets are finished with leaf. If desired, a stitch is made along the hips or a cord is passed through. The dress has a round neckline. The decoration is an elegant scarf made of light fabric. The skirt is tapered at the bottom, with slits in the sides.
To draw a drawing of the bodice, you need to take the following measurements (in cm):
Neck circumference (NC)—18
Chest circumference (CG) - 48
Waist circumference (WC) - 38
Waist length (WT)—З9
Front waist length (DWT)—52
Sleeve length (DR)—63
Back width (ShS) - 18
Table for constructing a drawing of a bodice with a one-piece sleeve and a gusset going to the side, size 48
Back construction:
We construct a right angle with the vertex at point A. 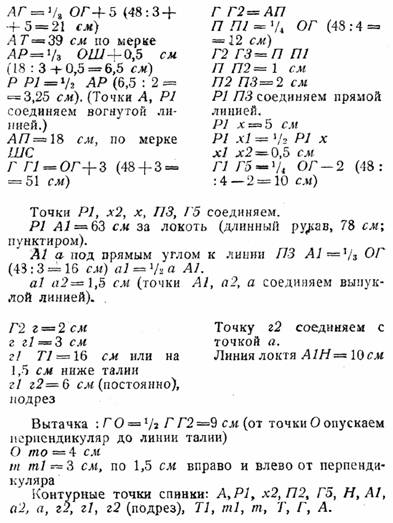
Construction of the front

The long sleeve is shown with a dotted line, P6D1=78-1=77cm.
D1D2 = 3 cm. Bevel from the elbow line. D2D3=11cm G 5D3= G 2Do-2
Front contour points: P6, v1, G1, T2, T3, m2, T4, T5, g5, g4 (g5, g4-undercut), g5, L1, L3, L, N1, G6, P5, P6
Side
G2 Go=1/2 G2 G3(12: 2=6 cm)
Go G4=2 cm up
We connect points g1, G4, g4.
Т5Тb=2 cm
Т1Т7=2cm
Side contour points: g1, G4, g4, T6, T7.
BODY WITH ONE-PIECE ELBOW-LENGTH SLEEVE AND GUSSET INCLUDED INTO THE SLEEVE
(size 48)
To construct a drawing of this bodice, you need to take the following measurements (in cm):
neck circumference (NC) - 18
chest circumference (CG)—48
waist circumference (WC)—38
length to waist (WT)—39
sleeve length (DR)—40
front waist length (DPT)— 52
back width (ShS)—18
Table for constructing a drawing of a bodice with a one-piece sleeve
and a gusset that goes into the sleeve
Back construction:
We construct a right angle with the vertex at point A. 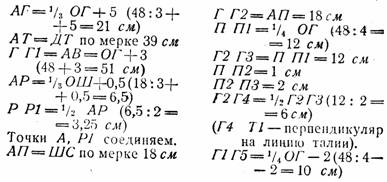
We connect points P1, P3, r5 and measure the length of the sleeve on this line.
Р1А1=40 cm according to DR measurements.
G2 G= 1 cm (for a sleeve length? shown with a dotted line: from the point G down 2 cm).
G4 Go=5 cm.
From point A1 at right angles to line PZ G5 we draw a line of arbitrary length. Points G, Go we connect and at the intersection with an arbitrary line we put point a.
T1 T2 = 2 CM (points Go, T2 are connected).
Г‚м = 1/2 Г Г2 (18:2 = 9 cm), (from point m we lower the perpendicular to the waist line).
mmo=6 cm
TZ T4=3 cm (dart)
Back contour points: A, P1, P2, A1, a, Go, g, Go (Go, g—undercut), T2, T3, T4, T, G, A.
Front build:
P1P4=2cm
P1P5=1/8 OG (48:8=6cm)
P5P6=1/8 OG=6cm
P6P7=P1P3-1 (14.5-1=13.5) through point P4
P7 h=3.5 cm
bb1=1/3 OS+Z.5 (18:3+3.5=9.5 cm)
c1 c2 = 1 cm (P7, c2 are connected with a concave line)
We connect points c2, G1 and continue downwards arbitrarily.
We connect the points Pb, m and on this line we measure the length of the front sleeve. It is equal to the length of the back sleeve minus 1 cm for fit.
P7 L=P1A1 -1(40-1=39 cm)
G3 g1 = 1 cm (for a sleeve 3/4 long from point g1, go down 2 cm and place point Go. The sleeve is shown with a dotted line).
Г1Л1 = ha (through point Go)
LL1=12 cm
T1 T5=2 cm (We connect Go, T5)
P7T6=DPT-AR1(52-7=45 cm)
From point T6 at right angles to the line