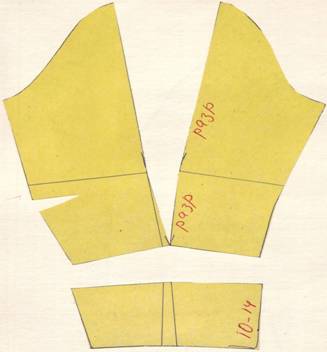
Pattern and cut of sleeves development of various styles. Impeccable workmanship: set-in sleeve
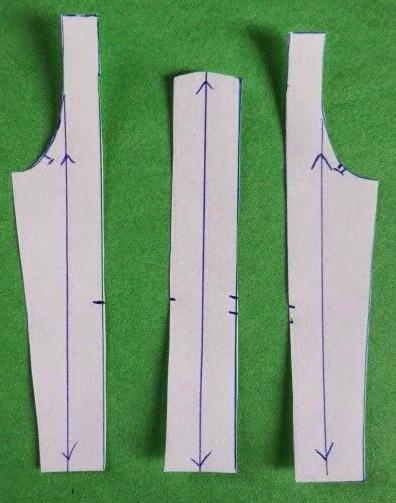
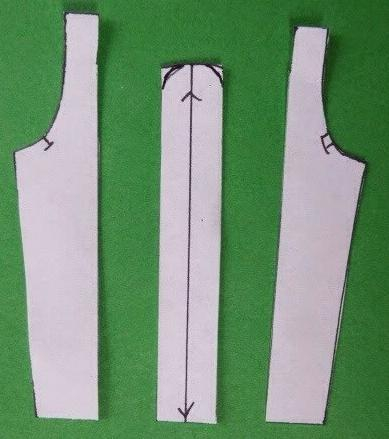
As in the previous case, we duplicate the sleeve pattern - it will serve as a lining. Be sure to mark the direction of the grain thread on the drawing (it is shown in the drawings with a dotted line).
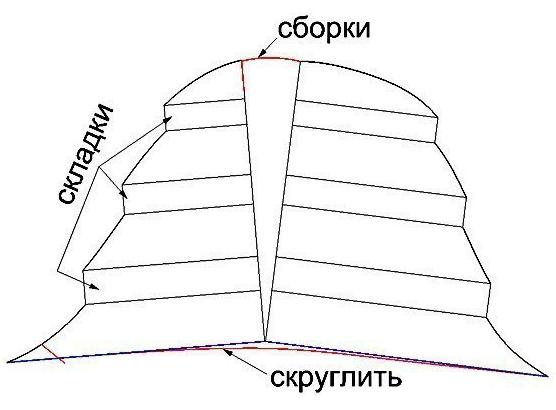
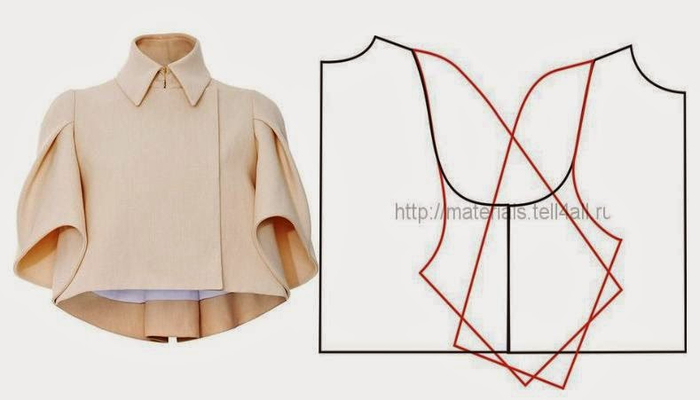
. In the drawing we outline a fold line running along the back half of the sleeve. Cut the pattern along the red line and close the shoulder dart of the sleeve. We increase the solution of the superimposed parts of the shoulder dart along the edge (blue line).
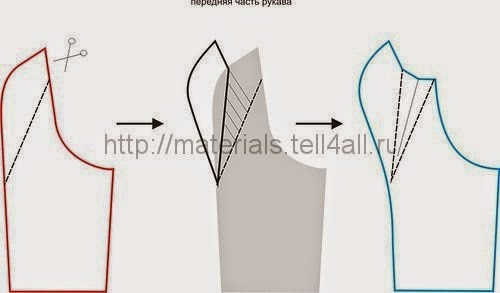
We outline the fold lines on the front half of the sleeve. Along the edge, the folds are located at an equal distance - 1.5 cm from each other, and at the sleeve seam - according to the style.
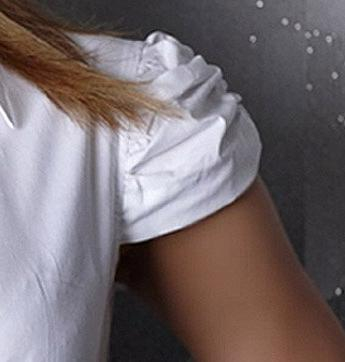
. Cut the sleeve along the lines. Pay attention to the shaded area - this is the excess fabric that will give the “flashlight” effect on the sleeve (photo), and a slightly sharp shape in the center of the sleeve.
. We spread the sleeve along the cut lines. For a sleeve roll, all fold openings are the same - 2-4 cm, and the folds are stitched to the marks (8-10 cm in length). At the sleeve seam, the fold openings are larger than those along the edge and differ in size. The lower folds have an opening from 6 to 8 cm, the two upper ones from 4 to 6 cm. The opening of the folds depends on the fabric and your preferences.
Before cutting expensive fabric, try making a dummy from rayon or chiffon and adjust the folds. Once you are satisfied with the result, do not forget to attach your sleeve to the lining.
Source http://www.season.ru/sovety/modeling/model_rukav/rukava_skladkami.html
Let's look at the set-in sleeve of a dress, the drawing of which is part of the drawing of the basic pattern. When constructing a drawing of such a sleeve, it should be remembered that the sleeve cap must have a shape and proportions corresponding to the armhole of the base pattern. The sleeve has a curve along the elbow line, close to the shape of the arm. Based on the drawing of the sleeve base, you can make different kinds sleeves: short, narrow, shirt sleeves, jacket sleeves, raglan, fancy coats, etc.
Taking measurements
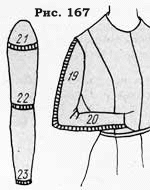 Taking measurements to construct a drawing of the base of the sleeve is shown in Fig. 167. The numbers indicating measurements are a continuation of the designation of measurements taken from the figures earlier.
Arm length to elbow 19 is measured from the end of the shoulder seam (at the armhole) to the protruding point of the elbow.
Arm length to wrist 20 is a continuation of measurement 19 in the direction of the little finger. The arm should be bent at a right angle, as shown in Fig. 167.
The girth of the arm at armhole level 21 is measured using the bare arm with the sanitary tape tightly attached to the arm. In this case, the hand should be pointing down.
The girth of the arm at elbow level 22 is measured by the naked arm hanging down. The centimeter length should fit tightly around the arm at elbow level.
The girth of the arm at wrist level 23 is measured in the same way as measurement 22. It is better to take girth measurements on both hands, since they quite often have a significant difference. Only the largest values need to be taken into account.
Constructing a drawing of the base of the sleeve
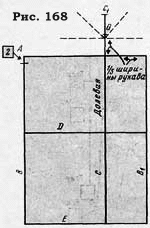 Take a sheet of paper equal in length to the length of the sleeve plus 10 cm and in width equal to the width of the sleeve plus 20 cm.
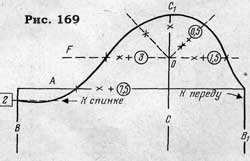
Table for checking the correspondence of the sleeve cap to the armhole, cm .
|
Arm circumference at armhole level |
Desired armhole length |
Length sleeve roll |
Arm circumference at armhole level |
| 25 | 37 | 40.5 | 3.5 |
| 26 | 38 | 41.8 | 3.8 |
| 27 | 39 | 43 | 4 |
| 28 | 40 | 44.5 | 4.5 |
| 29 | 41.5 | 46 | 4.5 |
| 30 | 43 | 47.5 | 4.5 |
| 31 | 44.5 | 49 | 4.7 |
| 32 | 45.5 | 50.5 | 5 |
| 33 | 46.5 | 51.8 | 5.3 |
| 34 | 47.5 | 53 | 5.5 |
| 35 | 49 | 54.5 | 5.5 |
| 36 | 50.3 | 56 | 5.7 |
| 37 | 51.5 | 57.5 | 6 |
| 38 | 52.7 | 58.7 | 6 |
| 39 | 53.8 | 60 | 6.2 |
| 40 | 54.5 | 61 | 6.2 |
Excess fabric along the hem line called landing. Depends on the landing size appearance sleeves If the fit is large, the sleeve will be fuller; if it is small, the sleeve will fit tightly around the arm and restrict movement.
The discrepancy between the sleeve edge and the armhole can be eliminated using their relationship, derived empirically and presented in table 3.
 Let's look at examples of using this control table.
The armhole is too big. For example, the arm circumference along the armhole line is 29 cm. If the armhole is 43 cm, it is too large, since according to the table. 3, this arm circumference corresponds to an armhole of 41.5 cm. A significant discrepancy in the indicated dimensions can arise for three reasons: 1) the measurements were taken incorrectly (arm circumference at the level of the armhole); 2) body type (small perimeter of the articular ligament and a thick arm, or vice versa); 3) the armhole line is drawn incorrectly. Correct the situation as follows.
- First solution. Check your arm circumference measurement and see if a 30cm arm circumference would fit (see Table 3). For a hand that is disproportionately thin compared to the figure, you can increase this measurement to improve the proportions of the product.
- Second solution. The arm circumference measurement was taken correctly, but they want to make the sleeve a little narrower. In this case, it is necessary to reduce the perimeter of the armhole, for which purpose the deepening of the armhole is reduced.
- Third solution. Increase your arm circumference a little and change the armhole slightly.
The armhole is small. For example, the arm circumference at the top is 32 cm. The armhole should be 45.5 cm (see Table 3), and in this example it is 43 cm. 2.5 cm is missing around the perimeter of the armhole.
- First solution. Check whether the hand measurement was taken correctly. Based on the table. 3 armhole equal to 43 cm corresponds to an arm circumference equal to 30 cm.
- Second solution. If the arm circumference measurement was taken correctly, make an additional fit along the edge or place a dart on the lower half of the sleeve, as shown in Fig. 173.
- Third solution. If the arm circumference measurement was taken correctly and you don’t want to increase the fit along the sleeve hem, you need to alter the armhole accordingly (widen the bodice along the side seam line or deepen the armhole).
- Fourth solution. Reduce your arm circumference measurement a little so as not to alter the armhole.
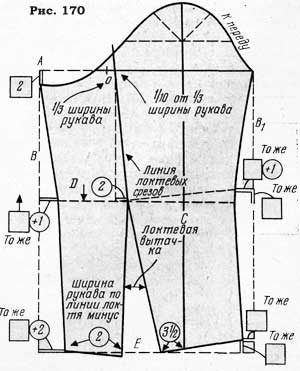
Figure 170 shows the construction of a drawing of the base of the entire sleeve.


- The lower part (half) of the sleeve. The lower part of the sleeve is limited on the left by line B. Along line D, starting from line B, set aside the amount of bending of the lower part of the sleeve (called a constant value below), to which add 1 cm (for example, 2 + 1 = 3 cm). This value, equal to 2 cm for a given girth, is enclosed in a square with the words Same in the drawing. The increase to it is enclosed in a circle.
Along line E on the left, set aside a constant value plus 2 cm (2+2=4 cm). Draw a line for the front cut of the lower part of the sleeve, bending it slightly at the level of line D. - Upper part (half) of the sleeve. The upper part of the sleeve is limited by line B 1. Transfer the values indicated in the figure to the drawing and draw the front line of the upper part of the sleeve. The line curves above the elbow line by a constant amount. This is to compensate for the shortening at the bottom of the front line of the top. The new level of the sleeve elbow line is indicated by a dashed line.
- Sleeve elbow line. This line starts from the width of the back, passes through the most prominent point of the elbow and ends at the wrist.
Along line A, starting from line B, set aside a third of the sleeve width, place point O (for example, 35:3 = 11.6 cm). To find the point through which the elbow line should pass, set aside a tenth of the resulting value (1.16 cm) from the point o to the right.
Measure the distance from the resulting point to line C (lobar thread) and, reducing it by 2 cm, set aside the resulting segment along line D, starting from line C (see number 2 in the circle).
Starting from line D, connect both points obtained with an inclined straight line extending to the sleeve hem line. - Bottom of sleeve. The width of the sleeve at the bottom is calculated as for a classic sleeve. Along line E to the left of line C, set aside 3.5 cm. Connect the resulting point with a straight line to the end of the line of the anterior midsection and to the point of intersection of the elbow cut line with line D.
Measure the width of the sleeve at the elbow line from the front cut line of the bottom of the sleeve to the elbow line. Along line E, set this value, reduced by 2 cm, to the right of the front cut line of the lower part of the sleeve.
Connect the resulting point with the elbow line with a straight line, continue it down, aligning both elbow sections of the sleeve. This line intersects line E. Draw a line for the bottom of the lower part of the sleeve as shown in the figure. - Fit along the sleeve cuff line. The excess fabric around the cuff of the sleeve is intended to be fitted to provide a natural bulge of the sleeve at the shoulder area. The planting is distributed between notches along the rim line, located at a distance of 8 and 8.5 cm from line C (Fig. 171).
The length of the sleeve hemline between the notches after the fit should be equal to 15 cm. Distribute the rest of the fit down from the notches. If the fashion requires a pronounced fit, then there will be more gathers between the notches; Sometimes for this purpose the sleeve in the area of the rim is widened. - Elbow darts. When cutting a sleeve consisting of one piece (see Fig. 170), it is enough to make a dart from the level of the elbow line to the bottom of the sleeve.
An additional small dart is made along the edging line (see Fig. 171) to give shape to the elbow seam. To do this, set aside 0.5 cm along the edge line in either direction from the line of the elbow cuts and mark the resulting points with notches. From these notches, draw slightly convex lines 5-6 cm long.Equalize the length of both sides of the darts on the right side, then connect the resulting point with a smooth curved line to the piping line of the lower part of the sleeve. Mark the length of the dart with a notch. This dart can only be a continuation of the elbow seam (in two-piece sleeves).
For a sleeve consisting of one part, the lobe thread is indicated along line C. In a sleeve of two parts, you need to indicate the lobe thread on both parts. If the drawing is made correctly, then the points located near the line of the hem and the bottom, spaced at an equal distance from the front cut of the lower part of the sleeve, should lie on the grain thread (see Fig. 171, wavy arrows). The width of the sleeve along line D should be equal to the arm circumference along the elbow line plus an allowance of at least 5-6 cm (29+5=34 cm).
The allowance along the elbow line depends on the size of the measurement: allowance is 5-6 cm for arm circumference along the elbow line up to 34 cm; 6.5 cm - for an arm circumference from 35 to 37 cm; 7 cm - for an arm circumference from 38 to 39 cm; 8 cm - for an arm circumference of 40 cm or more.
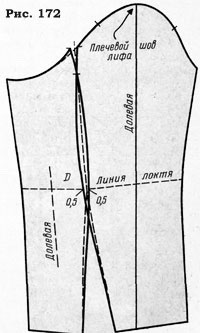
If the expansion of the sleeve is not enough, you need to make the elbow sections more convex, as shown in Fig. 172 (solid lines). Connect the resulting points on the elbow line with the end of the dart along the sleeve hem using smooth lines, then continue the lines down, as shown in the figure.
If the sleeve expansion is large, remove the excess sleeve width along line D equally from each part of the sleeve (Fig. 173). Connect the resulting points with slightly curved lines to the dart along the sleeve hem. Then continue the lines down.
If the reduction in sleeve width is small, the width of its upper part should be maintained. Sometimes it is necessary to make a slight additional extension of the sleeve at the top if the arm has noticeable fullness in this area.
If the length of the sleeve piping does not correspond to the armhole, it is necessary to make a small special dart along the piping, shown in Fig. 173 dashed lines.
 Short sleeve
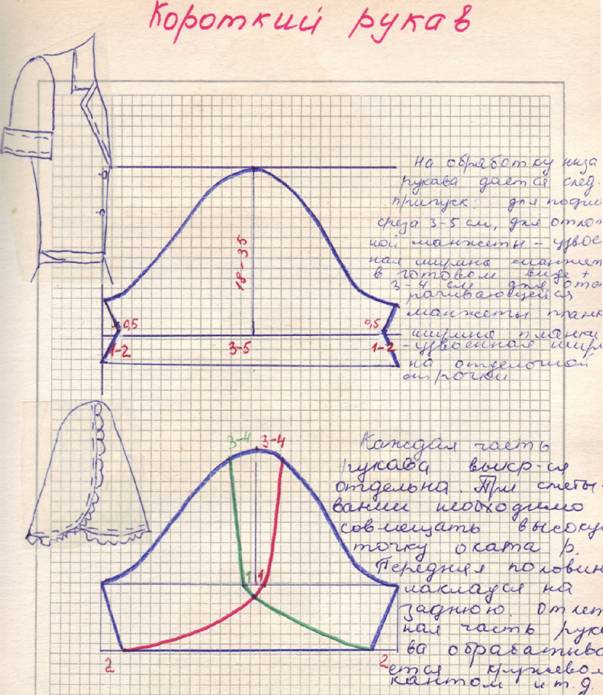
. On a sheet of paper, transfer the sleeve piping line from the base pattern, clearly marking its ends and notches (Fig. 174).
Ignoring the ends of the sleeve cuff line (notches /), distribute along line A the width of the sleeve (for example, 35 cm) equally on each side of line C (notches 2). Parallel to line A, draw a line for the bottom of the sleeve, which is located in a short classic sleeve 5 cm below the lowest point of the hem.
From points 2, lower the perpendiculars until they intersect with the bottom line, defining the width of the sleeve. Set aside 1 cm from the obtained points to the right and left and connect the new points with points 2. At the intersection of these lines with the edging line, place points 3. The allowance at the bottom of the sleeve is 4 cm (for example, 29 + 4 = 33 cm).
Construct the rest of the drawing as shown in Fig. 174. To construct the sleeve cap at the front, cut out the pattern, leaving minimal margins around it. If you want to save the pattern, do this work on a copy. Fold the sleeve as shown in Fig. 174, i.e. place the line of the back of the sleeve on the line of the share thread, then do the same with the front line of the sleeve. Between notch 1 of the front part and notch 3 of the back of the sleeve, draw the missing part of the sleeve cap, which sometimes fits exactly to the previous peaks 1 and 3, but sometimes it is necessary to slightly correct the cap to get a smooth curved line(in Fig. 174 the dashed lines show starting position sleeve ends).
If the hem line of the sleeve rises slightly when the sleeve is closed, then no correction is required. It is enough to put the sleeve on your hand to verify this.
To lengthen or shorten a sleeve, measure the desired sleeve length along your arm and transfer it to the grain line from the top of the sleeve. Draw a bottom line parallel to the classic length line.
 Narrow short sleeve. Such a sleeve restricts hand movements. You can verify this when trying on a bodice with rolled-in sleeves. Freedom of arm movement can be achieved by stretching the fabric or widening the sleeve.
Transfer the drawing of a classic short sleeve onto a sheet of paper (see Fig. 174) and transfer the elbow line from the base of the sleeve onto it (Fig. 175). Make a dart with a 2 cm opening along the bottom line of the sleeve. The short sleeve is reduced along the hem line by 2 cm, and the short narrow sleeve is reduced by another 2 cm.
 Close the resulting dart (Fig. 176). The hem line of the sleeve has a curved shape, so it is better to process it with a hem or pull out the cut with an iron. In less elegant clothes, you can draw a straight line at the bottom, as shown in Fig. 176 (dashed line). To narrow the sleeve even further, you need to deepen the dart on the back half of the sleeve or make a second dart, directing it towards the elbow section.
Very short narrow sleeve. This sleeve has a minimal expansion at the bottom, which does not deprive it of comfort when wearing due to its short length.  Transfer the short sleeve to a piece of paper and draw horizontal line connecting both ends of the okata (Fig. 177). This horizontal line, limiting the sleeve cap, indicates the depth of the armhole. . Draw two vertical lines at a distance of 1.5 cm from the ends of the rim, as shown in Fig. 177 (short dashed lines). The sleeve will be narrower by 3 cm (a constant value used for all similar sleeves).
Change the hem line to make the sleeve smaller. In this case, the more the line of the sleeve rim straightens, the more its length decreases (Fig. 178).  If you straighten the convexity of the collar without first reducing the width of the sleeve, the sleeve will expand. In this example, the ends of the rim are raised by 2 cm (see Fig. 178, numbers in squares). Connect the resulting points of the ends of the piping with a smooth curved line with the piping of the base of the sleeve (2 cm below the notches). Draw a thin horizontal dashed line 3 cm below the ends of the okat line.
Tilt the lines of the side sections of the sleeve inwards by 0.5 cm. Draw the line of the bottom of the sleeve in the form of a smooth curve, having a deflection in the middle equal to 2.5 cm.
Control notches on this sleeve are not needed, since the sleeve is sewn into the armhole without a fit or with a slight fit. The facing for processing the sleeve at the bottom is cut out according to the shape of the bottom of the sleeve.
A decrease in the length of the hem line, caused by the maximum narrowing of the sleeve at the bottom, leads to a corresponding decrease in the armhole of the product. In this case, it is convenient to use the armhole used for a sleeveless bodice.
source http://www.kroyka.ru/rukava4.php
Single-seam sleeve with fastening along the dart line
The width of the sleeve at the bottom is 22-24 cm. Excess fabric is taken into the dart.
Sleeve widened at the bottom and gathered at the cuff
On the main pattern of a single-seam sleeve, make cuts and move them apart for gathers
Sleeve with undercut
Along the bottom line of the main pattern of a single-seam sleeve, folded along the front roll and elbow
line, set aside the width of the cuff equal to 12 cm from the front roll. The height of the cuff is 8-10 cm. Along the elbow line, set aside 2-3 cm from the bottom and draw a cutting line 12 cm long.
Sports sleeve
On the main pattern of a single-seam sleeve, cut off the length of the sports sleeve, taking into account the allowance for the cuff. Using the main pattern of a single-seam sleeve, you can cut out a semi-long and a short sleeve: the length of the short sleeve is 20-25 cm, the length of the semi-long sleeve is 45 cm, i.e. 3/4 of the measurement of the full length of the sleeve.
Flashlight sleeve
On the main pattern of a single-seam sleeve, cut off the length of the sleeve - 25-30 cm. Make a cut in the middle of the sleeve and, when cutting, spread it apart by 10-12 cm into gathers. Increase the sleeve cap by 2-3 cm.
Flared sleeve
Draw cutting lines onto the main short sleeve pattern (optional length).
When cutting, spread the sleeve pattern along the cut line at the bottom to obtain a flared sleeve.
Puff sleeve
Apply cutting lines to the main short sleeve pattern (length as desired).
Then cut from the line of the bottom of the sleeve to the middle of the hem, after which make two more cuts on both sides of the first cut at a distance of 5 cm from one another. Cut the drawn lines, not reaching the edge by 0.5 cm.
Then cut in the middle of the roll, then make another cut on both sides of the first cut at a distance of 5 cm from one another. At the bottom, narrow the sleeve by 2 cm on each side. When cutting the patterns along the bottom of the sleeve, place one on top of the other (so that the width of the sleeve at the bottom corresponds to the volume of the arm), and move the sleeve edge apart by 4-5 cm along the edge line. Increase the sleeve edge by 5-8 cm.
Sleeve for robe
On the main pattern of a short sleeve, draw a line from the middle of the edge to the bottom of the sleeve, then from this line along the edge, put 5-7 cm to the right and left, and 10 cm along the bottom line.
Connect these points with a convex line.
Set aside 1.5 cm along the side sections of the sleeve from bottom to top and cut off.
Cut out the sleeve details separately.
IN modern fashion Special attention is paid to the sleeve, since its various shapes make it possible to give the product softness, severity, and clarity of lines. The variety of sleeve shapes makes it possible to use the entire range of existing cuts. This is a set-in sleeve with a clear transition from the shoulder line to a vertical position due to the filling of the sleeve in the upper part, and a raglan sleeve with a smoothly sloping shoulder shape and a deepened bodice armhole, and a one-piece kimono with a smoothly sloping or softly rounded shoulder shape, and a shirt sleeve with a deepened bodice armhole.
Special The sleeves of women's formal clothing differ in variety. They can be with increased volume at the top and narrow at the bottom, widened at the bottom and without a fit at the edge, lush - with a large number of gathers at the bottom and top, etc.
The length of the sleeves can be very different: very short sleeves, elbow-length sleeves, 3/4 and 7/8 arm length, and long sleeves are popular. These sleeves are built at the armhole with a natural, shortened or extended shoulder length. The height of the rim is increased or decreased accordingly.
At designing one or another sleeve shape use a ready-made sleeve base pattern, into which the necessary changes are made in accordance with the model.
Let's consider various shapes sleeves obtained on the basis of a single-seam set-in sleeve pattern
Option 1
Sleeve with increased volume in the upper part with gathers at the edge
(Fig. 1).
A sleeve with gathers along the edge and gradually tapering downwards is built on the base pattern of a single-seam set-in sleeve, tapered downwards and with a dart at the level of the elbow line (see section No. 1 about dresses - construction basics).
The pattern-base of the sleeve is transferred from the drawing to another sheet of paper. On the line of its middle from point O, a segment OS equal to 4 cm is laid down and a point C is placed. A horizontal line is drawn through it until it intersects with the sides of the sleeve at points C1 and C2. The pattern is cut along the line of the height of the sleeve rim O2O to point C and horizontally C1C2 and moved apart as shown in Fig. 2. In this case, the value of line CC3 determines the allowance for gathering and at the level of point O2 is equal to approximately half of it. Draw up new line sleeve cap and its side cuts in the upper part.
Option 2
The sleeve has pleats along the edges, which gives it increased volume at the top and narrows at the bottom.(Fig. 3).
If the volume of the upper part of the okat is created by folds, darts or tucks, then on the base pattern, transferred from the drawing to another sheet of paper, mark a horizontal cut line at the level of the width of the sleeve, i.e. point C will be located in the place of point O. From it Dotted lines mark the cut locations to make it possible to obtain pleats, darts or tucks along the sleeve hem. If they design along the edge odd number folds, darts or tucks (three or five), then the central one is marked on the line of the shoulder seam, and the rest - at equal distances from it. At even number pleats (two, four or six) are distributed evenly on both sides of the shoulder seam.
In the variant under consideration, there are five folds along the edge of the sleeve. The pattern is cut horizontally, vertically (the height of the edging) and the required value is moved apart with dotted lines as shown in Fig. 4. At the same time, the amount of rise of point C is specified and the solution of the fold, dart or tuck is determined:
bb1=(2СС3)/n,
where Вв1 is the depth of the fold, dart or tuck; CC3 - the amount of rise of point C after wiring; n is the number of folds.
Option 3
Sleeve, widened at the bottom, without gathering at the edge(Fig. 5).
The pattern is built on a single-seam pattern-basis transferred from the drawing to another sheet of paper. straight sleeves. Three cut lines are marked on it: one along the line of the middle of the sleeve and two along the front and elbow rolls. The pattern is cut along the marked lines and spread to the desired width. For a sleeve that is evenly expanded downwards, the extensions should be the same size, as in Fig. 6, and for a sleeve that is wider downward and more on the back side, the amount of expansion is not the same: at the front and middle rolls it is smaller, and at the elbow it is larger.
Option 4
A sleeve evenly expanded along its entire length (Fig. 7).
Such a sleeve is most often decorated with a uniform gather along the edge and bottom and ends with a cuff or elastic band. Its pattern is built on the basis of a single-seam straight sleeve pattern.
From the drawing, transfer the base pattern of a single-seam straight sleeve to another sheet of paper and mark a cut line on it in the middle of the O2M sleeve. The pattern is cut along this line and moved apart by 6-12 cm, depending on the number and depth of gathers. Then the lines of the collar and the bottom of the sleeve are redesigned, as shown in Fig. 8.
In the same way, create a “flashlight” sleeve shape, characteristic feature which is round in shape, formed by a large number of assemblies at the top and bottom. The sleeves are expanded and shortened accordingly.
Option 5
A sleeve of a more complex shape using a cutting line, which makes it possible to obtain a reduced volume in the upper part and an increased volume from the cutting line to the bottom (Fig. 1.192).
From the drawing, copy the base cut of a single straight sleeve onto another sheet of paper and mark a cutting line for the upper part of the sleeve on it. The cut is cut along this line, and the upper part of the sleeve along the cut line is slightly shortened (in Fig. 1.193 the shortened section is shaded). At the same time, the shape of the cut line of the upper part of the sleeve changes - it becomes concave. The pattern of the lower cutting part of the sleeve is cut along the line of its middle and along the ridges, and then spread to the desired size.
The expansion at the top, associated with the formation of gathers, along the outer side of the sleeve (between the elbow and front rolls) should be uniform along all cut lines. At the bottom, the sleeve is expanded unevenly: to a lesser extent along the front roll and to a greater extent in the middle and at the elbow roll (Fig. 10)
Option 6
A sleeve of a more complex shape using a cutting line, which makes it possible to increase the volume in the upper part and reduce it from the cutting line to the bottom (Fig. 11)
The sleeve is built on the base pattern of a single-seam sleeve tapered at the bottom. According to the model, a cutting line is marked on it. The pattern is cut along the intended line, and top part the sleeves are pulled apart by 6-12 cm, depending on the number and depth of the gathers. Then the lines of the edge and bottom are redesigned, somewhat shortening the latter in length, so it becomes concave. The lower part of the sleeve is narrowed according to the shoulder and wrist girth measurements with minimal increases and the line of its upper cut is redesigned (Fig. 12)
Option 7
A sleeve with an increased volume of the cuff in the upper part and with a cut line that creates volume in the area of the elbow roll at the level of the proposed cuff (Fig. 13).
This option the sleeves are built on a pattern-base of a single-seam set-in sleeve, narrowed kiizu and with a dart at the level of the elbow line. The pattern-base of the sleeve is transferred from the drawing to another sheet of paper. On it, from point O on the line of the middle of the sleeve, 3 cm is laid off and point C is placed: OS = 3 cm. A horizontal line is drawn through point C until it intersects with the sides of the sleeve at points C1 and C2. The pattern is cut along the line of the height of the sleeve cap O2O to point C and horizontally C1 C2 is moved apart, as shown in Fig. 14. Then the okata line is redesigned.
On the same pattern, mark a cutting line with gathers along its upper cut at the level of the elbow roll. The hem imitates a cuff, so its construction is also carried out on a base pattern narrow sleeves. The undercut height line M5P is, as it were, the cuff width line, so the value of this segment cannot be constant, it depends on the model of the product as a whole. The length of the undercut - the PC segment - is equal to the length of the dart at the elbow line. Point K is connected to the end of this value - point L3. The pattern is cut at the bottom along the lines PC and KL3 and moved apart. the required size, closing the dart. In this case, it becomes possible to assemble along the upper cut of the undercut at the level of the elbow roll. (Fig. 14)
Option 8
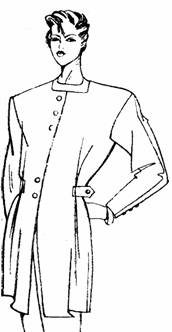
Sleeve, narrowed kiizu, with folds along the edge, turning into shoulder straps(Fig. 15).
This version of the sleeve is built according to the base pattern of a single-seam set-in sleeve, narrowed downwards, with a dart at the level of the elbow line. The pattern is cut in the upper part along the lines of the height of the rim O2O and the width of the sleeve P1P2 and spread apart, as shown in Fig. 16. In this case, two folds, darts or tucks are designed in the upper part of the edging; their depth will be equal to the magnitude of the rise of point O, i.e. O01=вв1=в2з. The lines of folds, darts or tucks are extended upward and the length of the back and front yokes, taken from the drawing of the bodice base, is laid on them. The width of the yokes will be equal to segments 03in1 and O3in2, respectively. According to the set aside values of the length of the yokes, a cut line for the shoulder strap is drawn up, corresponding to the cut lines of the neckline of the front and back at the levels of the yokes.
 |
 |
 |
 |
| Rice. 17. | Rice. 18. | Rice. 19. The sleeve is voluminous in the area of the slope due to the plastron, narrowed at the bottom |
Option 9
Sleeve with top and bottom seams(Fig. 17).
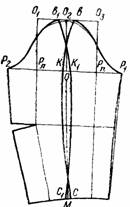
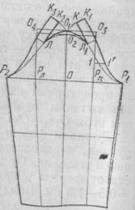
The pattern of the sleeve in question is built on the base pattern of a single-seam sleeve with a dart along the elbow line. The presence of an upper seam makes it possible to adjust the fit along the sleeve collar, its width under the armhole, and the shape along the entire length, but requires an increase in the height of the collar by 0.5-0.7 cm compared to that indicated on the base pattern. In the upper part of the sleeve cuff, darts are designed with a solution of 2.5-4.5 cm. The dart solution is laid symmetrically from point O2, with O2in1 = O2in = 3 cm.
The length and shape of the dart, which goes into the seam of the sleeve, is determined by its shape in the area of the shoulder girdle of the product. From point O to the right and left, depending on the shape of the sleeve, segments OK = OK1 = 0.5-1.5 cm are laid. Below from point M, segments are measured
MS=MS1==0.5-0.7 cm.
The line of the upper cut of the front part of the sleeve is drawn through points B, K and C, and the elbow - through points B1, K1, C1 (Fig. 18).
Option 10
The sleeve is voluminous in the area of the slope due to the plastron, narrowed at the bottom(Fig. 19).
The pattern of such a sleeve (Fig. 20) is built on the base pattern of a single-seam set-in sleeve, narrowed downwards. However, the height of the sleeve edge is segment OO2-v in this case will be increased by half the width of the plastron, which is usually 3 cm. At the same time, the length of the shoulder sections on the front and back is reduced by the width of the plastron, i.e. by 3 cm, accordingly redesigning the armhole line of the back and front. On the pattern, add 1.5 cm to the height of the edge and get point O1. The sleeve cap line is redesigned. Next, calculate the segments that define the cutting line of the plastron on the sleeve cap. To do this, from the middle of the sleeve edge of point O1, a segment O1L = 7.5 cm is laid out to the left along the arc, and O1L1-6.5 cm to the right along the arc. From the armhole lines, tangents are drawn to points L and L1 and continue them upward. Then, with radius LO1, an arc is drawn from point A to the tangent to this point and point K2 is obtained. A perpendicular is restored to it, on which the width of the plastron is measured - K2K3 = 3 cm - and point K3 is placed. It is smoothly connected to point P2, maintaining the width of the plastron at the level of point L.
Then, with radius L1O1, an arc is drawn from point L1 to the tangent to this point. A perpendicular is restored to the resulting point K, on which the width of the plastron KK1 = 3 cm is plotted. Point K1 is smoothly connected to P1, keeping the width of the plastron at the level of point L1.
 |
 |
 |
|
| Rice. 22. Drawing. | Rice. 24. Drawing |
Option 11
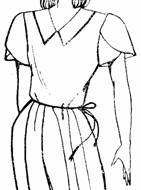
Short sleeve, consisting of two halves located on top of each other, with an original design of the bottom(Fig. 21).
The pattern of such a sleeve (Fig. 22) is built on the base pattern of a regular set-in sleeve. The shape of the sleeve cuff line remains unchanged. On the pattern, mark the sleeve length line. Usually, 25-30 cm are set aside from point O2 down the line of the middle of the sleeve and point M is placed. Using point L, the segment OM is divided in half. Determine the width of the sleeve at the bottom. It will be 5-6 cm less than the width of the sleeve at the armhole level. From points M2 and M1, measure segments M2M4 = M1M3 = 2.5-3 cm, obtaining points M4 and M3. A smooth line M4 is connected to L and this line is extended until it intersects at point L1 with the line of the sleeve hem. Then a smooth line connects M3 to L and continues this line until it intersects the sleeve cap line at point L2.
The sleeve in question consists of two halves (see Fig. 22).
Option 12
Short sleeves with a hem in the middle and gathers at the hem line(Fig. 23)
The pattern of such a sleeve is based on the pattern-basis of a regular set-in sleeve. The sleeve length line is drawn arbitrarily according to the model. In the middle of the sleeve at the bottom, draw a cutting line, which ends at the level of the sleeve width line. Dotted lines mark the places where the pattern will be cut for assembly, as shown in Fig. 24. Then the pattern is cut along the hem and dotted lines, not reaching the hem line by 0.5-1 cm, and moved apart to the required amount. Typically, the size of the extension is equal to the length of the undercut or slightly larger - approximately 6-8 cm. The armhole, side cuts, bottom and sleeve undercuts are redesigned with smooth lines.
| the name of the operation | Drawing | |
|---|---|---|
| Long sleeve |
|
|
| Short sleeve |
|
|
| Narrow sleeves to the elbow line, widened towards the bottom |
The shuttlecock can be cut to any width. Take the sleeve pattern and cut the flounce to the required length. Cut it into 4 parts and spread it at the bottom to the desired width of the shuttlecock. the upper part of the sleeve is narrowed by 2-5 cm |
|
| Sleeve with raised line | ||
| Sleeve with draped top and adjacent cuff |
|
The design of the sleeves is determined by the shape and cut of the product.
The head of the sleeve and the shoulder girdle of the product are the most important areas that determine its silhouette. Sleeves in products can be of different lengths: long, short, three-quarters, seven-eighths.
They are distinguished by shape: narrow, wide, straight, widened downwards, widened upwards.
By purpose, sleeves are divided into functional, classic, elegant, and by cut - raglan, one-piece, combined, shirt cut.
Drawings of sleeves of all types, shapes and cuts are constructed in whole or in part using the drawing of the base of a set-in sleeve. The construction of a sleeve drawing is currently a complex problem, so it needs to be given the most serious attention.
The dynamics of the product largely depends on the correct design solution of the hose drawing. A necessary condition in its construction there is a good pairing of the sleeve cap with the armhole, although the sleeve curve and the armhole curve have completely different configurations. Good pairing means not only visual perception correctness, but also ease of use of the sleeve.
The upper part of the sleeve, which is sewn into the bodice armhole, is called the sleeve head. The shape of the sleeve head and the width of the sleeve at the level of the armhole depth depend on the shoulder circumference measurement Op and the allowance for this measurement, and is also closely related to the shape of the armhole. The width of the armhole depends on the allowance for the shoulder girth measurement and is 500 ~ 0 of this allowance.
Using the design method, you can create a drawing of a classic one-seam or two-seam sleeve, as well as a functional sleeve (with a slight shortening of the collar) or a shirt-cut sleeve. All other shapes and cuts of sleeves are achieved by the method of constructive modeling based on a drawing of the base of the sleeve, checked by matching the lines of the sleeve cap and armhole (see Fig. 25 - 28).
NARROW SLEEVES
In the drawing of the base of the sleeve, a line of the middle of the sleeve is drawn through the centers of radii R1 and R2 (see Fig. 28). On this line from highest point Okata put aside the measurements of the sleeve length to the elbow line Dr.lok and the length of the sleeve to the wrist Dr.zap. Horizontal lines are drawn through the obtained points (Fig. 34).
The length of the sleeve to the elbow can be determined without the presence of the Dr.lok measurement. The standard position of the elbow line is 2 cm above the point located midway between the edge and bottom height lines.
The width of the narrow sleeve at the bottom is 1/4 of the sleeve width at the level of the armhole depth line.
The found sleeve width is divided in half and laid along the bottom line equally to the left and to the right of the midline. The resulting points are connected to the points on the sleeve width line. This completes the construction of the narrow sleeve. This sleeve is used in products made from elastic fabrics or knitwear.
A semi-fitting sleeve can be obtained by increasing the width of a narrow sleeve along the hem line by 1/8 of the sleeve width at the level of the armhole depth line.
NARROW SLEEVES WITH ELBOW DARTS
Narrow sleeves are built on the basis of semi-adjacent sleeves. For ease of wearing, the sleeves are widened along the elbow line. This is done as follows. To the right and left of the midline of the sleeve, segments equal to 1/8 of the width of the sleeve at the bottom are laid (Fig. 35, points 1 and 2). Points 1 and 2 are connected to point 3. The sleeve is cut along the elbow line to line 1 - 3 and along the line 1 - 3 to point 3. Then the sleeve is closed from the elbow to 1/8 of the width of the sleeve at the bottom; a dart will open along the elbow line, which will ensure free bending of the arm. Draw a new line for the bottom of the sleeve. For greater comfort, a second dart is introduced along the elbow line by spreading the sleeve along the line of the sleeve width at the level of the armhole depth.
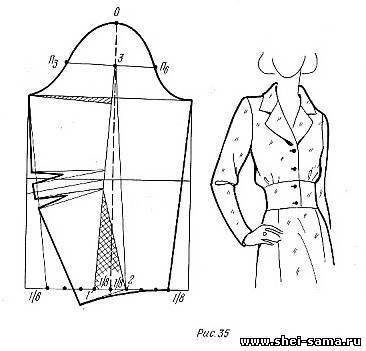
In Fig. 34 and 35, the middle line of the sleeve is drawn without shifting it along the bottom towards the front by 2 cm.
PUFFED SLEEVES
Based on the drawing of a narrow sleeve, a drawing of a sleeve with puffs along the edge is constructed. These sleeves have a very wide head and fit tightly around the arm from the elbow to the bottom of the sleeve. The shape of these sleeves is popular in models of fitted and close-fitting silhouettes.
To construct a drawing of this sleeve, take the base of a narrow sleeve, well-tested for mating with the armhole, cut the drawing along the midline and move both halves along the hemline at equal distances from the midline (Fig. 36). The height of the collar is increased by 1/2 of the increase in the width of the sleeve under the armhole, i.e. by 1/2 of the expanded value. A new line of the sleeve edge is drawn through points a, a1 and through a new point O.
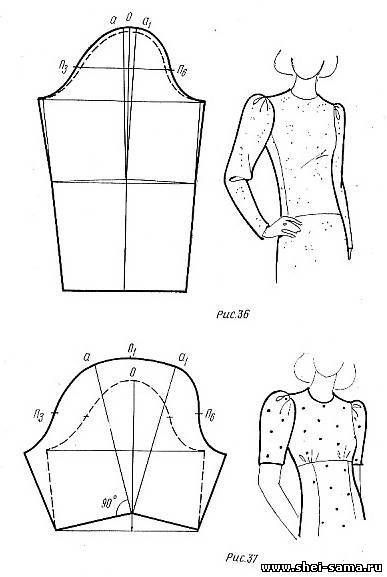
The minimum expansion of the collar for these sleeves, which is considered practical, is 1 cm on each side of the midline of the sleeve, the maximum is when the sections of the sleeve collar in the area of points P3 and P 6 are perpendicular to the line of the width of the sleeve under the armhole (Fig. 37). Extending the sleeve further using this method is not recommended, as it will be difficult to sew the sleeve into the armhole.
The short, ham-shaped sleeve shown in Fig. 37, is built on the same principle, only the length of the sleeve changes.
For long sleeves, it is advisable to lengthen the elbow section (see Fig. 35) to ensure freedom of arm movement.
Long and short sleeves with puffs at the top, widened at the bottom, are built on a drawing of the sleeve base of the corresponding length in three stages: 1st stage - construction of the sleeve base; Stage 2 - building buffs; Stage 3 - spreading the sleeve downwards.
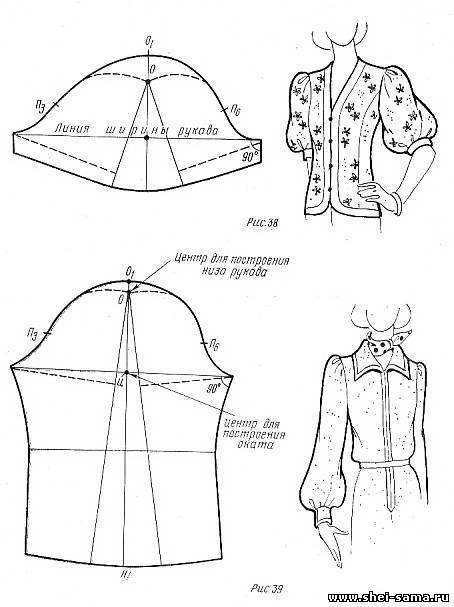
The first two stages are described above. The 3rd stage is as follows. The sleeve drawing is cut along the midline, not cutting to the highest point of the edging 0.2 mm (Fig. 38, 39). The sleeve halves are separated so that the elbow and front sections are located perpendicular to the new sleeve width line under the armhole. The point of intersection of the middle line of the sleeve with the new line for measuring the width of the sleeve under the armhole (point C) will be the center from which the upper part of the sleeve cap is drawn up with a compass of radius O 1C, and from the highest point of the sleeve cap, broken by the opening (point O), as from the center with a radius HE forms the line of the bottom of the sleeve, connecting the cut sections.
All sleeves of this design can be further expanded both along the hem and at the bottom of the sleeve using the constructive modeling method (cut and spread parts of the pattern to the desired size of gathers or folds in the right places).
DOUBLE-SEAM SLEEVES
Two-seam sleeves can have a seam along the middle line, that is, on the visible side, and a seam in its lower part. These seams help transform a flat pattern into a voluminous (closed) one. Sleeves with a middle seam or dart are used in cases where it is necessary to remove the fit of the sleeve along the edge.
The two-seam sleeve drawing is used to construct a raglan or kimono sleeve drawing.
Two-seam sleeves can also consist of upper and lower halves. Such sleeves are most often used in suits and coat dresses. They are more consistent with the placement of the arm and make it easier to create a classic sleeve shape (sleeve silhouette).
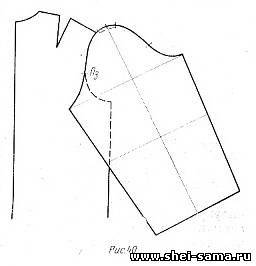
It is easiest to construct a drawing of a sleeve with a middle seam based on a drawing of a single-seam sleeve by connecting it at the point of contact Pz (Fig. 40) with the back armhole. This method allows you to most easily determine the solution of the dart on the head of the sleeve. To construct, take a pattern of a single-seam semi-adjacent sleeve, apply it to the back pattern, combining points Pz on the armhole with Pz on the sleeve (points where the sleeve touches the armhole when sewing in). The upper part of the sleeve collar to the highest point of the sleeve will extend beyond the armhole. This will be the segment by which the sleeve cap is longer than the armhole (the size of the fit) on the side of the elbow part of the sleeve. Measure this value and put it to the right of the highest point of the edge. In this way, the fit of the front part of the sleeve is determined. Then, on the line for measuring the width of the sleeve, 0.5 cm is set aside on each side of the midline, points 1 and 2 are obtained (Fig. 41). A point located on the midline at the level of the elbow line is connected to points 1 and 2 and the line continues upward to points 3 and 4 located on the line P 3P 6. Segment 3 - 4 is larger than segment 1 - 2 by 0.5 cm, t i.e. the total value of the solution will be 1.5 cm. Then, using a figured pattern, points 3 and 4 are connected to points 5 and b, located on the line of the sleeve rim.

Based on the drawing of a two-seam sleeve of this design, it is easy to build a one-seam sleeve with a dart on the collar (Fig. 42). To do this, the dart opening is reduced by 0.7 cm on each side, i.e., the allowance is increased to expand the sleeve. The tuck ends on the middle line, slightly short of line P ZP 6.
SINGLE SEAMS SLEEVES WIDENED AT THE BOTTOM
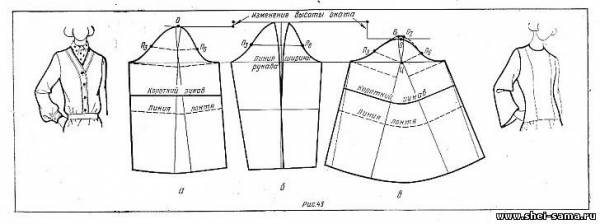
To obtain a pattern for single-seam sleeves extended downwards, take a sleeve pattern with a dart along the edge (Fig. 43, b). Then cut the pattern along the middle line and spread it to the desired width, at the same time closing the dart at the end of the sleeve. Along the bottom line of the sleeve from the elbow and front sections, add 1 - 2 cm to expand the sleeve. The crossing of the lines from the opening with the closed dart should occur slightly above the P 3P 6 line, i.e. above the area that cannot be changed in width. The minimum expansion of the sleeve is carried out at will (Fig. 43, a). The dart on the sleeve collar partially remains in the pattern, but when sewn into the product, it is replaced by a fit along the collar. Such sleeves are the most rational for products sporty style. The maximum expansion of the sleeve (Fig. 43, c) is obtained when the dart at the end of the sleeve is completely closed, and even part of the planned fit is removed, placing one half of the sleeve on top of the other. In this case, the highest points of the edge O 1 and O 2 should be separated from each other at a distance of no more than 2 cm. broken line P 3Ts - P6Ts should not be located below the sleeve width line (point C). Along the bottom line, the sleeve is expanded by 2 - 4 cm on each side.
With any opening, the upper part of the sleeve is slightly deformed, so the edging line needs to be slightly straightened, and then the bottom of the sleeve should be shaped. The bottom of the sleeve is formed using a compass with a radius from the center at point C, and the cut parts of the pattern are connected.
The expansion of the sleeve at the bottom contributes to a visual reduction in the height of the collar: the greater the expansion, the shorter the collar becomes. After installation, the sleeve will take the shape of a “bell”. For a more uniform expansion of the sleeve at the bottom, dilation is carried out along additionally drawn lines to the hem line.
FUNCTIONAL SLEEVES
Functional hoses differ from ordinary hoses in their purpose, and not in their design features; they provide dynamics and ease of use in accordance with their purpose. However, the shape of functional parts and its changes largely depend on the direction of fashion. Functional items include semi-fitting silhouettes with minimal fit at the waist, straight shirt dresses, or items with padding at the top and seams at the waistline. The sleeves in such products are wider than usual, and the head is lower; they require a different armhole. The construction of functional products and sleeves begins with the construction of a drawing of the basis of the product of the appropriate cut, to which the necessary additions and changes are made.
Functional sleeves look like properly sewn sleeves only when the arm is positioned on the hip and slightly bent at the elbow. When the hand is lowered in a strictly vertical position, creases are observed in the lower part of the edge, directed towards the center, which are formed as a result of a shortened edge.
The decrease in the height of the rim and the expansion of the sleeve have a close relationship. Reducing the height of the collar is always 1/2 of the allowance for the width of the sleeve. The limit for the height of the edging in sleeves of this shape is a value equal to the width of the armhole, less than which the height of the edging should not be, otherwise the sleeve goes into another structural group. Thus, the allowance for the width of the sleeve is equal to Wok - Shpr, where Wok is the height of the collar on the base drawing; Shpr - the width of the armhole on the base drawing.
The magnitude of the decrease in the slope is equal to (Vok - Shpr)/2.
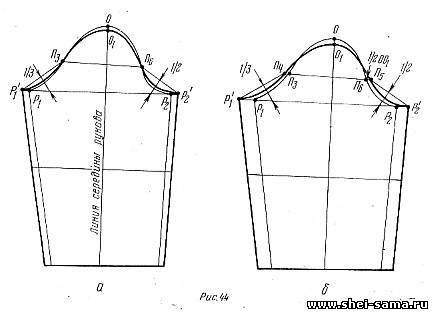
To create a pattern for a functional sleeve, transfer the pattern of the main semi-adjacent sleeve onto a blank sheet of paper. The sleeve is expanded along the line P1P2 (Fig. 44, a), new points P1" and P2" are obtained. Then the height of the edge is reduced, marking a new position of the highest point of the edge (point O1). OO1 = 0.5P"1P1 = 0.5P2P"2.
Points P3 and P6 are connected to points P1" and P2". From the middle of the resulting segments, perpendiculars are drawn towards the sleeve until they intersect with the sleeve width line. From the side of the elbow part of the sleeve cap, 1/3 of its length is laid on the resulting perpendicular, from the front part of the sleeve - 1/2 of the length of the perpendicular.
A new line of the sleeve cap is drawn through point P1", a point on the perpendicular to the segment P1"P3, points P3, O1, P6, a point on the perpendicular to the segment P2"P6 and point P2".
When constructing functional arms, the position of the PZP6 line remains constant regardless of the lowering of the edge. With the maximum expansion of the sleeve, points P3 and P6 (Fig. 44, 6) move along the line PZP6 in the direction of expansion by 1/2 or 1/3 of the decrease in the height of the rim. PZP4 = P6P5 = 1/2 OO1.
Modernization of the armhole for a functional sleeve begins with lengthening the shoulder section, deepening the armhole and expanding the product at the level of measuring the width under the armhole. The amounts by which these areas change are proportional to the change in the sleeve and are in the following relationship.
1. The lengthening of the shoulder section and the expansion under the armhole are equal to 1/4 of the expansion of the sleeve on one side, i.e., 1/4 Р1 "Р1 (see Fig. 44) (the allowance for half the sleeve width is 3 cm, so the extension The shoulder section of the shelf and back will be equal to 0.75 cm).
2. The deepening of the armhole will be 3/4 Р1"Р1 (the armhole will deepen by 2.25 cm).
3. The expansion of the front and back armholes at the level of points P3 and P4 will be equal to the size of the sleeve expansion at the level of the same points and will be 1/4 OO1 each.
To build a new armhole, take the front and back sleeve patterns of the appropriate cut (straight, semi-fitting or adjacent) and make all the changes described above to them. Make sure that when deepening the armhole, you do not narrow the product under the armhole. To do this, from the point obtained after expanding the shelf and back on the original construction line, lower a perpendicular and set aside the amount of deepening of the armhole. Through the obtained points, lines of lateral sections are drawn, parallel to the original ones. Check the cuts for mating, focusing on the waist line.

The lower part of the armhole is designed along the sleeve, combining the same points P3 and P6 of the sleeve and armhole (Fig. 45). The upper part of the armhole from points Pz and P6 is connected by a smooth curve with new point on the shoulder section, using a figured pattern.
In functional products, in addition to modernizing the armhole of the shelf, it is necessary to lengthen it above point P6 (Fig. 46, a).
The armhole is lengthened by partially reducing the opening of the upper dart. The size of the tuck opening is 1.5 - 2 cm. The sleeve cap is expanded by this amount using the spreading method if all the fitting has been removed.
The tuck solution remaining on the shelf can be transferred to any cut. When moving the dart to the side cut, its length from the center of the chest decreases by 1.5 - 2.5 cm. In Fig. 46, b shows the front pattern after upgrading the armhole and moving the top dart to the side cut.
The armhole is lengthened to improve the dynamics of the arm and visually straighten the armhole line in relation to the bust line.
This constructive technique will be used when constructing raglan sleeves and one-piece sleeves.
PRINCIPLES OF SLEEVES MODELING
The set-in sleeve can accept different shapes, which is achieved by changing the volumes of the upper part of the rim and the bottom. Gatherings, folds, darts - all this is widely used when modeling sleeves. If you have already made a base pattern for yourself, then it will not be difficult for you to make a sleeve pattern the desired shape and volume. Let's consider the principles of modeling various styles of sleeves based on a single-seam set-in sleeve.
Long set-in sleeve with gathered edges
The sleeve is shown in Figure 12.7. Cut the sleeve base pattern along vertical and horizontal lines. If the size of the assembly according to the style is small, then it is enough to make the necessary expansion by moving apart the cut parts of the pattern only in the upper part. The lower part of the sleeve in this case does not change. If you plan to make a large assembly, then cut the upper part of the sleeve (at the edge) into 4 parts, spread them evenly, placing them symmetrically relative to the central axis. Design a new edging line, similar to previous models. In this case, it is necessary to change the lower part of the sleeve in order to balance the increased volume of the upper. Cut this part along a vertical line and spread it apart at the top.
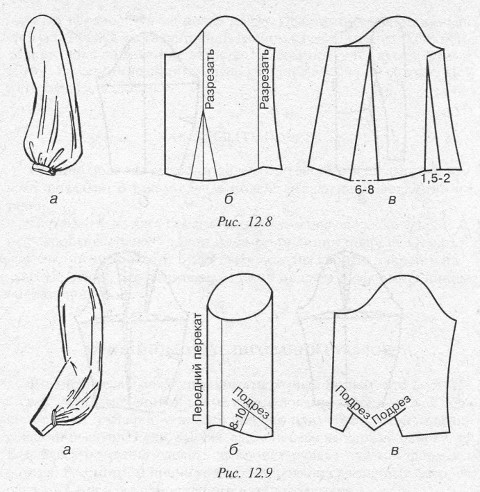
Long sleeve, widened at the bottom and gathered at the cuff
The sleeve is shown in Figure 12.8, a. On the main pattern of a single-seam sleeve, make cuts and spread them apart by the amount necessary for gathers: 6 - 8 cm and 1.5 - 2 cm (Fig. 13.8, b, c).
Long sleeve with undercut
The sleeve is shown in Figure 12.9, a. Along the bottom line of the main pattern of a single-seam sleeve, folded along the front roll and the elbow line, set aside a cuff width of 12 cm from the front roll. The height of the cuff is 8 - 16 cm. Along the elbow line, set aside 2 - 3 cm from the bottom and draw a hem line length 12 cm (Fig. 12.9, b, c). When stitching the sleeve, remove the excess undercut into gathers.
Short puff sleeve with gathers at the top and cuff
The sleeve is shown in Figure 12.10, a. The construction principle is the same as with any other arrangement of assemblies. Transfer the base of a single-seam sleeve onto a sheet of paper, cut off the length of the sleeve - 25-30 cm and mark one or several lines in the places where you will make the extension - its size depends on the model. Cut the base of the sleeve along the line you marked, lay out the parts on a sheet of paper and move them apart to the distance required for gathering (for example, 6 - 10 cm or 10 - 12 cm). In the middle, between the separated parts, draw a new line of the shared thread. Draw a new edging line - it should be 1 cm above the base edging line (Fig. 12.10, b, c). Try on the sleeve and determine the area where the gathers should be located. Usually they are located on the sleeve between the notches, unless a different location is required by the style. In any case, the gathers should not fall below the upper notches. If you want the sleeve to be more voluminous, increase the height of the collar by 2 - 4 cm. If the style requires an overlap above the cuff of the sleeve, lengthen it from below by 3 - 4 cm.

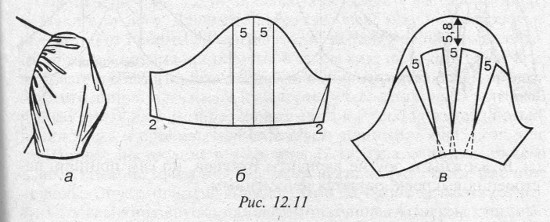
Short sleeve puff
The sleeve is shown in Figure 12.11, a. Draw cut lines on the main short sleeve pattern (length as desired) (Fig. 12.11, b). Then cut in the middle of the okat, then make another cut on both sides of the first cut at a distance of 5 cm from one another. At the bottom, narrow the sleeve by 2 cm on each side. When cutting the pattern along the bottom of the sleeve, place one strip on top of the other (so that the width of the sleeve at the bottom corresponds to the volume of the arm), and along the edge line, spread it apart by 4 - 5 cm. Increase the sleeve edge by 5 - 8 cm (Fig. 12.11, c).
Short sleeve flare
The sleeve is shown in Figure 12.12, a. On the main pattern of a short sleeve (length as desired), draw cut lines (Fig. 12.12, b, c) and cut: from the line of the bottom of the sleeve to the middle of the hem, then make 2 more cuts on both sides of the first cut at a distance of 5 cm one from the other. Cut the drawn lines, not reaching the edge by 0.5 cm. When cutting, spread the sleeve pattern along the cut line at the bottom to obtain a flared sleeve. When moving the parts apart, leave the edge line unchanged - the distance between them is 2 - 3 cm. Draw a bottom line.
Transfer the upper parts of the back and front patterns and the sleeve pattern onto a sheet of paper. Start changes from the back (Fig. 12.14, b). Raise the sprout by 0.7 cm and expand it by the same amount. In the diagram, all changes are shown with dotted lines. Then lift the shoulder seam up 0.7 cm, thereby moving the shoulder seam forward 0.7 cm. On the new shoulder line, set aside the previous shoulder length, increase it by 4 cm and slightly round the new line. Make changes to the armhole like this. deepen it at the bottom by 3 cm and widen it by 0.7 cm. Connect the new ones with a smooth line extreme points shoulder and armhole, measure the new armhole length and write it down.
On the shelf (Fig. 12.14, c) first move part of the chest dart into the armhole. To do this, cut the pattern along a random line from the armhole to the center of the chest. Close the dart on the shoulder by 1.5 cm, and open it in the armhole. In this form, place the pattern on paper and trace. Make all further changes as follows: lower the shoulder line by 0.7 cm and increase it by 4 cm; deepen the armhole at the bottom by 3 cm and widen it by 0.7 cm. Draw new shoulder and armhole lines, measure the length of the armhole.
Start building the sleeve (Fig. 12.14, d): connect the extreme points of the lower part of the sleeve with a straight line and continue it in both directions. Lower the highest point of the hem by 11 cm, according to the calculation: 1.5 x the amount of shoulder descent + 1 (constant value) + 6 (constant value) 2/3 of the armhole recess = 1.5 x 4 + 62 / 3 x 3 = 11 cm. So that the sleeve does not shortened, add the missing 7 cm at the bottom: 114 = 7 cm. Draw the line of the new edging in smooth lines from the highest point to the right and left to the intersection with the horizontal line, putting on them the corresponding lengths of the armholes of the back and front. Draw a new line for the bottom, set aside the desired width on it and draw new lines for the side cuts. If you want to make a shirt sleeve with a cuff (Fig. 12.14, d), shorten it by the width of the cuff and at the same time lengthen it by 1 cm (to allow the sleeve to overlap).
Raglan sleeves
Raglan sleeves include the raglan sleeve itself (Fig. 12.15, a) and the semi-raglan sleeve (Fig. 12.15, b), although it is transitional form between sleeves: set-in and raglan. Start building on the base pattern of the bodice with a set-in sleeve (Fig. 12.15, c). Apply the lines of raglan (solid line) or semi-raglan (dotted line), according to the style, on the paper patterns. Label them as in the figure: A, B, C and A 1, B 1, C 1 (for raglan); E, B, C and E 1, B 1, C 1 (for semi-raglan). Then cut the top sections of the back and front along these lines. These are the new armhole lines.
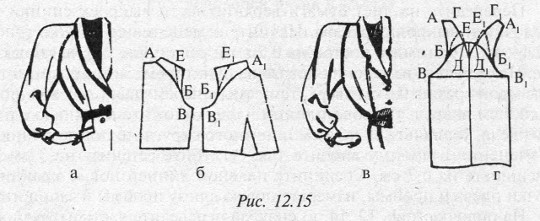
Now start changing the set-in sleeve base pattern. First, mark the points on it corresponding to the points on the armhole: B and B 1. For getting new form sleeves, connect the cut parts of the back and front, respectively, with the left and right sides okata, combining points B and B, B 1 and B 1. To soften the transition from shoulder to sleeve, between points D, D 1 and the cuff line, leave a gap of 0.7 - 1.2 cm (for a semi-raglan, give a smaller gap). Swipe smooth lines through points G, E, D and G 1, E 1, D 1 until they intersect with the center line of the old sleeve. Raglan and semi-raglan sleeves can be cut with a seam in the middle running along center line, or with a dart in the shoulder area. Change the volume of a raglan sleeve by deepening and widening the armhole and corresponding changes along the lines of the side sections of the sleeve, as well as by changing the steepness of the line of the central seam of the sleeve.
Armhole height and how to calculate sleeve width
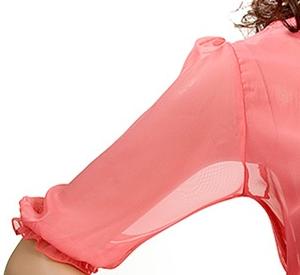
Who knows what armhole height is and what it is needed for?
Maybe someone doesn’t want to delve into what it is needed for, but it is very important.
The height of the armhole is important in order to correctly calculate the sleeve in all directions.
To pair the sleeve cap with the armhole, it is necessary to determine the length of the armhole and its vertical diameter.
We measure the length of the armhole from point P1 to point P5.
To determine the vertical diameter of the armhole, we connect points P1 and P5.
Divide this line in half and put point O.
From the resulting point O, we lower the perpendicular to the depth line of the opening GG3 and place point O1.
ОО1 is the vertical diameter of the armhole.
The height of the sleeve collar = the vertical diameter of the armhole - (minus) segment OO2, which for different sizes is equal to:
OG3:
88 - 92, ОО2 = 2.5 cm;
96 - 104, ОО2 = 2 cm;
108 - 116, ОО2 = 1.5 cm;
120 and above OO2 = 1 cm.
Sleeve height:

Determining the width of the sleeve.
1st method:
Sleeve width = Shruk = 1.25*(Dpr + Ppos) - 1.6*O1O2 - 1.8 / 2
Where:
Dpr - armhole length;
Ppos - landing allowance;
Ppos = Dpr*N, where N is the norm for fitting the sleeve edge per 1 cm of armhole length.
Norm for planting an edge per 1 cm Dpr:
|
Types of fabrics |
Planting rate, cm |
| Wool suits with synthetic fibers of more than 30%, silk dresses made of synthetic fibers and lightweight crepe dresses made of natural silk (crepe chiffon), etc. |
0,04 - 0,06 |
| Wool suiting with synthetic fibers from 15 to 30%, silk, medium-weight crepe (crepe de Chine) and cotton summer dresses (voile, etc.) |
0,06 - 0,08 |
| Pure wool dresses, silk dresses and suits, cotton dresses, demi-season (cashmere, tartan, etc.), linen fabrics, cotton clothes, worsted suits |
0,08 - 0,1 |
| P/w worsted dress, woolen suit, cloth, pure wool, coat, fine cloth |
0,1 - 0,12 |
| Wool coats, coarse and fine cloth drapes |
0,12 - 0,14 |
| Soft pure wool drapes, fine cloth |
0,15 - 0,16 |
2nd method:
Shrook = Op + Pop / 2
Where:
Op - shoulder circumference;
Pop - an increase in shoulder circumference.
Fashionable sleeves, several exclusive non-standard models 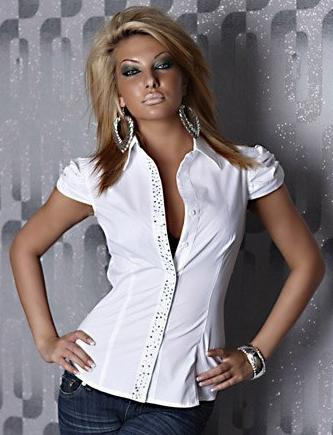

![]()

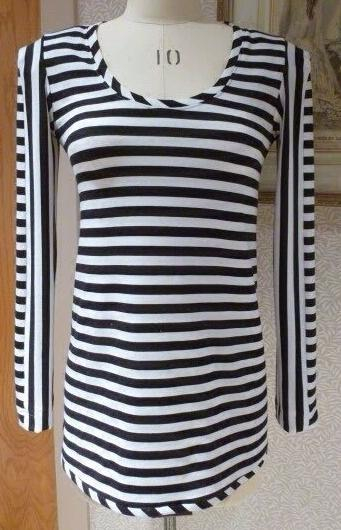
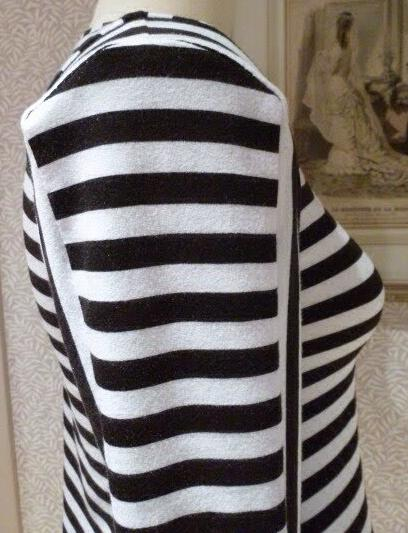
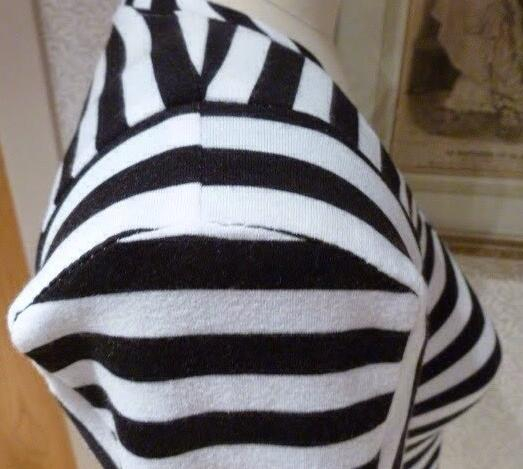
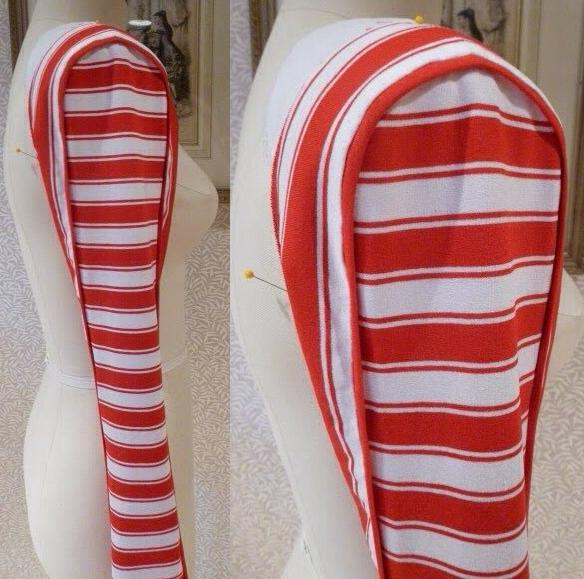


Sewing an armhole-sleeve knot on knitwear
We will need
- bias tape to match the color of the knitted fabric
-4-thread overlocker, well-adjusted for thread tension
-needles for stitching stretch fabrics 
Cut the bias tape in half, with the cut edge facing the outside of the shoulder seam 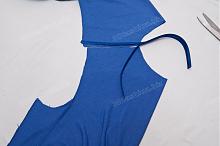
Sew the shoulder seam, ribbon on the back, iron the seam onto the front 
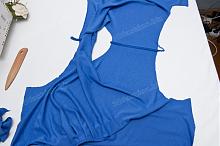
We apply the sleeve to the armhole, aligning the marks. The tape will be laid from arrow to arrow. Let's put marks at the ends of the arrows so that we know where to put the ribbon. 
We pin the sleeve to the armhole and begin to attach the armhole to the sleeve, stitching along the armhole. And in the place of the mark we also apply a ribbon. The cut of the ribbon is directed towards the outer edge of the seam. Before sewing, cut the ends of the ribbon diagonally. 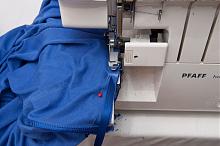

-beginning of the ribbon -end of the ribbon
Remove the pins as you sew and finish the seam to the end of the armhole
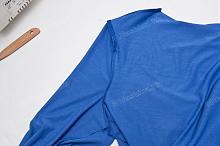

This is what the finished version looks like. What is good about this method - a sculptural rim
Knitwear has one significant feature - the bottom fabric shrinks when stitched. Keep this in mind - the bottom edge needs to be pulled up slightly to even out the cuts. So that when you reach the end of the seam you do not encounter an annoying surprise: the seams do not meet in length. Therefore, the sleeve is sewn along the armhole, and not along the sleeve, as in conventional fabrics. This way the sleeve shrinks slightly on its own.
PROCESSING RAGLAN SLEEVES. MASTER CLASS.
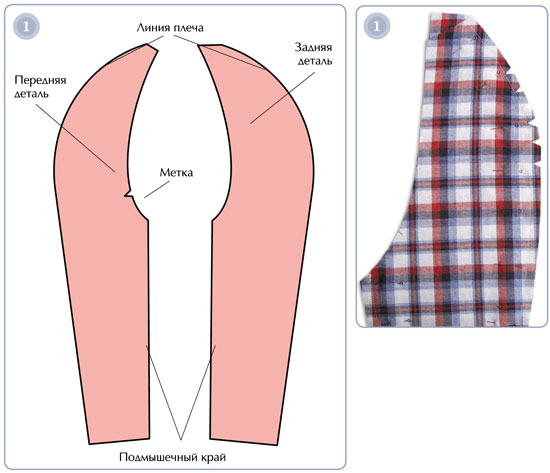
1. Fold the face sleeve pieces with the sides facing inward, aligning top points neck and axillary edges. Pin and baste the outer seam. Machine stitch it 1 cm from the edge. Take out the basting and make notches on the outer shoulder curve.
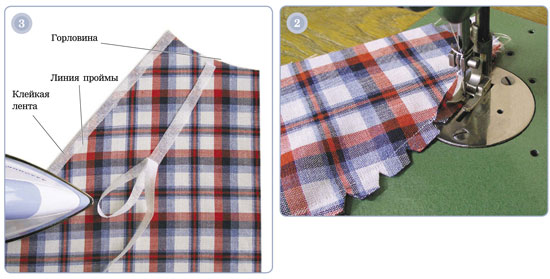
2.
Zigzag each seam allowance in turn, lay it out and press it on both sides of the seam. Baste and stitch the underarm seam. Also process the seam allowances.
3.
Place the garment evenly along the side seam, wrong side up. Cover the front and back sections of the armhole with adhesive tape, being careful not to deform it. Work the cut in a zigzag pattern, grabbing the adhesive tape.
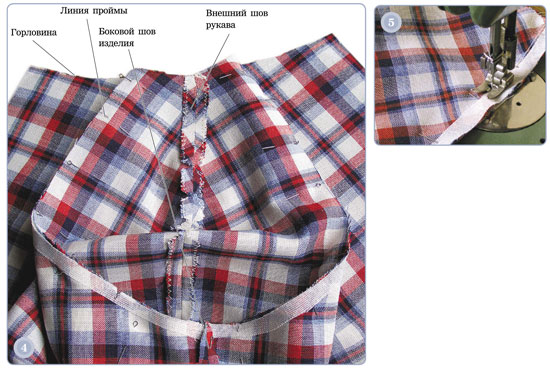
4.
Turn the sleeve inside out and pin it right side out along the armhole line, aligning the edges of the neckline, underarm seams and marks. Baste, being careful not to stretch or press the edge of the sleeve.
5.
Machine stitch along the armhole line near the inside edge of the tape.
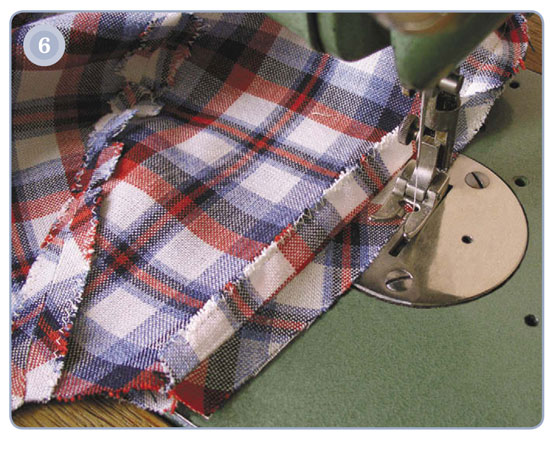
6. Pull out the basting. Make the necessary notches on the underarm seam allowances. Zigzag stitch each individual seam allowance.

7. Lay out seam allowances and iron. In less accessible places, iron the product with the tip of the iron.
Classic and short flounce sleeves
The flounce sleeve pattern is based on the same classic sleeve pattern, and is somewhat reminiscent of creating a wing sleeve.
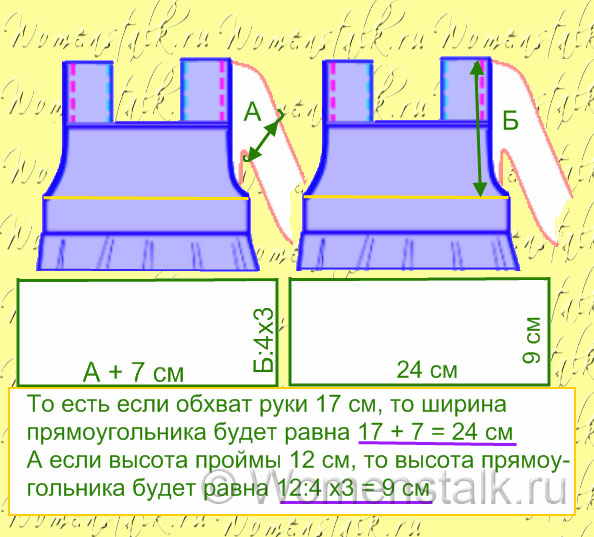
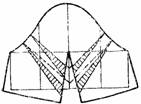
To do this, we need to strip it into narrow vertical stripes (Figure 1). Cut each strip from bottom to top, WITHOUT REACHING THE 5 MM ROUND (Figure 2).
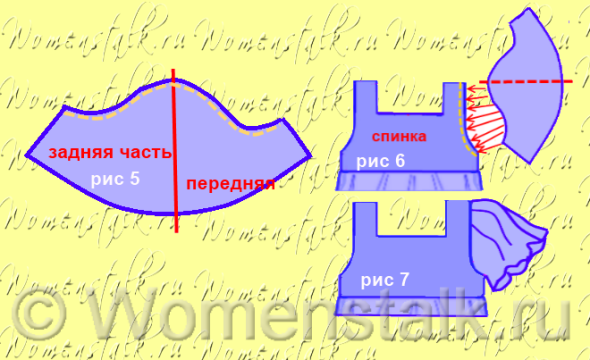
Now we need to take new leaf paper, place our pattern on it and unfold it like a fan, so that the edging line becomes a circle line (that is, it forms a ring), Fig. 3. 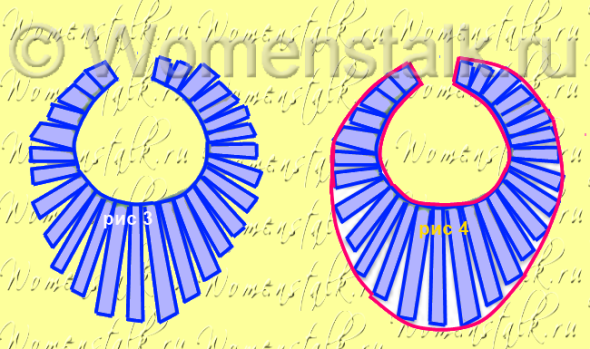
They put it away, now it remains outline new pattern (see red line in Fig. 4)
All the pattern is ready. Such a sleeve is sewn to the armhole along the edge of the inner circle (Fig. 5, 6).
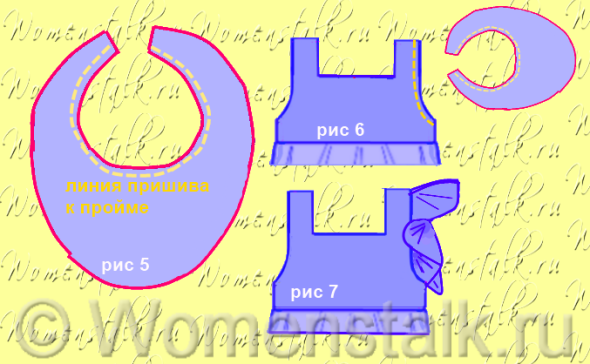
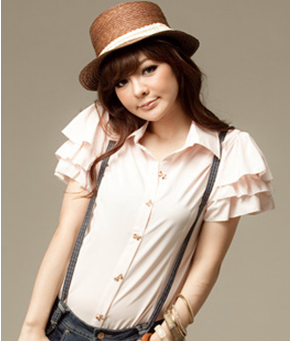
As you noticed in the photo above, the second light dress has a very short flounce sleeve.
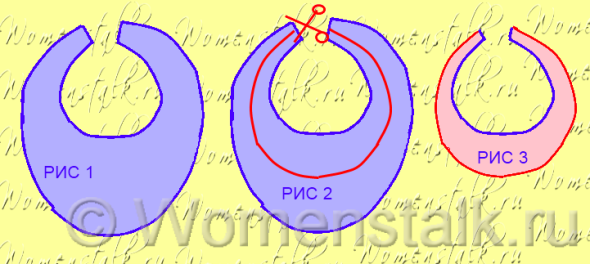
To make its pattern, you just need to shorten the pattern we just created - in this way (see picture below).
FULNESS SLEEVE - LONG

If you want to decorate your dress with such an elongated flounce sleeve, you will find below detailed instructions how to make such a shuttlecock correctly.
For this we only need to take 2 measurements:
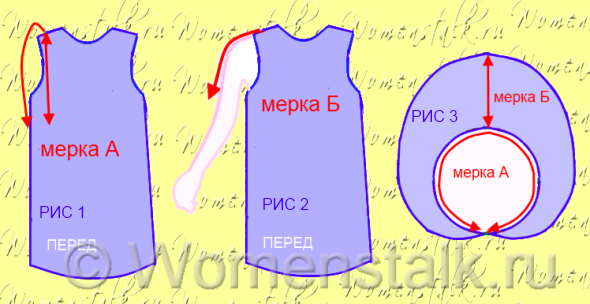
Measure A- Measure on the product (on a dress or on a blouse) the length of the line along which the flounce sleeve will be sewn. The line runs from the front, across the shoulder and down the back (Figure 1)
Measure B- the length of the flounce sleeve wing itself, from the shoulder area of sewing it to the armhole to the point on the arm where you want it to end (Fig. 2)
These measurements are needed to make a pattern like this (Figure 3). That is, our shuttlecock, when unfolded, will resemble a “lopsided donut”.
The most wide part The “donut” will rest on the shoulder, and the left and right sides will be sewn to the front and back. And the inner ring of this “donut” will be sewn to the dress.
And that means to create a pattern, we need to draw a circle whose length is equal to the length of the sewing line to the dress (measurement A) - Fig. 3.
Those who didn’t understand will understand now. I will show you step by step the entire process of creating this pattern.
CREATING A PATTERN FOR A LONG FULLAND SLEEVE.
Step 1. Draw a circle radius = measure A: 6.28.

For example. The sewing length (measurement A) on my dress is 67 cm. So we calculate the radius using this formula 67: 6.28 = 10.6. We take a compass, spread its legs to a distance of 10 cm 6 mm and draw a circle with this radius (Fig. 4).
If you don't have a compass- for example, I don’t have compasses in my house, so you can make a simple design for drawing circles. Take a spool of thread and tie one end of the thread to a pin. We tied it to a strong knot, now we measure 10 cm 6 mm from the knot and draw a mark on the thread with a felt-tip pen. And in the marked place we wrap a pencil that will draw this circle. That's it, the design is ready. Between the pin and the pencil we have a distance of 10 cm 6 mm. We stick a pin into the center of a paper sheet, stretch the thread with a pencil and draw a circle with this diameter around the pin.
Step 2.
Through the center of the circle we draw a vertical line that goes up beyond the circle (Fig. 5). The center of the circle is the hole from a pin or the sharp leg of a compass. Place a thick dot in the place where the line intersects the circle (point A in Fig. 5).

Now on this line from point A up, measure a distance that is equal to measure B. And put it in here point B (Figure 6).
Next, draw a horizontal line through the center of the circle. At the place where it intersects with the circle, place point B. And on this line, also mark a distance equal to HALF of the measurement B. We measured and placed point D. (Fig. 7)
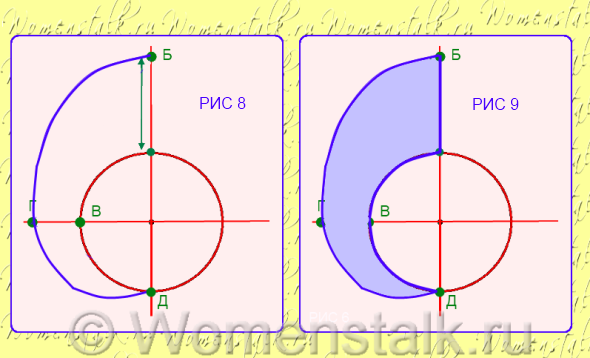
Step 3.
Now we connect these points with smooth rounded lines. As in the picture above, so that we get half of our “donut” (Fig. 8, 9).
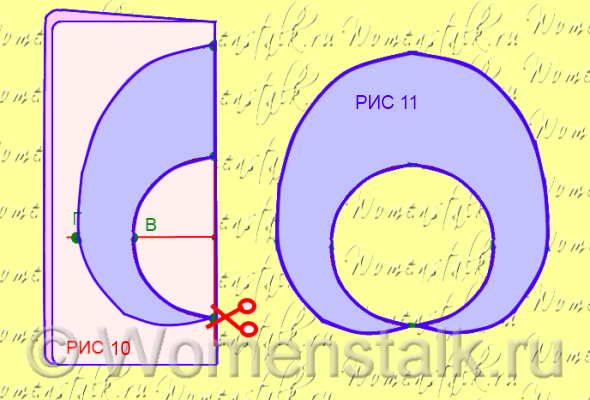
To make a whole pattern from half a donut, you need to fold a sheet of paper vertically in half and cut it with scissors along the drawn lines. You will get a whole donut pattern (Figure 11).
Don't forget to add seam allowances to your pattern. It is important to know here that Along the inner cut of the flounce, the seam allowance should be no more than 1 cm. If the allowance is made larger, then when sewing the flounce, unnecessary folds will form.
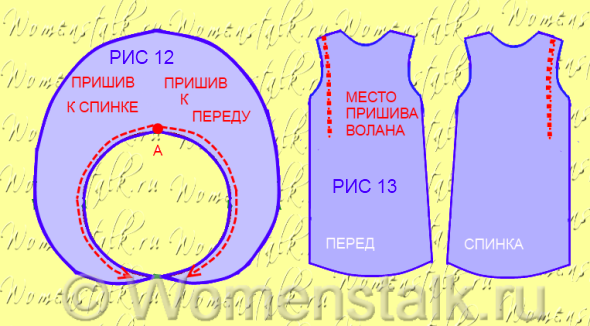
Now all that remains is to process the outer edges of the shuttlecock. And sew the flounce along the inner cut of the circle (Fig. 12 - red line) - we sew one half of the donut to the front, the other to the back.
That's all the wisdom. Now you can get to work. We sew for children, we sew for ourselves.
Modeling cap sleeves. 
Creating a wing sleeve pattern.
First we need it.
To turn a classic sleeve pattern into a wing sleeve, you need to strip it vertical lines. The lines must be drawn at the same distance from one another (Fig. 1)
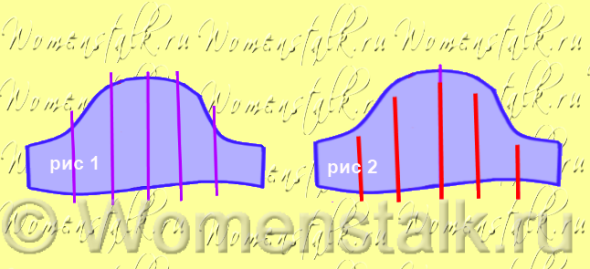
cut our classic pattern. Do not cut - just cut from the bottom up, WITHOUT CUTTING TO THE END. 
Now we take a new sheet of paper and place our pattern on it, spreading it like a fan - like this (Fig. 2). Try to remove the “fan blades” equal distance from each other(Fig. 2).
We choose an arbitrary distance between the “blades”. The greater the distance, the more folds you will get on the wing sleeve.
The choice of fabric is also arbitrary. If you want soft flowing wing folds- then take knitted fabric, soft stretch or any flowing fabric.
Then it will protrude slightly, like a real wing.
When the sleeve pieces are arranged in the way we need, it remains outline future new wing sleeve pattern
That's it, the wing sleeve pattern is ready.
Such a wing sleeve is sewn to the armhole in exactly the same way - along the edge - as a regular one classic sleeve.
WING SLEEVE TWO-, THREE-TIERED.
And to make such a three-tiered wing sleeve, we need a pattern of a regular wing sleeve and a sheet of paper.
Place the pattern on paper and finish drawing and lengthen it by 2-4 cm. We get pattern No. 2, slightly longer than the first.
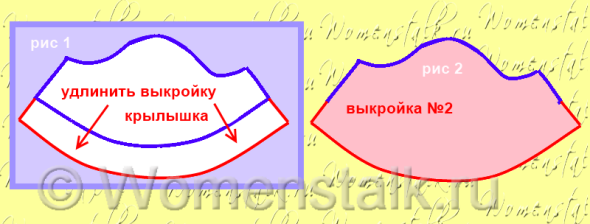
Now take this pattern No. 2, put it on a new sheet of paper and also lengthen it by 2-4 cm- we get pattern No. 3. 
Cut out all 3 pieces from fabric and put them on top of each other. Sew together along the edging line. 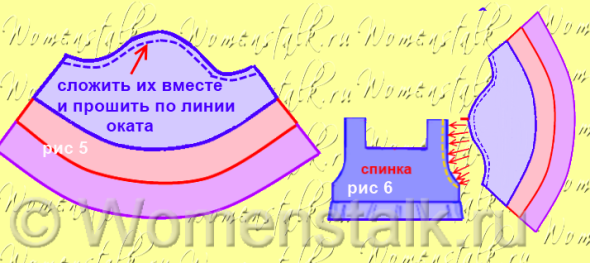
Now all this three-tiered wing can be sewn to the armhole in the same way as a regular one - along the edging line .
TRIM CAP SLEEVE.
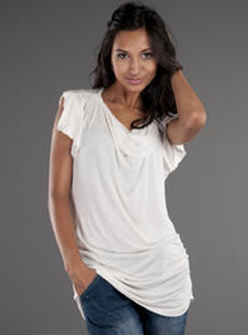
Sometimes there is also a wing cut off at the shoulder, as in the photo above.
In this case, we need to make the following changes to the standard wing pattern.
We take the pattern of a classic wing and draw on it a cutout of the depth we need.

Well, that's all - now you can get to work. Olga Klishevskaya, especially for the site ""
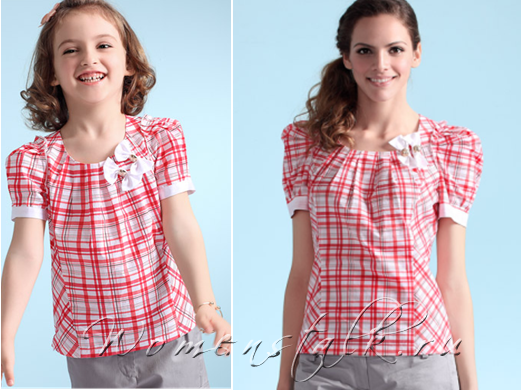
And today I’ll tell you how to make a puff sleeve pattern for children’s and adult dresses yourself. Like this:

The puff sleeve pattern differs from the classic sleeve pattern in that the rim line is raised and expanded. I explained in detail what a sleeve roll is. At the bottom, the puff sleeve ends with a cuff or the edge of the sleeve is simply folded, as in the picture above.
The puff sleeve can be absolutely any width and length (see photo collage below).
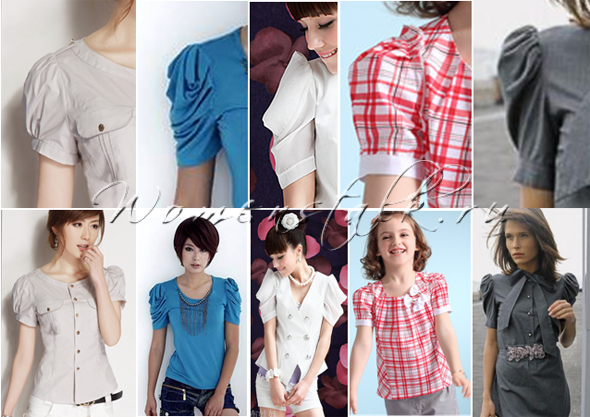
Today we will make a puff sleeve of moderate height - a classic puff sleeve.
So let's get started
Creating a puff sleeve pattern.
First we need classic sleeve pattern- I outlined the detailed construction of the classic sleeve pattern in part of the series.
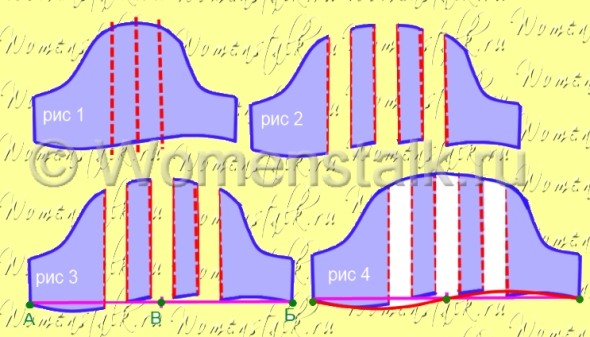
Place the standard sleeve pattern in front of you and draw a line connecting the ends of its edge(corners). Now from the highest point of the okata draw a line down to our horizontal line. Now on both sides of this median draw two more lines- at the same distance from each other (Fig. 1)

Now along the outlined lines you need cut our classic pattern.
We ended up with several pieces of the sleeve pattern. We lay them out on a new sheet of paper like this - see fig. 2. Try to arrange the top pieces (Fig. 2). The top pieces, as you noticed, we put fan-shaped.
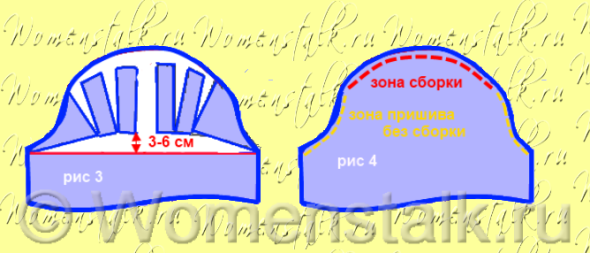
Of course you have questions:
How high should the arc of our “fan” be? I answer - anyone. The higher you draw the arc, the more “buffet” the sleeve will turn out. Our sleeve will have an arc height of 3-6 cm.
What fabric makes the sleeve look best? The answer is it depends on what you want to get.
If you need soft flowing puff folds (photo A)- then take jersey fabric, knitwear, muslin or any flowing fabric. And then make a high puff arc on the pattern, and expand the sleeve pattern itself to the sides from bottom to top - this is necessary for the soft folds to fall freely.
If you sew a sleeve from thick fabric , then it will rise royally above the shoulder line (photo C).
And if a puff sleeve made of thick fabric is also pushed to the sides - that is, widened, and then gathered at the bottom into a cuff, you will get something between a puff sleeve and a puff sleeve (photo B).

So, we laid out our sleeve pieces in the way we needed. Now outline the outline future new puff sleeve.
That's it - the puff sleeve pattern is ready.
Sew the puff sleeve to the armhole.
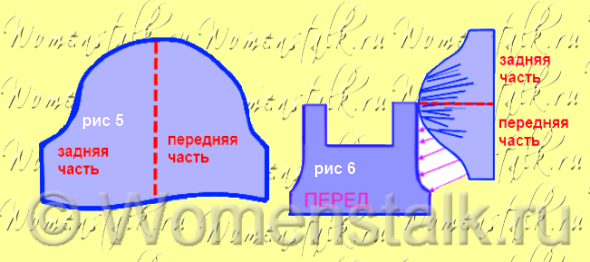 note that assembly area when sewing the sleeve to the armhole, it is located only in the area where we expanded our pattern (Fig. 4).
There are two ways to sew a sleeve to the armhole.
Method 1.
This is if gather the sleeve part before sewing it to the armhole (Fig. 6). That is, we manually form folds in the assembly area, grabbing them with a needle. The depth of the folds and their number are arbitrary. That is, you can make four deep folds or six smaller ones. The main thing is that the length of the edge of the assembled sleeve should be equal to the length of the edge of the same classic sleeve from which we started making our pattern (that is, equal to the length of the armhole). Then, when sewn on, it will absolutely match our armhole.
To achieve this, you can first secure the tucks with pins. Apply to the armhole of the product or to the pattern of a classic sleeve and make sure that you do not pinch too much. If you pinch too much along the edge, the sleeve roll will become short and its length will not be enough to sew from armpit to armpit of our product.
Method 2.
This method does not require attaching the sleeve to the pattern or armhole during assembly and allows you to easily make folds by eye. First, we manually sew the front and back “underarm” parts of the sleeve cap to the armhole (we baste the sleeve to the armhole in those areas where it does not shrink - rice 4 yellow dotted lines ). They sewed it on, and the rest middle part sleeve roll gather in relation to the shoulder section of the armhole .
And decorate the lower part of the sleeve in the form of a cuff, or fold the edge to the wrong side and stitch. You can also decorate it with an elegant braid on top.
Read the lesson - now get to work. We sew for children, we sew for ourselves.
In a separate part of the series I will tell you how to sew a puff sleeve to a dressyu s bare shoulders , that is, to a dress that essentially has no armhole. Olga Klishevskaya.
How to make a lantern sleeve pattern yourself based on the received classic sleeve pattern. Like this:

Lantern sleeves differ from the usual classic sleeves in that they are gathered along the upper part of the cap line. I explained in detail what a sleeve cap is in the previous part of the article. In the lower part of the sleeve, the lanterns are gathered on an elastic band, on a cuff, or simply on a bias tape.
The flashlight sleeve can be absolutely any width and length; you don’t even have to gather it at the bottom, but let it go freely, as in the third picture in top row(see photo collage below). You can make it loosely gathered (the striped sleeve in the photo) or very fluffy (the red lantern sleeve in the photo).
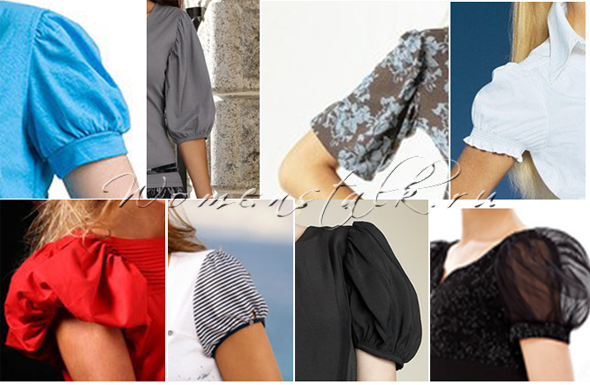
Today we will make a sleeve lantern of moderate splendor - a classic lantern. So let's get started.
Creating a pattern for a flashlight sleeve.
First, we create a pattern for a classic sleeve - detailed description V .
We take this standard pattern and find the middle in it - finding the middle is very simple - this perpendicular from the highest point of the sleeve edge. From the highest point of the okata we draw a line down.
Now on both sides of this line at the same distance from it we draw the same parallel lines (Fig. 1)
Cut the classic sleeve pattern along the marked lines. We will get four pieces of sleeve. We put them on a sheet of paper at an equal distance from each other(Fig. 2). We choose an arbitrary distance - 3-6 cm - the greater the distance, the more magnificent the flashlight sleeve will be.

Now we outline the outline of the future new pattern.
The lower edge of the flashlight sleeve pattern can simply be in the form of a straight line (purple line AB in Fig. 3). Or a semicircular line curved down. Or like mine (see Fig. 5 - red line) curved down on the back of the sleeve and concave up on the front of the sleeve.
That's it - the pattern of the classic lantern sleeve is ready.
note that assembly area when sewing the sleeve to the armhole, it is located only in the area where we expanded our pattern (Fig. 7).
You can sew a sleeve to the armhole of our dress or blouse in different ways.
Method 1.
First, we manually make folds on the sleeve part itself - we gather the sleeve part before sewing it to the armhole. When forming tucks and pleats, you need to constantly apply the sleeve piece to the armhole so as not to pinch too much - otherwise, when sewing it from armpit to armpit, it may not be enough.
Method 2.
We manually sew the front and back “underarm” parts of the sleeve cap to the armhole. That is, we baste the sleeve to the armhole in those areas where it does not shrink(Fig. 7 - okat line where there is no yellow dotted line). Sewn on, and the rest of the sleeve cap gather evenly relative to the shoulder section of the armhole- the sleeve is already sewn to the armpit parts of the armhole without assembly.
We sewed it by hand - now you can sew it on a machine.
Gather the lower part of the sleeve to the cuff, or make a drawstring and pull the elastic into it, or sew the elastic along the edge of the sleeve with a zigzag stitch. That's actually all the wisdom.
Pattern for a very puffy lantern sleeve.
Sometimes, according to the idea, it is very necessary for the flashlight sleeve to be more magnificent. Then you should make adjustments to the pattern of the classic flashlight sleeve.
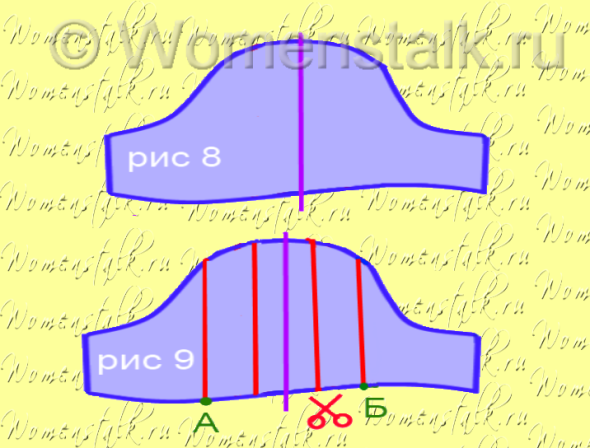
On the lantern sleeve pattern we again draw lines - two on the front of the sleeve and two on its back (Fig. 9). And we cut these lines from the bottom and almost to the very edge.

Then the cut parts spread fan-shaped at an equidistant distance from one another(Fig. 10).
We put our “fan” on a sheet of paper and circle- in the end we get a pattern for a lush lantern sleeve (Fig. 11).
It is sewn to the armhole of the product in the same way as a classic flashlight sleeve. The only difference is that at the bottom, towards the cuff, it gathers in larger folds, than at the top, towards the armhole.
In a special part of the series I will tell you how to sew a puff sleeve to an off-the-shoulder dress, that is, to a dress without an armhole or to a dress with straps.

By what principles are they created? sleeves Sleeves for adult and children's clothing are created according to the same principles.
I used to sew exclusively dresses without sleeves, because I thought that I would never be able to master such a complex (as it seemed to me) sleeve pattern. But one day I sat down and spent the whole day studying all the sleeves in my wardrobe, read all the manuals on constructing a sleeve pattern - patiently building a sleeve drawing, first in one way, then in another. And as a result, I chose the most convenient and quick way draw a sleeve. You won’t have to suffer as much as I did, I’ll tell you everything in simple human language (without abstruse tailor terms).
I will provide the story with the most detailed pictures and diagrams - so clear that even a fifth grader could sew the sleeve himself. And labor teachers, by the way, will be able to use these pictures as visual material in their lessons.
After this series of articles, you will be able to come up with any sleeve design for dresses, T-shirts and blouses yourself.
The agenda is as follows:
— Classic sleeve, its components.
— Construction of a sleeve pattern with step-by-step pictures.
— Lantern sleeve.
— Puff sleeve
— The sleeve is a wing.
- Cap sleeve.
— Flounce sleeve
— Sleeve with round neckline.
— Striped sleeve.
— One-piece sleeve(sleeve as part of a one-piece front and back pattern).
So let's get started...
First, I want to introduce you to the basic terms: sleeve cap, sleeve height, etc.
Let's look at the first diagram:

In Figure 1 we see a simplified image of a short sleeve. This is what it looks like before it was sewn on. I’ll say right away that long sleeve differs from a short sleeve only in length, so here we will learn how to make a short sleeve, and you can always lengthen it yourself if you wish.
The upper rounded line of the sleeve (by which it is sewn to the armhole) is called OKAT(Fig. 1).
Sleeve width- this is the distance between, roughly speaking, its “axillary” corners (Fig. 2)
The length of the sleeve- the distance from the armpit to the level we need (to the middle of the shoulder, to the elbow, to the wrist, etc.) (Fig. 3). Or the length of the sleeve can be calculated not from the armpit, but from the top of its collar (that is, from the shoulder seam - Fig. 5 (b)). As you prefer.
Okat can be high and low(Fig. 4) (this depends on the design of the dress, on the shape of its armholes) - but most often in clothes a standard armhole neckline and a standard classic sleeve with a standard edging height are used.
Classic sleeve pattern.
This standard sleeve We will draw with you now. And we will create the rest of the variety of sleeves using this standard pattern template.
