Very precise construction of the base dress, size 54. Dress pattern for large sizes
Due to numerous requests from readers of my website, its section “We model and sew ourselves,” I have prepared detailed master class with a photo that will help you create an exact base pattern for sizes 50 - 60 yourself. All measurements are given for size 54, and all calculations are made based on them. But the technology for constructing the pattern is the same for all large sizes.
You can also see sizes 44 – 58.
Measurements of size 54 for base pattern calculations.
OT – 93 - 94
GP – armhole depth– 15.5 cm. Measured from the waist to the armpit
DPT – front waist length – 50
VG – chest height – 32
CG – chest center – 20
SH – chest width - 38
DST – back length to waist – 43
ShS – back width – 39
Shpl – shoulder width – 13
Constructing a front pattern for size 54.
Let's make preliminary calculations:
We add 8 cm to the OG measurement - 108 + 8 = 116 cm
If you want to create not a pattern for a base for a dress or a blouse of an adjacent silhouette, but a pattern for a jacket, then the increase for a loose fit will be = 10 cm
Divide the resulting number 116 in half: 116: 2 = 58 cm
In order to ready product looked beautiful on the figure, you need to make half of the front pattern wider than half of the back pattern. Usually, for this, 0.5 - 0.7 cm is added to the resulting value of the front half. Accordingly, this figure is subtracted from the back value.
Everything is much simpler and faster than writing about it. For our example:
29 + 0.5 = 29.5 – new half front width
29 – 0.5 = 28.5 – for the back pattern
Now let's calculate the darts:
To the OT we add an allowance for a loose fit - 3 - 4 cm, depending on the style of the product. For the base pattern + 3 cm
OT + 3 = 93 + 3 = 96: 2 = 48 – OT for half front and back
58 – 48 = 10 cm Divide into 4 darts: 10: 4 = 2.5 cm
We will also calculate the pattern along the hip line later.
We make the main “mesh” for the front and back.
We start building the basic “grid” for the front pattern from point 1 - photo 3. We need to draw a neck line and 4 main horizontal lines.
The first is for the waist line, the second is the hip line, the third is the chest line, the fourth is for measuring the chest width.
The distance to the waist line corresponds to the DPT measurement - the length of the front to the waist, in our case - 50 cm. Place point 2 and draw horizontal line.
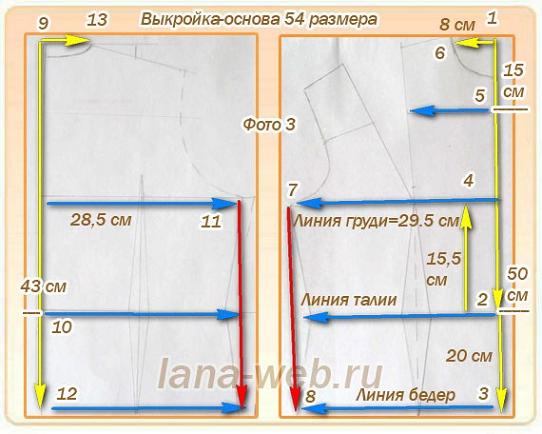
From point 2 down, measure 20 cm - this is the standard measurement for sizes 50 - 58 for the hip line. Of course, it depends on height. Your distance from the waist to the hips can be 18 - 21 cm. Place point 3 and draw a line for the hips.
From the waist line up, set aside the armhole depth measurement. On average, for size 54, it is 15–16 cm. In our example, it is 15.5. Place point 4 and draw a chest line.
We have already calculated this measurement - the size of the half front is 29.5 cm. Place point 7 and draw a vertical base line down to the intersection with the hip line - point 8. We will calculate the point on the hip line later.
From point 1 down, set aside 14 - 15 cm, put point 5, and draw a short horizontal line for the width of the chest. We will continue it when we make the top of the front pattern.
Semicircle neckline.
From point 1 to the left, measure 7.5 - 8 cm - standard measurements for half the neck width for sizes 50 - 58. Put point 6. The depth is still 7.5 - 8 cm - it is adjusted depending on the style of the product.
For the front basic foundation ready. I advise you to immediately make such a basis for the back pattern - you will be sure that in ready-made patterns you will have all the base lines and the side line completely identical.
The basis for the back pattern.
From point 9 down, set aside the DST measurement - the length of the back to the waist. For us it is 43 cm - point 10. Draw a horizontal waist line from point 10.
Down from point 10, the same as on the front pattern, the distance to point 12 is 20 cm - draw a line for the hips.
From point 10 up - set aside the measurement of GP = 15.5 cm - draw a chest line. The length of this line on the back pattern is 28.5 cm. Place point 11. You can, just like on the front pattern, draw a vertical base line down.
Draw a line for the neckline - from point 9 to the right, set aside 7.5 or 8 cm - point 13, and down - 2 - 2.5 cm - this is the depth of the neckline on the back.
Align 2 sheets of tracing paper with the bases of the front and back - all horizontal lines of the chest, waist and hips should match - photo 3.
Constructing a pattern for the top front, size 54.
Let's start making the top front. From point 6 to the left, draw a line 9 cm long - point 14. From it down - 2.5 cm - point 15. Draw the first line of the shoulder seam 8 - 10 cm long - dotted line in photo 4. We will specify the length of the shoulder later.
On the shoulder line, from point 6 to the left, measure 6.5 cm - the starting point of the chest dart.17.
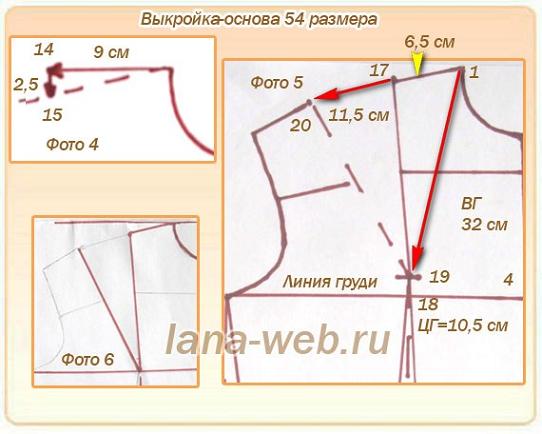
On the chest line from point 4 to the left, put point 18 - the center of the chest.
Calculation: (CG + 1) : 2 = (20 + 1) : 2 = 10.5 cm
From point 18, draw a vertical dotted line until it intersects with the hip line - this will be the center of the front dart. Continue up 3 – 4 cm
From point 1 to the intersection with the resulting short line, set aside the VG measurement - 32 cm. Point 19 - photo 5. Connect points 17 and 19.
The chest height point 19 can sometimes coincide with the chest line. But more often - higher by 2 - 3 cm.
From point 17 to the left along the line of the shoulder inclination, set aside the measure of the tuck solution. For size 54, with OG - 108 cm, it is equal to 11.5 cm. With OG = 110 cm - 12.5 cm, with OG = 100cm - 9.5 cm, with OG = 104 - 105 - 11 cm, with OG = 122 – 125 – 15 cm
Place point 20. Connect points 19 and 20. The finished chest front dart is in photo 6.
Determine the width of the front.
Connect points 17 and 20, fold the pattern over - you will get a tuck fold with the apex at point 19 - photo 7.

Continue the shoulder line and the chest width line.
On the shoulder line, from point 20, set aside 6.5 cm - point 21. In our example, the measurement Shpl - shoulder width = 13 cm is the segment between points 1 and 21.
We calculate the chest width measurement:
(SHG + 1) : 2 = (38 + 1) : 2 = 19.5 cm
Continue the chest width line from point 5, set aside a distance of 19.5 cm and place point 22 - photo 7.
Through points 21, 22 and 7 draw smooth line front armholes.
Sometimes point 22 turns out to be too shifted towards the chest dart. In this case, double-check that you have measured the chest width correctly. Or add 0.5 - 0.7 cm towards the armhole line to make the pattern proportional.
Construction of front darts.
From point CG 18 you have already drawn a dotted line to the hip line - put point 23 - photo 8.
According to our calculations, the size of the darts on the front and back patterns and on the side lines is 2.5 cm each
From point 24, at the intersection dotted line center of the dart and waistline, set aside 1.2 cm to the right and left. In total, you get 2.4 cm
From point 25, which is located at the intersection of the waist line and the vertical base line that you drew on the side, from point 7 to point 8, also set aside 2.5 cm to the right - point 26.
The completion of the size 54 front pattern is the hip line.
We calculate the total volume of the hips with allowances:
OB + 3 = 116 + 3 = 119
We divide the resulting value in half: 119: 2 = 59.5 cm You can round up to 60
60 – 58 = 2 cm
Since we have 2 side seams, on the front pattern and the back pattern, divide 2 by 2 = 1 cm
The fact is that in this method of constructing a front-basis pattern, all horizontal dimensions are calculated relative to the base vertical line, which passes through points 7 and 8. Therefore, we do not calculate the absolute value of half the hip circumference, but the relative one.
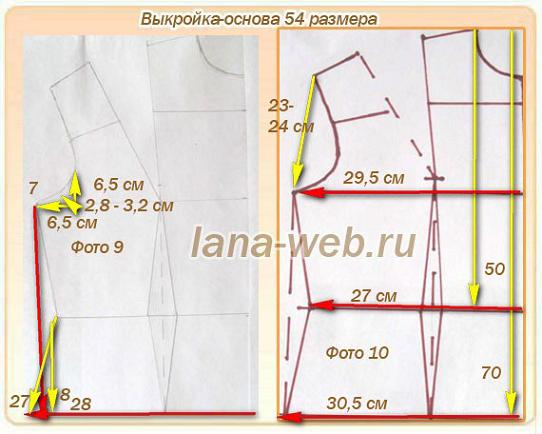
And the resulting figure of 1 cm shows how many cm the hip line will be longer than the chest line. Photo 9 shows this more clearly - point 27 on the left on the hip line, located 1 cm to the left of the baseline.
You may end up with a figure of half the volume of the hips with allowances that is less than half of the OG with allowances. For example, if with OG = 108 cm, OB = 109 cm
112:2 = 56 cm
In this case, we subtract 56 from 58. We also divide the resulting 2 cm by 2. But the hip line will be shifted relative to the baseline by 1 cm to the right - point 28. With another OB measurement, the point on the hip line may coincide with the baseline.
Bottom of armhole.
Check your semicircle at the bottom of the front armhole - if you draw a right angle with a side length of 6.5 cm, then the diagonal will be 2.8 - 3.2 cm - yellow arrows in photo 9.
The finished pattern is the basis of the front, size 54 with the main values - in photo 10. The length from neck point 1 to the hip line is 70 cm, the length to the front line is 50 cm, the length of the chest line is 29.5 cm, the length of the waist line with a central dart 2.5 cm – 27 cm, hip length – 30.5 cm
We will create a back pattern for size 54, learn how to evenly distribute the size of darts at the waist and side seam for figures with a narrow waist, and check the slope of the shoulder line using two additional measurements.
Let's start building.
Dress length.
From point P downwards we put aside the taken measurement of the length of the dress Di (100 cm) and put point H.
Armhole depth.
From point P downwards we put aside the taken measurement of the depth of the armhole (Gpr = 21 cm) and set point G.
Waistline.
From point P downwards we put the taken measurement of the length of the back to the waist (Dst = 39 cm) and put the point T.
Hip line.
From point T downwards, 18 - 19 cm are usually deposited. We will take the average value of 18.5 cm and place point B.
From points G, T, B and H to the left at right angles we draw horizontal lines: the depths of the armhole, waist, hips and bottom.
Back width.
From point G to the left, set aside the taken measurement of the back width Шс (19.5) plus 0.5 cm (increase for loose fit) and place point G1:
GG1 = Shs + 0.5 = 19.5 + 0.5 = 20 cm.
Distance to the sideline.
From point G1 to the left we set aside half of the taken measurement of the width of the armhole Shpr (12.5) minus 1 cm and set point G2:
G1 G2 = Shpr: 2 – 1 = (12.5: 2)-1 = 5.25 cm.
From point G2 downwards we draw a straight line and at its intersection with the lines of the waist and hips we place points T2 and B1.
Sprout width.
From point P to the left we set aside 1/3 of the half-circumference of the neck Ssh (19 cm) plus 1 cm and place point P1:
PP1 = 1/3 Ssh +1 = 19:3+1=7.3 cm.
Sprout height.
From point P1 up, we set aside the difference between the measurements of the height of the sprout BP (41 cm) and the length of the back to the waist Dst (39 cm) and set point P2:
Р1Р2 = Вр – Дст = 41 – 39 = 2 cm.
We connect points P and P2 with a concave smooth curve. We get the line of the back neckline (the sprout line). 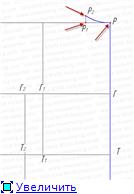
Back height.
From point T1 upward we set aside the taken measurement of the height of the shoulder of the backrest Vps (36 cm) and set point P. 
From point G1 upward we set aside 1/3 of the distance of the segment G1P and put point O. Using a compass from point O we draw an arc to the left through point P. 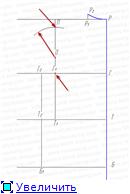
Shoulder length.
From point P2 as from the center, with a radius equal to 15 cm (measurement of shoulder length Dp (13 cm) plus 2 cm for the dart), draw an arc until it intersects with a previously constructed arc (see Fig. 12). At the intersection of the two arcs we place point P1.
Р2П1=13+2=15cm.
We connect points P2 and P1. 
By connecting points P1, O and G2 with a smooth curve, as shown in Figure 12, we complete the construction of the back armhole.
Back shoulder dart.
From point P2 to the left on line P2P1 we set aside 1/3 of the taken measurement of the length of the shoulder Dp and place point B;
Р2В=13:3=4.3 cm.
From point B we draw down vertical line 8 cm long and put point B1. 
From point B to the left along the line Р2П1 we set aside 2 cm and place point B2. From point B1 through point B2 we draw a line 8 cm long and place point B3. We connect points B3P1 with a straight line and get the back shoulder line.
Side line backrests
From point T2 to the right we set aside 2 cm and place point T3. We connect points T3 and G2. 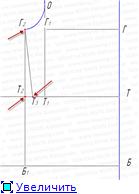
Waist line design.
From point T3 upward we set aside 1 cm and place point T4, points T4 and T are connected with a smooth curve (see figure) 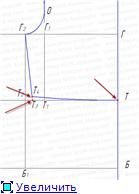
From point B1 to the left we set aside 1/2 of the difference between the measurements of the semi-circumference of the hips C6 with an increase for a loose fit (60+3=63 cm) and the second semi-circumference of the chest CgII with an increase for a loose fit (54+4=58 cm) and set point B2:
B1, B2 = (63-58) : 2 = 2.5 cm. We connect points G4 and B2 with a smooth curve. 
Width of the bottom of the back.
From point H to the left we set aside a value that is equal to the width of the back along the hip line (see drawing, this is distance BB2) plus 2-3 cm and place point H1. We connect points H1 and B2 with a straight line. From point H1 we put 1cm upward and place point H2. We connect points H2 and H with a smooth curve. 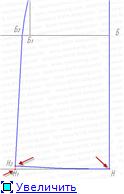
Back dart.
Divide the distance GG1 in half and put point G3. From point G3 downwards we draw a vertical line and at its intersection with the waist line we put point T5, with the line of the hips - point B3. From point G3 we put 4 cm down and put point B4, and from point B3 up - 3 cm and put point B4. 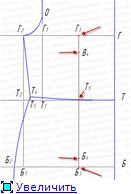
Depth of dart.
From point T5 to the right and left along the waist line, set aside 1 cm and put points T6 and T7, which we connect to points B4 and B4 (see figure). 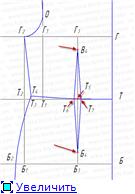
The construction of the back is completed
Before
We continue the bottom line of the backrest HH1 to the left. From point H1 we set aside approximately 45-50 cm and place point H3. From point H3, draw a vertical line upward. From points G2, T2, B2 to the left we draw horizontal lines until they intersect with the vertical. The points of intersection with the vertical line are designated G4, T8, B5, respectively.
Front width.
From point G4 to the right we set aside the taken measurement of the half-circumference of the chest of the second CgII with an increase for a loose fit (54 + 4) minus the width of the back with an increase (according to the drawing GG1 = 20 cm) and minus the width of the armhole (the measurement taken is 12.5 cm) and set point G5 :
G4G5=58-20-12.5=25.5 cm.
Through point G5 we draw a vertical line down, at the intersection of which with the waist line we place point T9.
Distance to the sideline. From point G5 to the right we set aside half the width of the armhole Shpr (12.5) plus 1 cm and place point G6:
G5G6 = 12.5:2+1=7.25 cm.
From point G6 downwards we draw a vertical line and at its intersection with the horizontal lines we place points T10 and B6.
Front height.
From point T8 up we put aside the taken measurement of the length of the front to the waist Dpt (44 cm) and put point P3
Neck width.
From point P3 to the right we draw a horizontal line and on it we put aside 1/3 of the half-circumference of the neck Ssh! (19 cm) plus 1 cm and put point P4:
Р3Р4=19:3+1=7.3 cm. 
Neck depth.
From point P3 downwards we set aside 1/3 of the half-circumference of the neck Ssh (19 cm) plus 1.5 cm and place point P5:
Р3Р5 = 19:3+1.5=7.8 cm.
We connect points P4 and P5 with a straight line, divide it in half and designate the middle as point O1. From point O1 down at a right angle we set aside 1.25 cm and put point 02. We connect points P5, 02 and P4 with a smooth curve and get the line of the neck of the shelf. 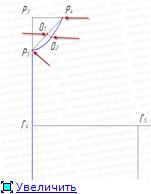
Center of the chest.
From point G4 to the right we set aside the taken measurement of the center of the chest Cg (11 cm) and set point G7. We connect points P4 and G7. 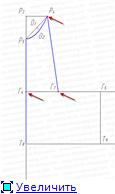
Chest height.
From point P4 down, extending the line P4G7, set aside the taken measurement of chest height Bg (29.5 cm) and place point C. 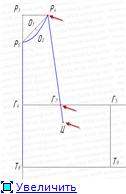
End of dart.
Along the same line from point C up, we set aside 2.5 cm and place point C1. The chest dart ends at this point. 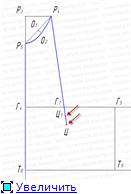
The size of the tuck opening.
From point C up, we put aside the taken measurement of the size of the dart opening Brv (12 cm) and set point U. From point C, as from the center, through point Y we draw an arc to the right.
Opening the dart.
From point Y on the drawn arc we plot the difference between the measurements of the half-chest girth of the second CgII (54 cm) and the half-chest girth of the first CgI (49 cm) and set point U1.
УУ1 = СгII – СгI = 54 - 49 = 5 cm This construction can be done using a compass. From point Y, as from the center, draw an arc with a radius of 5 cm until it intersects with the previously constructed arc. Designate the intersection point as U1.
We draw a straight line through points C1 and U1, continuing it upward by an amount that is equal to the distance C1P4 and place point P2:
Ts1P2 = Ts1P4. 
Front shoulder height.
On straight line T9G5, extending it upward, from point T9 we set aside the taken measurement of the height of the front shoulder of the runway (35 cm) and set point P3.
Auxiliary armhole point.
From point G5 upward we set aside 1/4 of the distance G5P3 (4.5 cm) and set point 03. Point 03 is a control point. When threading the sleeve into the armhole, it connects to the mark on the sleeve at point O (see drawing of the sleeve below)
From point 03 with a compass through point P3 we draw an arc to the right.
Shoulder length. From point P2, as from the center, with a radius equal to measured shoulder length Dpl, (in our case 13 cm), draw an arc until it intersects with a previously constructed arc and place point P4. Points P4, 03 and
We connect G6 with a smooth curve, thereby completing the construction of the front armhole. 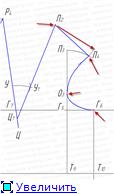
Side line front.
From point T10 to the left we set aside 1.5 cm and place point T11. We connect points G6 and T11 with a straight line. 
Waist line design.
From point T11 we set aside 1 cm upward and place point T12. We connect points T8 and T12 with a smooth curve. 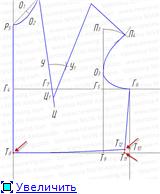
Formation of the lateral line in the hip area.
From point B6 to the right we set aside 1/2 of the difference between the measurements of the semi-circumference of the hips Sb with an increase for a loose fit (60+3=63 cm) and the second semi-circumference of the chest CgII with an increase for a loose fit (54+4=58 cm) and set point B7:
B6 B7 = (63-58): 2 = 2.5 cm.
We connect points T12 and B7 with a smooth curve.
Front bottom width.
From point H3 to the right we set aside a value that is equal to the width of the front along the hip line (see drawing, this is distance B5B7), plus 2-3 cm and place point H4. We connect points B7 and H4 with a straight line. From point H4 we set aside 1 cm upward and place point H5. 
Lengthening the front.
From point H3 we put 2 cm down and put point H6. We connect points H6 and H5 with a smooth curve. 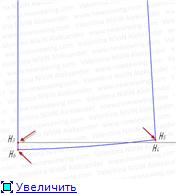
Construction of a dart.
Divide the distance G7G5 in half and set point G8. From point G8 downwards we draw a vertical line, and at the intersection with the lines of the waist and hips we place points T13 and B8. From point G8 we put 6 cm down, and from point B8 up - 2 cm and put points B5 and B9. 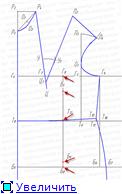
Recess depth.
From point T13 to the right and left we set aside 1.25 cm and put points T14 and T15, which we connect to points B5 and B9. (See Fig.) 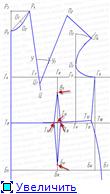
The construction is complete.
But before you start cutting, don’t be too lazy to take a centimeter and check the basic measurements again. Pay special attention to the waist circumference, since in this method, when constructing darts along the waist line, not a calculated value is used, but a constant. If, when checking, you find significant discrepancies between the figure and the drawing (specifically in the waist circumference), they can be easily eliminated by reducing or increasing the opening of the darts along the waist line. 
This is a basic dress pattern drawing - a guide for creating a wide variety of patterns. Before you start modeling, you need to check the pattern, “fit” it to the figure, and make adjustments if necessary. And only after you are completely sure that everything is in order, you can safely begin to create.
And remember, the one who walks will master the road!
Single-seam sleeve pattern for size 54.
To create a sleeve pattern you will need the following measurements: 
Reminder: this is the basis (pattern), which can and should be changed if desired or necessary: sleeve length, hemline configuration, width (by increasing or decreasing the allowance for a loose fit), etc.
Constructing a drawing of a single-seam sleeve pattern.
Stepping back 7-8 centimeters from the left edge of the sheet, draw a right angle with the vertex at point A.
The length of the sleeve. From point A downwards we put aside the taken measurement of sleeve length D (58 cm) and put point H.
Height of the rim. From point A we put 15.5 cm down (you will have a different figure, read on) and put point G. We get this figure by making the following calculations: (refer to the drawing of the dress base pattern for size 54, and you take similar data from your drawing): the height of the front armhole is the distance G5P3 (17 cm) plus the height of the back armhole is the distance G1P (18 cm), divide in half and subtract 2 cm: AG = (17 + 18) : 2 - 2 cm = 15.5 cm.
Elbow line. From point A, we put down the taken measurement of the length of the sleeve to the elbow DRL (34 cm) and put point L. From points G, L and H, we draw horizontal lines to the right and left.
Front roll height. From point G up, we put aside a value that is equal to the segment G503 (4.25 cm) in the armhole of the front of the dress (see the drawing of the pattern for the base of the dress 54 rub.) and put point O. Point O is the control point when threading the sleeve into the armhole. We connect it with the armhole of the dress at point O3.
Width of the upper part of the sleeve. From point G to the right we set aside a value that is equal to the measurement of arm circumference with an increase for loose fit, divided in half (34 + 8 = 42 cm), and set point G1:
G G1 = 42:2 = 21 cm.
Through point G1 we draw a vertical line up and down and at its intersection with the horizontal lines we place points A1 and L1. 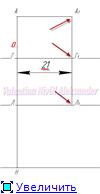
Front roll width. From point G to the left we set aside 6 cm, from point L - 4.5 cm, and from point H - 4 cm and accordingly set points G2, L2, H1. We connect points G2, L2 and H1 as shown in Fig. 
Width of the elbow roll. From point G1 to the right we set aside the value that we obtain by the following calculations: distance G G1 (21 cm) minus distance G G2 (6 cm) and set point G3:
G1G3=21-6=15 cm.
From point G3 we draw a vertical line down, at the intersection of it with the horizontal lines we put points L3 and H2, from which we put 2 cm to the left and put points L4 and H3. We connect points G3, L4 and H3. 
Decoration of the okat. We divide line AA1 in half and mark the middle with point C. From point C, set aside 1 cm to the right and place point P. Point P is the control point when basting the sleeve into the armhole; it is aligned with the shoulder seam of the dress. From point P downwards we draw a straight line and at its intersection with the line G2G3 we place point G4. 
From point A downwards we set aside 1/3 of the distance AG and place point O1:
A01 = 15.5:3 = 5.2 cm.
From point O1 to the right we draw a horizontal line and at its intersection with the vertical lines we place points O2 and O3. From point O1 to the right we set aside 1/3 of the distance O1O2 (3.8 cm) and place point O4. 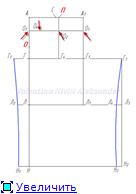
Point C is connected to point O4, and point P is connected to point O3. We divide the resulting segments in half and mark the middle with points O5 and O6. From points O5 and O6 up at a right angle, we put 1 cm aside and put points O7 and O8.
From point G3 to the left we set aside 3 cm and place point G5. We connect points O3 and G5 with a straight line. This auxiliary line to build an okat.
By connecting points G2, O, O4, O7, and C, as well as points P, O8, O3 and G3 with a smooth curve, as shown in Figure 11, we form the sleeve cap. 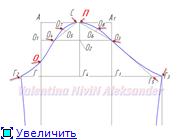
Elbow line. From point L1 to the left we set aside 1.5 cm and place point L5, from which we draw a vertical line down and at its intersection with the bottom line we place point H4. 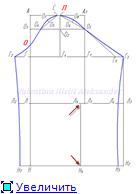
Sleeve bottom design. From point H we put 3 cm up, from H1 - 2 cm, from H3 - 1 cm and place points H5, H6 and H7 respectively. We connect points H5 and H6 with a straight line. We connect points H5, H4 and H7 with a smooth curve. 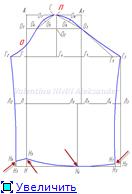
Construction of a dart. For hand full It is recommended to make a dart in the middle of the sleeve cap.
From point P downwards we set aside the length of the dart (9 cm) and place point B. From point P to the right and left along the sleeve hem we set aside the depth of the dart (1.5 cm each) and draw a smooth curved line of the dart, as shown in Figure 14. The main thing is to achieve so that these lines are the same. 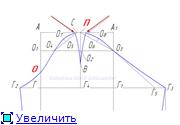
The sleeve, depending on the style, can be straight or with a dart along the bottom line. To construct a dart, measure the circumference of your wrist. The difference between the width of the bottom of the sleeve and the measurement of the wrist circumference with an increase for a loose fit (19 + 7 = 26 cm) is set aside for the dart 38 - 26 = 12 cm. We divide this value in half, set aside 6 cm from point H4 to the left and right and put points H8 and H9, which we connect to point L5 with a smooth curve.
The pattern is ready.
The one-seam sleeve pattern drawing is used for all sizes. 
You can download all the drawings in one file.
Dress pattern size 60. Step-by-step instructions for creating a pattern.
To create a pattern drawing, you need to take the following measurements:
Recommendation: Take correct measurements. The entire result of your efforts will depend on this.
To take measurements more accurately, you need to note starting points: the seventh cervical vertebra, which is clearly defined when the head is tilted, as well as the shoulder line at the base of the neck and at the junction of the arm and shoulder. Use pins or chalk for this if the woman is dressed. If you need to put a dot on the body, use a felt-tip pen, which can be easily erased with an alcohol-containing liquid after completing this procedure.
It’s good if the person you’re taking measurements from is wearing a thin dress, or better yet, only underwear. He, or rather she, because we're talking about about a woman, she should stand straight, without tension, i.e. maintain your normal posture. This is exactly what I draw your attention to. Because often when taking measurements or trying on, a woman, especially if she sees her reflection in the mirror, wanting to look slimmer, tightens her stomach, straightens her back, etc. The desire to look better is a good aspiration, but when taking measurements it can distort the real state of things. And a well-fitting dress being tried on, in ordinary life will not be as comfortable as we would like and as it should be.
Therefore, taking into account the above, turn the client away from the mirror, distract him with a peaceful conversation, tie a cord around his waist, mark the starting points and start measuring.
As an example, we took measurements corresponding to size 60 and when constructing all calculations will be based on the measurements given in the table below.
Be careful that you substitute your own values into all formulas when calculating.
The experience of using this method of constructing patterns suggests that an excellent result is easy to achieve under one condition: you need to take measurements accurately and diligently. The outcome of all further work depends on this. 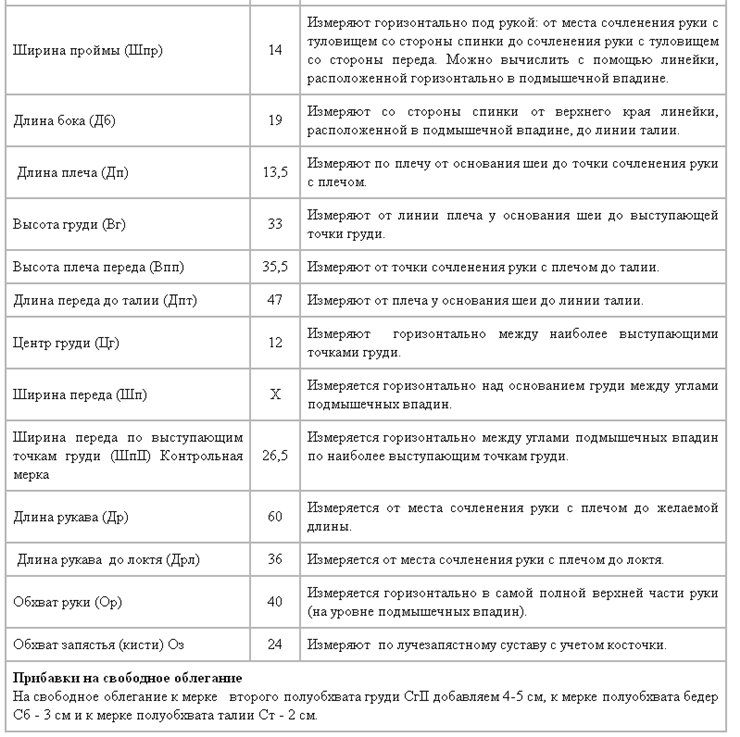
CONSTRUCTION OF A SEMI-ADJECT DRESS PATTERN. Size 60
Draw a right angle with the vertex at point P in the right corner of the prepared sheet of paper (Fig. 1).
Dress length.
From point P downwards we put aside the taken length of the dress Di (102 cm) and put point H (Fig. 1). 
Armhole depth. From point P downwards we put aside the taken measurement of the depth of the armhole Gpr (23 cm) and set point G. 
Back length to waist. From point P downwards we put the taken measurement of the length of the back to the waist Dst (40 cm) and put the point T. 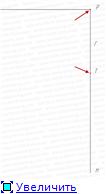
The length of the dress is up to the hip line. From point T downward, 18–20 cm is usually deposited. We will take the average value of 19 cm and place point B. From points G, T, B and H to the left we draw horizontal lines for the depth of the armhole, waist, hips and bottom. 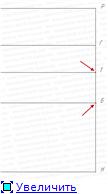
Midline of the back. From point P to the left we set aside 1 cm and place point P1 (back bevel). We divide the segment RG in half and designate the middle with the letter L. We connect points P1 and L with a smooth curve. From point T to the left we set aside 1.5 cm and place point T1. Points G, T1 and B are connected by a smooth curve, as shown in Fig. 
Back width. From point G to the left, set aside the taken measurement of the width of the back Шс plus 0.5 cm (increase for loose fit) and place point G1:
GG1 = 21 + 0.5 = 21.5 cm.
We draw a vertical line through point G1 up and down, and at the intersection with the waist line we place point T2. 
Distance to the side line (to the side seam). From point G1 to the left we set aside 1/2 of the width of the armhole Shpr (14cm) minus 1cm and place point G2:
G1 G2=14:2-1=6cm.
The distance to the side line can vary, it depends on the figure and style. If the figure is with a protruding belly, then the lateral line is located closer to the back, and if the figure is with protruding buttocks, then closer to the front. And, of course, the side line can be in the middle of the armhole.
From point G2 downwards we draw a vertical line to the line of the hips and at the intersection with the lines of the waist and hips we place points T3 and B1. 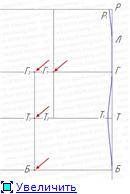
Sprout width. From point P1 to the left we set aside 1/3 of the half-circumference of the neck Сш (21 cm) plus 1 cm and place point P2:
Р1Р2=21:3+1=8cm. 
Sprout height. From point P2 up, we set aside the difference between the measurements of the height of the sprout BP (42 cm) and the length of the back to the waist Dst (40 cm) and set point P3:
Р2Р3 =42-40=2cm.
We connect points P3 and P1 with a smooth curve. 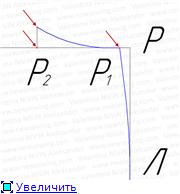
Back shoulder height. From point T2 up, we put aside the taken measurement of the height of the shoulder of the backrest Vps (36 cm) and put point P 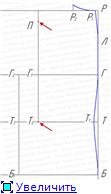
An auxiliary point for designing an armhole. From point G1 upward we set aside 1/3 of the segment PG1 and place point O. From point O with a compass through point P, draw an arc. 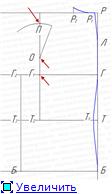
Shoulder length. From point P3, using a compass (with a radius equal to the shoulder length taken plus 2.5 cm for the undercut), make a mark on the previously constructed arc and place point P1:
Р3П1=13.5+2.5=16cm.
We connect points P3 and P1 with a straight line.
We draw the line of the back armhole. We connect points P1, O and G2 with a smooth curve as shown in Fig.
Shoulder dart. Along the line P3P1, from point P3 to the left, we set aside 1/3 of the taken measurement of the shoulder length and place point B:
Р3В =13.5:3=4.5 cm.
From point B down parallel to the RL line, draw a straight line 9 cm long and place point B1. 
From point B to the left we set aside 2.5 cm and place point B2. From point B1 through point B2 we draw a line 9 cm long and place point B3. We connect point B3 to point P1. 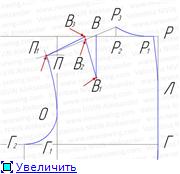
Lateral line of the back. From point T3 to the right we set aside 2 cm and place point T4, which we connect to point G2.
Design of the waist line. From point T4 we put 1cm upward and place point T5. We connect points T5 and T1 with a smooth curve.
Constructing the lateral line of the back in the hip area. From point B1 to the left we set aside half the difference between the measurements of the half-girth of the hips Sb and the half-girth of the chest of the second CgII with allowances for a loose fit:
B1B2 = (Cb+3cm) -(CgII+4cm): 2 = 65–64: 2 = 0.5cm. And put point B2
We connect points T5, B2 with a smooth curve. From point B2 downwards we draw a vertical line and at the intersection with the bottom line we place point H1. (This straight dress). You can widen the bottom of the dress slightly towards the bottom. How to do this, see the pattern for size 54, section Bottom back width. 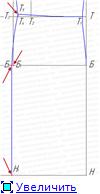
Construction of a dart. From point G1 to the right we set aside 1/3 of the width of the back (7cm) and place point G3 (this distance may vary). From point G3 downwards we draw a straight line and at its intersection with the lines of the waist and hips we place points T6 and B3, respectively. From point G3 we put 4 cm down and put point B4, and from point B3 up - 3 cm and put point B4.
Depth of dart. Along the waist line from point T6 to the left and right we set aside 1 cm and put points T7 and T8, which we connect to points B4 and B4. 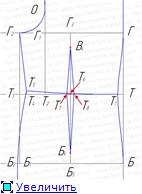
The construction of the back is completed.
Before.
From points G2, T3, B1 and H1 to the left we draw horizontal lines: the depths of the armhole, waist, hips and bottom, put approximately 50 cm on them and place points G4, T9, B5 and H2 respectively. Through these points up and down we draw a vertical line. 
Front width. From point G4 to the right we set aside the distance that we obtain as a result of the following calculation: the taken measurement of the half-circumference of the chest of the second CrII (60 cm) plus 4 cm for a loose fit, minus the width of the back according to the drawing (21.5 cm) and minus the taken measurement of the width of the armhole Shpr (14 cm ) let's set point G5:
G4G5 = 64-21.5-14 = 28.5 cm.
Through point G5 we draw a vertical line down and at its intersection with the waist line we place point T10.
We check the width of the front by taking the width of the front at the protruding points of the chest (ШпII). The width of the front in the drawing should be greater than the measurement taken, so that it does not turn out that the product is narrowed.
Distance to the sideline. From point G5 to the right we set aside half of the taken measurement of the armhole width Shpr (14 cm) plus 1 cm and set point G6, from which we draw a vertical line down and at the intersection of it with the lines of the waist and hips we put points T11 and B6.
G5 G6=14:2+1=8cm ![]()
Front height. From point T9 up, we put aside the taken measurement of the length of the front to the waist Dpt (47 cm) and put point P4. From point P4. draw a horizontal line to the right. 
Neck width. From point P4 to the right we set aside 1/3 of the half-circumference of the neck Ssh (21 cm) plus 1 cm and place point P5:
Р4Р5 = 21:3+1=8cm. 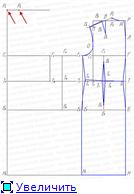
Neck depth. From point P4 downwards we set aside 1/3 of the half-circumference of the neck Ssh (21 cm) plus 1.5 cm and place point P6:
Р4Р6 =21:3+1.5=8.5 cm.
We connect points P5 and P6 with a straight line, divide it in half and mark the middle with point O1. From point O1 at a right angle downward we set aside 1.5 cm and place point O2. We connect points P5, O2 and P6 with a smooth curve and get a neck line. 
Shoulder length to dart. From point P5 to the right we set aside 1/3 of the taken measurement of shoulder length Dpl (13.5) and place point P7:
P5P7 = 13.5:3 = 4.5 cm. 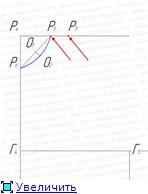
Center of the chest. From point G4 to the right we set aside the taken measurement of the center of the chest Cg (12 cm) and set point G7. We connect points P7 and G7. 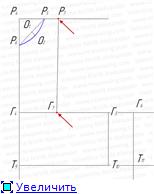
Shoulder bevel. From point P7 we put 1 cm down and put point P2. We connect points P5 and P2. 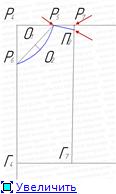
Chest height. From point P7 downwards we set aside the taken measurement of chest height Bg (33 cm) and place point C. 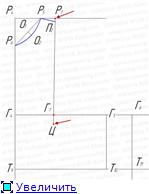
End of dart. From point C up, set aside 2.5 cm and place point C1. 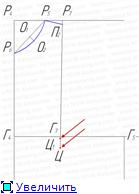
The size of the tuck opening. From point C up, we put aside the taken measurement of the size of the dart opening Vrv (14 cm) and put point U. From point C through point Y to the right we draw an arc 
Undercut solution. From point Y, along the drawn arc, we plot the difference between the measurements of the half-circumference of the second CgII (60 cm) minus the half-girth of the first CgI (53 cm) and set the point Y1.
УУ1 = 60 - 53 = 7 cm.
This construction can be conveniently done using a compass. To do this, draw an arc from point Y with a radius of 7 cm to the intersection with the previously constructed arc.
At the intersection we place point U1.
From point Ts1 through point U1 we draw a straight line, on which we lay off a segment equal to segment Ts1P2, and put point P3:
Ts1P3= Ts1P2. 
Front shoulder height. On the straight line T10G5, extending it upward, set aside the taken measurement of the height of the front shoulder Vpp (35.5) and set point P4.
Auxiliary armhole points. From point G5 up we put aside 1/4 of the segment G5P4 (4.65 cm) and put point O3. Point O3 is a control mark when threading the sleeve into the armhole. From point O3 with a compass through point P4 to the right we draw an arc of radius O3 P4. 
Shaping the shoulder line. From point P3 we draw an arc with a radius equal to: the taken measurement of the length of the shoulder Dpl (13.5 cm) minus the distance P5P2 (4.5 cm) to the intersection with the previously constructed arc. At the intersection we place point P5.
P3P5=13.5-4.5=9cm.
Connect points P3 and P5 with a straight line. 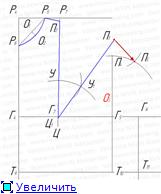
Design of the armhole line.
We connect points P5, O3 and G6 with a smooth curve as shown in Fig. 37.
Side line. From point T11 to the left we set aside 1.5 cm and place point T12. We connect points T12 and G6. 
Waist line design. From point T12 we put 1cm upward and place point T13. We connect points T13 and T9 with a smooth curve. ![]()
Construction of the side line in the hip area and the bottom line of the front.
From point B6 to the right we set aside half the difference between the measurements of the half-girth of the hips Sb and the half-girth of the chest of the second CgII with allowances for a loose fit:
B6B7 = (Cb+3cm) -(CgII+4cm): 2 = 65–64: 2 = 0.5cm, and put point B7:
We connect points T13 and B7 with a smooth curve. From point B7, draw a vertical line down and at the intersection with the bottom line we place point H3. From point H2 we put 2 cm down and put point H4. We connect points H4 and H3 with a smooth curve, thus creating a bottom line (This is a straight dress). You can widen the bottom of the dress slightly towards the bottom. How to do this, see the pattern for size 54, section “Bottom Front Width” 
This post is dedicated to curvy women. We will look at and learn how to build patterns using several methods that are used when sewing clothes for overweight women. Here are used step by step instructions constructing drawings of the basis of the dress, sleeves, etc.
As an example, in the first option we will take measurements that correspond to size 54 (chest girth 108 cm), so to speak, for women of average size. In the second option, we use, as an example, measurements corresponding to size 60 (chest girth 120cm), for women with more curvy figures. In both cases, we create patterns for the base for a dress with a semi-fitting silhouette, and accordingly, we take into account the allowance for a loose fit along the lines of the chest, waist and hips.
You take measurements from your figure or from the figure of the person for whom you will sew the dress.
In any case, we recommend that after constructing the drawing and making the pattern, test it on something simple. For example, sew a robe from cheap fabric. If you are not at all sure, use an old sheet or other item that has served its time for sewing.
As a parting word: I wish you courage in your endeavors, perseverance, perseverance and patience in achieving your goal. Step by step, moving forward, you will overcome the path to perfection.
We use step-by-step instructions for constructing drawings to demonstrate and convince you that in fact everything is not as complicated as it might seem at first glance. When you look at a finished drawing of a base pattern and have never encountered anything like this before, you may get the impression that all this is incredibly complicated and almost impossible. However, I note that the impossible is most often just something that we have not tried to do yet. Good luck!
SEMI-FITTING DRESS FOR WOMEN OF MEDIUM FITTING (for example, size 54)
There are some differences in the proposed methods in the methods of taking measurements, in the number of measurements, in the names of measurements, etc. In this technique, the procedure for taking measurements is as follows: 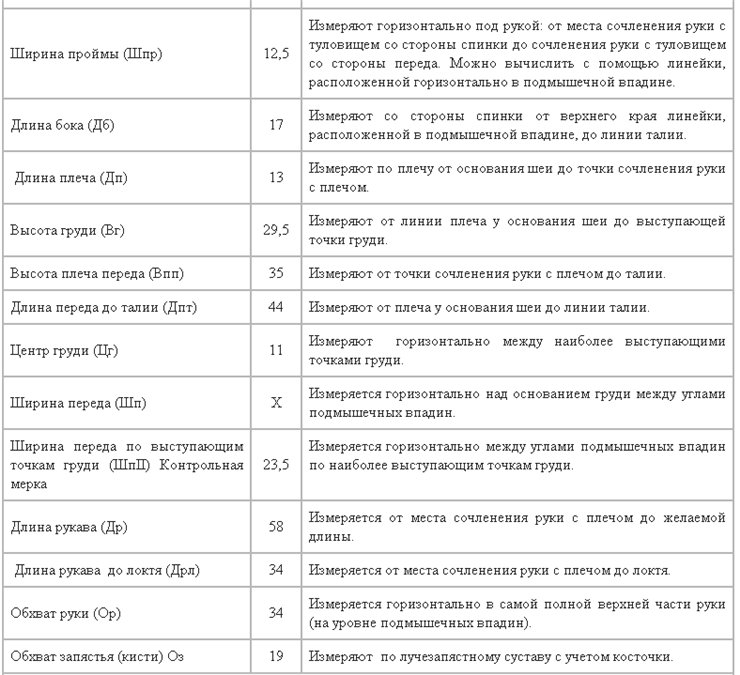
Let's start building.
Dress length.
From point P downwards we put aside the taken measurement of the length of the dress Di (100 cm) and put point H.
Armhole depth.
From point P downwards we put aside the taken measurement of the depth of the armhole (Gpr = 21 cm) and set point G.
Waistline.
From point P downwards we put the taken measurement of the length of the back to the waist (Dst = 39 cm) and put the point T.
Hip line.
From point T downwards, 18 - 19 cm are usually deposited. We will take the average value of 18.5 cm and place point B.
From points G, T, B and H to the left at right angles we draw horizontal lines: the depths of the armhole, waist, hips and bottom.
Back width.
From point G to the left, set aside the taken measurement of the back width Шс (19.5) plus 0.5 cm (increase for loose fit) and place point G1:
GG1 = Shs + 0.5 = 19.5 + 0.5 = 20 cm.
Distance to the sideline.
From point G1 to the left we set aside half of the taken measurement of the width of the armhole Shpr (12.5) minus 1 cm and set point G2:
G1 G2 = Shpr: 2 – 1 = (12.5: 2)-1 = 5.25 cm.
From point G2 downwards we draw a straight line and at its intersection with the lines of the waist and hips we place points T2 and B1.
Sprout width.
From point P to the left we set aside 1/3 of the half-circumference of the neck Ssh (19 cm) plus 1 cm and place point P1:
PP1 = 1/3 Ssh +1 = 19:3+1=7.3 cm.
Sprout height.
From point P1 up, we set aside the difference between the measurements of the height of the sprout BP (41 cm) and the length of the back to the waist Dst (39 cm) and set point P2:
Р1Р2 = Вр – Дст = 41 – 39 = 2 cm.
We connect points P and P2 with a concave smooth curve. We get the line of the back neckline (the sprout line).
Back height.
From point T1 upward we set aside the taken measurement of the height of the shoulder of the backrest Vps (36 cm) and set point P.
From point G1 upward we set aside 1/3 of the distance of the segment G1P and put point O. Using a compass from point O we draw an arc to the left through point P.
Shoulder length.
From point P2 as from the center, with a radius equal to 15 cm (measurement of shoulder length Dp (13 cm) plus 2 cm for the dart), draw an arc until it intersects with a previously constructed arc (see Fig. 12). At the intersection of the two arcs we place point P1.
Р2П1=13+2=15cm.
We connect points P2 and P1.
By connecting points P1, O and G2 with a smooth curve, as shown in Figure 12, we complete the construction of the back armhole.
Back shoulder dart.
From point P2 to the left on line P2P1 we set aside 1/3 of the taken measurement of the length of the shoulder Dp and place point B;
Р2В=13:3=4.3 cm.
From point B down, draw a vertical line 8 cm long and place point B1.
From point B to the left along the line Р2П1 we set aside 2 cm and place point B2. From point B1 through point B2 we draw a line 8 cm long and place point B3. We connect points B3P1 with a straight line and get the back shoulder line.
Lateral line of the back.
From point T2 to the right we set aside 2 cm and place point T3. We connect points T3 and G2.
Waist line design.
From point T3 upward we set aside 1 cm and place point T4, points T4 and T are connected with a smooth curve (see figure)
From point B1 to the left we set aside 1/2 of the difference between the measurements of the semi-circumference of the hips C6 with an increase for a loose fit (60+3=63 cm) and the second semi-circumference of the chest CgII with an increase for a loose fit (54+4=58 cm) and set point B2:
B1, B2 = (63-58) : 2 = 2.5 cm. We connect points G4 and B2 with a smooth curve.
Width of the bottom of the back.
From point H to the left we set aside a value that is equal to the width of the back along the hip line (see drawing, this is distance BB2) plus 2-3 cm and place point H1. We connect points H1 and B2 with a straight line. From point H1 we put 1cm upward and place point H2. We connect points H2 and H with a smooth curve.
Back dart.
Divide the distance GG1 in half and put point G3. From point G3 downwards we draw a vertical line and at its intersection with the waist line we put point T5, with the line of the hips - point B3. From point G3 we put 4 cm down and put point B4, and from point B3 up - 3 cm and put point B4.
Depth of dart.
From point T5 to the right and left along the waist line, set aside 1 cm and put points T6 and T7, which we connect to points B4 and B4 (see figure).
The construction of the back is completed
Before
We continue the bottom line of the backrest HH1 to the left. From point H1 we set aside approximately 45-50 cm and place point H3. From point H3, draw a vertical line upward. From points G2, T2, B2 to the left we draw horizontal lines until they intersect with the vertical. The points of intersection with the vertical line are designated G4, T8, B5, respectively.
Front width.
From point G4 to the right we set aside the taken measurement of the half-circumference of the chest of the second CgII with an increase for a loose fit (54 + 4) minus the width of the back with an increase (according to the drawing GG1 = 20 cm) and minus the width of the armhole (the measurement taken is 12.5 cm) and set point G5 :
G4G5=58-20-12.5=25.5 cm.
Through point G5 we draw a vertical line down, at the intersection of which with the waist line we place point T9.
Distance to the sideline. From point G5 to the right we set aside half the width of the armhole Shpr (12.5) plus 1 cm and place point G6:
G5G6 = 12.5:2+1=7.25 cm.
From point G6 downwards we draw a vertical line and at its intersection with the horizontal lines we place points T10 and B6.
Front height.
From point T8 up we put aside the taken measurement of the length of the front to the waist Dpt (44 cm) and put point P3
Neck width.
From point P3 to the right we draw a horizontal line and on it we put aside 1/3 of the half-circumference of the neck Ssh! (19 cm) plus 1 cm and put point P4:
Р3Р4=19:3+1=7.3 cm.
Neck depth.
From point P3 downwards we set aside 1/3 of the half-circumference of the neck Ssh (19 cm) plus 1.5 cm and place point P5:
Р3Р5 = 19:3+1.5=7.8 cm.
We connect points P4 and P5 with a straight line, divide it in half and designate the middle as point O1. From point O1 down at a right angle we set aside 1.25 cm and put point 02. We connect points P5, 02 and P4 with a smooth curve and get the line of the neck of the shelf.
Center of the chest.
From point G4 to the right we set aside the taken measurement of the center of the chest Cg (11 cm) and set point G7. We connect points P4 and G7.
Chest height.
From point P4 down, extending the line P4G7, set aside the taken measurement of chest height Bg (29.5 cm) and place point C.
End of dart.
Along the same line from point C up, we set aside 2.5 cm and place point C1. The chest dart ends at this point.
The size of the tuck opening.
From point C up, we put aside the taken measurement of the size of the dart opening Brv (12 cm) and set point U. From point C, as from the center, through point Y we draw an arc to the right.
Opening the dart.
From point Y on the drawn arc we plot the difference between the measurements of the half-chest girth of the second CgII (54 cm) and the half-chest girth of the first CgI (49 cm) and set point U1.
УУ1 = СгII – СгI = 54 - 49 = 5 cm You can make this construction using a compass. From point Y, as from the center, draw an arc with a radius of 5 cm until it intersects with the previously constructed arc. Designate the intersection point as U1.
We draw a straight line through points C1 and U1, continuing it upward by an amount that is equal to the distance C1P4 and place point P2:
Ts1P2 = Ts1P4.
Front shoulder height.
On straight line T9G5, extending it upward, from point T9 we set aside the taken measurement of the height of the front shoulder of the runway (35 cm) and set point P3.
Auxiliary armhole point.
From point G5 upward we set aside 1/4 of the distance G5P3 (4.5 cm) and set point 03. Point 03 is a control point. When threading the sleeve into the armhole, it connects to the mark on the sleeve at point O (see drawing of the sleeve below)
From point 03 with a compass through point P3 we draw an arc to the right.
Shoulder length. From point P2, as from the center, with a radius equal to the taken measurement of the length of the shoulder Dpl, (in our case 13 cm), we draw an arc until it intersects with the previously constructed arc and set point P4. Points P4, 03 and
We connect G6 with a smooth curve, thereby completing the construction of the front armhole.
Side line front.
From point T10 to the left we set aside 1.5 cm and place point T11. We connect points G6 and T11 with a straight line.
Waist line design.
From point T11 we set aside 1 cm upward and place point T12. We connect points T8 and T12 with a smooth curve.
Formation of the lateral line in the hip area.
From point B6 to the right we set aside 1/2 of the difference between the measurements of the semi-circumference of the hips Sb with an increase for a loose fit (60+3=63 cm) and the second semi-circumference of the chest CgII with an increase for a loose fit (54+4=58 cm) and set point B7:
B6 B7 = (63-58): 2 = 2.5 cm.
We connect points T12 and B7 with a smooth curve.
Front bottom width.
From point H3 to the right we set aside a value that is equal to the width of the front along the hip line (see drawing, this is distance B5B7), plus 2-3 cm and place point H4. We connect points B7 and H4 with a straight line. From point H4 we set aside 1 cm upward and place point H5.
Lengthening the front.
From point H3 we put 2 cm down and put point H6. We connect points H6 and H5 with a smooth curve.
Construction of a dart.
Divide the distance G7G5 in half and set point G8. From point G8 downwards we draw a vertical line, and at the intersection with the lines of the waist and hips we place points T13 and B8. From point G8 we put 6 cm down, and from point B8 up - 2 cm and put points B5 and B9.
Recess depth.
From point T13 to the right and left we set aside 1.25 cm and put points T14 and T15, which we connect to points B5 and B9. (See Fig.)
The construction is complete.
But before you start cutting, don’t be too lazy to take a centimeter and check the basic measurements again. Pay special attention to the waist circumference, since in this method, when constructing darts along the waist line, not a calculated value is used, but a constant. If, when checking, you find significant discrepancies between the figure and the drawing (specifically in the waist circumference), they can be easily eliminated by reducing or increasing the opening of the darts along the waist line.
This is a basic dress pattern drawing - a guide for creating a wide variety of patterns. Before you start modeling, you need to check the pattern, “fit” it to the figure, and make adjustments if necessary. And only after you are completely sure that everything is in order, you can safely begin to create.
And remember, the one who walks will master the road!
Single-seam sleeve pattern for size 54.
To create a sleeve pattern you will need the following measurements:
Reminder: this is the basis (pattern), which can and should be changed if desired or necessary: sleeve length, hemline configuration, width (by increasing or decreasing the allowance for a loose fit), etc.
Constructing a drawing of a single-seam sleeve pattern.
Stepping back 7-8 centimeters from the left edge of the sheet, draw a right angle with the vertex at point A.
The length of the sleeve. From point A downwards we put aside the taken measurement of sleeve length D (58 cm) and put point H.
Height of the rim. From point A we put 15.5 cm down (you will have a different figure, read on) and put point G. We get this figure by making the following calculations: (refer to the drawing of the dress base pattern for size 54, and you take similar data from your drawing): the height of the front armhole is the distance G5P3 (17 cm) plus the height of the back armhole is the distance G1P (18 cm), divide in half and subtract 2 cm: AG = (17 + 18) : 2 - 2 cm = 15.5 cm.
Elbow line. From point A, we put down the taken measurement of the length of the sleeve to the elbow DRL (34 cm) and put point L. From points G, L and H, we draw horizontal lines to the right and left.
Front roll height. From point G up, we put aside a value that is equal to the segment G503 (4.25 cm) in the armhole of the front of the dress (see the drawing of the pattern for the base of the dress 54 rub.) and put point O. Point O is the control point when threading the sleeve into the armhole. We connect it with the armhole of the dress at point O3.
Width of the upper part of the sleeve. From point G to the right we set aside a value that is equal to the measurement of arm circumference with an increase for loose fit, divided in half (34 + 8 = 42 cm), and set point G1:
G G1 = 42:2 = 21 cm.
Through point G1 we draw a vertical line up and down and at its intersection with the horizontal lines we place points A1 and L1.
Front roll width. From point G to the left we set aside 6 cm, from point L - 4.5 cm, and from point H - 4 cm and accordingly set points G2, L2, H1. We connect points G2, L2 and H1 as shown in Fig.
Width of the elbow roll. From point G1 to the right we set aside the value that we obtain by the following calculations: distance G G1 (21 cm) minus distance G G2 (6 cm) and set point G3:
G1G3=21-6=15 cm.
From point G3 we draw a vertical line down, at the intersection of it with the horizontal lines we put points L3 and H2, from which we put 2 cm to the left and put points L4 and H3. We connect points G3, L4 and H3.
Decoration of the okat. We divide line AA1 in half and mark the middle with point C. From point C, set aside 1 cm to the right and place point P. Point P is the control point when basting the sleeve into the armhole; it is aligned with the shoulder seam of the dress. From point P downwards we draw a straight line and at its intersection with the line G2G3 we place point G4.
From point A downwards we set aside 1/3 of the distance AG and place point O1:
A01 = 15.5:3 = 5.2 cm.
From point O1 to the right we draw a horizontal line and at its intersection with the vertical lines we place points O2 and O3. From point O1 to the right we set aside 1/3 of the distance O1O2 (3.8 cm) and place point O4.
Point C is connected to point O4, and point P is connected to point O3. We divide the resulting segments in half and mark the middle with points O5 and O6. From points O5 and O6 up at a right angle, we put 1 cm aside and put points O7 and O8.
From point G3 to the left we set aside 3 cm and place point G5. We connect points O3 and G5 with a straight line. This is an auxiliary line for constructing an okat.
By connecting points G2, O, O4, O7, and C, as well as points P, O8, O3 and G3 with a smooth curve, as shown in Figure 11, we form the sleeve cap.
Elbow line. From point L1 to the left we set aside 1.5 cm and place point L5, from which we draw a vertical line down and at its intersection with the bottom line we place point H4.
Sleeve bottom design. From point H we set aside 3 cm upward, from H1 - 2 cm, from H3 - 1 cm and place points H5, H6 and H7 respectively. We connect points H5 and H6 with a straight line. We connect points H5, H4 and H7 with a smooth curve.
Construction of a dart. For a full arm, it is recommended to make a dart in the middle of the sleeve cap.
From point P downwards we set aside the length of the dart (9 cm) and place point B. From point P to the right and left along the sleeve hem we set aside the depth of the dart (1.5 cm each) and draw a smooth curved line of the dart, as shown in Figure 14. The main thing is to achieve so that these lines are the same.
The sleeve, depending on the style, can be straight or with a dart along the bottom line. To construct a dart, measure the circumference of your wrist. The difference between the width of the bottom of the sleeve and the measurement of the wrist circumference with an increase for a loose fit (19 + 7 = 26 cm) is set aside for the dart 38 - 26 = 12 cm. We divide this value in half, set aside 6 cm from point H4 to the left and right and put points H8 and H9, which we connect to point L5 with a smooth curve.
The pattern is ready.
The one-seam sleeve pattern drawing is used for all sizes.
You can download all the drawings in one file.
Dress pattern size 60. Step-by-step instructions for creating a pattern.
To create a pattern drawing, you need to take the following measurements:
Recommendation: Take correct measurements. The entire result of your efforts will depend on this.
To take measurements more accurately, it is necessary to mark the starting points: the seventh cervical vertebra, which is clearly defined when the head is tilted, as well as the shoulder line at the base of the neck and at the junction of the arm and shoulder. Use pins or chalk for this if the woman is dressed. If you need to put a dot on the body, use a felt-tip pen, which can be easily erased with an alcohol-containing liquid after completing this procedure.
It’s good if the person you’re taking measurements from is wearing a thin dress, or better yet, only underwear. He, or rather she, since we are talking about a woman, should stand straight, without tension, i.e. maintain your normal posture. This is exactly what I draw your attention to. Because often when taking measurements or trying on, a woman, especially if she sees her reflection in the mirror, wanting to look slimmer, tightens her stomach, straightens her back, etc. The desire to look better is a good aspiration, but when taking measurements it can distort the real state of things. And a well-fitting dress when trying on, in everyday life will not be as comfortable as we would like, and as it should be.
Therefore, taking into account the above, turn the client away from the mirror, distract him with a peaceful conversation, tie a cord around his waist, mark the starting points and start measuring.
As an example, we took measurements corresponding to size 60 and when constructing all calculations will be based on the measurements given in the table below.
Be careful that you substitute your own values into all formulas when calculating.
The experience of using this method of constructing patterns suggests that an excellent result is easy to achieve under one condition: you need to take measurements accurately and diligently. The outcome of all further work depends on this.
CONSTRUCTION OF A SEMI-ADJECT DRESS PATTERN. Size 60
Draw a right angle with the vertex at point P in the right corner of the prepared sheet of paper (Fig. 1).
Dress length.
From point P downwards we put aside the taken length of the dress Di (102 cm) and put point H (Fig. 1).
Armhole depth. From point P downwards we put aside the taken measurement of the depth of the armhole Gpr (23 cm) and set point G.
Back length to waist. From point P downwards we put the taken measurement of the length of the back to the waist Dst (40 cm) and put the point T.
The length of the dress is up to the hip line. From point T downward, 18–20 cm is usually deposited. We will take the average value of 19 cm and place point B. From points G, T, B and H to the left we draw horizontal lines for the depth of the armhole, waist, hips and bottom.
Midline of the back. From point P to the left we set aside 1 cm and place point P1 (back bevel). We divide the segment RG in half and designate the middle with the letter L. We connect points P1 and L with a smooth curve. From point T to the left we set aside 1.5 cm and place point T1. Points G, T1 and B are connected by a smooth curve, as shown in Fig.
Back width. From point G to the left, set aside the taken measurement of the width of the back Шс plus 0.5 cm (increase for loose fit) and place point G1:
GG1 = 21 + 0.5 = 21.5 cm.
We draw a vertical line through point G1 up and down, and at the intersection with the waist line we place point T2.
Distance to the side line (to the side seam). From point G1 to the left we set aside 1/2 of the width of the armhole Shpr (14cm) minus 1cm and place point G2:
G1 G2=14:2-1=6cm.
The distance to the side line can vary, it depends on the figure and style. If the figure is with a protruding belly, then the lateral line is located closer to the back, and if the figure is with protruding buttocks, then closer to the front. And, of course, the side line can be in the middle of the armhole.
From point G2 downwards we draw a vertical line to the line of the hips and at the intersection with the lines of the waist and hips we place points T3 and B1.
Sprout width. From point P1 to the left we set aside 1/3 of the half-circumference of the neck Сш (21 cm) plus 1 cm and place point P2:
Р1Р2=21:3+1=8cm.
Sprout height. From point P2 up, we set aside the difference between the measurements of the height of the sprout BP (42 cm) and the length of the back to the waist Dst (40 cm) and set point P3:
Р2Р3 =42-40=2cm.
We connect points P3 and P1 with a smooth curve.
Back shoulder height. From point T2 up, we put aside the taken measurement of the height of the shoulder of the backrest Vps (36 cm) and put point P
An auxiliary point for designing an armhole. From point G1 upward we set aside 1/3 of the segment PG1 and place point O. From point O with a compass through point P, draw an arc.
Shoulder length. From point P3, using a compass (with a radius equal to the shoulder length taken plus 2.5 cm for the undercut), make a mark on the previously constructed arc and place point P1:
Р3П1=13.5+2.5=16cm.
We connect points P3 and P1 with a straight line.
We draw the line of the back armhole. We connect points P1, O and G2 with a smooth curve as shown in Fig.
Shoulder dart. Along the line P3P1, from point P3 to the left, we set aside 1/3 of the taken measurement of the shoulder length and place point B:
Р3В =13.5:3=4.5 cm.
From point B down parallel to the RL line, draw a straight line 9 cm long and place point B1.
From point B to the left we set aside 2.5 cm and place point B2. From point B1 through point B2 we draw a line 9 cm long and place point B3. We connect point B3 to point P1.
Lateral line of the back. From point T3 to the right we set aside 2 cm and place point T4, which we connect to point G2.
Design of the waist line. From point T4 we put 1cm upward and place point T5. We connect points T5 and T1 with a smooth curve.
Constructing the lateral line of the back in the hip area. From point B1 to the left we set aside half the difference between the measurements of the half-girth of the hips Sb and the half-girth of the chest of the second CgII with allowances for a loose fit:
B1B2 = (Cb+3cm) -(CgII+4cm): 2 = 65–64: 2 = 0.5cm. And put point B2
We connect points T5, B2 with a smooth curve. From point B2 downwards we draw a vertical line and at the intersection with the bottom line we place point H1. (This is a straight dress). You can widen the bottom of the dress slightly towards the bottom. How to do this, see the pattern for size 54, section Bottom back width.
Construction of a dart. From point G1 to the right we set aside 1/3 of the width of the back (7cm) and place point G3 (this distance may vary). From point G3 downwards we draw a straight line and at its intersection with the lines of the waist and hips we place points T6 and B3, respectively. From point G3 we put 4 cm down and put point B4, and from point B3 up - 3 cm and put point B4.
Depth of dart. Along the waist line from point T6 to the left and right we set aside 1 cm and put points T7 and T8, which we connect to points B4 and B4.
The construction of the back is completed.
Before.
From points G2, T3, B1 and H1 to the left we draw horizontal lines: the depths of the armhole, waist, hips and bottom, put approximately 50 cm on them and place points G4, T9, B5 and H2 respectively. Through these points up and down we draw a vertical line.
Front width. From point G4 to the right we set aside the distance that we obtain as a result of the following calculation: the taken measurement of the half-circumference of the chest of the second CrII (60 cm) plus 4 cm for a loose fit, minus the width of the back according to the drawing (21.5 cm) and minus the taken measurement of the width of the armhole Shpr (14 cm ) let's set point G5:
G4G5 = 64-21.5-14 = 28.5 cm.
Through point G5 we draw a vertical line down and at its intersection with the waist line we place point T10.
We check the width of the front by taking the width of the front at the protruding points of the chest (ШпII). The width of the front in the drawing should be greater than the measurement taken, so that it does not turn out that the product is narrowed.
Distance to the sideline. From point G5 to the right we set aside half of the taken measurement of the armhole width Shpr (14 cm) plus 1 cm and set point G6, from which we draw a vertical line down and at the intersection of it with the lines of the waist and hips we put points T11 and B6.
G5 G6=14:2+1=8cm ![]()
Front height. From point T9 up, we put aside the taken measurement of the length of the front to the waist Dpt (47 cm) and put point P4. From point P4. draw a horizontal line to the right.
Neck width. From point P4 to the right we set aside 1/3 of the half-circumference of the neck Ssh (21 cm) plus 1 cm and place point P5:
Р4Р5 = 21:3+1=8cm.
Neck depth. From point P4 downwards we set aside 1/3 of the half-circumference of the neck Ssh (21 cm) plus 1.5 cm and place point P6:
Р4Р6 =21:3+1.5=8.5 cm.
We connect points P5 and P6 with a straight line, divide it in half and mark the middle with point O1. From point O1 at a right angle downward we set aside 1.5 cm and place point O2. We connect points P5, O2 and P6 with a smooth curve and get a neck line.
Shoulder length to dart. From point P5 to the right we set aside 1/3 of the taken measurement of shoulder length Dpl (13.5) and place point P7:
P5P7 = 13.5:3 = 4.5 cm.
Center of the chest. From point G4 to the right we set aside the taken measurement of the center of the chest Cg (12 cm) and set point G7. We connect points P7 and G7.
Shoulder bevel. From point P7 we put 1 cm down and put point P2. We connect points P5 and P2.
Chest height. From point P7 downwards we set aside the taken measurement of chest height Bg (33 cm) and place point C.
End of dart. From point C up, set aside 2.5 cm and place point C1.
The size of the tuck opening. From point C up, we put aside the taken measurement of the size of the dart opening Vrv (14 cm) and put point U. From point C through point Y to the right we draw an arc
Undercut solution. From point Y, along the drawn arc, we plot the difference between the measurements of the half-circumference of the second CgII (60 cm) minus the half-girth of the first CgI (53 cm) and set the point Y1.
УУ1= 60 - 53 = 7 cm.
This construction can be conveniently done using a compass. To do this, draw an arc from point Y with a radius of 7 cm to the intersection with the previously constructed arc.
At the intersection we place point U1.
From point Ts1 through point U1 we draw a straight line, on which we lay off a segment equal to segment Ts1P2, and put point P3:
Ts1P3= Ts1P2.
Front shoulder height. On the straight line T10G5, extending it upward, set aside the taken measurement of the height of the front shoulder Vpp (35.5) and set point P4.
Auxiliary armhole points. From point G5 up we put aside 1/4 of the segment G5P4 (4.65 cm) and put point O3. Point O3 is a control mark when threading the sleeve into the armhole. From point O3 with a compass through point P4 to the right we draw an arc of radius O3 P4.
Shaping the shoulder line. From point P3 we draw an arc with a radius equal to: the taken measurement of the length of the shoulder Dpl (13.5 cm) minus the distance P5P2 (4.5 cm) to the intersection with the previously constructed arc. At the intersection we place point P5.
P3P5=13.5-4.5=9cm.
Connect points P3 and P5 with a straight line.
Design of the armhole line.
We connect points P5, O3 and G6 with a smooth curve as shown in Fig. 37.
Side line. From point T11 to the left we set aside 1.5 cm and place point T12. We connect points T12 and G6.
Waist line design. From point T12 we put 1cm upward and place point T13. We connect points T13 and T9 with a smooth curve. ![]()
Construction of the side line in the hip area and the bottom line of the front.
From point B6 to the right we set aside half the difference between the measurements of the half-girth of the hips Sb and the half-girth of the chest of the second CgII with allowances for a loose fit:
B6B7 = (Cb+3cm) -(CgII+4cm): 2 = 65–64: 2 = 0.5cm, and put point B7:
We connect points T13 and B7 with a smooth curve. From point B7, draw a vertical line down and at the intersection with the bottom line we place point H3. From point H2 we put 2 cm down and put point H4. We connect points H4 and H3 with a smooth curve, thus creating a bottom line (This is a straight dress). You can widen the bottom of the dress slightly towards the bottom. How to do this, see the pattern for size 54, section “Bottom Front Width”
Construction of a groove. We divide the segment G5G7 in half and put point G8, from which we draw a straight line down and at the intersection with the horizontal lines we put points T14 and B8. From point G8 we put 6 cm down, and from point B8 up - 3 cm and put points B5 and B9.
From point T14 to the right and left we set aside 1.25 cm and put points T15 and T16, which we connect to points B5 and B9.
For full figures, starting from size 60 and above, it is necessary to draw a front deflection line on the pattern. To do this, set aside 1-1.5 cm from point B5 to the left (depending on the bulge of the abdomen) and place point B10. We connect points P6 and B10 with a straight line, extending it to the bottom line. The drawn line is the middle of the front.
The construction is complete. But before you start cutting, don’t be too lazy to take a centimeter and check the basic measurements again. Pay special attention to the waist circumference, since in this method, when constructing darts along the waist line, not a calculated value is used, but a constant. If, when checking, you find significant discrepancies between the figure and the drawing (specifically in the waist circumference), they can be easily eliminated by reducing or increasing the opening of the darts along the waist line. 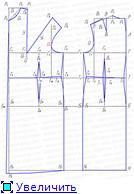
This is a drawing of a pattern for the base of a dress - the basis for creating a wide variety of models. Before you start modeling, you need to check the pattern, “fit” it to the figure, and make adjustments if necessary. And only after you are completely sure that everything is in order, you can safely begin to create.
And as a bonus, 2 more patterns for modeling festive dresses.
Pattern evening dress.
The first model of an evening dress for obese women has a corsage silhouette, eliminating unnecessary folds and giving the figure the required form, and has lace inserts that also mask problem areas. And here is the pattern of this dress: 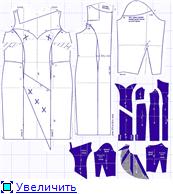
Cocktail dress pattern.
This model of dress, now no longer evening, but daytime - cocktail, also has a corsage silhouette, for the same purposes. In addition, the skirt part of this dress is made with very, very lush folds, which will also distract attention. And designer jewelry will help you look especially amazing! Below is the pattern for this cocktail dress. 
And now some ideas for inspiration!!! All models are presented from designer fashion houses. The cost of these dresses is from $150 and above.
To draw a pattern drawing, you need to take your measurements correctly.
The entire result of your efforts will depend on this.
To take measurements more accurately, it is necessary to mark the starting points: the seventh cervical vertebra, which is clearly defined when the head is tilted, as well as the shoulder line at the base of the neck and at the junction of the arm and shoulder. Use pins or chalk for this if the woman is dressed. If you need to put a dot on the body, use a felt-tip pen, which can be easily erased with an alcohol-containing liquid after completing this procedure.
It’s good if the person you are taking measurements from is wearing a thin dress, or better yet, only underwear. He, or rather she, since we are talking about a woman, should stand straight, without tension, i.e. maintain your normal posture. This is exactly what I draw your attention to. Because often when taking measurements or trying on, a woman, especially if she sees her reflection in the mirror, wanting to look slimmer, tightens her stomach, straightens her back, etc. The desire to look better is a good aspiration, but when taking measurements it can distort the real state of things. And a well-fitting dress when trying on, in everyday life will not be as comfortable as we would like, and as it should be.
Therefore, taking into account the above, turn the client away from the mirror, distract him with a peaceful conversation, tie a cord around his waist, mark the starting points and start measuring.
There are some differences in the proposed methodsin the methods of taking measurements, in the number of measurements, in the names of measurements, etc. In this technique, the procedure for taking measurements is as follows:
Let's start building.
Draw a right angle with the vertex at point P in the right corner of the prepared sheet of paper (Fig. 1).
Dress length.
From point P downwards we put aside the taken measurement of the length of the dress Di (100 cm) and put point H.
Armhole depth.
From point P downwards we put aside the taken measurement of the depth of the armhole (Gpr = 21 cm) and set point G.
Waistline.
From point P downwards we put the taken measurement of the length of the back to the waist (Dst = 39 cm) and put the point T.
Hip line.
From point T downwards, 18 - 19 cm are usually deposited. We will take the average value of 18.5 cm and place point B.
From points G, T, B and H to the left at right angles we draw horizontal lines: the depths of the armhole, waist, hips and bottom.
Back width.
From point G to the left, set aside the taken measurement of the back width Шс (19.5) plus 0.5 cm (increase for loose fit) and place point G1:
GG1 = Shs + 0.5 = 19.5 + 0.5 = 20 cm.
Distance to the sideline.
From point G1 to the left we set aside half of the taken measurement of the width of the armhole Shpr (12.5) minus 1 cm and set point G2:
G1 G2 = Shpr: 2 - 1 = (12.5: 2)-1 = 5.25 cm.
From point G2 downwards we draw a straight line and at its intersection with the lines of the waist and hips we place points T2 and B1.
Sprout width.
From point P to the left we set aside 1/3 of the half-circumference of the neck Ssh (19 cm) plus 1 cm and place point P1:
PP1 = 1/3 Ssh +1 = 19:3+1=7.3 cm.
Sprout height.
From point P1 up, we set aside the difference between the measurements of the height of the sprout BP (41 cm) and the length of the back to the waist Dst (39 cm) and set point P2:
Р1Р2 = Вр - Дст = 41 - 39 = 2 cm.
We connect points P and P2 with a concave smooth curve. We get the line of the back neckline (the sprout line).
Back height.
From point T1 upward we set aside the taken measurement of the height of the shoulder of the backrest Vps (36 cm) and set point P.
From point G1 upward we set aside 1/3 of the distance of the segment G1P and put point O. Using a compass from point O we draw an arc to the left through point P.
Shoulder length.
From point P2 as from the center, with a radius equal to 15 cm (measurement of shoulder length Dp (13 cm) plus 2 cm for the dart), draw an arc until it intersects with a previously constructed arc (see Fig. 12). At the intersection of the two arcs we place point P1.
Р2П1=13+2=15cm.
We connect points P2 and P1.
By connecting points P1, O and G2 with a smooth curve, as shown in Figure 12, we complete the construction of the back armhole.
Back shoulder dart.
From point P2 to the left on line P2P1 we set aside 1/3 of the taken measurement of the length of the shoulder Dp and place point B;
Р2В=13:3=4.3 cm.
From point B down, draw a vertical line 8 cm long and place point B1.
From point B to the left along the line Р2П1 we set aside 2 cm and place point B2. From point B1 through point B2 we draw a line 8 cm long and place point B3. We connect points B3P1 with a straight line and get the back shoulder line.
Lateral line of the back.
From point T2 to the right we set aside 2 cm and place point T3. We connect points T3 and G2.
Waist line design.
From point T3 upward we set aside 1 cm and place point T4, points T4 and T are connected with a smooth curve (see figure)
From point B1 to the left we set aside 1/2 of the difference between the measurements of the semi-circumference of the hips C6 with an increase for a loose fit (60+3=63 cm) and the second semi-circumference of the chest CgII with an increase for a loose fit (54+4=58 cm) and set point B2:
B1, B2 = (63-58) : 2 = 2.5 cm. We connect points G4 and B2 with a smooth curve.
Width of the bottom of the back.
From point H to the left we set aside a value that is equal to the width of the back along the hip line (see drawing, this is distance BB2) plus 2-3 cm and place point H1. We connect points H1 and B2 with a straight line. From point H1 we put 1cm upward and place point H2. We connect points H2 and H with a smooth curve.
Back dart.
Divide the distance GG1 in half and put point G3. From point G3 downwards we draw a vertical line and at its intersection with the waist line we put point T5, with the line of the hips - point B3. From point G3 we put 4 cm down and put point B4, and from point B3 up - 3 cm and put point B4.
Depth of dart.
From point T5 to the right and left along the waist line, set aside 1 cm and put points T6 and T7, which we connect to points B4 and B4 (see figure).
The construction of the back is completed
Before
We continue the bottom line of the backrest HH1 to the left. From point H1 we set aside approximately 45-50 cm and place point H3. From point H3, draw a vertical line upward. From points G2, T2, B2 to the left we draw horizontal lines until they intersect with the vertical. The points of intersection with the vertical line are designated G4, T8, B5, respectively.
Front width.
From point G4 to the right we set aside the taken measurement of the half-circumference of the chest of the second CgII with an increase for a loose fit (54 + 4) minus the width of the back with an increase (according to the drawing GG1 = 20 cm) and minus the width of the armhole (the measurement taken is 12.5 cm) and set point G5 :
G4G5=58-20-12.5=25.5 cm.
Through point G5 we draw a vertical line down, at the intersection of which with the waist line we place point T9.
Distance to the sideline. From point G5 to the right we set aside half the width of the armhole Shpr (12.5) plus 1 cm and place point G6:
G5G6 = 12.5:2+1=7.25 cm.
From point G6 downwards we draw a vertical line and at its intersection with the horizontal lines we place points T10 and B6.
Front height.
From point T8 up we put aside the taken measurement of the length of the front to the waist Dpt (44 cm) and put point P3
Neck width.
From point P3 to the right we draw a horizontal line and on it we put aside 1/3 of the half-circumference of the neck Ssh! (19 cm) plus 1 cm and put point P4:
Р3Р4=19:3+1=7.3 cm.
Neck depth.
From point P3 downwards we set aside 1/3 of the half-circumference of the neck Ssh (19 cm) plus 1.5 cm and place point P5:
Р3Р5 = 19:3+1.5=7.8 cm.
We connect points P4 and P5 with a straight line, divide it in half and designate the middle as point O1. From point O1 down at a right angle we set aside 1.25 cm and put point 02. We connect points P5, 02 and P4 with a smooth curve and get the line of the neck of the shelf.
Center of the chest.
From point G4 to the right we set aside the taken measurement of the center of the chest Cg (11 cm) and set point G7. We connect points P4 and G7.
Chest height.
From point P4 down, extending the line P4G7, set aside the taken measurement of chest height Bg (29.5 cm) and place point C.
End of dart.
Along the same line from point C up, we set aside 2.5 cm and place point C1. The chest dart ends at this point.
The size of the tuck opening.
From point C up, we put aside the taken measurement of the size of the dart opening Brv (12 cm) and set point U. From point C, as from the center, through point Y we draw an arc to the right.
Opening the dart.
From point Y on the drawn arc we plot the difference between the measurements of the half-chest girth of the second CgII (54 cm) and the half-chest girth of the first CgI (49 cm) and set point U1.
YU1 = CgII - CgI = 54 - 49 = 5 cm This construction can be done using a compass. From point Y, as from the center, draw an arc with a radius of 5 cm until it intersects with the previously constructed arc. Designate the intersection point as U1.
We draw a straight line through points C1 and U1, continuing it upward by an amount that is equal to the distance C1P4 and place point P2:
Ts1P2 = Ts1P4.
Front shoulder height.
On straight line T9G5, extending it upward, from point T9 we set aside the taken measurement of the height of the front shoulder of the runway (35 cm) and set point P3.
Auxiliary armhole point.
From point G5 upward we set aside 1/4 of the distance G5P3 (4.5 cm) and set point 03. Point 03 is a control point. When threading the sleeve into the armhole, it connects to the mark on the sleeve at point O (see drawing of the sleeve below)
From point 03 with a compass through point P3 we draw an arc to the right.
Shoulder length. From point P2, as from the center, with a radius equal to the taken measurement of the length of the shoulder Dpl, (in our case 13 cm), we draw an arc until it intersects with the previously constructed arc and set point P4. Points P4, 03 and
We connect G6 with a smooth curve, thereby completing the construction of the front armhole.
Side line front.
From point T10 to the left we set aside 1.5 cm and place point T11. We connect points G6 and T11 with a straight line.
Waist line design.
From point T11 we set aside 1 cm upward and place point T12. We connect points T8 and T12 with a smooth curve.
Formation of the lateral line in the hip area.
From point B6 to the right we set aside 1/2 of the difference between the measurements of the semi-circumference of the hips Sb with an increase for a loose fit (60+3=63 cm) and the second semi-circumference of the chest CgII with an increase for a loose fit (54+4=58 cm) and set point B7:
B6 B7 = (63-58): 2 = 2.5 cm.
We connect points T12 and B7 with a smooth curve.
Front bottom width.
From point H3 to the right we set aside a value that is equal to the width of the front along the hip line (see drawing, this is distance B5B7), plus 2-3 cm and place point H4. We connect points B7 and H4 with a straight line. From point H4 we set aside 1 cm upward and place point H5.
Lengthening the front.
From point H3 we put 2 cm down and put point H6. We connect points H6 and H5 with a smooth curve.
Construction of a dart.
Divide the distance G7G5 in half and set point G8. From point G8 downwards we draw a vertical line, and at the intersection with the lines of the waist and hips we place points T13 and B8. From point G8 we put 6 cm down, and from point B8 up - 2 cm and put points B5 and B9.
Recess depth.
From point T13 to the right and left we set aside 1.25 cm and put points T14 and T15, which we connect to points B5 and B9. (See Fig.)
The construction is complete.
But before you start cutting, don’t be too lazy to take a centimeter and check the basic measurements again. Pay special attention to the waist circumference, since in this method, when constructing darts along the waist line, not a calculated value is used, but a constant. If, when checking, you find significant discrepancies between the figure and the drawing (specifically in the waist circumference), they can be easily eliminated by reducing or increasing the opening of the darts along the waist line.
This is a basic dress pattern drawing - a guide for creating a wide variety of patterns. Before you start modeling, you need to check the pattern, “fit” it to the figure, and make adjustments if necessary. And only after you are completely sure that everything is in order, you can safely begin to create.
And remember, the one who walks will master the road!
You can download all the drawings in one file .
Single-seam sleeve pattern for size 54.
To create a sleeve pattern you will need the following measurements:
Reminder: this is the basis (pattern), which can and should be changed if desired or necessary: sleeve length, hemline configuration, width (by increasing or decreasing the allowance for a loose fit), etc.
Constructing a drawing of a single-seam sleeve pattern.
Stepping back 7-8 centimeters from the left edge of the sheet, draw a right angle with the vertex at point A.
The length of the sleeve. From point A downwards we put aside the taken measurement of sleeve length D (58 cm) and put point H.
Height of the rim. From point A we put 15.5 cm down (you will have a different figure, read on) and put point G. We get this figure by making the following calculations: (refer to the drawing of the dress base pattern for size 54, and you take similar data from your drawing): the height of the front armhole is the distance G5P3 (17 cm) plus the height of the back armhole is the distance G1P (18 cm), divide in half and subtract 2 cm: AG = (17 + 18) : 2 - 2 cm = 15.5 cm.
Elbow line. From point A, we put down the taken measurement of the length of the sleeve to the elbow DRL (34 cm) and put point L. From points G, L and H, we draw horizontal lines to the right and left.
Front roll height. From point G up, we put aside a value that is equal to the segment G503 (4.25 cm) in the armhole of the front of the dress (see the drawing of the pattern for the base of the dress 54 rub.) and put point O. Point O is the control point when threading the sleeve into the armhole. We connect it with the armhole of the dress at point O3.
Width of the upper part of the sleeve. From point G to the right we set aside a value that is equal to the measurement of arm circumference with an increase for loose fit, divided in half (34 + 8 = 42 cm), and set point G1:
G G1 = 42:2 = 21 cm.
Through point G1 we draw a vertical line up and down and at its intersection with the horizontal lines we place points A1 and L1.
Front roll width. From point G to the left we set aside 6 cm, from point L - 4.5 cm, and from point H - 4 cm and accordingly set points G2, L2, H1. We connect points G2, L2 and H1 as shown in Fig.
Width of the elbow roll. From point G1 to the right we set aside the value that we obtain by the following calculations: distance G G1 (21 cm) minus distance G G2 (6 cm) and set point G3:
G1G3=21-6=15 cm.
From point G3 we draw a vertical line down, at the intersection of it with the horizontal lines we put points L3 and H2, from which we put 2 cm to the left and put points L4 and H3. We connect points G3, L4 and H3.
This section is dedicated to curvy women. We will look at and learn how to create patterns using several methods that are used when sewing clothes for obese women. Here, as in previous lessons, we use step by step instructions constructing drawings of the basis of the dress, sleeves, etc.
As an example, in the first option we will take measurements that correspond to size 54 (chest girth 108 cm), so to speak, for women of average size. In the second option, we use, as an example, measurements corresponding to size 60 (chest girth 120cm), for women with more curvy figures. In both cases, we build patterns for the base of the dress. semi-adjacent silhouette, in accordance with this we take into account the increases for a loose fit along the lines of the chest, waist and hips.
You take measurements from your figure or from the figure of the person for whom you will sew the dress.
In any case, we recommend that after constructing the drawing and making the pattern, test it on something simple. For example, sew a robe from cheap fabric. If you are not at all sure, use an old sheet or other item that has served its time for sewing.
As a parting word: I wish you courage in your endeavors, perseverance, perseverance and patience in achieving your goal. Step by step, moving forward, you will overcome the path to perfection.
We use exactly step-by-step drawing instructions, to demonstrate and convince you that everything is actually not as complicated as it might seem at first glance. When you look at a finished drawing of a base pattern and have never encountered anything like this before, you may get the impression that all this is incredibly complicated and almost impossible. However, I note that the impossible is most often just something that we have not tried to do yet. Good luck!
SEMI-FITTING DRESS FOR WOMEN OF MEDIUM FITTING (for example, size 54)
To create a pattern drawing, you need to take the following measurements:
To take measurements more accurately, it is necessary to mark the starting points: the seventh cervical vertebra, which is clearly defined when the head is tilted, as well as the shoulder line at the base of the neck and at the junction of the arm and shoulder. Use pins or chalk for this if the woman is dressed. If you need to put a dot on the body, use a felt-tip pen, which can be easily erased with an alcohol-containing liquid after completing this procedure.
It’s good if the person you’re taking measurements from is wearing a thin dress, or better yet, only underwear. He, or rather she, since we are talking about a woman, should stand straight, without tension, i.e. maintain your normal posture. This is exactly what I draw your attention to. Because often when taking measurements or trying on, a woman, especially if she sees her reflection in the mirror, wanting to look slimmer, tightens her stomach, straightens her back, etc. The desire to look better is a good aspiration, but when taking measurements it can distort the real state of things. And a well-fitting dress when trying on, in everyday life will not be as comfortable as we would like, and as it should be.
Therefore, taking into account the above, turn the client away from the mirror, distract him with a peaceful conversation, tie a cord around his waist, mark the starting points and start measuring.
There are some differences in the proposed methods in the methods of taking measurements, in the number of measurements, in the names of measurements, etc. In this technique, the procedure for taking measurements is as follows:
Name of measurements and symbols | cm | Taking measurements |
|---|---|---|
Product length (Di) | Measure from the cervical point (seventh cervical vertebra), bringing the centimeter to the waist and to the required length. |
|
Armhole depth (Gpr) | Measure from the seventh cervical vertebra to a horizontal line drawn with a centimeter through the armpits. |
|
Back length to waist (Dst) | Measure from the seventh cervical vertebra to the waist line, taking into account the convexity of the shoulder blades. To do this, you can apply a thin ruler to the protruding points of the shoulder blades; the centimeter tape should pass over the ruler. |
|
Back width (Ws) | Measure horizontally along the shoulder blades, between the upper corners of the armpits. |
|
Half neck circumference (Ssh) | The measuring tape should run along the base of the neck, at the back above the seventh cervical vertebra, at the front above the jugular cavity (recess). |
|
Half chest girth 1st (CrI) | The measuring tape runs horizontally, at the back along the protruding points of the shoulder blades, and at the front above the base of the chest. |
|
Half chest girth 2nd (CrII) | The measuring tape runs horizontally at the back along the protruding points of the shoulder blades, and at the front along the protruding points of the chest. |
|
Recess opening size (Vrv) | Measured vertically. It is taken simultaneously with half-chest measurements. This is the distance from the base of the chest to its highest point. |
|
Half waist (St) | Measure horizontally at the narrowest point. |
|
Half hip circumference (Sb) | Measure horizontally, from the back along the protruding points of the buttocks, from the front, taking into account the bulge of the abdomen. |
|
Sprout height (Vr) | Measure along the back from the shoulder at the base of the neck to the waist line. The measuring tape runs parallel to the spine. |
|
Back shoulder height (Vps) | Measure along the back from the point where the arm meets the shoulder to the waist. |
|
Armhole width (Shpr) | Measure horizontally under the arm: from the joint of the arm with the torso on the back side to the joint of the arm with the torso on the front side. You can calculate it using a ruler placed horizontally in the armpit. |
|
Side length (db) | Measure from the back from the top edge of the ruler located in the armpit to the waist line. |
|
Shoulder Length (Dp) | Measure along the shoulder from the base of the neck to the point where the arm meets the shoulder. |
|
Chest Height (Vg) | Measure from the shoulder line at the base of the neck to the protruding point of the chest. |
|
Front shoulder height (VPP) | Measure from the point of articulation of the arm with the shoulder to the waist. |
|
Front length to waist (Dpt) | Measure from the shoulder at the base of the neck to the waist line. |
|
Center of the chest (CG) | Measure horizontally between the most protruding points of the chest. |
|
Front width (W) | Measured horizontally above the base of the chest between the corners of the armpits. |
|
Width of the front at the protruding points of the chest (ШпII) Control measurement | Measured horizontally between the corners of the armpits at the most protruding points of the chest. |
|
Sleeve length (Dr) | Measured from where the arm meets the shoulder to the desired length. |
|
Sleeve length to elbow (DRL) | Measured from the joint of the arm with the shoulder to the elbow. |
|
Arm circumference (Op) | Measured horizontally at the fullest part of the upper arm (at armpit level). |
|
Wrist (hand) circumference Oz | Measure along the wrist joint, taking into account the bone. |
|
Loose Fit Increases For a loose fit, add 4-5 cm to the measurement of the second half-circumference of the chest CgII, 3 cm to the measurement of the half-circumference of the hips Sb and 2 cm to the measurement of the half-circumference of the waist St. |
||
Let's start building.
In the right corner of the prepared sheet of paper, draw a right angle with its vertex at the point R(Fig. 1).
Dress length.
From point P downwards we set aside the taken measurement of the length of the dress Di(100 cm) and put a dot N.

Armhole depth.
From point P downwards we set aside the taken measurement of the depth of the armhole ( Gpr=21 cm) and put a dot G.
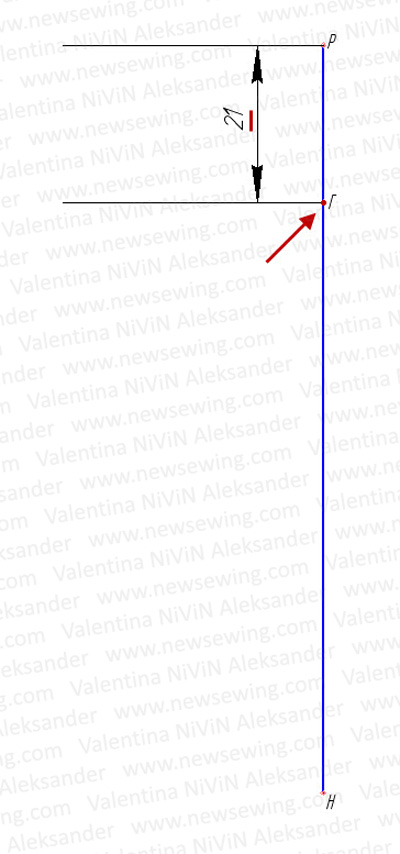
Waistline.
From point P downwards we set aside the taken measurement of the length of the back to the waist (Dst=39 cm) and put a dot T.
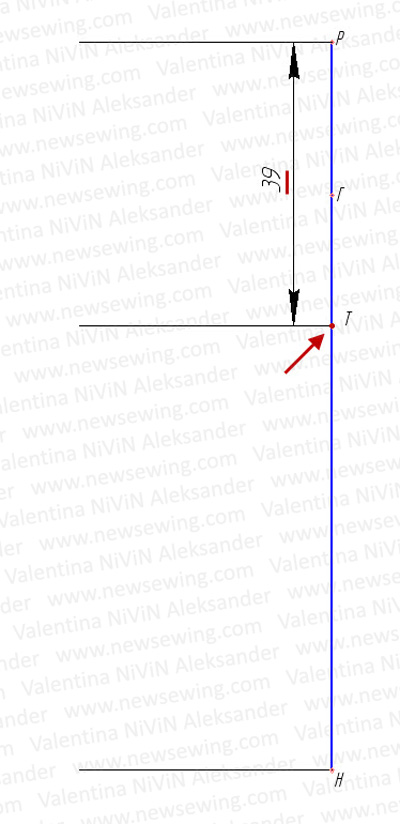
Hip line.
From point T down is usually postponed 18 – 19 cm. We'll take the average 18,5 see and put a dot B.
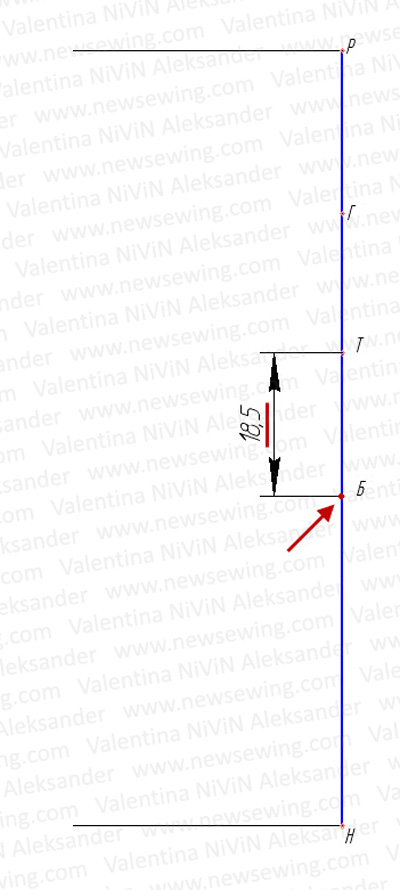
From points G, T, B and N to the left at right angles we draw horizontal lines: the depths of the armhole, waist, hips and bottom.
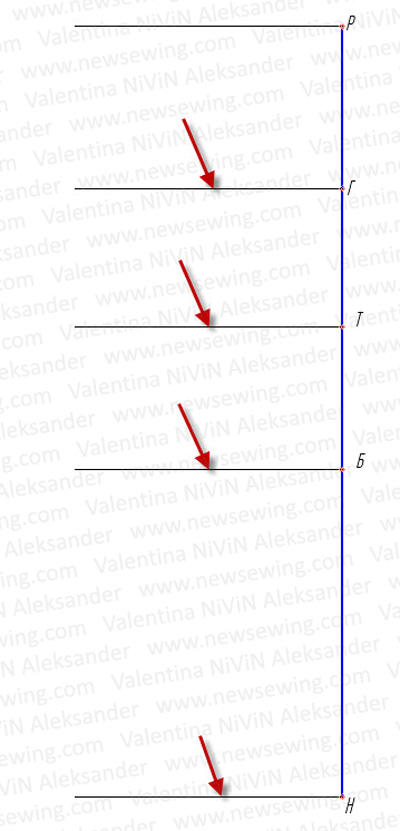
Back width.
From point G to the left we put off the taken measurement of the width of the back Shs(19.5) plus 0,5 cm (increase for loose fit) and put a dot G1:
GG1 = Shs + 0.5 = 19.5 + 0.5 = 20 cm.
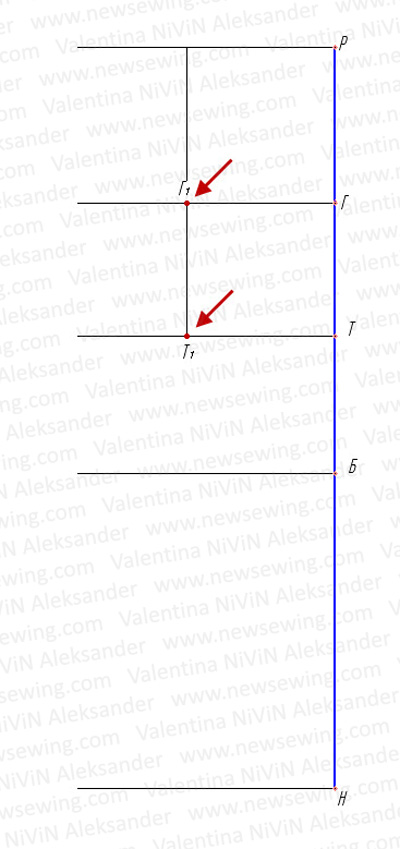
Distance to the sideline.
From point G1 To the left we set aside half of the taken measurement of the width of the armhole Shpr (12.5) minus 1 see and put a dot G2:
G1 G2 = Shpr: 2 – 1 = (12.5: 2)-1 = 5.25 cm.
From point G2 draw a straight line down and put dots at its intersection with the lines of the waist and hips T2 and B1.
Sprout width.
From point R set aside to the left 1/3 half neck circumference Ssh(19cm) plus 1 cm and put an end to it P1:
PP1 = 1/3 Ssh +1 = 19:3+1=7,3 cm.
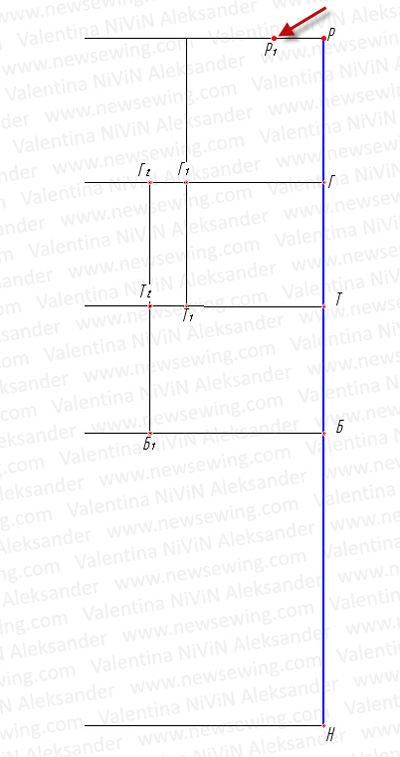
Sprout height.
From point P1 upward we plot the difference between the height measurements of the sprout VR(41cm) and back length to waist Dst (39cm) and put an end to it P2:
Р1Р2 = Вр – Дст = 41 – 39 = 2 cm.
Points R And P2 connect with a concave smooth curve. We get the line of the back neckline (the sprout line).

Back height.
From point T1 We put the taken measurement of the shoulder height of the backrest up Vps(36 cm) and put a point P.
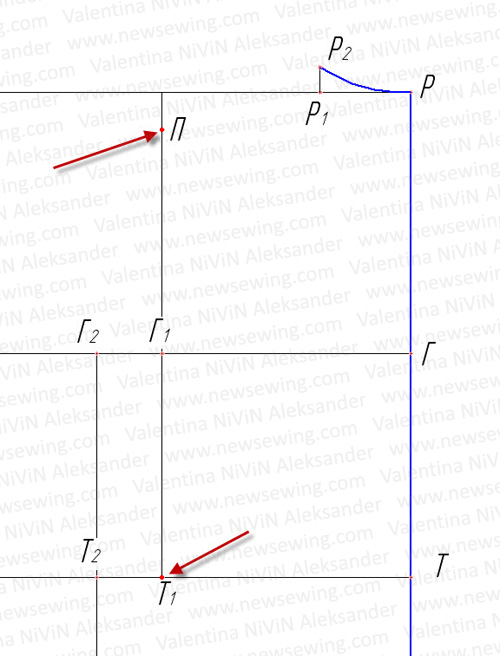
From point G1 set aside up 1/3 segment distances G1P and put an end to it ABOUT. Compass from a point ABOUT draw left through the point P arc.

Shoulder length.
From point P2 as from the center, with a radius equal to 15cm(measurement of shoulder length taken dp (13cm) plus 2cm to the dart), draw an arc until it intersects with a previously constructed arc (see Fig. 12).
Place a point at the intersection of two arcs P1.
R2 P1 =13+2=15cm.
Points R2 And P1 connect.
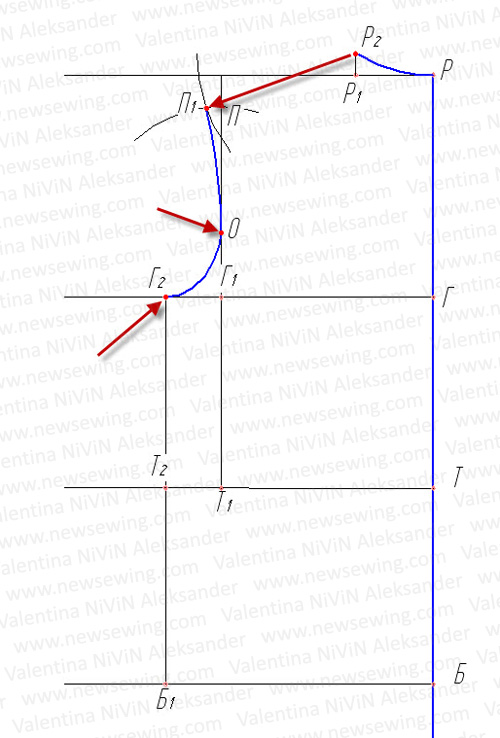
Connecting the dots P1,O and G2 smooth curve, as shown in Figure 12, we complete the construction back armholes.
Back shoulder dart.
From point R2 left on the line R2 P1 set aside 1/3 of the taken measurement of shoulder length Dp and place point B:
Р2В=13:3=4.3 cm.
From point B downwards we draw a vertical line of length 8 cm and put point B1.

From point IN left along the line R2P1 postpone 2 cm and put an end to it AT 2.
From point IN 1 through the point AT 2 draw a line length 8 cm and put an end to it AT 3.
Points V3P1 connect with a straight line and get back shoulder line.
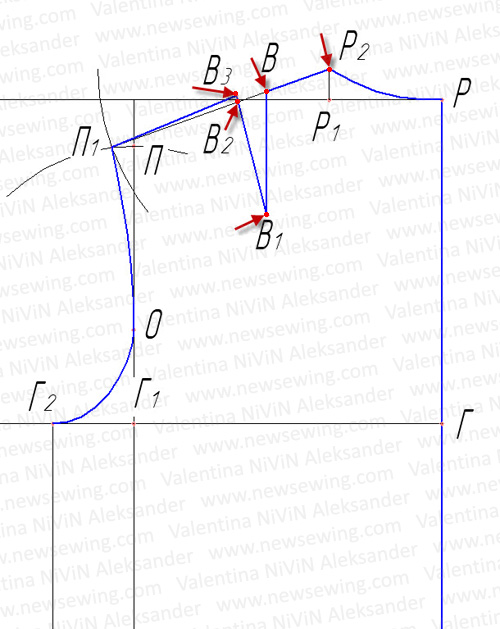
Lateral line of the back.
From point T2 set aside to the right 2 cm and put an end to it T3.
Points T3 And G2 connect.

Waist line design.
From point T3 set aside up 1 cm and put an end to it T4, points T4 And T connect with a smooth curve (see Fig. 16).
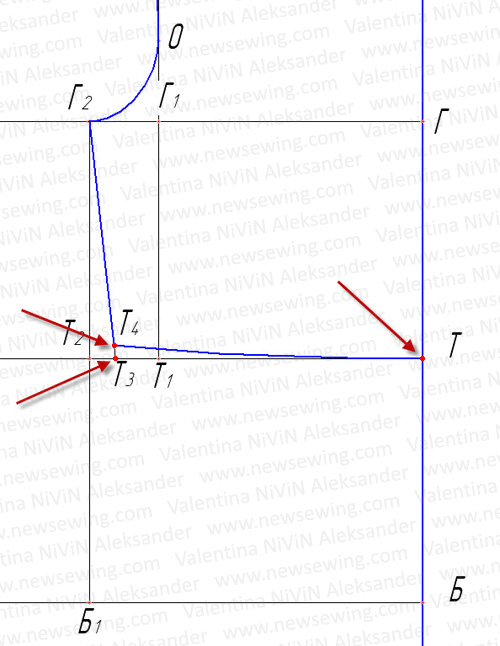
From point B1 set aside to the left 1/2 C6 (60+3=63 cm) and the second half chest circumference CgII with an allowance for a loose fit (54+4=58cm) and put an end to it B2:
B1, B2 = (63-58) : 2 = 2.5 cm.
Points G4 And B2 connect with a smooth curve.

Width of the bottom of the back.
From point N to the left we set aside a value that is equal to the width of the back along the hip line (see drawing, this distance BB2) plus 2-3 cm and put an end to it H1.
Points H1 And B2 connect with a straight line.
From point H1 set aside up 1cm and put an end to it H2.
Points H2 And N connect with a smooth curve.

Back dart.
Distance GG1 G3.
From point G3 draw a vertical line down and place a dot at its intersection with the waist line T5, with the line of the hips - a point B3.
From point G3 put down 4 cm and put an end to it AT 4, and from the point B3 up - 3 cm and put an end to it B4.
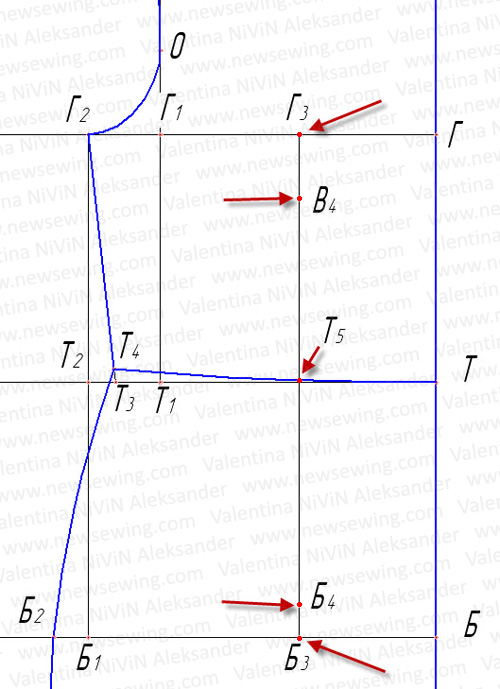
Depth of dart.
From point T5 to the right and left along the waist line we put it aside 1 cm and put dots T6 And T7 AT 4 And B4(see Fig. 20).
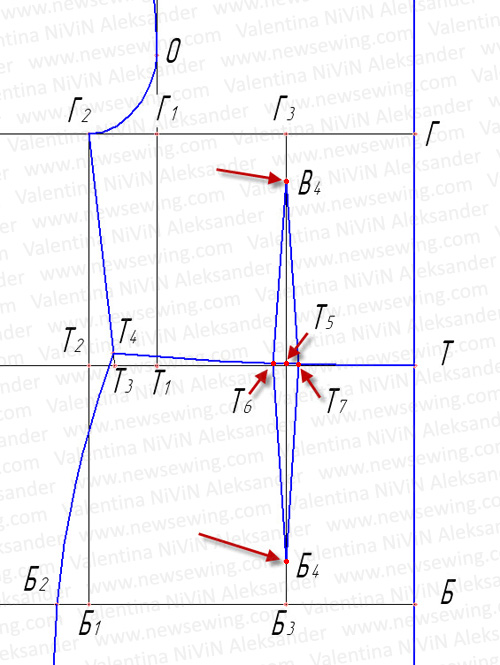

The construction of the back is completed.
Before
Bottom line of the back НН1 let's continue to the left.
From point H1 set aside approximately 45-50 cm and put an end to it H3.
From point H3 draw a vertical line up.
From points G2, T2, B2 to the left we draw horizontal lines until they intersect with the vertical.
The points of intersection with the vertical line are designated accordingly G4, T8, B5.

Front width.
From point G4 to the right we put aside the taken measurement of the half-circumference of the chest second CrII with an allowance for a loose fit (54 + 4) minus back width with increase (according to drawing GG1 = 20 cm) and minus the armhole width (measurement taken 12.5 cm) and put an end to it G5:
G4G5=58-20-12.5=25.5 cm.
Through the point G5 draw a vertical line down, at the intersection of which with the waist line we place a dot T9.
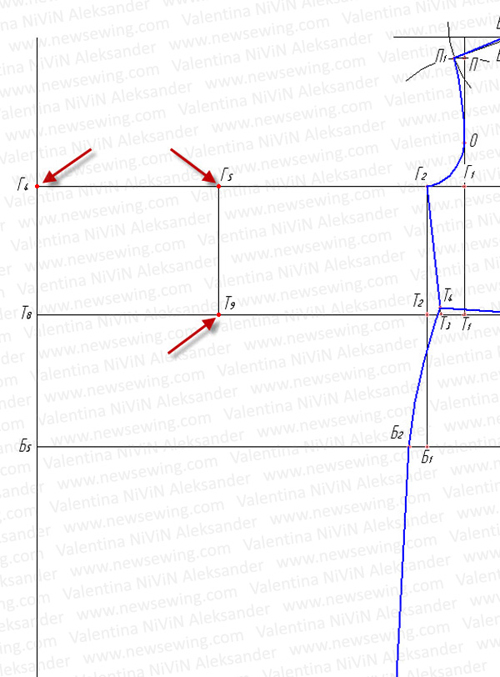
Distance to the sideline. From point G5 to the right we set aside half the width of the armhole Shpr(12.5) plus 1 cm and put an end to it G6:
G5G6 = 12.5:2+1=7.25 cm.
From point G6 draw a vertical line down and put dots at its intersection with the horizontal lines T10 and B6.
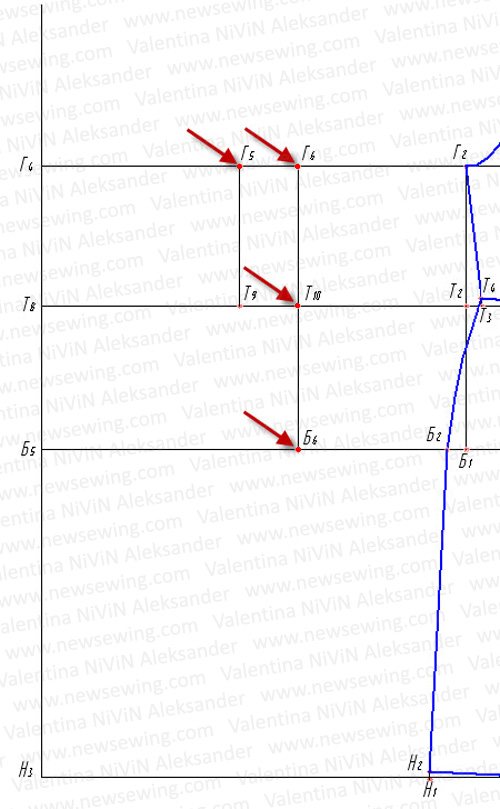
Front height.
From point T8 We put the taken measurement of the length of the front to the waist up Dpt (44 cm) and put an end to it P3
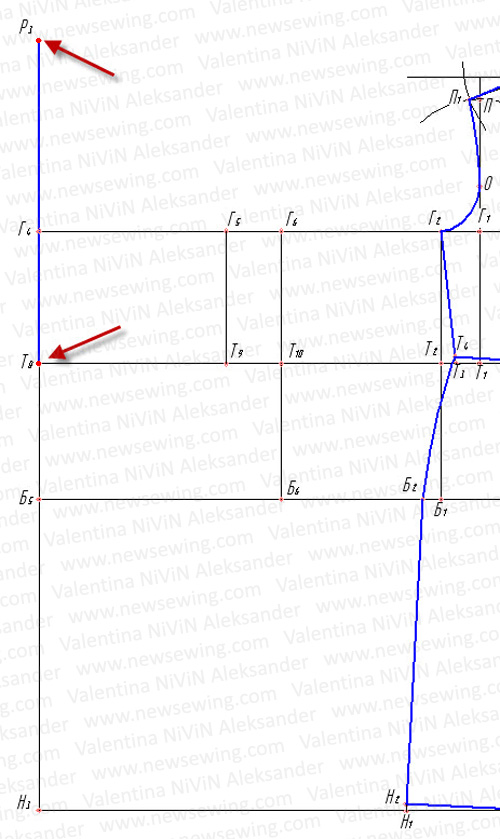
Neck width.
From point P3 draw a horizontal line to the right and put it on it 1/3 half neck circumference Ssh!(19cm) plus 1 cm and put an end to it P4:
R3 R4 =19:3+1=7.3 cm.

Neck depth.
From point P3 put down 1/3 half neck circumference Ssh (19cm) plus 1.5 cm and put an end to it P5:
Р3Р5 = 19:3+1.5=7.8 cm.
Points R4 And P5 connect a straight line, divide it in half and mark the middle with a dot O1.
From point O1 lay down at right angles 1.25 cm and put an end to it 02 .
Points P5, 02 and P4 connect with a smooth curve and get the line of the neck of the shelf.
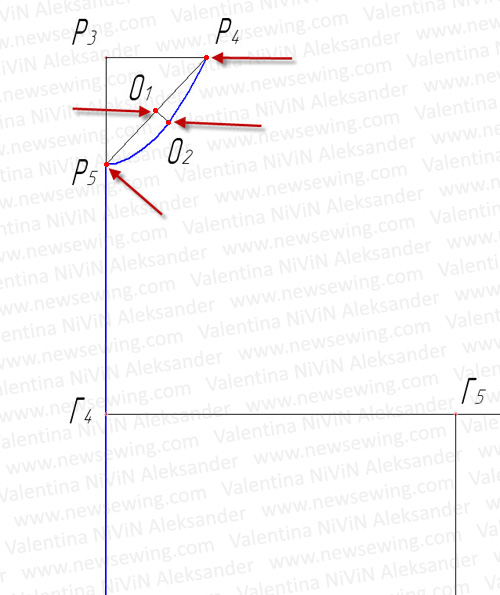
Center of the chest.
From point G4 to the right we put the taken measurement of the center of the chest Tsg (11 cm) and put an end to it G7.
Points P4 And G7 connect.

Chest height.
From point P4 down, extending the line R4G7, set aside the chest height measurement taken Vg (29.5 cm) and put an end to it C.
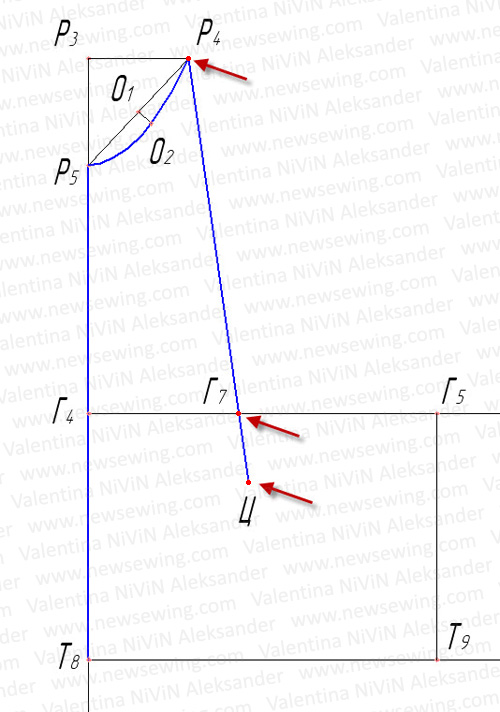
End of dart.
Along the same line from the point C set aside up 2.5 cm and put an end to it C 1.
The chest dart ends at this point.
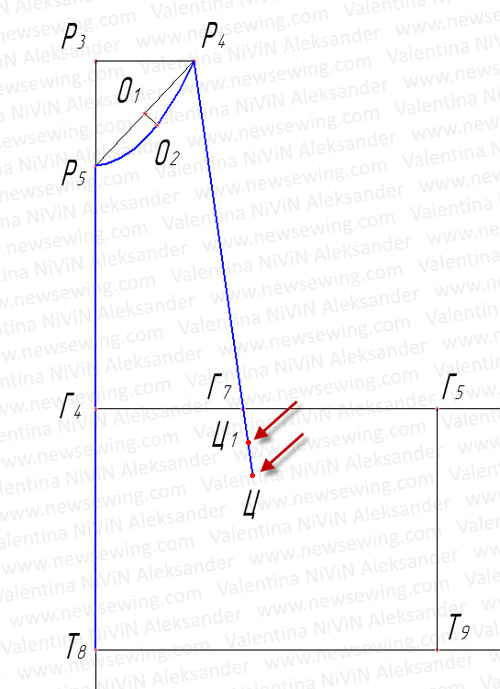
The size of the tuck opening.
From point C We put the taken measurement of the size of the dart opening up Vrv (12 cm) and put an end to it U.
From point C, as from the center, through a point U draw an arc to the right.

Opening the dart.
From point U on the drawn arc we plot the difference between the measurements of the half-circumference of the chest of the second СгII (54cm) and half chest circumference of the first CgI (49cm) and put an end to it U1.
УУ1 = СгII – СгI = 54 - 49 = 5 cm
This construction can be done using a compass. From point U, as from the center, radius 5cm draw an arc until it intersects with a previously constructed arc.
Mark the intersection point U1.
Through dots Ts1 and U1 draw a straight line, continuing it upward by an amount that is equal to the distance Ts1R4 and put an end to it P2:
Ts1P2 = Ts1P4.
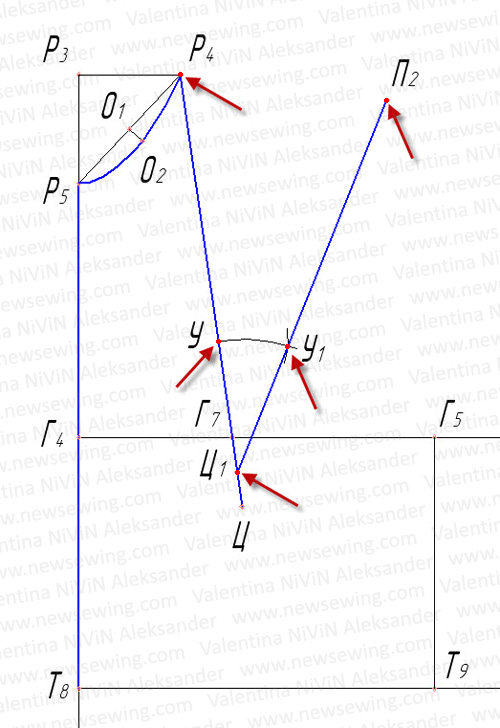
Front shoulder height.
On a straight line T9G5, extending it upward, from the point T9 set aside the taken measurement of the front shoulder height Runway (35 cm) and put an end to it P3.

Auxiliary armhole point.
From point G5 set aside up 1/4 distances G5P3 (4.5 cm) and put an end to it 03 . Dot 0 3 - check Point. When threading the sleeve into the armhole, it connects to the mark on the sleeve at the point ABOUT
From point 0 3 using a compass through a point P3 draw an arc to the right.
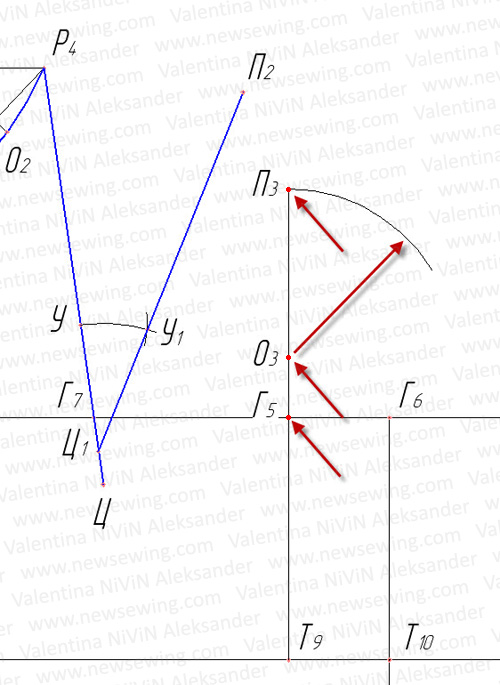
Shoulder length.
From point P2 , as from the center, with a radius equal to the shoulder length measurement taken Dpl, (in our case 13cm) draw an arc until it intersects with a previously constructed arc and place a point P4 .
Points P4 , 0 3 And G6 connect with a smooth curve, thereby completing the construction of the front armhole .

Side line front.
From point T10 set aside to the left 1.5 cm and put an end to it T11.
Points G6 and T11 connect with a straight line.
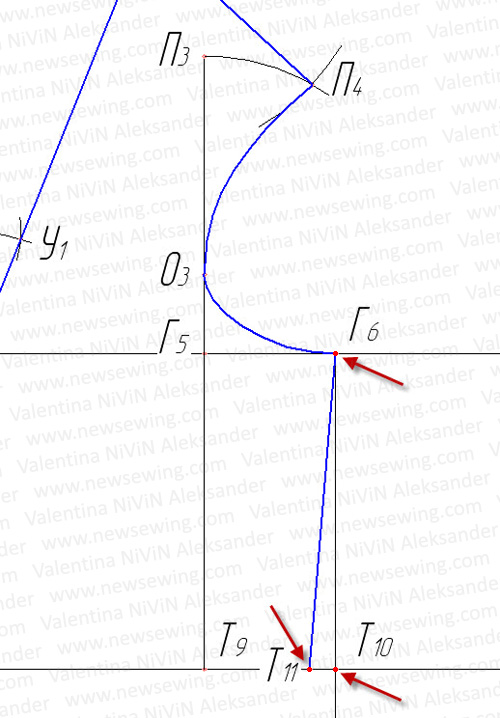
Waist line design.
From point T11 set aside up 1 cm and put an end to it T12.
Points T8 and T12 connect with a smooth curve.
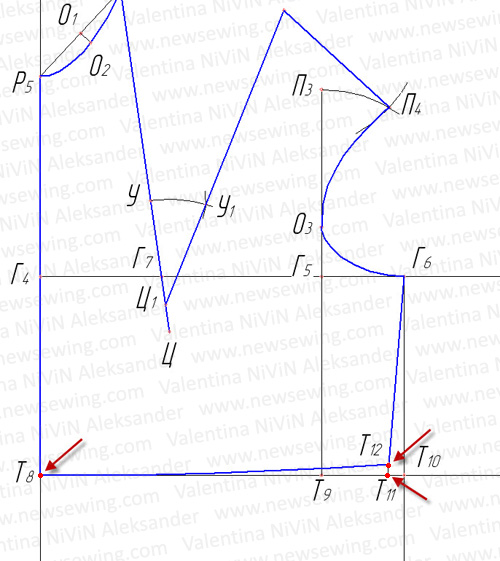
Formation of the lateral line in the hip area.
From point B6 set aside to the right 1/2 differences between hip circumference measurements Sat with an allowance for a loose fit (60+3=63 cm) and the second half chest circumference CgII with an allowance for a loose fit (54+4=58cm) and put an end to it B7:
B6 B7 = (63-58): 2 = 2.5 cm.
Points T12 and B7 connect with a smooth curve.

Front bottom width.
From point H3 to the right we set aside a value that is equal to the width of the front along the hip line (see drawing, this distance B5B7), plus 2-3 cm and put an end to it H4. Points B7 And N4 connect with a straight line.
From point H4 set aside up 1 cm and put an end to it H5.
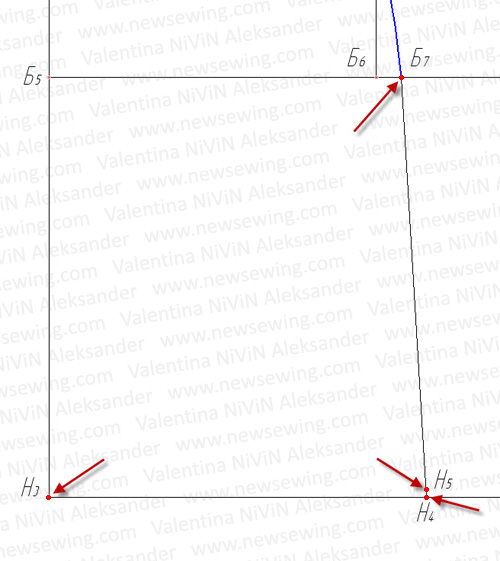
Lengthening the front.
From point H3 put down 2 cm and put an end to it H6. Points N6 and N5 connect with a smooth curve.
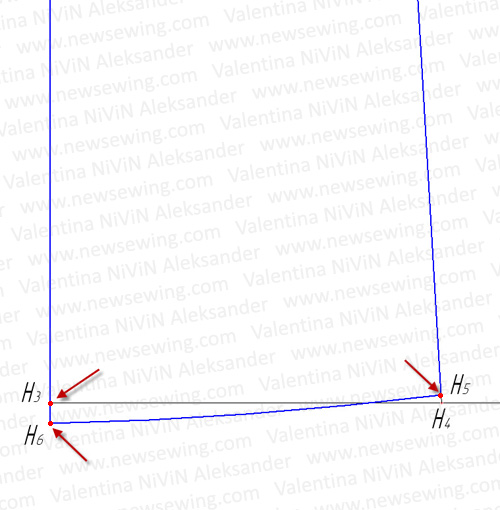
Construction of a dart.
Distance G7G5 divide in half and put a dot G8. From point G8 draw a vertical line down and place dots at the intersection with the lines of the waist and hips T13 and B8. From point G8 put down 6 cm, and from the point B8 up - 2 cm and put dots B5 and B9.
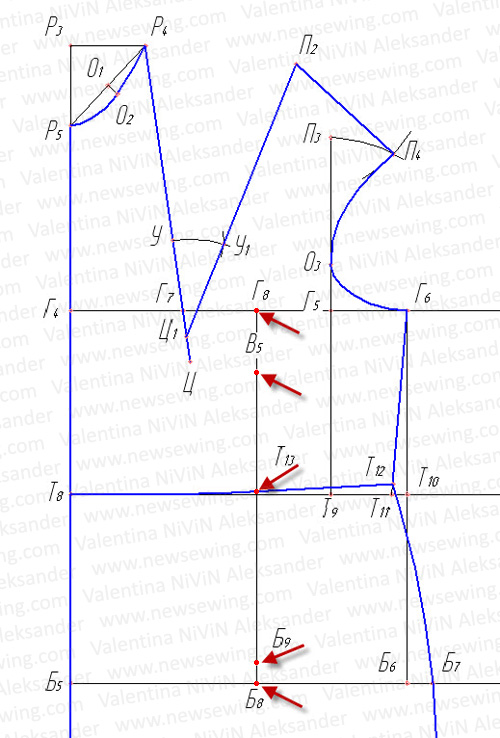
Recess depth.
From point T13 to the right and to the left we postpone by 1.25 cm and put dots T14 and T15, which we connect to the points B5 and B9. (See Fig. 42)
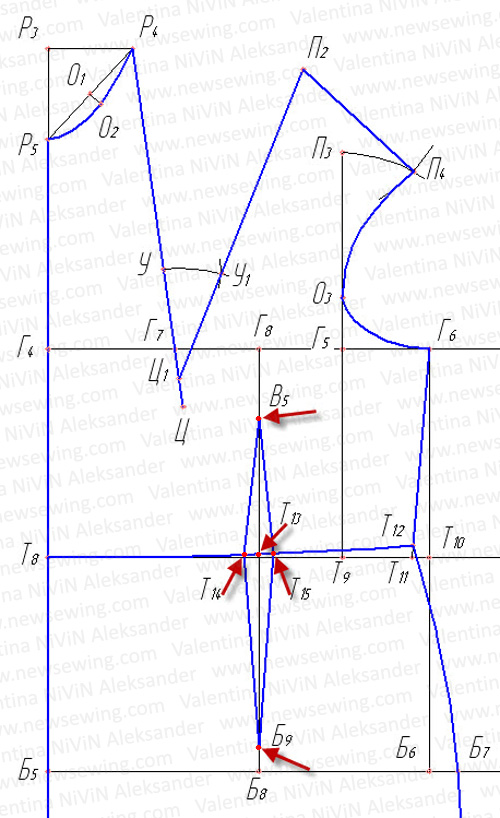
Construction completed.
But before you start cutting, don’t be too lazy to take a centimeter and check the basic measurements again. Pay special attention to the waist circumference, since in this method, when constructing darts along the waist line, not a calculated value is used, but a constant. If, when checking, you find significant discrepancies between the figure and the drawing (specifically in the waist circumference), they can be easily eliminated by reducing or increasing the opening of the darts along the waist line.


This is a basic dress pattern drawing - a guide for creating a wide variety of patterns. Before you start modeling, you need to check the pattern, “fit” it to the figure, and make adjustments if necessary. And only after you are completely sure that everything is in order, you can safely begin to create.
And remember, the one who walks will master the road!
I sincerely wish you success!