How to correctly take measurements from the waist
To determine the size of a shirt or chemise, it is important to know the sleeve length and neck circumference. Measuring them is not difficult, and as a result you will be able to purchase clothes that fit you well. Follow the step by step instructions.
Step No. 1. In order to take measurements correctly, stand straight with your arms slightly bent at the elbows at your sides. For convenience, you can put your fingers in the front pockets.
Step No. 2. Arm yourself with a measuring tape. The first measurement should start from the distance between the shoulder joint and the protruding vertebra at the base of the neck.
Step #3: Measure the above distance and then write down the result. You will need it later.
Step #4: Now take the second measurement. The distance from the wrist to the shoulder joint should be measured. When measuring, the measuring tape should go from the wrist bone.
Measuring neck circumference
Step No. 1. We use the same measuring tape. Wrap a ribbon around your neck. The tape should be about two centimeters above where the neck meets the shoulders (perhaps this will be the lower part of the Adam's apple).
Step No. 2. The measuring tape must be held tightly - no distances are allowed. Also, do not overtighten the tape - you just need to tighten it enough so that you can make the correct measurement. Make sure that the tape lies flat, without tilting or bending.
Step No. 3. Remember your results - this will be your neck circumference. When buying a shirt, please note that its actual size will be one centimeter larger. For example, if your measurement is 38 cm, then your shirt size should be indicated by the number 39.
If the measurement does not show a round number, then round it up. By the way, the average size collar of a man's shirt - 39-40 centimeters.

Everything is simple here: take out your favorite shirt or shirt from the closet that fits you perfectly. If you don't have one in your wardrobe, then a T-shirt will do. Gently straighten it on a table or any other flat surface, and then measure the length of the shoulder with a centimeter tape.
Please note: the tape must be applied to the points where the connecting seam runs.
My advice: measurements must be taken in underwear. Prepare two measuring tapes and a cord (a soft thin belt to determine your waist). It’s good if someone close to you can help you take measurements. When taking measurements, stand straight, do not tense up.
1. Bust
When taking this measurement, the tape passes on the back - along the shoulder blades, on the side under the armpits, and in front along the most protruding points of the mammary glands.
2. Waist circumference
Tie the belt at the waist, and at the point of the knot, take the measurement strictly horizontally. We do not remove the belt until the end of the fitting.
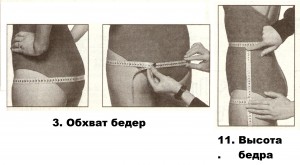
3. Hip circumference
The measurement must be taken horizontally. Measurements are taken at the level of the most prominent points of the buttocks. The distance from the hips to the waistline is fixed, it depends on the figure.
At the same time as this measurement, it is convenient to take measurement 11 (hip height) with a second centimeter tape.
4. Chest height
The measurement is taken from the base of the neck - (this is the most high point shoulder) to the most protruding point of the mammary glands (indicated by an arrow in the figure).
5. Front length to waist
The measurement is taken from the base of the neck (this is the highest point of the shoulder) to the waist. The measuring tape should go along the most protruding point of the chest.
6. Back length
The measurement is taken along the spine (middle of the back) from the seventh cervical vertebra to the waist.
7. Shoulder length
The measurement is taken from the base of the neck (the highest point of the shoulder) to the junction of the shoulder with the arm (the estimated sleeve hem is shown with a dotted line).
8. Sleeve length

The measurement is taken along the outside of the arm (the arm should be slightly bent at the elbow) from the expected sleeve hem to the wrist through a slightly bent elbow.
9. Upper sleeve circumference
The measurement is taken horizontally at the widest point of the hand (we take the measurement on both hands and choose the larger one)
10. Neck circumference
The measurement is taken at the base of the neck, at the back along the seventh cervical vertebra, at the front at the collarbone and jugular notch.
11. Thigh height
The measurement is taken from the waist to the hip line. The centimeter runs along the hip. Take this measurement along with the hip circumference measurement, using a second measuring tape.
12. Hip circumference taking into account the protruding part of the abdomen
The measurement is taken 8 cm below the waist line and parallel to it.
13. Back width
The measure is measured horizontally, the measuring tape runs along the line of the middle of the shoulder blades. When taking this measurement, stand straight, but do not tense up.

14. Sitting height
This measurement is taken in a sitting position. The measuring tape runs vertically from the waist line to the plane on which you are sitting.
15. Skirt length
The measurement is taken along the middle front line. The measuring tape is located vertically from the waist line down.
16. Maximum side seam length (for trousers)
Measured from the waist to the floor.
17. Height
The measurement is defined as the distance from the top of the head to the steps.
18. Upper leg circumference
The measurement is taken horizontally at the widest point of the leg. Measure both feet and take a larger measurement.
19. Model length
Determined along the line of the middle of the back.
The main measurements when sewing skirts and trousers are the circumference of the waist and hips. For shoulder products, chest circumference is added to these measurements.
Sleeve length is measured from the shoulder seam to the end of the cuff. That is, the cuff fits into the sleeve. This is the size that we display in the product card. And the length of the sleeve, measured from the outermost protruding point of the shoulder to the wrist, along the lowered arm, to the first phalanx thumb– this is your own measurement, compared with our data. It is better to measure with a centimeter tape. This is an analogue of a men's construction tool, which is called Roulette.
But there is one catch in measuring the sleeves. This is what you need to do to find this outermost protruding point of the shoulder yourself. And the spread in changes from this point can reach up to two centimeters. And these centimeters can be the most important! The point where the shoulder ends and the sleeve begins is very important for men's shirts. And in knitwear products, especially such as jumpers, the shoulder seam is shifted (or stretched). What is strictly prohibited in shirts. But in jumpers, because of this “play,” it’s not tight anywhere and doesn’t stretch anywhere.
You can do without the error obtained by measuring from the beginning of the shoulder. We suggest checking with our consultant the length of the shoulder and sleeve (to the phalanx) as the same length. This is a simpler and more accurate measurement. Measure from the beginning of the collar (from the neck) to the end of the cuff, as shown in the picture.
Measuring the length of the sleeve must partially extend onto the palm. This is necessary for the length allowance on the elbow bend. Alternative way: measure the length of the sleeve with your arm bent at the elbow to the desired length.
In generally accepted sleeve measurements, there are also such measurements as sleeve width or sleeve girth (measured along the biceps) and wrist girth. Please also check these sizes with our consultants. To make a successful purchase in our store, the courier will bring you additional sizes of the selected products. Trying on is never superfluous.