Crocheted flowers and leaves patterns. How to crochet leaves? Crochet leaf pattern.
We continue to publish patterns of knitted leaves. This part contains leaves of real flowers and plants: clover, oak leaf, etc. They are perfect for knitted appliqués, brooches, and color compositions.
| Knitted clover leaf
|
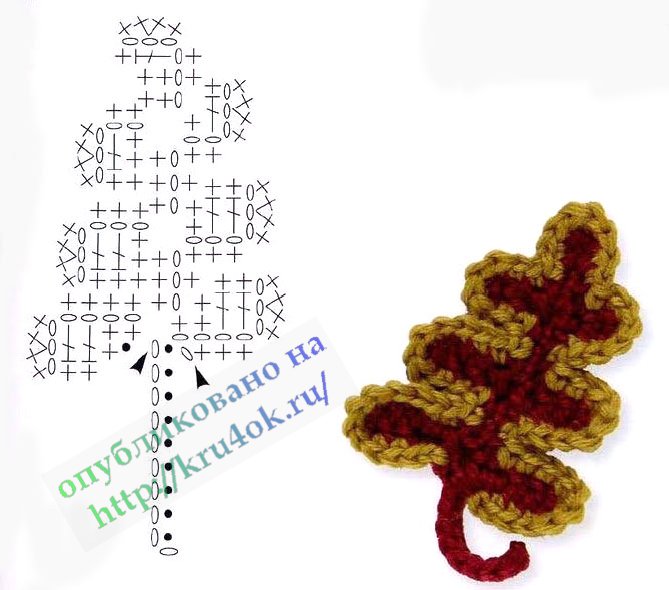
| Knitted oak leaf
|
 |
 |
 |
 |
| For example, how you can use knitted leaves in a composition:
|
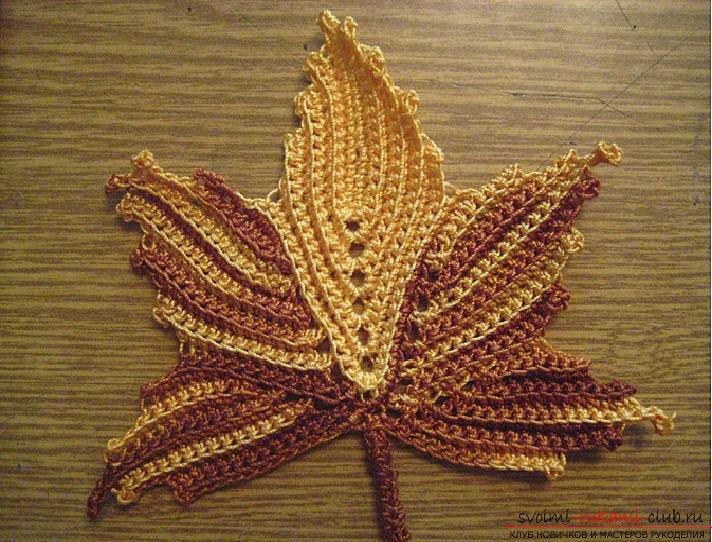
| Knitted Maple leaves
|
 |
| Maple leaves can be used to decorate skirts, or knit a stole from them. |
Crochet has always been in demand, but to varying degrees. Today this type of needlework is more popular than ever. Are being integrated classic types knitting: the fillet knit pattern becomes the border of a summer jacket; elements of guipure tablecloths - a lush decor of blouses. The brims of hats are knitted with napkin patterns, and the yokes of jackets are knitted with collar motifs. There are many examples. This is a natural process, a kind of creative game. The value lies in the preservation of traditions and their modern embodiment.
Have you noticed, dear craftswomen, that the emphasis in knitting is on complex options that cannot be reproduced on a knitting machine? One of these trends is guipure. It is designed as an imitation of intricate and expensive Venetian embroidery.
The best examples of such crocheted lace were produced by Irish nuns, so over time it began to be called “monastic”, and later - Irish guipure. Please do not confuse it with Irish lace, which differs from guipure in its method of execution. Classic guipure knitting is complex and painstaking. Since it imitated lace embroidered with a needle, they used lace linen, thin cream or white paper threads for knitting elements and very thin ones for nets and brids. Modern fashion takes into account our busyness, the fast pace of life, the desire to quickly realize the planned product. She favors large-knit models made from thick yarn. This is beneficial for beginning craftswomen. You may have noticed that the mesh holding the elements together is rarely used. “Adhesive” guipure fabrics are relevant. The elements have become larger, the thread is thicker.
So, let’s assume you are planning to knit a blouse entirely or a fragment of it with guipure elements. It is advisable to first draw a sketch on the pattern; you can improvise as you knit. Most the compositions are occupied by leaves. There are many patterns for knitting leaves in various books and magazines. It is impossible to discuss their diversity within the scope of this article.
For example, it is customary to knit a classic guipure sheet in two ways: with an extension from one sc (pattern 1) and with an extension on the arch (pattern 2). In this case, the knitting methods can be different: for both half-loops, for the back half-loop, for the front half-loop, for the purl horizontal half-loop of the columns of the previous row.
The texture of the sheet in the first photo turned out to be flat, in the second - ribbed.
| Photo1. The sheet is crocheted according to pattern 1 using both half loops:
|
| Photo 2. The sheet is crocheted according to pattern 1 using the back half-loop:
|
| Photo 3. Complex sheet.
|
| Crochet pattern for leaves 1 and 2:
|
| Photo 4. Sheet 1 is crocheted according to pattern 2.
|
| Pattern 3. Crochet a leaf.
|
| Pattern 4. Crochet a leaf.
|

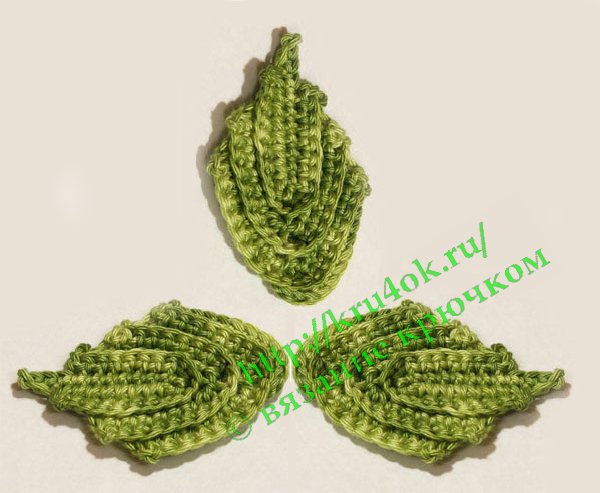

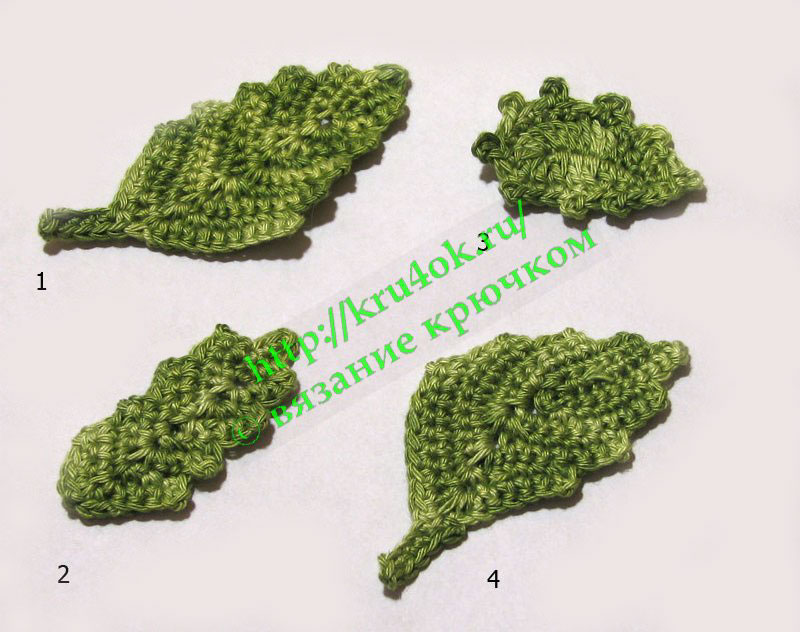
The shape of the leaf, knitted according to scheme 1, is wide at the cutting and sharp at the end. The increments on the arch according to scheme 2 create a sharper leaf shape on the cutting. At large quantities cast on air loops (10-12) and the generally accepted indentation of 2 single crochets, the sheet turns out to be wide. The leaf denticles are concentrated on the front part; the stem has a smooth leaf. This form is good when combining them into a complex sheet (photo 3). With a small number of air loops in the initial chain (4-6), the sheet turns out to be narrow and, when knitting in multiple rows, long. The cloves are located along the entire length of the leaf (sheet 2 in photo 4).
What if the composition requires a large sheet with teeth along its entire length? Increase the number of single crochet stitches (diagram 3).
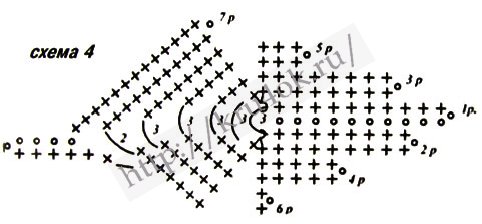
For clear, ornamental compositions, one or two types of leaves are used. In the sketch, leaves of different sizes and shapes are drawn: small and large, smooth and curved. The rotation of the sheet is obtained by knitting different numbers of sc on the left and right sides of the arch: 1 and 2, 2 and 3 give a slight turn of the sheet, and 1 and 3 - a steeper one. Sheet 4 in photo 4 is associated with a rotation in one direction (diagram 4). Such a variety of shapes and sizes of leaves only decorate the composition.
To be continued …
Let's continue the conversation about knitted leaves.
Diagram 5 shows a sheet in which the turns are connected alternately in different directions. A variety of leaf shapes decorates the composition and gives it expressiveness. Experiment too. How else can you get curved leaves? In addition to the toothed ones, there are rounded and free forms leaves. Often found in compositions are small leaves connected by columns of different sizes. To add rigidity and beauty, tie them with single crochets with a “picot” or “crawfish step” (see diagram 6 and 7).
Tip: do not knit more than 2-3 half-stitches in a row. Their function is to create a smooth transition from single crochets to double crochets.
By analogy with knitting small leaves, it seems logical to knit medium-sized leaves in double and triple crochet stitches. Yes, this is possible, but the sheet, even after tying, turns out to be somewhat loose. Medium-sized leaves will look better if you knit them with single crochets, half crochets and single crochets on both sides of the VP chain (Diagram 8). Tie such a sheet with single crochets twice at the same column heads. Of course, add a single crochet on the rounded areas of the sheet. For the cutting, knit 6-7 chain stitches and tie single crochets on them in the opposite direction.
Another leaf option: knit stitches of different sizes on single crochets, with which you tie a chain of air loops on both sides (diagram 9).
Tie this sheet with a bourdon: fold the knitting thread in half (this is a bourdon), fasten single crochets in the middle of the bourdon, fold the bourdon threads together. Then hold the thread along the fabric and tie it with single crochets. Having tied the leaf completely, tie 6-7 sc around the thread (on the bourdon) for the leaf stalk. Knit the VP, tear off the bourdon unevenly, attach the rest to the knitting and knit the sc in the opposite direction. Lastly, tie the connecting posts at the base of the sheet, break the thread and pull it to the wrong side. Use the tail of the thread to sew the elements together.
If you plan a fabric made of openwork, transparent elements, then the method of knitting the leaves changes. The diagrams show options for such leaves: small (diagram 10) and medium (diagram 11). Tying two rows of sc will give shape.
Two more options for openwork leaves are presented in Diagram 12.
To be continued …
The article was prepared based on publications from Fashion Magazine.
 |
|
|
|
|
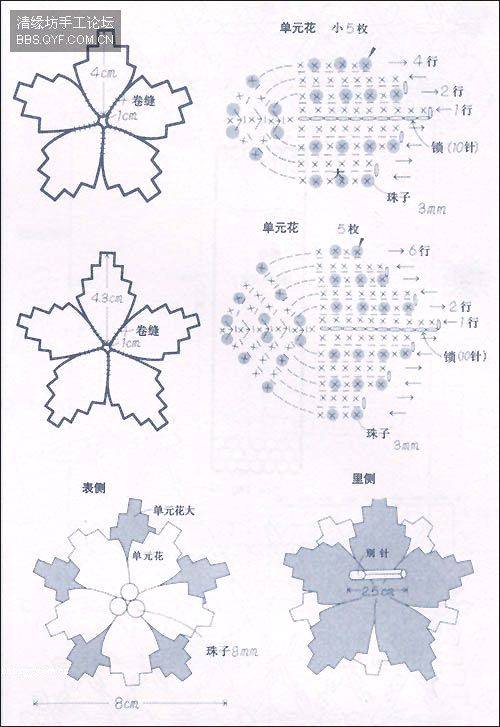
| Model 2: another flower from a Japanese magazine. You can use it to make a wonderful brooch. |
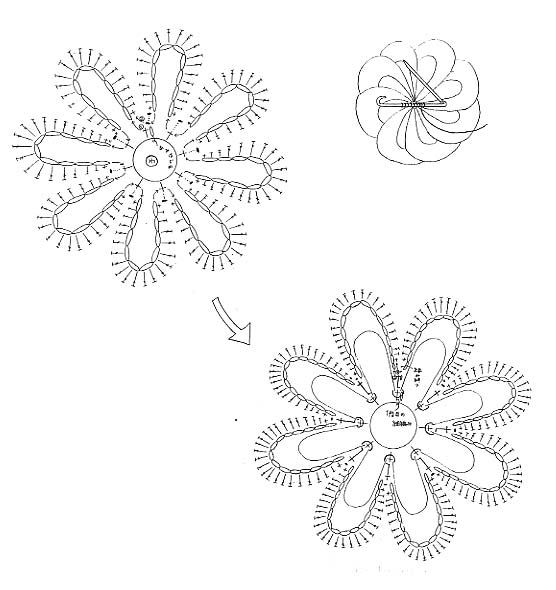
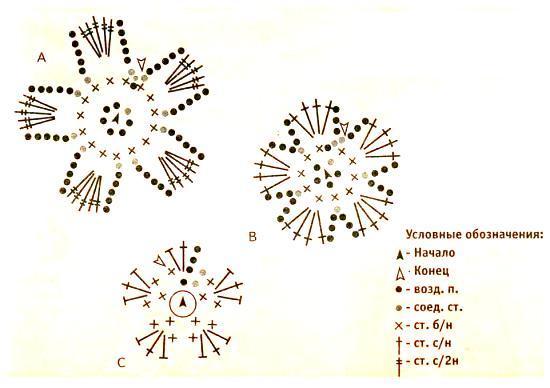
Model 3.Flower: knit a chain of 6 vp. and conclude its 1 connection. Art. in a circle Knit according to the pattern in circular rows, replacing the first loop of each circular row with a chain stitch of the beginning, the number of which is indicated in the pattern. And finish 1 connection. Art. in the last v.p. started.  |
Model 4. This flower is from a foreign magazine. I translated according to the meaning. 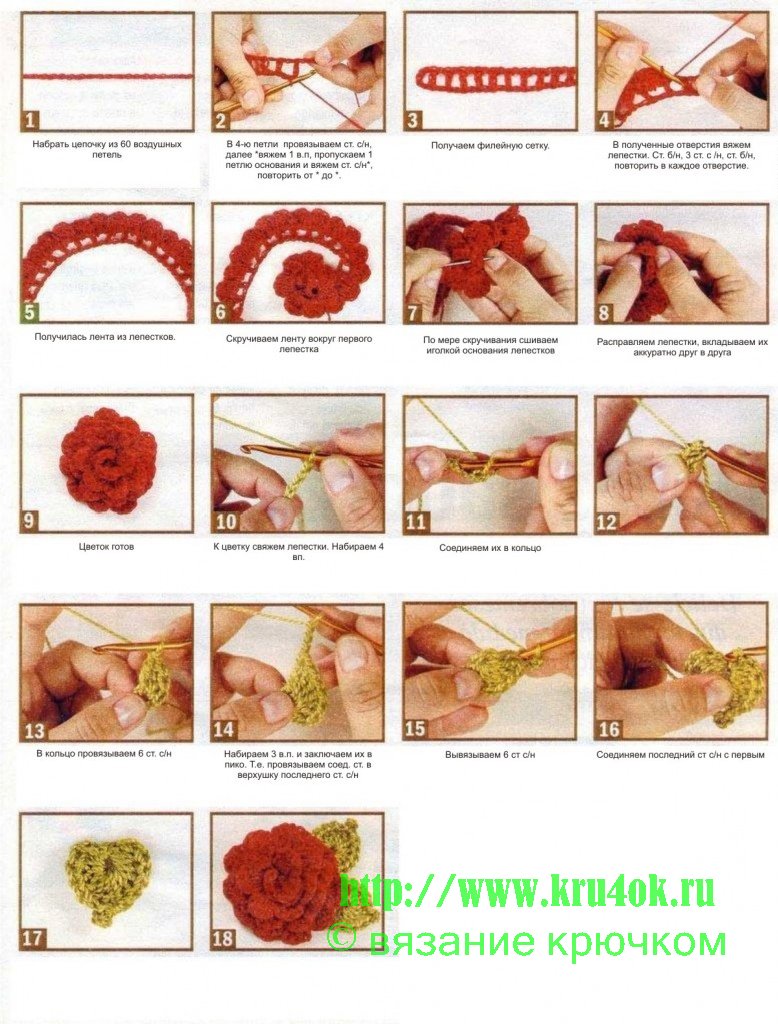 |
Model 5. Relief rose. Motive to knit according to the pattern. Start from point A 9 ch and close these loops into a connecting ring. Art. In the first row of Art. b/n knit around v.p. In the next row, knit loops under both threads and around the lower chs. In the 4th and 6th rows we knit s/n stitches by introducing a hook from the wrong side of the motif from right to left around the st. b/n or art. s/n of the penultimate row. 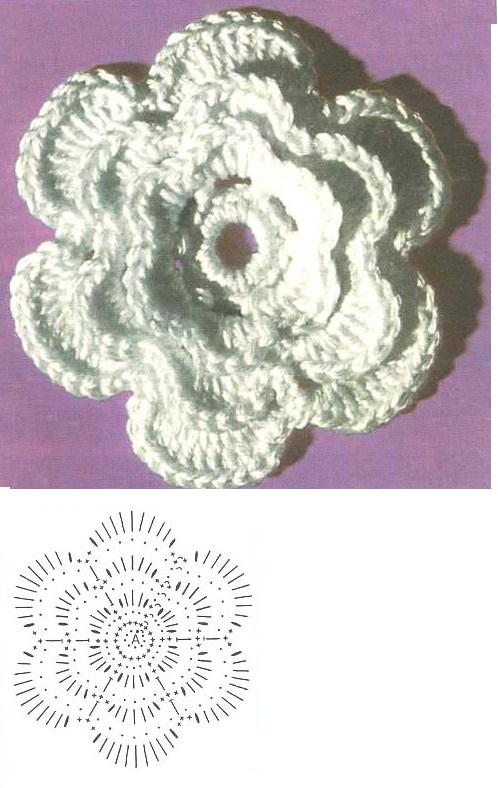 |
| Model 6.Flower: knit a chain of 5 chains. and concluding it with 1 connection art. 6/n into the ring. 1st round row: 1 ch. beginning *3 v.p. 1 tbsp. b/n in the ring, repeat from * 2 times, 3 air. p., 1 connection Art. in air p. beginning. 2nd circular p.: 1 air. p. beginning, * 1 tbsp. 6/n into the air arch. p of the previous circular row, 4 tbsp. s/n. 1 tbsp. 6/n, repeat from * 3 times. 1 connection Art. in air n. beginning. 3rd circular route: 2 air. p., perform between the 2nd and 3rd art. s/n 1 tbsp. b/n in the arch made of air. n. 1st circular r., 5 air. n., repeat from * Zraz, 1 connection. Art. in the 1st art. 6/n. 4th circular route: 1 air. p. beginning, * 1 tbsp. 6/n into the air arch. p., 8 tbsp. s/n, 1 tbsp. 6/n, repeat from *Zraz. 1 connection Art. in the air beginning 5th circular p.: 1 air. n. beginning. * 4 air p. perform between the 4th and 5th art. s/n 1 tbsp. 6/n into the air arch. n. 3rd circular r., 4 air. p., 1 tbsp. 6/n in the next st. 6/n 3rd circular r. Repeat from * 3 times, ending with 1 connection. st b/n in v.p. started. *1 tbsp b/n, 6 tbsp s/n, 1 tbsp. b/n in the arch from v.p. previous row, repeat from * 7 times, finish 1 connection. st instead of st. b/n in air n. beginning.  |
Model 7 without description, only diagram.  |
Model 8 without description.  |
 |
Model 9. Double-layer flower.  |
Model 10.  |
Model 11. 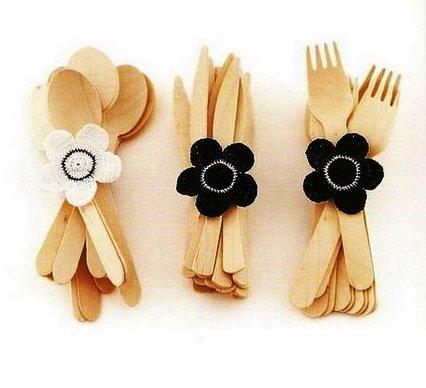 |
 |
Model 12. 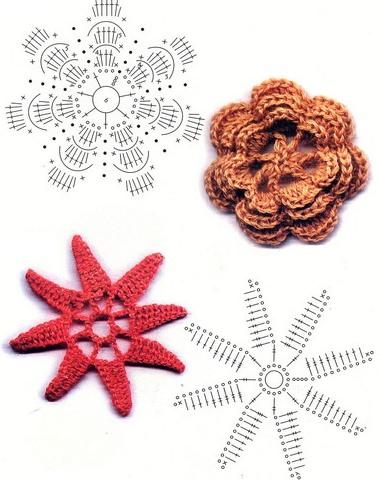 |
| Model 13Description: use 2-ply purple yarn to knit a flower according to pattern A and 2-ply blue yarn to knit a flower according to pattern B. Place the flowers on top of each other. Sew 3 beads in the middle. |
 |
Dear friends, today I want to tell you how to crochet a simple leaf. The article will not be long at all, excuse me - it’s summer))) and I, like all of you, want to spend as much time as possible in nature...
By the way, this is where the desire to crochet a leaf came from... Everything on the street is so beautiful now - green... nature has woken up and is enjoying the summer sun with all its might. I also found a pattern for a wonderful, in my opinion, napkin...
When I knit it, I’ll be sure to show you, they use knitted leaves...
Well, let's get started, quickly crochet a leaf and Fresh air Enjoy the beauty of living nature with your children.
Crochet leaf - knitting pattern
Knitting techniques:
Crochet leaf - knitting description
We knit a chain of 7 VP+1 VP for lifting
1st row - insert the hook into the second loop of the chain and knit 6 single crochets in a row, then, in the next (outermost) loop 5 sc and again 6 sc in a row. Turn knitting.  2nd row – 1 VP of lifting, insert the hook behind the back lobe of the loop of the second underlying column
  and starting with it we knit 7 RLS (don’t forget that we knit all the stitches at the back of the loop), except for the central one... The central one is the stitch from which we knit several RLS, it is located in the center of the row, that’s why I called it that))) .
So, we knit the central column, as usual, using both pieces. Let's continue... 3 sc from one loop, 7 sc in a row behind the back wall. Turn knitting  3-13 rows - similar to the second
  Row 14 - knit to the central loop, into which we make 1sc and finish knitting the leaf.
 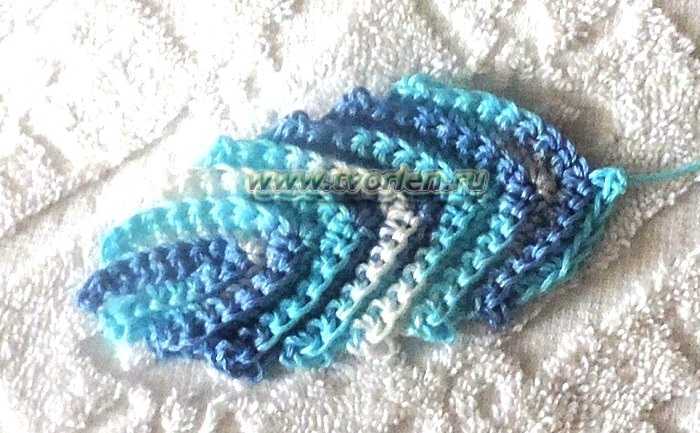 Crochet leaves like these are an element of Irish lace... You've probably all seen such beauty. Honestly, I don’t even dare to start something like this... In my practice, I tried to knit a napkin using the Irish lace technique... The experiment failed... or rather, it never ended - the whole napkin, unassembled in detail, is lying somewhere in a bag... and I have no desire yet return to her.
The napkin I just started knitting is quite ordinary thing, a little voluminous, not a lot of strange color for a napkin... well, in general, you will soon see and appreciate the fruit of my imagination based on another simple scheme from the magazine.
A start. The leaf is crocheted.
I need 16 of these leaves. True, I already knitted them too... 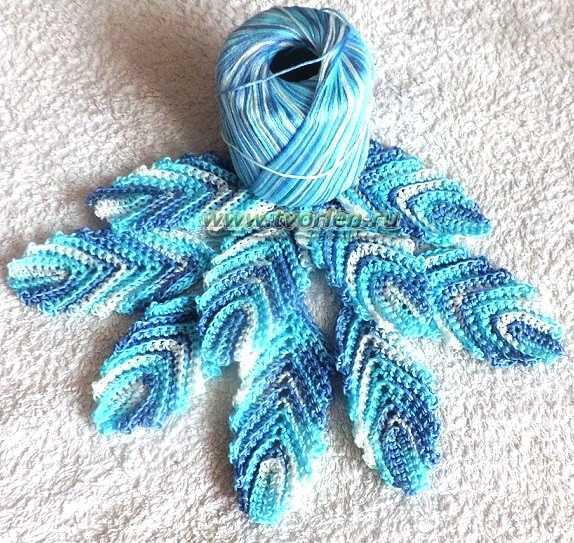
Join us!
And don't forget to leave your comment. Your opinion is important to me!
If you liked the article, then share this information with your friends by clicking the social network buttons! Just a huge request! - do not copy the entire material, please use social buttons! Do not be shy! I’ll help as much as I can 🙂 An idea has arisen - Share! If you find any errors, write to us and we will fix them! I have a desire to help the blog in some way - I will be only too glad! Hosting costs money, and materials are not cheap these days... So, if possible, then help financially))) 
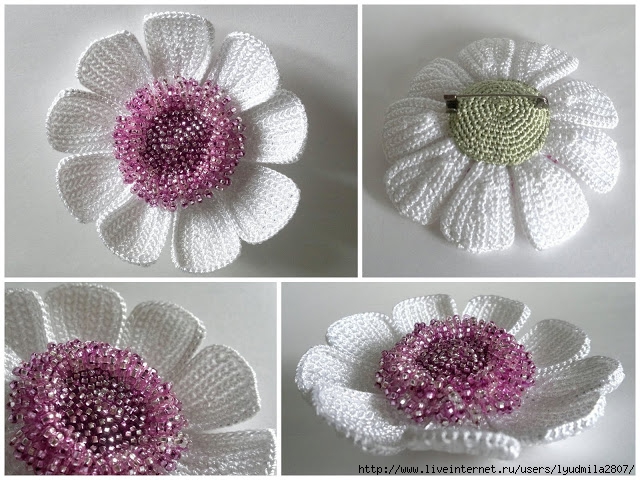
Ksenia Nikolaeva and her wonderful crocheted flowers. 2011
If your head is like a toilet, get yourself notebook... (K. Nikolaeva)
Chronology of the talented craftswoman’s work from the site kseniyanik.livejournal.com
2 May 4, 2011 Knitted bracelets
Quite often I scroll through posts from handmade_ru diagonally, and then my eye caught my eye on the knitted bracelets. And I really wanted it. Very. So far two have contacted. With daisies - for yourself. With daffodils - to a girl I know. Fastened with buttons. I’m wondering who else I know to “make happy”) 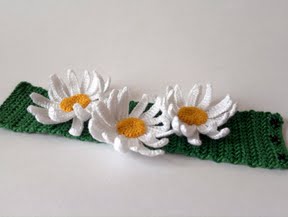
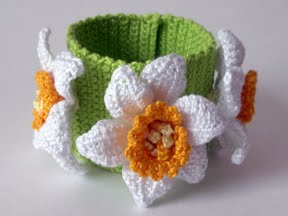
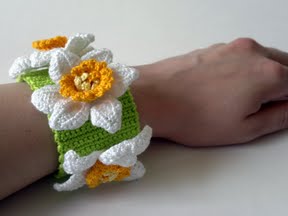
June 7, 2011 Bracelets: daisies and daisies![]()
For daisies, the pattern of tying the petals has slightly changed compared to the previous version. These petals do not curl. Hooray 
I knitted daisies according to the pattern from the book “100 Flowers to Knit and Crochet”. The base for the bracelet is crocheted with Tunisian crochet.
June 10, 2011 Sunflower
Threads are cotton. The middle of the flower is cotton with lurex. Hook 1.3. Became a brooch. I don’t wear brooches myself; I will give it away. I’ll make myself a bracelet with a sunflower. 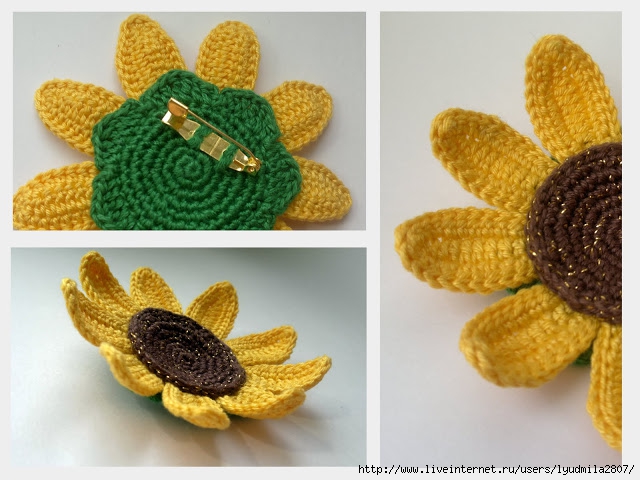
June 18, 2011 Sunflower number two
I knitted another sunflower. The middle is connected with beads and stuffed with filler. The surface is cool to the touch and pleasantly springs when pressed. I like the result, but the process of knitting with beads is not very good. It is quite tedious to collect more than two hundred beads on a thread. For now it's just a flower. I can’t decide what to turn it into: either a brooch, or a bracelet, or a hairpin... 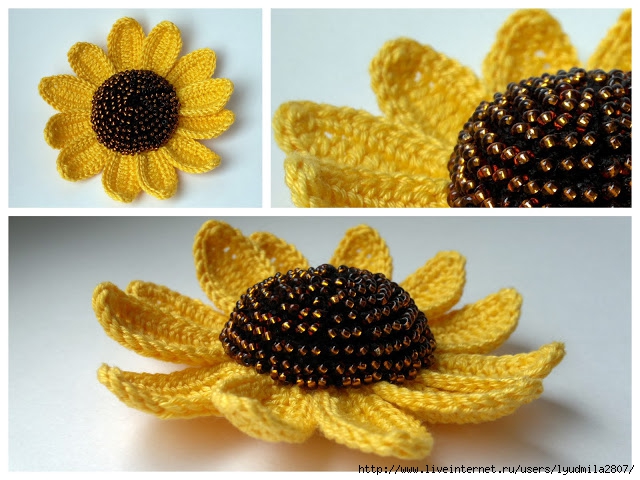
July 21, 2011 Knitted flowers
I found an orchid pattern online from some French magazine (Google it for “crocheted orchid”). In the original description, the installation involved attaching the petals to a wire using glue. I simply tied the wire around the perimeter: I didn’t have to starch and it made assembly much easier. 
Having slightly changed the pattern, I knitted an iris. Next time I want to take a different color: not sky blue, but blue-violet. You should try to tie the wire not only along the edge, but also in the middle of the petal. It seems to me that then it will be more flexible. And, perhaps, increasing the wire strands will help avoid breaking the wire during installation. 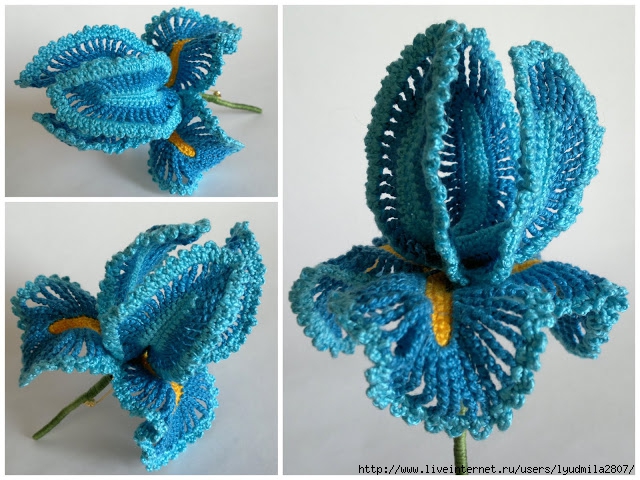
August 21, 2011 Knitted floral brooches with beads
When knitting flowers, I am moving further and further from nature) There are no more poppies and daisies, instead there are fantasy flowers with terry beaded centers. These centers are surprisingly pleasant to the touch; you want to touch them and touch them. I'm a kinesthetic person after all)
YarnArt Tulip yarn also turned out to be tactilely pleasant, but during knitting it causes inconvenience: it jumps off the ball in coils, gets tangled, and twists. But the result is pleasing: the knitted fabric is smooth and shiny.
As usual, I ran a wire around the perimeter of the petals. Without it, the petals curl tightly, and you don’t want to starch them.
In the white flower I tried not to sew a pin, but to tie it into the base backdrop. Looks neater. On the other hand, if a pin breaks, replacing it will be a pain. 
October 9, 2011 Evolution of daisies
The first daisies were crocheted in May according to the description from the book “Crocheted Flowers” by Natalya Kovpak and Olga Chernomorskaya. I quote: “PETAL (white). Knit a chain of 14 ch. Starting from the 3rd loop from the hook, knit 1 st b/n, 1 pst s/n, 9 st s/n, 1 pst s/n. Knit 2 chains 12 petals each."
I knitted exactly according to the pattern and the petals with terrible force twisted. What is visible in the photograph was taken immediately after the ironing) Before each “going out” I tried to smooth out the petals, but literally after two or three hours they curled again. My husband joked that they are like real ones: they close at sunset).
The second attempt was more successful. I additionally tied each petal tightly with single crochets. This strengthened the edge of the petals and prevented them from curling. Because of the extra row, I had to add one ch between the petals; in addition, there was no need for two tiers of petals, since they already overlapped themselves. 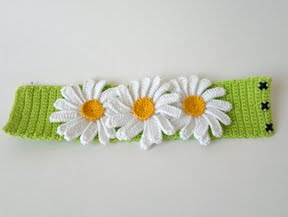
A little later, daisies “migrated” from bracelets to brooches. They have leaves, buds, stems, and sepals. To give the elements the necessary rigidity and for ease of installation, I used wire. The wire is tied into the leaves in the center, then it is tied into the last circular row of the sepals, thereby fastening the elements. 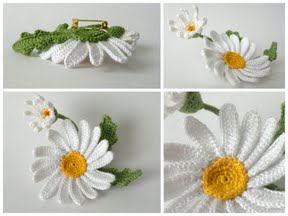
![]()
The last two daisies were knitted not from cotton, but from microfiber. It seemed to me that tying the petals only with single crochets was not enough: they did not bend very much, but they still bent. I tried to strengthen the “tying” row with wire. I liked the result. Not only do the petals not curl, but they can also take any shape and hold it perfectly.
To be honest, I'm a little tired of daisies. For some reason, many people ask to link them specifically. And I’m quite sad about knitting the same thing)
October 26, 2011 Poppy crochet: description
I came up with and knitted a poppy. I admired it and decided to write a description for it. It turned out to be verbose, but with pictures. The pictures are clickable. 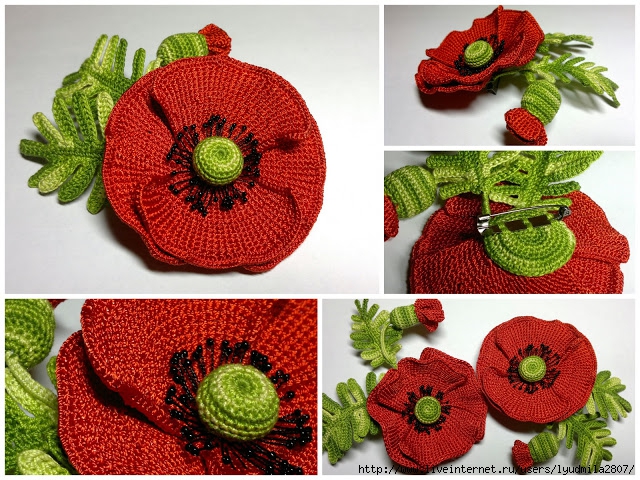
Materials and tools
Red yarn for petals (in in this case YarnArt Tulip, 100% microfiber, 250 m per 50 g) and green yarn for leaves (YarnArt Violet section dyed, 100% cotton, 282 m per 50 g). Hooks of the appropriate size: in this case 0.9 for petals and 0.7 for leaves. The wire is red, green and black; black beads, scissors, wide eye needle (tapestry); a little filler for stuffing the box and bud (in this case, toy filler was used; you can get by with padding polyester); platform brooch pin with three holes.
Flower petals 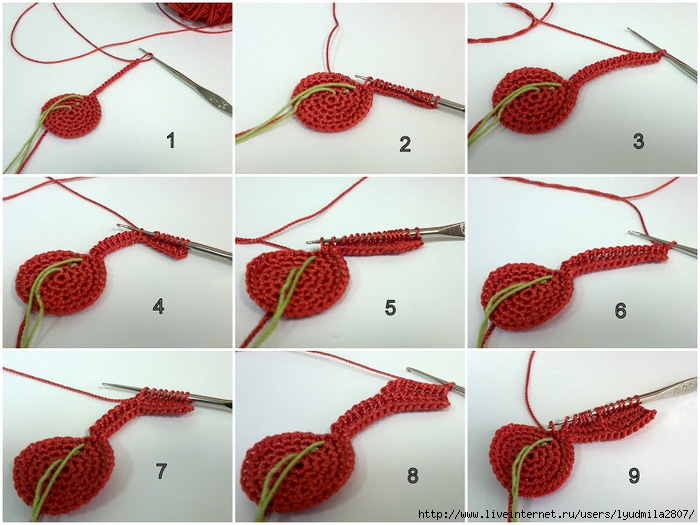
A poppy flower consists of two parts: a pair of lower petals and a pair of upper ones.
For the lower petals, use single crochet stitches to work a circle 6–12–18–24–30. Knit the first row (6 loops) into a sliding loop (amigurumi loop); then knit in a spiral (without lifting loops), making 6 increments evenly in each row. For increases, knit two double stitches from one stitch. Insert the hook under both half loops. For ease of counting stitches, the beginning of the row can be marked with a marker (thread of a different color, pin). If you make increments exactly under each other, clearly defined 6 sectors will be visible on the part and it will have the shape of a regular hexagon rather than a circle. For small sizes this is not critical, but for reasons of perfectionism, you can shift the position of the increases from row to row.
The resulting round part - the base of the lower petal circle - has 30 loops around the perimeter. We will consider the current loop to be the first. On the first 12 loops, one petal is knitted using the Tunisian technique; then 3 loops are knitted in a double stitch (the space between the petals); on the next 12 loops - the second petal; last 3 loops - st b/n.
For the petal, from the first loop of the base, knit a chain of 15 air loops (photo 1). Consider the loop on the hook to be an edge loop. From the remaining loops of the chain, pull out one loop at a time, but do not knit; Pull the last loop out of the first warp loop (photo 2). There will be 16 loops on the hook: 15 + edge loops. Knit two loops on the hook (a total of 15 “knits”). The first Tunisian row is ready (photo 3).
Cast on loops for the second row (pull the last loop again from the first warp loop); knit loops on the hook two at a time. The second row is ready (photo 6). The third row will be shortened: cast on 7 loops (there will be 8 on the hook, counting the edge loop), knit one (!) loop, then knit the remaining loops two at a time (photo 8). For the fourth row, cast on the first seven loops from the third row, seven more loops from the second row and pull the last loop from the second (!) warp loop. Knit loops two at a time. Knit the fifth row in the same way, picking up the last loop from the second warp loop. The sixth row is shortened again. In the seventh and eighth rows, the last loop is cast on from the third warp loop. 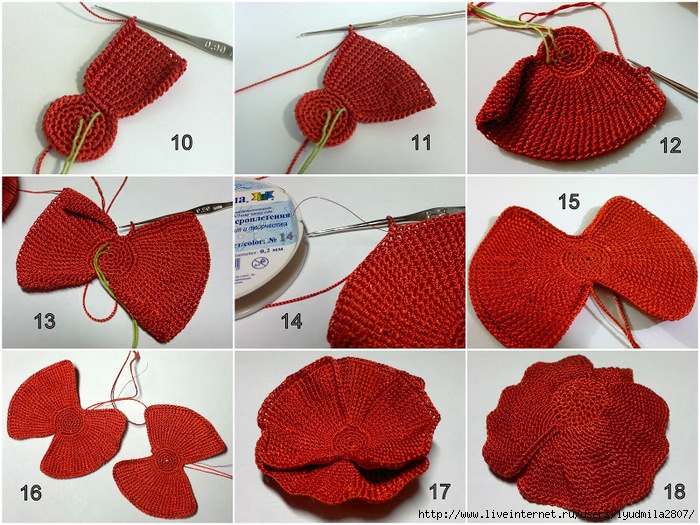
Knitting the petal continues up to the 12th warp loop inclusive (on each warp loop there are two Tunisian rows, with one shortened one between them). Having finished the petal, close the row with connecting posts (photo 12), knitting the last one into the 12th loop of the warp. In the 13th, 14th, 15th and 16th loops of the warp, knit along a single crochet. From the 16th loop, start knitting the second petal in the same way as the first. The detail resembles a figure eight (photo 13). As a rule, the edges of the petals curl (more or less depending on the density of the knitting and the twist of the thread). To impart rigidity and ductility, the part must be tied around the perimeter with single crochets, attaching wire to the edge (photo 14). It is advisable to choose a wire that matches the thread. However, with a sufficiently tight knitting, the wire will completely “hide” inside the last row. In the corners of the petals you should knit 3 single crochets to avoid deformation. From time to time it is useful to stretch the fabric in order to tie the maximum length of wire around the perimeter. This will give more freedom in giving the petals a natural dynamic shape. Having finished tying, cut the thread and twist the ends of the wire. “Hide” the ends of the threads by stitching them through the warp circle. The wire can be secured in the same way. The lower petal circle is finished.
The upper petal circle is knitted in a similar way. The base is one row less: 6–12–18–24. Each of the two petals is knitted on 10 warp loops. In the spaces between the petals there are two single crochets. For each petal, from one warp loop, knit two Tunisian rows of 15 loops (plus one edge stitch). Between twos of full rows, knit one shortened row of 7 loops (plus an edge stitch).
Tie up the ends of the threads and sew the pieces together.
Capsule and stamens 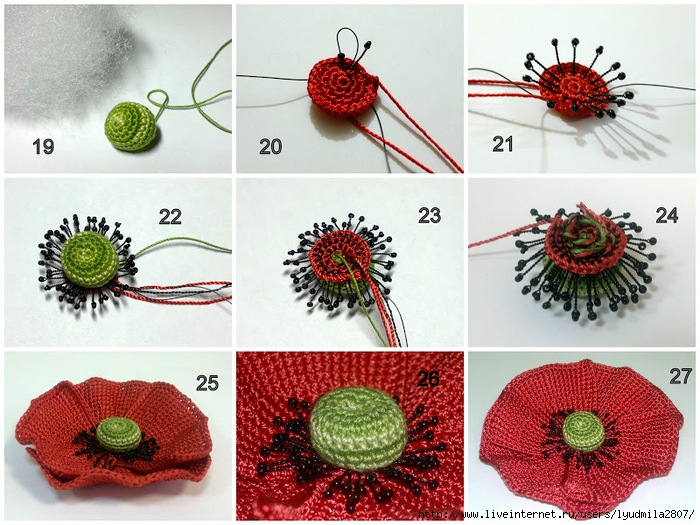
For the box (photo 19), knit a ball using single crochets in a spiral: 6–12–18–24–24–24–24–18–12–6. Decreases/increases are performed evenly. To decrease, knit two loops at a time: insert the hook into the first loop, pull the thread, insert the hook into the second loop, pull the thread, knit three loops on the hook. Before the last row, while the size of the hole still allows, tightly fill the ball with toy filler. Then knit the last row and cut the thread, leaving enough end to attach to the core of the flower.
For the stamens, use red yarn to knit a circle according to the size of the base of the upper petal circle: 6–12–18–24. Cut the thread, leaving a long enough end so that you can then sew the part with the stamens to the petals. Cut a piece of black wire 70–80 cm long (this length is not enough for all the stamens, you will have to increase it; but longer wire is extremely inconvenient to work with). The loops of the first row must be skipped; a box will be sewn to them later. But stamens will “grow” from all the other loops. Insert the wire into the first loop of the second row from the bottom up (from the inside to the face), leaving a short end of 7–8 cm. Attach the wire to the base with this end, wrapping it around the nearest post. Place a black bead on the working end of the wire, bring the wire through the same first loop to the wrong side, leaving on the face a loop with a bead about 1 cm high. Twist the loop to the base: you get a bead on a wire “leg” - the first stamen. Insert the wire from the wrong side onto the face into the second loop, string the bead, and through the same loop bring the wire to the wrong side, leaving a loop; twist the loop. In total there will be 12+18+24=54 stamens. The stamens of the first circle are about 1 cm high; the second circle – a couple of mm more; the third – a little more. If you want to make the stamens thicker, you can “grow” not one, but two stamens from every second or third loop. To extend the wire, just twist the ends of the “old” and “new” wire from the wrong side.
Using a thread coming from the box, sew it to the first row of the circle with stamens. Then, having pierced the box through and through, bring the thread to the top of the head and, hooking a couple of threads, again to the bottom. Pull the thread so that the box is slightly flattened and the top is concave. Make a couple more of these stitches, tightening the top and bottom. Fasten the thread and cut. Sew a circle with stamens into the center of the flower.
Leaves 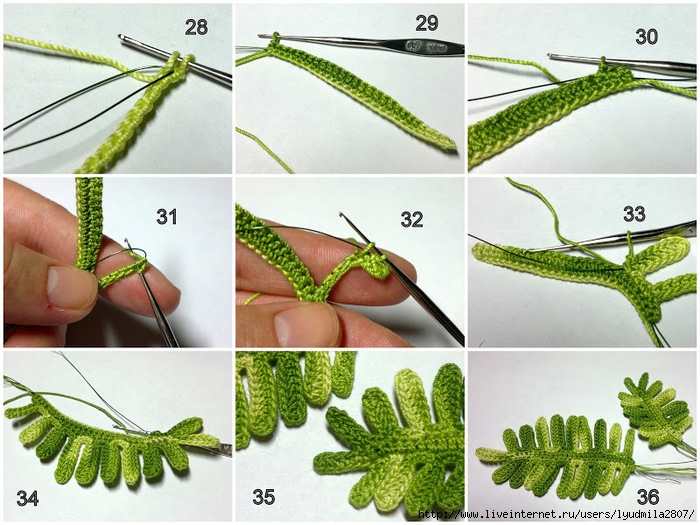
For a large sheet, knit a chain of 29 ch. Fold a green wire about 30 cm long in half. Attach the wire to the ch braid and knit the first loop from the hook with a single crochet, inserting the hook into the wire arch (photo 29). Pull up the wire and continue tying it, inserting the hook into the next loop of the chain under the wire veins. 2–4 loop – st b/n, 5–8 loop – pst s/n, 9–20 loop, st s/n, 21–24 loop – pst s/n, 25–28 loop – st b/n. Unfold the knitting. Attach the wire coming from the spool to the “pigtail” (do not cut the wire; it will be a shame to miss the size to the smaller side). In the first three loops, knit a single crochet. Knit only 7 tbsp on the wire (the wire and loops on it are located perpendicular to the previous row, photo 31). Bend the wire immediately after the last loop, placing it along the bottom edge of the seven loops cast on. Knit 6 tbsp, inserting the hook under the wire vein between adjacent loops on it. Knit the 7th stitch from the 3rd warp loop. Knit the next three loops of the warp with single crochets, continuing to “hide” the wire frame inside. Then, only on the wire, knit 1 tbsp, 6 pst s/n, 1 tbsp. Bend the wire and knit in the opposite direction 1 tbsp, 6 pst s/n; Knit another st into the warp loop. Knit the next three loops of the warp with single crochets. For the third branch of the sheet, cast on 9 loops on the wire: 1 st b/n + 7 st s/n + 1 st s/n. Bend the wire and knit the loops in the opposite direction symmetrically. Continue knitting branches from every 3rd warp loop. At the same time, knit the 4th, 5th and 6th leaves on 10 loops (1 st b/n + 8 pst s/n + 1 st b/n), the 7th leaf - on 9 loops, the 8th on 8, 9th on 7. 10th - “apical” leaf - knitted on a loop from the end of the base of 7 loops. The left side of the sheet is performed symmetrically.
For a small leaf, knit a chain of 20 chain stitches. Attach a wire bent in half; knit 3 tbsp s/n + 3 tbsp s/n + 6 tbsp s/n + 3 tbsp s/n + 4 tbsp s/n. Unfold the knitting and attach the wire without cutting it from the spool. Knit 3 tbsp. For the first toshoko branch, knit 6 tbsp on the wire, bend the wire and knit 6 tbsp in the opposite direction, knitting the last stitch from the warp loop. Knit the next three stitches of the warp in a st. For the second branch, cast on the wire 1 st b/n + 5 pst s/n + 1 st b/n and knit symmetrically in the opposite direction. Knit another 3 tbsp and for the third branch, cast on the wire 1 tbsp + 6 tbsp s/n + 1 tbsp; knit in the opposite direction. Tie the 4th branch in the same way; 5th – like the second; 6th – like the first. Tie the top leaf at the end of the base of 6 columns. Knit the left side symmetrically.
Bud 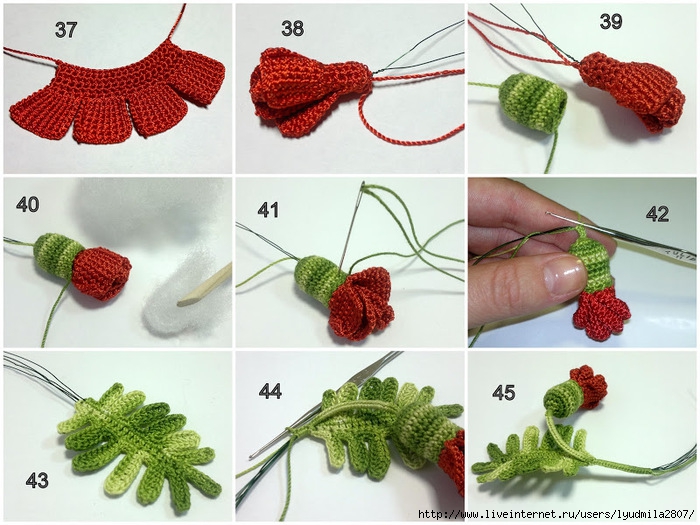
For the petals, use single crochet stitches to knit a rectangle 19 stitches long and 5 rows high. Next, using the Tunisian technique, knit 4 petals 7 loops high and 8 rows wide (2 rows from each warp loop). The gap between the petals is 1 column (4+1+4+1+4+1+4=19). Having finished the last petal, use connecting posts to go down to the first row of the rectangle and cut the thread, leaving an end of about 30 cm (photo 37). Roll the piece into a tube (right side out) and secure the base of the resulting cylinder with the remaining thread.
Knit the sepals for the bud with single crochets in a spiral: 6–12–18–18–18–18–18–18–18–18. Before starting knitting, leave the end of the thread about a meter long; bring it to the front side. Having finished the piece, cut the thread, leaving an end of about 30 cm.
Using a piece of green wire about 35 cm, pierce the base of the bud petals. Place the part in the middle, twist the wire ends by 3-4 mm. Seal the ends of the threads.
Insert the petals of the bud into the sepal, bringing the wire through the bottom of the sepal to the front side (photo 39). Fill the gap between the base of the petals and the walls of the sepals with filler. Using a thread from the edge of the sepal, sew it to the petals. Using a thread from the bottom, tie the wire with single crochets. At a distance of 3–4 cm from the bud, attach to the stem small leaf(the wires from the leaf will become part of the stem) and continue tying another 3-4 cm. When attaching the leaf to the stem, it is important not just to tie the ends of the wire together, but to knit the very first column after the junction by inserting the hook into the end loop of the sheet. Otherwise, there is a risk of “losing” the sheet during operation: the wire may simply slip out of the binding.
Assembly 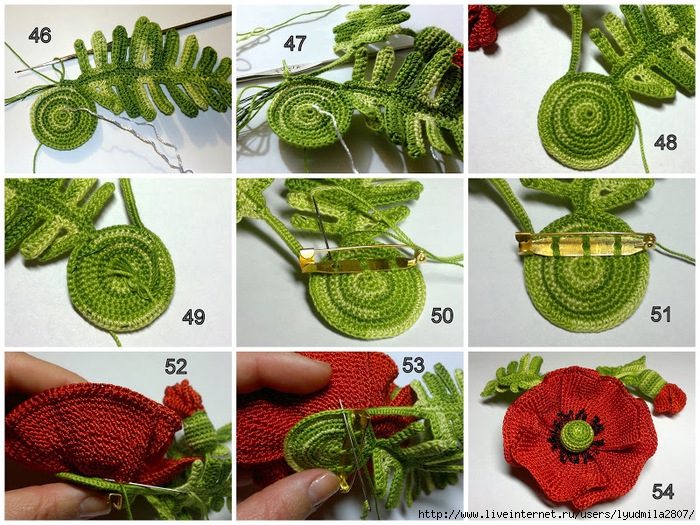
Knit the sepal for the flower (aka the base of the brooch) with single crochets in a spiral: 6–12–18–24–30–36–42–48–54. Increases within each row are made evenly, but from row to row it is better to shift their location so that the part turns out to be round rather than hexagonal.
Before the last row, attach a large sheet to the base (with the wrong side facing you, facing away from you!), and continue knitting, laying the wire and threads from the sheet around the perimeter of the base (photo 47). After 7–9 loops, attach the stem with the bud inside out to yourself, facing away from you (photo 48). Having finished the last row, cut the thread, leaving a fairly long end to sew the pin to the sepal and the sepal to the flower. Twist the protruding ends of the wire, if any remain, together, roll them into a ring and lay them flat on the part. Sew a brooch pin to the sepal, placing it just above the center. If you sew exactly in the center, it may “dangle” on the clothing. Sew the flower to the sepal. Rejoice.
October 27, 2011 Following on from the post about poppies (why I don’t knit for sale)
While I was knitting the second poppy and preparing the description, I tried to calculate the time spent. Each pair of petals takes about two hours; box with stamens for almost 3 hours; leaves by the hour; bud for about an hour; and at least an hour to assemble. Total 11 hours. Probably, you can do it faster, but I’m counting my time costs now, right? 11 hours is a little less than one and a half working days. If my total monthly income is divided by the number of working days, it will be approximately 2,000 rubles. Even if you don’t add the cost of materials (although some beautiful threads or Japanese beads are worth a wow!), in order to maintain your financial situation in the event of leaving your main place of work, the poppy would have to be offered for 2500 rubles. No one will buy it for this price, and for less I would be SORRY to part with it. That's why I don't take orders and prefer to give my own flowers. So I’m going to release the poppy today. I really hope that the future owner will like it.
November 3, 2011 Crochet snowdrops: debriefing
The last work - snowdrops - left me feeling dissatisfied and annoyed. I have never made so many mistakes in any product before. Nevertheless, I still decided to describe it. Firstly, I photographed the stages of work and did not want the pictures to settle as dead weight on the hard drive. Secondly, you can learn from unsuccessful experiences useful lessons. In the description, thoughts about possible improvements in the next version are highlighted in green italics. 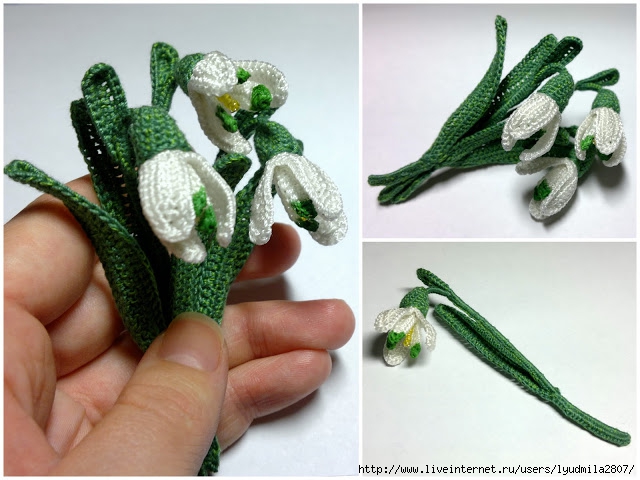
Materials and tools
For leaves, bobbin threads (polyester + silk), hook 0.5; green wire. It must be admitted that the choice of threads is not entirely successful. Below I will outline my thoughts on this matter in more detail.
For flower shoe nylon 7K; hook 0.7; white (silver wire); some yellow beads.
For assembly, a needle with a wide eye, pliers, side cutters.
For one flower you need to knit three inner petals (in one piece), three outer petals (in one piece), a bract, a large leaf, and a calyx. All stitches are knitted using both half-loops.
Inner petals 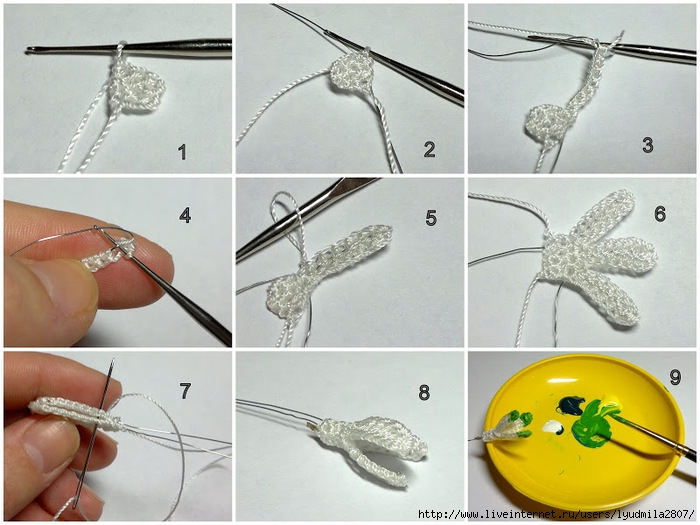
Knit a 3 by 3 rectangle with single crochets (photo 1). Attach the wire, leaving the end about 10 cm (do not cut the wire from the spool), knit a double stitch into the loop of the previous row (photo 2), cast on only 1 double stitch, 6 double stitches, 1 double stitch. n (photo 3). Bend the wire, placing it along the edge of the loops you just cast on; knit 1 st b/n and 6 pst s/n in the opposite direction, inserting the hook between the loops under both wire strands (photo 4, 5). Work a st b/n into the 1st warp loop, a st b/n into the 2nd loop. Similarly, knit the 2nd petal on the wire, then the 3rd. Work another 2-3 sc along the edge of the rectangle to go down to its base (photo 6). Fasten the thread; cut the thread and wire, leaving the end of the wire 10 cm long, the thread 15-20 cm. Use this thread to sew the edges of the rectangle so that you get a tube with petals (photo 7,8). Seal the ends of the threads (nylon ones can simply be tied in a knot and melted with a lighter). The tips of the petals need to be tinted green. You can embroider them if you know how to do it carefully. I don’t know how, so I decided to paint them (photo 9).
The first mistake was to take ordinary acrylic paints instead of special paints on fabric. The paint did not spread, as I feared, but it significantly changed the texture of the canvas: the tips of the petals became rough and tactilely unpleasant. The second mistake is that when mixing paints, I tried to achieve only a believable shade that was pleasing to the eye, without checking the available supplies of green thread. Naturally, I missed. Not a single tone suited me, I had to buy more.
Outer petals 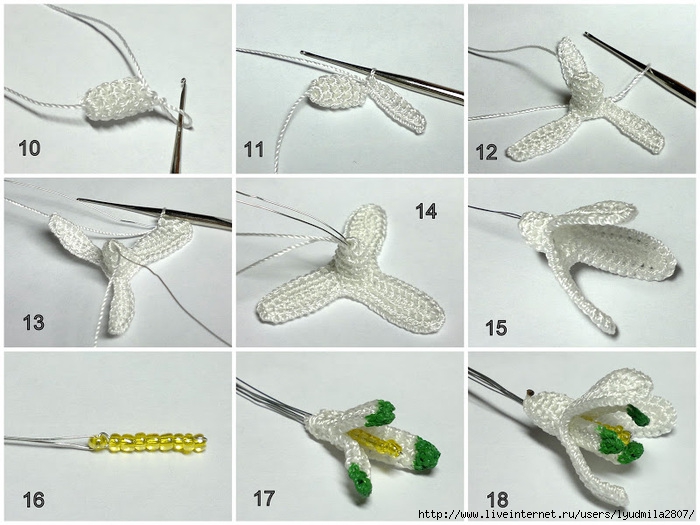
In a spiral, single crochet, tie a tube 6-9-9-9-9 (photo 10). Count the last stitch knitted as the first one. Cast on a chain of 11 ch. Starting from the second loop from the hook, knit 1 st b/n, 2 st s/n, 4 st s/n, 2 pst s/n, 1 st sc/n (photo 11). Knit single crochets into the 1st warp loop (the same one from which the petal “grows”), into the 2nd, 3rd and 4th. From the 4th loop, knit the second petal; from the 7th – the third (photo 12). Attach the wire and tie the petals around the perimeter with single crochets (photo 13). Leave the ends of the wire 10 cm long for the stem; bring them through the initial ring to the front side (photo 14). Seal the ends of the threads (photo 15).
I don’t yet see the possibility of knitting reliable pistil-stamens for a snowdrop. You can depict the yellow center (photo 16) like this: string a bead into the middle of a wire about 25 cm long, bend the wire in half and string beads on both ends in such a quantity that this bead column is level with the inner petals (or even slightly lower). To secure the “post”, string the last bead onto only one end of the wire, and pass the other end through it in the opposite direction. To assemble, you need to insert a bead column into a small petal circle (photo 17), all together into a large petal circle (photo 18).
Leaves, assembly
For the leaves, in this case, bobbin threads (polyester + silk; two threads) and a 0.5 hook were used.
I didn’t really like the result: two threads different shades green did not give any noticeable color transitions and all this greenery looks pretty dull. Thin sectional dyed yarn would fit perfectly here, but the YarnArt Tulip and YarnArt Violet sectionals I had turned out to be too thick for such a miniature flower. In the future, I’m thinking about dyeing nylon threads myself, but for now I’ll tell you how I knitted this time. 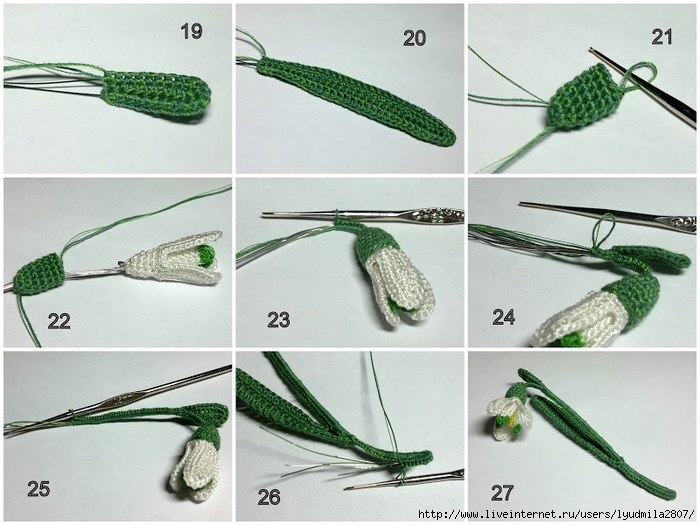
For the bract leaf (photo 19), knit a chain of 11 chains. Starting from the second loop from the hook, knit 2 st b/n, 2 st s/n, 2 st s/n, 2 pst s/n, 2 st sc/n. Unfold the knitting, attach the wire to the edge of the piece, leaving the end about 10-12 cm long, and tie the sheet around the perimeter with single crochets. From the end, knit three stitches into one loop. Cut the wire, leaving an end of about 10-12 cm.
For a large sheet (photo 20), knit a chain of 31 ch. Starting from the second loop from the hook, knit 3 st b/n, 3 st s/n, 18 st s/n, 3 pst s/n, 3 st sc/n. Unfold the knitting, attach the wire to the edge of the part and tie the sheet around the perimeter: 4 tbsp s/n, 4 tbsp s/n, 14 tbsp s/n, 4 tbsp s/n, 3 tbsp s/n, in the loop at the top - 3 st b/n; tie the second side of the sheet symmetrically. Cut the wire, leaving an end 5-7 cm long.
Knit the cup (photo 21) in a spiral using single crochets: 6-12-12-12-12-12-12. To reduce the number of connections during assembly, it is better to first unwind a couple of meters of thread from the spool and knit a cup with this end. Closing the first row into a ring, you need to bring the thread from the spool to the front side.
Insert a flower into the cup (photo 22). Sew the edge of the cup to the petals. Use a thread coming out of the bottom of the cup to tie the wire veins - the stem of the flower (photo 23). Attach a small leaf 1-1.5 cm from the flower (photo 24). After another 5-6 cm, attach a large sheet. After 1.5-2 cm from the large leaf, bend the wire (you may have to use pliers) and knit the columns on the stem in the opposite direction to the leaf (photo 26). Cut off the excess wire with side cutters; seal the end of the thread.
I described this method of forming a stem because I myself used it in this version of snowdrops. I can't say that I'm completely satisfied with the result. A braid made from columns does not turn out as smooth as we would like on bobbin threads. When the ends of the wire veins become very short, they “crawl” onto the surface of the stem. It is practically impossible to bite them down: even if the “stumps” are not visible visually, they are felt tactilely. It is difficult to neatly bend a bundle of 10 wire strands.
What other option do I see? You can try not crocheting the wire stem, but simply wrapping it with thread. I did this when installing flowers from beads. Naturally, the winding must be tight, the turns must be laid one after another. For reliability, you can process the PVA thread as you wind it. What will it give? The stem will be thinner and more graceful, without excessive thickening at the end. The wire ends will not stick out through the threads. When choosing this method of making a stem, you cannot seal the ends of the threads from the sheets. The fact is that when tying the stem, the leaf is tied to it “by the meat”. When winding, there is no possibility of such a connection and there is a risk that the sheet will slide along the wire frame, exposing it. To avoid this, you need to wrap the stem together with these threads coming from the attached part.
A few more words about my unsuccessful attempt to collect three flowers into a brooch. 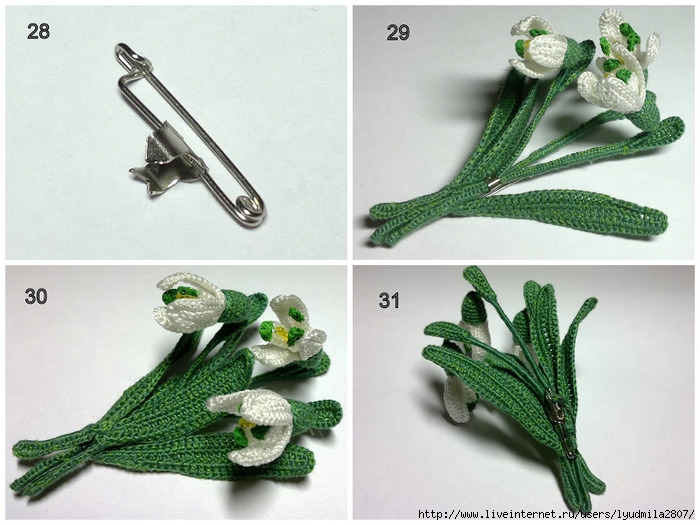
I purchased a “vertical flower pin” specifically for this purpose (photo 28). By design, it is a safety pin with an open ring attached. You need to insert flowers into this ring and clamp them with pliers. In theory, everything is fast, simple and reliable. I made a bouquet, put it in a ring, and clamped the ring with pliers. After this manipulation, the ring, which had previously sat firmly on the pin, began to move freely along it up and down and rotate left and right. I had to twist it out and secure the pin with thread and wire. As a result, the inside looks completely unpresentable (photo 31).
Another problem with the pin was that the metal ring “hugging” the stems was visible on the front side of the bouquet (photo 29). I had to tie an extra leaf and sew it to the stem to cover the ring. No matter how hard I tried, I couldn’t make the connection point invisible (photo 30). Options? First, look for high-quality fittings that will behave decently. Secondly, the “camouflage” leaf must be attached to the stem directly when assembling the flower, and not to a ready-made bouquet. It must be understood, however, that if the stem is not wrapped, but tied, then it will be practically impossible to position it at the desired angle without skewing the “pigtail”.
P.S. Now I’m trying to take into account all the mistakes and knitting the third version of snowdrops.
November 4, 2011 Crochet snowdrops: working on mistakes
I knitted the third version of snowdrops. Fixed some errors.
I have already written that monotonously colored green threads in snowdrops look rather dull, and there are no thin enough sections on sale. I haven’t gotten around to dyeing my favorite shoe nylon yet, but I bought some floss in the color I wanted to try. Cotton, 6 threads, 8 m per skein. 6 threads is, of course, too many. I rewound three. From 8 meters in three threads three large leaves for a snowdrop come out. It’s not cheap, to be honest; but the leaves look much more graceful.
As planned, this time I did not tie the stems, but wrapped them. They turned out thin and neat. And now it’s not a shame to show the inside out. 
The issue with the fittings remains open. This time I acted as carefully as possible and the ring on the pin does not move up and down, but it does rotate left and right, although with a small amplitude.
November 27, 2011 Blooming apple tree
Another brooch - a blossoming apple tree branch. For petals: shoe nylon 7K and hook 0.9. For leaves: Micron polyester 20s/3 and hook 0.5. The leaves are embroidered with floss in 2 folds. Stamens made of beads and wire. I’m not entirely happy with the result, but the trouble is, I can’t understand why exactly. Perhaps I tormented them too long) 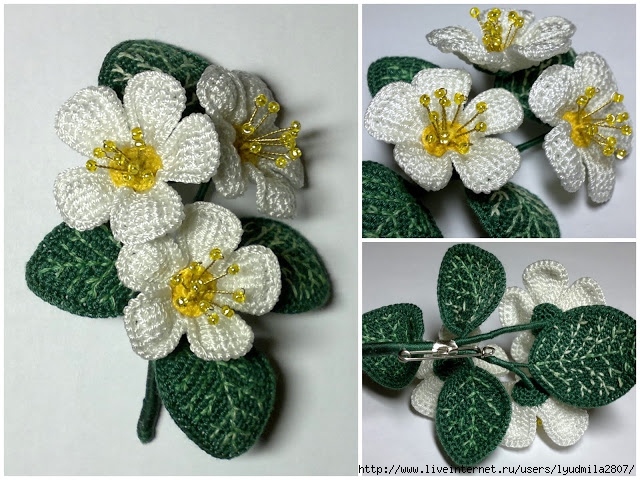
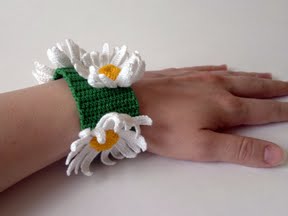
December 1, 2011 Hair bands with daisies
I knitted it at the request of a good friend for his daughter’s birthday. 100% cotton and this time no internal frame: in children's hair accessories you want to do without wire. Now I want to try other flowers in rubber bands. I only doubt whether it will be possible to completely eliminate the frame and at the same time maintain its shape without starching. 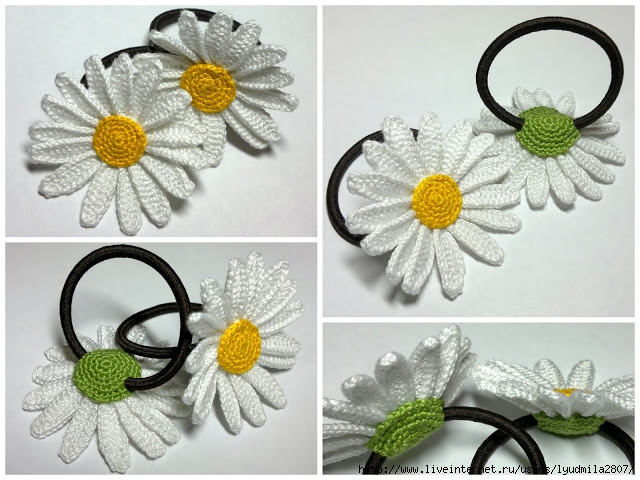
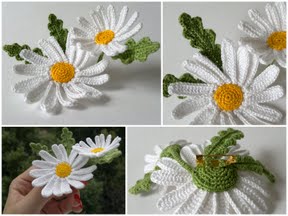
December 8, 2011 Crochet chamomile: description
I am sharing a description of daisies. There are a lot of words. The pictures are clickable. 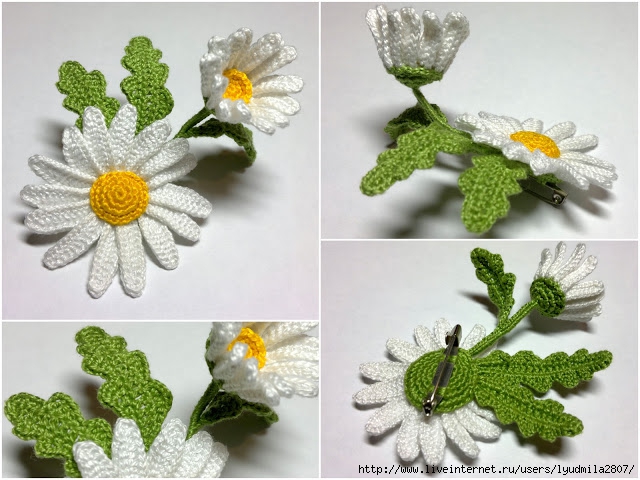
You will need “Iris” threads in white, yellow and green colors, a hook No. 0.7, green wire, a base for a brooch, and a needle with a wide eye. 
For the petals, cast on a chain of 13 ch. Starting from the 3rd loop from the hook, knit 1 dc, 1 dc, 7 dc, 1 dc, 1 sc (photo 1). Turn the knitting and tie the petal around the perimeter with connecting posts (photo 2). Knit 2-3 stitches into the end loop so as not to tighten the fabric. The first petal is ready. Without breaking the thread, knit a chain of 13 ch for the 2nd petal (photo 3). Do it exactly like the first one. Knit 15 petals in total. The result is a bunch of 15 elements, in which each petal partially overlaps the previous one (photo 5). Work 1 ch for lifting. Tie the bases of the petals with a stb in such a way that each stitch fastens the left half of one petal to the right half of the previous one (photo 6, 7, 8). In total you will get 15 sc, according to the number of petals. Having finished tying, close the part with the petals into a ring and continue knitting sc, evenly decreasing until the hole in the center is completely closed (photo 9). In the first row, repeat five times: 1 sc – 1 decrease. There are 5 decreases in the second row. Just in case, let me remind you how to make decreases: insert the hook under both half-loops of the column of the previous row, pull out the thread, do not knit, insert the hook under both half-loops of the next column, pull out the thread, knit all three loops on the hook. The side on which the ends of the threads are located is the wrong side. 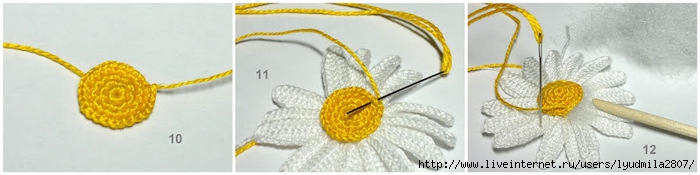
The yellow center (photo 10) is knitted in a spiral using single crochets with even increases: 6-12-18-24. The hook is inserted under both half loops. To increase from the loop of the previous row, knit two sc. First row: 6 sc in a slip stitch (amigurumi stitch). Second row: 6 increases. Third row: increase - 1 sc (repeat 6 times). Fourth row: 2 sc - increase (repeat 6 times). When cutting the thread, you need to leave an end of sufficient length to sew the center to the petals (photo 11). To make the middle convex, you can fill it with filler (photo 12). Bring the thread to the wrong side, tie all ends with a knot and trim. 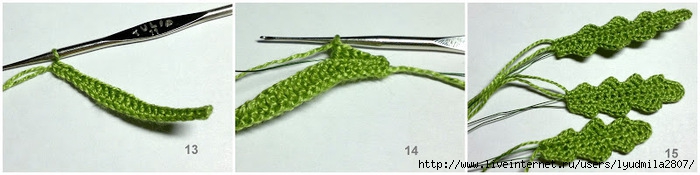
For the sheet, cast on 22 ch. Starting from the 3rd loop from the hook, knit 2 dc, 3 dc, 10 dc, 3 dc, 2 dc (photo 13). Unfold the knitting, attach a green wire about 25 cm long to the edge of the part. Tie the part along the perimeter along with the wire as follows:
2 dc, 1 dc, 1 dc, ch 2, 1 sp in the base of the last stitch;
1 dc, 1 dc, 1 dc, 1 dc2n, 3 ch, 1 sp in the base of the last stitch;
1 dc, 1 dc, 1 dc, 1 dc2, 1 dc3, ch 4, sp at the base of the last stitch;
1 dc, 1 dc, 1 dc, 1 dc2n, 3 ch, sp at the base of the last stitch;
3 sc, from the end of the sheet knit 2-3 sc, 3 sc;
1 dc, 4 ch, 1 dc3n in the base of the chain of ch, 1 dc2n, 1 dc, 1 dc, 1 dc;
1 dc, 3 ch, 1 dc2n in the base of the chain of ch, 1 dc, 1 dc, 1 dc;
1 dc, 2 ch, 1 dc in the base of the chain of ch, 1 dc, 2 dc.
Using the same principle, knit 2 more sheets of a smaller size (make the initial chain shorter, the “teeth” lower and in smaller quantities). 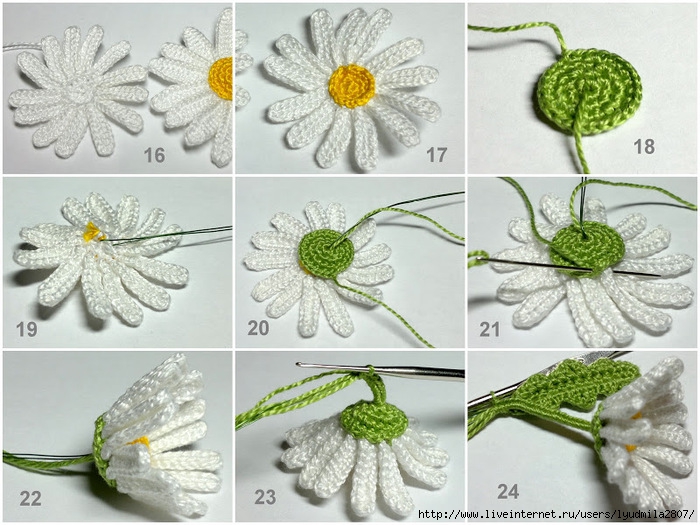
The bud is knitted similarly to a flower, but its petals are shorter (instead of 13 ch for the initial row, you can dial 10), thinner (instead of dc and pdc, knit a dc) and there are fewer of them (13 will be enough). Yellow center: 6-12-18. Green cup: 6-12-18-24. Sew the center to the petals. Using a piece of wire about 25 cm, sew through the petal circle from the inside out, hooking several threads (photo 19). Bend the wire in the middle, bringing the ends together. Place a cup on the stem and sew it to the petals (photo 21). Attach a green thread to the base of the cup and tie the wire stem rather tightly with a stb to the desired length (photo 23). During the tying process, attach a small leaf to the stem (photo 24). 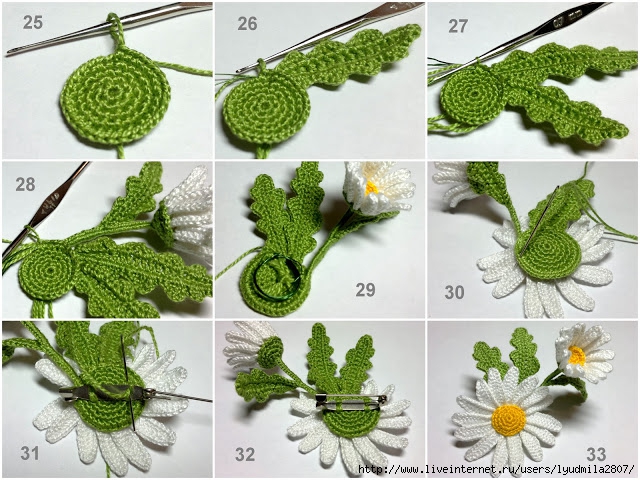
Knit the cup: 6-12-18-24-30-36 (photo 25). Before the last - sixth - row, attach a stem, knit 2-3 sc, attach a leaf, knit 2-3 sc, attach the last sheet, knit the row to the end. Tie the ends of the threads on the wrong side with a knot and trim. Twist the wire ends together and lay them in a ring (photo 29). Sew the cup to the petals. Sew on the base for the brooch. Ready)
December 15, 2011 Elusive color
I knitted a brooch. And I can't take a picture. I tried all the settings available to me. The color is distorted beyond recognition. IN best case scenario, the photo comes out almost black and white. And it is a wonderful shiny lilac-blueberry color. I’ll try, of course, to wait until Sunday and shoot it in natural light, but I strongly suspect that it won’t get much better. About a year ago I already encountered a situation where the camera “didn’t pick up” the color. It was a felted red poppy and it was only possible to photograph it more or less tolerably with a DSLR.
Out of almost a hundred frames, the color is most similar to itself in those cases when the brooch does not lie on a sheet of white paper, but is lying on the sofa next to multi-colored balls.
Reshot on a black background. It turned out better than on white, but very “brilliant”. The flash produces glare on a smooth thread. And without a flash, under artificial lighting, even on a black background, even on a gray-brown-crimson background, the color is conveyed completely implausibly. 
December 30, 2011 Madeira Decora floral sectional brooch
A couple of months ago I bought Madeira Decora No. sectional dyeing threads at Leonardo. 6 and still didn’t dare to touch them, because one reel costs almost 200 rubles, and there are 100 meters in that reel. Having never come up with anything stunning, I knitted another flower brooch based on a cornflower, but without realistic stamens. The summer thing turned out to be: bright, juicy, graphic and a little cartoonish. One problem: again I can’t take a good picture. The blue thread contains a section of that very elusive violet shade, which I wrote about a couple of weeks ago. In all photographs, this section almost completely merged with the blue-blue ones.
And I liked the threads, by the way. We'll have to repeat it. 
The diameter of the flower is 6.5 cm. A wire frame is tied into the stem and around the perimeter of the leaves and petals. The petals are connected in one piece: first a circle STBN (6 - 12 - 18), then the petals on a chain of 10 VP in Tunisian rows (between two full rows - one shortened by 5 loops).
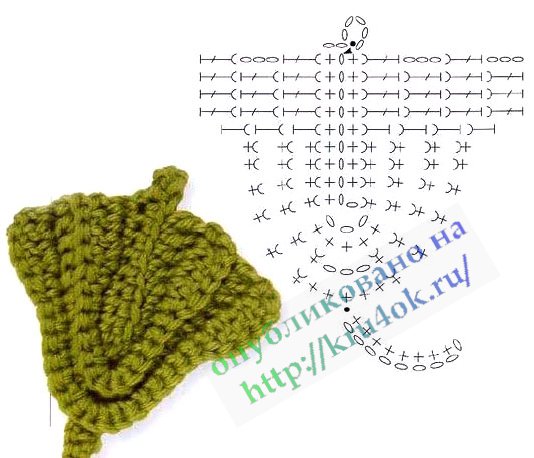
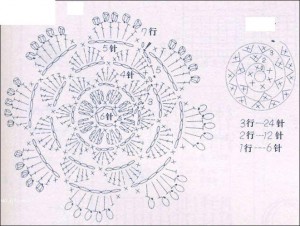
Crochet leaves
Sometimes for knitted bags, hats and other things, you need decorations such as flowers, leaves and other little things.
Knitting patterns, descriptions, and photographs are easy to find on the Internet.
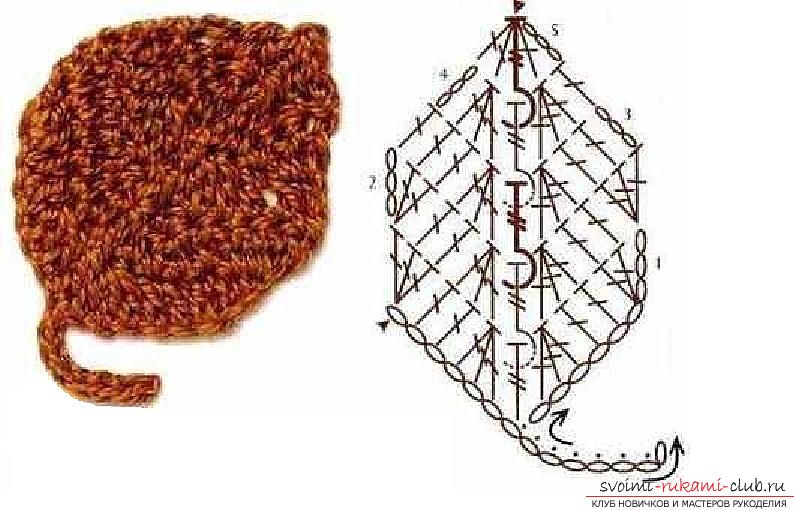
Here you will find the simplest patterns for knitting leaves of clover, oak, tulip and other plants on video, as well as a description of each crocheted leaf.
Knitting symbols in the table at the end of the text.
Note
If, when crocheting a leaf, you crochet both loops, the leaf will be flat. If you knit loops in one arc, the sheet will be embossed.
The descriptions are arranged according to the pages of the slideshow and the number of each associated leaflet.
1st row: crochet a chain of 15 ch for the stem + 10 ch for the stem of the right leaf +
5 ch for the middle of the right leaf.
2nd row: connect the last and 5th loop from the hook with a connecting loop into a ring; elm turn.
Row 3: (ch 5, hdc) in ring * 3; pov elm.
Row 4: (sc, 10 dc, sc) in each arch.
Row 5: 10 hdc on a chain of 10 ch.
Row 6: without tearing off the thread, continue knitting; knit a chain of 10 ch for the middle leaf + 5 ch for the middle of the middle leaf.
Row 7: knit 15 hdc on the starting stem. [Q]
1st row: knit a chain of 17 ch, knit a sc on the second loop from the hook, repeat until the last loop of the chain; in the last loop 3 sc (forming an oval), then knit a sc along the second side of the chain (when knitting on the second side, you can hide the initial tail of the thread by knitting a sc, then at the end of the row cut off the rest of the tail), p. elm.
2nd row: ch, sc to the end of the row, in the middle loop of the oval (see 1st row) knit 3 sc and continue sc into each loop, without tying 4 loops before to the end of the row. row, rev. elm.
Rows 3-7: Work as row 2. [Q]
For a cutting, knit 1-2 cm long.
Knitting only on the front side.
1st row: double chain tie a leaf stalk about 3 cm long.
2nd row: ch 9, on the second loop from the hook, hdc, 7 hdc; this is the middle of the leaf.
3rd row: first half of the leaf: hdc, hdc, sc, dc, dc2n * 2, 3 dc2n in one loop, ch 4; hdc in last stitch; Knit the second half of the leaf symmetrically to the first.
Knit the next two leaves as described in row 3.
At the end of knitting, attach the leaf to the previous leaf psbn.
1st row: knit a chain of 20 ch; starting from the fourth loop of the chain from the hook, knit a group of loops: (psbn, sc, dc, dc2n, dc, sc), psbn, (psbn, sc, dc, dc2n, dc, sc); On the second side of the sheet, continue knitting symmetrically.
2nd row: tie a psc, tie a picot over the dc2n, and at the top of the leaf, ch 4 in the ring.
1st row: knit a chain of 12 ch; starting from the second loop of the chain from the hook, knit a group of loops: (psbn, sc, dc, 5 dc2n, dc, sc, psbn);
Row 2: tie the leaf in a crawfish step, starting from the knitted group of loops and on the second half of the chain.
Knit the next four leaves separately, repeating rows 1 and 2.
When all five leaves are knitted, turn them to the wrong side and connect everything, knitting a sc at the base of each leaf, connecting at the end. loop of the last leaf with the first.
Tie the stalk with a double chain of the desired length.
Tie the first leaf.
1st row: knit a chain of 10 ch and enclose in a ring;
2nd row: 3 ch, 14 ss2n in the ring, 3 ch, psbn.
Without breaking the thread, knit 1-2 rows of the next two leaves as described.
Connect the last sheet to the first with a connecting loop.
Tie the stalk with a double chain of the desired length.
Leaves on the branch on the right side.
1st row: knit a chain of 8 ch; starting from the second loop of the chain from the hook, knit a group of loops: (psbn, sc, dc, ss2n, dc, sc, psbn) - this is the first leaf of the branch.
Row 2: ch 3 for the cutting, for the next leaf repeat row 1 according to the number of desired leaves.
Knit the top leaf without a stem.
The leaves on the left are knitted in the same way as on the right, on the cuttings 3 pcs.
Tie the length of the lower cutting with a double chain.
Start knitting from the top of the leaf - knit a chain of 7 ch; 3 ch rise, 3 dc in the next loop, 2 dc, 2 sc, hdc, ch, hdc in the first loop of the initial chain.
Continue knitting on the second side of the chain symmetrically knitting on the first side. If desired, tie the cuttings with a chain or double chain.
If the yarn is thick, then the leaf will be a decoration for a bag, scarf, or hat. For fine yarn, such leaves with a knitted flower will decorate a dress.
Knit a chain of 27 ch; on the second loop from the hook, knit 4 hdc, 3 hdc, 4 hdc, (2 hdc in one loop) * 2, 4 hdc, 5 hdc, 5 hdc, ch.
Continue knitting on the second half of the chain:
VP, 6 psc, 2 sc, decrease, 4 sc, 8 sc, 2 sc, 3 psc, connecting loop.
As you can see, depending on the increases and decreases, the shape of the sheet changes.
Knit a chain of 10 ch - this is a leaf stalk. - This is a chain of three air loops.
Work a sc into the first loop of the chain.
The right side of the sheet (to make it clearer, the first three picots will be numbered).
Row 1: ch 3 (this is the leaf stem), picot No. 1, (ch 2, picot No. 2), (ch 2, picot No. 3);
To form the top, knit 2 more picots and attach a hdc to picot No. 3.
On the second side knit (2 psc, picot) * 2, 3 psc.
2nd row: 4 ch, in each arch (bump, 2 ch) to the end of the row, dc, p.elm;
3rd row: ch 4, prop. arch, in the middle three arches (bump, ch), ch, dc, p.elm;
4th row: ch 4, prop. arch, in the middle two arches (bump, ch), ch, dc, p.elm;
5th row: ch 4, prop. arch, bump in the middle arch, ch, dc, p.elm, hdc in the arch;
Tie the piece around with a ch chain, as shown in the figure, and also tie the leaf stalk during the knitting process.
Special stitches (for easier reading of the description):
2 dc with a common vertex - bump
(2 dc with a common top, 2 ch, 2 dc with a common top) – “P_shishka”
(3 ch, dc knitted together, 2 ch, 2 dc with a common top) - “L_shishka”.
1st row: knit a chain of 4 ch, in the first loop of the chain dc, 2 ch, cone, 3 ch, cone, 2 ch, cone, elm p.
2nd row: L_shishka, 2ch; in the second arch 5 dc, 2 ch, P_shishka, elm turn.
3rd row: L_shishka, ch 2, above dc before. row (dc, ch) * 5 times, ch, P_bump, p.v.
4th row: L_shishka, ch 3, arch prop., (sc in arch, ch 3) * 3, sc in arch, ch 3, in last arch, P_shishka, elm turn.
In the next rows, at the beginning of knitting, knit psc in the first arch.
5th row: L_shishka, ch 3, arch prop., (sc in arch, ch 3) * 2, sc in arch, ch 3, in last arch, P_shishka, elm turn.
6th row: L_shishka, ch 3, prop arch, sc in arch, ch 3, sc in arch, ch 3, in last arch, P_shishka, elm p.
7th row: L_shishka, 3 ch, sc in the middle arch, 3 ch, in the last arch P_shishka, elm p.
8th row: ch 3, dc knitted together, picot, P_shishka.
Abbreviated names of loops
| SLP | next loop |
| decrease | pull the thread through the first loop, then through the second and knit them together |
| decreaseSS | knit two unfinished double crochets together by pulling the working yarn through 3 loops on the hook. |
| VP | air loop |
| sc | single crochet |
| dc | double crochet |
| ss2n | double crochet stitch |
| ss3n | double crochet stitch |
| psbn | half crochet |
| pssn | half double crochet |
| increase | 2 sc in one loop |
| increaseSS | 2 dc in one loop |
| sp-N | connecting loop, pull the thread through Nth loop the beginning of the row and the last knitting loop |
| connection loop | connecting loop; pull the working yarn through the first loop of the row and the loop on the hook |
| prop.N | skip N stitches |
| (ch + sc) | The plus sign indicates that both loops are knitted into one loop before. row |
| arch | chain of several chs in a knitting pattern |
| ! | (exclamation mark) - to the left of the sign is what we are knitting, and to the right - where we are knitting in the previous one. a number of |
| * | repeat the specified number of times |
| twist or turn | turn knitting |
| previous row | previous row |
| ( ),() or (()) | brackets enclose a group of loops that are performed a specified number of times |
| number of loops in knitted row | |
| [X] | Fasten the thread, but do not cut it. Leave the tip 12-15 cm. |
| [Q] | Fasten the thread, hide the end of the thread inside the part and cut it |
| "around" | the word “around” means that the indicated stitch must be knitted into each stitch of the circular row |
| RN | working thread |

Thanks for reading
Crochet leaves updated: July 24, 2017 by: Lana
The use of flowers and leaves for decoration by humans has been going on since the beginning of the world. In those ancient times, plants were depicted on temples and palaces; certain types of flowers and leaves were used by shamans and priests of various cults. Plants were symbols of many ancient gods. Certain types of flowers and foliage were given powers to bring good luck, victory in battle, profit, and even love. With the advent of needlework, their images were embroidered or knitted on clothes or furnishings and were convinced of their miraculous power. Some beliefs about them magical properties For example, the belief that the clover shamrock brings good luck has survived to this day.
Nowadays, needlewomen crochet leaves as decorative elements or components of a dress, shawl or other things. Openwork and dense products created with your own hands show the whole world a miracle of craftsmanship and beauty.
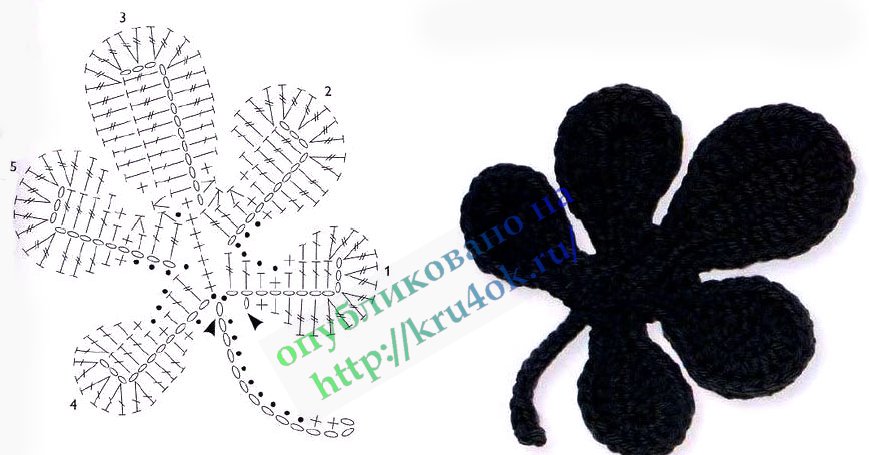
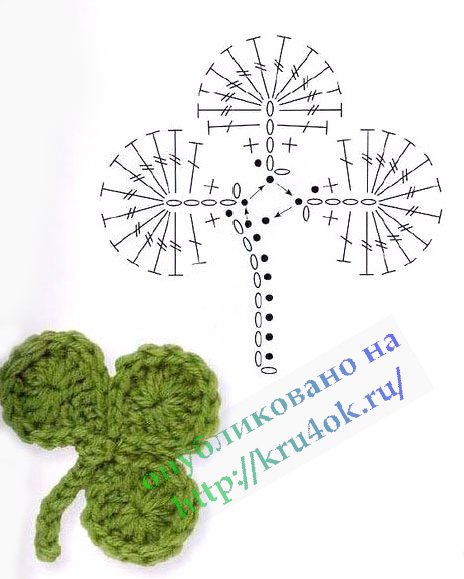
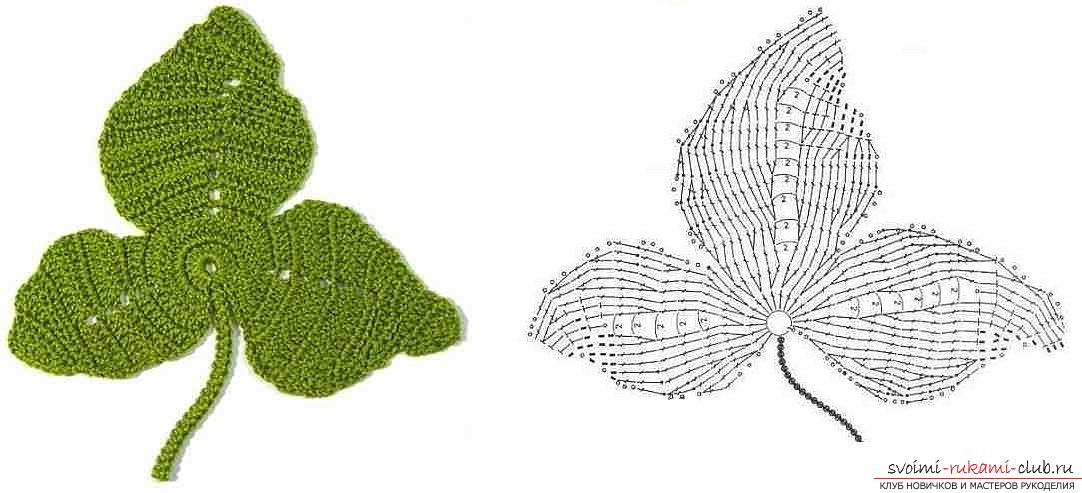
Clover shamrock.
Very simple circuit will be clear even to beginners, and the graceful shamrock can be used as an element of Irish lace or to create a composition of voluminous flowers.
- Knit a chain of 4 chains. loops
- 1 air lifting loop, 1 tbsp. without crochet, 1 tbsp. with a double crochet, knit 10 tbsp into the outer loop of the chain. with 2 yarn overs.
- Knit 2 more such leaf parts.
- Knit a chain of 8 air. loops
- 1 air lifting loop, knit 7 tbsp. without a crochet, tie all 3 leaves into the last loop of the chain with connecting posts.
Small leaf.
When knitting this leaf, embossed stitches with 2 crochets are used.
- Knit a chain of 13 chain stitches. loops
- 1 air lifting loop, 7 tbsp. without double crochet (6 chain stitches remain unknitted). Knit from the last st. single crochet chain of 6 chains. loops
- In one loop of the row below, knit 3 air. lifting loops + 2 tbsp. double crochet, 2 tbsp. double crochet, 3 tbsp. double crochet, 1 tbsp. with 2 double crochets in the seventh st. without crochet, 3 tbsp. double crochet, 2 tbsp. double crochet, 3 tbsp. double crochet with one base.
- Knit 3 air into one loop. lifting loops + 2 tbsp. double crochet, 2 tbsp. double crochet, 3 tbsp. double crochet, 1 concave column with 2 double crochets, 3 tbsp. double crochet, 2 tbsp. double crochet, 3 tbsp. double crochet with one base.
- 3 air lifting loops, 2 tbsp. double crochet, 3 tbsp. double crochet, 1 double crochet, 3 tbsp. double crochet, 3 tbsp. double crochet
- 3 air lifting loops, 3 tbsp. double crochet, 1 double crochet, 3 tbsp. double crochet, 1 tbsp. double crochet
- Knit with one top (3 chain stitches, 1 double crochet, 1 double crochet, 2 double crochets).
Relief columns are convex and concave.
Convex relief column. Make the required number of yarn overs, then insert the hook not into the loop, but from right to left into the column of the row below so that the “body” of the column of the bottom row is in front of the hook, pull out 1 loop and then knit as a regular double crochet.
Concave column. Knit like the convex one, but the “body” of the column of the bottom row should be behind the hook.
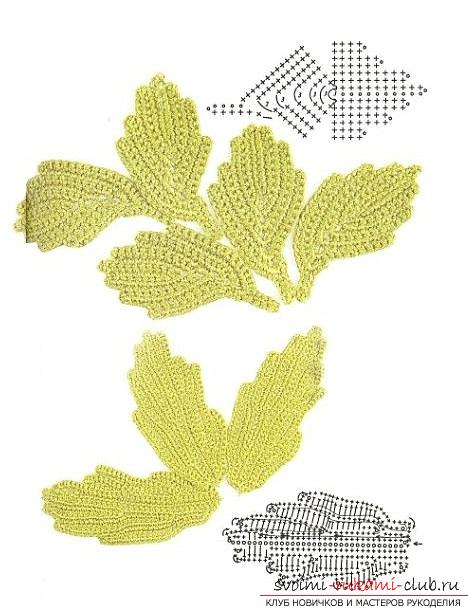
Chestnut leaf.
Starting from the 5th row of the middle, each petal is knitted separately. The length of the leaves varies due to the number of loops in the chain. For example, the smallest leaf is considered. Initially, a chain of v.p. is typed. for the petiole and center. Next, the middle is knitted in the round in rows back and forth.
Middle.
- Knit a chain of 28 chain stitches. loops
- Close a chain of 4 chains in a ring. loops
- First row. Knit 7 tbsp into the ring. without crochet + 2 air. loops (beginning and end of the row). Complete the row with a connecting column.
- Second row. 1 air lifting loop, 13 st. without crochet, 1 air. a loop. Finish with a connecting post into the lifting loop.
- Knit the third row in the same way, 20 tbsp. without crochet + 2 air. loops.
- Fourth row. similarly, 24 tbsp. without crochet + 2 air. loops.
- Fifth row. 32 Art. without crochet + 2 air. loops.
Knit the remaining air. loops in 2 rows st. without a crochet, each time tying it to the middle with a connecting post.
Leaf. Bottom right.
- Knit a chain of 13 air. loops and knit st. single crochet, tie with a connecting stitch into the 3rd loop of the middle from the first row of the petiole.
- Knit a connecting stitch into the next center loop (instead of 1 lifting loop), knit into a chain of air. loops 2 tbsp. single crochet, 2 double crochets, 2 tbsp. double crochet, 2 tbsp. with 2 double crochets, 2 tbsp. with 3 double crochets, 2 tbsp. with 4 double crochets, in the last air. chain loop and st. Single crochet, knit 15 tbsp. with 4 yarn overs.
- Knit the second side of the leaf symmetrically. Last st. Secure without a crochet with a connecting post with a center.
- Skip 1 tbsp. without crochet, 3 tbsp. single crochet, *picot, 2 tbsp. without a crochet*, repeat from * to * 10 more times, 8 tbsp. without a crochet.
- By analogy, tie the remaining leaves.
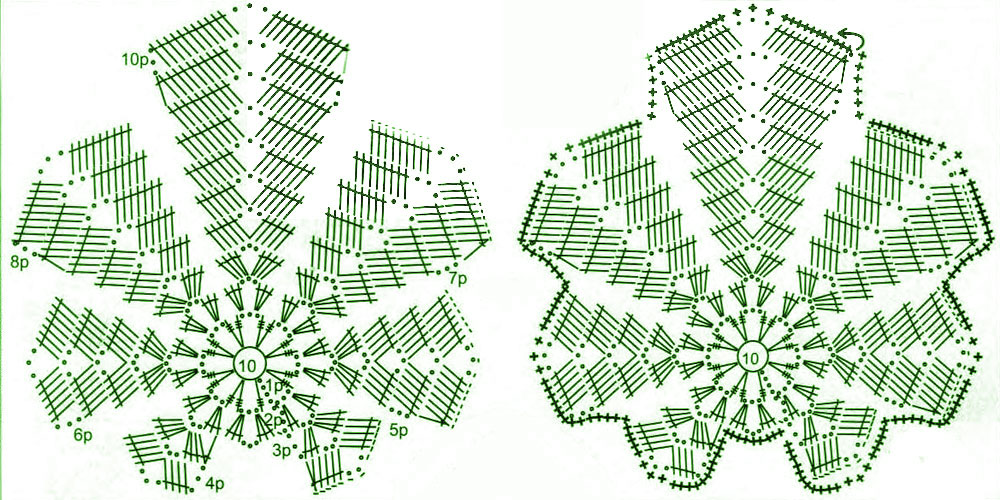
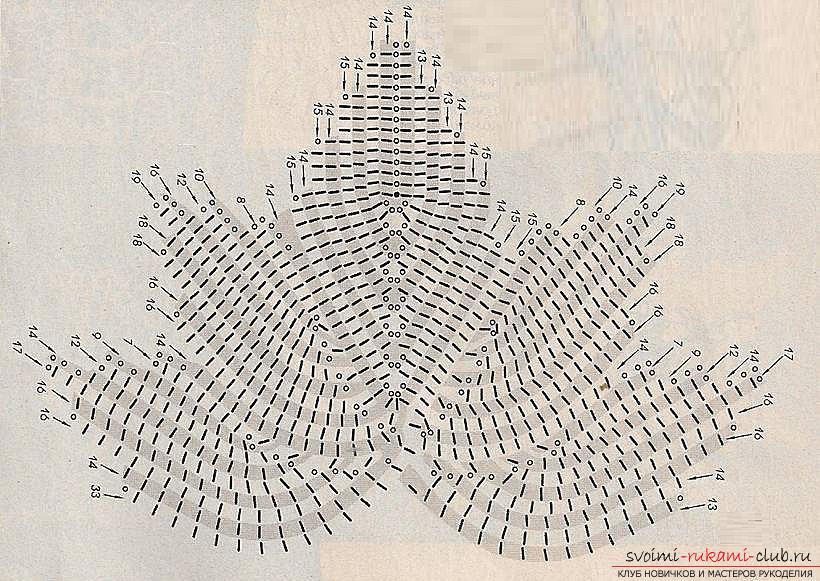
Beautiful maple leaf.
This motif, knitted from fine yarn, will be an excellent element of a dress; it can be used as part of a shawl or tablecloth. If you knit such a maple leaf from thick threads and attach it to fabric, it will become an excellent stand for hot food, and the various shades of yarn will allow you to choose a color that matches the interior of the kitchen or dining room, and make the room even more cozy.
- Close a chain of 10 air into a ring. loops
- First row. Knit a fragment into each loop (2 tbsp with 2 yarn overs + 3 chain stitches), replacing 1 tbsp in the first case. with 2 yarn overs for 4 air. lifting loops.
- Second r. In each fragment of the previous row, knit (3 double crochets + 3 double crochets + 3 double crochets), replacing 1 double crochet in the first case. double crochet lifting loops. There are 10 fragments in total.
- Starting from the 3rd row, the fabric is divided. Knit into 9 fragments (4 double crochets + 3 double crochets + 4 double crochets), in the first case replacing 1 double crochet. double crochet with 3 lifting stitches, finish row 1 tbsp. double crochet Turn the work around.
- Fourth r. 3 air lifting loops, knit into each of 9 fragments (5 double crochet stitches + 3 double crochet stitches + 5 double crochet stitches).
- Fifth r. 1 air lifting loop 11 st. single crochet (all loops knitted into 1 fragment of the previous row), knit into each of the remaining 7 fragments (6 double crochet stitches + 3 chain stitches + 6 double crochet stitches), replacing in the first case 1 tbsp. double crochet lifting loops.
- Sixth r. start 3 air. lifting loops. Knit 7 fragments (7 double crochet stitches + 3 chain stitches + 7 double crochet stitches). Finish row 2 tbsp. double crochet knitted with one top.
- Seventh row. Start with 1 lifting loop and st. single crochet in all loops of one fragment of the previous row, 3 air. lifting loops, knit 5 fragments (8 double crochet stitches + 3 double crochet stitches + 8 double crochet stitches). Finish row 2 tbsp. double crochet knitted with one top.
- Eighth row 5 fragments (9 double crochet stitches + 3 chain stitches + 9 double crochet stitches), replacing 1 double crochet stitch in the first case. double crochet lifting loops.
- Ninth row. 3 fragments and 10 tbsp. double crochet
- Tenth row. 3 fragments and 11 tbsp. with a double crochet, replacing in the first case 1 tbsp. double crochet lifting loops.
- Eleventh row. 2 fragments and 12 tbsp. double crochet
- Twelfth row. 1 fragment, start 3 air. lifting loops, 13 tbsp. with double crochets + 3 air. loops + 13 tbsp. with double crochets.
Maple leaf in original technology continuous knitting.
You can use it as a component of Irish lace or attach it to a fillet mesh to create a shawl. Perfect for decorating a bag.
In the diagram, a black dot marks the beginning of work.
- Dial a chain of 15 air. loops
- First row. 1 air lifting loop. Knit 13 tbsp. single crochet, glad to knit in the last loop (1 tbsp. single crochet + 4 chain stitches + 1 tbsp. single crochet), knit 13 tbsp. double crochet with reverse side initial chain.
- Second row. 1 air lifting loop, 13 st. without a crochet, in an air arch. knit loops (2 tbsp. double crochet + 4 chain stitches + 2 tbsp. single crochet), 11 tbsp. without a crochet.
- Knit 8 rows of the central part of the leaf according to the pattern.
- Ninth row. Start as usual with 1 air. with a lifting loop, knitting the indicated number of stitches according to the pattern. without a crochet, at the end of the row knit 4 air. loops.
- Tenth row. Knitting begins on one of the lateral left parts of the sheet. 1 air lifting loop, 8 tbsp. without crochet, 1 air. loop over st. single crochet row below, 1 tbsp. without a crochet.
- Eleventh row. 1 air lifting loop, 10 tbsp. without crochet, 4 air. loops.
- Twelfth row. 1 air lifting loop, 14 st. without crochet, 1 air. loop over st. without crochet, 1 tbsp. single crochet in st. Single crochet row 9.
- Knit further according to the pattern, securing the even rows of st. single crochet to st. Single crochet row 9.
- Knit the second left side of the leaf in the same way, without tearing off the thread, continue knitting st. single crochet to the end of the 9th row (right), knit 4 air. loops.
- Next row start 1 air. lifting loop and start knitting the two right parts of the leaf in the same way as the left ones.
A few more crochet leaf patterns.
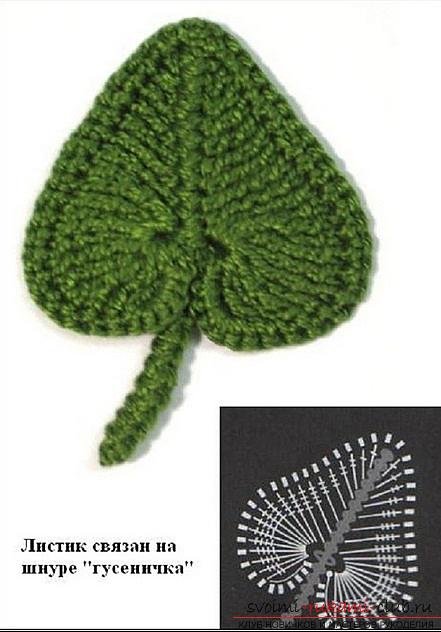
The original leaf is knitted on a caterpillar cord.