Original techniques and drawing techniques. Children's drawing techniques Techniques for drawing on paper
Ecology of consumption. Children: If your child periodically gets upset, saying: “I can’t draw this” or “it didn’t turn out nicely,” stop trying...
If your child periodically gets upset, saying: “I can’t draw this” or “it didn’t turn out nicely,” stop trying to draw according to a model, as is done in various drawing circles, and try spontaneous drawing techniques, not standard ones.
We offer you 20 OPTIONS of similar techniques that reveal...
Passepartout.
This is when a child’s doodles are inserted into a sheet with some shape cut out. Those. cut out a template, for example, butterflies and place it on top of the baby’s “drawing”. As a result, the child’s work forms a unique pattern of butterfly wings.
Drawing with feet.
Secure a sheet of paper to the floor with duct tape. Place a pencil between your baby's toes and ask him to draw something. You can create with both feet on one sheet of paper at the same time. Attach a large piece of paper to the wall and ask your child to draw something on it while lying on his back.
Frottage.
A sheet of paper is placed on a flat, relief object and then, moving an unsharpened colored pencil across the surface, you get a print that imitates the main texture. You can rub pencil crumbs over a textured surface in the same way. Anyone who has tried to draw on a table with a relief surface knows how this drawing technique can be included in a drawing completely uninvited. You can create drawings by combining the relief of several objects.
Airy colors.
To prepare the paint, mix in a small cup:
- one tablespoon of “self-raising” (pancake) flour - this is flour with baking powder already added. You can simply add 1 tsp to flour (per 500 g). soda and 1 tsp. citric acid,
- a few drops of food coloring,
- one tablespoon of salt.
Then you need to add a little water to give the “airy” paint the desired consistency.
You need to apply the paint onto a thick sheet of cardboard (if you don’t have the right brush, you can use cotton swabs).
Attention! Cardboard should not contain synthetic materials or films; use regular cardboard or very thick paper.
Place the painting in the microwave on high for 10 to 30 seconds until the paint is dry. Drying time depends on the thickness of the paint layer and its consistency.
Marbled paper.
Needed: shaving cream (foam), watercolor paints or food coloring, a flat plate for mixing shaving foam and paints, paper, scraper.
Work plan:
- Apply shaving foam in an even, thick layer onto the plate.
- Mix different colors of paint or food coloring with a little water to make a rich solution.
- Using a brush or pipette, drip paint of different colors onto the surface of the foam in a random order.
- Now, using the same brush or stick, beautifully smear the paint over the surface so that it forms fancy zigzags, wavy lines, etc. This is the most creative stage of the whole work, which will bring pleasure to children.
- Now take a sheet of paper and carefully apply it to the surface of the resulting patterned foam.
- Place the sheet on the table. All you have to do is scrape off all the foam from the sheet of paper. For these purposes, you can use a piece of cardboard or a lid cut in half.
- Underneath the shaving foam you'll find stunning marble patterns. The paint has time to quickly absorb into the paper; you just need to let it dry for a few hours.
Drawing with cling film.
We apply spots of several colors of watercolor or gouache paint on the entire surface of the sheet. We put the film on top and draw various lines, lightly pressing the film. Let the paint dry and remove the film. We complete the drawing with felt-tip pens or pencils.
Soap painting.
You can mix the paints with soapy water and then apply patterns and shapes with a brush. When drawing, soap bubbles are formed, which create the texture of colorful strokes.
Blotography.
Let the child drip paint onto the sheet, tilt it in different directions, and then finish drawing the blot so that it turns out to be some kind of image. Or a child dips a brush into paint, then places a blot on a sheet of paper and folds the sheet in half so that the “blot” is imprinted on the second half of the sheet. Then he unfolds the sheet and tries to understand who or what it looks like.
Drawing on a damp surface.
The technique is very simple: moisten a sheet of paper with water, let it dry for 30 seconds and start painting with watercolors. The colors spread in different directions and very interesting patterns are obtained (dawn, clouds, trees, rainbow).
Salt.
Make a sketch on paper first. Moisten it with water using a brush, sprinkle with salt, wait until it absorbs the water, sprinkle off the excess salt. When everything is dry, draw the missing elements and paint. Salt is good for drawing dragonflies, birds, jellyfish, butterflies, snow, smoke.
Wax.
Prepare a sheet of animal silhouettes that you will “draw” with a candle in advance. By painting over the drawing, the child will unexpectedly “create” images of animals.
Foam rubber or sponge.
By dipping a sponge in thick gouache, a child can draw landscapes, bouquets of flowers, lilac branches, and apple trees.
A bunch of pencils.
Securely secure a large piece of paper with duct tape. Gather colored pencils into a bun so that the sharpened ends are at the same level. Invite your child to draw.
Crayons and starch.
Pour a little starch onto a piece of paper and spread it evenly over the surface with your hands. Invite your child to draw with crayons on a slippery surface. It's better to use the primary colors of the crayons so that they give you new colors.
Colored glue.
Pour the glue into empty bottles, add a few drops of a different color to each, and you are ready to create works of art. Draw with colored glue on dark paper using the drip technique.
Gauze swab.
Invite your child to dip a gauze swab into paint and draw clouds, soap bubbles, snowdrifts, ducklings, and butterflies. The missing details must be completed with a brush or felt-tip pen.
Corn cobs.
Come up with some image. Dip the cob into the paint and roll it over a sheet of clean paper. Make an impression using the tail of the corncob.
Prints.
We make drawings using stamp imprints.
Drawing with dots.
The child, with light pressure from the pencil, outlines the preliminary contour of the object, then, using a dot technique, fills the space inside it, using felt-tip pens or pencils of different colors.
Painting with splashes.
The most important thing here is to master the “spraying” technique. Apply gouache to a dry toothbrush with fairly stiff bristles, a little less than you usually put in toothpaste. The consistency of the paint is slightly thicker than a paste, so water is usually not needed here. Hold the brush in your left hand with the bristles down at a distance of 3-4 cm from the paper and use the stick to scrape the bristles towards you.
The multi-colored “spray” (fireworks) and yellow-red (golden autumn) on a white sheet are very beautiful; white “spray” on a dark blue background (winter landscape).
Magic balls.
Material: box lid, balls, paint, paper, brushes, water.
Progress. Place a sheet of paper in the box and apply several multi-colored or plain drops of paint on it. Place 2-3 balls in a box and shake the box so that the balls roll, mixing the colors, creating a pattern. published
Consultation for parents "Non-traditional drawing techniques in joint activities of children and parents"
Non-traditional drawing techniques in joint activities of children and parents
The artist wants to paint
Let them not give him a notebook...
That's why the artist and the artist -
He draws wherever he can...
He draws a stick on the ground,
In winter, a finger on the glass,
and writes with charcoal on the fence,
and on the wallpaper in the hallway.
Draws with chalk on a blackboard
Writes on clay and sand,
Let there be no paper at hand,
And there is no money for canvases,
He will draw on stone
And on a piece of birch bark.
He will paint the air with fireworks,
Taking a pitchfork, he writes on the water,
An artist, therefore an artist,
Which can draw everywhere.
Who is stopping the artist?
He is depriving the earth of its beauty!
“The origins of children’s abilities and talents are at their fingertips. From the fingers, figuratively speaking, come the finest threads - streams that feed the source of creative thought. In other words, the more skill in a child’s hand, the smarter the child.”
V.A. Sukhomlinsky
It is known that drawing is one of the most favorite children's activities, which cultivates many positive qualities in a child, such as perseverance and patience, attentiveness, imagination, ability to think and much more. All of them will be very useful to the baby in later life.
Along with traditional methods of depicting an object or object on paper (drawing with pencils, brushes and paints, gouache), I also use non-traditional techniques in my work. I think that they attract the attention of little fidgets more. They are interesting to children of all ages and allow them to reach their full potential during the creative process. The work of creating drawings is not difficult, so kids do it with pleasure, acquiring skills in working with materials and becoming familiar with painting.
To instill a love of fine art and arouse interest in drawing, starting from a young age, I advise parents to use unconventional methods of depiction. Such unconventional drawing gives children a lot of positive emotions, reveals the possibility of using objects well known to them as artistic materials, and surprises them with their unpredictability.
Organize your workspace at home so that your child can comfortably not only sit, but also stand and sometimes move around a piece of paper. After all, you can draw any way, anywhere and with anything!
Be friends with your child. Try to understand what makes him happy, what makes him sad, what he strives for. Ask him to tell you what he wanted to depict. And do not forget that the child expects praise from you. He really wants you, adults, to like his work. Rejoice at his successes and under no circumstances ridicule the young artist if he fails. No problem next time!
Unconventional drawing techniques- these are methods of drawing with various materials: foam rubber, crumpled paper, tubes, threads, paraffin candles, dry leaves; drawing with palms, fingers, blunt ends of pencils, cotton swabs, etc.
They are different for each age group.
With kids junior preschool age can be used:
finger painting
painting with cotton swabs
poke with a hard semi-dry brush
palm painting
Children middle preschool age You can introduce more complex techniques:
foam rubber impression
stencil printing
candle and watercolor
spray
poking
IN senior preschool age children can master even more difficult methods and techniques:
regular blotography
drawing with a toothpick
monotype
batik
Each of these methods is a little game. Their use allows children to feel more relaxed, bolder, develops imagination and freedom for self-expression, and the work also contributes to the development of coordination of movements.
Non-traditional artistic and graphic techniques:
Punching
Since little children are always happy to stamp everything they can, they always like this drawing technique. Using a pre-made stamp (this could be the bottom of a plastic bottle, a lid, a cut from a potato, an apple, etc., covered with paint), prints are made on paper, creating a design that can later be supplemented.


"Leaf Print"- different leaves from different trees are used. They are covered with paint using a brush, leaving no empty spaces; this is done on a separate sheet of paper. Then the painted side is pressed tightly against the paper, trying not to move it out of place. The leaves can be reused by applying a different color to it; when mixing paints, an unusual shade can be obtained, the rest is painted with a brush. The results are magnificent landscapes.


"Drawing with palm or fingers"
The child dips his palm (the entire brush) into the gouache or paints it with a brush (from the age of five) and makes an imprint on paper. They draw with both the right and left hands, painted in different colors. After work, wipe your hands with a napkin, then the gouache is easily washed off.

"Imprint with crumpled paper"
The child crumples the paper in his hands until it becomes soft. Then he rolls it into a ball. Its dimensions may vary. After this, the child presses the crumpled paper to a stamp pad with paint and makes an impression on the paper.
"Paper Rolling"- take the paper and crumple it in your hands until it becomes soft. Then a ball is rolled out of it. The sizes can be different (small is a berry, large is a snowman). After this, the paper ball is dipped in glue and glued to the base.

"Drawing with cotton swabs"
It is very easy to draw with cotton swabs. We dip the stick in water, then in paint and put dots on the sheet. What to draw? Anything! The sky and the sun, a house in the village, a river, cars, dolls. The main thing in this matter is desire!

"Drawing on wet paper."
The sheet is moistened with water, and then the image is applied with a brush or finger. It will turn out to be blurry in the rain or fog. If you need to draw details, you need to wait until the drawing dries or put thick paint on the brush.

“Drawing with a toothbrush and disposable forks”
A brush or fork is dipped in paint and an imprint is made on paper. You can drag a brush over a sheet, you will get waves, wind, stream, etc.

"Blotography"
A blot is an integral part of every child. Therefore, this technique is very close in spirit to children. To work you need paper, a brush and paints. Paint is drawn onto the brush and dripped from a height onto the paper. By turning the sheet or blowing on it, the blot blurs, forming an interesting image.


"Plasticineography"- the plasticine needs to be heated (can be in a container with hot water). Cardboard is used, and plasticine is fixed to the surface with a pre-drawn background and outline using the technique of pressing and flattening.

"Drawing with Soap Bubbles"
Soap bubbles are a well-known children's pastime. Fragile, transparent, they shimmer so beautifully with different colors of the rainbow and create a feeling of celebration. And you can also draw with them.
Drawings using this unusual technique also turn out to be very unusual, and the activity brings joy to children. In addition, the prints turn out different every time, so it’s very interesting to experiment with them and then imagine what they look like.

"Nitcography"
There are two options for working with this technique. For each of them you will need paints with a brush, a container for them, threads and paper. In the first case, paint of any color you like is applied to the thread. The paper needs to be folded in half. The colored thread is laid out on one side, and the other is covered. The thread is then pulled out. When a child unfolds a piece of paper, there is some image there, which he can then complete at his own discretion. The second method also involves using glue. The drawing is created by gluing threads to paper in the form of a particular object.

"Batik"
Batik is a very old painting technique. At the same time, the fabric is painted. The design is applied to the fabric using special paints.


Drawing with non-traditional techniques:
- helps relieve children's fears;
- develops self-confidence;
- develops spatial thinking;
- teaches children to freely express their ideas;
- encourages children to creative searches and solutions;
- teaches children to work with a variety of materials;
- develops a sense of composition, rhythm, color - perception;
- develops fine motor skills of the hands;
- develops creativity, imagination and flight of fancy;
- while working, children receive aesthetic pleasure.
Non-traditional drawing allows you to reveal the creative potential of the child; gradually increase interest in artistic activity, develop mental processes. It allows children to feel more relaxed, bolder, develops imagination, and gives complete freedom for self-expression.
Tips for parents:
materials (pencils, paints, brushes, felt-tip pens, wax crayons, etc.) must be placed in the baby’s field of vision so that he has a desire to create;
introduce him to the surrounding world of things, living and inanimate nature, objects of fine art,
offer to draw everything that the child likes to talk about, and talk with him about everything that he likes to draw;
do not criticize the child and do not rush; on the contrary, from time to time encourage the child to practice drawing;
praise your child, help him, trust him, because your child is individual!
Elena Nikitina
Drawing one of the children's favorite activities. Drawing in unusual ways evokes even more positive emotions in children. Using unconventional drawing techniques development of thinking, imagination, fantasy, creative abilities. The child develops an interest in drawing, as a result, the desire to create.
Today I will tell you and show you how paint without using a brush.
1. Drawing with cotton swabs. We put paint on a stick and decorate the image on a sheet of paper with dots. (Christmas tree, snow, teapot, sundress, rowan branch).


2. Drawing with palms. Pour the paint into a flat container. Dip your palm and press it to a sheet of paper. (Flowers, fish, Santa Claus, swan, carrots).

3. Drawing with cotton pads. With cotton pads you can paint, folding them in half, quarter or whole. (Moon, snowdrifts, various flowers).


4. Drawing with prints. Simple drawing method: paint is applied to the surface to be printed and a print is placed on a sheet of paper. (Use: flowers, shells, fruits, vegetables).


5. Blotography. A spot or blot of watercolor paint is made on a sheet of paper. Take a tube and blow air onto the blot.

6. Drawing with a fork. We put paint on a fork from a flat plate and make an imprint with the flat surface of the fork. Can draw grass, fence, flowers, hedgehog.

7. Drawing with thread. The best thing draw with wool thread. We dip the thread in paint and apply it to a sheet of paper and create a pattern by imprinting with the movement of the thread. The wool thread creates a fancy pattern that is suitable for depicting clouds, clouds, sheep, or an unusual flower.
8. Drawing sponge or piece of foam rubber. We clamp a piece of foam rubber with a clothespin, dip it in paint and apply prints that create the texture of the object. They are used to paint animal fur, fluffy bunches of flowers, clouds, and tree crowns.


9. Splash painting. You will need a toothbrush and comb. Take a little paint on the brush and spray it with a comb. Move the brush over the comb over a sheet of paper. You can apply paints of different colors, it will turn out very beautiful.

10. Drawing with stamps. The stamp is easy to make from plasticine. We apply plasticine to a block, cube, etc. Using any sharp object, we depict some object or abstract pattern on it. The stamp is ready. We make a pillow from a sponge. Pour paint onto the sponge. We apply the stamp to the sponge with paint. Now you can make prints. A stamp can be made from the bottom of a plastic bottle, you get beautiful flowers.

11. Drawing imprints of cups and necks of different diameters. Pour the paint into a flat plate. Dip the glass in paint and apply the design to a sheet of paper.

12. Drawing with a comb. We will need a comb with fine teeth. Apply multi-colored paint (next to each other) on a sheet of paper in the shape of a drop. Then we run a comb over all the drops of paint, connecting and smearing them. It turns out to be an amazing rainbow. You can also draw different patterns, adding drops and moving the comb in different directions.


13. Drawing with wax crayons. Using colored wax pencils or wax crayons, apply the design to a sheet of paper. Then we cover it with one or several layers of watercolor. The result is an unusual and bright pattern. (Can draw stars, flowers).
14. Scratch (waxography). We paint the surface of the entire sheet of paper with wax crayons, then cover the sheet with black gouache. When everything is dry, scratch the paint and create a drawing with lines. You can scratch with a pointed stick, skewer, or toothpick.

15. Drawing with gauze. Apply a layer of gauze to a wet sheet of paper, straightening it. The gauze should remain motionless on the paper. Paint on top of the gauze with a brush and paint. Let the drawing dry. We remove the gauze - a pattern remains on the paper in the form of an imprint of the texture of the gauze fabric. (Landscape, sky, tree, grass)

16. Drawing using plastic film. Let's draw a picture. Before the paint has dried, quickly apply the film to the drawing in the right place and carefully, using rotating movements, create wrinkles of the film on the paper. The wrinkles collect paint. Allow to dry and carefully remove the tape.

17. Monotype. Drawing symmetrical objects. To do this, fold a sheet of paper in half and draw an object on one half. While the paint has not dried, fold the sheet in two again. A print will be made on the other half. After this, the image can be add or decorate.


18. Drawing air bubble film. With the help of this wonderful material you can very easily draw falling snow. We apply white or pale blue paint to the film and apply it to a sheet of paper with a pattern. With this technology you can make an extraordinary background for winter applique.


19. Painting with salt. Apply a design to a sheet of colored cardboard using PVA glue. We draw a picture on the theme of winter. Sprinkle salt on top. When everything is dry, shake off the excess salt.

20. Drawing with semolina. For drawing in this technique Use colored paper or cardboard. PVA glue is applied to the outline of the design. Semolina is poured on top and a sheet of paper is placed tightly on top. Then remove the paper and shake off the excess semolina. So way the next part is created.
21. Drawing with a candle. On a thick sheet of paper or cardboard, children draw with a candle according to plan. The sheet is painted over with watercolor paint. Wax images will appear through the watercolor. (Christmas tree, snowflakes, animals).
You can also use the following techniques unconventional drawing: feather drawing, finger painting, drawing on a stencil with a stamp, drawing using the poke method, drawing with soap bubbles, drawing with crumpled paper, drawing with leaves.
Publications on the topic:
Introduction to non-traditional art techniques 1. “Introduction to non-traditional techniques of fine art activities” 2. slide Children should live in a world of beauty, games, fairy tales, music, drawing, fantasy.
Consultation “Drawing in non-traditional ways” The development of the creative potential of the individual should be carried out from early childhood, when the child begins to master it under the guidance of adults.
 The children in our group and I really enjoyed learning about various artistic techniques. The guys were so immersed in.
 Notes on drawing with non-traditional techniques “Autumn Leaves” Age group: 2-junior Type: productive activity Form of organization:.
Introducing preschool children to non-traditional drawing techniques Municipal budgetary preschool educational institution MBDOU No. 33 “Malinka” METHODOLOGICAL DEVELOPMENT: “We introduce preschool children.
Each has its own characteristics: techniques, execution techniques and materials and tools used. The types of drawing and painting, the quality and accuracy of the image, as well as its aesthetic properties depend on what artistic materials the artist uses.
Drawing and painting: what is the difference?
Drawing is a type of graphics, which is a black and white or color image on paper, cardboard, made by hand. This concept includes both a simple drawing or sketch and complex paintings using perspective. For drawing, materials such as:
- simple graphite pencils;
- colour pencils;
- markers;
- ink, ink (applied to paper with pens or pens);
- sanguine;
- coal.
Drawing, unlike painting, has a wider application. The figure below shows graphs of functions of the form y. This presentation of educational material helps students and students better understand complex mathematical equations and their practical applications.
Drawing with pencils
One of the most used tools in fine art is a simple pencil. They are inexpensive. They do not require any special handling skills. Based on their hardness, they are divided into 3 types: soft (M, M2 or B, B2), medium hard (TM or BH) and hard (T, T2 or H, H2). With a pencil you can create all types of drawings: from a sketch to a photographic image.
How to use such a tool correctly? Gennady Li, in his book “Fundamentals of Academic Drawing,” advises beginning artists to use the softest (M2) pencil. This teaches you to be more responsible about your work and act more carefully. They learn to make lines and strokes with a light movement, barely touching the surface of the paper. A soft graphite mark is easier to erase with an eraser or a kneader (soft eraser). Even slight pressure makes the lines darker and thicker. Professionals can achieve the desired tonal ratio using the hardest (T2) pencil.
Techniques for working with pencils
Particular importance when working with pencils is given to the execution technique - shading. Contours are drawn not with long lines, but with short strokes. Also, shading darkens areas on a sheet of paper. It should convey not only the tone, but also the texture of the subject. In this case, the lines are placed parallel and tightly to each other.
The figure shows graphs of functions in the form of complex mathematical formulas, which are impossible to depict without the use of special tools and without taking your hand off the sheet. This can only be done by applying the image with short strokes. But it is precisely from such simple lines, ovals or sinusoids that all visible objects consist.
When working with colored pencils, the same tools and techniques are used as with simple graphite pencils. The main difference is that the drawing is colored.
Markers
These brightly colored sticks with hard shafts that leave rich color on the leaf are a recent development. Therefore, nothing is written about them in old drawing textbooks. Lines drawn with a felt-tip pen have an even, bold mark not only on the surface, but also on the back side of the sheet of paper. Therefore, it is not suitable for painting large areas. It is used for highlighting, loose color shading.

Felt-tip pens are used when you need to create a drawing in the form of signs or inscriptions. It is suitable for drawing graphs, especially if you need to draw several lines on them, displaying different functions or calculation results.
Ink, ink
Fountain and ballpoint pens, which use ink and ink as coloring pigments, are used not only in calligraphy, but also in drawing. In terms of their capabilities, they are not inferior to pencils, but they have some features. Ink and ink lie on paper or cardboard in smooth, monochromatic lines, regardless of the pressure applied. That is, the tone does not change. Therefore, they are rarely used when creating photographic three-dimensional images. But they are suitable for such types of drawing as sketching and sketching.
To work with the tool, you can use any paper, even writing paper. The ink is applied easily without scratching the paper, which often happens when working with a sharpened hard pencil.
Sanguine, coal
Sanguine is a type of clay. Sticks are made from it and fired. It has a red or brownish-brown color.
Coal gives black color. It is obtained by roasting birch or aspen branches in a closed oven. Compressed charcoal is made from simple charcoal.
Despite the fact that these are two different materials, the execution technique and types of patterns obtained with their help are the same. Artists often use both materials on the same sheet of cardboard along with chalk. To prevent the image from crumbling, it is treated with special adhesive fixatives. You should work with these materials carefully, as it will not be possible to erase what you have drawn. Even a smudge won’t help, and an eraser will simply smear everything into a muddy spot. See below for what the drawing made with charcoal or sanguine looks like.

Painting: tools, materials, technique
In painting, the main tool is the brush, and the materials used are watercolor, gouache, acrylic or oil paint. They are produced in sets of 3, 6, 9, 12 or more colors. To get the paint of the desired shade, they are mixed on the palette. A palette is a plastic or wooden board with grooves and a hole for your finger. If there is no such item, then you can use a porcelain plate instead.
The image is applied to cardboard, whatman paper or canvas. When using oil paint, they are primed with special gypsum-based compounds.
Watercolor
This is a water based paint. The peculiarity of this artistic material is that it is almost transparent. Apply it to cardboard or paper with squirrel hair brushes. There are two techniques for working with watercolors: on a dry or wet sheet of whatman paper.
Even a small child who has picked up a brush for the first time can work on dry cardboard or paper. An image is drawn with a simple pencil. Usually at this stage of work such types of drawing as sketch and draft are used. Light areas are painted first, then dark areas. This is done so that the colors do not mix. Errors are corrected by rubbing the paper with a sponge or brush soaked in water.

Drawing on wet Whatman paper is much more difficult. Only an artist with extensive experience working with this technique can perform work with The drawing shows the appearance of objects with streaks of paint, an almost transparent play of light. To do this, paint is applied in circles, gradually darkening the corresponding areas. The white parts of objects are not painted over.
Gouache
To work with gouache paints, use brushes with synthetic bristles. It lays down in an even, opaque layer. It is applied to paper or cardboard. The technique of working with gouache is the same as when working with watercolors on dry paper, but with some features. Since it is opaque, a different, but different color can be applied to a layer of paint. Excess gouache in the painting, as well as errors made during work, are eliminated using a scraper (the corner of a ruler will do) or a damp brush. Applied in a thick layer, it cracks when dried. If the excess is not removed, then it may fall off.

Gouache dried in a jar is diluted with water to a creamy consistency. Since the paint quickly fades in the sun and rubs off, such paintings must be hung in places inaccessible to direct sunlight under glass.

Oil paint
Most of the paintings in the Hermitage and Tretyakov Gallery are painted in oil. The advantage of oil paint is that it practically does not fade in the sun, but takes a long time to dry. It can be applied either pointwise, when strokes of different colors are placed side by side, or in layers. Errors and/or excess paint are removed with a palette knife. A palette knife is a special spatula. Sometimes it is used to apply paint. It produces an unusual artistic effect when it is laid out in blocks.
They use not only thick, but also liquid oil paint. To liquefy it, add vegetable oil (sunflower, corn, flaxseed, etc.). It is applied in layers. This technique is called the glaze method. A striking example of what a painting done in this way looks like is “Moonlit Night on the Dnieper” by A. I. Kuindzhi. The moon seems to glow.

An oil painting takes about a year to dry. If the glaze method was used, then each layer dries for about six months. The drying process can be speeded up by adding a solvent, such as turpentine or white spirit, to the paint. Then the paint will dry in 2-3 days, and the surface of the painting will become matte. To prevent the surface from cracking during drying, cover it with damp rags.
Acrylic paints
Acrylic paints are a modern art material. With their help, artists create paintings that are close in their graphic parameters to photography, with the same clarity and brilliance. They dry quickly. When working with the same techniques are used as when working with oil.
Artists, along with traditional materials, use modern ones and combine them. It is not always possible to determine and explain what types of drawings are obtained. For example, a watercolor still life, where the contours of objects are highlighted with a felt-tip pen. What artistic material was used to paint the picture? What type of drawings can it be classified as? But it is not so important how and with what to draw, the main thing is that drawing brings pleasure not only to the artist, but also to the audience.
We recently looked at seven simple watercolor painting techniques, and if you've mastered them, then it's time to move on to something more complex and interesting. Today we will look at six more interesting techniques that will help you create your own masterpiece.
Spray
We wet the bottom of the paper to see what would happen.
This technique is quite simple. Just put paint on the brush and start tapping the bristles of the brush on your finger so that the splashes scatter chaotically
If your brush is too wet, it will be difficult to control the splatter. Therefore, shake a few drops off it, and only then get to work.
If you don't like hitting the brush on your fingers, then you can use any available tool, a pen, for example.

Before we start splashing our paint, we'll place some pieces of paper in the top corner of our canvas.
We also wet the bottom edge of the sheet with clean water and painted it light purple.
Find an old toothbrush, rinse it and remove any remaining toothpaste. And get ready for chaos.

There are several ways to get paint onto your toothbrush. You can dip it in paint, which makes it very difficult to fill the bristles with paint. You can try filling your toothbrush using a brush. This way you can control the amount of paint.

Take your toothbrush and run your thumb over the bristles. You can also use improvised means. Choose a tool that you can use to spray paint off the bristles. Notice how the speed of your movements and the distance of the brush from the paper affect the paint atomization.

When you want to spray paint of a different color, rinse your toothbrush thoroughly and dry it with a towel.
Don't worry if you don't get this technique as well as you'd like. Practice and you will succeed.

As you can see, it turns out to be quite an interesting effect. Use the available tools that you have, use your imagination and be creative in your drawing.

Sgraffito and stamps
Sgraffito is an Italian term that refers to a scraping technique associated with wearing away the top coating of pottery to expose the layers underneath.
In the example, we scraped off the paint using a pocket knife. If you scrape off paint that has not yet dried and has soaked deep into the paper, you will get dark lines.
If used wisely, this technique can be used to create interesting landscapes by scraping out the shapes of trees and other flora.
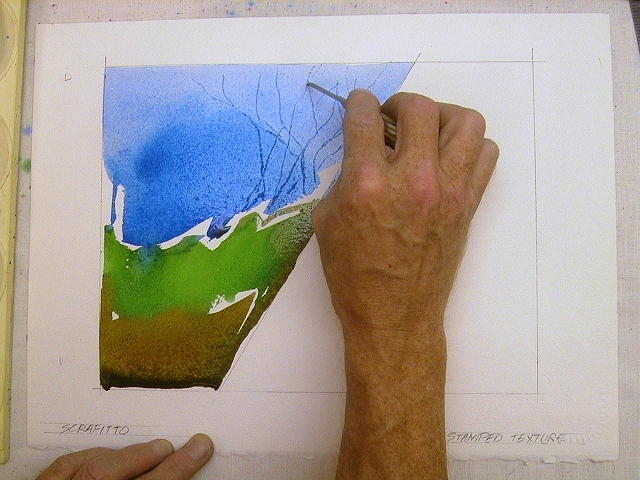
You can use old credit cards to scrape off paint. Use a smooth side card to sweep away any remaining paint.

Many brushes have a pointed edge. You can use these brushes to create fine lines.
It is very important to understand at what interval you need to start scraping. Practice on a separate sheet of the same paper and with the same colors.

A stamp is the application of paint by pressing other objects onto paper. You can choose any material to create stamps. Try everything you can get your hands on.
In this example, we are using facial tissues. Fill them with paint and stamp on the top of the paper.

You can also use a sponge. With its help we will depict grass.
You can play with textures using different materials. Experiment!

Don't be afraid to use body parts for stamps. Everything can be used!

Washing out
A relatively simple technique will help you create unusual and interesting textures.
First, cover the top of the paper with blue paint.

Then quickly paint the rest of the canvas red. This is what our drawing will look like at this stage.

Now rinse your brush thoroughly and refill it with clean water. Using light brush strokes, sprinkle drops of water onto the still wet paint.

Continue spraying water until you are satisfied with the result.
How far the paint has dried can be determined by the force of the water on it. Notice that the more water applied to the same area, the lighter the color of the paint became.

Don't be discouraged if you can't control the blur. You most likely will not succeed, since it is quite difficult to influence this process.

Experiment with the amount of water, colors and how dry the paint is. This technique can help you create an interesting and textured background.

We use alcohol
You will need cotton swabs and alcohol.

Paint your sheet thickly with paint.

Create the background color you want and get ready for the fun.

Dip a cotton swab into alcohol and start dripping it onto the paint.
Alcohol, when it gets on the paint, repels it, creating a light spot.

Try dripping alcohol onto the paint as it dries to see the effect.
It turns out quite nice, doesn't it?

This interesting technique allows you to create unusual textures.

We use salt
Obviously we will need salt for this technique.

Let's draw the sky and the hill.

Our second hill will be raspberry in color, let's mix it a little with the first hill to get an interesting transition.

Now take salt and sprinkle it on our drawing. After a few minutes, add a little more salt. It pushes the paint away from itself, creating an unusual texture.

Let's wait until it all dries and see what happens next.

Once the design has dried, the effect the salt created becomes more visible.
Shake the salt off the drawing and enjoy the result.

It is better to use a sponge to brush off the salt. This way you don't damage the paint. Clean the drawing with light movements, try not to rub it.

The salt absorbed the paint, creating a huge number of star-like specks.
It is worth noting that coarse salt will leave larger specks, and fine salt will leave smaller ones.