Crochet amigurumi ring for beginners. How to crochet an amigurumi ring, step by step for beginners. A special knitting method.
07 January 2014.
How to crochet an amigurumi toy according to the pattern1. MODERN KNITTED TOYS
In one of the previous materials, we told you how to make a children's soft toy with your own hands using patterns. Today we will talk about popular knitted Japanese amigurumi toys. On the Internet you can find numerous photos showing cute crocheted dolls with homemade clothes, funny baby dolls and all kinds of animals made according to amigurumi patterns Japanese masters. On this page you will find detailed master classes with descriptions of knitting these amazing toys and also diagrams and tables with instructions for their correct use.
Features of amigurumi knittingAs the name suggests, in order for it to work you must first create central ring, around which the circles will increase. The ring can be made different ways, the simplest is to use a ready-made ring of any material, such as plastic, for example, curtain rings.
Another way to make a center ring is to make it a chain whole in a circle, combining the first and last with a very low mesh. Even so, around a flexible ring made with chains, the actual points work in ever increasing turns.
The baby quickly grows out of diapers and enjoys exploring amazing world, surrounding him. And a variety of soft toys play a huge role in development little man. Games with homemade dolls, horses, bears, bunnies, knitted from soft, high-quality yarn for children, help develop sensory abilities, improve tactile sensations and creative thinking child.
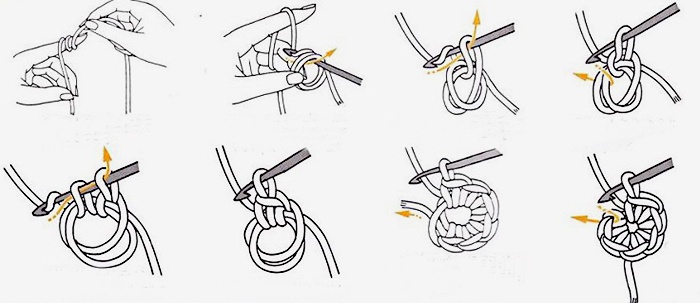
Another way is " magic ring", always used for all projects where the central hole must be completely closed. The magic ring is called simply because you simply pull on the loose wire to see it shrink and close completely.
To create a magic ring there are two systems, the first of which is to create a twisted or triple thread, and work directly in this ring on the very first thread-like circle, as in the previous work. It's a bit tricky holding the loose wire loop and it's not easy to work with, it tends to run away from all sides.
THIS IS INTERESTING!
Children begin to speak faster than their peers, and then read, if early age begin to play with knitted toys and develop fine motor skills fingers when they touch ribbed surface during the game.
You don't have to buy expensive soft toys self made. Even a novice needlewoman can knit an original horse or a funny teddy bear with her own hands. Below you will find information on how to correctly work with the diagram and read symbols to crochet a toy.
Japanese schemes in picturesIt stays nicely wide and is used as a ring, working the first round with a low net and then tightening up. The result is identical to a real magic circle, but much simpler. Having made a circle, with the system preferred and suitable for the job, you should start working with the actual points around the circle, generally you use a low grid, but to get a different effect you can also use a high grid or other points.
After the first turn, make some regular adjustments to keep the flat work out of the way and avoid getting unplanned and unworkable. The classic increase scheme in a circle provides an increase in each point of the second circle, one increase and none for the third circle.
Exists great amount different ways knitting soft toys using a hook. In this article we will talk about an amazing manufacturing technique. original toys
amigurumi. Many amigurumi crafts consist of simple knitted elements And geometric shapes- balls, cylinders, ovals. On the Internet you can find many lessons and amigurumi knitting patterns, but most of them are accompanied by a description on Japanese. This page contains information from step by step description this Russian knitting technique with diagrams and photos.
Increase every two normal points on the fourth circle and so on. This pattern is indicative and you may need to modify it slightly as you work, depending on the elasticity of the yarn and your hand. If it's very tight it may need some extra push, but if you work it very wide it might increase a bit.
In crochet, rules and patterns must be evaluated from time to time and, if necessary, adapted through testing all the time, due to possible differences between the user's hand and the thickness and elasticity of the yarn, corrections may be required even if the original pattern is very accurate and well executed.
2. FEATURES OF AMIGURUMI KNITTING
General principles of knitting Japanese amigurumi:
INTERESTING FOR WOMEN:
| Comments |
|
Knitting is fun and useful activity. Modern needlewomen have learned to use crochet hooks and threads to create not only clothes and openwork napkins, but also cute little animals. Soft little ones amigurumi toys – great gift for a person of any age, made with your own hands. To start making it, learn how to knit an amigurumi ring. What is it, why and how is it done, let's figure it out.
What is an amigurumi ringThen start trading the next 4 rows alternating one high-fill column in one stitch with two high-fill columns in one stitch. Each cycle is followed by a series of high-fill columns. After braiding, begin to gradually reduce as one row, knit one column with high fill through the stitch - jump over one and move to the next stitch. The resulting hooded pattern is very effective on the finished hat.
Next row knit one column with high fill in each stitch. Finish the hat by cutting the yarn, leaving a few inches of it and pulling out the last loop. Tighten, attach the upholstery needle, turn the hood upside down and carefully tuck the rest of the yarn between the braided rows and loops.
What is an amigurumi ringThere are many knitting techniques, the most popular technique coming from Japan is amigurumi (small animals created using a crochet hook). Such products have spherical or cylindrical parts that are sewn together and stuffed with soft filler. The design of each individual piece of the toy begins with an amigurumi ring (Japanese loop) - a composition of a sliding loop and several single crochets, thanks to which there will be no unwanted holes in the product (as in the manufacture of napkins), allowing the stuffing to peek out.
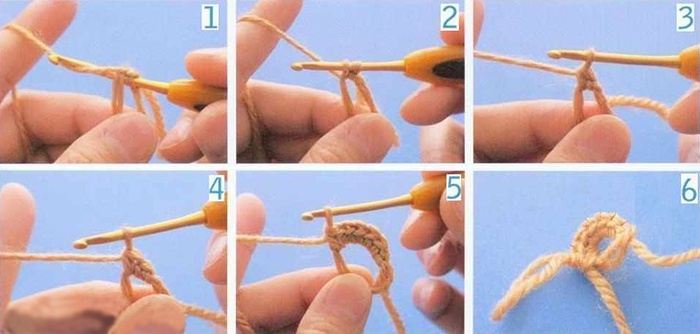
Step-by-step instructions and patterns for knitting a ring amigurumi crochetAny novice needlewoman can learn how to make these toys. The circuits for such products are primitive. To learn how to knit an amigurumi ring correctly, check out step by step instructions and practice a little. Before you start work, have everything ready necessary tools, materials:
- Yarn. Beginners are recommended to choose threads of any color of medium thickness (cotton, acrylic). Too thin or textured threads or wool yarn can spoil or bend the knitted fragment.
- Crochet hook. Select the size of this tool 1-2 smaller than indicated on the yarn, then the product will be dense. The tip of the hook should not be too sharp or round, and its cutout should not be small.
There are two main ways of knitting a Japanese loop, which differ in the number of turns of the thread - one turn or two. The option you choose depends on the texture and thickness of the yarn taken, the size of the hook, and the purpose of the future product. IN step-by-step master classes described below, both methods, their advantages and disadvantages will be discussed.
Master class on knitting a simple ring in one turnThe first method is easier to learn, but to completely simplify the lesson, choose thicker yarn and a suitable hook for it. Execution steps:
There are many advantages to creating this element using the one-turn method - it knits quickly and is easily tightened without effort. The disadvantages of this method include the following points:
- it is not suitable for knitting on thin threads;
- If you frequently wash the finished product, such a Japanese loop may become loose or unravel.
The second method is more labor-intensive and requires more practical classes. Thin and medium-thick yarn is suitable for this work. Step-by-step instruction is this:
The disadvantages of this method include only the somewhat labor-intensive procedure for performing a “sliding loop”. The positive properties are:
- you can use thin yarn;
- regardless of the manipulations performed with finished product(washing, stretching), its middle will never unravel.
The technique of creating a Japanese loop cannot be called complicated, but you will have to do some practice to get a small, neat ring. Often, knitting a toy or other product begins from the head, where the Japanese “sliding loop” is located on the top of the head (the most considered place). All the nuances, secrets, ways of how to properly knit an amigurumi ring from threads and elastic bands are described in detailed video instructions below. Take advantage of them.
Two ways to crochet an amigurumi ring How to knit a magic amigurumi ring correctly How to weave a magic ring in amigurumi style from rubber bands Lesson on knitting a magic ring from threads


