Knitting toys patterns and videos. How to crochet toys with your own hands, for beginners: horse, body parts, patterns, amigurumi, step-by-step instructions video
Crocheted toys are suitable for children and adults! After all, a toy knitted by yourself is so cute and funny! It can easily be given as a gift - and it will be one of the most wonderful things you can give. Let's not forget that the main advantage of toys self made- this is their environmental cleanliness and safety, and making them is a pleasant and not very difficult task, the main thing is to master simple techniques. And now we present to you a master class for beginners on how to crochet a toy; You will find diagrams and descriptions below.
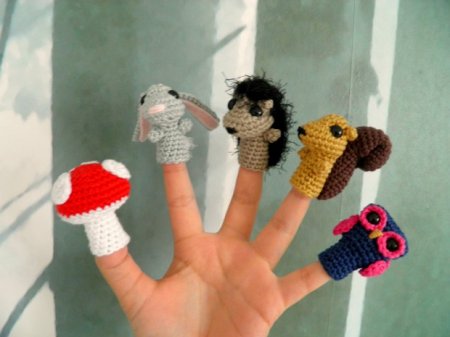
For children who love lively fairy tales, you can knit finger toys. It will be much more interesting for children to come up with new fairy tales and show them to their parents.
Finger attachment
For example, you can crochet a teddy bear toy on your finger.
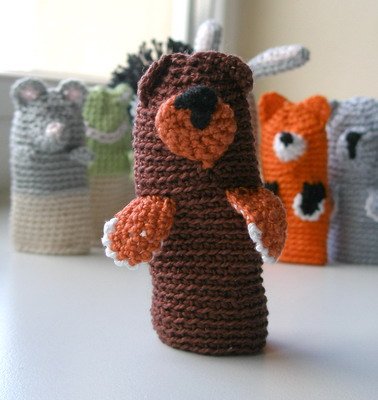
We will need threads of the desired colors and hook No. 2.
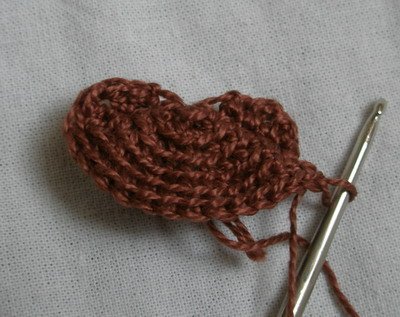
First you need to knit the base. To do this, cast on 4 air loops and close them into a ring with a single crochet.
2nd row. Double crochets are knitted (you get 12 stitches).
3rd row. The first loop is knitted with a single crochet, the second with a double crochet, and so on until the end of the row (18 loops are obtained).
4 row. From every third loop a double single crochet is knitted.
It turns out to be a small circle.
We knit ears. We knit a path of 4 loops to the center of the circle. Then a double crochet is knitted into the first loop, a single crochet into the 2nd stitch, a single crochet into the 3rd stitch, and a single crochet into the 4th stitch. Then 12 single crochets are knitted across the face and the ear is repeated on the other side. Example in the photo.
7 rows of single crochets are knitted - this is the head. Next the muzzle is knitted. Similarly, as with the ear, you need to lay loops, outlining the contour of the muzzle. The rows are knitted in single crochets, gradually decreasing stitches after 2 stitches. Depending on how sharp the muzzle is, there will be so many rows. The nose is embroidered with black thread. Next, 2-3 rows of the bear’s body are knitted. Then the paws begin. We cast on 5 air loops and tie them with 4 single crochets. We fix the thread on the body. Then the paw is tied again, adding two loops where the curves go. We break and fasten the thread. We knit the second paw in a similar way. At the very end, the body is tied. Its length depends on the length of your finger.
Using this scheme, you can connect other characters, the main thing is imagination and inspiration!
That's our step-by-step master class ends. We hope you will enjoy using the knowledge you have gained and make some beautiful animals with your own hands. See you!

Video lesson
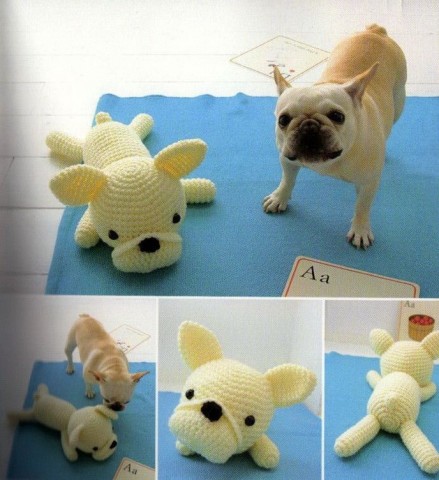
From this video lesson you will learn how to knit a bunny.
In the meantime, mom will knit a toy, dad can do it with the children - it’s both educational and very interesting.
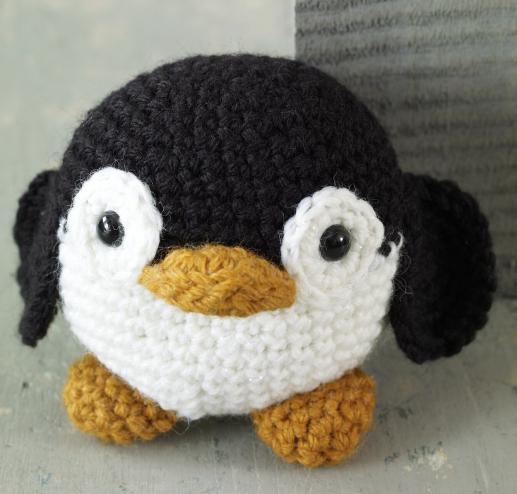
Little kids like their mother's. For beginner craftswomen, it is better to pay attention to round and oval shapes. It could be the sun, a ladybug, a penguin, a chicken, a bee, an egg, Smeshariki, mice, turtles. Gradually move on to more complex models, which are knitted according to patterns, have moving parts of the body. Let's take a closer look at how to knit rattles, soft and developmental models.
Round (for beginners master class)
Rattles in the form of ladybugs or turtles. To do this, first knit the bottom with single crochets in a circle. Cast on the chain, close it and move in a circle, adding loops evenly (knit two loops in one base). The diameter of the bottom will determine the size of the toy. Knit the last row with black thread.
Then, using the same plan, knit the top of the ladybug. As soon as the circle reaches the same size as the bottom, continue knitting without increments. That is, the top will begin to round and look like a cap. You also tie the last row with black thread. If ladybugs are five to seven centimeters in size, then they can be used as New Year's toys(crochet a loop and sew it to the body).
Then you fasten the bottom to the top and stuff it with padding polyester. The result is a semicircle. Now you stitch it in half with black thread. Knit small circles of spots and attach them to the body.
Ladybugs, turtles
Next, use black threads to knit an oval-shaped head, like the bottom for booties. That is, you cast on a chain of three to five loops and tie it in a circle with single crochets, adding two loops every other time. Then you fold the oval in half, sew it together, fill it with padding polyester, and sew it to the body. The eyes can be embroidered with thread or sewn on with beads.
If you put a bell inside, the toy will ring. If you fill toys with different contents (buckwheat, peas, beans), then they can be used in the sensory development of children. Having imposed several ladybugs different colors, you can teach your children colors and numbers using spots.
Now let's look at how to knit a turtle. The shell is knitted according to the plan described above. For larger turtles, add another thread to create spots on the shell. If there are small multi-colored rows. Next, make the paws, tail and head. The principle is the same, only the number of loops is different.
You start by knitting a circle and then with or without increases (tail), decreases (paws, head with neck) create the required form. The paws and tail are slightly stuffed; if the yarn is dense, then do not use padding polyester. Attach all parts to the shell. On the head you embroider eyes and a mouth.
Penguin
Beginning craftswomen knit such round toys not entirely, but in parts. Let's look at the example of a penguin.
Smeshariki
Now let's look at how to crochet the entire toy. Smeshariki are made according to this plan. You start knitting the body like a penguin, only when you reach half, you continue working, decreasing the loops and forming a ball. So, you do Nyusha as follows:
- start knitting with a chain of two loops;
- add six columns in each row;
- increase nine rows;
- knit the next eight rows without increases;
- from the nineteenth row, create a parting on the side of the face, changing the threads different color;
- from the twentieth row you begin to decrease six columns in each row;
- fill with padding polyester;
- tighten the last three loops with thread.
Separately, knit the cheeks in the shape of hearts, legs, arms, eyes with eyelids, a snout, and sew them to the body. You can insert a wire into your arms and legs, the end of which is rounded into a loop and wrapped with padding polyester. Then the limbs can be twisted and bent. You make hair from threads, pulling them through loops like fringe. Braid it and decorate it with a bow.
Toys based on patterns
There are toys that are knitted so professionally that they cannot be distinguished from factory ones. But even beginners can knit models no worse, the main thing is to know a few nuances. So, how to crochet a toy to get a “store-bought” look. 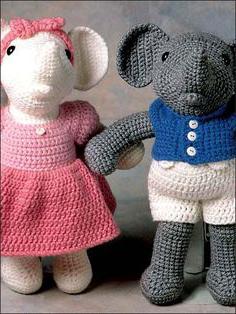
- Patterns for sewing soft toys. Select the look you want to link. Find patterns for sewing this toy. Transfer it to paper, this will be the template you will use to knit the patterns. Use regular single crochets or connecting loops. Then you tie or sew the patterns together, fill them with padding poly - and the toy is ready.
- Banners. To get “dimples” and “jumpers”, you need to pull together crocheted toys. For beginners, ready-made toy making kits are sold. But you can practice on bees, bears and bunnies, and then move on to making dolls. For example, to make toes, you need to wrap the thread from the middle of the palm, insert the needle into the same point and pull the thread.
- Amiguri. These miniature toys are difficult to knit, as they require manual dexterity due to large sizes(no more than ten centimeters). But you can gain enormous experience, which you transfer to the production of large models.
Educational crochet toys: diagrams, descriptions
The hook allows you to create a variety of analogues of real objects: animals, plants, products, food, insects, dolls, vehicles, dishes, shoes. Such toys can be used as teaching material for learning colors, numbers, letters, time, and for sensory and speech development. 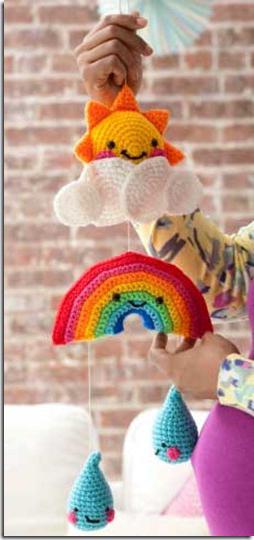
Here's how to make a weather study tutorial.
- Sun. Knit the halves of the ball as described when making the penguin. You knit the rays in triangles or sew on a special braid. Sew the halves together and fill them with padding polyester. Embroider eyes, mouth, cheeks.
- Clouds, clouds. Knit large and small circles, which you sew overlapping, forming a wavy cloud. If you need to add color, make the edging with blue or gray threads.
- Precipitation. Knit rain with blue droplets, hail with white balls, and snow with snowflakes. By the way, multi-colored sediments are used as Crochet (choose patterns for beginners) to each element you knit a chain of different lengths.
- Rainbow. You make multi-colored stripes, connect them together, insert a cardboard base, and sew the parts together.
You tie all the details by strings to wooden base or an arc on a baby cradle. If each element is knitted in large sizes and arms and legs are sewn on, you get unusual toys.
Alarm
Here is another version of the teaching aid - an alarm clock. Crocheting a toy for beginners according to the pattern is not difficult.

Vegetables, fruits, berries, food
Children willingly play in the store, and for this they need goods. The foam analogue quickly becomes unusable, but knitted products delight with their variety: candies, eggs, chickens, sausages, vegetables, steak, fruits, sandwiches, berries, pasta, scrambled eggs, greens, pastries, cakes, etc. The main thing is to choose according the color of the thread, and you can crochet any voluminous toys (there will be no difficulties with the patterns).
Chocolate cake with berries:
- Cut out a circle from thick foam rubber (5 centimeters thick).
- Divide it into pieces of cake and cut it.
- Now tie the foam pieces.
- You start from the top. Knit a triangle with white thread and try it on the foam rubber. Go through the last row with brown thread and move to the sides. Periodically try on the template and change the color of the thread to highlight the layers of biscuits.
- Finish with a brown triangle, which you knit from the side of the piece. Attach it to the template and sew the sides.
- This way you knit all the pieces of the cake. Then sew cream from the “cream” edge (separately knit a chain with numerous arches with columns and picots).
- You sew Velcro onto the cake pieces, which holds the culinary masterpiece together.
If you sew a loop to individual pieces and insert special blanks, you will get a keychain. And if you make them in different colors, you can use them as original New Year’s toys. Crochet (patterns of berries are given below) to crochet strawberries, “cream” leaves, flowers and other culinary decorations.
Strawberry
Strawberries are knitted from 12 rows:
- A chain of three loops.
- 6 single crochets.
- Add 3 more rows to three columns.
- Next, add three rows by five loops.
- You should get 25 loops, knit four rows without increments.
- Decrease eight times, reaching 17 columns.
- Decrease five times, leaving 12 stitches.
Turn the strawberries inside out and stretch them with your fingers, giving them the desired shape. Fill with padding polyester and tighten the thread. Use green thread to sew on the leaves, and use a needle to make white grains.
Any fruits and vegetables are knitted according to the original. Thus, a banana consists of a milky core and a yellow peel, which splits into four parts from the middle; carrots are knitted with increases, like strawberries, only elongated; radishes with beets are also similar to knitting sweet berries, only the base is wider.
Crocheting a toy for beginners will be easy if you mentally divide it into sectors geometric shapes. For example, divide an apple into six petal parts. When they are stitched and filled with padding polyester, clearer shapes are obtained. The top and bottom of the apple are tied together with thread and decorated with a twig and leaf. A cut apple resembles the shape of a turtle shell, only you put a cardboard circle in the bottom. 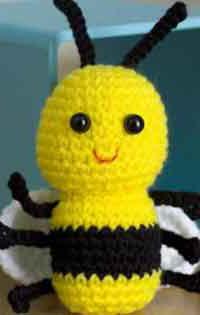
conclusions
Crocheting allows you to create products entirely or in parts. Beginning knitters can start by tying wooden or plastic blanks, then they will gain experience in knitting different geometric shapes. And then you can create various toys ourselves. Also pay attention to the yarn. Now it is presented in different configurations (grass, lumps, ribbon-like, pellets, flowers), which allows you to create fantastic images.
Many people have a favorite hobby: some draw, some embroider, and some knit. Do-it-yourself knitting came from ancient times, and has now regained popularity. You can knit for children using a hook and knitting needles. It’s so nice to create beautiful things for yourself or wonderful things to decorate your interior. Or make something for the kids. In this article we will look at how to do it yourself for a child and instructions for beginners.
Some readers will immediately object that crocheting is a very difficult task for beginners. And in general, it’s not interesting. But once you try it, it’s impossible to stop. It is impossible to convey the joy when a small creation comes out of your hands. Then you will want to do more. And then maybe a person will decide to knit something larger, say, or an openwork pattern; there are many options for creativity.
Before you start crocheting or knitting various crafts, you should study the tips experienced needlewomen. Don't be scared when you look at it. There is nothing complicated about it; the canvas is created on the basis simple techniques. For beginners who want to try to create a toy for a child with their own hands, the craftswomen advise: first of all, master the columns. This is the basis of everything. Each product is described, you just need to read more carefully. Well, a couple of secrets described in the video won’t hurt.
If the product is based on a circle, then begin knitting by making a sliding loop and then repeating. Then there will be no hole left in the circle, the canvas will be dense, and the shape of the product will hold. To tie this loop, take a hook and a thick thread.
- You need to wind the thread around 2 fingers, forming a circle.
- Remove the thread and hold it. In this case, the tail should be under the circle.
- We pull the thread with a crochet hook.
- Now you need to pull the ends to make a loop.
Once you have practiced, you can start making toys with your own hands, but using thin threads.
The parts are made separately and filled with something, most often cotton wool. But the arms, legs or paws should not be stuffed very tightly, otherwise the filler will stick out near the joint. In addition, the limbs must occupy a certain position, and with dense filling this will not work.
They finish manufacturing the parts so that the product turns out neat. To do this, you need to leave 6 loops at the end and pull the working thread through them. You will have a hole that needs to be tightened.
Before you knit a toy for a child yourself, you need to know the diameter of the thread in order to select a hook. It should be the same or half a size smaller, otherwise the fabric of your toy will not be dense enough.
When all the parts are ready, they need to be sewn. But before that, it’s best to take special needles and use them to secure the parts where necessary. Check symmetry. If you don't do it right from the very beginning, you will have to redo the entire product.
It must be borne in mind that it will be much easier for people who know how to knit to master the crochet hook. Conversely, when you learn how to properly crochet toys, knitting needles will not seem so scary to you.
Sometimes it is necessary to draw some details on a toy. To do this, purchase paints for fabric. Also suitable acrylic paints or pencils. You can also use coffee, but you just need to brew it properly. Even eye shadow will work!
Fill the product with cotton wool or padding polyester. When using the latter, do it a little at a time, separating small pieces. You should not stuff huge pieces into the product. If the filler of the toy is padding polyester, the product should be filled with it gradually, in small portions.
Now you can move on to practice. So that a beginner can learn how to crochet toys, we’ll tell you how to make a horse for beginners using knitting needles or a hook with your own hands.
Crocheted horse
It is easy to do, and even a person who is still awkward with a hook can knit a horse in 2-3 evenings. To make a horse, we will need 22 cm long wire, glue or double-sided tape, a piece white material, yarn and acrylic marker. Threads must be 3 colors. For our example, we'll use light brown for the body, dark brown for the mane, and gray for the hooves. You can take other colors and make a magic horse from knitting threads.
First of all, we need to create the body of our horse, because all other parts are attached to it. Here are step-by-step knitting instructions, following which the toy is made:
- Let's make the first row. To do this, we first create a sliding loop, and from it we knit without a crochet (hereinafter will be designated “st. b/n”. You will need 6 of them).
- Now you need to knit 2 single crochets from each loop. This will be the second row.
- To make the third row, you first need to divide the circle into parts - a total of 6. In each part we add 1 tbsp. The number of resulting loops should be 18.
- Now in each part you need to add 1 single crochet.
- Those. you need to knit 2 single crochets in each of the loops, and then the same 2 columns in the next loop.
- At the beginning of each part we knit 2 tbsp from 1 loop. b/n.
- The sequence of loops is as follows: 1 single crochet in 5 loops, 2 tbsp. b/n in the 6th. So we knit up to x loops at the end.
- We count the loops, there should be 42 of them. They should be knitted st. b/n - in each loop.
- Again you need to divide the circle into equal 6 parts. From a single crochet you need to make 2.
- We knit 1 single crochet and again count the loops, which should be 48.
- We repeat point No. 9. Total loops -54.
- We knit exactly the same as item No. 10.
- We knit 5 loops, and in the sixth we add 1. Total loops -60.
- We knit 4 rows as in point No. 10, knitting loops.
- Rapport: from 2 loops, 1 single crochet, then 3 single crochet, decrease again (from 2 x 1 dc), knit a column from 1 loop. Repeat 4 times. We count the loops, which should be 55.
- We knit 2 rows only with single crochets. We knit single crochet columns so that the 2nd row is combined with the 22nd row.
- For the 23rd row we make a rapport: we make 2 single crochets together, and then 3 columns in each of the loops. Repeat 5 times. We knit the next 30 columns without crochet. This results in a decrease of up to 50 stitches.
- To make the 24th, 25th and 26th rows, you need to knit a column in each stitch.
- We look at where we had a decrease and move the beginning there. We knit rapport - first 2 columns together, then just 4. Repeat - 5 times. The row must be completed with 5 columns. Then you get 45 loops.
- For the 28th row we simply knit columns.
- We make a rapport: together there are 2 columns, 7 simple columns. Repeat 5 times until the row ends. There should be 40 loops.
- We knit them in single crochet columns.
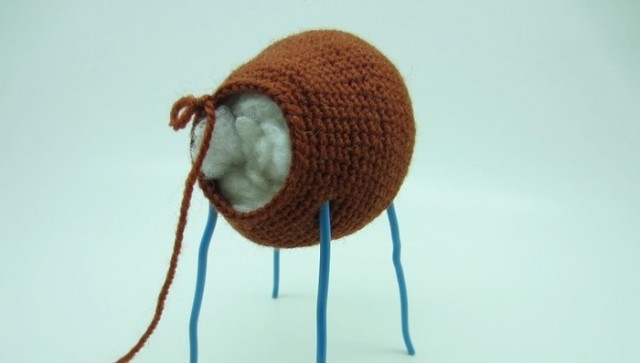
- Let's turn the toy so that the convex side is at the bottom. This is the belly of our horse. You need to very carefully thread the wire where the back legs will be.
- For 31 rows we knit 2 columns together and just 6 columns. Repeat until the row ends.
- We knit further in single crochet columns. We put filler in the body. There should be at least a centimeter between it and the wire. We fix the legs that will be in front. We continue to fill out the body of the horse.
- In the 33rd row we do the same as in step 24, but just 5 columns.
- As in the previous one, only now there are 3 single crochets. Fill in this detail.
Filling the torso with filler
- In the 35th row as in paragraph 26, but now there are 2 columns together and 2 single crochets.
- We knit 2 loops together with a single crochet and 1 stitch.
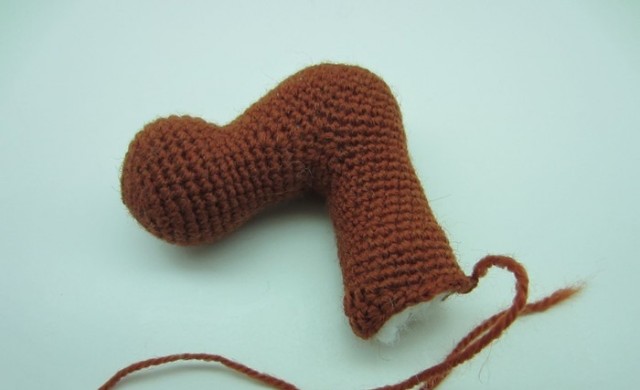
- There will only be 12 stitches left. They need to be knitted 2 together and the body filled. Fasten off the last 6 stitches.
- You will end up with a funny barrel with legs that need to be slightly rounded.
Next you need to knit small hooves for the horse. We do everything step by step for this. First, we make a sliding loop and knit single crochets into it - 6 pcs. You will get a circle where you need to make 2 from 1 column. Then divide the circle into 6 even parts, adding along the loop so that there are 18 in total. For the 4th row, we again make an increase in the size of 1 column. Total loops -24. They are knitted st. b/n for the previous row, more precisely, for its wall.
We make the sixth row by knitting columns in loops. Divide into 6 parts, decrease 1 loop in each. We knit row No. 8 in the same way, ending it with a half-column with the thread with which the body is knitted. Decrease again, like row No. 7. Knit to the middle, fill our hoof with filler. Using the same scheme, we make 3 more hooves. Next you need to wrap the leg with tape. And only then with thread.
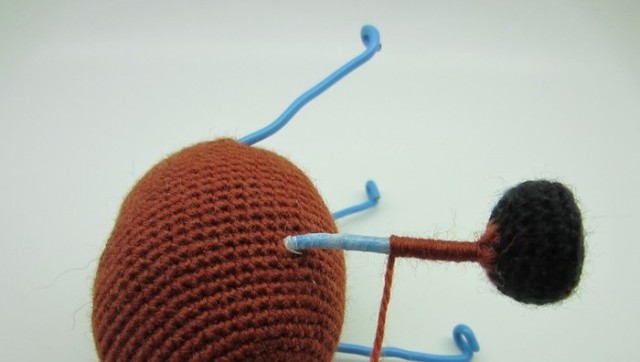
Wrapping the hoof
First we knit the neck, making 6 tbsp. b/n. circle. Next, divide into 6 parts, add 1 loop in each of them. We also do the 4th row. Row No. 5 is done like this: single crochet row, repeat, 2 single crochet columns. The report is knitted like this: single crochet - 3, from 1 loop 2 single crochet. Then a single crochet is knitted in each loop - these are rows 6, 7 and 8. Now the decrease in row No. 2 should be parallel to the row.
We make an increase: we make 2 single crochet columns from one, and then 6 tbsp. Next, together 2 tbsp. We continue to knit a single crochet in each of the loops until the row ends. And row No. 10 should be knitted in the same way as No. 10. Now we knit the horse’s muzzle. Just look at the photo to understand the process of making and mating a horse.
Neck knitting
In the 11th row you need to knit 10 chain loops, in the previous row we count the loops - a total of 18. In the 19th loop we attach a chain. We knit single crochets - 15. They should be knitted in a chain. There are 25 loops in total. In the 12th row we knit single crochets. Now you need to knit 2 columns together, 11 single crochet stitches in each of the following stitches. Then together 2 columns and 10 single crochets. In the 14th row we knit 2 single crochets together.
Then we knit 9 columns, then again 2 columns together and 10 more. Let's see how to knit row No. 12. So we make rows from 15 to 17. Next we knit 2 columns 10 times. And we knit all the remaining loops in single crochet columns. Then we repeat row No. 12 for rows 19 to 24. In the 25th row we perform rapport: first, together 2 tbsp. b/n, and then 4 columns b/n. At the end of the row we make 1 column. The next three times we repeat the previous row, instead of 4 we knit 3 rows. And we already knit 2 loops together, repeating this 5 times.
All loops that remain must be tightened. Fill with filler. Next we make the neck. First you need to find where the middle is at the head. There we fasten a loop to start a new row. If it is very difficult to understand what and how, a master class on knitting this toy will help you find your way.
- Lifting loop, then knit 1 column into the first loop. We knit 7 single crochets. We find the end of the muzzle and the beginning of the head. You need to knit these 2 loops together. Then we make 8 columns, then we find the second connection, we knit 2 loops together again. The row ends with eight columns. The result will be 26 loops.
- We knit 8 stitches, then 2 loops together where the head and body are connected. Next we knit 4 single crochets. We decrease, until the end we knit 8 tbsp. without a crochet.
- We make two rows like the previous one, but we decrease the loops that are in the intervals with decreases by 2 pieces.
- We knit the next 5 rows in single crochets.
- Rapport: one single crochet, then 2 stitches together. b/n. Do it 2 times, starting the row. Next we knit the columns. At the end we repeat the rapport, only in reverse.
- We knit the next three rows st. b/n.
- We do the 16th row like this: first there are 2 columns; 2 loops together; again 2 columns; 2 more loops together; again 2 tbsp; 4 double crochets; half-column – 2 pcs.; 2 columns; 2 more loops together; 2 columns; again together 2 loops; and end with 2 columns.
- Row 17 is the final one. You should start it by making 7 double crochets. We knit 3 columns. We make 2 half-columns. Next - 4 double crochets. 2 more half columns. We finish with 3 single crochets and 7 double crochets.
Sew the head to the body. To do this we use hidden stitches. So that the product does not have to be altered, it is attached with pins in advance.
Ears
We knit the ears in a chain, making one chain stitch so that the row rises, and at the end there should be a connecting loop.
- We knit 8 loops.
- We knit 8 columns on each side, leaving the last loop in which we knit 3 single crochets.
- Next, you need to unfold and knit like this: one single crochet; half columns – 4; single crochets -5; unfold again.
- We make 9 tbsp. without crochet; knit 1 stitch from 1 loop. When we close the last loop, we need to cut the thread, but leave a long tip. In the middle of the ear we find loops through which we thread the thread. We sew the ear, starting from the tip.
- We repeat the above. When the ears are ready, you need to sew them to the head.
To make the tail, a sliding loop is first made. You need to knit 8 single crochets into it. We look at the circle, knit 7 rows into its loops.
We measure 17 cm wide on cardboard and cut it off. We take the threads for the tail and wrap it around this cardboard. We cut the threads on both sides. The result is a fringe, which is threaded into the ponytail using a hook. You need to form loops.

Horse tail
Bangs and mane
They are not difficult to make yourself. Take a pencil and mark the boundaries. We cut the threads and fasten them where we marked them. We make sure that the mane looks uniform. We fasten the bangs, cut off half the threads.
Eyes and mouth
In order to make eyes for our horse, we need white fabric. You need to cut out suitable circles from it. You need to put filler in the middle. The circles must be pulled together so that they become balls. Carefully sew the resulting eyes to the horse’s head, and then draw the pupils on it. To do this, use acrylic paints or a pencil. You also need to draw the nostrils.
We make the mouth with black threads, embroidering it. You can draw the mouth in advance so that it is distributed in the same way.
When the product is finished, you need to make the horse spotted using paints. Now that the horse is ready, you already have experience in how to crochet toys for both beginners and professionals. And you can do something else yourself.
Amigurumi is a technique for knitting various toys with your own hands, which has recently gained popularity. It was invented by the Japanese. With its help you can make small crochet toys. Often they make bears, bunnies or cats. Or creatures similar to people. Most of them are quite cute.
Amigurumi technique toys
Knit in a spiral without connecting the circles. The hook is always smaller in diameter than the yarn. You can try to make amigurumi yourself, and then they will appear in your home to delight everyone with their presence. But first you need to learn how to make them, and in this matter you cannot do without reading diagrams.
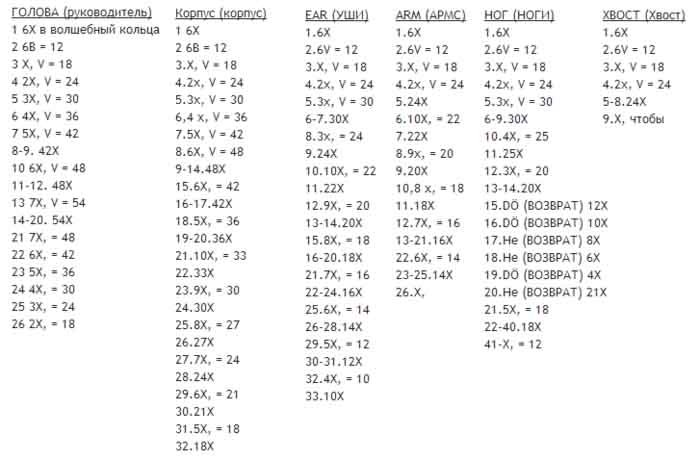
Initially, you should remember the designations, because otherwise there is no way to read the knitting patterns according to which toys are knitted. Most of the magazines are all Japanese, although translations can be found on the Internet.
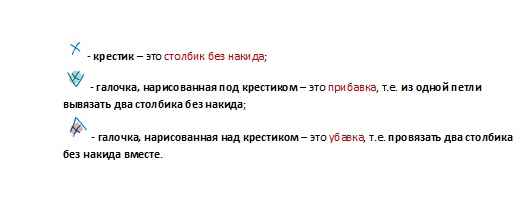
Amigurumi diagram designations
So, if a cross is visible, then it means a single crochet.
But the checkmark that is under the cross is an addition, i.e. knit 2 tbsp. b/n. from 1 loop.
If the daw is above the cross, then this is a decrease. We knit 2 stitches with 1 loop.
Analyzing a knitting pattern for a soft toy can become quite tedious, so to make it easier, magazines include a sign. The first line indicates the rows, or rather, their number. The second shows what the row number is. Additions are possible in a row, but they are indicated behind the table, and their number is located near the row number.
There is no child who would be indifferent to soft toy. Often children are inseparable from them. And you don’t have to buy them in a store - you can just knit them yourself! Our article today features crocheted toys, with diagrams and a description of the manufacturing process. We have selected some of the most interesting and unusual options.
If you know how to knit, then for your child you can make absolutely any character he asks for - a hook and yarn work wonders. We offer you not only complex schemes for experienced craftswomen, but diagrams that will tell you how to crochet a toy for beginners.
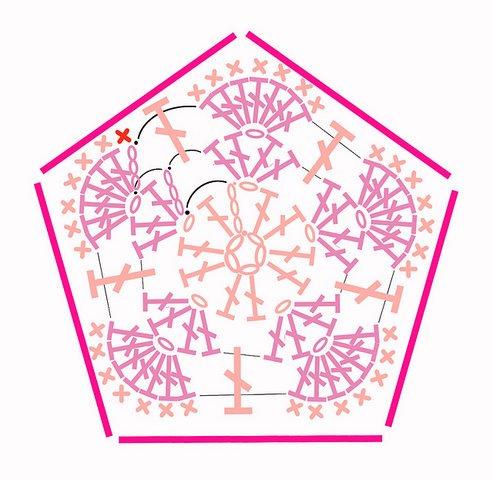
Flower bear
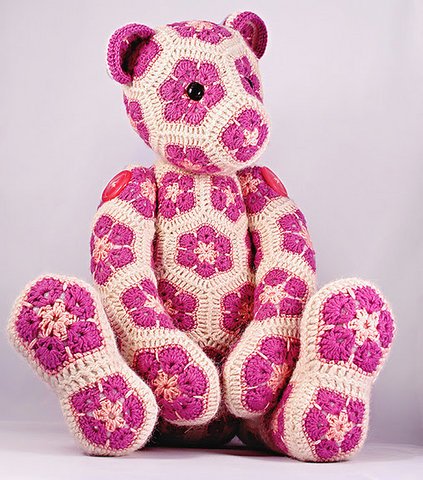
This magical bear will win the heart of any girl. It consists of many individual fragments, which are then connected to each other.
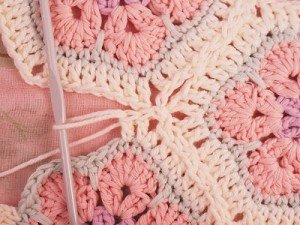
Knitting pattern for these fragments:
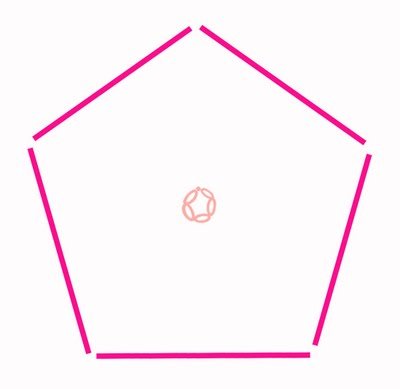
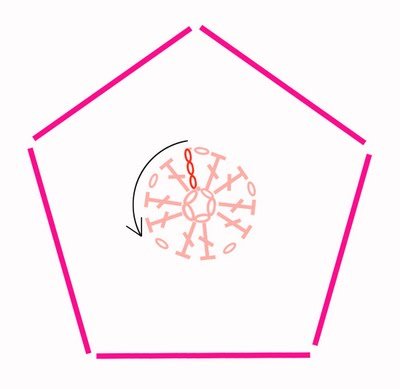
![]()

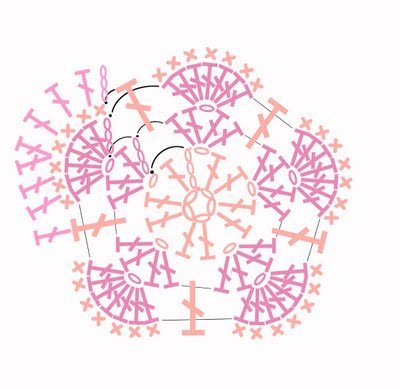
The result should be details like this:
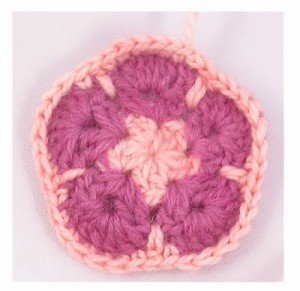

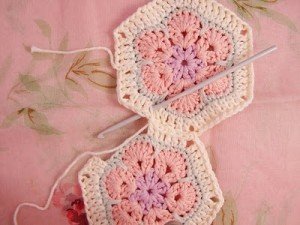
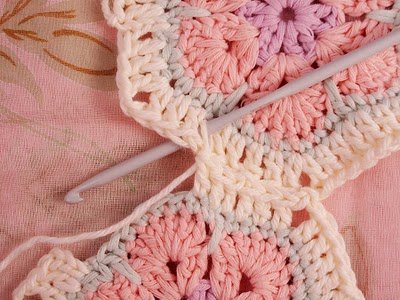
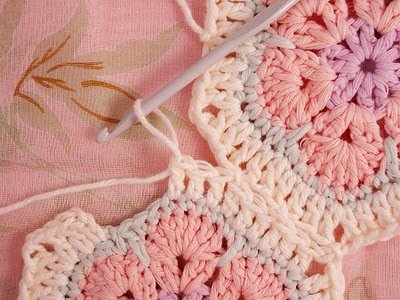
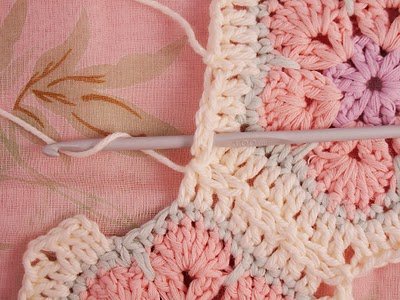
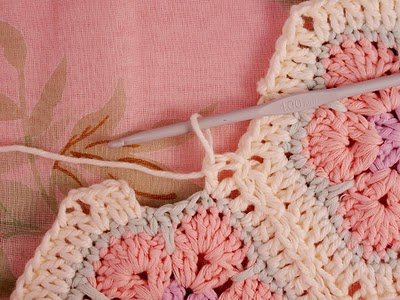
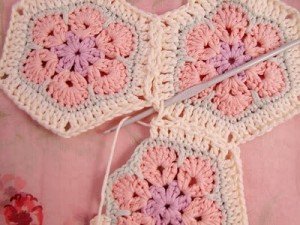
By sewing them all together and filling them with holofiber or padding polyester, we get our teddy bear, which even a beginner can make.
Cute little bunny
Another favorite toy for children is a hare.

Follow the description and you will definitely succeed:
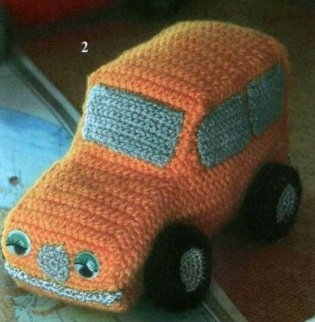
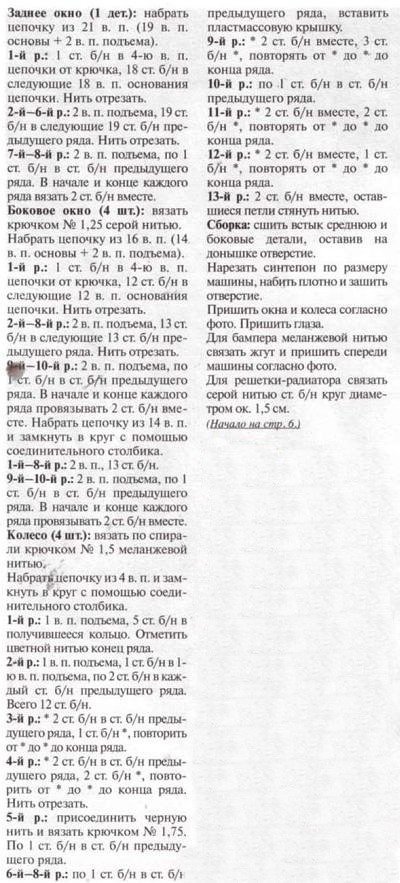
Knitted machine
No boy will be indifferent to the car knitted by his mother:
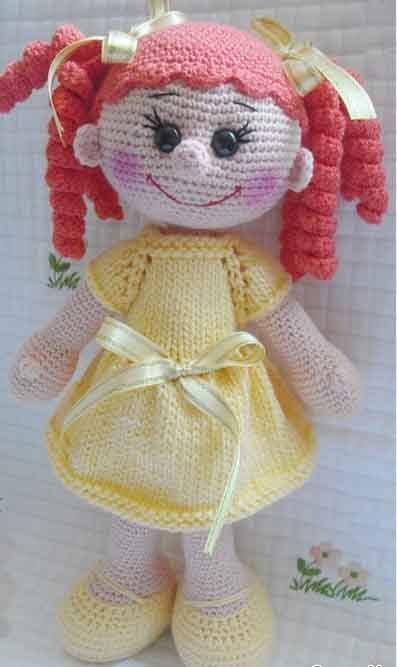
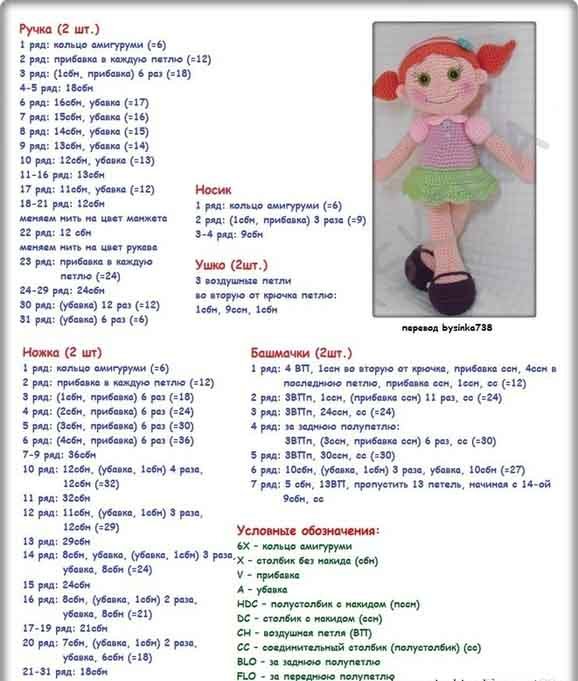
Red doll
Girls will surely love the mischievous red-haired doll:
The crocheted toys, the patterns for which we have proposed, will definitely please children no less than the next toy - a ballerina mouse, which we would like to show detailed master Class.
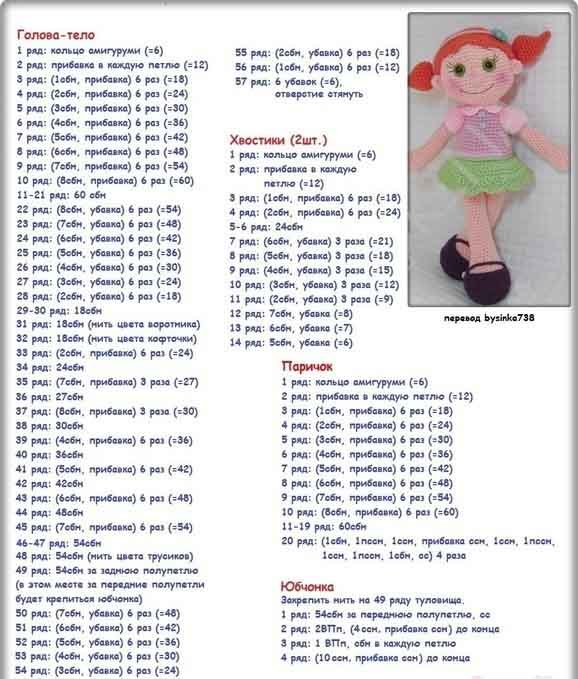
Knitting a ballerina mouse
For this mouse we will need:
- Three-thread gray acrylic - 30g, black - a little for embroidering the face
- Hook No. 2
- Filler.
- The wire is thick
- Needle, scissors
- Tulle 30*50 cm
- Tape 1m.
Process description:
First, let's define some terms.
Increase - tying two columns into 1 loop.
Decrease - when two loops are combined with one stitch.
1. Make a loop. To do this, the thread is wrapped around the finger 2 times, and 6 sc are knitted into it. Then you need to pull the tip and tighten the hole that has formed.
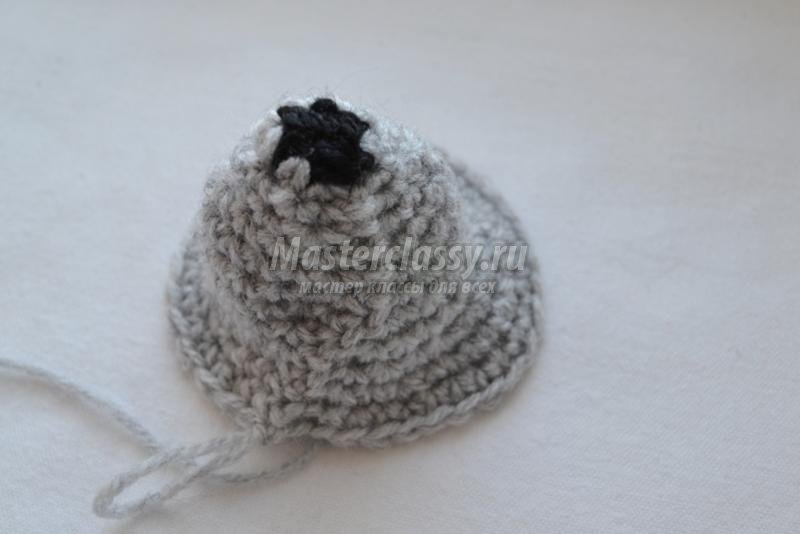
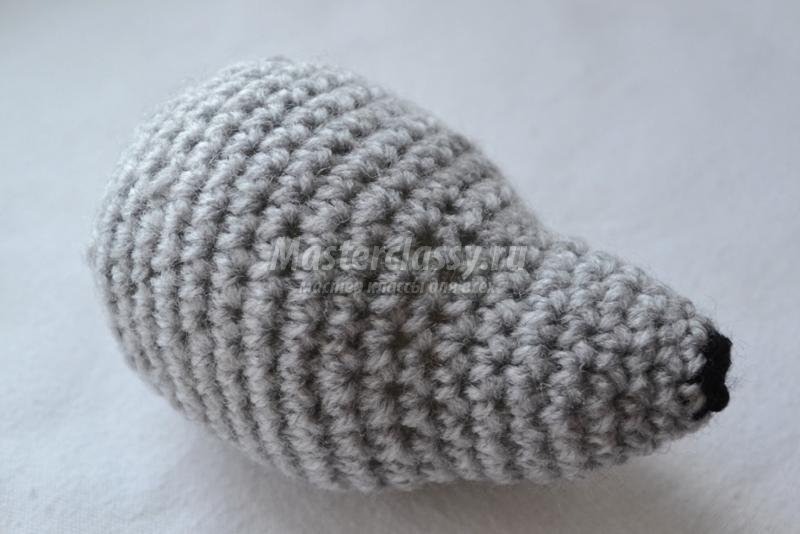
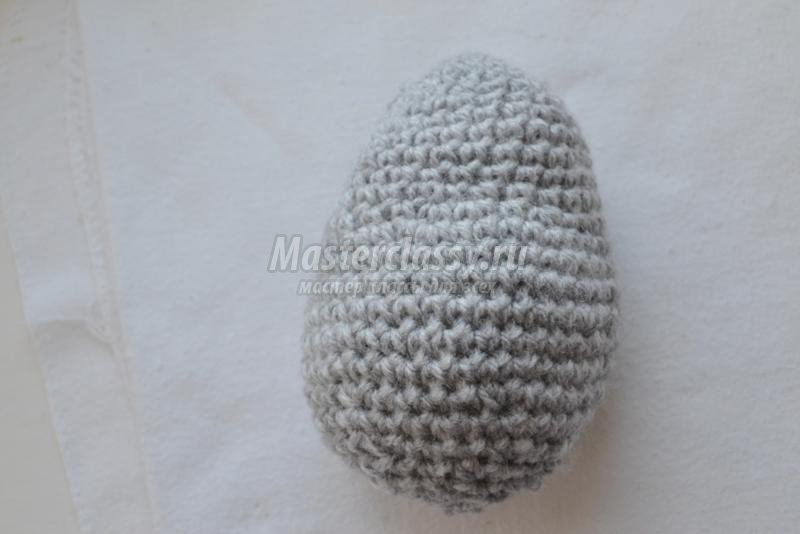
2. We knit the mouse’s head from the tip of its nose
In the first row we make a loop with black threads and knit 6 single crochets into this loop.

In the second row we knit 1 tbsp with gray yarn. single crochet, 2 single crochet stitches in one loop, alternately.
The entire third row consists of st. without double crochets. There should be a total of 9 loops at this stage.
In the fourth and fifth rows we add every third stitch.
In the sixth row, add every fourth stitch. (3 single crochet columns, 2 single crochet stitches in one loop - this is our rapport).
From the seventh to the tenth row - we knit everything with a single crochet. There should be 20 loops in total.
The eleventh row in the following order: 2 single crochets, 3 increases, 2 tbsp. without a crochet, 4 increases. 2 tbsp. without a crochet. 3 increases, 3 tbsp. without crochet
Order of the twelfth row: 2 single crochet, increase, (4 single crochet, increase - repeat 5 times), 2 tbsp. without a crochet.
From rows 13 to 17 we knit with a simple single crochet. There are 36 loops in total.
In the 18th row we knit 4 single crochets and decrease - repeat 6 times.
Rows 19 and 20 are worked in regular stitches. b. nak.
In the 21st row we knit 3 tbsp. without. nak. decrease and repeat 6 times,
In the 22nd row we make 2 tbsp. without. nac., decrease - repeat 6 times
And 23rd row - 1 st. without. nak., decrease - and repeat the same 6 times
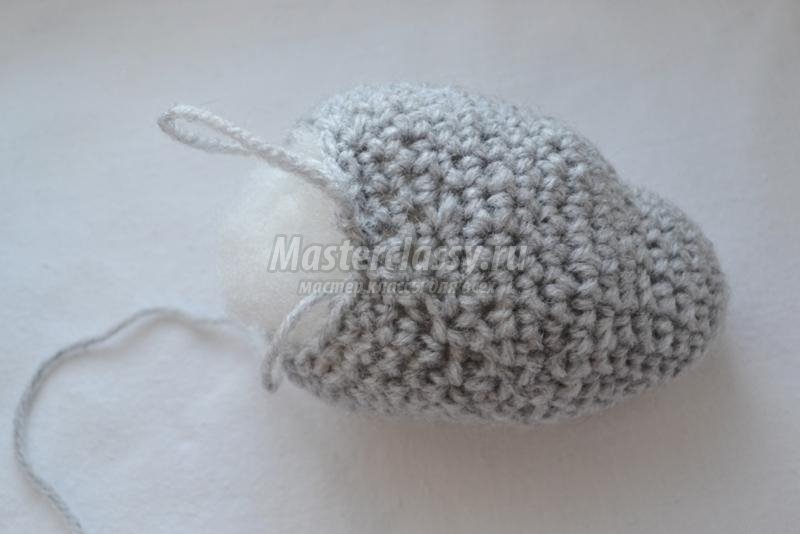
Now we stuff the filler into the head more tightly and continue knitting. At this stage we make a decrease until the hole is completely closed.
3. We knit the body of the mouse. Same as the head. Only the rows should have a different number of loops:
5-6 rows - st. without a crochet,
7th row - increase every sixth column,
8th row - increase every fifth column,
From the 9th to the 12th row, st. without crochet (25 stitches in total)
In the 13th row we knit: 2 tbsp. without nac. Let's add. 6 tbsp. without nak., add 2 times, 6 tbsp. without nak., add 2 tbsp. without nac.
For the 14th row we knit in the following order: 10 tbsp. without nak., add 2 tbsp. without nak., add, and again 10 tbsp. without nac.
We knit rows from 15th to 19th in 36 stitches. without nak
We begin to decrease from the 20th row: every 5th column.
We knit the 21st row with single crochets, and in the 22nd row we decrease every 5th column.
In the 23rd row - we decrease every 3rd, in the 25th - every 2nd. Then we stuff the body with filler and finish this stage.
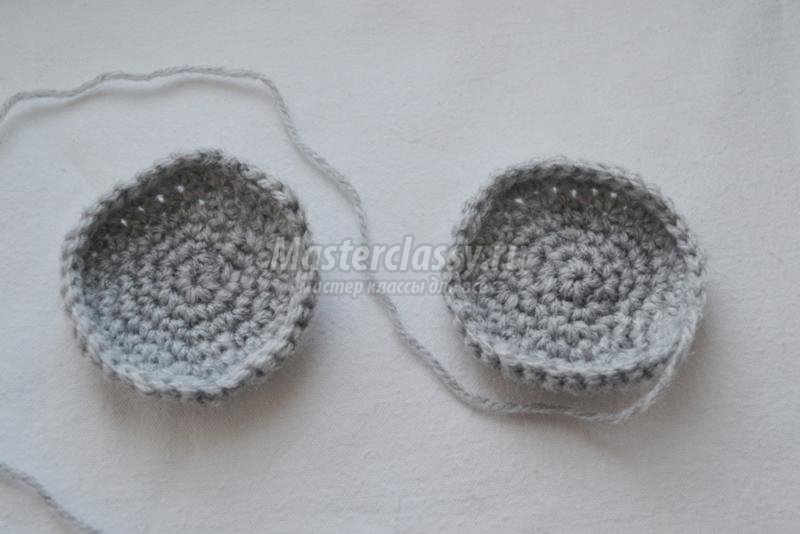
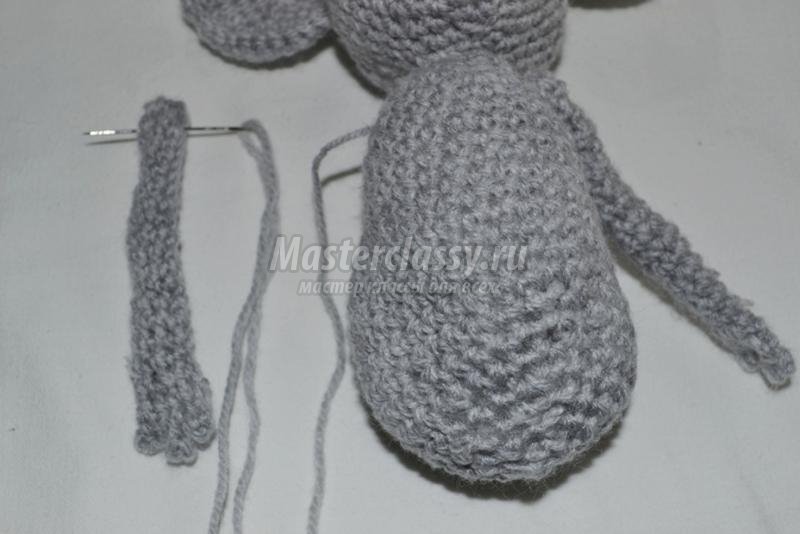
4. Knit ears.
One ear consists of 7 rows. When we knit the first row, increases are made in each stitch. In subsequent rows we alternately knit 1 tbsp. single crochet and 2 columns, but in 1 loop.
5. We knit the legs.
First, the leg itself: Cast on a stitch, double everything on the second row, and subsequent rows are knitted without any increases, in regular single crochets. Adjust the length as desired. Insert thick wire.
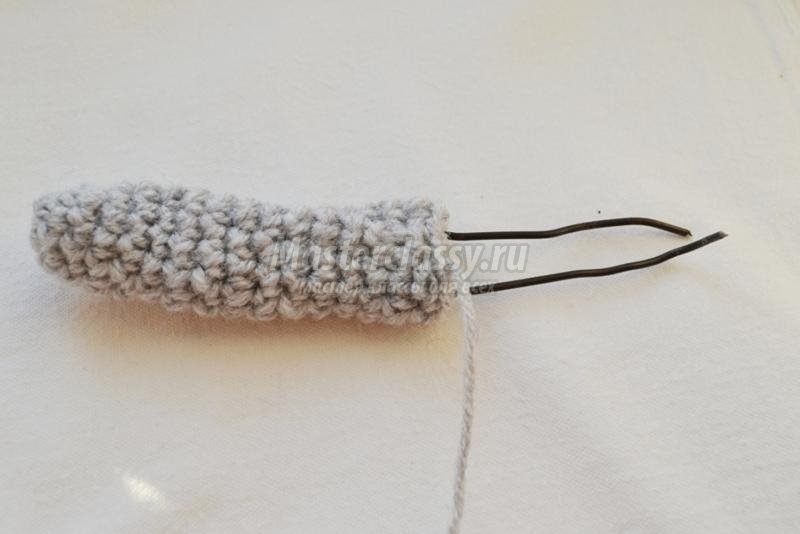
Now the paw, limb. 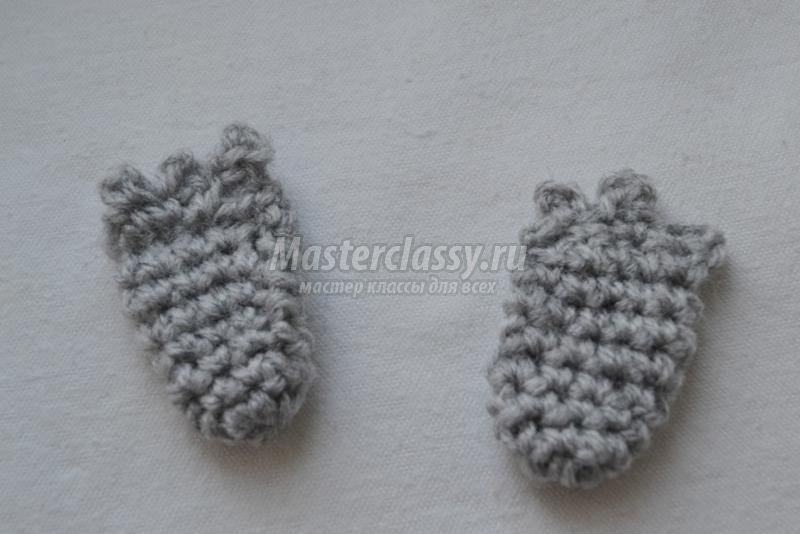
We don't use filler.
6. We knit the arms: similar to the legs, only shorter. No filler is used.
![]()
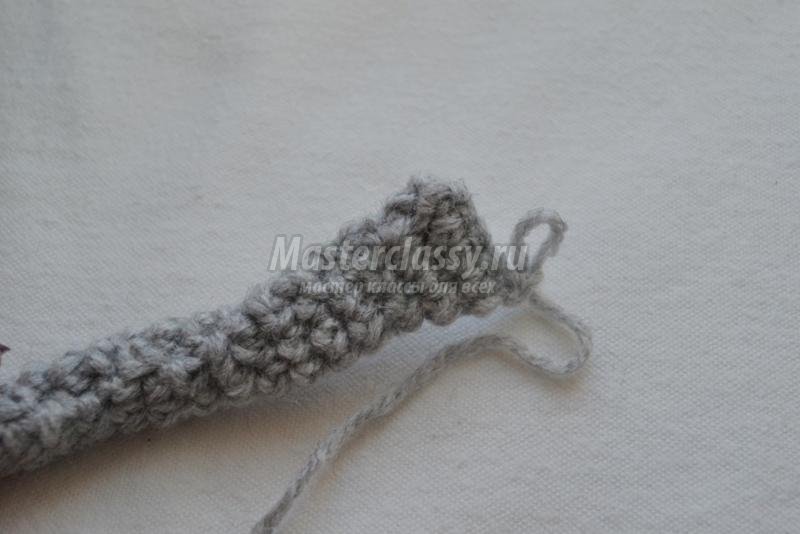
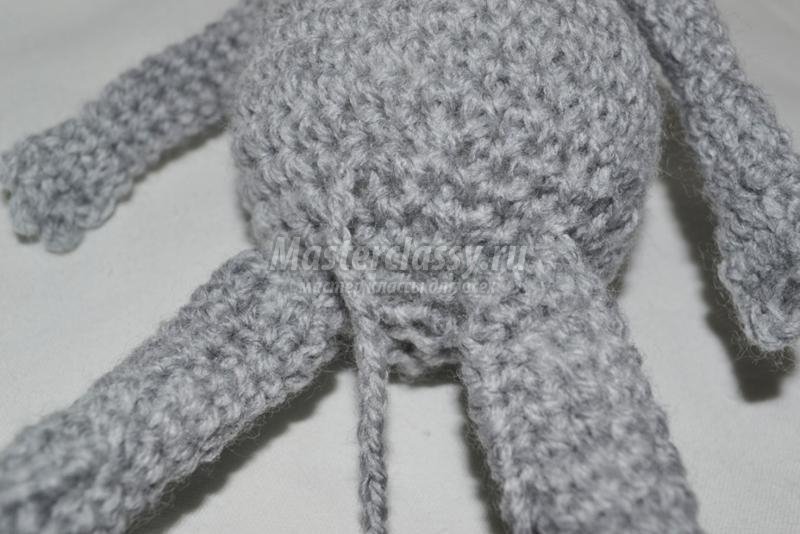
7. Assembling the mouse. We sew all parts of the mouse’s body with the thread that was used for knitting, and for sewing we use one thread, stretch it through the body - this will give dynamism to the limbs, they will be able to move. After the legs and arms are in place, the thread is pulled out from the point where its tail will be. We knit the tail with air loops. 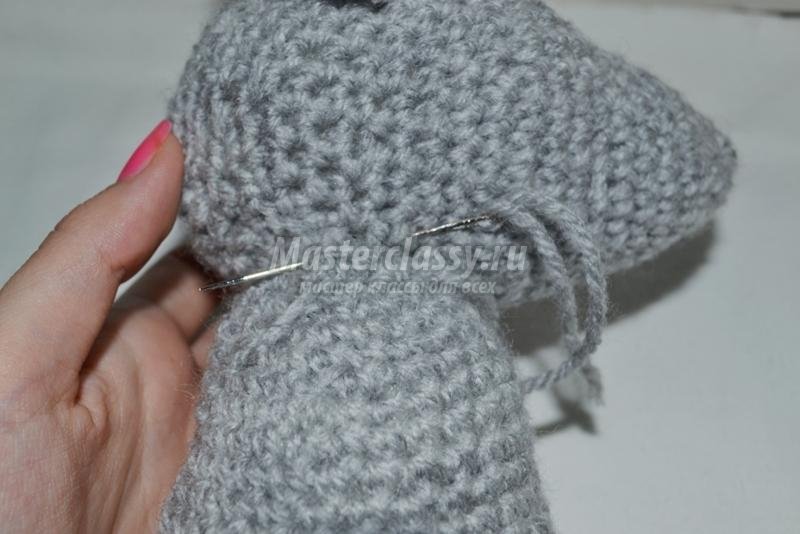
We embroider the eyes and nose with black thread (you can use accessories).
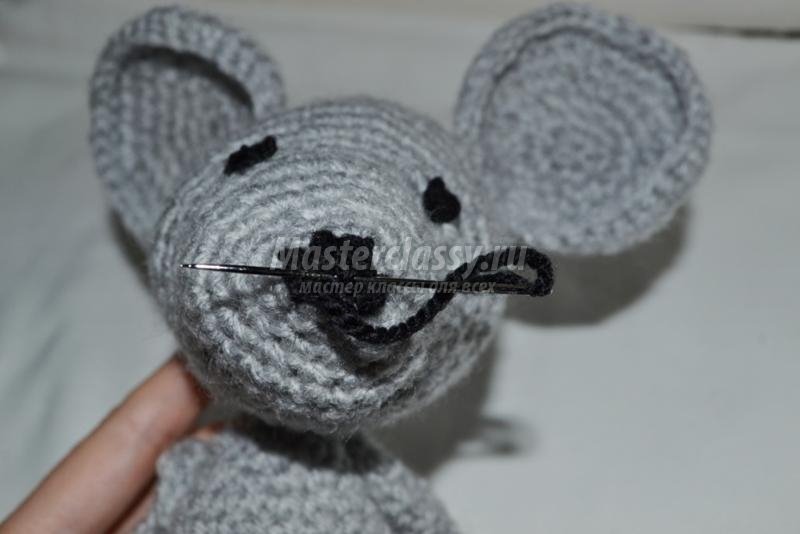
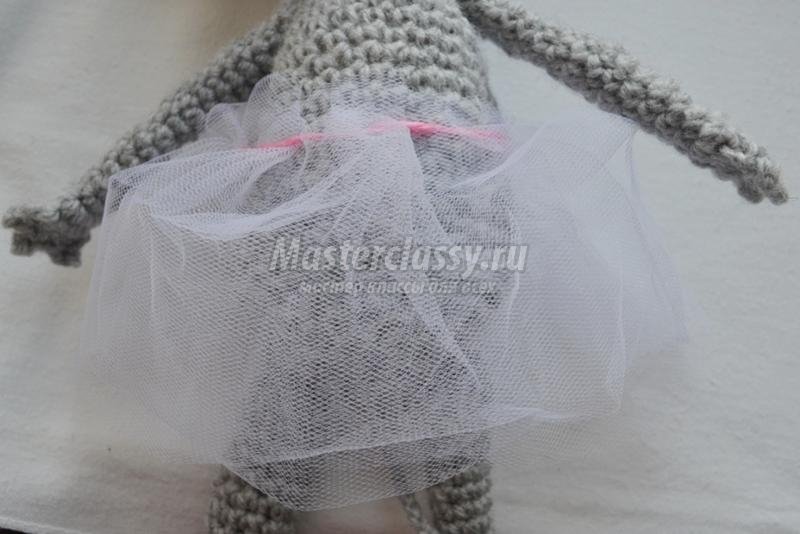
The mouse is ready, all that remains is to dress it up. To do this, we need tulle, from which we make a tutu for her, an elegant ribbon for her head and a thin ribbon for her legs - it will imitate pointe shoes:
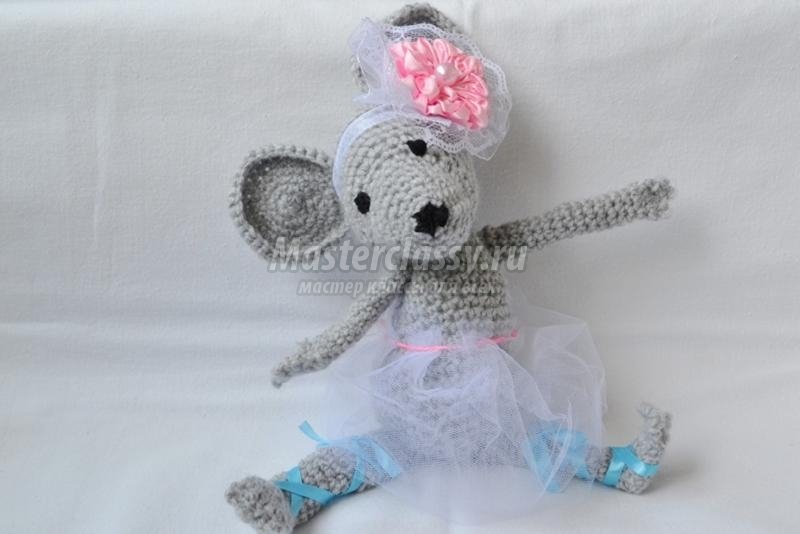
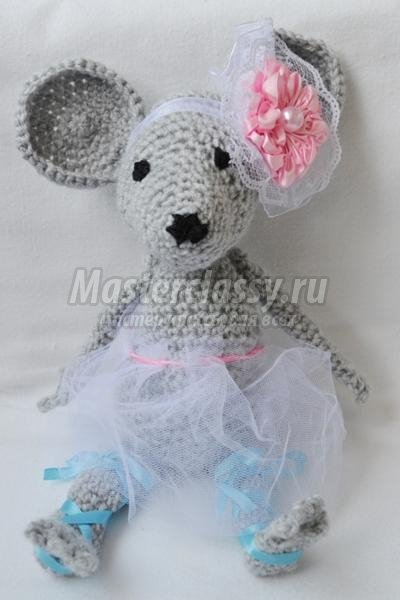
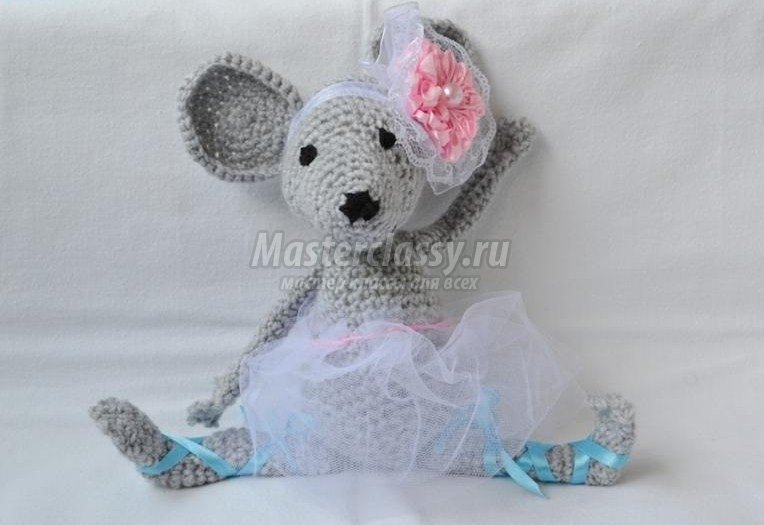
Our master class on crocheting toys is over.
Fill your children's world with toys, all the best to you!
Other models of knitted friends in the video:
Stylish Teddy Bear:
Adorable bunny:
Cool owl: