Patterns of felt toys for finger theater. DIY felt finger theater
You can play a finger theater made of felt (you can draw patterns for dolls with your own hands or take those suggested below) with both toddlers and older children. And little needlewomen can even help make characters from felt from any fairy tale. Already at the age of five (and some young artists even earlier), a child can draw a pattern of a bunny or a fox and cut it out of fabric.
The activity is not only exciting, but also useful. Firstly, during the game (performance), a child can try on the role of absolutely any fairy-tale hero, and secondly, finger theater is a good simulator for motor functions and speech, and develops artistry. Thirdly, an older child will develop in several directions, not only during play, but also while making dolls for performance with mom or dad.
Features of felt
It is very easy to work with felt, this material is:
- does not require processing of cuts, does not crumble;
- pleasant to the touch, soft, warm and fleecy;
- maintains a neat edge when cutting with curly scissors;
- the material has a wide selection of colors, bright and rich;
- holds its shape well, is durable and does not wrinkle;
- has no back or face, identical on both sides;
- you can not only sew, but also simply glue;
- does not change color after washing or when exposed to the sun;
- does not form pills and does not become shaggy during sewing and use.
Fairy tale "Teremok"
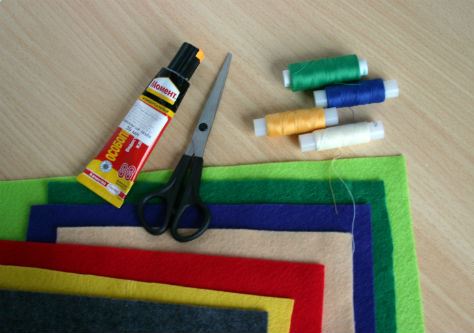
In order to act out the fairy tale “The Teremok” on the stage of an improvised finger theater, you need to make a mouse, a bunny, a frog, a fox, a wolf, a bear and the tower itself. You will need several sheets of thin felt of different colors, glue, scissors, a needle and thread. You also need a pencil and several sheets of paper to draw patterns for future finger theater toys.
To make the Teremok finger theater, you will need felt in nine colors: two shades of green, white, black, gray, pink, orange, brown and beige.
Fairy tale characters
Let's start making toys for the theater with a frog. You need to draw on paper and then cut out only seven parts from felt: two green bases, one frog tummy (you need a different shade of green, lighter or darker, depending on which was the main one) and four parts for the eyes (two circles from white felt and two, but smaller ones, made of black). First, use large stitches to baste the tummy to the front of the frog and glue the eyes. The smile can be sewn with a back stitch or simply drawn with a black marker. Then all that remains is to sew the front and back sides together, but so that there is room at the bottom for a finger.

To make a mouse, you need to cut out two bases from gray felt, a gray tail and a white tummy. Details for the muzzle (nose and eyes) can be cut out of black felt, or you can simply draw it. This will be easier than trying to carefully glue small parts. You can add pink semicircles to the inside of the mouse's ears. Next, all that remains is to sew on all the parts, and then sew the two halves of the toy together, leaving a hole for the finger.
Making a bunny with your own hands is a little more difficult due to the large number of small parts. In addition to the white felt base, you need to cut out pink cheeks, the same tummy, a white tail and elongated pink ovals for the inside of the ears. First, glue or sew all the parts to the parts of the toy, draw the eyes and nose, and only then sew the bases together.
To make a sister fox, you need to cut out two parts for the body from orange felt, a tail and a muzzle, a white tip of the tail, a breast, almond-shaped eyes and a black nose. First sew on the chest and muzzle, tail, then glue on the remaining parts. As in previous cases, next fold the two fox parts and sew them together using a buttonhole stitch.
Now all that remains is to make the gray wolf and the bear. For the wolf, cut out two parts for the body, a tail, a muzzle, white eyes, a breast and the tip of the tail, a black nose. The technology is the same - sew the larger parts, and glue the smaller ones to the base. Then sew the front and back of the body together.
For the bear, you need to cut out two body parts from brown felt, a tummy and a muzzle from felt in a lighter shade, two white eyes (draw the pupils with a marker). Embroider floss on the muzzle with black thread or draw a nose and mouth with a marker. Sew the muzzle and tummy to the base, sew the two halves of the base.

From the remaining felt you can make a house with pockets for all the characters - a little house.
Masha and the Bear
In the finger theater you can act out the fairy tale “Masha and the Three Bears” or several episodes of the popular children’s animated series “Masha and the Bear”. Bears can be made as described above, but for Masha you will have to prepare other patterns. So, to make Masha, you need to draw the base (two details) - the silhouette of a girl in a sundress and with a scarf on her head. You also need to separately prepare two parts of the scarf (front and back), hair, two parts of the sundress (also front and back). For a sundress, you can additionally cut out decorations, for example, flowers or buttons. All the parts are quite large, so you can do without glue and draw the face with a marker. You can brown Masha with regular blush or pastel crayons. The felt finger theater “Masha and the Bear” is ready!
Fairy tale "Turnip"
You can draw your own finger theater patterns from felt for the fairy tale “Turnip” based on images of finished toys. But it is more difficult to make dolls for such a performance than the characters “Teremka” or Masha from the fairy tale “Masha and the Three Bears,” but you can choose simpler options. In total, you need to make seven toys: grandmother and grandfather, granddaughter, dog and cat, mouse and, of course, a turnip. Finger toys are made in the same way as for other fairy tales: details are attached to the base that will make one or another character recognizable. For example, a braid for a girl, a headscarf and apron for a grandmother, a beard for a grandfather. Also make the turnip a finger toy - this way it will be more convenient to show a performance based on a fairy tale.

"Kolobok"
For the fairy tale “Kolobok” you need the following felt dolls: grandfather and grandmother, bun, bunny, wolf, bear and fox. We have already learned how to make all these characters in the description of the finger theater diagrams based on the fairy tales “Teremok” and “Turnip”. All that remains is to make the bun. To do this, you just need to cut out a circle from yellow felt, draw eyes, nose and mouth on it, and sew it so that there is room for a finger.
Other characters can be made as already described, or use other patterns. Making a finger theater from felt with your own hands is a creative process (both during the creation of toys and during the performance), so variations are possible. One of the options for a bunny pattern, for example, is below.

"Three piglets"
Felt dolls for the fairy tale “The Three Little Pigs” can be made in different ways. Toys can be either complex, detailed, or simple. One of the pattern options for a do-it-yourself felt finger theater (pig) is below. But a pig can also be drawn schematically. A toy can consist only of a pink base, a tail, ears and a snout - the presence of even just these elements will already make the doll recognizable. Of course, the show wouldn’t be complete without the Three Little Pigs’ House.

"Chicken Ryaba"
Patterns for a finger theater made of felt (it’s very easy to make toys with your own hands) based on the fairy tale “Kolobok” are presented below. You can, of course, draw the characters a little differently, add or remove some details.
If you work according to the proposed finger theater template, you need to transfer the pattern to felt and cut out all the details. There will be a lot of them, so it’s better to make the toys one by one: first the grandmother, then the grandfather, then the chicken Ryaba, then the mouse (or in another order). Here you can give free rein to your imagination, because the clothes of old people and even the Ryaba chicken itself can be of a variety of colors.

It will be more convenient to glue most small parts to the base. But it is better to sew on the shirt, pants, apron, sleeves, chicken wing and some other elements for strength.
DIY finger theater
Master class on making finger puppets from felt
Author: Ekaterina Nikolaevna Demidova, teacher, MBDOU “Combined Kindergarten No. 62 “Silver Hoof”, Kurgan
Theater is thoughts free flight,
Theater – here fantasy blooms generously...
Vladimir Miodushevsky
The master class is designed for teachers and specialists of preschool institutions, additional education teachers, parents and creative individuals.
The finger theater is intended for theatrical activities in kindergarten and at home; it can be used during direct educational activities as a surprise moment. It can become a wonderful tradition for your family.
The choice of material – felt – is determined by the following criteria:
easy to process, edges do not crumble;
wide range of colors, different thickness and density;
natural, safe for health!!!
Target: making a finger theater to develop children's creative abilities through theatrical activities.
Tasks:
introduce the technology of making felt finger puppets;
develop children's acting and directing abilities;
develop fine motor skills;
promote the enrichment and activation of vocabulary, develop monologue and dialogic speech;
to develop interest in arts and crafts;
develop skills in organizing practical activities.
Materials and tools:
simple felt, with a self-adhesive base;
lace;
beads, rhinestones, small buttons, small eyes for dolls;
reinforced threads;
tailor's pins;
needle;
tailor's chalk;
pattern paper;
“second” glue;
scissors;
sewing machine.

Chanterelle Patterns:

Manufacturing technology of the finger puppet “Fox”.
Before we get started, let’s remember the basic safety rules when working with scissors and needles.
Store needles and pins in a designated place (pincushion). Do not put needles or pins in your mouth or stick them into your clothing.
Do not use rusty needles and pins.
Do not leave the scissor blades open while working.
Don't cut as you go.
Making a pattern for a finger puppet will not take you much time. First you need to decide on the size. The base of the toy should be about the height of your index finger. Draw the body and other details. Don’t forget to make allowances for the parts that are inserted into the base.
We select materials for our chanterelle. We transfer the details onto paper and cut them out.
Base – 2 parts;
Head – 1 piece;
Muzzle – 1 piece;
Ears – 2 parts;
Tail – 1 piece;
Ponytail tip – 1 piece;
Paws – 2 parts.

Transfer the pattern to felt. We pin larger parts to the material with pins, and outline small ones with tailor's chalk.

We distribute the parts in places.

We adjust the right foot to the base. We make fastenings.

Adjusting the second foot. We make fastenings.

We adjust the muzzle to the head. Align the edges with scissors.

We sew the ears to the head with a triple tack.

We design the ponytail - we fit the tip of the ponytail onto the part. Align the edges with scissors.

We connect the parts of the body along the contour. Don't forget to insert a tail on the side. We make fastenings. Align the edges along the contour.

Using glue we attach the head to the body. We work with glue carefully, as traces may appear on the surface of the material. We make the eyes and nose from large black beads. They can be glued or sewn with threads in color.

Manufacturing technology of the finger puppet “Mashenka”.
A distinctive feature of the execution will be the processing of the head.
Let's draw the pattern. We select materials.
Base (dress) – 2 parts;
Sleeves – 2 parts;
Hands – 2 parts;
Bast shoes - 2 parts;
Head – 1 piece;
Headscarf (front part) – 1 piece;
Headscarf (back view) – 1 piece;
Braid – 1 piece;
Spout – 1 piece;
Bangs – 1 piece.

Patterns of the doll “Mashenka”

We cut out the blanks. We put the parts in place.

We adjust the sleeves on the dress, put handles along the bottom of the sleeves (without adjusting them).

We adjust the lace along the bottom of the dress. We make fastenings.

Adjusting the bast shoes. We make fastenings. Sew the dress along the contour. Align the edges along the contour.

We adjust the bangs and nose to the head. To prevent the spout from sliding under the sewing machine foot, it must first be glued.

Glue the head to the base. Glue a scarf of self-adhesive felt on top. We fasten the braid between the two parts of the scarf. Align the edges.

We secure the edges of the scarf with machine stitching. We make fastenings.

Glue on the eyes - beads. Brown the cheeks with a red pencil.

Mashenka's eyes can be decorated using special accessories for needlework - peepholes.

This is what we got!

My first works.

Design options for the finger puppet “Frog”.

Design options for the finger puppet “Cockerel”.

Design options for finger puppets - people.
Content
All mothers know how much children love home theater, even if the characters are as small as in the finger version of the game. Making such a theater is not difficult, although the more heroes there are, the more time it takes to make it. But the child will definitely appreciate the mother’s efforts, will be happy to watch the original fairy tale, and then play with unusual toys himself.
In the public domain you can find many options and master classes on making finger toys. Using simple patterns and clear step-by-step instructions, even a mother who has little knowledge of needlework can sew such characters. And for a child, the process of making toys will be a real adventure and will help develop fine motor skills. Little ones will be able to do little to help, but they will happily begin to put the first characters on their own fingers, showing interest and joy in such a game.
Finger Theater "Ryaba Hen"
To create the heroes of the fairy tale “The Pockmarked Hen,” you need to make 5 heroes from felt, including the golden egg that the mouse pushed off the table.
At first glance, it seems that making such a number of finger toys is difficult, they have a lot of small parts, and it will take a lot of time. In fact, felt is a simple and easy-to-process material, it is not difficult to work with, and even novice needlewomen can cope with this task.
So, before you start making finger theater characters from felt, you need to prepare all the materials and tools for the work. First of all, these are sheets of multi-colored felt. You need to buy thin sheets that will not create excess volume for the toys, but will not tear after the first use. You can choose the color variety of felt to suit your own taste, choosing any dress for your grandmother, and a shirt for your grandfather. But, of course, the mouse should be gray, and the egg should be yellow.
In addition to felt, you need to prepare the following materials:
- threads of different colors;
- scissors, needle;
- black marker for drawing people's faces and mouse faces;
- glue "Moment".
To glue some felt parts, you can use another glue, but from experience, “Moment” holds the best.
There are only five heroes of the fairy tale: an egg, a chicken, a mouse, and grandfather and grandmother. They need to be done sequentially.
golden egg
All finger theater toys consist of two parts - a face and a back, so that they can be put on the fingers. The egg can be made one color on both sides, or you can use felt of different colors.

The parts are sewn together using a loop seam - small, neat stitches that will prevent damage to the felt and give the toys a finished look.
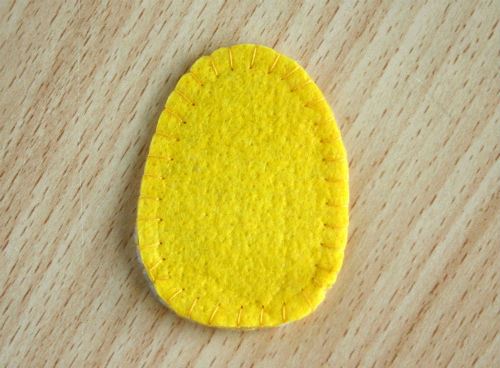
In the place where the toy will be put on the finger, the edges of the felt need to be processed on both parts separately. The size of the hole does not need to be made too large, since felt is a soft and pliable material and will stretch over time.

The egg for the fairy tale is ready!
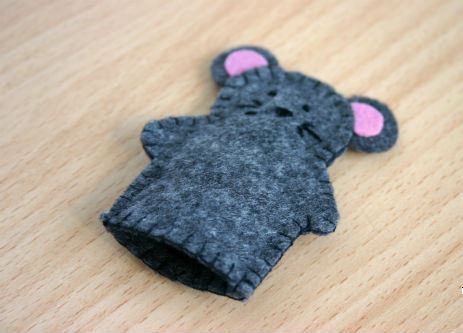
Little gray mouse
With a mouse there will be a little more work than with a simple oval, but it is also not particularly difficult. The sizes and shapes of the parts can be made arbitrary; you don’t even need a clear pattern for this. But it is important that the mouse has ears with pink centers and a tail.

Having cut out and prepared all the parts, you can begin assembling the mouse. Glue the outer and inner parts of the ears together with glue, and draw a muzzle with a marker.

The next step is to sew all the pieces together. Even black threads will look harmonious in a buttonhole stitch, which needs to be used to process all the edges of the toy. It is important not to forget - leave a hole at the bottom for the finger, and process the parts separately.

The mouse for the fairy tale is also ready!
Chicken Ryaba
The color of the felt from which the chicken for the fairy tale will be sewn can be almost any, from light beige or yellow to dark brown or red. After all, chickens come in different colors. In addition to the body of the toy, the chicken will also need wings, a beak and a red crest.

After all the parts are cut out, you need to glue and finish drawing the chicken’s head. This is easy to do.

In the process of processing the edges of the fabric, wings and a comb on the head are sewn to the product.

The cheerful and funny chicken is also ready to lay an egg!
Grandfather in a blue shirt
The figures of the grandfather and grandmother are made a little more complex than the previous heroes of the future fairy tale. To make them you need more parts, so you will have to try and make an effort. This is especially true for the subtleties and elements of the face. But first you need to prepare the following details: two halves of the body, two heads, a beard and a nose.

First of all, you need to make grandpa’s face. The eyes can be embroidered with black thread, although it is much faster and easier to draw them with a marker. The nose is glued on with glue. Above the eyes you need to make two small stitches of eyebrows, and in the center of the beard - a red stripe of the mouth. The work is small, but not difficult. And at the same time you can give grandfather any facial expression.

The next step is to sew the head to the body. This only requires a few stitches along the neckline.
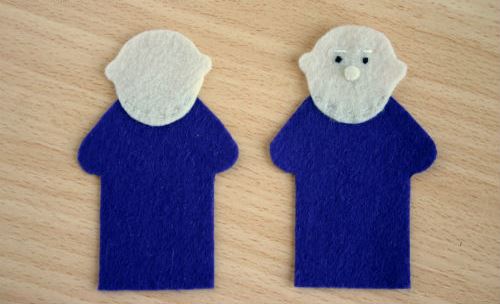
Only after this will you need to sew on the beard. It can also be glued, but the white threads in the old man’s gray beard look natural and appropriate.
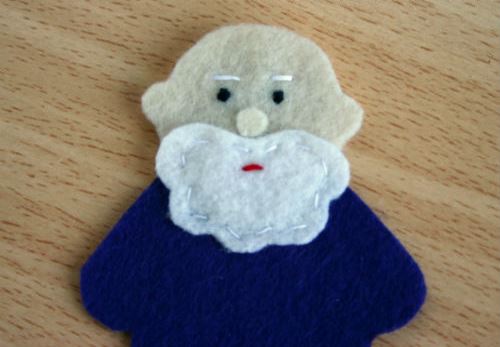
When the main assembly is ready, you can start processing all the edges of the toy. Grandpa is ready.

Grandmother in a scarf
The last and perhaps most complex character in the fairy tale is the grandmother. The only difficulty is that there are more details for this hero than for all the others. However, once you get the hang of it and train your hand on previous toys, sewing a grandmother won’t be particularly difficult either.
In addition to the body and head, you need to cut out a scarf, an apron and facial elements from felt.

Grandma's face is shaped similarly to Grandpa's previous toy. You can draw the eyes with a marker, embroider the lips with red thread, and glue the nose. The oval of the face against the background of the scarf is sewn with white threads. The apron is also sewn on the front side and on the back - a strip from it.

When all three parts are ready, you can sew the head to the body using threads that match the color of the felt.

Only after this can you begin to process the edges and sew the two halves into one toy.

Thus, all the characters of the future fairy tale are ready.

It is important that all toys look beautiful and neat, both from the front and from the back. If you do everything slowly, sewing the parts together with small stitches, this will not be difficult to complete.

If the process of making toys was easy and interesting, you can expand the number of characters in your home finger theater. Grandmother and grandfather can be used for the fairy tales “Kolobok” and “Turnip”, completing the missing characters. And over time, the child will begin to help create new heroes and invent stories about their adventures. It’s not difficult to make a finger theater from felt, but all family members will have a lot of joy and happiness from the process and result of joint work.
Post Views: 541
"There is a tower in the field..."
Well, for those who want to sew finger toys with their own hands, we offer patterns and a description of the work.
I think you can draw the pattern for the house yourself, but we have prepared patterns for sewing its inhabitants.
You will need:
A simple pencil or chalk for transferring patterns;
Felt in orange, yellow, white, black, light and dark brown, light and dark gray, pink, green and light green, as well as felt any color for mansion;
Scissors, simple and curly;
Threads of the desired colors;
Sewing machine (but you can also do it by hand).
DIY finger theater made from felt, description and patterns:


1. Patterns of all toys consist of the main part and parts of the front part.
Basically, the front part is sewn first (here we are talking about the faces of the fairy tale characters), and then it is connected to the back so that there is a hole at the bottom for the finger.
2. Ears and paws felt toys , as well as the tail of the mouse, are sewn in at the moment of joining the front and back halves. Or, if you want them to be stronger, you can also sew them to the back main piece, and then sew on the front of the toy.
3. The fox and wolf tail is shaped before stitching and sewn to the back.
In the picture there is also a pattern for a fly (it is in some versions of this fairy tale, sew it as you wish). The only note is that the pattern does not include fly wings, but they are easy to draw yourself.
These are the main points. I think even beginners understand it. Happy sewing . You can always ask any question regarding sewing toys for DIY finger theater in comments.


Felt lion mask pattern:


Felt crocodile mask pattern:


Felt tiger mask pattern:


Felt panda mask pattern:


Felt monkey mask pattern:


Felt elephant mask pattern:

Felt lamb mask:

Felt lamb mask pattern:

Felt duck mask:

Felt duck mask pattern:

Little bee made of felt (from “Luntik”)
Here is our last hero - Felt bee . For those who have not yet sewn previous felt finger toys, here are the links:
 So, we will need:
Felt (you can’t live without it :-)) in flesh-colored, brown, yellow, light and dark orange, gray colors;
Eyes (I glued on store-bought felt eyes because they fit, but you can also cut them out and sew them on from felt);
Scissors, thread.
1. Cut out the parts of the desired colors according to the pattern. Let's take a look at the photo.


2. As shown in the figure, we decorate the back part (we first sew the hairstyle with a mustache to the main part, then the gray wings and arms), as well as the front part (we sew on the legs, feet, stripes, apply and sew on shorts, sleeves, collar and tie). Let's create the face. 
3. Overlap and sew the front part to the back, leaving a hole for the finger at the bottom. Then we sew on the face. Here's what happens:
Finger toy Little Bee (from "Luntik") made of felt video master class:
DIY educational toys made of felt. Lacing - hedgehog.
Dear readers of the column " Felt toys "! We continue to introduce you to the works of felt craftswomen.
And today we present to your attention DIY felt educational toy.
This is a hedgehog who loves to collect all sorts of berries, fruits and mushrooms on his thorns.)) Of course, children are invited to help secure these goodies with a cord. The work of Olga from St. Petersburg.
 This toy is designed for children from one year to... as long as they are interested in this activity.))
The benefits of lacing in a baby’s life are enormous! Especially these days, when we buy shoes for children in kindergarten and on the street with Velcro, when we try to put on blouses with zippers. Of course, this makes life easier for both the child and us, but as a result of this, general motor skills, and specifically the hands, develop poorly; modern children are not ready for writing and many have significant problems with speech. In the twentieth century, Maria Montessori conducted research on the dependence of speech development on the development of fine hand movements. And the results revealed this dependence. Therefore, it is very important to develop fine motor skills.
It also happens that everything is fine with speech, but a child cannot tie his sneakers at the age of 5, and this is also not the norm!
By the way, my daughter learned this at the age of three and now does it faster than me. At the end of the article you can watch the video so that I am not unfounded. Sorry for the boastfulness, I just want overly caring parents to understand that it is better to devote time to such skills from early childhood, because later it will be much easier for the child, and there will be time for something else, more interesting.))
Well, let's get back to the hedgehog's lacing - developing
Good afternoon everyone!
I am keeping my promise: I am placing felt finger puppet templates in the group.
Common patterns for all animals (with the exception of the mouse and frog's leg)
Next are the animal templates. I make ears only on the back parts, i.e. they are single. I don't cut anything on the faces. The holes in the eyes and muzzles are only to show where these parts need to be glued or sewn.
Mouse

Frog

Bunny

Fox

Bear

Cat (the tail can be made from lace or felt)

Dog

Wolf (his muzzle is more complex). It consists of three parts, 1 and 2 are gray, and 3 are yellow, these are the eyes. Part number 3 must be placed between 1 and 2, and then sew or glue the pupils. The assembled muzzle is shown above; there is no need to cut it out.

Granddaughter

Grandma: You can’t cut holes in the face either, this was done in order to draw glasses.

Grandfather: the place for drawing glasses is also indicated here. And pay attention to the hair on the front of your head - the numbers show how to position it correctly.
And this is a new template and a fox sewn according to this template. 
Here's a front and back view. In the template I only changed the face, everything else remains unchanged.
I really like felt finger puppets. I didn’t want to copy someone else’s work, so a little over a year ago I made my own doll templates. At first I liked them, but after a while they somehow didn’t please my soul very much. And I wanted to make other templates. It took me a long time to get ready, but I finally got around to it. I have already started sewing using new patterns, which I am refining during the sewing process. Perhaps this will be the final version of dolls for showing Russian folk tales.
Since I often have to change threads during the sewing process, I decided to sew each character in three copies at once. I sewed the first four characters from the fairy tale "Teremok", but then an order arrived. So I sewed six more dolls in one copy, quickly photographed them and gave them to the customer. I show you what I managed to capture.
The top row is new dolls, the bottom row is old. The new ones are made of soft felt, they are more comfortable for the baby's hand. Which ones do you like best? Interested to know your opinion.
These are new characters for the fairy tale "Teremok"

These are old grandparents (I mean the old version of the dolls).

And this is a new version of the dolls, more modern characters. In this case, one cannot dare to call them grandparents. So meet: grandfather, grandmother and their granddaughter.

I was in a hurry to complete the order, so it didn’t turn out very nicely. But this is an order for the preparatory group of a kindergarten, so it is unknown what they will become in a short period of time. The main criterion here is strength. It is present in my dolls: first I work on the front and back of the dolls and connect these halves first by hand with a buttonhole stitch, and then stitch them with a zigzig on a machine. So it turns out durable.
True, if a child decides to make two dolls from one doll, nothing will stop him.


