Cartoon style of drawing is called. Creating a female character
How to develop your own unique drawing style? This question is usually asked by those who have done little practice. For those who practiced a lot, the style developed on its own. However, here is the answer :)
But you can describe in more detail - 5 tips on how to approach creating illustrations in order to decide on your own style and consolidate it.
Decide what you will draw
People, animals, imaginary creatures? Choose a direction: manga, realism, vector, etc.
Get inspired and try to copy their style in a couple of sketches. If you like the way someone draws eyes, then there is nothing wrong with drawing eyes in a similar way.
Just don't copy someone else's style entirely. These people have worked hard to develop their own style, so you should too. You should not plagiarize.

Practice makes perfect!
It's tiring, but to become good artist, practice is required. Your mechanical drawing will give impetus to the development of a distinct style of your own.

Create your own characters
This will help you. Make them as unique as possible, you should not copy famous artists. Start drawing them often and perhaps you will develop a new style. Another way to practice drawing is to draw yourself. Most people see themselves as they want to appear. Those. if they imagine themselves as attractive, they may enlarge their eyes somewhat; if they consider themselves fat, they may draw themselves taller. Try to paint yourself in your own vision, and then develop your own style from there.

Pay attention to the structure
Use simple shapes such as circles and squares when sketching. Learn a little more about human/animal anatomy to make your task easier. It would be nice to have a book on academic construction or take courses.
The most important thing is not to get tired of practicing and believing in yourself.
Cover photo:
Character design
The technique of creating characters and the characters themselves in cartoons, comics and products with the most various manifestations character and emotions
- Author
- 2 April 2019, 17:45
- Author
- 18 December 2016, 14:35
- Author
- 15 February 2016, 20:44
Creating cool, memorable characters is easy if you know certain rules. This post captures some simple but useful aspects of the creation process.
Tell a story
Stories are what pique our interest and help us believe in a character. Think about movie plots and games - we're usually intrigued by a character's story and personality traits, and this also applies to illustration. Even the most simple stories make the character more attractive and memorable. You can show the story in a picture through the environment, movement, costume elements, or facial features.
Shapes and lines
Many famous characters consist of simple shapes and lines. Remember that the viewer subconsciously reads rounded soft shapes as a sign of the character’s kindness, and sharp and torn ones - as an attribute of a negative character. So if your cute character is made up of sharp pieces, it may cause problems in understanding.
Silhouettes
It's safe to say that people can immediately recognize familiar characters from their silhouettes alone if they are well designed and use the right shapes and lines. If you remove details from your character and test them for silhouette recognition, this is usually a sign of a cool design.
Proportions and exaggeration
Using distorted proportions or exaggerating the length and size of body parts, even with small details, such as fingers, can really help create your character's personality. You can make him appear stronger or clumsier, even angrier, by exaggerating his features appearance. This is also true for their walking and movement if you want to go ahead and animate the character in the animation. Plus, when you need to show that a character is small and cute, his head and eyes are deliberately enlarged.
Expression
The first thing we look at when we see a character is his eyes. IN real life human and animal eyes are full of emotions and are in a good way understand what someone is thinking or feeling. So naturally we look at the eyes in the illustration. Another good advice- exaggerate the expression so that it actually reads and does not force the audience to think hard.
Posture and position
Thinking about how a character stands or how they carry themselves is another way to reveal more about their personality and add detail to the story. You can make characters look strong, imposing, scared, confused, angry, etc. simply by changing their pose and position.
Scale
Knowing the scale and size of a character is important, and it can be difficult to visualize its size especially in abstract designs. This is where the introduction of other objects such as trees, houses or tables and plants can help us understand how big or small character, which we are looking at.
Color
Using color can help with a character's mood, making them more serious or cheerful. Using the right shades for skin tone, fur, clothing, etc. also helps the viewer understand what kind of character they are looking at, and even whether they have a friendly or not-so-friendly personality. Remember that using a more fun and unrealistic color palette will make your character more fun and playful.
Shadows
The shading can be as complex or simple as you like. It really depends on how realistic or detailed you want the character to look. You can really play with the style and final visual appearance of your character when you think about shadows. This is a way to introduce some tones/shades of the existing colors you have been using.
Texture
You don't always need to use texture on your character illustrations, if you want a clean vector art it may be better to leave it without texture. However, if you want your illustration to look more organic, vibrant, and natural, it may be worth adding texture. There are plenty of successful examples, you just have to look around.
That's all the main points, this list can really help and be useful even if only some of the points are implemented.

Sometimes we need to draw animals that look like people and there are some very simple ways that allow you to achieve this goal. The technique of humanization is especially often used in children's books and when creating mascots. There are several degrees of anthropomorphism (humanization).
1. Animal with human emotions - when animals remain animals, but have human emotions and facial expressions. Human poses can be used to enhance the effect.

2. The animal performs human actions - the effect works great in contrast with the technique above, when one animal only has emotions, and the other performs some actions. At this stage, animals may or may not wear clothing, but they usually have paws rather than arms and are usually not wearing shoes. Very often this technique was used by the famous English illustrator Betrix Potter (this is her illustration on the cover of the post).


3. Practically complete coincidence with a person - at this stage, in addition to the points above, animals wear clothes, shoes, usually walk on two legs and act like people. Sometimes such characters look like people with the head of an animal.


Here visual illustration all degrees of humanization. The first penguin is just an animal, the second has emotions, the third becomes more and more humanized, but remains a penguin for now, and the last one is completely human-like. 
I hope now drawing human animals will be simple and easy for you)
Honestly, I thought about this question for a long time, because the answer “everywhere” categorically did not suit me. As a result, several clear areas have come together, taking into account the features of which you can develop characters specifically for something.
Cartoons/animation
The success of cartoons largely depends on the uniqueness and originality of the character, so the image is usually not taken out of thin air, but carefully worked out. Cartoons can be 2D or 3D - it depends on how to draw the character. The character is accompanied by a set of diagrams for its subsequent animation (front view, profile, map of emotions, and so on). The introductory task is prepared by the film's directing group. Usually in feature films the artist works on the character throughout the entire shoot.
By the way, many large studios, after the release of cartoons, release art books with the work process and a lot of stuff with the character.
Commercials
Usually short and with an emphasis on what is being sold. All the character's actions should be built around the product being sold. Essentially a cartoon in miniature, only with fewer poses, environments and scenes. With the development of motion design, they are often made from vector characters with a combination of different transitions and frame changes. Just turn on the TV and wait for the commercials - the characters there are very different.

Computer games
The starting point is the general theme of the game, its plot, setting (the environment in which the action takes place) and the role assigned to this character. For example, you need to create concept art of the main character for a shooter, which takes place during the 2nd World War or during crusade. Before you start drawing this character, the artist must carefully study the clothing of that time ( military uniform, if the hero is a soldier), samples of weapons, etc. It is also important to work out every action of the character, how he runs, shoots, dies, and so on. Something like this.
Mascots
Mascot characters representing the company, brand, sports team, team and so on. Mascots are often used as characters that represent products and services to consumers (for example, Ronald McDonald the clown). For street advertising, as a rule, they hire a person and dress him up in a mascot costume. Very bright mascots are also usually used for Olympic Games and at sporting competitions (in the video below is just one of the symbols of the American basketball team). Even car brands can have their own mascots - for example, a Ferrari horse or a Lamborgini bull. At the same time, the character does not have to be cartoonish; a stylized brutal version can also very well be a mascot.
Book graphics/comics
As a rule, there is a lot of development required here. different characters and their interaction with each other. Behavior, character and environment are closely related. How brighter character, the easier it is to build a story around it. Comics in general are a separate large trend, very clearly represented in eastern countries like Japan and the USA, but with a different style. Here's a great video on how to make characters different.
Here's a rather long but interesting tutorial on how to make a character cute.
Figurines
Usually these are collectible series with game or cartoon characters, but it happens that a character is initially created only for a sculpture in a small edition. With the advent of 3D printing, the impossible becomes possible even for amateurs and it is not necessary to make a huge print run at once.
By the way, I have several figures from Game of Thrones, excellent characters)

If you know others interesting examples use of characters - share in the comments.
 I decided to summarize all the useful tips that are recommended famous illustrators to create high-quality and recognizable characters. The main thing about a character is his recognition and readability. Accordingly, without a clear silhouette, it is difficult to achieve this. Therefore, the first thing to do is fill the character with black and check how it generally looks like as a spot. For example, here are a few silhouettes - of course you will recognize them immediately.
Denis Zilber works very cool with the silhouette, for example, the sequence of drawing his character and you can clearly see how he changed his pose in favor of the readability of the silhouette. 
Lots of options
You shouldn’t immediately draw a character and concentrate on only one image - it’s better to draw several different concepts and choose the most successful one. In any case, you can take from the rejected options interesting details.
Simple forms
It’s easier and more correct to start drawing with simple shapes - ovals, pears and cylinders and only then build up the required volume and details on them. Drawing from shapes allows you to simply find the desired pose or angle without changing the entire drawing. And despite the fact that very often you want to go into details, initial stage stick, cucumber - this is our everything)

Unusual details
A character can be memorable not only for his figure, but also interesting things complementing the image. For example, if you remember Harry Potter, then these are glasses, an owl and a scar in the form of a lightning bolt. I once saw a book cover design where these three things were drawn and the title of the book was not written and I was one hundred percent sure that it was Potter.
Correct proportions
Usually, if a character is smart, they give him a bigger head and big glasses; if he is a jock, he will have broad shoulders; romantic girls will have broad shoulders. big eyes And long eyelashes. All these things make it easier to read the character's image without thinking. You need to remember the ratio of body parts, because... proportions create a character's character. For example, a large and pugnacious hero will have a small head, a wide chest, shoulders and legs, and a mouth and chin that will protrude forward. Cute characters will have the proportions of a baby: big head, oval body, high forehead, and small areas of the chin, mouth, eyes. Knowing these things, you can already achieve certain effects.For example, almost everything disney princesses They look cute due to their big eyes and small mouth.

The environment is also important
Understanding where exactly the character will act and work can greatly simplify the work. This is especially important when the character is “fitted” into a ready-made place. In some mysterious forest, goblin and sorcerers would be more appropriate than, for example, a horse rider or an African animal.I love the Bikini Bottom example - it's the perfect style for SpongeBob and his friends, and they match it perfectly.


Why and for whom is the character created?
For some company selling travel packages, it is better to make the character simple, but for games they usually develop complex and detailed heroes. However, if a person is just walking down the street and sees a complex character, most likely he will not look at him.Here is a Euroset character who can be easily changed and forced to do anything and who can often be seen while passing by another salon.

But the hero of Warcraft, where people sit for a long time and the atmosphere and every little detail is important.

And finally
It’s always interesting not just to look at the characters you like, but to analyze them and highlight them character traits. Knowing the basic techniques, you can very quickly learn how to create interesting characters, corresponding to the task.Do you know any important points, which should be taken into account when creating characters?
Attach a piece of paper to the photo and translate it. Simplify your hair into patches, enlarge your eyes and create large highlights in your pupils. Anime portrait is ready. But this is enough if you want to know how to draw yourself in
You have read a description of the process of creating many cartoon characters. But the anime style has enough nuances and special details. Manga characters immediately catch your eye, and it is impossible to confuse them with any other regular cartoon characters. Learn this and drawing anime portraits will be easy for you.
Facial expression
Do you want to convey emotions, but don't know how? Drawing a face in anime style is one thing, conveying it is another. Emotions are drawn quite simply, one might even say, with symbols.
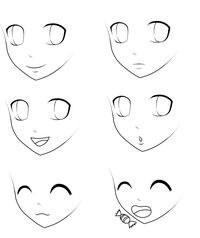
For example, pink lines on the cheeks show that the hero is embarrassed, a wide open mouth with a grin when talking - he is angry, two arcs instead of eyes - the eyes are closed, and, most likely, the character is experiencing pleasure.
However, without studying this “ABC”, you can easily guess state of mind hero. If the person in the portrait is smiling, look at how it is depicted in anime style and do the same.
Dynamics
It's easy to draw a head from the front. But it's boring and gets boring quickly. How to draw yourself in anime style so that your head is dynamic? Imagine that your head is a ball. Draw a line exactly in the middle where the eyes will be located. Now rotate this ball along with the line to change the angle of movement.
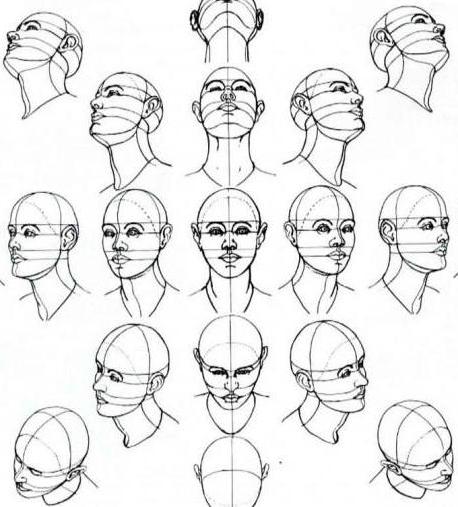
Draw lines for the nose and lips and then draw in the details of the face. The work should always be done by outlining the shapes. Draw it in detail - and it turns out that the result is not the movement that you would like.
Main mistakes
Anime in portraits obeys general rules. The nose, eyes, mouth, ears take their position on the head. If you can’t draw a regular head, it’s too early for you to think about how to draw a portrait in anime style. Mastery depends on experience.
Draw more sketches, practice. This helps in identifying errors and eventually correcting them. So, instead of opening a tutorial on how to draw an anime portrait every time, go through the list common mistakes, which you should consider and try to eliminate them.

Are the eyes evenly spaced along the line? Many beginning artists fail to draw identical eyes; they don’t know what to do with it or how. Drawing yourself in anime style isn't just about making your eyes the size of a galaxy. Once you draw them, mark the bottom and top extreme points and draw lines through them. This will help you find out if the eyes are drawn evenly.
Is your chin centered between them? Draw a line down the center of the face between the eyes and make sure the chin is on this line. It should also cross the mouth and nose. In the center, third or fourth - it depends on the perspective in which the head is located.
Are the ears level with the eyes? Top point The auricle is located at the level of the eyebrows. The earlobe is in line with the tip of the nose. But these are individual values, so there may be deviations from the given rules - take this into account.

Watch anime based on manga by different authors so you don’t have to worry about how to draw yourself in anime style. Explore different styles manga and enjoy watching it at the same time. Many otaku (avid anime fans), without studying the principles, make a good “anime” drawing the first time.
(Translation of Tara Leaver’s article “Finding your own artistic style: A practical guide” –
For many of us, finding our own recognizable artistic style causes great difficulty. And this applies not only to those new to drawing, but also affects experienced artists.
Perhaps you begin to doubt even before the brush touches the canvas, remembering various criticisms of your teachers, or simply getting lost in a huge number different possible ideas and inspiration received from different courses. Or maybe both at once!
It's no wonder that when you find your style, you'll feel amazing!
Today I see a few simple ways to find and develop your own style.
Every person has it, you just need to help him express himself. We develop it through constant practice and exercise, but there is also an unconscious part, the one that comes not through the “hands”, but from the heart.
I know this idea seems obvious, but it is this combination that allows us to begin to work on developing our individual style. Received from the outside, this idea gives you a clearer idea of where to start exploring your creativity and finding your style.
What you read below is not intended to be comprehensive information on this topic. It's just starting points for you in finding your own path.
Take your latest work, place it so that it is convenient for you to look at it. Answer the questions consistently, noting your reactions and observations along the way. If you want, you can make written notes.
We're going on a treasure hunt!
The main treasure is your own creativity.
Think about what you draw most often
- What themes and subjects attract you most to drawing? If you find it difficult to answer, look in your paintings and folders with works in search of an answer.
Personally, I try to remember my preferences in stories, how often I work on a particular topic. And somewhere at home I have a piece of paper from a notebook where I write down this information. So, when I find it difficult to answer a question about my favorite topic in drawing, I look inside myself or this sheet.
So, I love drawing boats! And also fish, figures and trees.
The list of favorite topics does not need to be completely complete or exhaustive at this stage. It is enough to highlight a few of them for yourself in order to have a starting point.

A selection of works with experiments and creative explorations on the theme of trees. You can see common features, connecting works – winding lines and contour drawing.
What colors do you like?
- Think about your default color palette.
- What can your last work about the repeated choice of colors?
To my working palette in Lately includes aqua, blue, Nepalese yellow, fluorescent pink and white, for which I use Gesso acrylic primer. This gives me a good range of darks, mids and highlights. I truly enjoy playing with these colors and they suit my needs and needs perfectly. this moment.
And what about you?

On the left is my photograph, on the right is a drawing based on it. I used colors from “my” palette and experimental techniques.
What are the features of your style?
- What do you prefer – graphic lines or working with large areas of color?
- Do you like to use unusual techniques when working with a brush?
- Or maybe you prefer not to use it at work? toothbrush for spraying?
- Do you like to create so-called patterns, designs, or do you prefer to work with more imagination and scope?
Features of my style - contour lines, often uneven and blurry, sometimes “dirty” in color scheme. I am inspired by the works of Egon Schiele. I love nervous ones too color contrasts, a sophisticated and flexible pattern.
Analyze which techniques you especially like and are close to, which give you a feeling of satisfaction with your creativity. Develop them and adhere to them in your future works.

Drawing of a fish made with nut-colored ink. Experiment with lines.
What technique or art material do you like?
- You may have several of them. What do you like best?
I really love working with oil pastels. But most of all I like to work with acrylic and use the medium in my work. This allows me to control the drying process of the paints and play with the result. Everything dries quickly and is just as easy to clean.
If you have one favorite technique, this means that you can explore all its possibilities, improve your skills, and therefore your work in general.

I didn't use references for this work. There are only two of my favorite materials - acrylic and oil pastel.
What inspires you?
So, we have looked at the main questions that need to be addressed. Special attention in search of your own style. Now let's digress a little, look at the work of other artists and think about what we could borrow from them for ourselves.
I recommend doing this after you have answered the previous four questions. Before you begin to consider and evaluate the work of other artists, you first need to understand your own creativity.
If you are confident that you have identified the main features of your work, this makes it easier for you to find the work of other artists similar to your style and vision of the world. It will be easier for you to evaluate their work, and look for features that you would like to add to your work, your style.
It's made for collecting and sharing. visual information. There's a sea there various pictures, photographs and images. Ask a few key queries and look at the results.
You can create your own personal board on which you will collect (Pin it!) everything that will inspire and interest you, be it interesting composition in one picture, color palette another, the artist's style on the third or the plot of the fourth.
On my board I do not collect paintings by other artists. I don't do this because they don't inspire me. I just want to be free from what other artists painted at the moment when I begin to create, to look for my own subjects and solutions.
Reference photos (photo sources for drawing) will partially help you with this. They can serve you well, so keep them handy or save photos to your Pinterest board that inspire you.
In addition, by carefully looking at the photographs you have collected, you will certainly see clues about what is interesting to you at the moment and what to do next.
Yes, Pinterest is like a rabbit hole! If you can't tear yourself away from it, set a timer.

On the left is a photo from Pinterest, on the right is my work, which was inspired by this photo.
You can only ask yourself ONE question, and let it be: “What inspires me right now?”
I always ask myself this if I’m not sure where to start or can’t remember how “I” draw. He allows me to follow my own path.
Think about what you want to draw right now, pick up reference photos if you need them, a few favorite colors from your palette, and draw in a technique that you like.
So, are you ready? What will you draw?
I would be grateful for a repost of the article!
More useful translation materials on drawing:
The pleasure of creating cartoon character immeasurable. Creating and developing a character involves more than just drawing their figure: each character has its own shape, personality traits and features. It's great if you're already familiar with the basics of head proportions and depicting emotions. But this knowledge is useless if you don't know how to draw a character's torso. The artist must take all of these details into account in order to create a character that will look believable in the eyes of the audience.
There are several in animation various styles for characters such as "chump" and "bully". Want to know more about them? This is what I will teach you in this lesson.
1. How to Get Started
By the way, the steps we will take today are very simple. First, draw the basic shape of the figure and then add features and other body parts. This is a procedure that should be followed regardless of whether you are drawing a person or an animal, or even an object that you decide to animate (for example, make a smiling cup).
Every drawing you make will depend on your work during the sketching stage. At this stage, you should improve your sketch for now final result will not satisfy you.
Once you've decided on the proportions, the next step is to develop expression in your body movements, arms and legs. Just one hand position can tell a whole story.
 Hands are vast and difficult subject(even in animation) which deserve a separate lesson.
 In short, there are no secrets in the character creation process. 95% of artists create characters, and they do it by going through certain stages because it makes the process much easier!
2. Proportions
Proportions are one of the most important factors to take into account when creating characters. The artist must remember the relative proportions of the body parts, because on the basis of this we determine structural features our characters. For example, a bully has a warlike character, so he will have a small head, but his chest will be very impressive! His arms and legs are strong and well defined, as are his large cheekbones. In contrast, the modest character is based on the proportions of a child, with a larger head compared to the body. And all this in round shapes! Other parts such as the forehead and large eyes are responsible for determining the fragility of the personality. And so on...
Animation studios, for the most part, use rounded shapes to estimate a character's height. For example: A child's head, usually more sizes other parts. But an adult character has different proportions, which depend on the gender and physical form of the hero.


Psychedelic cartoon? It looks like it.
When designing (or animating) a character's body, it is recommended to sketch on separate sheets of paper. This makes it possible to have before your eyes a sample of its proportions when sketching other poses and actions.

Rotation example

It is very important to draw a character in various poses, situations and situations. different clothes, until you find it for him perfect proportions.

Examples of drawings of a puppy.
3. The body is a pear!
A common practice among designers is to use a pear shape - or similar objects - to construct the body shape, due to common associations. In fact, this is a common technique in animation studios, as several different artists can work with one character, and at the same time they must maintain the correct proportions.


The example above shows the effectiveness of this technique. Using one template, you can draw several different characters! The reason why pattern-based drawing is used is because it creates an instant association in a person. Especially in the case of children, when everything should be simplified to make it easier to understand. Drawing the body in the shape of a pear allows us to maintain a dynamic look and makes our hero more interesting!

4. Adding a Skeleton
Now that we know how to define the shape, we need to define the structure of the skeleton. If you are drawing any character in cartoon style, you need to understand the basic differences in muscle and skeletal structure for different categories such as cats, birds and humans. This knowledge is important and leading for determining the position of the hero's joints, such as elbows and knees.

Pay attention to the main elements: rounded shapes - pear-shaped body - position of the joints.
When it comes to animation, it's important to remember that we have to tell a story in every scene we create. This doesn't matter as much if we're talking about photographs or realistic image. For the reason that people amazingly may hide their real motives.
In animation everything is different. Your character's physical condition and posture should be easy to read without any dialogue or environment. It is for this reason that it is so fascinating and charming art style!


Learn to tell a story in your sketches and you will become a successful cartoonist.
To sum it up:
- Estimate your character's proportion using round shapes;
- Summarize the body using the famous pear rule;
- Follow the guide lines that show the basic position of the creatures;
- Finish building your character by adding the final elements to the basic structure you've built.
5. Pear Turn
Does the pear rule apply to all the characters we create? Not always. If we flip this shape, we will give a feeling of strength and power to our hero! Look at the examples below:


Fragile little man: pear-shaped body. Strong man: body is an inverted pear. Easy, isn't it?

Can you find the differences in the “pears” in this picture?
Another interesting analogy that characters can be based on is objects that resemble certain physical forms, as in the example below:

In principle, we also use the pear rule. We just use different shapes, relying on the same technique. You, as an artist, can use the method that works best for you!
6. Character Blockhead
A "boob character" is one that walks on two legs (even animals) and looks stupid, clumsy, and generally lazy.
This character is often portrayed as a coward. They usually try to stay out of trouble than everyone else. He can also be presented as a nerd or a frustrated guy.

There is a template that can be followed when creating this type of character, but it is not a defining rule, and can vary depending on the character of the hero.
- The heads are thinner;
- Large noses (or muzzles, if an animal);
- Big teeth;
- Narrow shoulders;
- Virtually no chin;
- Pear rule (never upside down, always up!).
Basically, these are the basic elements needed to create a dummy. Play around with it until you perfect the technique enough to apply it to any character.

What? A lion on two legs? Wait... is that a lion dunce?
Not all animals that walk like humans are "boobs." Many of them have a sarcastic or ironic tone. As an example of such characters, we can recall Woody Woodpecker and Bugs Bunny.
7. Let's Apply Our Knowledge: Creating a Heroic Character
Now we will draw a character together based on what we have learned. Let's get started!
Step 1
I'll start by drawing as a very rough sketch. Don't be afraid to sketch until you find the perfect proportions. It's like a game!
We started by drawing the head and body using round shapes:

Notice that we defined the proportions of our character without special effort.

Note that we used the inverted pear rule here because... our hero is strong!
Step 2
Now let's add lines showing the position of the skeleton joints. Notice that we are giving our hero a common pose where the body weight is transferred to one leg.

It is very important to mark the pelvic area in a bowl shape because this will make it easier to see the movement. This movement in the hips will add dynamics to the pose.
Step 3
Great! Now let's add facial features and muscles for our hero.

My mouth is watering... And this is just a sketch!
To build muscle, you need to have a basic knowledge of anatomy. Otherwise, it will be difficult for you to properly add volume in the places where it is needed.
Step 4
Once the general structure is determined, we can add clothing.

Great! Our hero is finished! By adding a suit and some great accessories, we achieved great result. Can you tell a story with this picture?
Great Job, You Done It!
Well, that's all! We went over the process of drawing a character's body in a cartoon style. Moreover, we learned to use round and oval shapes to shape the character's body. We also learned the differences that make up the heroic/strong/bully type and the helpless/fragile type, and how to apply the punching bag technique to achieve these results. And finally, we discovered how to apply the boob technique to people and animals. And to top it all off, we created a heroic character from scratch!

Are you already convinced that you can draw cartoon character from head to toe? I'm looking forward to meeting him! Share your drawings below, and if you still have any questions, I will be glad to answer them in the comments.