Draw the construction of the head of Hercules. Drawing
Compose the image on the sheet. Knowing that the front part has many small details, it is necessary to create a larger background field in front of it. The image of the head moves slightly upward, since the lower part of the sheet should be more heavy. When outlining the general proportions, you need to pay attention to the ratio of the total width to the total height of the head, find out what proportions of the rectangle the plaster head fits into.
Having determined the tilt, rotation and plastic characteristics of the total volume, outline the general dimensions of the image and the outlines of the total mass of the head.
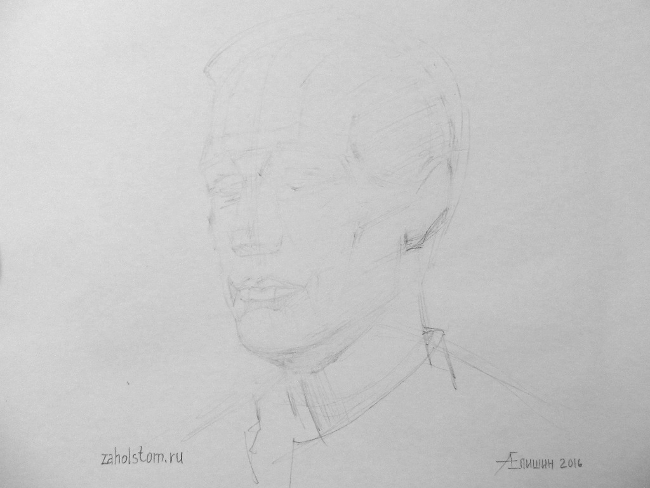
Drawing of a human head (plaster anatomical head). Second phase
Taking into account the perspective reductions, generalization, outline the average profile section. Mark a line passing through the middle of the eye section. This line will divide the head into two equal parts vertically. The main task at this stage is to correctly identify perspective abbreviations and express them when drawing these lines. This will help in further work. You will need to check yourself each time, relying on the directions previously specified in the drawing.
Often, when outlining a profile section, the draftsman is faced with the problem of determining the slope. The tilt of the head should be found based on an imaginary line connecting the bridge of the nose to the middle of the chin and the vertical. Determining the facial angle is also of great importance. By outlining two generalized lines of sections, the so-called cross, the drawer must firmly establish his horizon line.

Drawing of a human head (plaster anatomical head). Third stage
Based on anatomical points, highlight the general proportions of the facial part. Anatomical points should be primarily the temporal lines, the protrusions of the zygomatic bones and the angles of the lower jaw. It is necessary to determine the proportions of the front part by comparing it with the general shape.

Drawing of a human head (plaster anatomical head). Fourth stage
Study the profile of the head and strictly outline the profile longitudinal section. You need to start drawing the section from the midpoint of the nose bridge. Moving up to the back of the head, down to the chin and jugular cavity, examine the entire head. When outlining a profile section, you should check the proportionality of individual small parts of the head and correctly identify protruding points, comparing them with each other vertically.

Drawing of a human head (plaster anatomical head). Fifth stage
Outline the width of the large shapes of each part of the head, building from the profile section and taking into account the perspective cuts and pairing of shapes. Perform a three-dimensional constructive construction of the head shape.

Drawing of a human head (plaster anatomical head). Sixth stage
Draw small details, checking the construction using sections. Trace the turns of the form, conveying the complex plastic basis of the human head, and complete the linear constructive drawing.
By remembering the canons that have come to us from time immemorial, and comparing them with what is in nature, students more accurately determine the nature of the shape and proportions of a particular head. In the sculptural images of heads made by ancient sculptors, some general patterns can be traced.
The front part of the head can be divided into three equal parts. The line delimiting the upper third of the middle part runs at eye level. The height of the ear is equal to the height of the middle third of the face. It is necessary to begin construction based on knowledge about the features of the structural structure of the plastic shape of the head, obtained while working on the trimming pattern.

Drawing of a human head (plaster anatomical head). Seventh stage
Considering the direction of the light, outline the main volume of the head and the main details in a light tone. Strictly trace the light separations in the drawing. Show illumination.

Drawing of a human head (plaster anatomical head). Eighth stage
Introduce halftones, moving on to more detailed identification of form, while maintaining a constructive, proportional and perspective basis of construction. Analyze the form according to tonal gradations, subordinating them to the tonal scale. Subordinate all the elements of chiaroscuro to their relationships, achieving the integrity of the drawing.

Drawing of a human head (plaster anatomical head). Ninth stage
Define more precise light and shadow gradations by accumulating details and subordinating them to the overall form. Taking into account the tone, at the same time clarify the structural basis of the plastic form. Summarize and complete the drawing of the anatomical head.

Similar to the drawing of a plaster anatomical head, the drawing of any other life is carried out.


In this drawing lesson, I prepared the material so that the key principles of drawing a human head were visible. To learn how to draw a portrait, you need to understand the shape of the head, and this is possible through simplification and generalization of unnecessary details. For this purpose, I used a schematic representation of a head called “chipping,” an academic drawing of a skull, a step-by-step drawing of a human head, and additional schematic drawings to help understand the features of the anatomical structure.
1. Three-dimensional form. Simplification and generalization.
At the initial stage of learning to draw, people most often see the contours of an object instead of its volume. This is exactly how beginners draw a portrait: they draw the contours of the eyes, nose... But a person’s head, eyes, nose, lips - they all have volume, they are not just contours. In addition, they have a rather complex shape. Therefore, at the beginning of training, you need to be able to generalize the secondary and realize the scope of each form.
First, let's try to draw a person's face with a protruding nose and forehead, presented in the form of rectangular geometric shapes.

2. The skull is the basis of the head shape.
There is one important lesson to learn next. All the main curves and contours of the face are formed from the bulges and bends of the skull. After all, it is the skull that is the basis on which the shape of the head in a portrait is built. Try to trace this relationship by comparing the shape of the skull with the pattern of the head. This is a very important point in learning.
Since the skull has a complex shape, it will not be easy to immediately understand this relationship. Therefore, first we will draw a skull in general.
The skull consists of two main sections: the brain and the face.

In addition, the shape of the skull can be roughly represented as a cube. The skull has a frontal side, two lateral sides, an occipital side and the so-called cranial vault or roof.

After the conventional, generalized drawings, I give as an example an academic academic drawing of a skull. With many details, you can see the frontal, occipital, lateral sides and arch. You can also see how the details are grouped into two main sections - the brain and the face.

It should also be noted that the widest part of the skull is located closer to the back of the head. It can be clearly seen in the figure below.

For those learning to draw a portrait, the following anatomical names for the various parts of the skull may be useful:

- brow ridges;
- frontal bone;
- parietal bone;
- occipital bone;
- temporal bone;
- zygomatic process;
- cheekbone;
- maxillary bone;
- mandibular bone;
- nasal bone;
- eye socket or eye socket.
3. “Orubovka” is the key to understanding the shape of the human head.
In addition to the skull, the shape of the head and face is influenced by muscles, cartilage, fat deposits, etc. In order not to get confused in the details, trimming will help you understand the anatomical structure. A cut is a conventional image of a person’s head, consisting of edges. With the help of such planes the volume of the entire head is formed. Thanks to these edges, the main curves of the skull and the main muscle groups of the face are clearly visible. In any portrait, for any person, the shape of the head is built on the basis of these trimming edges. Of course, each person has his own facial features, his own proportions, but the key points in the construction of the head correspond to the cutting. Therefore, when drawing a portrait, the artist always keeps these key facets in mind.
Try to trace the main planes of the cut in the drawing of the skull and in the tonal drawing of the head made in pencil.


4. Formation of volume through light and shade on the front, side and top sides of the head.
To make the head drawing three-dimensional, it needs to be worked out with shading. Hatching creates the desired tone. By changing the tone (lighter-darker) we see volume and shape. According to the law of chiaroscuro, light is distributed on the surface of the form in the following sequence: highlight, light, penumbra, shadow, reflex, falling shadow. If you draw a ball or similar simple geometric shapes, then everything is much simpler. But how to show chiaroscuro in a tonal drawing of a human head? In the portrait, chiaroscuro is also done with shading, as in the drawing of the ball. But with the difference that the artist must trace the light and shadow on each individual fragment of the face in particular and on the entire head as a whole. That is, you need to show light, penumbra, shadow - on the nose, on the forehead, on the eye sockets, on the lips, chin, etc. But besides this, light and shadow need to be shown on the entire head as a whole, that is, on its main large faces or sides. For example, one side of the head may be darker than the other. This is an important point when creating the volume of the head in a portrait.
For a better understanding of this topic, I give as an example visual diagrams and drawings of a plaster stump, a human skull and head. In them you can clearly see the front, side and top edges of the head. The diagrams and pencil drawings are designed in such a way that they can be used to gradually trace the main edges of the head, which will help novice artists see the chiaroscuro on the surface of the head as a whole.


5. Brain and facial sections of the head.
Above I have already given a schematic drawing in which the brain and facial parts of the skull were visible. But how to practically see these areas in drawing a portrait? A number of drawings and diagrams below can help with this. Here you can trace the boundary between the front and brain parts of the head in the usual pencil drawing, plaster casting and training drawing of the skull.

6. Step-by-step tonal pencil drawing.
After studying the basic anatomical features of the structure of the head, you can begin step-by-step pencil drawing. Here you need to learn this sequence. First we draw in general terms. Then we complicate the drawing by adding details.
A) Since the shape of the head resembles the shape of an egg, we first draw the corresponding figure with a line.

b) After this, we construct a drawing of the head. Draw an axis of symmetry that will run through the middle of the head. This is very important because the axis will allow you to compare the left and right sides, which will help to avoid errors and irregularities. Next, we outline the levels at which the eyebrows, eyes, nose, and lips are located. We outline them using light lines. I wrote about how to determine these levels in the lesson

V) At the next stage, you can outline the eye sockets, eyes, nose, lips, as well as the cheekbone, frontal lobes, main muscle groups and folds on the face.

G) Let's clarify the details.

d) I use an eraser to lighten the blackness of the auxiliary lines, which will be erased in the end, however, they are needed at the beginning of constructing the head.
e) Let's start with tonal drawing. Enter shading. We designate shadows and light. We “sculpt” the shape of the head using tone. I did not record the intermediate stages of shading, so I am publishing the final stage of the drawing right away.

7. Different manner and technique of drawing.
At the end of this lesson I would like to add that the manner and technique of drawing can be different. The drawing can be linear or tonal. You can draw with a line, or you can draw with a spot. You can work in a free sketch style, allowing for inaccuracies. Or you can make an accurate academic drawing. You can draw in detail, or you can draw in general terms.
But with all the variety of approaches, literacy should be visible in the drawing. The principles of constructing a head are preserved, whether on paper or in the mind of the artist. A professional artist with experience may not draw auxiliary construction lines. He may work in a different sequence. However, whatever the technique of execution, his drawing will show an understanding of the basics of plastic anatomy. Therefore, if you want to learn how to draw a portrait, you need to understand the essence, and not just copy a nature or picture step by step. When a novice artist gains such an understanding and begins to see nature by analyzing, and not just copying, then he will be much more successful in learning. I hope the drawings and diagrams from this lesson will help beginners with this.
It's hard to learn, but it's easy to fight.
Therefore, before taking up pencils, we will need to “stock up” on the material on which the training will actually take place.
Our bookstore turned out to be powerless in terms of educational literature on this topic. That is why I had to turn to the online store.
In the vastness of the ozon we all know, I found a couple of pretty decent and inexpensive books. (1.https://www.ozon.ru/context/detail/id/20413958/ 2.https://www.ozon.ru/context/ detail/id/3379370/)
Having placed an order, you should not go with the idea that “when the books arrive, then I’ll get down to business.” Fortunately and luckily, there are a lot of videos on this topic on YouTube (don’t forget to search in other languages, especially in English. Even if your language skills are difficult, even a deaf Chinese will be able to understand which line follows which).
You can also search for books on the Internet. Especially on VKontakte, in the vastness of such public spaces as “academic drawing”, “typical creative” - you often come across useful things. But you can’t count on great literary masterpieces either. Most often you just come across a few sketches or a couple of pages from a good book.

Practice. Practice. And practice again.
Books are already collecting dust on your shelf, and you still haven’t done anything? I have bad news for you...
Otherwise, if the books are already memorized, then it’s time to continuously draw until it turns out just right.
Don’t forget that you are moving towards your goal and do not give up on it under any circumstances. Even if your first attempts failed, this does not mean that you are an absolute mediocrity. (Although if after your 10th “work of art” there are absolutely no big changes, then it’s better to abandon this idea rather than waste time)
p.s. don't forget to watch how to draw a skull at least once. this will really make your life easier in the future when building a plaster head.
And a couple more tips:
1. Try to draw parts of the face separately. One day draw only the eyes (the cute heads, of course), the next - the lips, etc.
2. Practice should be regular. Don’t you dare shirk.
3. Don’t treat this activity as a complete routine. Turn up the music, put pencils in your teeth and go!
(as you accumulate money, you can buy a bunch more books that will not be superfluous)
Criticism.
Your works are undoubtedly masterpieces and you just don’t know what needs to be corrected in them? The time has come to listen to criticism and urgently correct all the shortcomings that are no longer visible to our eyes, tired of eternal practice.
What to do:
1. Take a photo of what you think is the most successful recent work (don’t forget that you need to take the photo at an even angle of 90 degrees, otherwise you will be mistaken not only for mediocrity, but also for an idiot)
2. We return to all our favorite public pages/groups for creative people (which were already mentioned earlier) and post our works in albums with names like: “criticism”, “objective opinion”, “creativity of our subscribers”, etc.
3. Tell everyone that you have been drawing for 10 years and are attending art school. So the opinion will be even more critical. And we need a good result, right?
4. After reading a dozen comments similar to “I studied art for 10 years, but you draw such a crooked and ugly nose”, “the eyes are set close together”, “but I like it”, “too few planes” and other heresy, you take a pencil and draw like this so that these mistakes are not even close
This procedure can be repeated until you turn blue.
And you shouldn’t take EVERY word in the comments to heart. The nervous system will still be needed.
Review the theory the day before the exam
We can do this!
And for goodness sake, finally get some sleep.
Exam day.
The road to the university is not close, so you can take some books, notes, drawings with you to look at everything along the way, sitting on the bus. And take it to eat.
Oh, don't forget to bring all the necessary pencils, erasers, etc.
p.s. I hope at the beginning of the year you got acquainted with the paper format on which you will have to draw
Good luck, bro. Everything will work out for you \o/
And if you have really reached this point, then they are simply obliged to take you on a paid basis.
P.S. don't forget to leave comments with:
So, a prerequisite for drawing is a consistent planned course of work on the drawing. It is completely wrong to work in parts, drawing first, for example, then, etc., or “jumping” from detail to detail. As a result of this method, there will be no complete image.
The integrity of the vision of the model and the integrity of its image is one of the main tasks of the drawing and this task must be set at all stages of the work, starting from the first sketch.
Therefore, it is first necessary, without paying attention to details, to concentrate on the large shape of the head and find out its characteristic features.
Thus, at this stage, the general shape of the head is clarified and the main details are outlined, but always in relation to the whole and to each other. Therefore, you need to look at the entire volume as a whole and, outlining one detail, “keep in mind” and the rest, especially paired ones, are symmetrical. The entire volume at this stage is outlined by several main surfaces.

Third stage (Fig. 3). Further, more in-depth analysis of the form continues. More precisely, the shape of the brain skull is constructed, its main surfaces are demarcated. The same is done with the rest of the head: zygomatic arches, orbital sockets, etc.
You should not draw any detail more carefully than others. The drawing at any stage must be equally worked out in all parts. If only the main surfaces that form the shape of the skull are outlined, then the nose at this stage should be clarified only in relation to the general dimensions and main surfaces; let its shape be somewhat geometric for now, but it should already have an individual character.
Now timely determine the height of the hump and the width of the nose at the base and tip, the size of the wings. The main directions of the surfaces (including thickness) of the lips are also outlined; As for the eye, the shape of the orbital socket is now more accurately constructed, and the thickness and position of the eyelids are outlined. At the lower jaw, the main turns of the shape are determined and constructed... The main attention should be paid to the construction of the edge of the jaw with its angles and the chin prominence.
When constructing a volume, it is advisable to divide its surface into main directions close to planes. This helps well in understanding the constructive form. Having understood the direction of these surfaces, it will be easier to determine which of them is darker, which is lighter, which is more turned towards the light source, which is smaller.
This should also be guided by when laying out light and shade - not just copy the lightening and darkening observed in nature, but be consistent with the direction of the surface of each section of the volume; only in this case the process of sculpting the form using chiaroscuro will be conscious.
Study drawing of a plaster head of Gattamelata
Let's look at the stages of drawing a plaster head.
As a natural model, let’s take a plaster cast of the head of the monument to Erasmo de Narni, nicknamed Gattamelata.
This head is extremely useful for educational drawing, thanks to the pronounced architectonics of the form. In simpler terms, the plans (planes) on this head are clearly defined and detailed.
In a certain sense, the antique female heads can be considered the opposite of this head, where all plans are smoothed out and studied with difficulty.
Nowadays, the situation is aggravated by the fact that plaster heads sold in popular stores look as if they were also sanded, not to mention distorted castings. For example, the head of Gattamelata, which can be found in showrooms, no longer resembles the prototype.
In this case, we take a casting from Soviet times.
We place the light from above so that the volume works, but so that the shadows from the brow ridges and nose are not too large, if possible.
We begin to draw with light lines, without pressing on the pencil. It should be borne in mind that the drawings presented here, especially the first stages, in reality are much lighter in tone.
First, we mark the composition on the sheet. The composition must immediately be in proportions and in character, otherwise in the process of changes and clarifications of proportions, tilt, etc. it can change a lot...
In any case, if you immediately determine what is important for you in the composition of the sheet, where the “center” is, then even with small changes it will never lose.

The composition of such educational drawings is usually extremely simple, the question arises, why bother bothering yourself with this at all?
And then, that all the principles we are considering work in drawing and creativity in general, and not just in this particular case. Developing the right attitudes and habits is beneficial for the future. It’s unlikely that you are preparing yourself to be a plaster head painter...
We start with light lines, do not put pressure on the pencil for two reasons: 1) a drawing that is light in tone is easily erased i.e. it is easy to edit 2) when pressing on the pencil, the hand tenses and the consciousness micro-strains, goes into the hand, which means at this very second it does not observe nature.
We place the main details and fractures of the shape, but do not forget that now we are NOT DRAWING DETAILS, but DRAWING THE WHOLE WITH DETAILS.
In practice, this means that we constantly look at the whole nature and at the drawing as a whole, trying to more accurately take the general proportions of the head as a whole, the rotation, tilt and nature of the form.

But we cannot take all these basic things abstractly, therefore, we immediately grasp all the most characteristic moments, but without hanging on them, but as if rushing past.
It is better to immediately outline elements that are closer to us with a little more contrast than parts that are further away. Due to this, volume and space begin to appear at the beginning of the drawing.
At the same time, until you find out that all the details and dimensions are taken correctly, the overall tonality of the drawing should remain light so that it is easy for you to edit.
After you have outlined the main characteristic relationships by eye, it will not be superfluous to try on, starting with the largest sizes.
Also, pointing the pencil vertically and horizontally at the nature and drawing, check whether the slope is correct.
Why is it better to first outline everything by eye and only then start measuring? Because by doing this, each time you give your eye a small chance, as if you feed it. Gradually he begins to justify your trust.
Gradually you should understand the architectonics of the head shape. You can add light shadow to immediately create volume.

This should be done in accordance with the plans (planes) and fractures (rotations) of the head shape that you see. To do this, it is useful to come closer and look carefully from different angles.

In order to have a good understanding of the location of plans and shape fractures, you need to be very interested in this issue and notice them on all the plaster and living heads that you see in front of you.
Training “cutting” heads should be drawn many times in different turns and angles. At the same time, many long-term sketches of 20-30 minutes of small size (8-12 cm) from different points provide much more benefits than just two full-size three-quarter drawings on the left and right, as is the case in some educational institutions.
In addition, from the point from which you draw, not the entire shape of the head can be perceived adequately.
Therefore, you should not be shy to approach and inspect (sometimes feel) the form from all sides.

As you manage to correctly find both the general proportions of the head and its details, you can slowly add more tonality - we make more active what is closer. Due to this, volume and space appear. By space we mean that the more active (done in the picture with more contrast) parts appear to be located closer than the parts decided more softly. Accordingly, it is worth making more contrasting those parts that are actually closer to us, in this case, this is the nose, the near cheekbone, the brow ridge, the near edge of the mouth, etc.
This whole transfer of space as a whole gives a feeling of overall volume, the overall shape of the head - more or less reminiscent of an egg.

At the same time, we use the transition of the drawing from linear to tonal in order to compare everything even more accurately.
The more realistic the tonality is, the easier it will be to compare, because in life we see everything in spots, not in pencil lines.
Therefore, you need to continue comparing until the end of the drawing.
As you can see, details are added gradually.
At the same time, the more confident we are that the main thing is taken correctly, the more confidently we arrange the details. The more specific each place becomes, the easier it is for us to compare the whole again. The easier it is for us to compare the whole, the easier it is for us to adjust the arrangement of small parts. The more specifically we worked on the details in the foreground, the more volume and greater relationships are felt, and so on ad infinitum.

Thus, our consciousness constantly looks at the overall impression of the head as a whole.
At the same time, the more tonal the drawing becomes (the more we gain the real tonality of dark and light places),

it is all the more important for us to remember to often look with an unfocused gaze. What is it about?
In ordinary life, if we look at an object, we see it clearly, specifically, all the details in turn.

For this reason, our gaze often rushes from detail to detail, examines them, but at this very time does not see the whole - it is impossible to see absolutely clearly many places at once. But this is not particularly necessary. But to see as a whole (in a literal, not figurative sense) is necessary.
If you just look at the entire object you are drawing at the same time, it will be a little unclear. This is the look we need - the one that needs to be added in addition to the usual “jumping” look. You can also glance around without focusing - all this usually happens when a person is thinking, “looking absent-mindedly.”
There is a famous saying by Chistyakov: “When you draw an ear, look at the heel!” You can interpret it in different ways, but the fact is that the details are better placed in their places when you look at the entire object with a slightly defocused look.
When working in tone, we need to see the overall tonal picture and clearly visible details usually greatly interfere with this.


Moreover, the more unfocused we look, the more details disappear, the better we see the overall picture, the basic relationships.


This vision of the basic tonal relationships allows us to correctly set the tone of the drawing.

It is important not to forget to constantly compare linear relationships - the proportions of the head as a whole, the location of small and large parts, etc.
The ability to look out of focus does not mean that you do not need to move away from the drawing and compare from a distance. On the contrary, doing this from a distance is even more convenient and efficient.