How to do a gradient manicure at home. Gradient manicure EL Corazon®. We prepare materials for work.
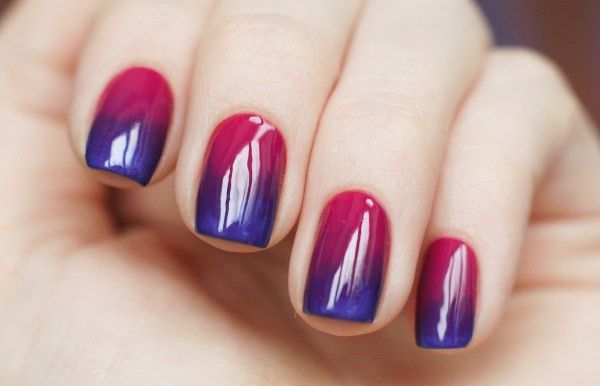
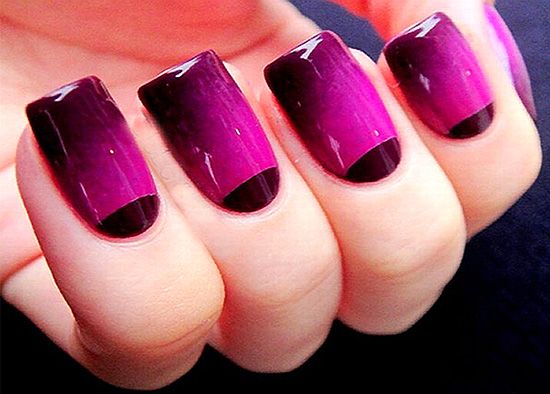
The technique of decorative coating of nails with varnish with a smooth color transition, or the so-called gradient, has long been well-deservedly popular among fans of nail design. Masters constantly come up with new and interesting things, combining several techniques in one manicure. is one of the options in the nail industry, the creative design of which is everything larger number fashionistas give their preference. With this method, the composition on the nail is created by the color transition of one geometric element to another. Not blurry, but the clarity of the lines distinguishes this gradient from the classic ombre.
Options and techniques
Trend This year’s project is good because it’s easy to do and has a lot of ideas for execution. There are several varieties of geometric manicure, when all the nails are painted geometric shapes on a gradient or just one or two. Used for decoration various figures and lines that divide the nail into equal or asymmetrical segments, zigzags. Color variations in geometric design can be either classic or quite bright and contrasting. To create a design, artists use tape, vinyl or paper nail stencils, or draw shapes and lines with a brush. Besides, fashionable manicure supplemented with acrylic powder or velvet sand. The methods for applying a gradient are varied and which one to use depends on the artist.
Who is suitable for geometry manicure?
Geometric nail design is suitable for casual style, both young girls and women with creativity, who love everything new and creative, and are not afraid of experiments. This design optically lengthens the nails and helps hide some imperfections. Pairs perfectly with different styles in clothes.
Geometric Gradient Options
Before applying decorative coating, nails need to be treated. They must be the same length and beautiful shape.
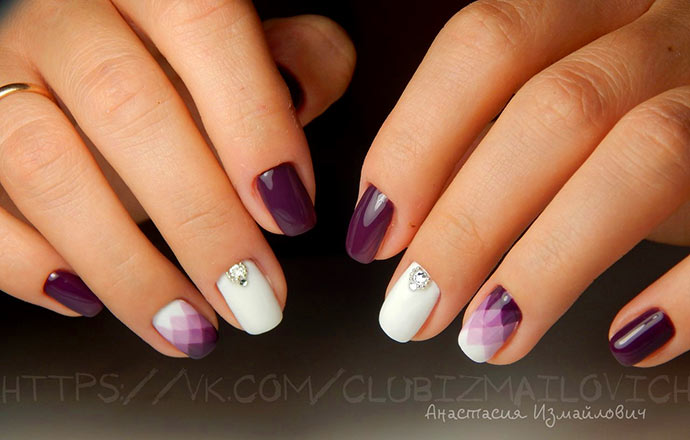
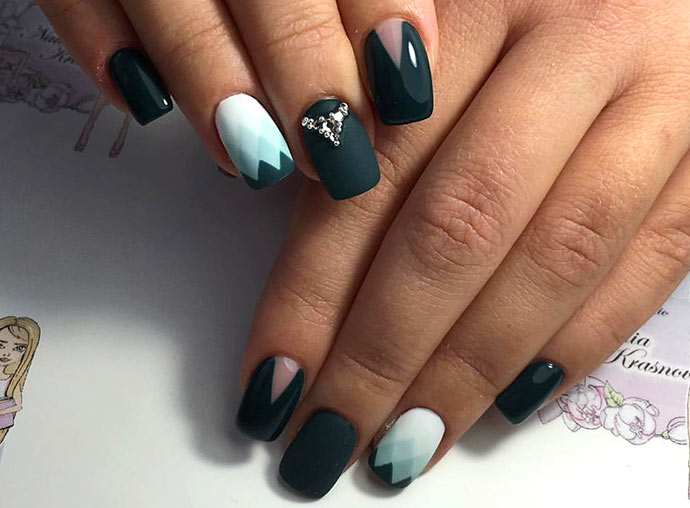
Diamond gradient
To make the design on the nail clear and beautiful, you need to make a sketch on paper.
Step 1 Apply to nails basic foundation, dry.
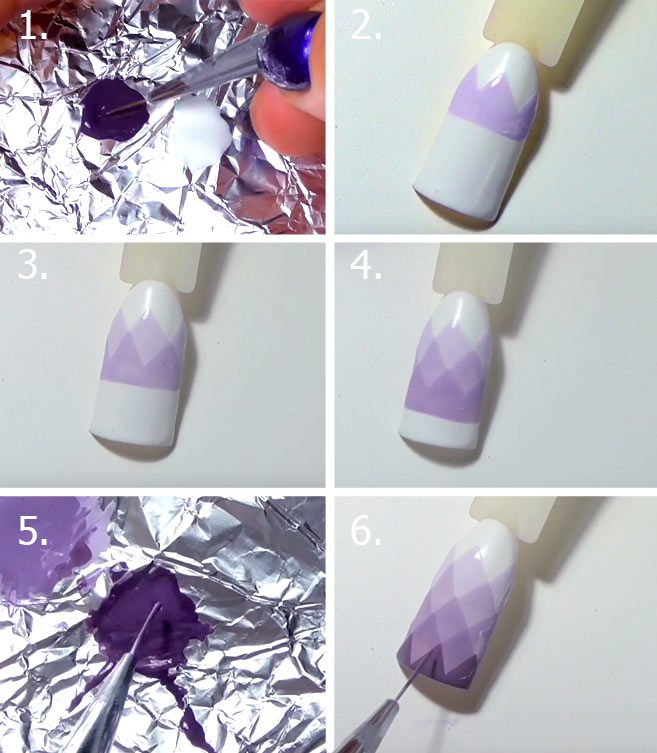
Step 2 We paint the nail with white varnish and dry it. We put two colors on the palette - white and any color, in our example a dark purple color. And each time, before applying a new gradient layer, we add White color a little purple color. This way we will get a shade darker than the previous one each time. The result is a very harmonious gradient.
Step 3 So, add a couple of drops of purple to the white and mix well. Use the resulting light color to paint the contours of the triangles with a thin brush for the pattern (photo 2). Now we paint the drawn triangles with the same color. Let's dry it.
Step 4 Again we mix the lilac color to our originally white varnish (now light lilac). We draw triangles in a checkerboard pattern, filling them with varnish (photo 3).
Step 5 We repeat these steps until the end of the nail plate, each time mixing more purple color into the white. This will make it smooth color transition, the pattern will be the lightest at the cuticle, and darkest at the end of the nail. We draw triangles at the end of the nail with a pure dark purple color. Dry each layer.
Step 6 We complete the manicure by applying a matte top coat.
Video:
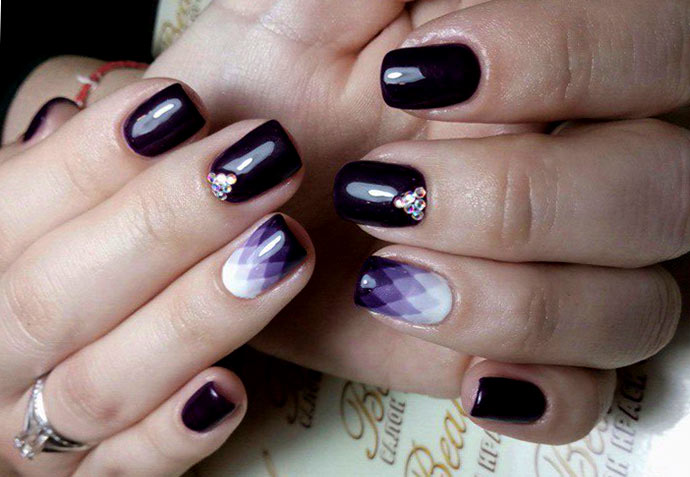
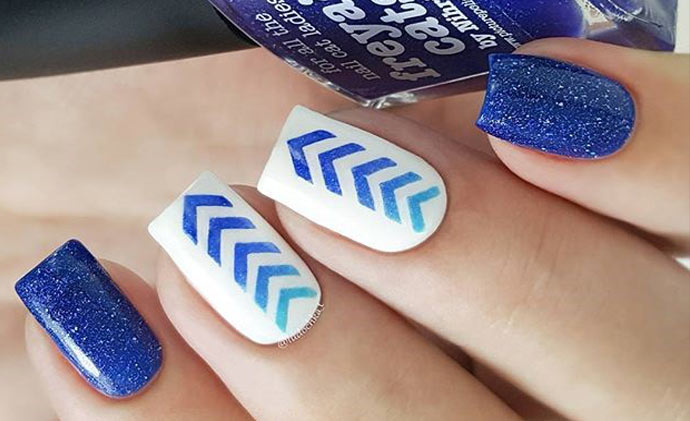
Geometric gradient from center
Step 1 Apply a light color to your nails.
Step 2 Now we start drawing the gradient with the darkest color. Using a thin brush, create a diamond-shaped frame for the nail.
Step 3 More light in color varnish, draw a diamond along the contour without painting the middle.
Step 4 Draw a diamond with an even lighter color, leaving an unpainted light diamond in the center.
Step 5 Cover with a transparent top. Manicure is ready!

Video:
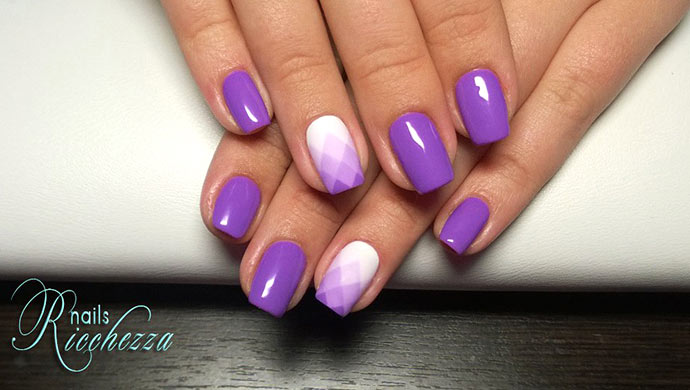
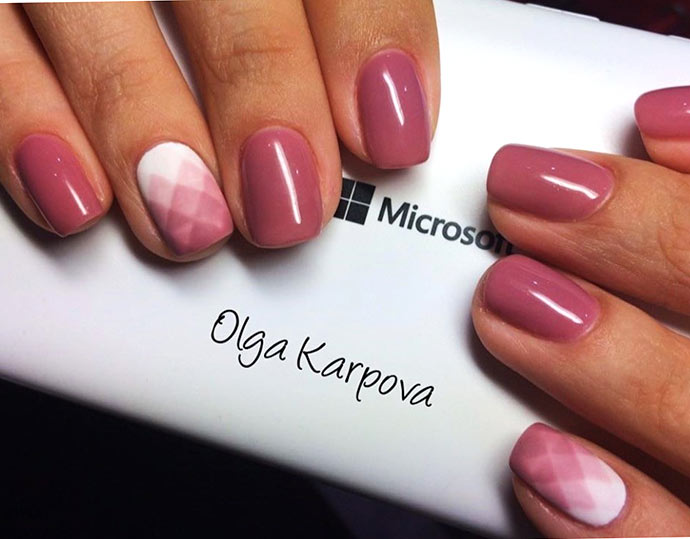
Stencil patterns
The geometric pattern in this embodiment is applied using special nail stencils. They come with different drawings. Such stencils can be replaced with adhesive tapes. It can be done with both regular polishes and gel polishes. Consider the option with regular varnish.
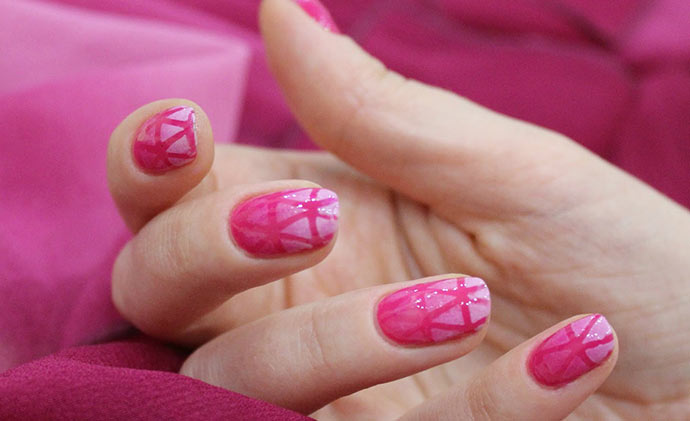
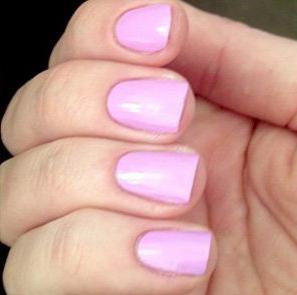
Step 1 Apply pink polish to prepared nails and dry.
Step 2 You can make a pattern on all nails, or on one or two. Glue a stencil with triangles onto your nails. We cut off the excess stencil with scissors so that it does not interfere.
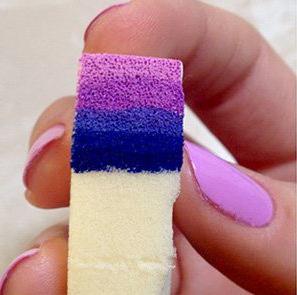
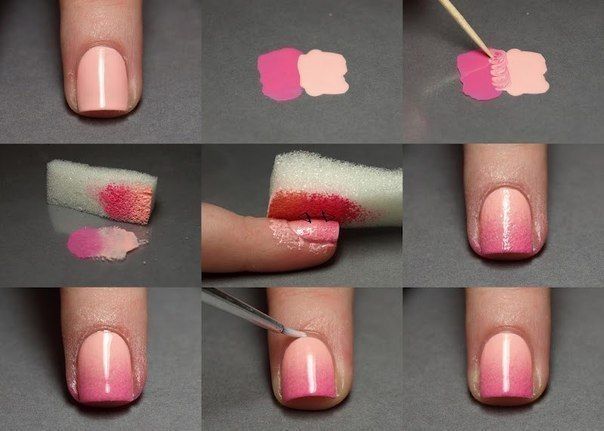
Step 3 Using a sponge, we make a transition with two colors. Place a drop of pink and white varnish next to the palette and mix them in the middle. We blot with a sponge and transfer the gradient to the nails. Dry your nails more.
Step 4 Carefully remove the stencil. Cover all nails with a layer of transparent topcoat.
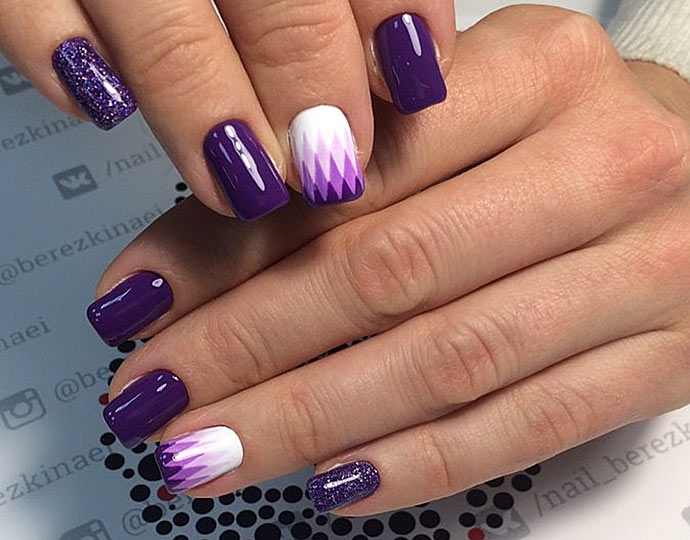
A geometric print always gives room for creativity and exclusivity; no two designs will be the same, which is exactly what many fashionistas like.
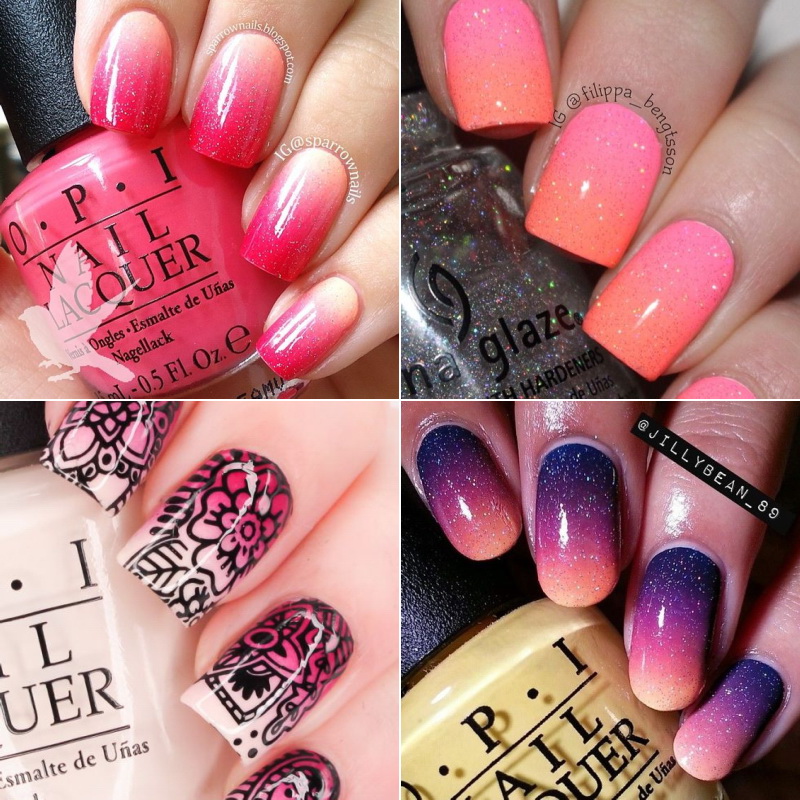
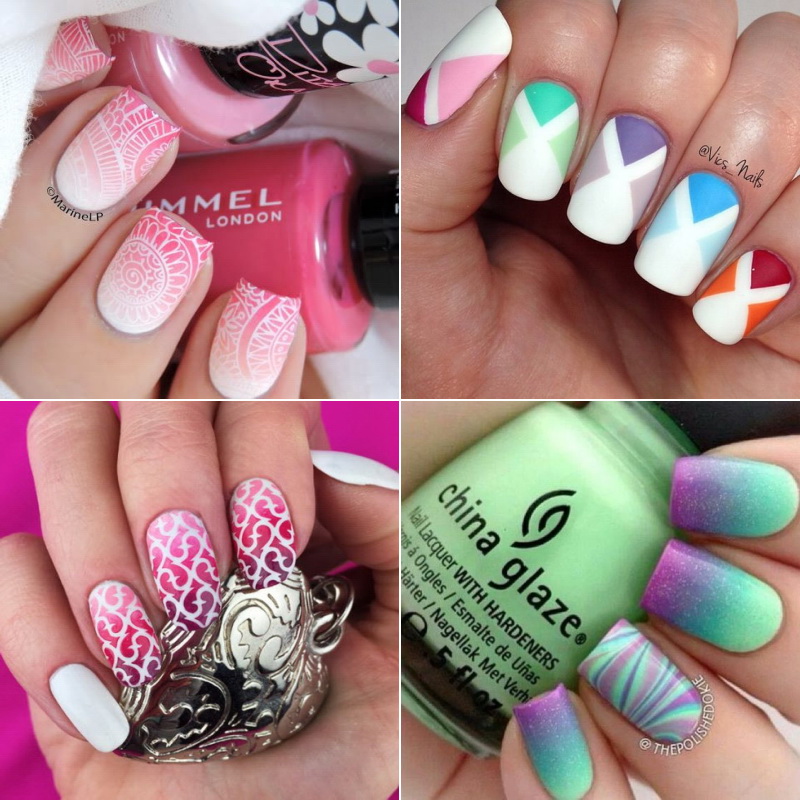
Geometric gradient: photo ideas
Have you already tried geometric gradient on your nails? Share in the comments!
Gradient manicure (another name for it is ombre) is a nail design in which different shades of varnish smoothly flow from one to another.
Unfortunately, it’s difficult to create such beauty on your own, but once you get the hang of it, you can perform simple versions of this manicure on our own. And ours step by step instructions will help.
We prepare materials for work
We will be doing a gradient manicure at home, so we can do without professional products.
Prepare:
- Foam sponge. The one designed for washing dishes will do.
- New clear plastic bag, stationery file or foil.
- A few toothpicks.
- Base coat for varnish.
- Fixing coating.
- Tint varnishes.
- Nail polish remover, cotton pads, sticks or special pencils to remove excess polish.
For the first time, it is better to take two colors, since applying more shades requires honed skills. These can be two different but compatible colors or two shades of the same color. It is very difficult to work with chameleon varnishes, so when creating gradient manicure You should avoid them at home.
Keep in mind that a gradient manicure requires a lot of polish.
Cut out small pieces from the sponge in advance - about one and a half centimeters wide and three to four centimeters long.

Preparing your nails
Before doing a gradient manicure, carefully treat your nails to give them a neat and well-groomed look. These are standard procedures: filing and polishing, removing cuticles, degreasing the surface with nail polish remover.
After this, apply the base and wait for it to dry. This can be either a special base varnish or some kind of colorless medicinal varnish (such as “Smart Enamel”).
Method one
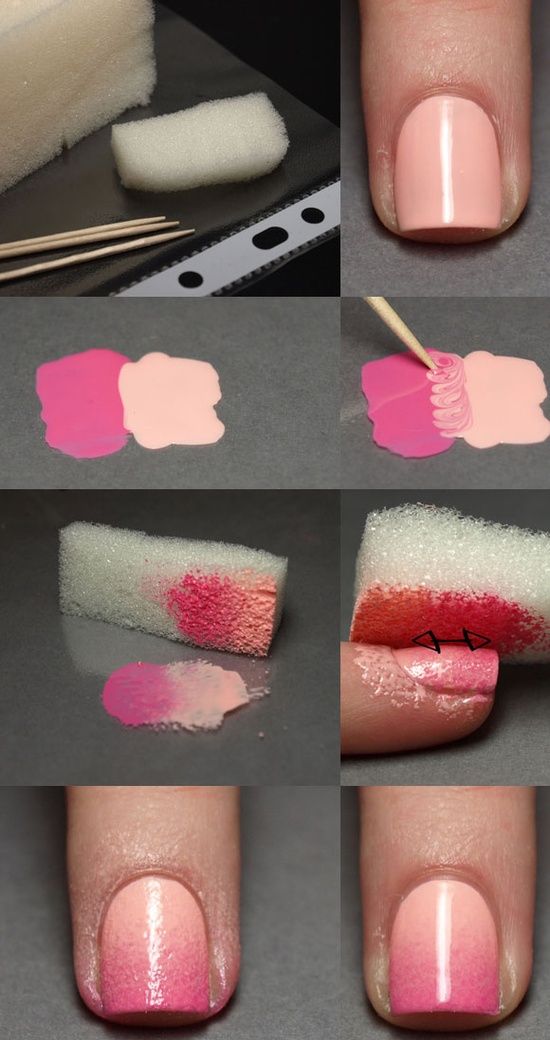
Place a package (stationery file or foil) on the table. Apply the lightest varnish to the entire surface of the nail.
 While the layer is drying, make two blots of the selected varnishes on the surface of the bag or foil. The droplets must touch each other. Use a toothpick to blur the boundaries between them.
Apply the sponge to the color spot and immediately after that to the surface of the nail. Make sure that the arrangement of colors on the sponge matches the one you want on your nails.
Blend the color with light pressing movements. Repeat this step if necessary. Don’t be afraid to stain the skin around your nail; any excess can be removed later.
Repeat the procedure for all nails.
Apply a protective coating. You can use clear varnish with glitter.
After drying, clean the stained areas of the skin using a special pencil or a cotton pad soaked in nail polish remover.
Varnishes can be applied directly to the sponge. Don't be sorry coloring material. Apply enough so that it can be well imprinted on the surface of the nail.
It is advisable to have several pieces of sponge in stock in case one begins to crumble during the painting process.
If a gradient manicure is performed using matte varnish, then there shouldn’t be any special difficulties. If the varnish is glossy, it may become cloudy when you stretch it with a sponge. If this happens, you will have to cover the nail with several layers of a fixing coating.
Method two
The principle is the same, but instead of a sponge, an applicator (sponge) is used to apply eye shadow. The skin will get a little less dirty than using a regular piece of foam, and some people find it more convenient to blend the color using an applicator stick.
But, in general, don’t be afraid to get dirty when doing a gradient manicure. The skin can be easily cleaned with nail polish remover, but if you are too careful, you may not paint the entire surface of the nail, it will turn out ugly.
Method three
If you still dare to make more than two colors, you can apply the required number of shades to the sponge or proceed as follows.
- Apply the base color to the entire surface of the nail.
- After the first layer has dried, use a sponge to apply the second color from about the middle of the nail plate. Try to make the border between the colors a little blurry.
- Using another piece of sponge, apply a third coat to the outer edge of the nail, making sure the edge is blurred.
- Apply topcoat.
Method four
Suitable if you want to get a vertical gradient manicure.
- Apply two (or more) shades of polish to the nail at once in stripes so that the boundaries between them meet.
- Quickly, before the polish begins to dry, use a sponge to blur the boundaries between colors by lightly patting.
- Repeat steps 1 and 2 if necessary.
- Apply topcoat.
What problems may arise
If you don't get a smooth transition between colors, then perhaps you chose too contrasting shades. We'll have to find another combination. Or try applying several layers, letting each of them dry a little.
If bubbles appear after imprinting the sponge, use a finer-grained sponge. If this does not help, then after applying varnish to it, make prints first on foil or paper, and then on the nail.
If this does not work, then simply increase the number of layers of nail polish on the nail. Then the dots will become invisible.
Using gel polish for gradient manicure
A gradient manicure with shellac or gel polish looks more impressive and lasts much longer than using a regular finish. The technique is similar, but if you do not have special equipment and cosmetics, then it is better to do this procedure in a salon.
A gradient manicure with gel polish is performed as follows:
- Nails are degreased with a dehydrator.
- An acid-free primer is applied. Then the base, which is baked for a minute under a UV lamp.
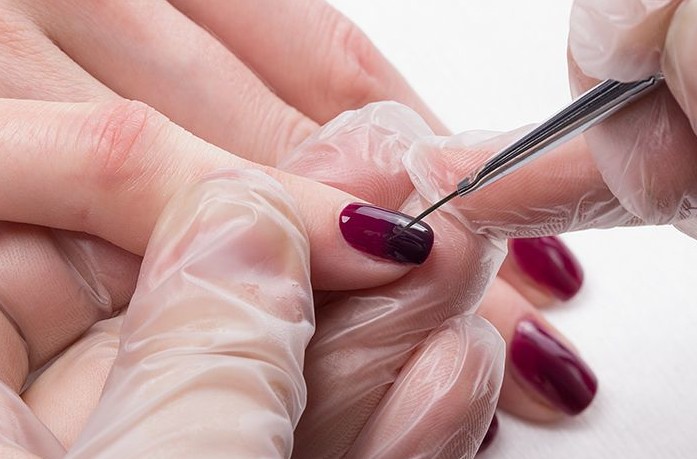
- A lighter gel polish is applied from the base of the nail to the middle. The remaining part is painted over with a dark shade. The joint line should be smooth.
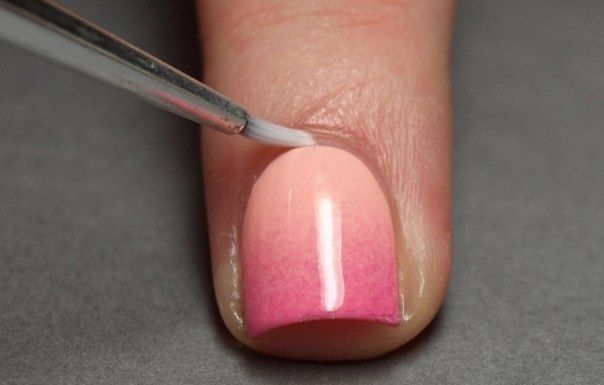
- The border between colors is blurred with a thin paint brush or sponge.
- After erasing the boundaries, the nails on each hand are dried under a lamp for one and a half to two minutes.
- If it is necessary to obtain a more saturated shade, steps 3-5 are repeated.
- The painted legs are covered with fixing gel polish and dried again under the lamp.
![]()
Benefits of gradient manicure
A gradient manicure looks unusual, adds zest and is appropriate in any setting, provided correct selection colors. The coating can be done using both bright and pastel colors. For the same reason, manicure is suitable for women and girls of all ages.
Despite enough complex technology execution, “smearing” the varnish is undoubtedly easier than painting flowers, patterns or letters with it. Once you learn how to paint your nails this way, you will be able to choose from a wide variety of options. After all, you can endlessly look for interesting color combinations, and every time your manicure will look new.
One of the new fashion trends in manicure is the gradient manicure technique. This technique has gained great popularity among women.
A creative and neatly executed manicure is the perfect complement to any clothing style. Over the past few years, manicure has turned into an entire art: fashionistas and designers are coming up with more and more sophisticated ways to decorate their nails.
Glitter, stickers, foil, rhinestones, stamping, nail piercing, volumetric sculptures– a variety of decorations place emphasis on the nails in female image. Fans of nail art always invent new ways of painting nails: a manicure can be lunar, marble, holographic, or gradient.
What is a gradient manicure?
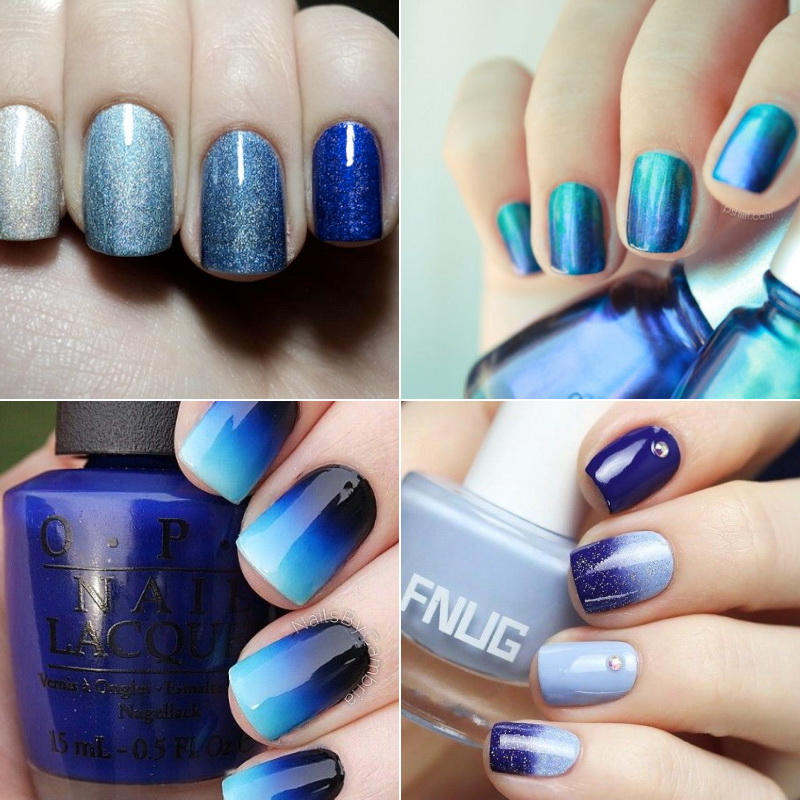
Gradient manicure has become a popular trend in the spring-summer 2013 season. Summer gave way to autumn, but this sophisticated manicure has not lost its relevance - bright summer tones have given way to more deep shades, corresponding to the time of year.

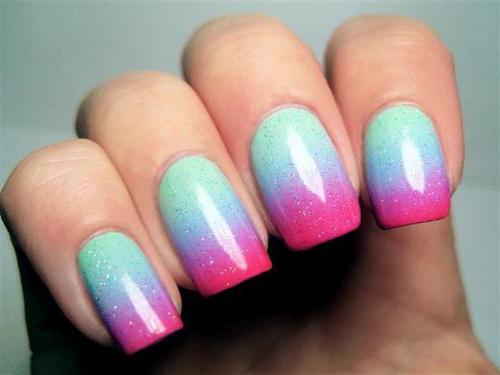
Gradient manicure is a special technique of coating nails with varnish, which creates the effect smooth transition one color to another. The gradual color change on your nails looks impressive!
There can be countless color solutions for such a manicure. The color can gradually fade or become brighter if you use similar tones of different saturation.
For a more expressive manicure, you can combine contrasting or related-contrasting colors - to correctly create a harmonious combination, you need to use the color spectrum.
Gradient manicure technique
The gradient nail coating technique is not difficult, but it will require patience. There are several ways to paint to achieve a smooth transition of colors.
The main tool that is used in any gradient manicure technique is foam sponge. It is best to use a thick, triangular-shaped makeup sponge. The smaller the pores on the sponge, the better. The sponge is used as a stamp to apply the desired design.
Basic application methods
- The nail plate is covered with a colorless base varnish. Colored varnishes are applied in lines to the surface of the sponge, after which the resulting pattern is quickly imprinted. This technique will be discussed in detail below.
- Varnishes of selected shades are applied not to a sponge, but to the surface of a plastic film or lid. Varnishes must be applied so that the colored spots touch. At the point of contact, the colors are mixed using a toothpick, then the design is transferred to the surface of the nail plate, which is pre-coated with a manicure base.
- This method is quite simple and is used to create a gradient of two shades. If a transition is made from the moon to the tip of the nail from dark to light, a darker shade is applied as a base.
- If the gradient needs to be made from light near the moon to dark at the tip, the nail is covered with the lighter of the selected shades, or with a varnish of a natural shade. The second shade is then applied to the sponge and stamped onto the top. Using the topcoat, the polish is evenly distributed over the nail to create a smooth transition.
How to do a gradient manicure at home
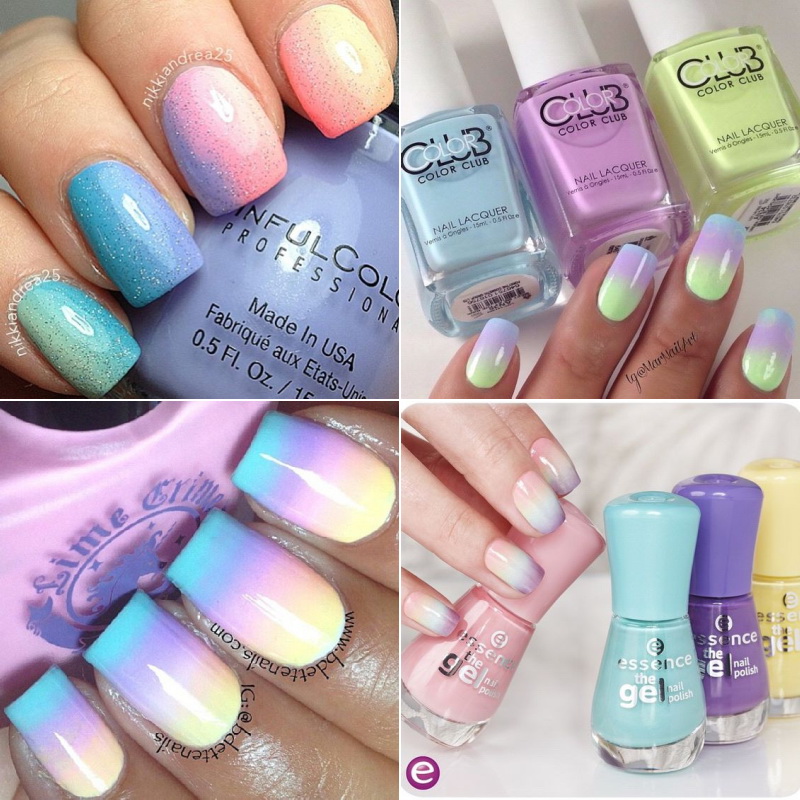
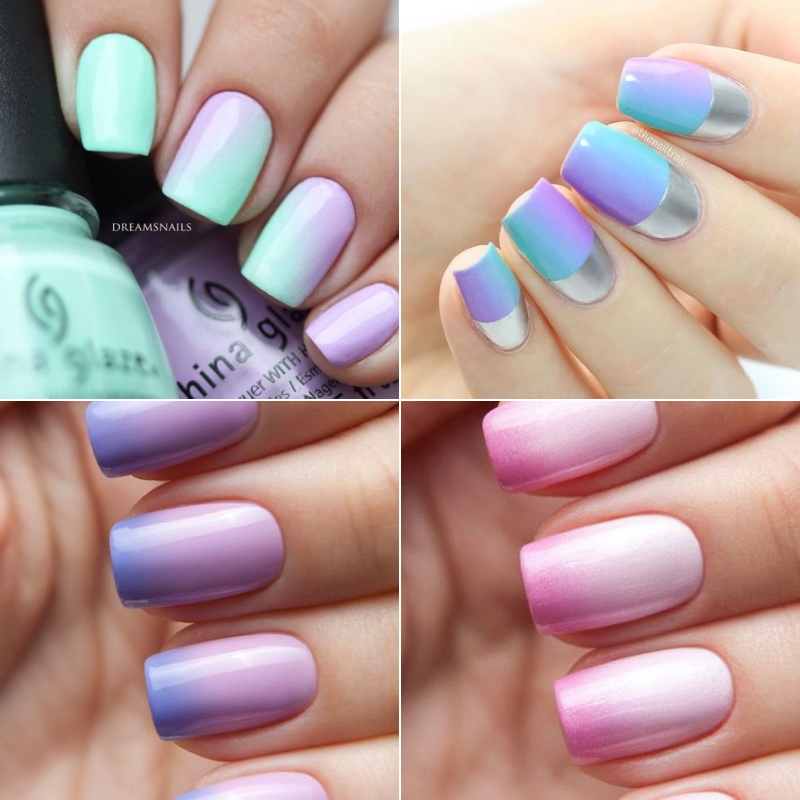
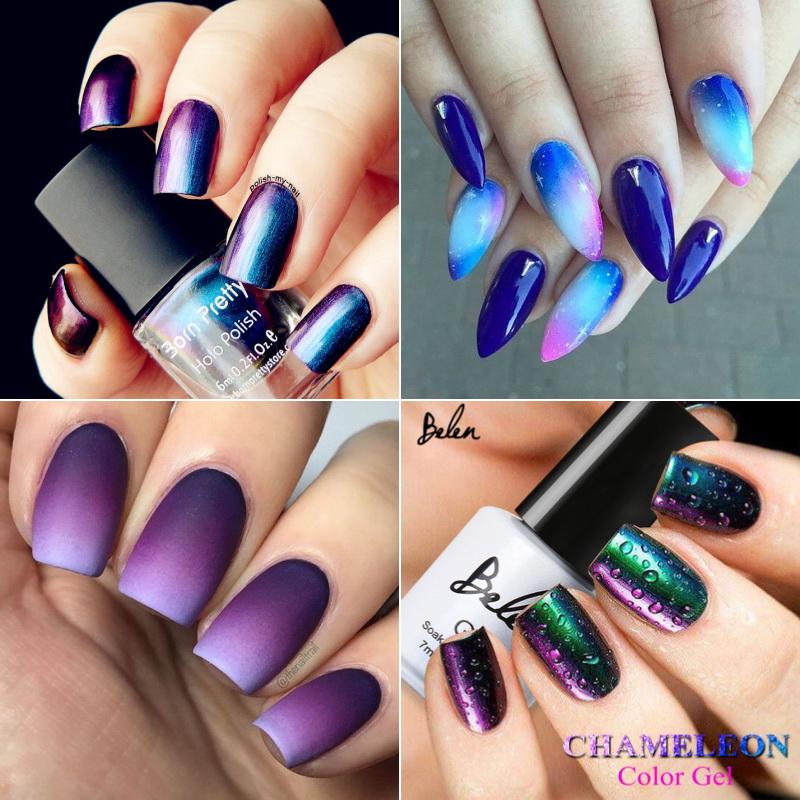
Select your shades first - this process may take longer than the coloring process itself! You can choose shades of the same color and make a smooth transition, for example, from lilac to soft pink.
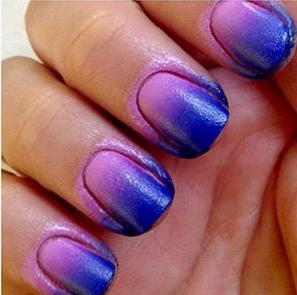
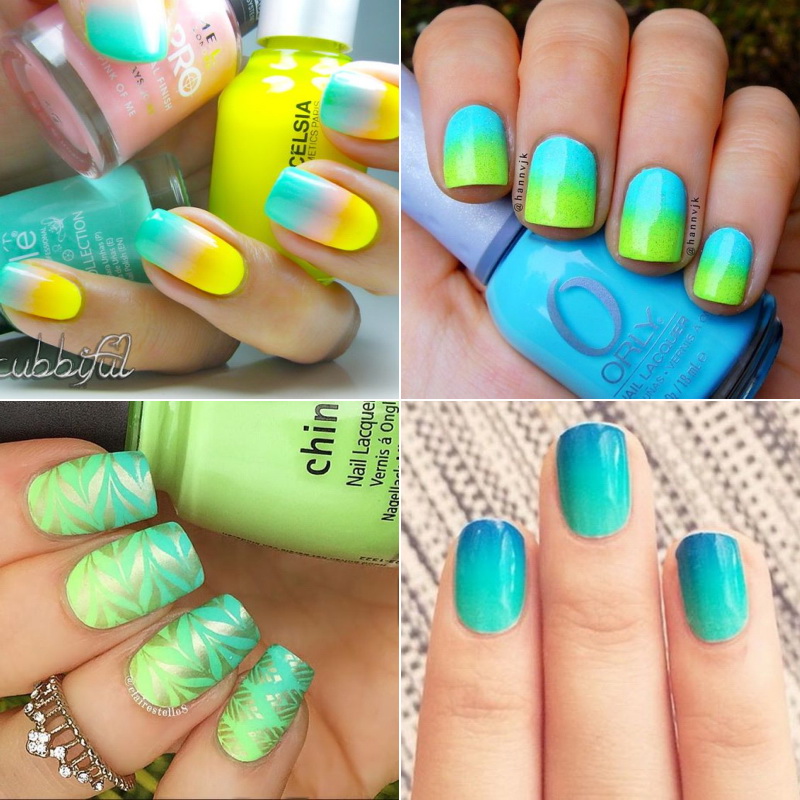
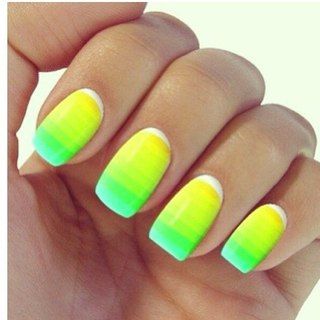
But the colors don’t have to be similar: a manicure with a transition from blue to yellow or from green to black will look very bold! To create a spectacular evening gradient manicure, you can use varnishes with glitter.
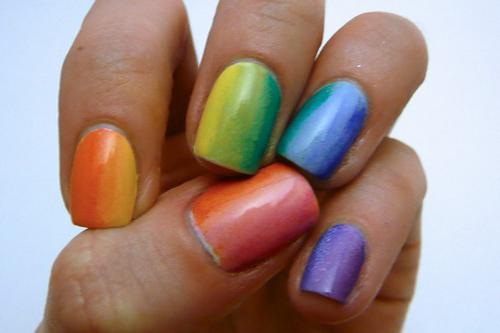
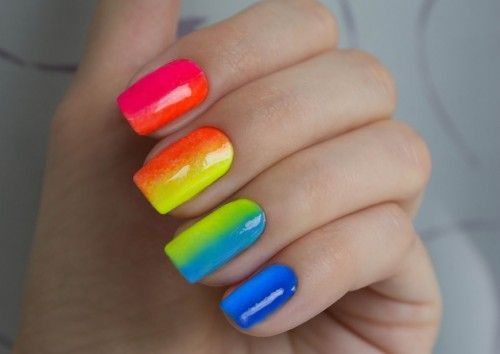
You can create a color block from shades different colors– it will look especially expressive: remember how the colors of the rainbow change from one to another. Experiment with various combinations colors so that you can start your manicure with a ready-made solution.
When choosing the number of color stripes, consider the length of your nails. Long ones are more convenient to work with, and more transitions from one color to another will “fit” on them. On short ones, a blend of two shades looks harmonious, otherwise the colors will mix too much and the manicure will be blurry.
Helpful tip: if you have white or black polishes, they can be mixed with any other polishes to obtain a darker or lighter shade. The color transition on the nail plate can be done both vertically and horizontally.
What you need for a gradient manicure
Necessary materials:
- nail file, nippers, cuticle scissors
- base for manicure
- varnishes of selected shades
- sponge or sponge
- plastic film (file) or plastic cap
- cup of water
- correction pencil or cotton buds and nail polish remover
- nail finisher
Step-by-step instruction

For those who are always on the run and don’t have an extra free minute, you can make a simpler manicure using a gradient technique: the effect of a smooth transition of color shades can be achieved by painting the nails on one hand with different varnishes.
If you have a rich palette of varnishes, you can choose five close shades of the same color. It doesn’t matter if you don’t have a lot of varnishes - use 2-3 bottles, mixing shades with each other to get a smooth tone transition.
For the thumb nail, choose the darkest shade, gradually “lightening” it towards the little finger nail - or vice versa. Each time before applying the next shade, rinse the brush with solvent.
The ombre style has been very popular for several seasons now. He touched on almost all areas of fashion - from hair coloring techniques to accessories and clothes with patterns and color schemes made with a transition.
Gradient on nails - new ideas
Therefore it is not surprising that this fashion trend migrated to nail design. And if French name Since this “ombre” technique is more associated with hair, the Latin “gradient” has taken root in manicure.
So, if you want to look fashionable and stylish, then a gradient manicure should definitely decorate your nails from time to time.
What is a gradient on nails? This is a gradual transition of colors from one to another. At the same time, the border between them seems to be blurred. As a result of such transitions, new colors and shades are formed. The uniqueness of this technique lies in the fact that there are no rules or restrictions on the choice of colors. On the contrary, there are enormous opportunities for experimentation and search for new original solutions. This means that your manicure will be unique and one of a kind.
Types of gradient manicure
I wonder what gradient manicure differs not only in color solutions, but also in application technique. To create it, you can use a sponge or thin brush. In addition, several variations of this design can be distinguished, which as a result create completely different visual effect. Let's look at some of the types of gradient manicure.
1. Simple gradient on nails
This option fully lives up to its name. It's really very easy to make, even at home. All you need is 5 shades of polish. You also don’t have to mix anything or use improvised means.
Just decide what you want color scheme, select the desired shades with a transition from light to rich bright or dark and you can get started. The most is applied to the little finger light shade, gradually use darker shades from finger to finger, the thumbnail will be covered with the darkest.
For example, do you like coral color? Great! Start on your little finger with a soft pink and gradually move to a rich coral. The beauty of such a gradient is the ease of execution and the ability to make it, as in discreet pastel colors, and in richly bright
2. Classic gradient on nails
Classic version involves the use of varnishes of two colors. Moreover, they can be either in the same key or contrasting. It is most convenient to perform it using a sponge - apply two selected colors to its surface, so that they form a small area of overlapping each other, and then press the sponge to the nail plate.
3. French gradient on nails
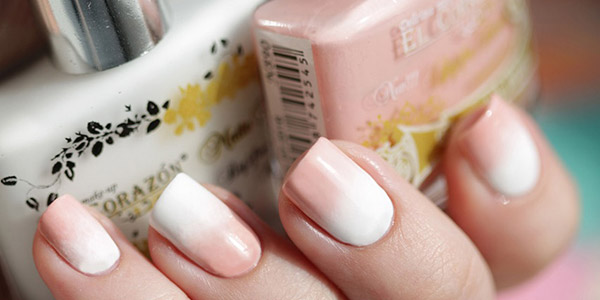
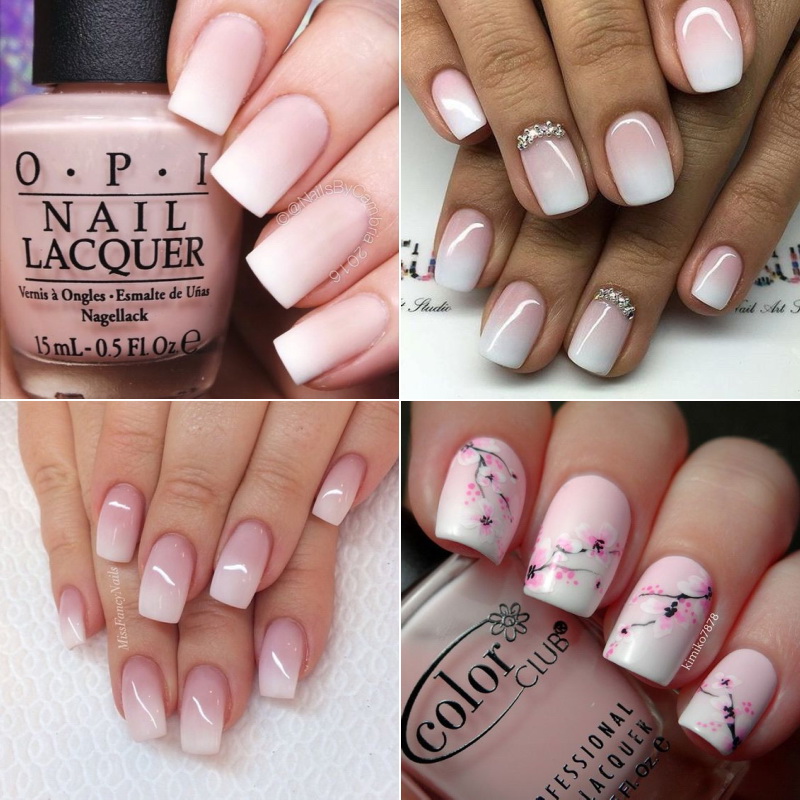
French manicure has long become a classic that never goes out of fashion. It is a symbol of grace and elegance, and also absolutely universal design, which will be appropriate for any style and look. But this season, the designers went further and offered us a French gradient - the ends of the nails are covered with white varnish and it gradually turns into transparent shades towards the cuticle, traditional for the classic french manicure. This gradient looks very stylish and gentle.
4. Beverly Hills Gradient Nails
IN in this case two colors are used, but the transition between them is carried out not within one nail, but throughout the hand. Let's bring step by step example for clarity:
- Let's take cherry and pale pink varnishes;
- Apply pink polish to the little finger and cherry polish to the thumb;
- Now on a separate surface we place approximately the same two drops of both varnishes and mix, apply the resulting color to the middle nail;
- For ring finger mix the varnishes so that the tone is darker than on the little finger, but less saturated than on the middle finger;
- For index finger we mix a tone that is already more saturated than on the medium one, but has not yet turned into cherry.
The result will be very impressive.
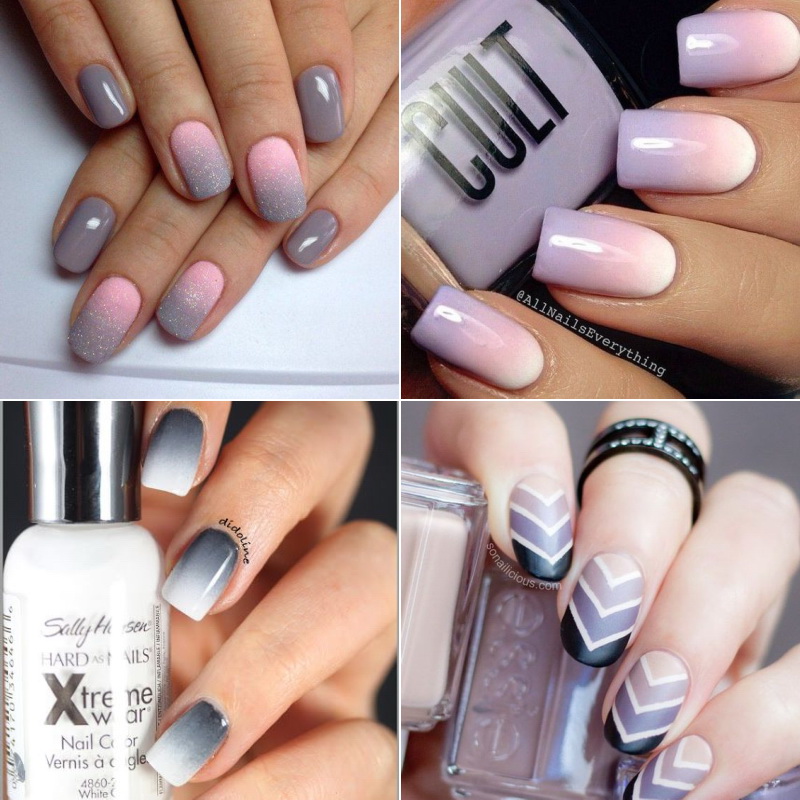
5. Gradient painted nails
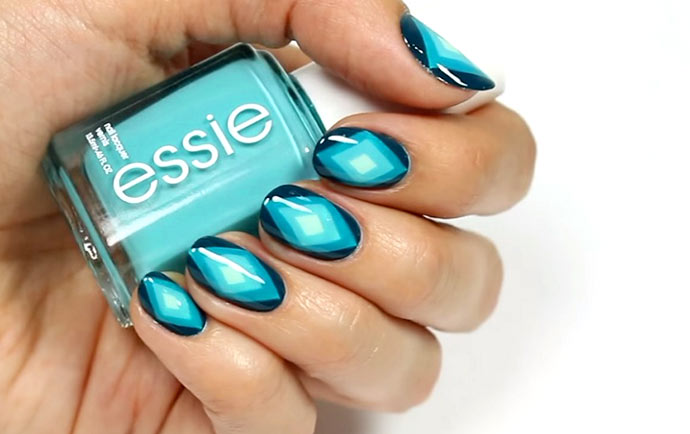
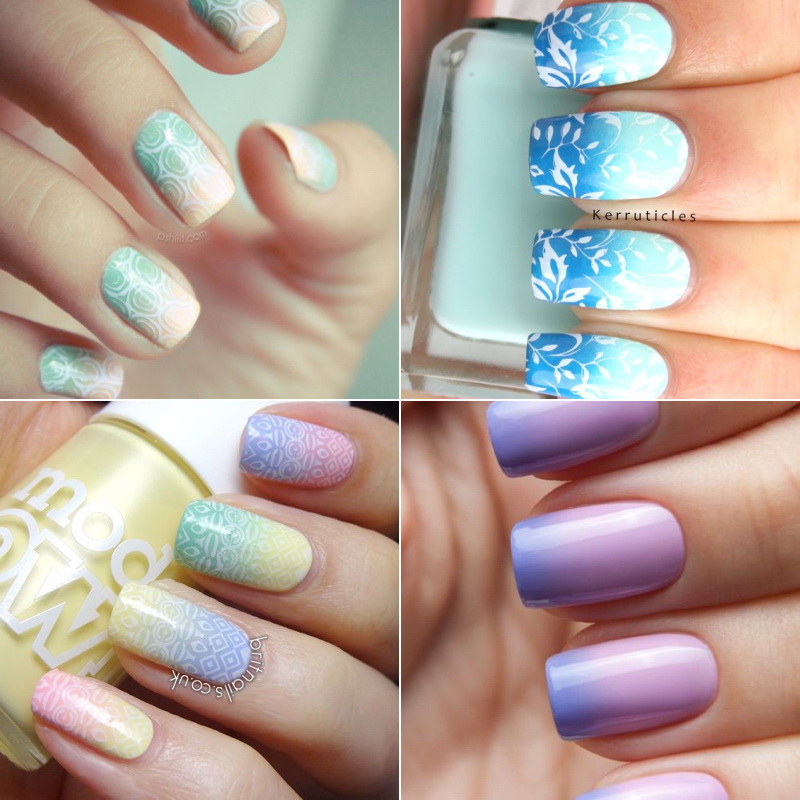
The gradient may well become the basis for a drawing. This season, various geometric designs and ornaments. To make them look impressive on a gradient manicure, use black, gold or silver polish for application. It can be other colors - the main thing is to choose an expressive contrast.
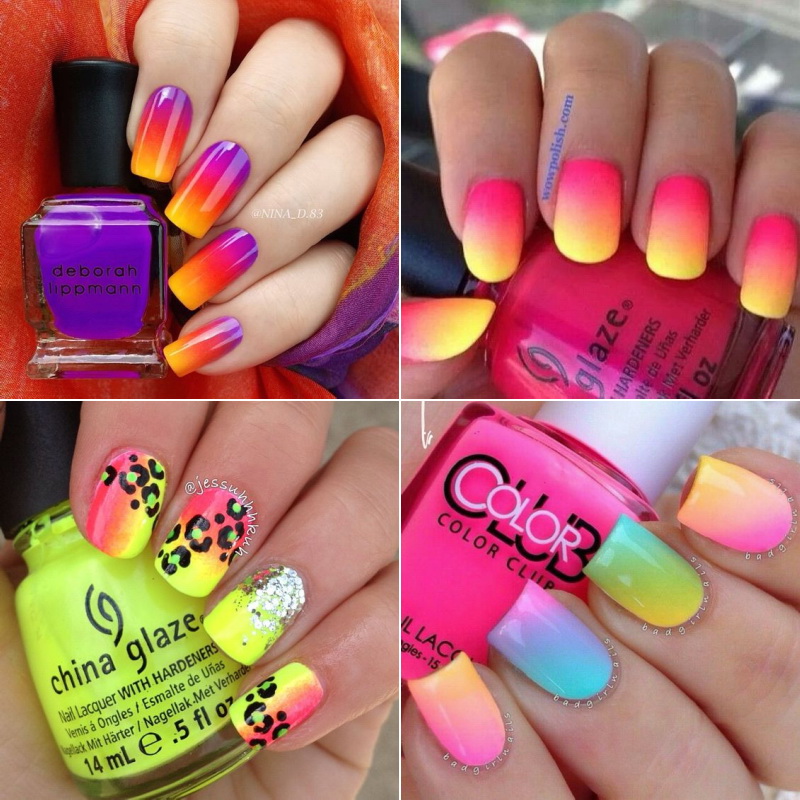
6. Gradient on nails - bright skittles
You've probably seen, and maybe even loved, Skittles candies. Your gradient nails can be just as vibrant, and this is very fashionable for the new season. To create such a manicure, you can choose several bright colors and apply them randomly, one might say chaotically, using a sponge on your nails. Uniqueness and originality with this technique will be guaranteed.
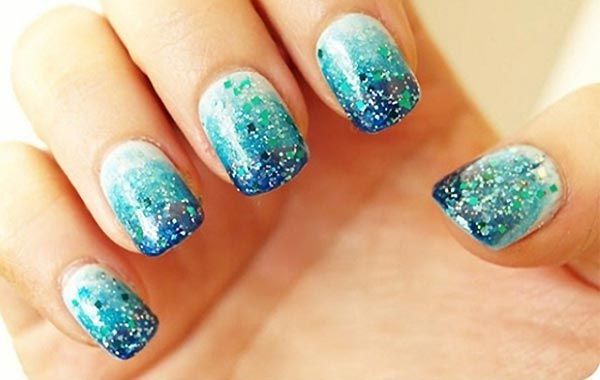
7. Gradient nails with glitter
Who said that a gradient is just a color transition? You can easily create a stretch effect with glitter or confetti. The nail is covered with the main varnish, and then glitter is applied to the edge of the nail. large quantities- you literally completely cover the edge with them, and then with the help of a pussy you stretch them towards the hole in a thinner layer. This is a spectacular and festive manicure option. At the same time, you can achieve completely different effects by choosing glitter to match the base polish or vice versa, playing with contrast. Using confetti, you can “play” with their size - confetti of a larger diameter at the end of the nail, smaller ones towards the middle of the nail.
Try, experiment and be trendy!

![]()
An unusual and neat manicure is the perfect complement to stylish look. To lift your spirits and add variety to drab everyday life, give preference to creative and bright design. The nail industry offers great amount options for decorative nail coating.
What is a gradient on nails?
The gradient is special technique decorative coating of nails with varnish, gel polish, in which a gradual transition is made between several colors or shades of the same color. The smooth change in color in this design looks very unusual. It goes well with stamping, painting, and manicure using stencils.
This is a type of nail art, which you can do both at home and in the salon. Due to the original color scheme it visually lengthens nails and makes hands graceful. This manicure gained popularity back in the summer of 2013. It still remains relevant today. Rich summer shades on nails have given way to deeper and dark colors autumn and winter.
Selection of colors
The color scheme and number of shades depend only on imagination and personal preference. Here are some tips:
- Be careful when using contrasting shades. To create a gradient with light and dark varnish, you need to gain experience.
- The more colors used, the more interesting the result.
- To begin, select shades that are nearby on the color spectrum: light green and pale green, light pink and fuchsia, lilac and purple.
- The more colors you use, the more attractive the gradient becomes.
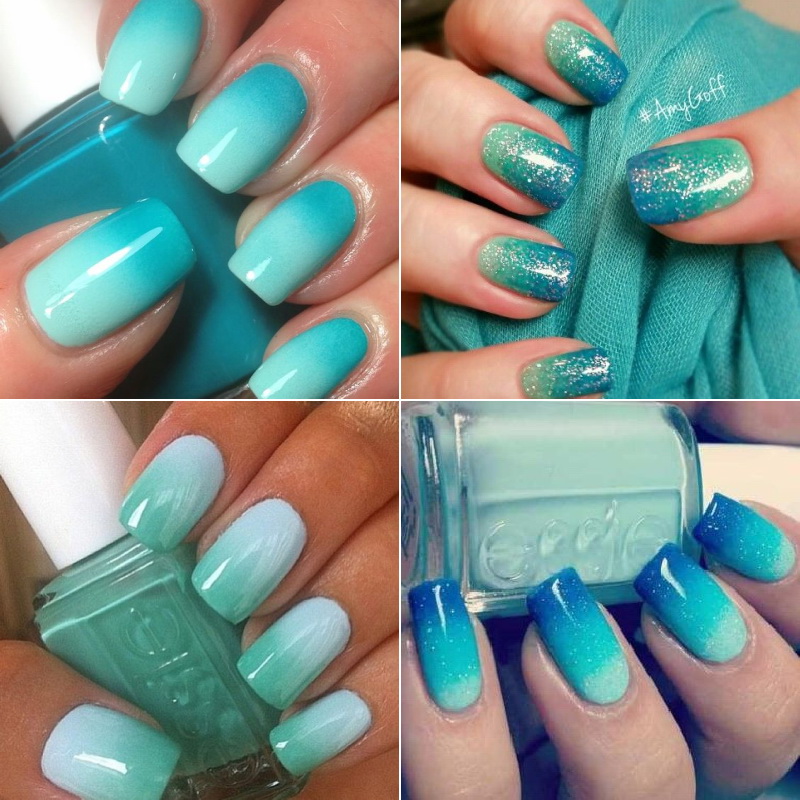
- For a festive or evening manicure, use polishes with glitter or sparkles.

Varieties of gradient
There are several types of design. Therefore, you can often surprise your loved ones, colleagues, and fellow students.
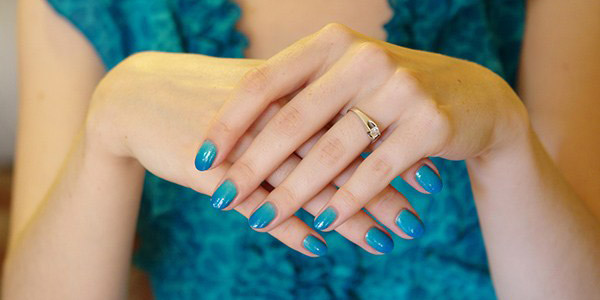
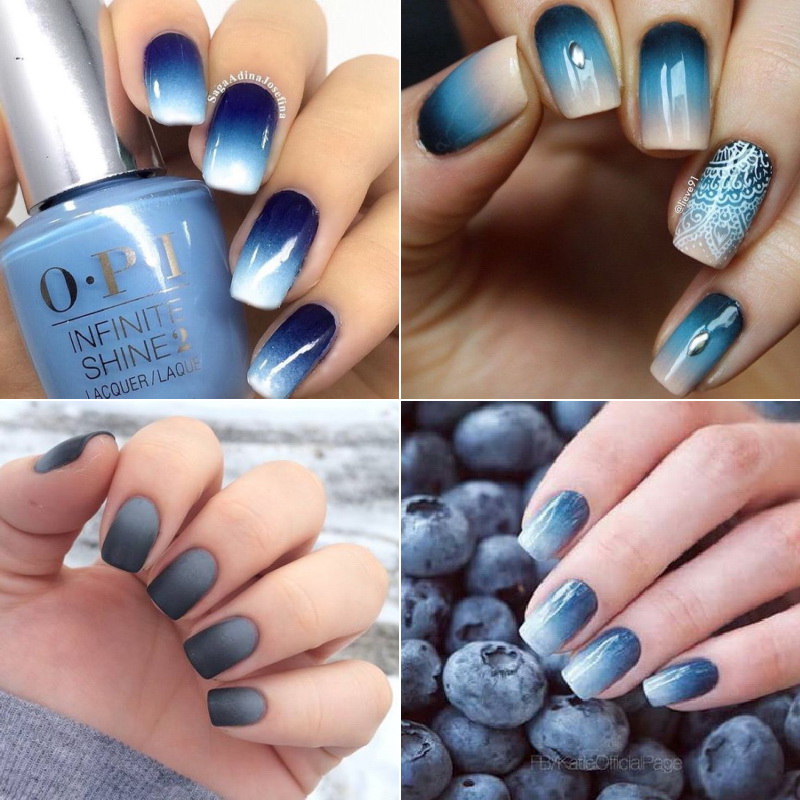
- Horizontal. This type is also called classic. The colors flow smoothly from the base of the nail to the free edge.
- Vertical. The transition of colors occurs in the vertical direction - from left to right.
- Separately on each finger. The nails are covered different shades the same color and together create a smooth transition from darker to lighter. This type of design looks especially good on short nails.
- French manicure. The color is stretched from light pink or milky pink to white. Such manicure will do for everyone, it will be appropriate for work or a special event, but it will require growing your nails a little.
Materials and technology
When doing your own manicure, you have the opportunity to act as an artist and experiment. For this you will need:
- base varnish;
- cotton swabs or correction pencil;
- nail polish remover;
- multi-colored varnishes;
- foam sponge or makeup sponge;
- bag, film, paper file or foil;
- varnish fixer.
Before directly applying the decorative coating, do a manicure: give your nails a beautiful shape and the same length, tidy up the side ridges and cuticles.
Next follow the instructions:
If you decide to make a gradient with different colors on each nail, use several varnishes of the same range. A smooth transition can be made by mixing them together. On thumb- most dark shade, then lighten the coating towards the little finger, or vice versa.
Features of making a gradient with gel polish
Gel polish is a special mixture of gel and nail polish. A manicure made with gel polish will be more durable, but will require more accuracy and skill from you. Since gel polish stays on nails longer long time than a simple varnish, carefully select colors; if necessary, it can only be removed in a special way.
The colored rainbow on the nails should match general image and clothes, because you will have to wear them for about two to three weeks. In addition, gel polishes have a higher cost.
You will need special products, a base and a fixative, and a UV lamp to dry the decorative coating. If you do not have experience working with such a coating, then to perform a gradient manicure, we advise you to contact a salon or a specialist working at home.
When making a gradient with gel polishes yourself, first experiment with a small number of colors from the same palette. When covering nails with gel polishes, it is necessary to strictly follow the technology, which differs from the methods used when working with conventional decorative coatings.
To create a spectacular color transition in addition to special tools and a UV lamp  You will need a thin brush, which will make a soft transition by shading the border of the colors with vertical or horizontal strokes.
The main specificity of the hybrid varnish is a three-stage application system and drying in a special ultraviolet lamp.
Benefits of gel manicure:
- It is easy to apply with a regular brush.
- The stretched coating will last for about 2-3 weeks without losing its original gloss or chipping.
- Since it only dries in a special lamp, you have enough time to calmly and carefully mix the colors until you achieve the desired soft transition.
- Rarely causes an allergic reaction.
Gradient gel polishes - video tutorial
Other ways to create a gradient
The gradient is suitable for festive events, important meetings. And the design, made in soothing colors, will be appropriate at work or study.
Gradient manicure is an interesting and creative option with which your nails will always look unusual.
With a little patience and desire, every fashionista can complete it on her own. Be beautiful to the tips of your nails!
2015-11-21