How to teach a child to braid his hair. Beautiful braids for girls.
Many people look with delight and affection at girls with beautiful hairstyles. Little princesses with pigtails always look neat, cute and charming. Braids are suitable for both formal and special occasions. In addition, such hairstyles are well maintained throughout the day, so they are also comfortable. Of course, the question may arise: how to learn to braid children’s hair, because little ones are restless and, accordingly, long time It is difficult for them to sit quietly in a chair.
Therefore, in this article we will discuss step by step how to quickly braid a girl’s hair. But first, let's give some general advice:
- Hair should be clean and dry.
- Before braiding, the hair must be combed well.
- If a girl's hair is curly or unruly, then she should apply a little mousse or moisturizing spray to her curls. You can simply wet the comb in warm water and run it through the strands.
- Hairpins, ribbons and other accessories will help make your hair more voluminous and festive.
- When braiding long ones, use elastic bands or hairpins to secure the strands.
- Do not pull the curls, otherwise the hairstyle will be too pressed to the head and tight. This can cause headaches in your baby. In addition, such hairstyles do not suit everyone.
- To create additional volume, it is recommended, on the contrary, that as new curls are added to the braid, the strands can be gradually unraveled. But don't overdo it, otherwise this hairstyle won't last long.
How to braid beautiful hair for children?
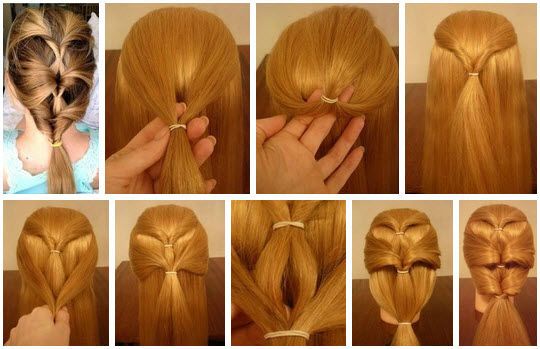
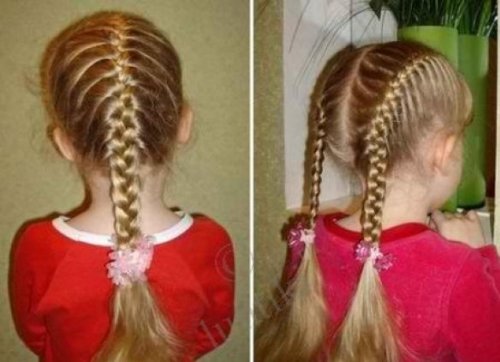
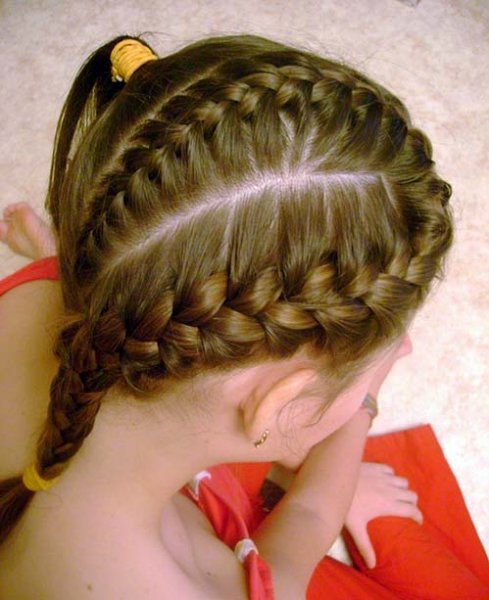
Let's look at the most common styling - "spikelet", or French braid. First, let's braid the braid in the center of the head.
- Separate the strand at the top and divide it into three parts. If you want the “spikelet” to be tall, then you need to start weaving as close to the hair roots as possible.
- Lay the curls on top of each other from top to bottom once.
- Before weaving the strand a third time, we take a small part of the loose hair from the same side, attach it to the outermost curl and place a “new” strand on the one in the center. We also do this on the other side.
- Gradually add curls to the strands and weave them into a braid. And so on until the end.
Remember that the strands should be the same in volume, then the spikelet will look even and beautiful. Also, the thickness of the braid depends on the thickness of the curls you are creating.
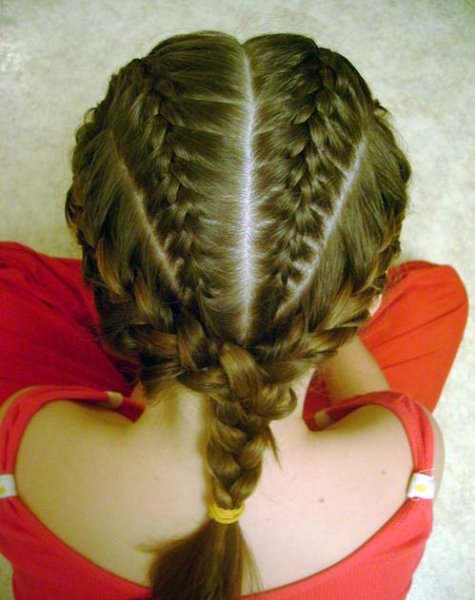
Hairstyles consisting of two or three “spikelets” look impressive.
A French braid can also be braided starting from below the head, from the neck

- Take a strand of hair above your neck and divide it into three equal parts.
- Place the left and then the right curl on top of the central one.
- Next, we continue to weave like a regular spikelet to the crown.
- Then we braid a regular braid and secure it with an elastic band.
- We connect the remaining hair to the braid with another elastic band. We can now remove the first rubber band. We comb our hair. Thus, we have a voluminous tail.
The peculiarity of this hairstyle is that the end of the braid will be on the top of the head. You can leave the ponytail, tying it with an elastic band, ribbon, or forming a “donut” using a hair roller. The hairstyle will look elegant if you first curl the ends of the ponytail. The hairstyle will look beautiful if the tail is hidden in a “pocket” under an elastic band and secured with bobby pins. The styling for your princess is ready!
Today it is very fashionable to do "spikelet inside out", i.e. The side strands should be laid not on the central strand, but under it. Let's look at how to braid a pigtail on its side using the "inverted" principle.
- Let's make a deep parting on the side on either side. Comb your hair well.
- Separate the front strand from the rest of the hair and divide it into three parts. We begin to weave the braid inside out.
- We gradually weave all the hair into a braid.
- Secure the braid with an elastic band, but not tightly. To make it as voluminous as possible, relax all the strands one by one.
- Now you can tie the elastic band tighter and decorate your hair with a ribbon.
So, we discussed step by step how to braid simple pigtails for a girl that do not require a lot of time.
Below we will describe a more complex version of a hairstyle based on two strands.
Let's take a step-by-step look at how to braid a pigtail. "fish tail":
- We comb our hair and begin to braid it like a French braid, i.e. We form a large strand and divide it into three small ones. The left strand is placed in the middle, then the right one as well.
- We combine two strands into one: we put the left one on top of the right one. Thus, our braid will consist of two strands.
- From the left strand we separate a small curl from the outer edge, from the same side we take a free strand of hair, connect them and transfer them to the other hand.
- From the right strand we separate a small bunch from the outer edge, add a free lock of hair to it, connect it and transfer it to the other hand. And so on until the end of weaving.
- For additional volume, relax the strands of our braid and tie it with a ribbon or elastic band. The thinner the hair tufts, the more beautiful the braid will be.
Looks very festive openwork braid. Let us describe the principle of its weaving:
- We comb the hair and use a triangle to select the area in the area of the bangs, and from the rest of the hair we form a tail.
- We lay the strand on top on its side, and divide the tail crosswise into two parts.
- Select a small bun from the front and one curl from the tail, which we divide into two parts. Thus, we have three strands.
- We weave an inner braid from them, gradually adding small bunches from the tail and bangs. Gradually we weave in the second tail.
- Next we braid a regular braid. At the end, we pull out the strands from it, creating volume.
- We twist the braid and secure it with bobby pins. Decorate your hair with a flower.
Having learned how to weave simple braids for a child, you can move on to more complex ones.
No girl can resist a beautiful hairstyle. Various braiding techniques are in no hurry to lose their popularity, because this best options hairstyles for girls. After carefully studying several schemes, you can create a stylish hairstyle yourself and change your look every day.
For beginners
Option #1
- First you need to wash your hair well, dry it with a hairdryer and comb it thoroughly, because for braiding the curls must be perfectly smooth.
- With your left hand, take a strand in the center.
- One more strand is separated from the left and right sides (should be approximately the same thickness).
- The left strand is placed on top of the central one and passed under the right one.
- You need to ensure the strength of the weave so that the braid does not fall apart.
- On the right, take a thin strand of loose hair and connect it to the main one.
- An additional strand is taken from the left side and added to the main one.
- According to this pattern, weaving continues until the end of the hair.
- Once the braid is finished, the ponytail is secured with a beautiful elastic band.
Option No. 2
- The hair is washed well, dried and combed. A tight ponytail is tied at the top of the head. You need to make sure that the hair is combed smoothly and that “roosters” do not form.
- The tail is divided into 3 approximately equal strands.
- The right strand is placed under the middle one. Then the left strand is placed under the middle one.
- A curl is separated from the loose hair on the right and added to the main one, then placed under the middle one.
- The free part of the hair on the left is separated and attached to the main one, then placed under the central one.
- According to this pattern, the braid is braided to the end.
- The top of the tail can be decorated with an elastic band or a bow. This is a reverse French braid that is perfect for almost any occasion.
Option #3
- Dried hair is combed to the right side.
- In the area of the right temple, take 3 not very large strands and braid a simple braid.
- The weaving continues to the left temple.
- At the end, the hair is wrapped in a thin curl and fixed so that the hairstyle does not fall apart.
For long hair
Option #1
- Clean and combed hair is divided into two equal parts.
- On the left, a part is separated from the main strand and placed on top of it.
- The actions from the previous paragraph are repeated on the right side.
- Additional strands intersect and connect to the main ones.
- The steps from point 2 are repeated again.
- According to this pattern, the braid is braided to the very end. This hairstyle will suit for graduation, but can be done for every day.
- To make the braid more voluminous, you can fluff it slightly by pulling out the strands.

Option No. 2
- The hair is combed well and parted evenly.
- On the right side, take 3 equal strands and braid a simple braid.
- To prevent these braided hairstyles from falling apart during the day, you need to gradually add strands from the bulk of your hair. As if weaving a braid.
- The braid is woven to the middle of the back of the head and fixed.
- The strands are slightly stretched, which gives additional volume.
- Using the same pattern, the braid is braided on the left side, but now it is placed on top of the first.
- The end of the hair is carefully fixed and hidden under the braiding so that the ponytail is not noticeable. This is the perfect hairstyle for little girls because it stays neat all day long and the hair won't get into your child's eyes.
Option #3
- The next master class will help you create a beautiful and stylish hairstyle. First, a fishtail braid is braided.
- You should not make the braiding too tight and at the end the braid is fixed with a simple elastic band, then it can be replaced.
- Just above the middle of the braid, one strand is pulled out and a not very large loop is made.
- The same loop is made on the opposite side.
- The ends of the elongated strands are used to secure the bow so that it does not fall apart.
- The ends of the strands are carefully masked, tucked into a braid.
- You can make several bows using this pattern.
Option No. 4
- The hair is combed and 3 strands of equal thickness are taken from the top of the head.
- During weaving, additional strands are added on each side.
- The braid is woven to the middle.
- The braid at the back of the head is woven using the same pattern, but in an upward direction.
- Two braids are connected into a ponytail and tied with an elastic band.
- A loop is made from the tail, which is divided into 2 parts.
- In the middle, the loops are intersected by the remaining hair, and neatly secured in the shape of a bow.
For medium hair
Option #1
- Dried hair is combed and straightened with an iron so that the curls are perfectly smooth.
- In the area of the temples, on the right and left, one strand is taken, which are fastened at the back of the head with an elastic band.
- The tail is passed inside, flagella are formed.
- Once again, a strand of hair is taken from the right and left, which is secured at the back with an elastic band. The tail is passed inward, again forming flagella.
- Another tail is made using this pattern.
- At the end, the hair is gathered into a ponytail and combed.
Option No. 2
- The hair is combed well and, if necessary, straightened with an iron.
- 2 strands of approximately equal volume are separated.
- On the right side, near the temple, take the third strand and throw it over the second.
- On the left side, near the temple, take the fourth strand and throw it over the first.
- Using the same pattern, the fifth and sixth strands are added and the braid is braided to the end.
- At the bottom, the ponytail is tied with a thin elastic band and the hairstyle is completely ready.

Beautiful weaving
Option #1
- Washed and dried hair is combed. A small piece of hair is taken from the back of the head and a ponytail is tied with a thin elastic band.
- The tail is divided into several equal strands. 2 additional strands are taken near the forehead and the process of weaving a simple braid begins.
- During weaving, strands from the tail are gradually added.
- The braid is woven to the back of the head.
- According to this pattern, the braid is woven on the left side.
- At the back of the head, the braids are connected and braided as one until the end.
Option No. 2
- First, the hair is combed well, then a strand is taken and placed on forefinger left hand. The second strand is pinched between the index and middle fingers. The third is between the middle and ring fingers.
- The third strand is passed under the central one, and the first is placed on top.
- An additional strand is taken from the left and right sides, which are added to the main ones.
- According to this pattern, the braid is braided to the end, leaving loose curls below.
Option #3
- On well-combed hair, a side parting is made on the right side. Take 4 strands of approximately equal volume.
- A simple braid is woven.
- Having reached the back of the head, you need to use loose curls on the left side for weaving.
- As soon as the braid is braided to the end, it is twisted into a neat circle.
- Pins are used for fixation.
- This hairstyle is ideal for both daily use and special occasions.
Option No. 4
- To braid African braids, you need to carefully comb the strands and part them.
- A small area is selected in the back of the head, and a thin strand is taken.
- The strand is combed well and a Kanekalon thread is taken, which is pre-whipped into a tangle and attached to the roots.
- Then the strand is divided into 3 approximately equal parts and the tightest braid is braided. Once the level of natural hair is reached, a little Kanekalon is woven into the strand. Thanks to this, the braid acquires a uniform volume.
- You can fix the end of the braid different ways- rubber band, glue or bead.
Using this technique, you can not only braid straight braids, but also create a wide variety of patterns directly on your head.
Option #5
- The hair is carefully combed, straightened and parted. 3 thin strands are taken from the top of the head and the braid begins on the left side.
- Additional strands are gradually added.
- According to this pattern, the braid is braided on the right side, but in the middle the hair remains untouched.
- A simple thin braid is braided in the middle.
- 3 braids are connected together and secured with small hairpins so that the hairstyle does not fall apart.
With ribbons
Option #1
- The hair is combed well, and 3 strands of equal thickness are taken from the top of the head.
- A tape is fixed on the central strand and a tourniquet is made.
- A simple braid is braided around the head, and a bun is tied at the back of the head.
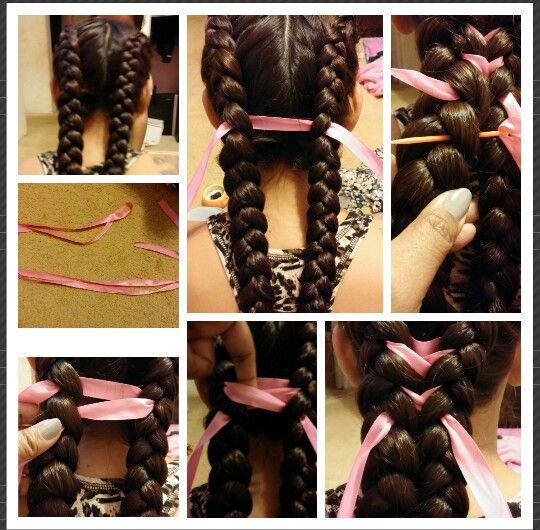
Option No. 2
- Two tight braids are braided.
- Take a ribbon and fix it in the braids. All actions must be careful so that the hair does not become disheveled.
- Using a pencil, the ribbon is tucked into the braids and then tightened.
- The result is one thick braid, accessorized with a colorful ribbon.
The content of the article:
Any mother wants her little princess to always look well-groomed and neat, even while sliding down the slide and playing tag. Therefore, braids are very popular compared to other children's hairstyles. Multifunctionality, versatility, various methods of weaving and decoration make braids an ideal hairstyle for any situation, be it a trip to kindergarten or school or to a formal party. In addition, styling the baby's hair in beautiful hairstyle, mom with early childhood teaches her princess to take care of herself and feel beautiful. But before you braid your hair, you should study the rules in advance and find out how to create a beautiful hairstyle for a young lady.
To avoid damaging children's hair follicles, do not tighten the braid too tightly. In addition, strong hair tension will cause significant discomfort to the child.
Features of children's hairstyles with braids
Children's hair is thinner and more fragile compared to adults; their hair follicles have not had time to grow stronger, so when braiding a girl's beautiful braid, a mother should take into account some of the features of children's hairstyles.
Hairpins. A baby's hair, even long, is not yet able to withstand a large number of decorations At the same time, metal hairpins are heavier and more damaging to the scalp and hair, so give preference to plastic jewelry.
Simplicity. Even if a young fashionista loves to dress up and show off in front of the mirror, it is unlikely that the girl can stand sitting in one place for a long time. So as not to spoil the mood for yourself or the baby, choose simpler hairstyles and weaves.
Durability and functionality. All children are extremely active, so a girl's hairstyle must withstand active games and not unravel, but Do not tighten the braid too much so as not to damage your hair.
Age appropriate. Adult hairstyles are mostly not suitable for child's face, besides, they are more complex and tight. Simple weaves and hairstyles look much more interesting and beautiful on the head of a little princess..
Rules for braiding hair for girls
- In an effort to make the hairstyle stable and neat, try not to tighten the strands too much, otherwise you can damage the baby’s hair and disrupt blood circulation to the scalp.
- Clean and moisturized hair is easier to braid into a beautiful braid than dry hair. But under no circumstances cannot be used by adults cosmetical tools . To moisturize your hair and protect it from damage, use special baby mousses.
- Even if the braid does not come undone during the day, Do not leave your hair in place for more than eight hours. To keep your hair healthy, you need to unbraid it every day and let it rest.
- A large number of hairpins and barrettes, especially if they are made of metal, can damage the hair structure and scalp, so use only safe jewelry in limited quantities.
- If the girl short hair, you can braid two braids on the sides and secure them with bobby pins or make a French waterfall hairstyle. And the bangs can be removed by braiding a braid along it with a catch.
To braid a tight braid, you need to moisturize your hair in advance. To create children's hairstyles, it is better to use mousses designed specifically for children's hair.
Examples of hairstyles with braids for going to kindergarten or school
There are many options for braids for girls, from the simplest to the most sophisticated and intricate.
Simple braid
To braid your hair in a regular braid, you need to divide it into three strands of equal thickness. Take the left part and apply it, crossing it over the middle strand, and tighten it a little, tightening the weave. Then repeat these steps with the right part of the hair. Repeat this simple algorithm until a small tail remains. You can secure the resulting braid with an elastic band, a hairpin or a bow.
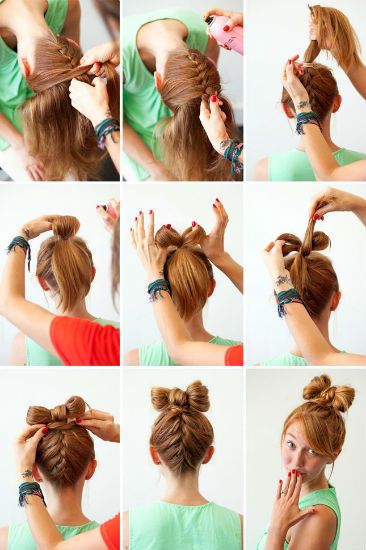
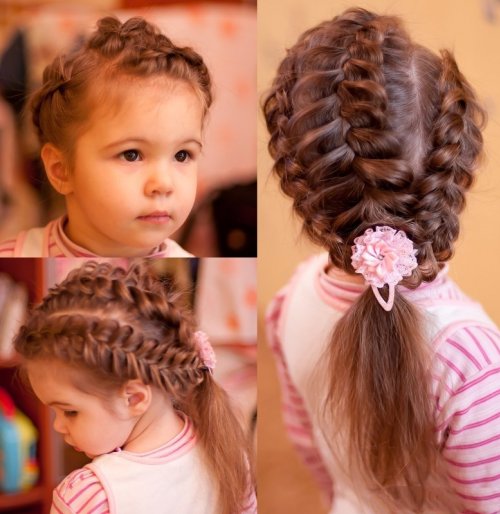
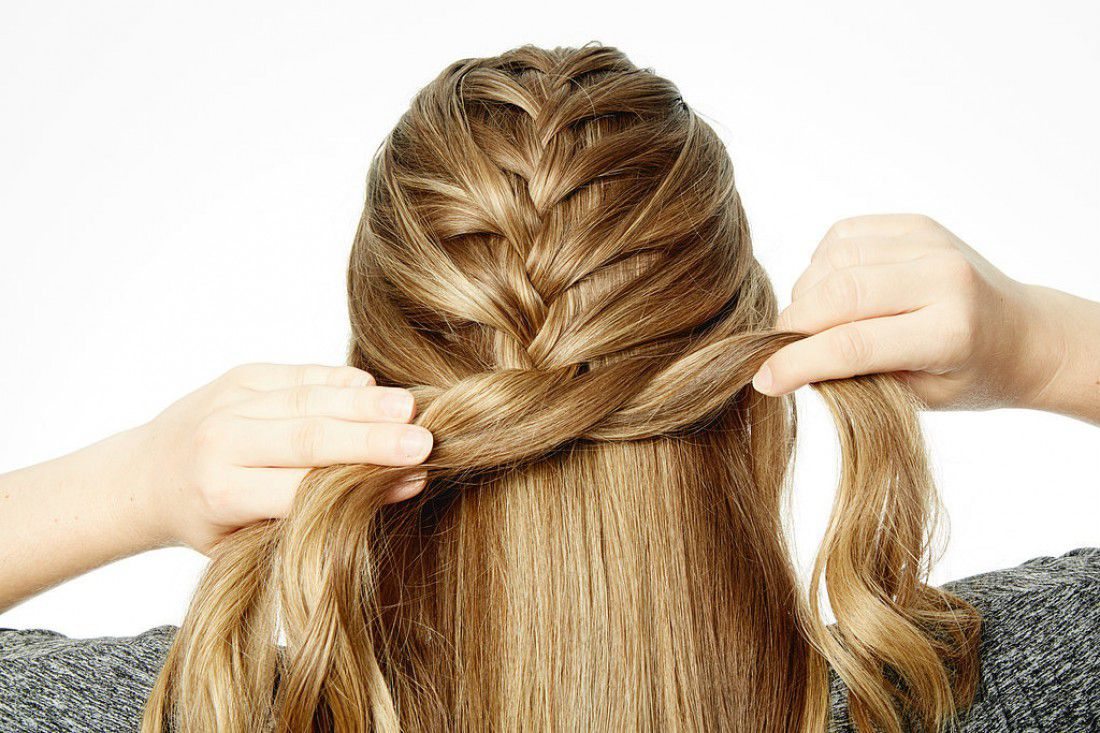
French braid
First, you need to separate a strand from the middle of your forehead to the top of your head with a triangle and secure it with an elastic band. Separate small strands on each side and intertwine them with the main one. Separate the strands from the sides again and intertwine them with the main one and continue braiding the hair in this way until you reach the back of the head, then weave a simple braid of three strands. In this hairstyle, it is important to tighten the braiding tightly enough to keep the braid neat.
![]()
Elven braid
The basis of any hairstyle based on Tolkien characters is thin simple or French braids, braided on the sides and secured at the back of the head. There can be one, two or several pairs of such braids. You can simply secure it at the back of your head with a small hairpin or weave it into the main braid.
Inside out braid
This hairstyle is done almost the same way as a French braid, but with some features. First, separate the strand above your forehead and divide it into three equal parts. Cross the left strand with the main one, bringing it from below, and do the same with the right strand. Then add a small part of the hair from the temple to the left strand and intertwine it with the main strand, bringing it from the bottom. Repeat these steps on the right side. Having brought the braiding to the back of the head, you can continue further by weaving a simple braid or secure the hair and leave a ponytail.
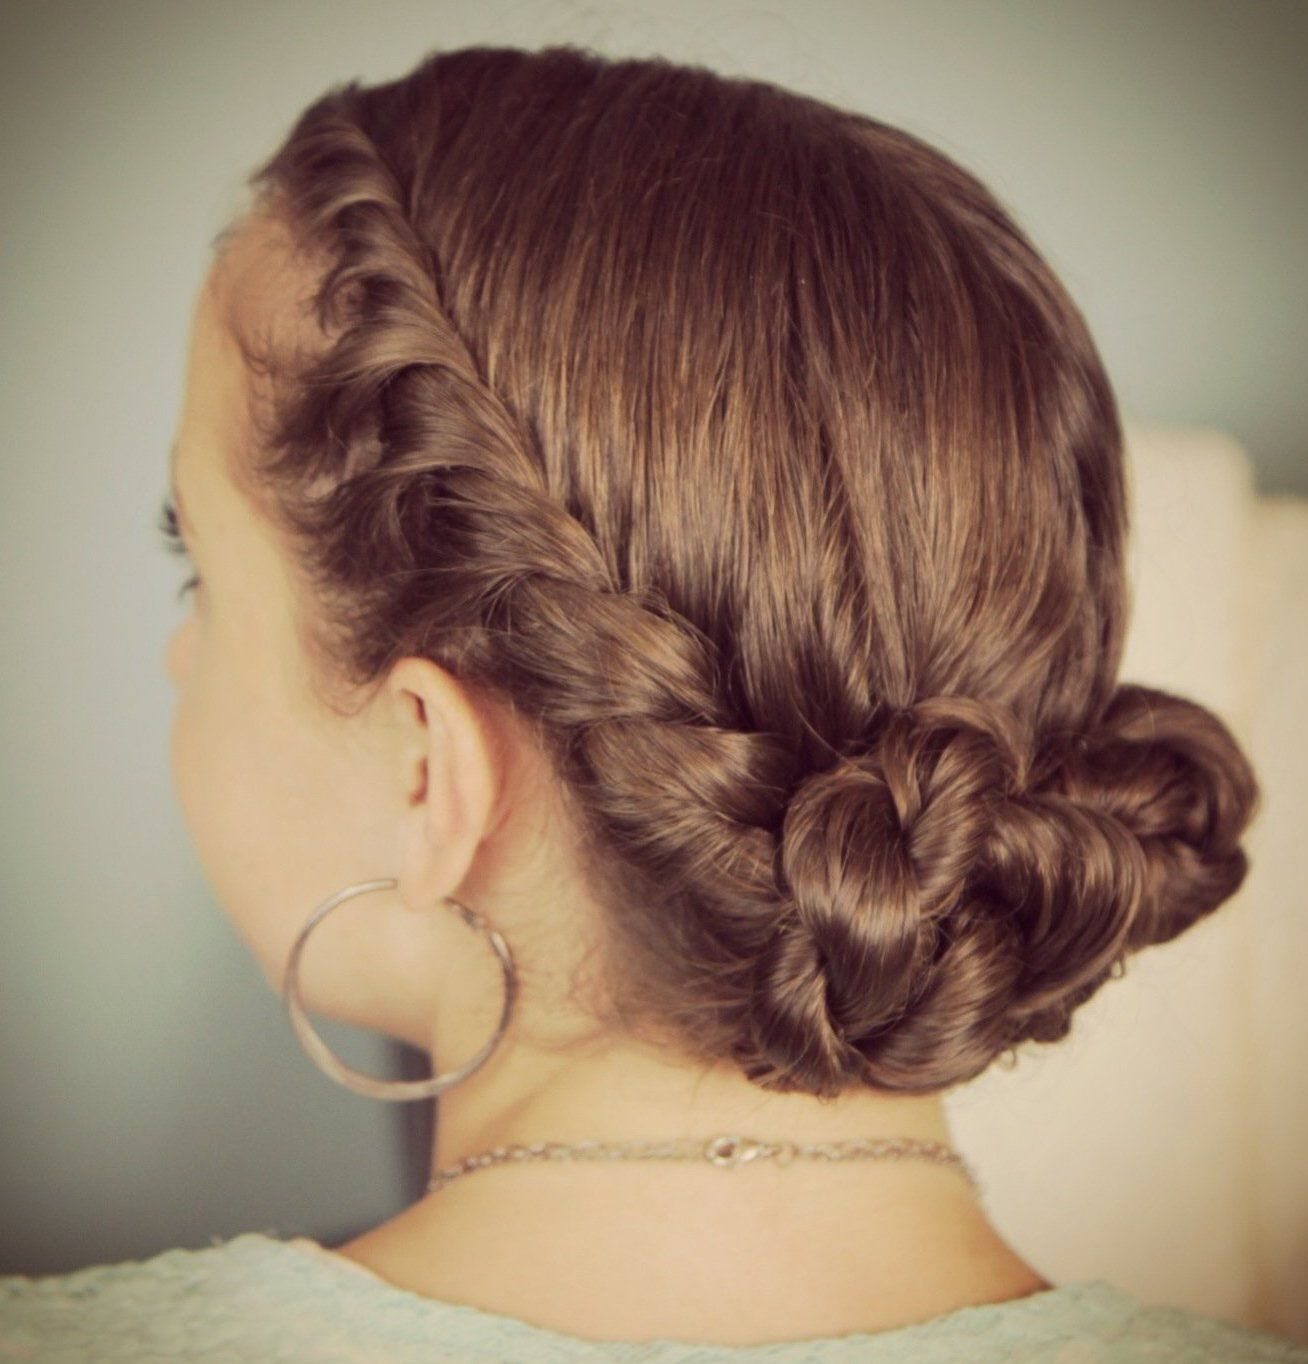
Pigtail-harness
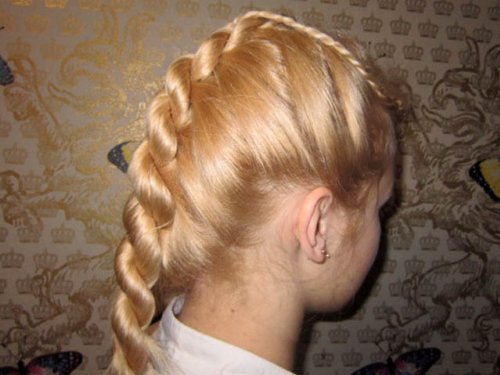
This hairstyle has become a fashionable replacement for the traditional braid. To achieve this hairstyle, comb your hair and braid it into a ponytail. Next, divide it into two equal parts, and right side twist about three turns to the right. To prevent the resulting bundle from unraveling, pinch it with your fingers. Do the same with the left side of the tail. Now intertwine both strands with each other until a small tail remains. You need to secure your hair with an elastic band or tape.
To make sure your little princess can stand sitting in one place while her mother braids her complex braid, show her photos of your finished hairstyle or turn on your favorite cartoon and be sure to take a photo of the young model with a new gorgeous hairstyle.
Examples of festive hairstyles with pigtails for girls
For the holiday you need to do special hairstyles.
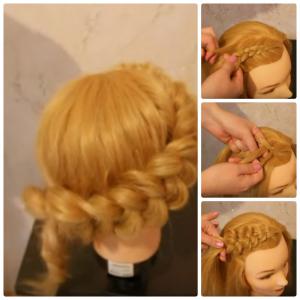
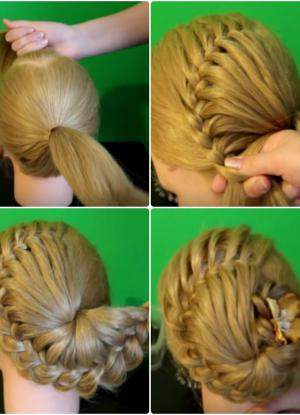
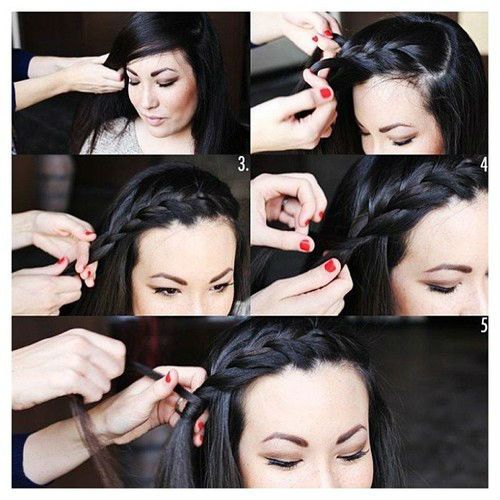
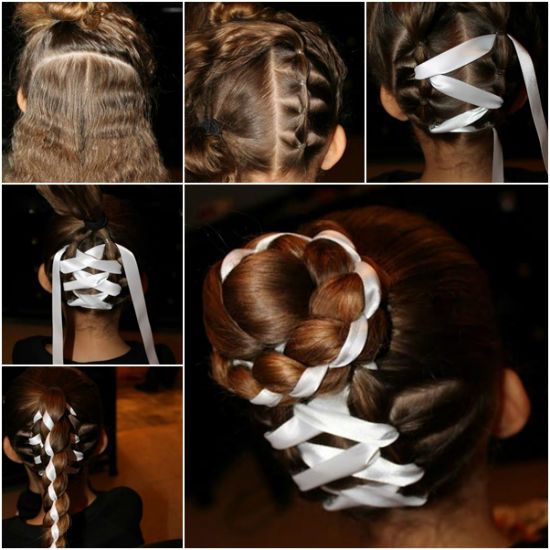
Braids with ribbons
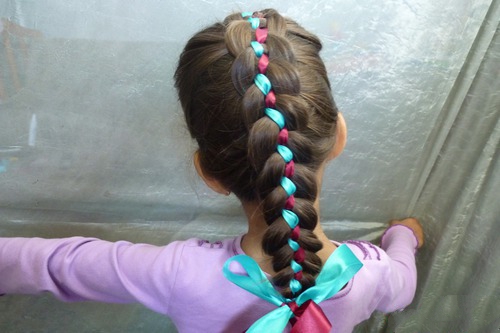
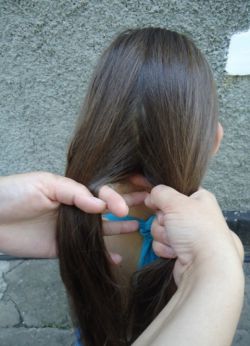
Ribbons can be satin, silk or lace, but should contrast with the color of the hair and match the shade of the outfit. The tape should be placed between the second and third strands of the future braid. Throw the first strand over the second, thread it under the ribbon and throw it over the third. Next, thread the ribbon under the third strand so that it is in its original position between the second and third strands. Continue this braiding algorithm until the hairstyle is complete.
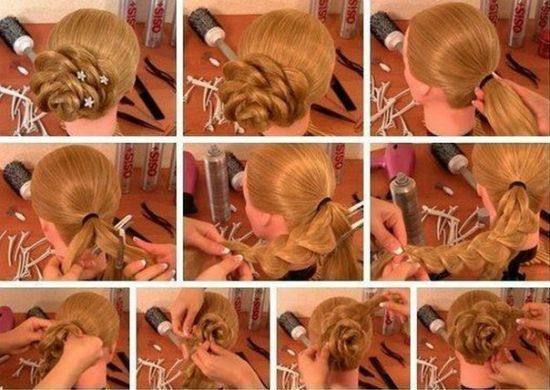
Colored African braids
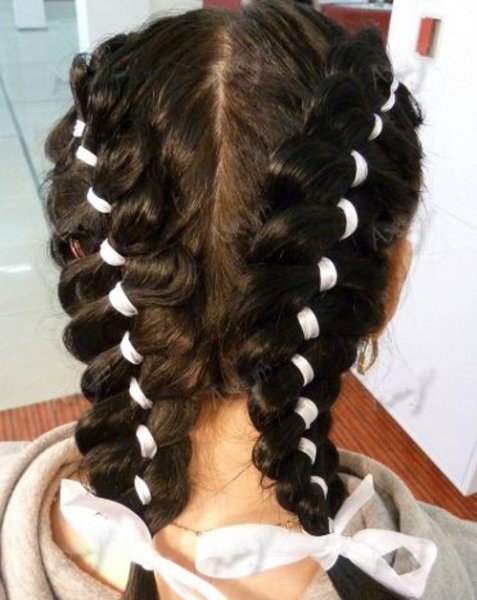
There are many ways to weave such braids, but at home, the optimal braiding option is three-strand braids. First, divide all your hair into partings to form squares and secure the resulting strands with hairpins. Braid each strand into a tight braid and secure with a bead or elastic band. You need to weave a thin colored ribbon into each braid, securing it in the middle strand of each braid.
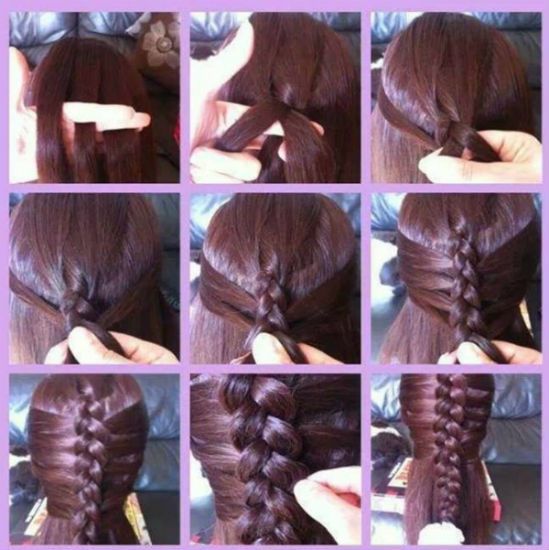
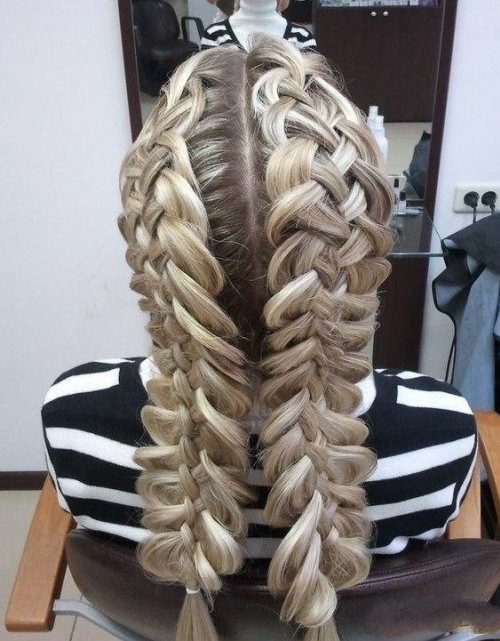
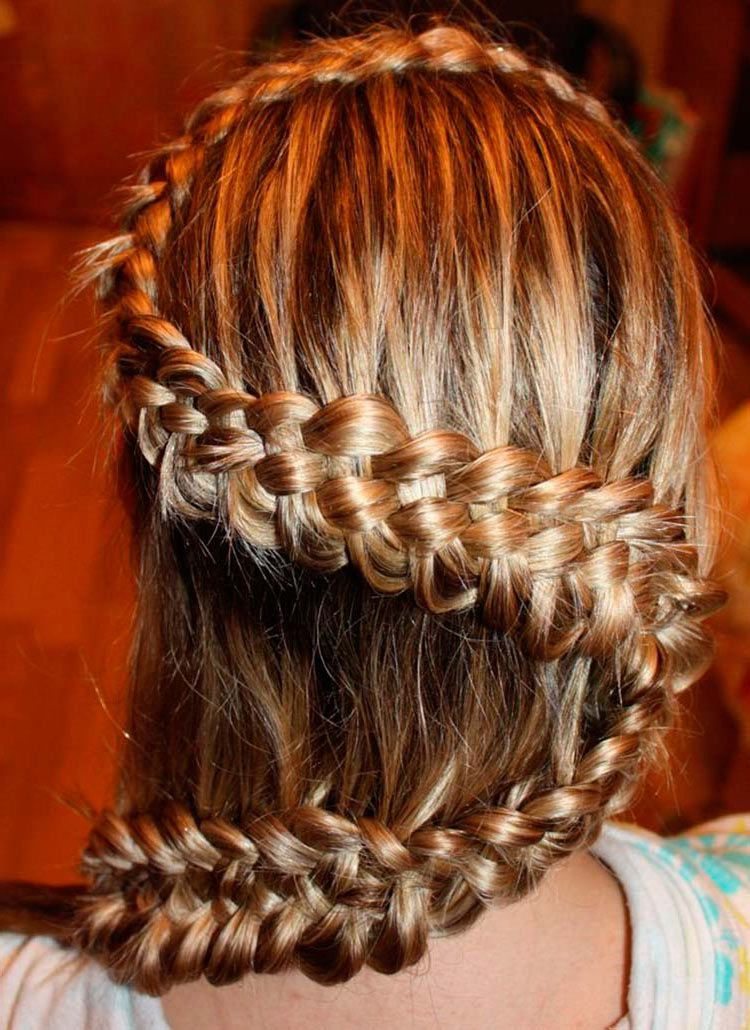
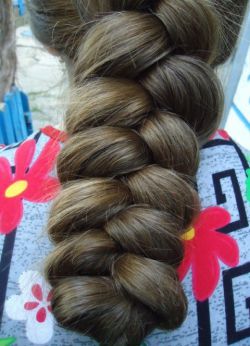
Five-strand braid
This hairstyle, despite the apparent complexity of weaving, is braided quite simply. To begin, divide your hair into five equal parts (for convenience in describing the weaving pattern, we number the strands from left to right). So, the first strand needs to be held under the second and thrown over the third. And draw the fifth strand under the fourth and throw it over the third. Number the resulting five strands again and repeat the previous weaving algorithm. The braid can be secured with a beautiful hairpin or elastic band.
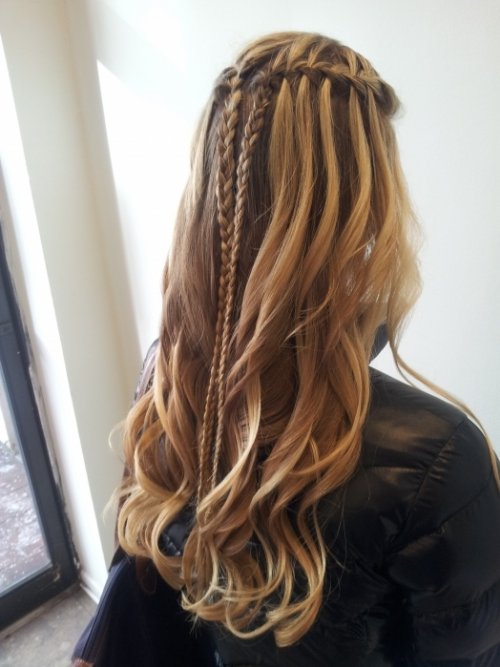
Openwork braid
This hairstyle looks very beautiful, and the braiding is quite simple. The braiding begins as a three-strand braid, but there is no need to tighten the strands tightly. If you are weaving a braid with one-sided weaving, then on the outer side we evenly pull out the strands on each turn, and inner side leave it untouched. In the case of double-sided weaving, the strands are pulled from both sides. You can secure the resulting hairstyle with a bobby pin or a beautiful elastic band.
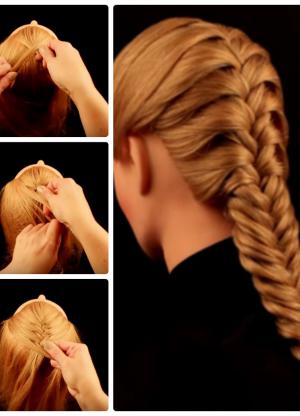
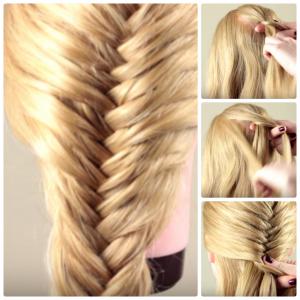
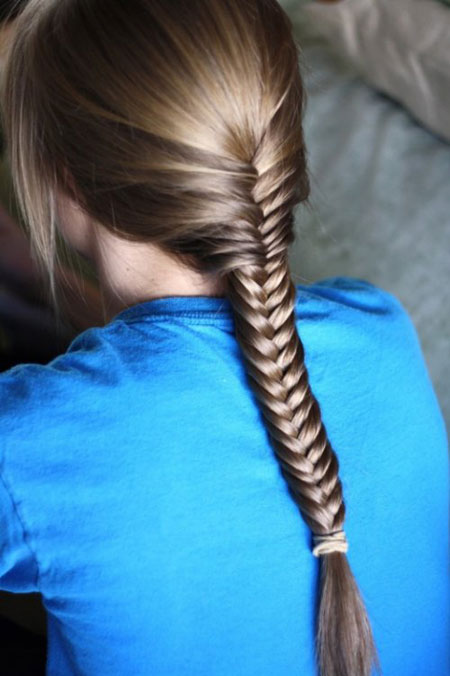
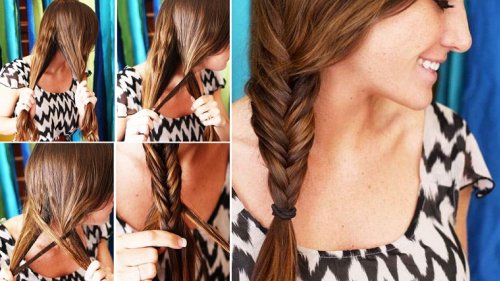
Fish tail
Little fashionistas love this hairstyle; it is easy to do and looks unusual. So, the hair is parted into two parts. Separate a thin strand from the left part and pass it over the left part of the hair under the right. Repeat this operation with the right part of the hair. It is important to ensure that the strands are the same thickness; the thinner the strands, the more complex and textured the braid looks. Repeat this algorithm until the hair is braided. The hairstyle can be secured with a beautiful ribbon, hairpin or elastic band.
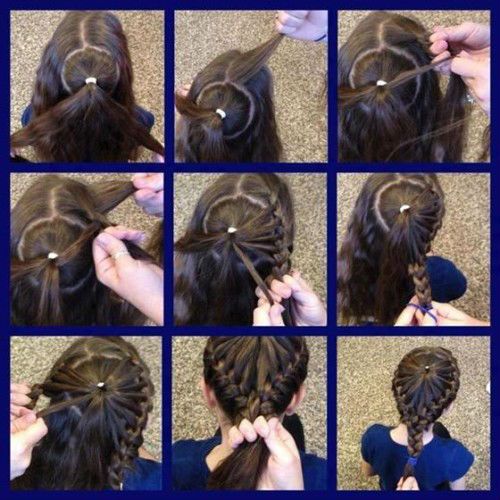
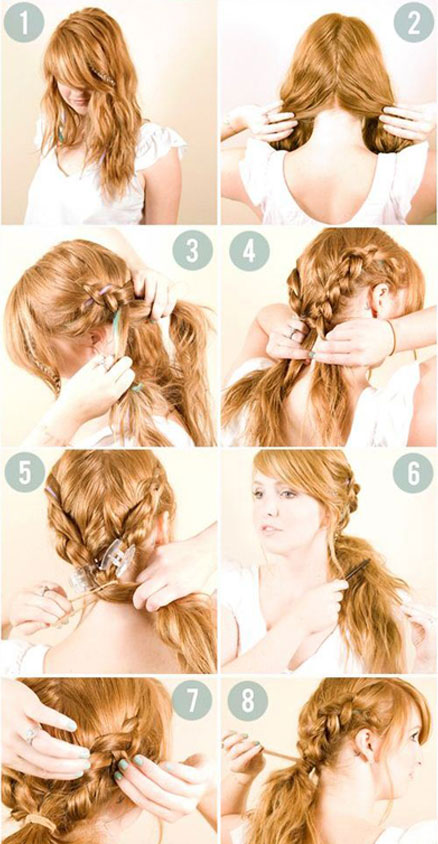
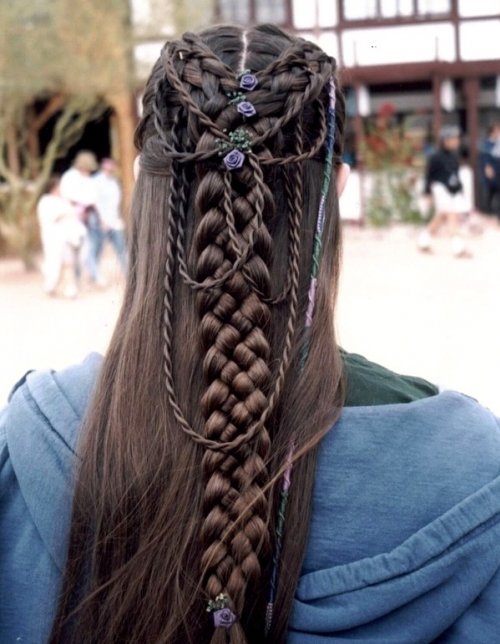
Heart made of braids
If your little princess has long hair, you can create such a wonderful hairstyle using several braids. This weaving is universal and is suitable both for going to school and for a holiday, you just need to add bright ribbons or a beautiful hairpin. Despite its fancy and complicated appearance at first glance, this hairstyle can be easily braided at home.
Moisten clean hair with baby mousse, comb thoroughly and part vertically into two equal parts. Now divide the resulting right and left halves again as shown in the photo.

Starting from the back of the head towards the forehead, braid a French braid, then make a turn and lead the braiding back to the crown.
Repeat this algorithm with the remaining free part of the hair. Braid the remaining loose ends after braiding into one simple three-strand braid.
Video tutorial on braiding hair for girls
If you want to learn how to professionally braid various braids for your little princess, you should definitely watch these video tutorials, which describe in detail each process of creating a beautiful hairstyle.
You are raising a little princess and want her curls to always be in good condition, is the head placed nicely and neatly? Then you definitely need to learn how to braid hair for children. Braided hair is not only the most hygienic, but also amazingly beautiful, romantic and original, especially when you master the skill of creating complex braided hairstyles.
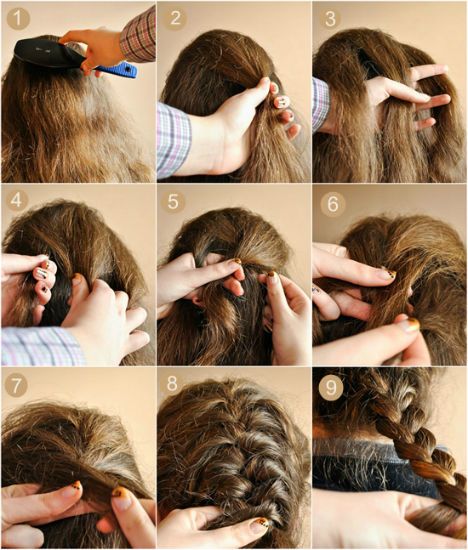
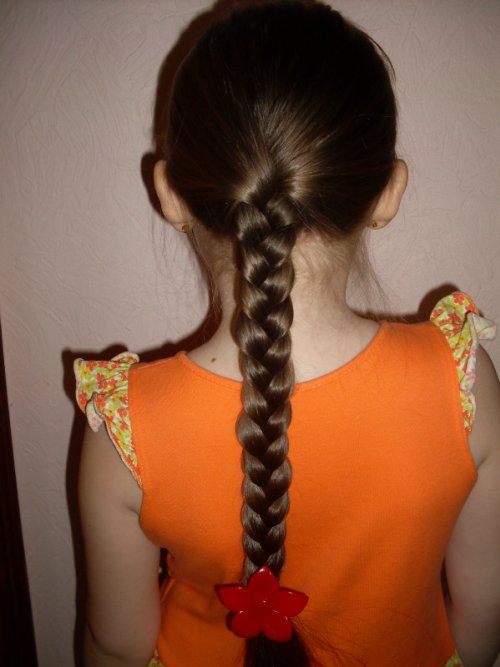
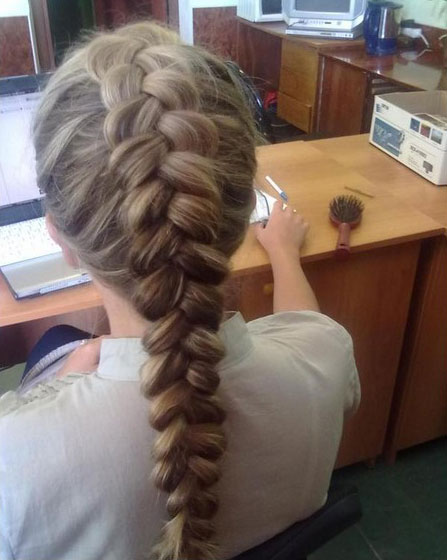
But, as in any business, you need to start with mastering the simplest elements. One of them is the classic or Russian braid. The technique of braiding it is familiar to all women, because... this is the first hairstyle taught to girls in early age so that they can take care of themselves independently.
Classic braid
To do it, you need to prepare a regular flat comb and rubber bands.
Weaving technique:
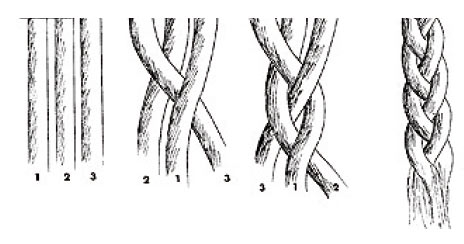
- divide your hair equally into three parts;
- place the left strand over the middle one, then place the right strand over the left one (at this stage it has already become the middle one);
- Continue crossing the strands until the end of the length. Secure the end of the weaving with an elastic band;
- During the process, you can weave ribbons into the braid or at the end of styling, decorate it with bows or beautiful hairpins.
This hairstyle can be quickly braided for a child with both long and long hair. middle length hair.
If you make two such braids, the hairstyle will become more sweet and touching.
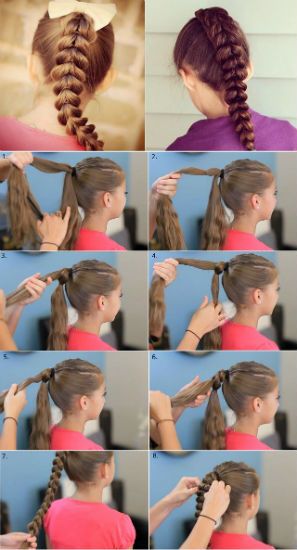
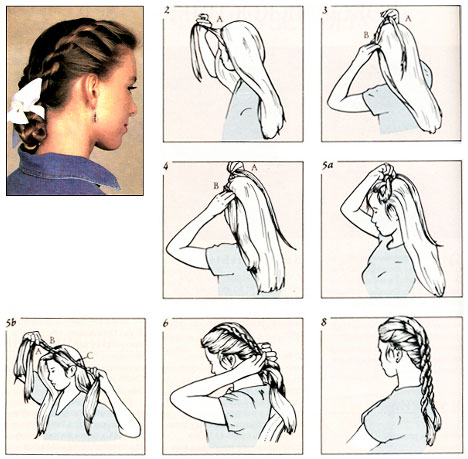
French braid
This weaving - also known as a “spikelet” - is the next level of complexity. Although learning how to do it is not much more difficult than usual, it looks more elegant and beautiful. You can braid this braid for a child beautifully and quickly if the curls reach at least to the shoulders.
Take a thin comb with a long thin end (“fishtail”), elastic bands for fixation (choose inconspicuous ones), a spray bottle for water, hairpins for decoration and bobby pins for picking up loose strands.
Braiding technique:
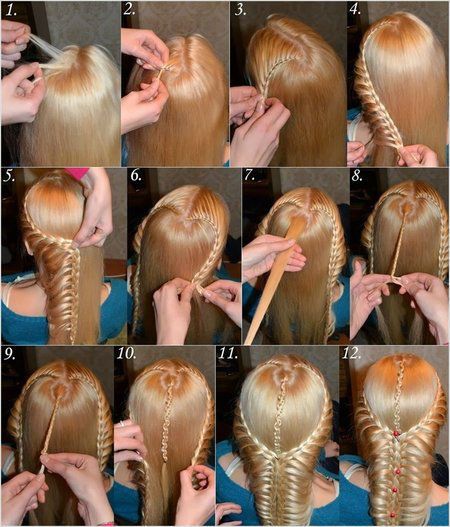
- Gently comb the girl’s head and use a comb to separate a wide strand above her forehead, divide it equally into three parts;
- cross these three strands together once, as in a traditional braid (place the left strand over the middle one, and then the right strand over the middle one);
- then start weaving the same simple braid, but picking up the side strands (that is, evenly adding braiding strands hanging from the sides to the main strands);
- braid all your hair in this way;
- When all the side strands are woven, continue to weave a regular braid.
Can be done different types styling using a “spikelet”. For example, braid not one, but two or more braids at the same time, or style them in unusual partings (from ear to ear around the head or zig-zag along the head).
The styling will look original, in which the tip French braid, braided in the classic way, tucked under her hair and pinned there with invisible bobby pins.
It will turn out unusual volumetric styling, decorated with a wonderful, simple weaving - it will be appropriate at school, in dance classes, gymnastics, and sports.
A hairstyle done this way will look even more impressive: divide the entire hair into 4 parts using two cross partings, braid 4 “spikelets” in each “sector” and connect them at the top of the head into one ponytail.
You can also style short hair this way.
The advantage of a spikelet over other hairstyles is that all the small hairs are reliably collected in it, so the hairstyle looks neat, and the hairs do not bother the child.
Reverse braid
This weave is a purl variation of the “spikelet”. To complete it you will need the same tools and accessories.
Weaving technique:
Repeat absolutely all the steps of weaving a “spikelet”, only cross the strands not on top of each other, but from below.
If this description is not entirely clear, try it step by step:
- On a combed head, using a comb with a thin tip, select a wide strand of hair above the forehead, divide it equally into three parts;
- then begin to weave a regular braid, placing strands under the bottom: pass the right one under the central one, then the left one under the new central one;
- immediately after these two crossings, begin to pick up strands from the sides of your head, attach them to the main strands and intertwine them from below;
- Having gathered all the side hairs into your hair, begin to weave a simple braid;
- Secure the end of the braid with an elastic band.
Harnesses and braids
This option for a spectacular unusual hairstyle for long hair Suitable for both school and kindergarten. It looks great on older girls too. You can also freely make it yourself while going shopping or to work.
A step-by-step technique will help you master weaving:
- gather all the hair on the top of your head into a ponytail, separate a thin strand from it and leave it alone for now;
- Braid the hair in the ponytail with a reverse braid (as described above), leaving one strand free from each link. As a result, you should end up with a braid with several strands protruding from it, which will be used to twist the braid;
- fluff the braid with your fingers to make it more voluminous;
- secure the end of the braid with a hair elastic;
- then start twisting the strand: return to the strand that you left at the very beginning of the ponytail, divide it into two parts, twist each of them with a strand, intertwining with the strands that stick out from the braid;
- this way you will get a tourniquet connected along the entire length to the braid. Now secure the end of the braid with an elastic band and gently ruffle the braid links - this will make it airy and romantic.
How to weave original braids for children on short hair
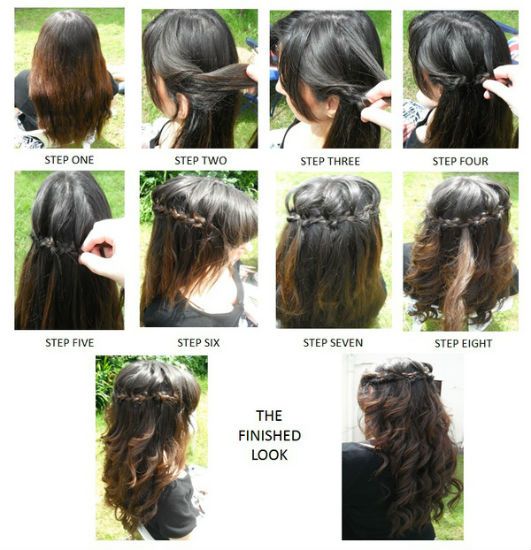
Styling short hair differs only in the absence long tails remaining in case long curls after braiding, spreading over the surface of the head. But there are ways in which you can braid even strands 10 cm long. For example, a hairstyle known as “Waterfall”.
"Waterfall"
This is a very simple weave.
Technique:
- make a side parting on the combed curls, select a small strand and divide it into three parts;
- start the usual weaving: place the upper strand on the central one, then the lower one, also on the new central one - shifting the weaving to the temple farthest from the parting and moving from it towards the back of the head;
- After this, leave the strand that would normally be woven into a braid to hang, and from under it take a new strand and make another classic weave. In the next step, leave one strand hanging again and go around your entire head.
The waterfall consists of strands hanging down, similar topics directly onto the falling streams of water.
Crossing ponytails looks lively and fashionable.
Try to evenly divide the girl's hair into even rows running parallel to the forehead line across the entire head.
Make identical ponytails from the first row, securing soft elastic bands near the roots. Then divide the resulting tails and add curls from the second row to them. Again, secure the new ponytails below the first row of elastic bands with rubber bands. You should end up with partings in the form of checkerboards, on which a grid of strands is laid.
The corners in this mesh are the elastic bands at the base of the ponytails. It is enough to cross 3 rows of ponytails so that the head takes on a very elegant look, especially if the ends of the free ponytails of the last row are slightly curled.
With frequent practice and acquiring manual dexterity, you will undoubtedly enjoy turning your beloved daughter's head into wonderful masterpieces of hairdressing art.
And after watching several master classes for beginners on how to learn how to weave unusual braids for a child, you simply won’t be able to resist repeating the most beautiful ideas you’ve seen, or even come up with a lot of your own. Now your girl will be the most sophisticated and original lady.
Every mother of a young fashionista will sooner or later have to learn how to braid her daughter’s beautiful braids. Not a single holiday at school or kindergarten can't do without beautiful dress and neatly braided hair.
Moreover, the girls themselves also very early ask to be taught the art of weaving, first experimenting with the hairstyles of their favorite dolls, and then with their own hair.
Already as adults, many women who are lucky enough to become the owners of long and luxurious hair, daily or special occasions braid them into one or many braids, thereby giving their appearance neatness or negligence, severity or romance. will never go out of fashion and will always remain very popular among the fair sex.
Meanwhile, there is a huge variety various types braids for long hair and medium-length hair, each of which is suitable for a specific event or time of day. Any girl or woman can easily choose from this variety what is right for her.
In this article we will show you several detailed instructions, with the help of which you can learn how to braid beautiful pigtails for children and easily figure out how to do it.
How to braid a Russian braid?The most popular type of weaving at all times is the classic, or Russian braid. Sometimes it is made from all the hair, and sometimes several such braids are braided around the perimeter of the head. The following photographs clearly demonstrate how to braid such pigtails for a girl:
Weaving a Russian braid begins by dividing the hair into 3 equal parts. Then the strand that is on the right (or left, as you prefer) moves to the middle strand, after which it is overlapped by the left strand (or right, respectively). This alternation continues to the ends of the hair, and then the braid is secured with an elastic band, hairpin or any other decorative element.
There is a very beautiful variety of this braid:
It differs from an ordinary Russian braid in that during weaving, the strands are draped not from above, but from below.
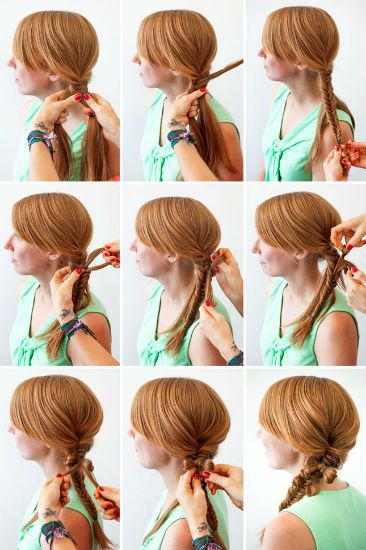
How to braid a fishtail braid?
The fishtail braid, or spikelet, is also very popular among lovers of various types of braids. Weaving this braid begins by dividing all the hair into 2 strands of equal volume. Further, from the crown to the back of the head, new ones are alternately added to these two strands. The following master class will help you quickly master this technique:
Fishtail braid is perfect for girls and women with thin hair, because it can visually increase their volume by almost 2 times.
How to braid your hair on the side?This braid begins to be woven from the side of the head. To make the weaving beautiful, the girl should tilt her head back and to the side a little. By and large, the beginning of weaving here is no different from an ordinary Russian braid - first, 3 strands of equal size are taken and a braid is woven from them, but only one strand is taken sequentially. Thus, only one strand is always woven into the hairstyle - on the left or right side, depending on the direction of weaving.
If you have developed imagination and imagination, you can very easily and quickly learn how to braid a child’s hair, both those presented in this article and many other varied