Drawings to draw with a pencil. How to draw with a pencil for beginners step by step easy pictures
All children love to draw, but not all can. Very important on early stages support the child in his endeavors. If a child doesn’t succeed in something and no one helps him, then he will most likely simply give up this activity. Therefore, teach children to draw, strengthen their faith in their abilities. If you think that you don’t know how to draw at all and can’t teach anything, then you are very mistaken. You will certainly be able to master drawing with a pencil. Today I will show you a few simple drawings animals.
How to teach a child to draw with a pencil?
When you need something to do small child, I always sit him down to draw. True, as it turned out, some children have no idea what to do with colored pencils. I remember a time when a little girl bit off all the pencil leads when I was distracted for a minute. It took a long time to explain what it was for Blank sheet which side of the pencil to run on the paper. It's sad to remember this incident. As it turned out, her parents did not let her draw... But at this age, many children meaningfully draw objects, people, and even simple plot drawings. I believe that a child should be introduced to pencils from about 1 year of age. And a little later you can paint, of course, observing the process. .
How to teach a child to draw correctly?

It's quite simple. Our cow is chewing grass and watching someone with curiosity. First draw an open circle, then the head. A cow's muzzle is wider at the bottom. Let's draw a border by separating the nose. There will be eyes at the top, mouth and nostrils at the bottom. The expression “eyelashes like a cow” was invented for a reason. Cows do have very long eyelashes and beautiful eyes. They are in no way inferior to horses. Therefore, we draw eyelashes, ears, a tail and, of course, horns for the cow. The cow's legs end in cloven hooves. Don't forget about the udder - it is one of the main “attributes” of a cow. I wanted to add bangs to the cow, flowers in her teeth and spots. It turned out to be a very cute image.

How to draw a deer with a pencil?
We will draw a cartoon deer. Judging by the expression on his face, he is offended by someone. But you can draw a deer that smiles for children. It's the owner's business. First we draw the torso and neck, then the head with a narrow chin. The Deer has a small tail, 4 legs, raised ears and special antlers. The deer's antlers branch. It is thanks to the branched antlers in the picture that you can unmistakably recognize a deer. If you draw a mane instead of antlers, the deer will become a horse. We draw a triangular nose, a small mouth and eyes. So we drew reindeer, which Santa Claus rides. Wait, or Santa? Of course, Santa! From time immemorial, Santa Claus rode on a sleigh drawn by three horses.
The craft of a good draftsman is based on 2 basic things: the ability to control your hand and correct vision. If you want to create or design websites, then you can’t do without special training.
The next 6 sections of the article are essentially the first step in in this direction— you will learn how to learn to draw and where to start. Immediately after this, proceed to the second part of the topic and go through some more.
This is a translation of a note from Medium by Ralph Ammer (all the graphics are his).
Advice. For the next 6 tasks, use one type of pen and one type of paper (for example, A5).
Dexterity of hands - two trainings
The first two techniques are about controlling your hand. You should train your hand, and also learn to coordinate the vigilance of the eye and the movement of the hand. Mechanical practices are great for beginners. You can use them later to try out new tools. They also allow you to relax and take a break from mental or physical work. So, how to start drawing correctly.
1. Many, many circles
Fill a piece of paper with circles different sizes. Try not to let the circles intersect.

Learning to draw circles is not as easy as you might think. Note that the more circles there are on the paper, the more difficult it is to add the next one. Draw them in two directions and as many as possible.
Advice. Shake your hand when it starts to cramp, do this after each approach.

2. Hatching - creating a structure
Fill a sheet of paper with parallel lines.

Diagonal lines are the easiest for us, as they correspond to the movement of our wrist. Note that a left-hander prefers the opposite direction of strokes than a right-hander. Take a look at your favorite artist (in my case, Leonardo da Vinci) and try to guess which hand he wrote with?
Try different stroke directions. Enjoy the shading process. Combine different strokes and enjoy how the paper is covered with different shadow spots.
Advice. Do not rotate the paper. It is very important to train your hand in different directions.
So, after we trained our arms, we need to do some exercises for our eyes!
Perception - learning to see
Drawing is primarily about vision and understanding what you see. People often assume that everyone sees the same thing, but this is actually not the case. You can always improve and improve the quality of your vision. The more you draw, the more you see. The following four techniques will force you to expand your view of familiar objects. This is exactly where they start learning to draw in different courses.
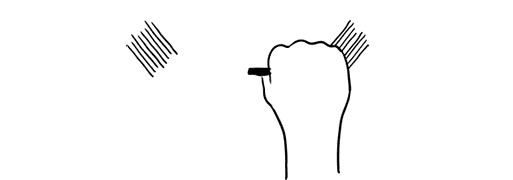
3. Outline - show me your hands!
Do you see these different fascinating contours of your hand? Draw them on a piece of paper. Don't try to recreate everything, just pick a few of the most interesting ones.

Whether you're drawing a person, a plant, or your favorite animal, you're creating an outline of what you see. Contours define a body or object and make it possible to recognize a pattern. The goal is not to immediately display all existing distinctive features, but to learn to see them!
Even if you know the shape of an object, it's still worth taking a closer look and re-examining it.
4. Chiaroscuro - adding light and shadow
Draw a piece of fabric. Start with outlines, and then use your shading skills to find the light and shade transitions.
This exercise will help you learn how to convey light and shadow on paper. I must admit that this is not the easiest way for beginners. Keep in mind that you don't have to make perfect light and shade transitions. The fabric provides a playing field to practice the skills learned in previous lessons. Plus, you'll also understand how to learn how to paint chiaroscuro using just your hand.
Advice. You can do curved shading to create shape and cross shading to achieve more deep shadows, which resemble the structure of fabric.

Advice. Close your eyes slightly when looking at the fabric. You will see a blurred image of the fabric and enhanced contrast between chiaroscuro.
5. Perspective - cubes in three-dimensional space
Let's draw some cubes! Follow simple steps.

Perspective drawing is a projection of a 3D object into 2D space (your sheet of paper).

Building a perspective is a separate science that cannot be fully considered in one article. However, we can have a little fun within the confines of a simple technique that gives us an intuitive sense of the magic of drawing in perspective.
Step 1: Draw horizontal line. This will be the horizon.

Step 2. Place two points on the edges of the line - two invisible vanishing points.

Step 3. Draw a vertical line anywhere.

Step 4: Connect the ends of the vertical line to the vanishing points.

Step 5: Add two more vertical lines as below.

Step 6: Connect them to the vanishing points.

Step 7: Now use a black pencil or pen to trace the cube.

Repeat steps 3 to 7 as many times as desired. Enjoy the build! Have fun drawing, then you will succeed. You can shade the sides of the cube.

Advice. When you draw cross lines, it is better to slightly overlap one line over the other, this will make the shape easier to see.

Mastering perspective drawings will help you create the illusion of depth. And most importantly, you will teach your brain to see and recognize three-dimensional space. This is a great practice on how to start drawing from scratch without any skills.
Even if you decide to ignore the rules of perspective and make “flat drawings,” this knowledge will never be superfluous, but on the contrary, it will help expand your horizons and sharpen your visual receptor.
6. Construction of the composition - why here?
Make 5 different designs one object. Position the item differently each time.
As you create various options placement of your subject on paper, try to trace how this changes its connotation - meaning.

Author Ralph Ammer has several more interesting articles, but this is the one you need to watch first in order to understand where to start drawing with a pencil and more. In the comments I would like to see your opinion about the pros and cons of the presented methodology. Which exercises really gave you pleasure and which ones didn't? What else do you want to know on the topic or perhaps you have your own ideas on how to learn to draw from scratch - write it all below.
P.S. Free and complete SEO analysis of a website page - sitechecker.pro. In promotion, not only external factors are important, but the web project itself must be good.
In childhood, a child does not think about why and what to draw. While drawing, he reworks his life experience, transferring it to paper, and thereby comprehends it and develops.
As you get older, it becomes more and more difficult to find ideas... We get distracted by everyday affairs, we stop hearing ourselves, our inner world. It is especially difficult at the beginning, when you are just embarking on the path of discovering yourself as an artist.
To draw well, you need to draw every day. But where do you get the inspiration for this?
Here are some ideas for you: how and what to draw every day.
What to draw? 11 ideas for daily drawing.
1. Go through the archives of your drawings and sketches.
The simplest thing is to open a folder with your old drawings and look at them.
What is unfinished about them? Where did the hitch occur? 
Look at the drawing with fresh eyes. Think how to modify or rewrite it.
In addition, immersing yourself in past drawings will immerse you in the emotions that you previously experienced. This may reinvigorate your creative muse. Maybe based on an old idea a new one will arise... And then another picture will be born.

2. Draw something from life.
Take a look around the house: walls, furniture, interior items, potted plants, souvenirs brought from trips that keep your memories. What caught your eye? 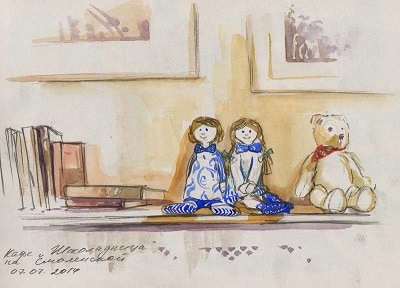
Draw one object. You can add other objects to it and draw the background.
As a result, your drawing can turn out to be very atmospheric, keeping the warmth of the house, your thoughts and memories

I suggest watching a recording of my speech on Periscope on the topic of quick sketches from nature. I hope you find this video helpful.
Sketch of a plant from life
3. Draw an abstract combination of spots.
Unleash your imagination, imagine yourself as a creator and get the most out of the play of color, how the paint flows and mixes, what new shapes and shades you observe. Cast aside doubts and fears. Create! This is great color therapy.
Depict your day, your mood, and capture it in color.


4. Create a hand-drawn recipe.
The process of cooking itself can be very creative. And if you also transfer it to paper... Write down your culinary ideas, make them beautiful pictures, create your unique recipe books. In the future, this will inspire you to continue to create in cooking and drawing.

Don't know how to draw recipes? Watch this video:
Recipe drawing: charlotte with apples!
![]() More interesting and useful information about drawing
More interesting and useful information about drawing
from the artist Marina Trushnikova
You will find in electronic magazine“Life in Art”.
Receive magazine issues to your e-mail!
5. Draw a sweet little something for your friends or family.
This could be a postcard for a holiday - for a birthday, for the New Year, for March 8 or Valentine's Day. Or just a cute impromptu for no reason... 
Receiving a handmade card in the age of email is unusual. Such gestures are always very pleasant.
The emotions of gratitude received in return will certainly give you inspiration to continue the creative process.

6. Practice quick sketches.
Draw people and animals using sketchy human and animal anatomical figures.
To complicate the task, use a timer, setting yourself the time for this work in seconds.

In the future, the ability to quickly draw a human figure will inspire you to make quick sketches.
Watching and noticing interesting stories, types and characters, you will be able to draw, snatching scenes from life: on the street, in the theater, in a cafe, at work.
This will allow you to develop yourself, your worldview and the inner feeling of an artist.
Seconds timer:
7. Practice creating monotypes.
Learn to create monotypes. This will allow you to create without initially thinking about the plot. Monotype will do this for you.
Use your imagination! Experiment! A monotype print will give you many opportunities for spontaneous solutions. Examine the image in the spots and streaks that have appeared. And draw in the spots a little to help the viewer see this image.

 Start painting with watercolors today!
Master the basics of watercolor painting with this popular course
“Taming Watercolor”
8. Draw a graphic design.
Love to draw with a simple pencil or in black and white?
Then try your hand at graphics! This can be drawing a spot with further drawing of details with a pencil, gel pen, ink or marker.
Or maybe you will first make some kind of graphic graphic, and then complement it with a background, add volume to the details, make a fill, fill it with fancy patterns, lines and scatter splash spots.

Practice making doodles!
9. Draw in a travel sketchbook.
Going on a trip? Bring a small sketchbook with you! 
A notebook filled with impressions and drawings (as well as booklets, tickets, receipts, napkins... and other “tourist trash”) will become no less valuable a memory than an album with photographs.

 IF YOU WANT TO:
- learn to quickly record your thoughts and impressions
- remove the fear of drawing in public
- bring beautiful travel books back from travels
then my sketchbooking workshop
will become an invaluable assistant for you in this!
10. Browse the websites of your favorite artists.
Look at their paintings, find something that catches you and touches your soul. Compare different techniques, try to imagine how this or that picture was painted, what the artist felt, what he wanted to say, how he saw the world while working. 
Look at your favorite painting by your favorite artist and try something like this. Or just copy a piece of the painting to study the technique, repeat it as you understand.
In the previous article on how to learn to draw from scratch, I talked about general tips, but rather about the mindset for learning. Now, I want to talk about those things that... I am often asked the question - how to learn to draw? Are there any secrets, training, certain training tactics for beginners...? In this article I would... Pencil drawings step by step. So, a couple more ways easy drawing flowers for beginners. I really hope that these simple lessons will help you learn to draw... Pencil drawings step by step. Despite the fact that some flowers are quite easy to draw, for those who have just picked up a pencil, drawing flowers is... Pencil drawings step by step. Second lesson in the series simple lessons drawing the queen of flowers - how to draw a rose with a pencil step by step. It will be a little more complicated... Pencil drawings step by step. The difficulty in drawing a flower like a rose is to draw the interlacing of the petals. For beginners this task is sufficient... Pencil drawings step by step. Another lesson on drawing trees is how to draw a tree step by step for beginners. The tree that we will draw in this lesson... Pencil drawings step by step. In this lesson for beginners, I will try to tell you how to draw a palm tree step by step with a pencil. A palm tree is very easy to draw, and now... Pencil drawings step by step. The next tree drawing lesson for beginners is how to draw a tree step by step. You will be interested in drawing a tree, because...Pencil drawing lessons step by step are activities that will help you master drawing techniques, regardless of your abilities or age. Drawing is really easy!
PopularDon't believe that you can draw beautifully? Of course, a magnificent oil portrait can only really be painted a real artist, but even Small child will soon be able to replicate the character of his favorite cartoon on paper if he takes drawing lessons for children on our website.
Just think how happy your baby will be when you tell her what happened today we are learning to draw with a pencil! Why pencil? You need to start with something simple. And the easiest way to start is with light pencil drawings. Gradually you will master more and more complex skills. And, as a result, you can move on to working with paints. Drawing for children will become a favorite pastime and will gradually introduce kids to amazing world bright images and favorite heroes.
Fundamentals of pencil graphics taught in art school, you and your child will learn much faster if you go through the pencil drawing lessons step by step on our website. We managed to create activities that even kids can handle! With us, learning is simple and fun, step by step you will understand that drawing is very interesting.
Learning to draw with a pencil
The first drawing lessons for children are designed with the help of adults. Help your child grasp the pencil correctly, support his hand while drawing the very first lines. Little artist should get a better feel for how much pressure you need to apply to get a line of the correct thickness. Then let him draw simple lines in different directions. Afterwards you can move on to simple shapes such as a circle, rectangle, etc.
Gradually, the child’s drawing skills will be strengthened, he will be able to come up with more complex plots himself, fantasize and embody his fantasies on paper. But you need to start with the baby with the simplest objects or characters that are well known to him. When purchasing everything you need, please note that for the first lessons to the young artist You will need a thick, soft stylus that leaves a bright mark with virtually no pressure.
Pencil drawing lessons step by step for children
Talent is given to every person by nature, but developing any abilities must begin with early childhood. By helping children learn to formulate images into pictures, you are doing them a great service. Drawing with a pencil step by step is not only interesting, but also very useful for young children. The impact of development has already been proven fine motor skills hands on mental abilities and psycho-emotional sphere in the very early age. Working with a felt-tip pen or pencil, the baby becomes calmer, more balanced, develops a wonderful aesthetic taste, and develops a sense of harmony in relation to the entire world around him. This is also true for adults: when we learn to draw with a pencil, our nervous system resting. Isn't this the best cure for endless stress?
Why is it so important for parents to also learn art lessons for children? Help your child! Your baby, most likely, will not be able to cope with the first tasks on his own; he is very small and, most likely, has not yet mastered many skills. It is difficult for him to hold a pencil in his pen; he has not yet learned to calculate the force of pressure on the paper, or to correctly navigate within the boundaries of a paper sheet. The started drawing may not fit on the paper, and the baby will begin to get nervous. It is important not to miss this moment, but to help the child skillfully organize classes, then drawing will become a favorite pastime.
Pencil drawing lessons are staged in such a way that the child sees only objects familiar to him. They systematize existing experience little man and gradually expand his worldview, introducing him to new phenomena of nature and life. Perhaps now the baby will take a new look at the world, and you will help him with this.


