How to knit a shirtfront with knitting needles, detailed description. Video: A simple knitted shirt front for beginners.
A simple knitted shirt front for beginners
Start knitting a shirtfront with knitting needles in straight and reverse rows using a 2x2 elastic pattern. Having made the canvas a few centimeters high, close it in a ring and try it on. If the part fits well over the head and clasps the neck sufficiently, you have decided on the number of initial loops (neck width). If necessary, adjust their number.
Follow high elastic band for the future neck with a lapel. Try on the item from time to time to make sure the size is correct. When the fabric reaches about 20 cm, start adding stitches for the shoulders. Make a row of knit stitches, and in the next row - through a loop over the crochet, thus doubling the number of initial loops.
Continue knitting the shirt front using stockinette stitch. To prevent holes from forming in the fabric after yarn overs, knit the arms over the yarn overs, grabbing them by the back walls with a knitting needle. Sew 7-10 cm in satin stitch and bind off the loops. Make a connecting seam and steam the edge of the finished shirt front so that it does not curl.
Fashionable raglan bib
Make a raglan shirtfront without a seam, on circular knitting needles with fishing line. Make a tubular elastic band on them required height, then use bright threads or pins to mark the points of raglan formation. To do this, you need to count the loops and divide the fabric into 4 parts: front and back (equal in width); left and right shoulders (equal in width).
Work on the shirtfront in stockinette stitch, and make a raglan line every row before and after the marks - add yarn over stitches. Knit this way for about 7 cm, then bind off all the loops except the front. Remaining front row knitted shirt front perform on straight knitting needles, from the “face” of the product on both sides, knitting together the two outer loops in front of the edge loop. So knit another 7 cm and close the row.
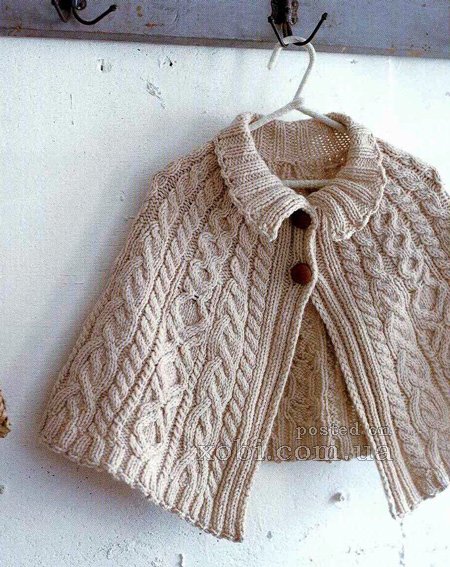
Shirt with buttons
An excellent solution for a children's bib is a product with a clasp, which is very convenient to use. This is especially important for babies who do not like to put things with a neck over their heads.
Start knitting with 1x1 elastic in straight and reverse rows. Make the fabric the desired height, taking into account that the knitted shirtfront will have a lapel. Then start increasing, knitting two from each knit stitch at once. Thus, you will get a 1x2 elastic band, which you need to make 5 rows of. Repeat the increases again, knitting two knit stitches from one loop. You will get a 2x2 elastic band, which you will use to complete 16 rows.
Form a lapel, sew it loosely around the edges. Cast on loops along one of the side edges of the shirtfront and tie the button placket with a 1x1 elastic band. The size is approximately 5 rows. Along the opposite edge, make the same piece, but with holes for fittings. To do this, after knitting a couple of rows with an elastic band, in the third row in the place of the holes, make a yarn over after the front loop. In the fourth, knit the thrown loops, picking them up on the front wall. Finish knitting the placket and sew on the buttons.
Now you know how to knit a shirtfront with knitting needles different ways. The product will look more elegant if you crochet it. If desired, the canvas can be made with jacquard, a relief pattern or decorated with embroidery and appliqués.
A master can knit a shirtfront with knitting needles in less than an hour. This is one of the easiest knitted items to make. For beginner knitters, I would advise starting with a baby shirt. It's a pleasure to work on things for children. I bring to your attention several diagrams describing interesting and at the same time very simple products.
How to knit a baby shirt
 You can connect this thing in two fundamentally different ways. For older children, something made using the circular knitting method is perfect. It does not need to be buttoned and unbuttoned when dressing, it is more practical.
If your baby is still very small, then putting a bib with a narrow neck over his head can be a big problem. In this case, use regular knitting needles. A pattern with a seam will suit you. This product is usually decorated with beautiful buttons or clasps. They can always be altered if the child is uncomfortable.
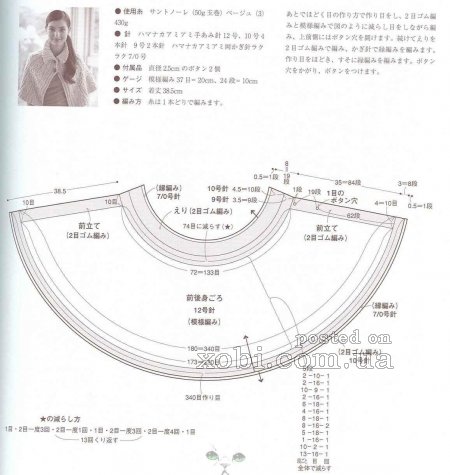
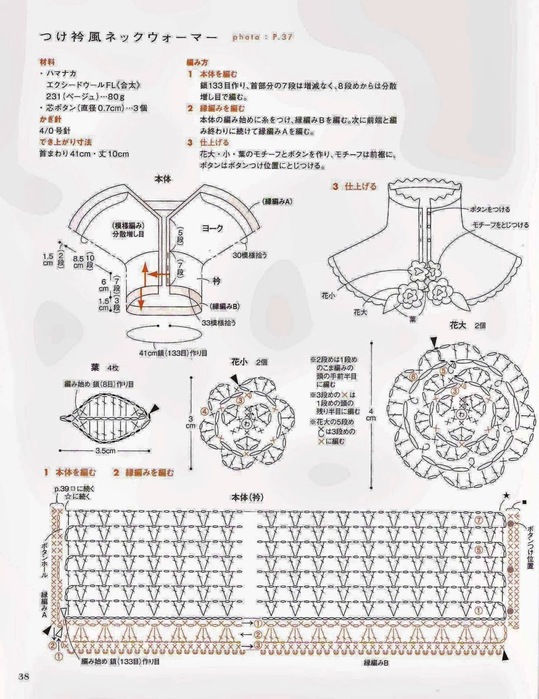
Another way to knit a shirt front for a child is to use the description of the pattern. An example of such a scheme is shown in the figure below. 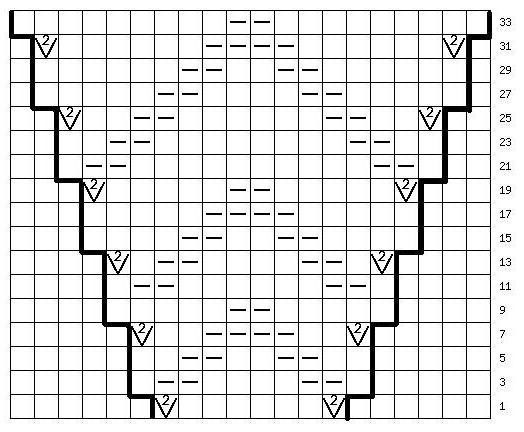
- Using knitting needles, cast on a number of stitches that are a multiple of 8.
- First you need to knit the collar. You can make it any length, with or without a bend.
- After this, proceed to knitting according to the pattern.
- Put marks so as not to get confused in the rapports.
Video: Knitting a stylish shirtfront
Knitting an openwork shirtfront
An interesting shirt-front design for older girls. It is solid and has no seams. 
The shirt front for a girl is made using knitting needles No. 4, 5 and 4. Of course, these should be circular needles. You will also need a hook to make beautiful lands. It will take about 100 grams of yarn.
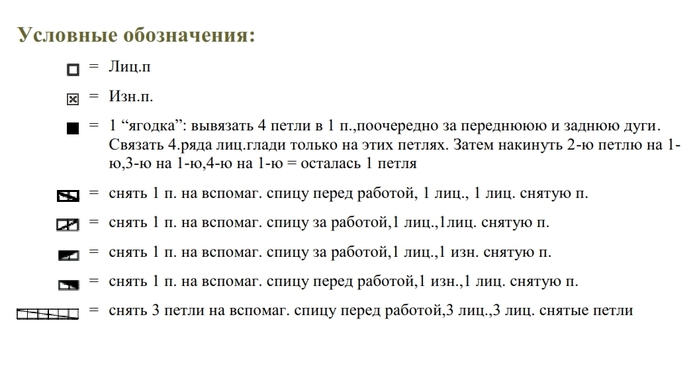
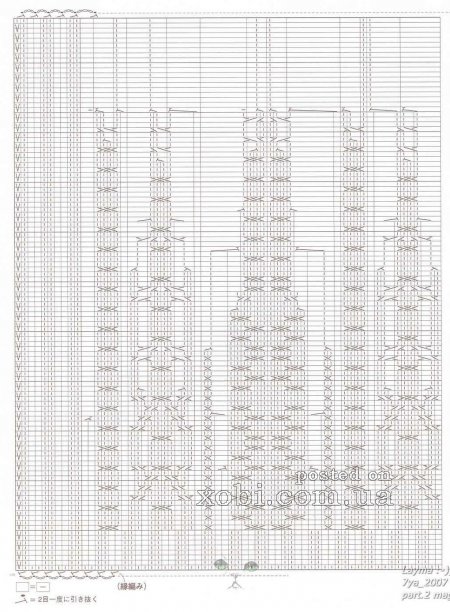
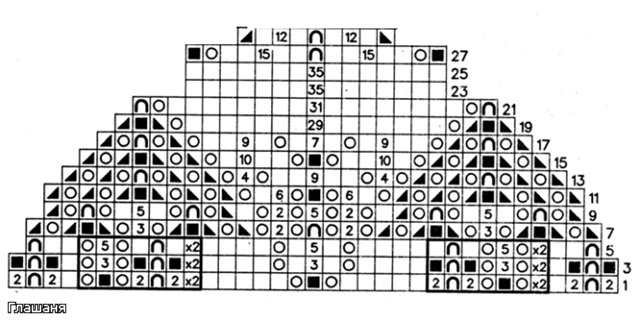
Main pattern: 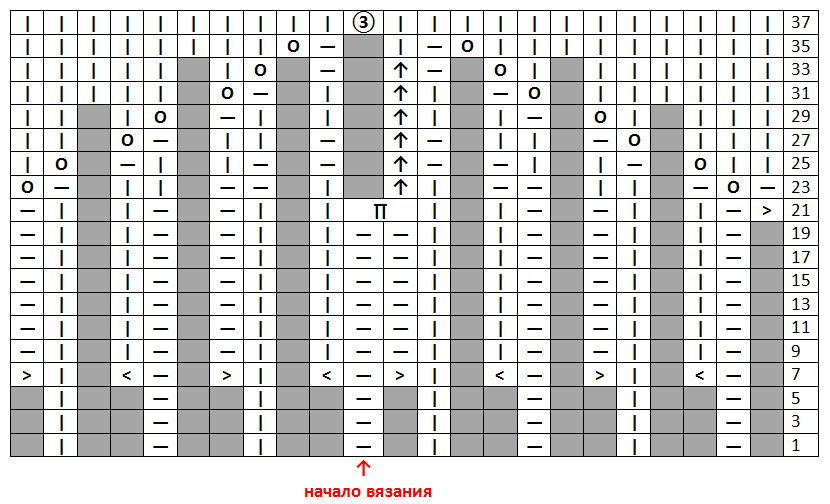 Let's consider symbols to the picture:
  The master will easily understand the principle of performing the work just by looking at the picture above. For beginners we give detailed description symbols.
It's good if you already know how to count stitches for casting on. If not, our articles will help you.
Progress:
- Rapport consists of 8 loops. Therefore, when doing your own calculations, use knitting needles to knit loops in a multiple of 8. For example, let there be 96 of them.
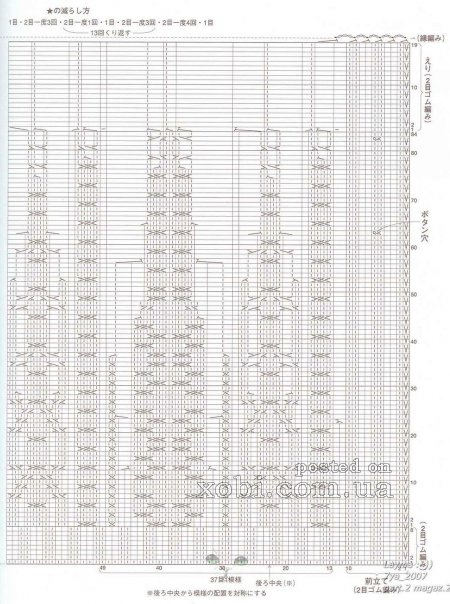
- We tie it in a circle and make a 2*2 elastic band. Its height is approximately 20 cm. Try it on before moving on to the main part of the work so that the child can wear it comfortably.
- Next, we move on to the yoke. The master sometimes makes his own adjustments to the scheme. For beginners, our advice is to strictly follow the description.
- When the work is finished, close the loops and you can begin decorative processing of the edges.
Another incredibly simple and yet interesting model. It is perfect for older girls. 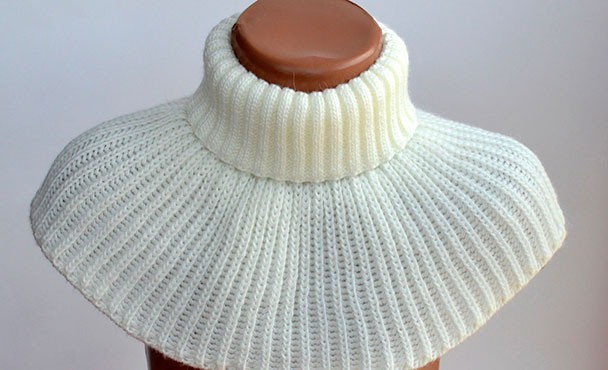
As you can see, there is a 1*1 or 1*2 elastic band all over the canvas – whichever you prefer.
Video: Dickey with a “Leaves” pattern
We knit a warm shirt-front with raglan
For children under 5 years old, it is better to choose the most simple drawings. Patterns that are too voluminous can rub the baby’s delicate skin and create discomfort.
This interesting and at the same time simple little thing is suitable for both a boy and a girl. Just use pink threads instead of blue ones. This is a warm version of the item, so fold the threads in two layers. 
Progress:

And here knitted bib for a girl. Despite everything, this is practically the same scheme as the previous one. The only difference is different threads and the most beautiful flowers for your girl. The beauty of these models is that they are performed exactly the same for a boy and a girl. And you can come up with great decorations yourself.
Video: Simple knitted shirt front for beginners
Models with buttons and contrasting stripes
Another interesting shirtfront for a boy. Again, I want to make a reservation that simply by using yarn of a different color, you can easily turn it into a product for a girl. 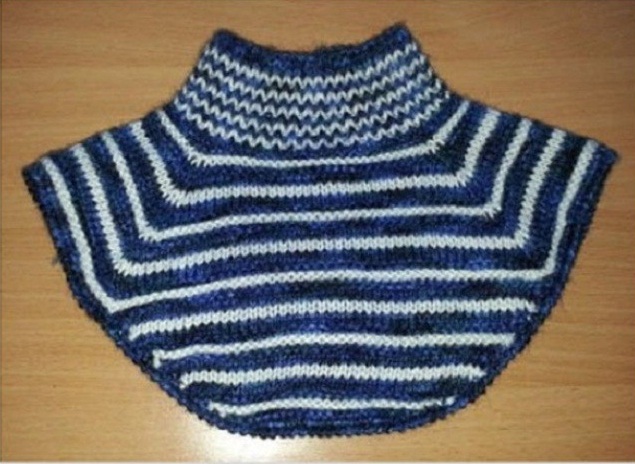
The general description of your work is the same as in the previous diagram. The only difference is the multi-colored stripes, which serve as the main decoration. In general, a children's item should always be bright and attractive. In the example given, the stripes white are made in stockinette stitch, and blue ones are made in garter stitch. Both the back and front are slightly elongated.
For children of any age, a scarf like this, fastened with buttons, is very suitable. For kids it is convenient to use models with buttons - they are easier to put on, you can unbutton them slightly if it is hot. Adults are also delighted with the button-down model. 
To knit one like this, we take large knitting needles (for small children it is better not to use large knitting, but take a simpler pattern), cast on the required number of stitches and knit a scarf. Don't forget to make holes for buttons. Then they fastened it beautifully - and the shirtfront is ready.
Video: Children's shirtfront with a braid
Collection of photo instructions for knitting a shirt front


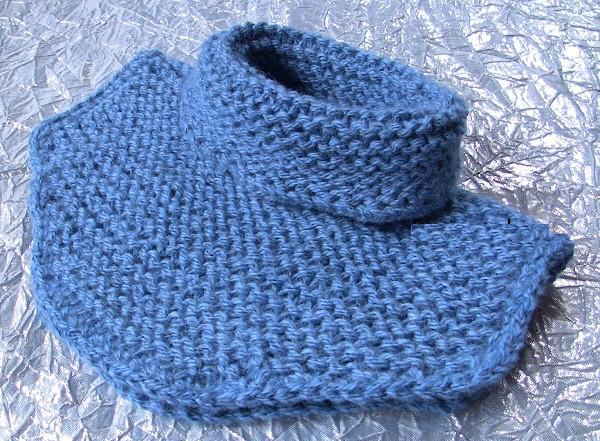
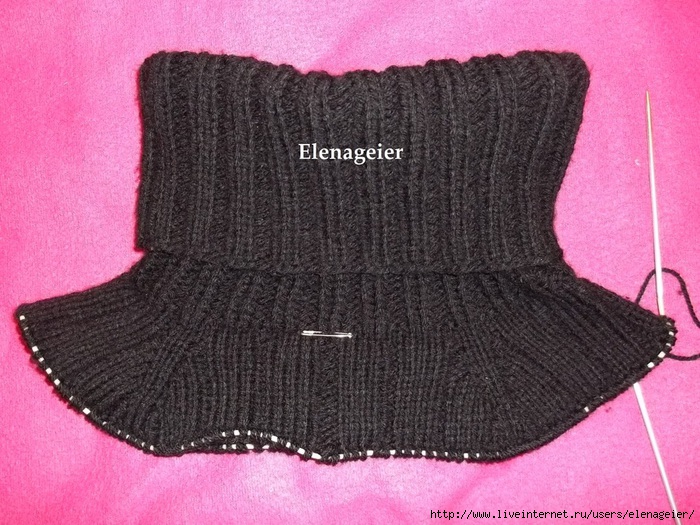
A little background: My mother asked me to tie her neck, but I must say that she is an old lady and quite picky))) this is not so, but that is not so))), in short, we need to make sure that nothing is found anywhere puffed up, did not fold and did not interfere...the most the best choice for such a task - this is a classic, i.e. the simpler the better)))
What to knit from? It seems like a simple question, but... not clear... I, for example, don’t like pure wool... firstly, it usually itches, and if it doesn’t itch it’s quite expensive, and I have doubts that this is PURE wool... secondly, it tends to shrink and pill after washing... oooooh - how many things have I ruined... because I know that you CANNOT wash them in a machine, but you run around during the day and don’t notice how you put a woolen item in the machine, and when you take out a “felt boot”, it’s a pity, and a shame, and an annoyance... This is why I prefer semi-synthetics, and I also like, paradoxically, to re-knit things... nothing will happen to the thread after various treatments))) So this “collar” will be knitted from a sweater that was unraveled five years ago...
There is not much yarn for it, 100-150 grams, no more than for socks))) We knit on 2 needles, because... I haven’t told you how to knit in the round yet))) My thread is quite thick, so I take needles No. 4, I don’t need tight knitting for this product, the neck should be soft and comfortable)))
I’ll say right away that I’ll only draw the principle of knitting here. You will have to calculate everything yourself.
Dickey with knitting needles - how to knit
So where to start?)))
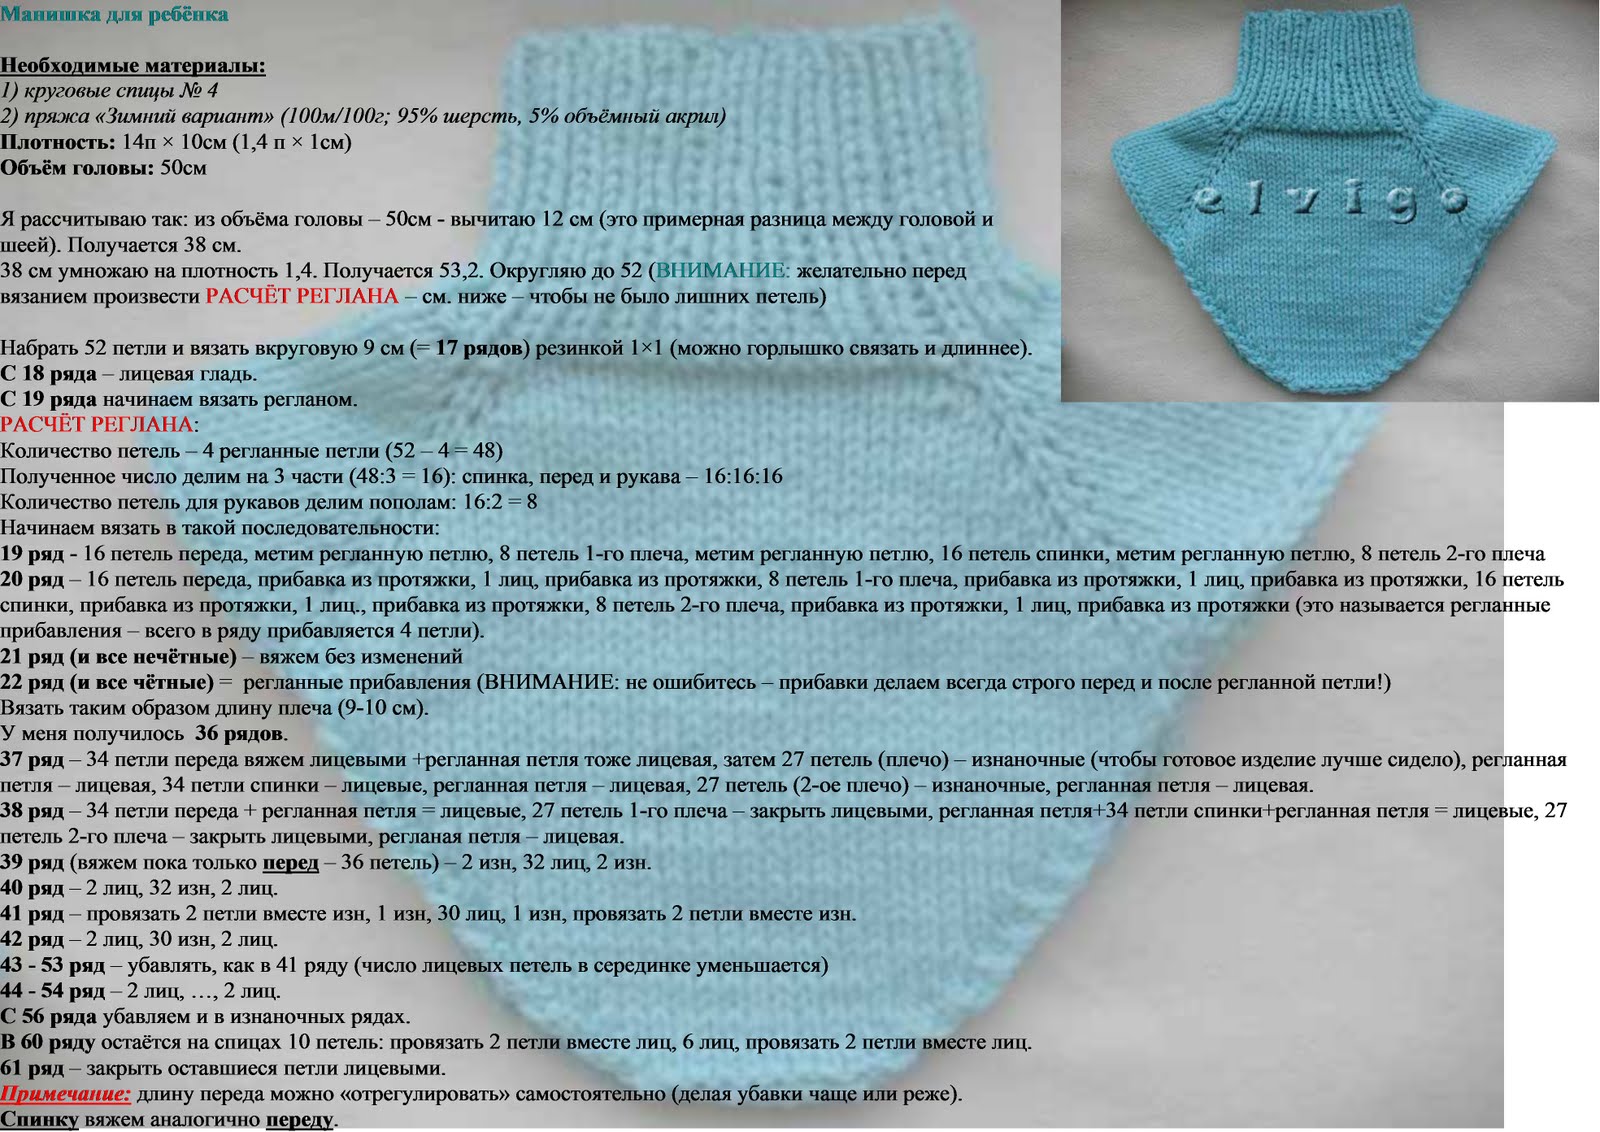
- We take a measuring tape and measure the volume of the head of the potential owner of the future collar - shirt-front. I'm 54cm. When measuring, do not stretch the tape too much!
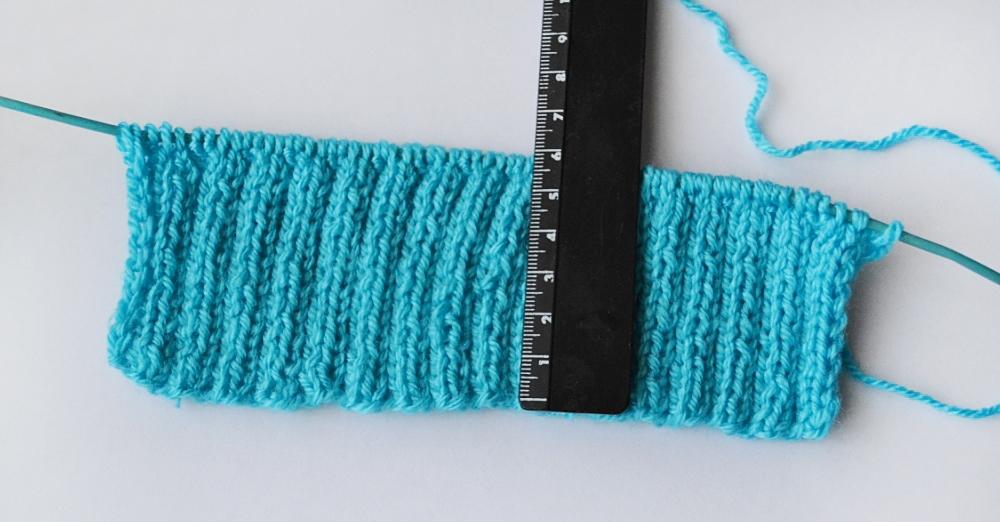
- Next, we cast on the knitting needles 20 loops with the selected yarn and 5-8 rows.
We stretch this sample directly on the knitting needle and measure it along the cast-on edge with a centimeter (at the bottom) ATTENTION!!! This HARMFUL advice! YOU CAN ' T CALCULATE LOOPS THIS WAY!!! ❗ But sometimes you can 😉))) 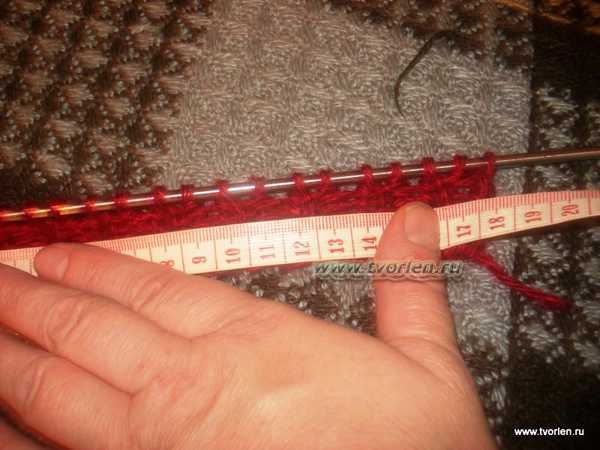
- We calculate the loops (I have 17 cm for 20 loops, so we divide 20 by 17 and multiply by 54 and round to a whole number) and cast on the required number on the knitting needles (I have 64 loops). I'm typing (as I wrote earlier - my favorite set)
- We knit the neck with an elastic band to the desired length. The length depends on whether you have a shirtfront with a turn-up (like a sweater) or just a stand-up collar (I have a 20 cm turn-up collar)
- The throat was tied. Knit 4 rows (2 cm.)
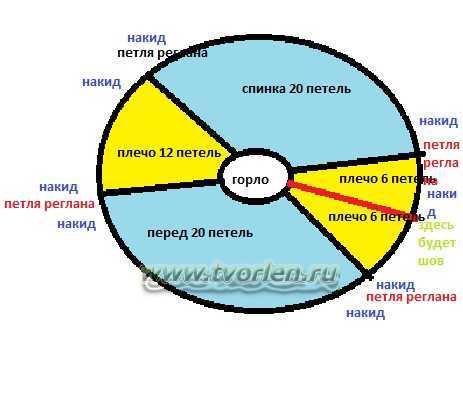
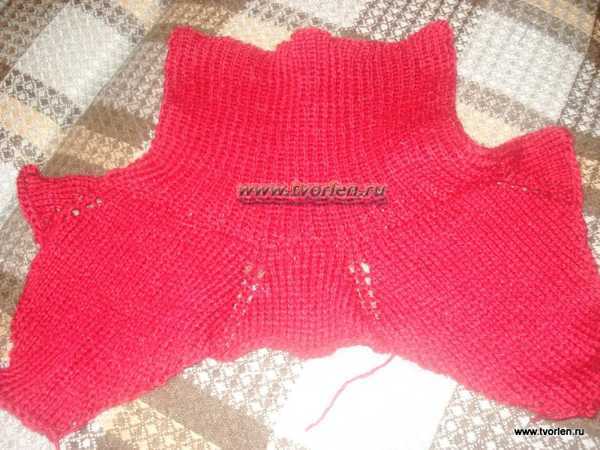
- Now you need to calculate the loops for the back, front and shoulders. You can draw, you can mentally divide total loops into three equal parts, and then one of them into 2 more, in total you will get 4 parts - 2 identical large ones (front and back) and 2 identical small ones (shoulders). Here I distributed it like this: 20 stitches on the front and back and 12 on the shoulders
- Next, we mentally select four loops for ourselves to form the raglan (it will be more convenient if you select the loops of the beginning and end of the shoulder, I have the 1st and 12th loops of the shoulder). Before and after this “raglan loop” we will need to yarn over (we just throw the thread on the knitting needle without twisting).
- Since we are knitting on two knitting needles, we divide the loops of one shoulder into two more 12/2 (half a shoulder), knit with knit stitches (since it is better to make yarn overs in the front row), before the last loop of the shoulder - yarn over, knit loop and yarn over again , then we knit (also knit, since the front row) back loops-20p., yarn over, knit loop, yarn over, shoulder loops completely, before the last shoulder loop - yarn over, knit loop and yarn over again, front loops, yarn over, knit loop, yarn over and the remaining half of the shoulder.
- in the purl row we knit all the loops, including yarn overs
- Next, we knit according to the pattern, not forgetting to make a yarn over in each front row before and after the “raglan loop”. In total, there are 8 yarn overs in each front row. With this we expand the canvas.
- in this way you need to knit about 8 cm.
- In the front row we close the loops of half the shoulder together with the yarn over, knit the loops of the back, close the loops of the second shoulder, knit the loops of the front and bind off the loops of the half shoulder. Only the back and front loops remained on the knitting needle. We knit them separately from each other. According to this principle: at the beginning of each row we decrease one loop, so we knit 13-14 cm. We close the loops.
- Sew the detail. Here you can sew it with a vertical knitted seam, but I haven’t told you about it yet, and I don’t see it in this seam makes a lot of sense(I’ll tell you later), you can connect the edges of the product using or, and you can also just sew it without bothering too much))). The only thing you need to pay attention to is that if you have a shirtfront with a lapel, then you need to sew along the wrong side from the bottom to the middle of the collar, and sew the rest of the collar along the front side of the product.

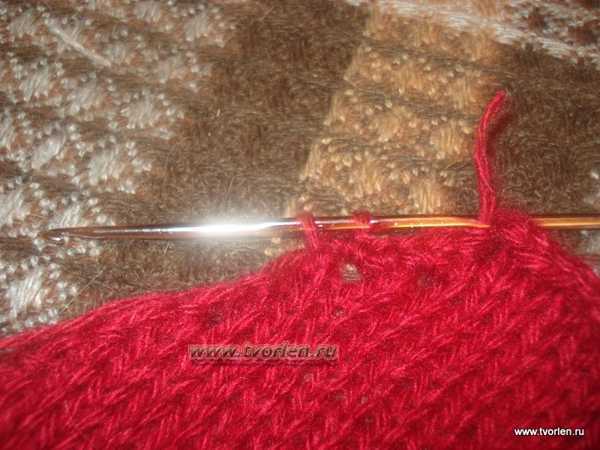
- All. Now we crochet the bottom of the shirtfront with a single crochet for 3-5 rows (depending on the thickness of the thread). It turns out to be crocheted in the round. We end each row with a connecting post, and start the next one with an air loop.
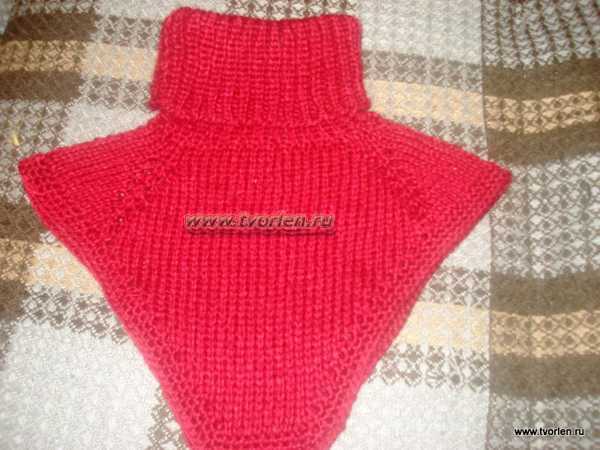
The knitted shirtfront is ready! Mom was pleased! I’m not really... I probably should have made the back equal to the shoulders... but oh well... next time I’ll do it differently)))
Knitted shirt front
In fact, everything is quite simple, that is, elementary, Watson!)))
If anything is unclear, please ask, don’t be shy)))
This is the biggest blog post to date...
And don't forget to leave your comment. Your opinion is important to me!
If you liked the article, then share this information with your friends by clicking the social network buttons! Just a huge request! - do not copy the entire material, please use social buttons! Do not be shy! I’ll help as much as I can 🙂 An idea has arisen - Share! If you find any errors, write to us and we will fix them! I have a desire to help the blog in some way - I will be only too glad! Hosting costs money, and materials are not cheap these days... So, if possible, then help financially))) 
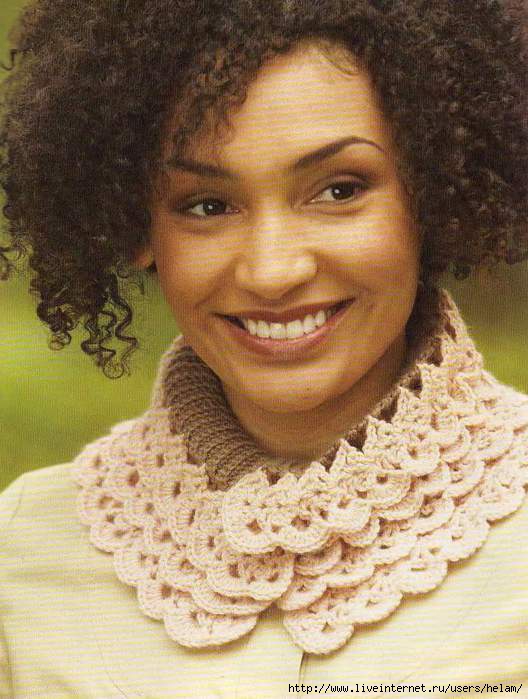
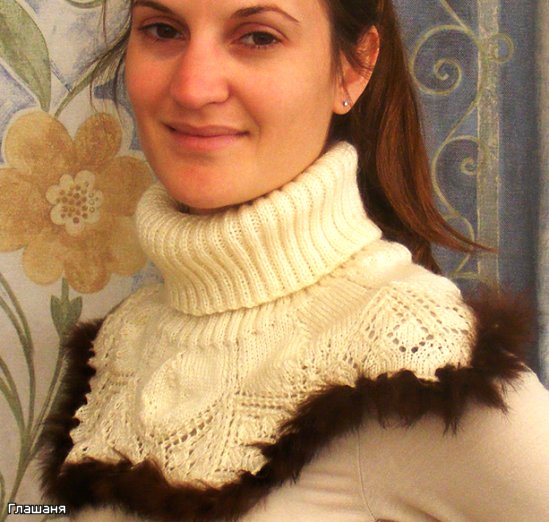
With the arrival of cold weather, every mother thinks about how to insulate her child. The scarf cannot always perform its functions properly, since it has the ability to constantly come untied. We invite you to knit an excellent alternative to a scarf. This accessory is called a “shirt-front”. The shirt front is a collar with a high neck, and the lower part of the product is located on the shoulders. The shirt front is worn not only by adults, but also by children in particular. The product is very comfortable, and most importantly, it will reliably protect you from colds and colds. A master class for beginners with a description, which will be discussed in the article, will teach you how to knit a shirt front for children, namely for a boy and a girl.
Knitting a baby shirt for beginners
Knitting such a simple example will not be difficult. For work, prepare 100 g of soft yarn. This number of threads is quite suitable for a child of kindergarten age. Take circular knitting needles number 5.
Cast on approximately fifty-six stitches and then knit a plain rib pattern for high collar. Knitting should be loose so that the child's head can easily pass through the shirtfront. When you finish the first stage of work, you need to divide all the remaining loops into three. This comes out to eighteen pieces. Eighteen links go forward, and the rest, the same number of loops, go back. The remainder in the amount of two pieces must be added to the front part. You will need 9 stitches for the sleeves.
Tie contrasting threads on all parts of the product to highlight the sectors of the shirtfront. Next, knitting is done with knitting needles in the round. The pattern scheme is chosen by you personally. Knit with the pattern that you are most familiar with, such as a braid. Upon completion of the work, the product is crocheted in a circle.
Original bib for girls
The shirt front for the girl will be made with buttons. This simple master class for beginners can be repeated by every craftswoman. To make knitting, you will need two colors of yarn, circular knitting needles, and a hook number 2. The product is knitted from top to bottom. Cast on seventy stitches with knitting needles and make a fabric whose height should be six centimeters. It will be best if you try the blank on your child and understand whether you need to knit the collar even higher or not. Knit a simple rib pattern as follows: alternate 2 knits. p. and 2 p. n. to the very end of the strip. The first and last stitch should be removed without knitting. Unfold the fabric and knit the row again according to the pattern. When the neckline is high enough, bind off all the stitches of the last row in the usual way.
Next, the work will be done with crochet. The first line will be made with single crochets, by pulling a loop from a loop knitted with knitting needles. The next row is also easy to knit by adding buttonholes in doubles. You need to knit each link of the previous strip with two single crochets. With the help of such manipulations, the shirtfront will cover the child’s shoulders.
To complete the master class for beginners, you need to tie the fabric in a different color and also make buttonholes. In the place where the buttonhole should be, make three chain stitches, and then continue working further. All you have to do is sew it on missing elements, and you can try the shirtfront on a child.


This accessory will be a great addition to children's clothing. They will definitely like its functionality and convenience. Every little fashionista will appreciate such a bright thing.
We knit a shirt front for a boy
The next knitting option will be designed for a boy. The design of the accessory is simple without any frills or decorations. But the child will be warm and comfortable. The pattern is made in garter stitch. The size is designed for a two or three year old boy. This children's item will be knitted from wool yarn.
Cast on ten stitches on straight knitting needles and knit, adding 2 p. two links each. Such manipulations are best done at the end of the strip using yarn overs. Do this work until you count thirty-two loops. This means that you have already knitted a fabric five centimeters high.
Having made another six centimeters, you need to transfer the middle fourteen pieces to the pin and tie the two sides separately from each other. To round the sides of the fabric, bind off in every second strip twice, 1 stitch each. Having completed another 13 cm, bind off for the shoulder bevel in every second line, once 3 stitches and once 4 stitches.
The back of a boy's shirtfront is made in a similar way. Transfer the loops from the back to circular knitting needles to continue knitting the collar. Raise four links where the buttonholes were cut in the front and fourteen pieces in the back. Knit another 10 cm in height and close the remaining loops with a crochet hook. The baby shirt is assembled very simply by sewing the shoulder seams.
Knitting is the easiest for children, since the size of the item is not large, so little time is spent on work. All completed lessons with descriptions can be pinned interesting video material that will show in detail the process of knitting a shirt front for children.
Video: Method of knitting a shirt front
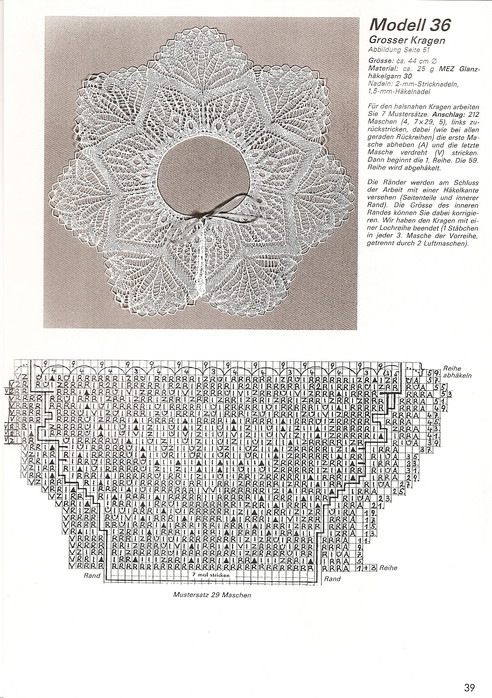
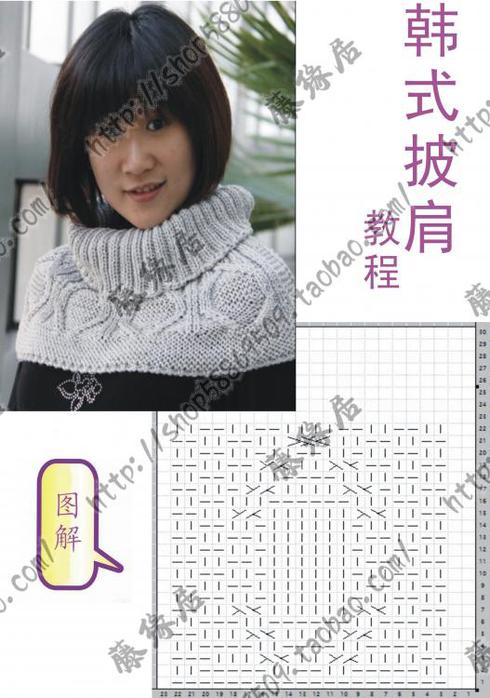
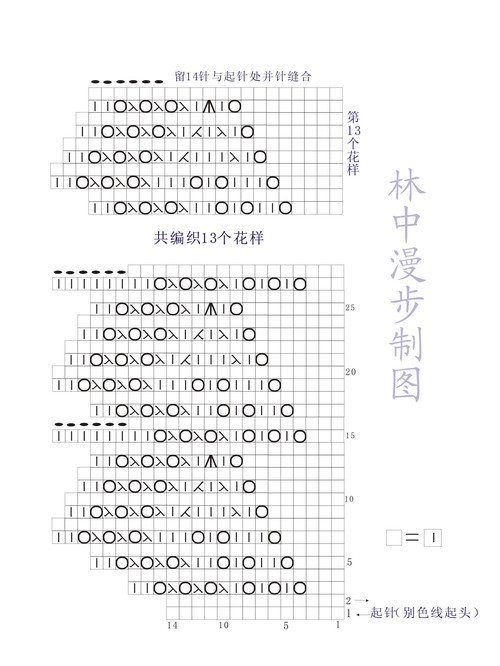
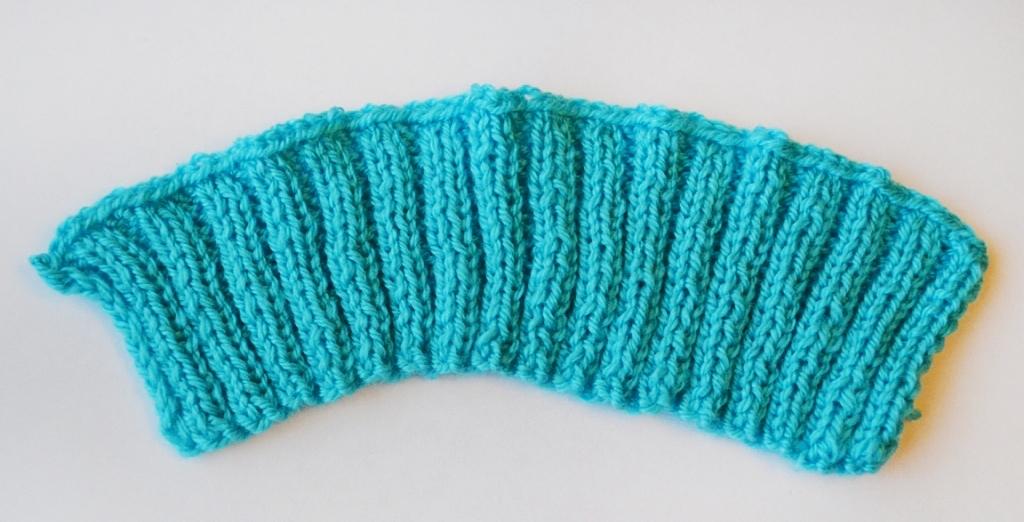
Cast on 67 stitches (edge stitches are included in this count).
Row 1 - slip 1 loop, k40, p12, p1, (1 yo, 2 knit stitches together) - 6 times, 1 yo, p1.
Row 2 - slip 1 stitch, k27, purl 1. and turn back without knitting to the end of the row
Row 3 - slip 1 stitch, p12, k3, (1 yo, 2 knit stitches together) - 6 times, 1 yo, p1.
Row 4 - slip 1 stitch, k29, purl 1. and turn back.
Row 5 - slip 1 loop, p13, k4, (1 yo, 2 knit stitches together) - 6 times, 1 yo, p1.
Row 6 - slip 1 stitch, knit to end of row, purl 1.
Row 7 - slip 1 loop, k40, (1 yarn over, 2 loops together knit.) - 14 times, 1 yarn over, purl 1.
Row 8 - slip 1 stitch, k31, p1. and turn back.
Row 9 - slip 1 stitch, k31, yo 1, purl 1.
Row 10 - cast off 5 stitches, knit 13, purl 13, knit the rest to the end of the row, last stitch purl.
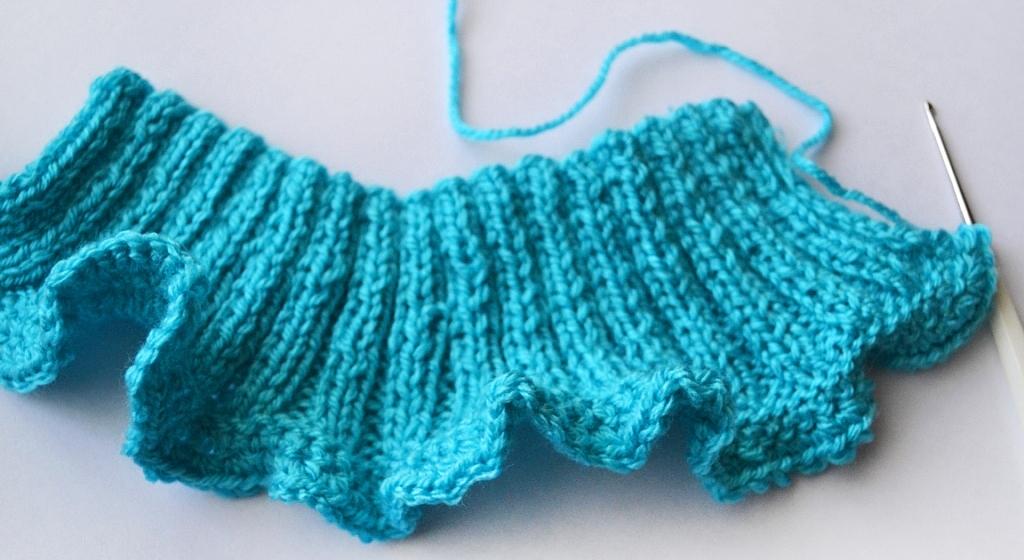
Repeat the pattern from the first row. These ten rows make one clove; there are 35 cloves on my shirtfront.
Cast on 67 loops, including chrome.
Slip 1-1p, k40, p12, k1, *k1, k2tog.*-6 times, k1, p1.
Slip 2p-1p, k27, p1, and turn back without knitting to the end of the row.
Slip 3-1 stitches, p12, k3, *k1, k2tog.*-6 times, k1, p1.
Slip 4p-1p, k29, p1, turn back.
Slip 5p-1p, p13, k4, *k1, p2tog*-6 times, k1, p1.
Slip 6p-1p, knit to end of row, purl 1.
7p-1p.slip.40k, *1k, 2p.knit together.*-14 times, 1k, 1p.
Slip 8p-1p, k31, p1, turn back.
Slip 9p-1p, k31, k1, p1.
10p-5p. Close off, k13, p13, the rest to the end of the row of knits, p1.
Rows 1-10 - you get 1 “teeth”, repeat until the required shirt size (we have 32 “teeth”).
On and how to tie 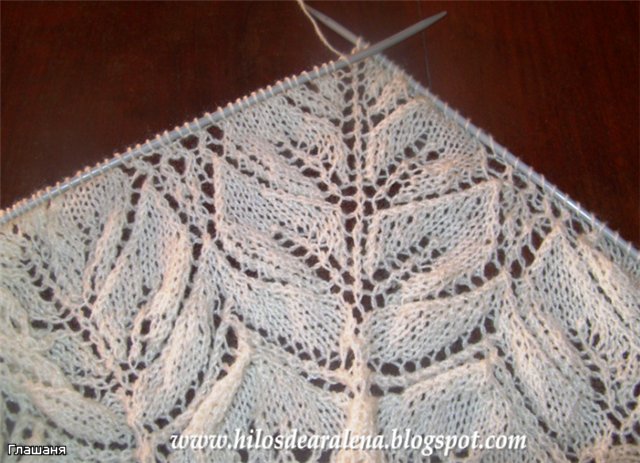

![]()

 xn--80a6amn.xn--80aafud2a4a...-iz-listev
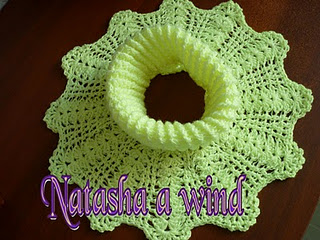
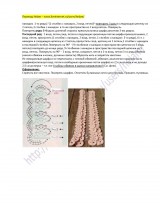
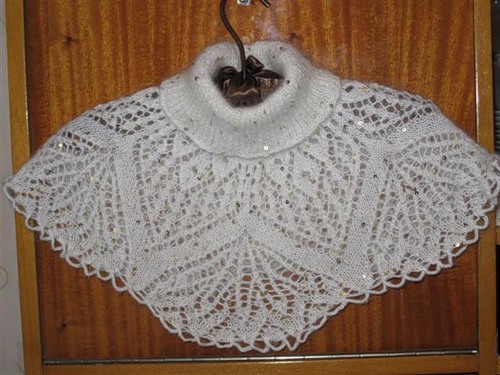
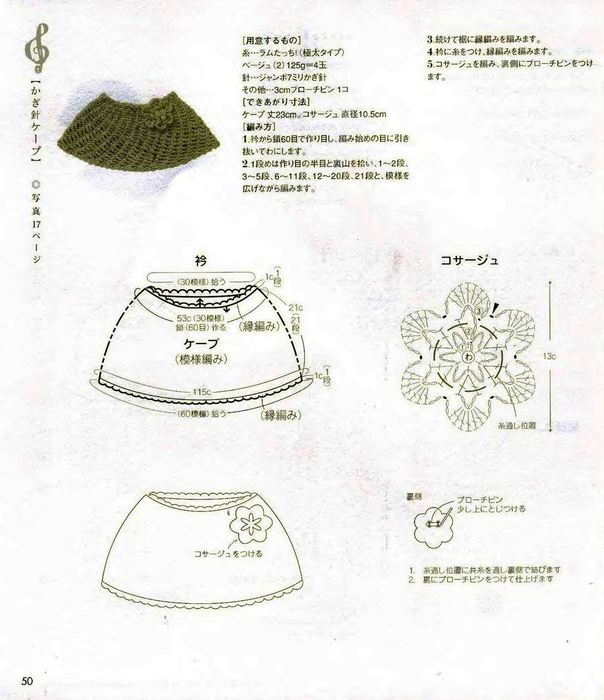
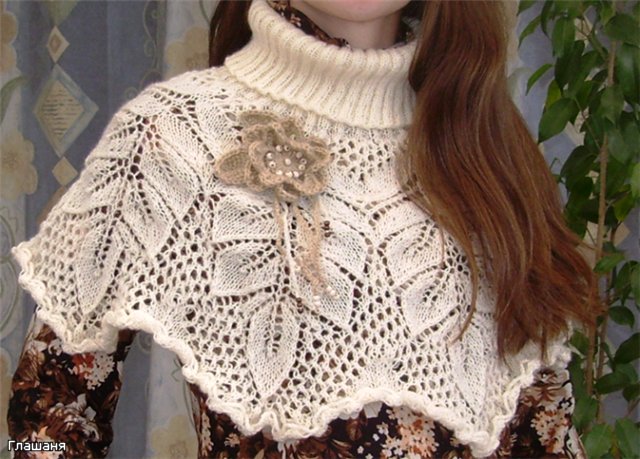
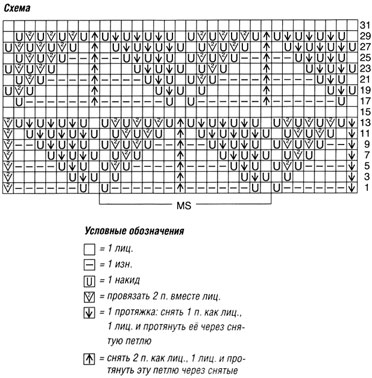
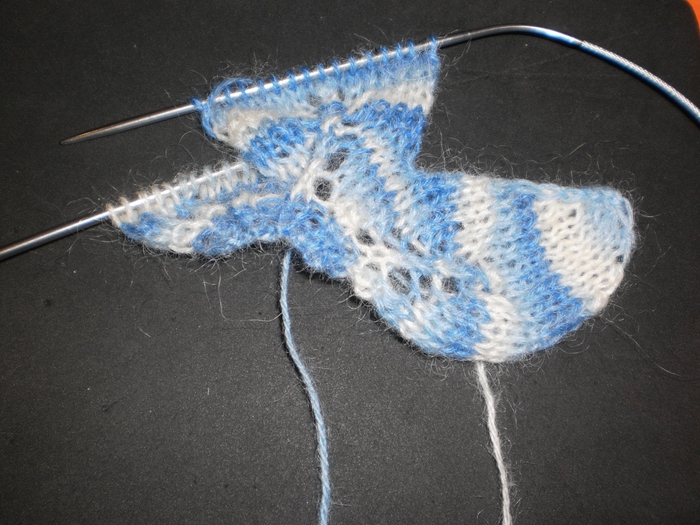
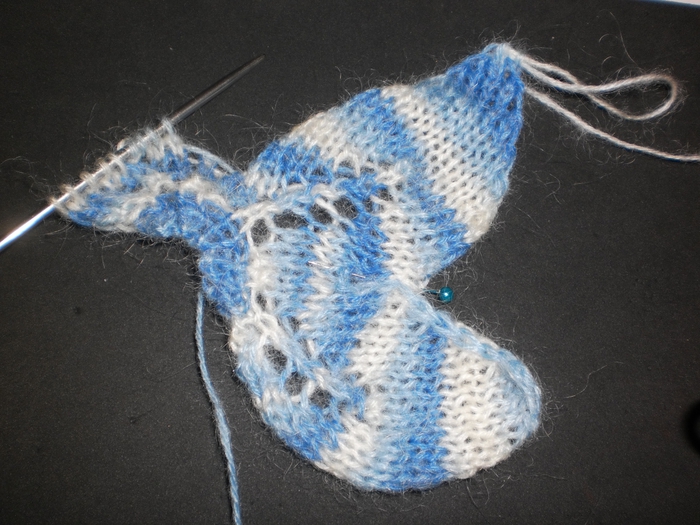
A small warm shirtfront with a border of leaves. First, the border is knitted according to the pattern. Start with waste thread. We knit a chain of air loops of arbitrary length, on
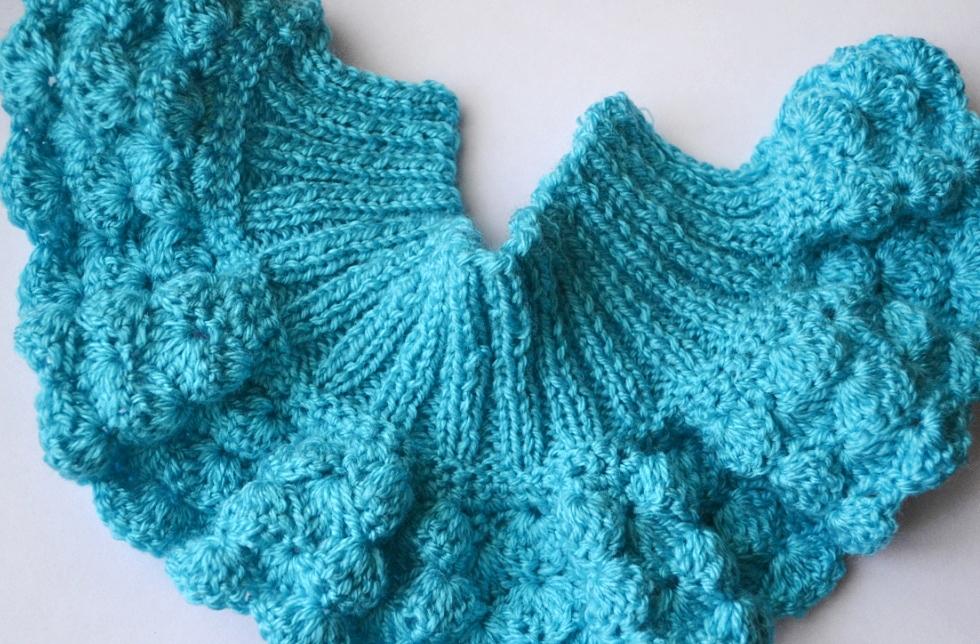
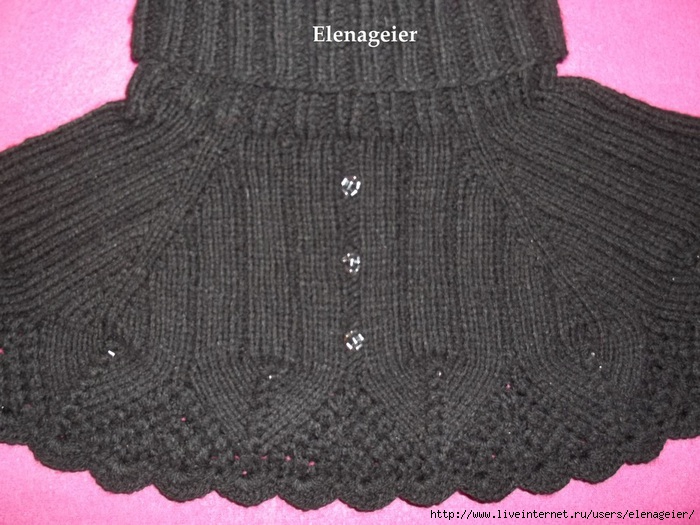
I cast on 96 stitches on circular needles and knitted an elastic band with 2x2 circular needles. I knitted the elastic band high so that it could be folded into 2 and 4.
After the elastic band, I divided it into 4 equal parts in the form of 2 knit stitches from which I added a loop in both directions (every other row). And between these 2 knit stitches I knitted like this: 1p.-4k.p.-1i.p.-4l.p.-2i.p.-4.l.p.-1i.p.-4l.p.- 1p. They turned out 4 times, and between them (let me remind you) 2 facial ones. I knitted the desired length to the shoulders, adding loops through the row.
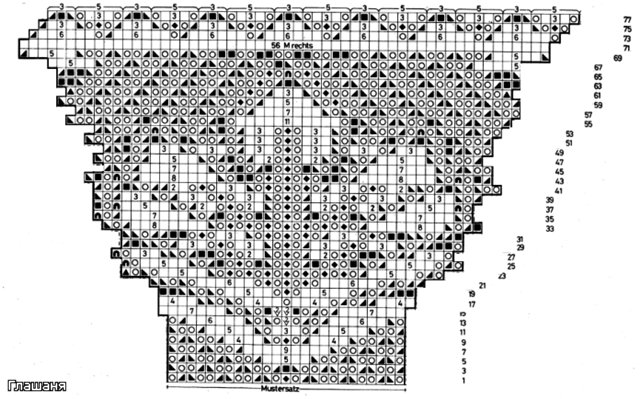
When I had 208 stitches on my knitting needles (should be divisible by 16), I knitted a couple of rows, and then according to the pattern:
I did a little my own way: in the pattern, instead of purling stitches, I knitted with knit stitches. And because I knitted with circular knitting needles, then I made a row according to the pattern, the next row was all knit.
When I finished the drawing, I knitted rows 15 and 16 with knit stitches and then closed off all the loops. Then I crocheted the shells. I used small pebbles (hematite) to make 3 button flowers, and a pebble in each part of the design.


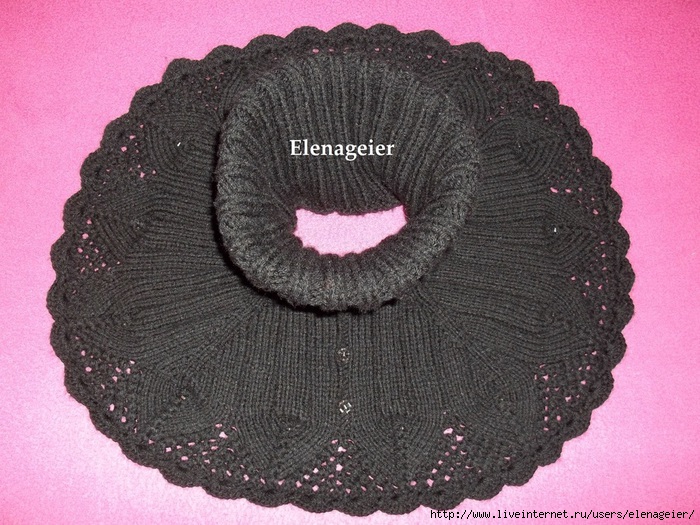
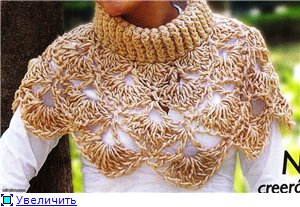
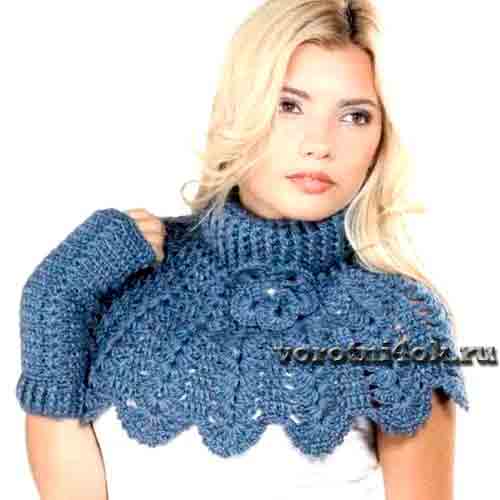
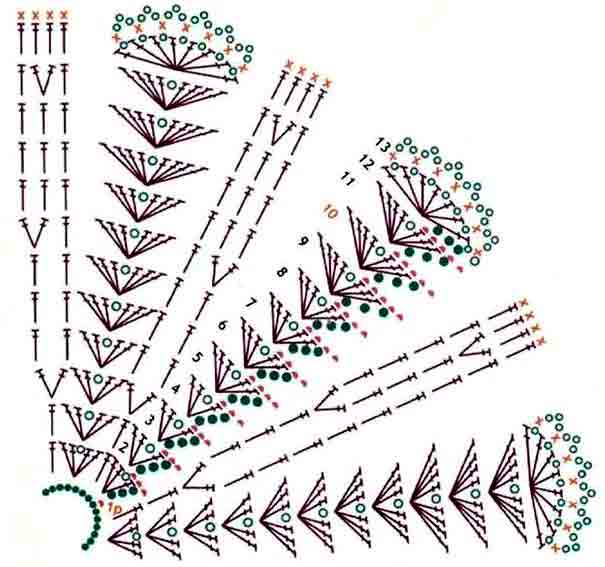
Very very fast and very stylish
We knit from thick yarn in one evening
I want to offer you very interesting idea knitting a shirt front. It knits very, very quickly. Oncrochet shirt frontit will take you no more than three hours.
To knit a shirtfront you will need: very thick soft wool yarn, hook number 9-10 and circular knitting needles.
Knitting a shirtfront begins with crochet. The basic pattern shown in the diagram below is knitted. Thus, four rows are knitted. Thus the width should be 26 cm.
When all the main rows are knitted, we begin knitting the very neck of the shirtfront. On circular knitting needles we cast on loops in a circle and knit with a regular elastic band in the round (height about 15-20 cm).
That's all, crochet shirt front finished. This shirtfront can be worn either instead of a scarf or as a cape.
Wear and enjoy the warmth.
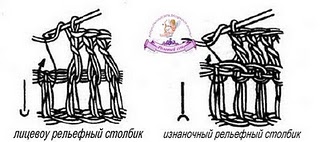
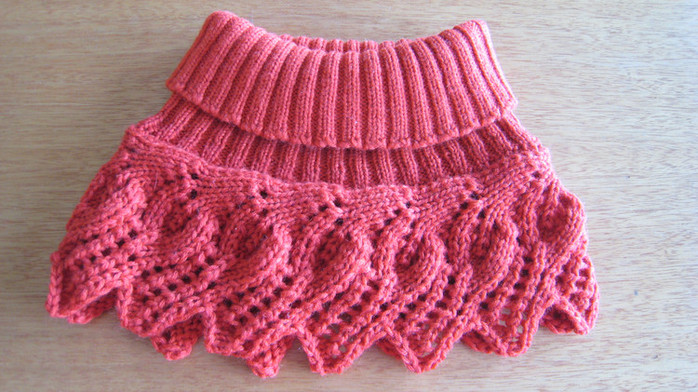
We will need approximately 320 g of yarn, hook number 4, 4.5.Using hook No. 4.5, cast on a chain of 68 chain stitches. and knit in a circle with a relief elastic band according to pattern 1. So about knitting 9 cm with crochet number 4.5.
Then take hook number 4 and knit another 9 cm.
Relief column.
Then, using crochet number 4, continue knitting according to pattern 2, making increments accordingly. On the 13th row we finish knitting.
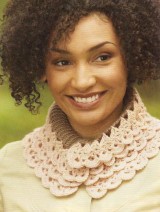
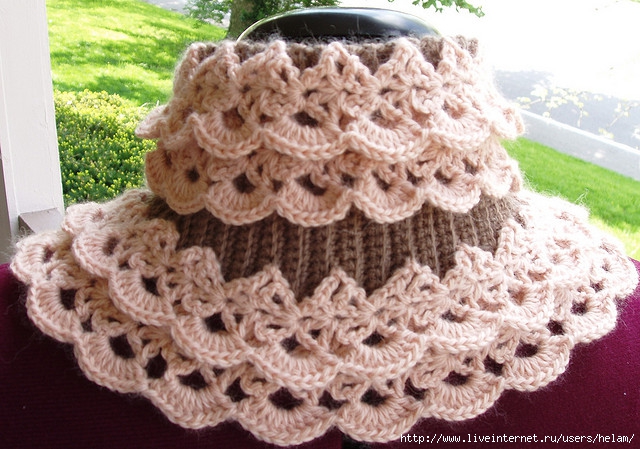
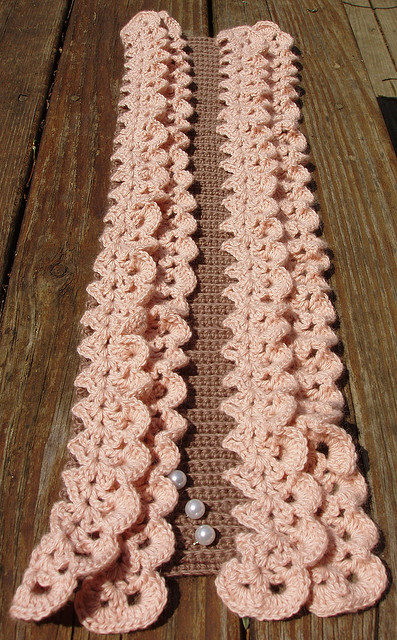
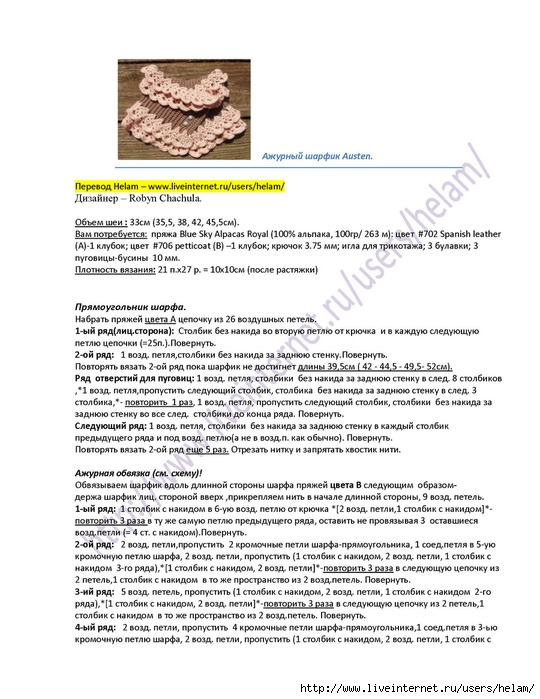
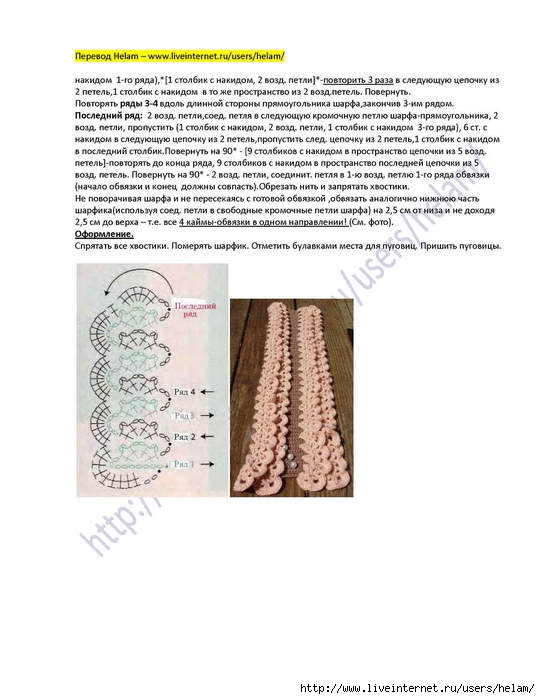
Austen Lace Muffler openwork scarf collar!
Designed by Robyn Chachula (crochet artist) and featured in Interweave Crochet.
A beautiful and quite easy to make scarf!
I made a translation at the request of a reader...Click - the pictures will enlarge! Then click a second time!
Dickey, crocheted, from the magazine Knitting for adults. Yarn consumption 250g, hooks No. 4 and 4.5.
The shirt front begins to be knitted with a chain of 68 chain stitches using crochet number 4.5. An elastic band made of convex and concave columns knit 9cm, go to hook number 4 and knit another 9cm. Next, knit the pattern with “fans” according to the pattern.
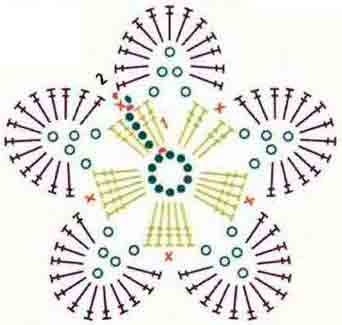
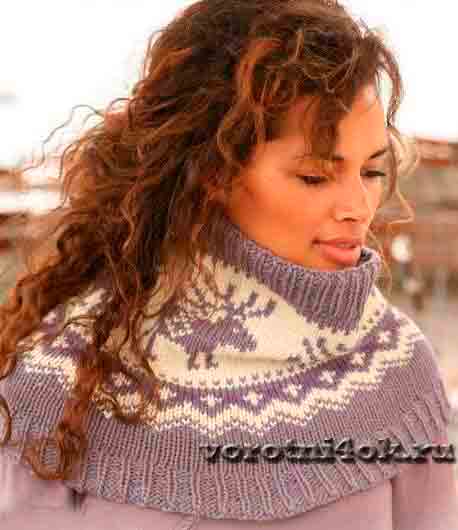
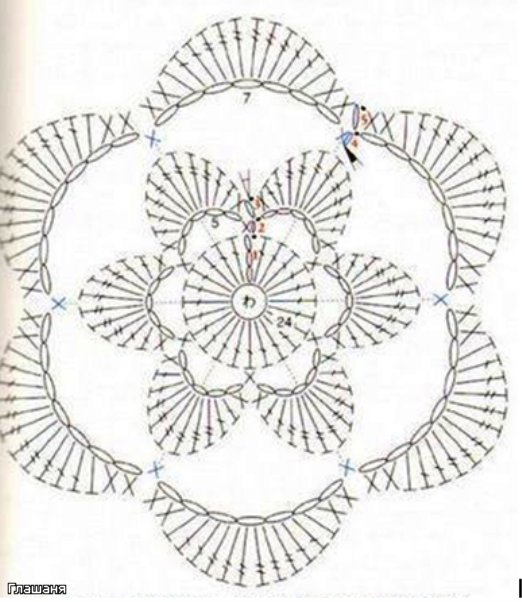
Tie a flower and sew it to the shirtfront.Dickey " Reindeer"
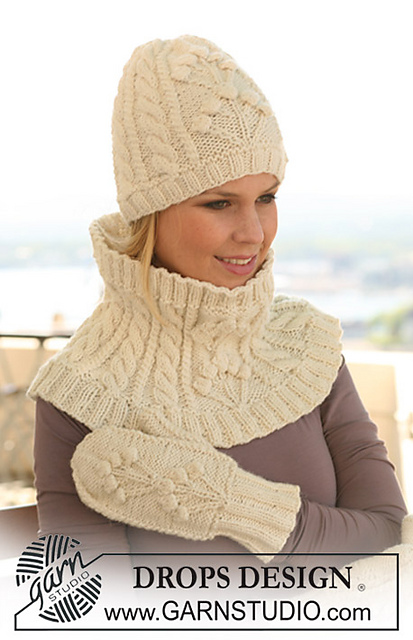
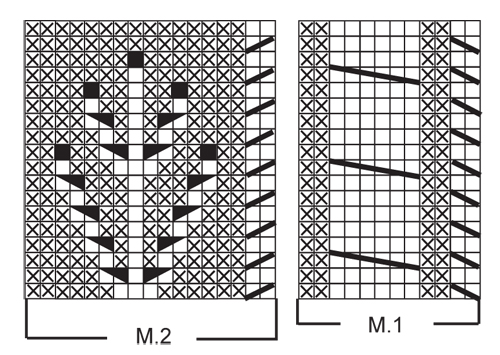
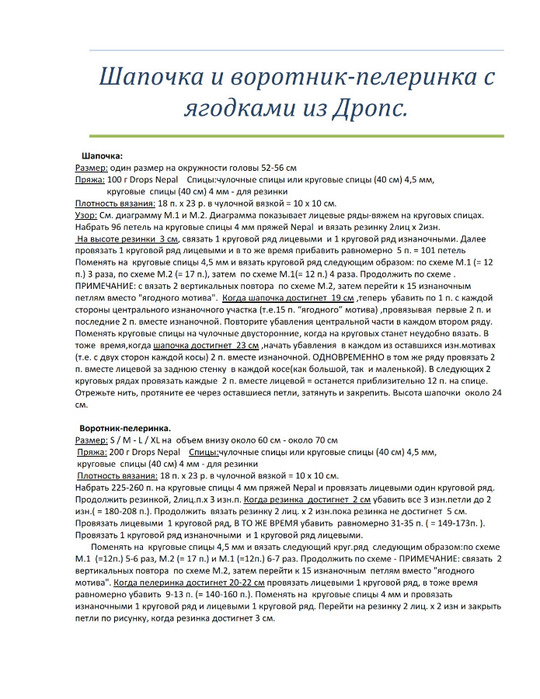
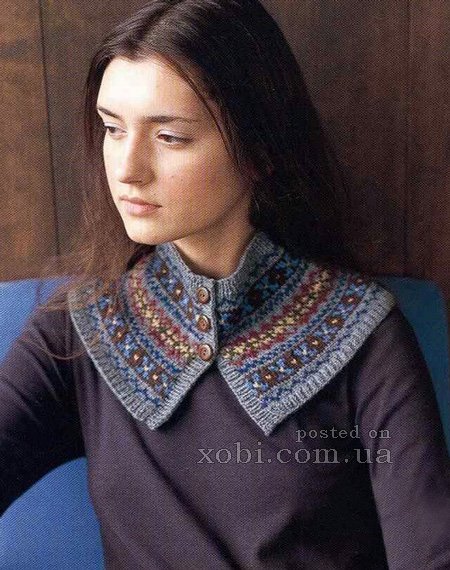
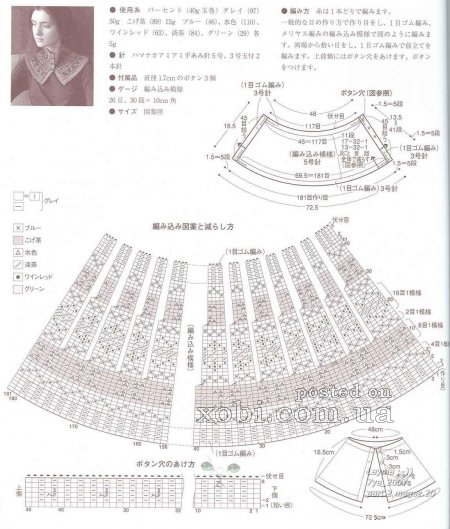
The Reindeer shirtfront from DROPS DESIGN magazine is knitted from 260g of yarn (65; wool, 35% alpaca; length 75m/50g) - 150g gray-lilac, 100g natural white, 10g purple; circular needles No. 4 and 5. Shirt height 31cm.Knitting density: 17 stitches and 22 rows in a 10x10cm square.
On circular needles No. 4, cast on 216 stitches with gray-lilac yarn and knit with a 1x3 elastic band. At a height of 2 cm, from every second 3 purl loops, knit 2 loops, at a height of 3 cm, make decreases in the resulting groups of their 3 purl stitches. Knit the remaining 162 loops to a height of 4cm.
Switch to needles No. 5 and knit 1 row, evenly decreasing 42 stitches. Knit on the remaining 120 stitches geometric pattern. After this, knit 1 row with white yarn, evenly decreasing 10 stitches.Knit a pattern with deer on 110 stitches, decreasing according to the pattern. After the deer pattern, 85 stitches remain on the knitting needles. Knit 1 row with gray-lilac yarn, evenly adding 29 loops.
On 114 loops, knit with a 1x2 4cm elastic band and loosely bind off the loops.
Shirt with buttons
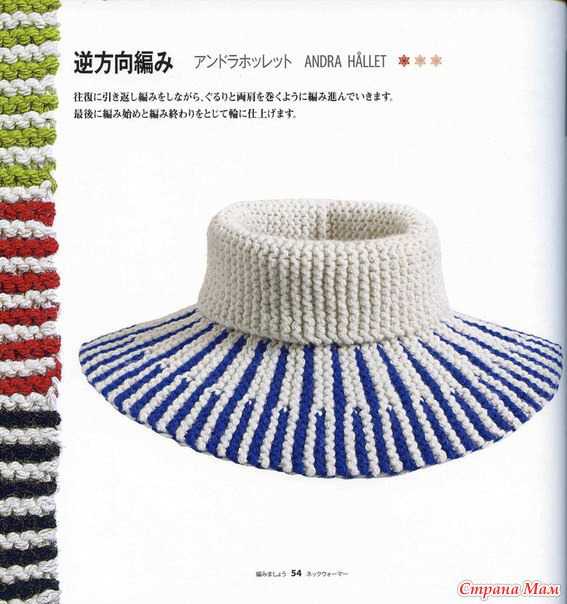
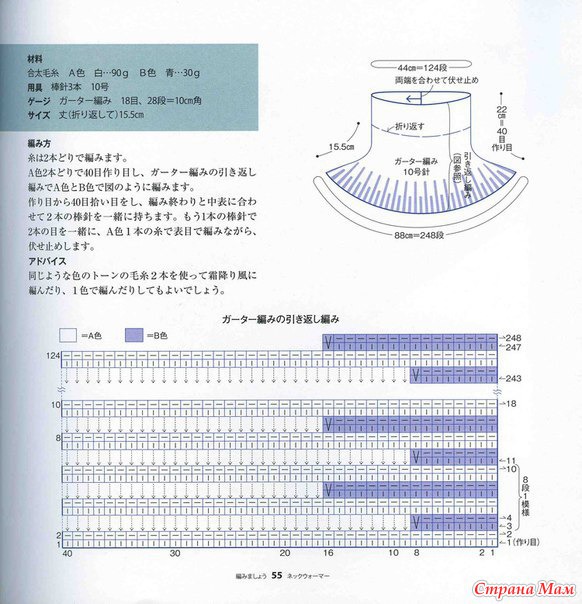
Shirt from Drops Design magazine, knitted in short rows in garter stitch. This shirt-front is especially convenient because it is not worn over the head, that is, it does not spoil the hairstyle.
The shirtfront is knitted from 200g of pure wool yarn, 100m long in 100g, knitting needles No. 8.
Having cast on 28 stitches, knit 6 rows in garter stitch and 3 rows in stocking stitch, making buttonholes on the purl row - 3 purl, *2 together, yarn over, 5 purl*, 4 purl. In the next row, knit yarn overs.
Next, shortened rows are knitted in garter stitch. Knit 15 loops, turn the work and knit 15 loops in the opposite direction, knit 19 loops in the forward and reverse directions, knit 2 rows in garter stitch on all loops. Repeat this technique until the length reaches 36cm on the narrow side of the shirtfront. Knit 3 rows in stocking stitch and 6 rows in garter stitch. Sew on 4 buttons.
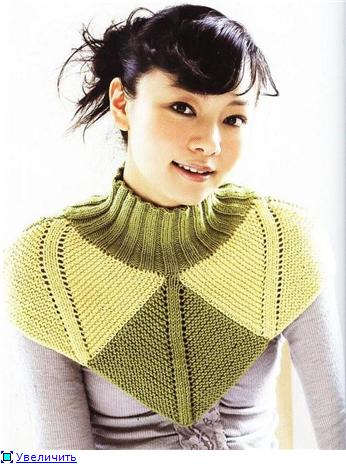
To work, you will need two skeins of yarn.
“LILY Castle” (50 g - 350 meters, composition 60% alpaca, 30% merino wool, 10% acrylic), knitting needles No. 3, straight and circular.
For the top part, cast on 98 stitches on straight needles, folding two threads from both skeins at once. Knit 2 knit stitches, 2 purl stitches with an elastic band. Height - 28-30 rows, about 17 cm. We start knitting with one knit stitch, then 2 purl stitches, 2 knit stitches and so on until the end of the row. The row ends with 2 purl, 1 knit, 1 edge loop.
Then we distribute the loops as follows:
1 edge stitch, 1 raglan loop, 10 knit stitches, 2 raglan loops, 10 knit stitches, 2 raglan loops and so on until the end of the row. At the end there is one raglan loop and 1 edge loop. Total 8 raglan lines.
Every middle 10 stitches between raglan lines and the even raglan lines themselves are knitted in garter stitch (knit stitches in knit and purl rows). Odd raglan lines are knitted with knit stitches on knit rows and purl stitches on purl rows. On both sides of them, one loop is added in the front loops. The added stitches in the purl rows are knitted with knit stitches crossed.
Every middle 10 stitches between raglan lines and odd raglan lines are knitted in garter stitch (knit stitches in knit and purl rows). Even-numbered raglan lines are knitted with knit stitches on knit rows and purl stitches on purl rows. On both sides of them, one loop is added in the front loops. The added stitches in the purl rows are knitted with knit stitches crossed.
Repeat rows until the required length of the product. At the same time, we continue knitting on circular knitting needles.
The last 3-4 rows are knitted without any additions in garter stitch.
In the photo, the raglan lines are numbered in red numbers.
If there are not eight raglan lines, but four, then the shirtfront will be in the form of a quadrangle.
another way:
1. Cast on the required number of stitches onto the knitting needles with the rubber edge. Usually this is from 60 to 80 loops. The number must be divisible by 3, and the quotient must be odd. We knit the neckline of the desired height with a 1x1 elastic band.
2. We knit two rows with a 3x3 elastic band. Then we start increasing. We knit one loop from the jumper between the loops before and after the front wedge. We make increments in every 6th row. If the yarn and knitting needles are thick, then add in every 4th row.
3. We knit in this way until the desired length of the shirtfront is achieved. We close the loops according to the drawing.
4. We knit the strips with single crochets.
5. To give rigidity, we tie the edge of the bar with loops in one row of “crawfish step”. We do not tie the bar with loops.
6. Crochet the edge of the shirtfront itself. A pattern of double crochets and arches of air loops.
5. Sew on the buttons.
You can also knit on circular needles or stocking needles
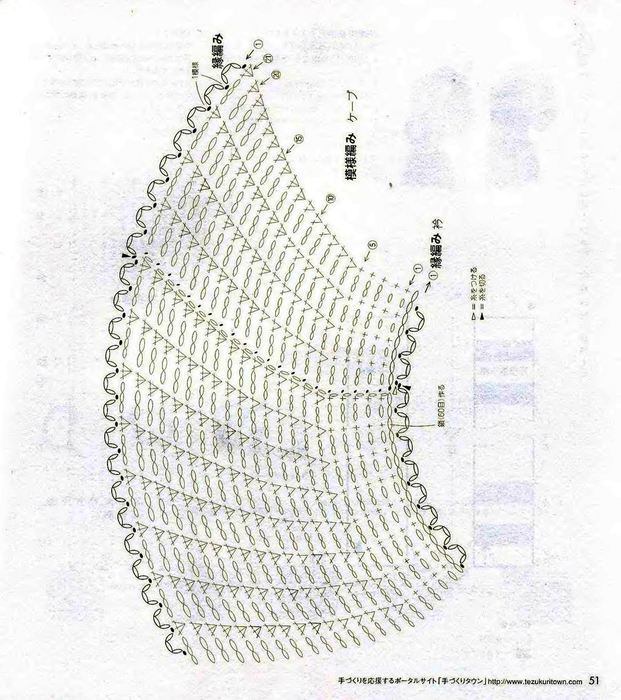
You start knitting from the neck, cast on the required number of loops on stocking needles, distribute the loops on four needles and knit with a 1/1 elastic band (or any other) as many centimeters as you need to the shoulders or more (if you want with a lapel). Then distribute the loops on the front and back more than on the sides (for example: 80 loops = 1st knitting needle - front 25 sts, 2nd knitting needle - side 15 sts, 3rd knitting needle - back 25 sts, 4 -th knitting needle - side 15 p.) and knit like raglan.True, the quality of the pattern is not important, so I had to draw mine on the Knitting Box website 1. We cast on the number of loops, a multiple of 3, without edge stitches, and knit them with a 1x1 elastic band as many as we need to make a collar lapel. after this we begin to knit the leaves according to the pattern (be careful in each leaf there is an expansion and an increase in the number of loops)
2. We knit all the leaves together with additions up to the 9th row (according to the pattern), i.e. up to 3 air loops per sheet.
3. After this, we begin to knit each leaf separately (I indicated the rise of air loops to be 6, but you can make 8 or more additions), the more air loops you add, the larger and longer the leaf you will get.
4. When the last 3 loops are closed, you can tear off the thread and move on to the next leaf, but I decided not to break the thread and simply tied the inner edge with single crochets.
5.Move on to the next piece of paper:
6. When the second and all subsequent ones are knitted , just try on how many stitches you need to sew together. In the diagram I showed 3 loops with red dots - connect. You may have more, or you may have less.
7. In the photo I showed the pinning loops.
By the way, if you sew loops on some leaves, not on others, on some more, on others less... then you can get a different effect.
8. If the thread is not very dense, then the scarf should be steamed.
9. If the thread is thick, the leaves will immediately turn out large. If it is thin, then you need to increase the number of yarn over loops.
Incarnation with Ravelry!
2.
Beautiful shirtfront with a multi-colored pattern knitted on three buttons.
I got in touch with this shirt-front :) Threads
Radugina Angora Ram in 2 additions. Knitted approximately according to the pattern of this children's blouse: , and approximately due to the fact that there are errors in the pattern - somewhere in the region of 7-9 rows and from the 23rd (here I generally knitted on a whim). But the scheme is simple; where the errors are is immediately clear. The petal is narrowed by knitting the middle 3 loops with a double pull and yarn overs on the sides of the petal.
The knitting density is 13 loops and 10 rows in a 10x10 cm square. Knitting begins with a chain of 59 air loops (8 repeats of 7 loops + 2 loops for symmetry + 1 lifting loops). Next, knit according to the pattern, repeating rows 3-6 2 times.
The right side of the shirtfront is knitted in a row of 28 single crochets, in the second row loops are made for 7 buttons, for this you knit 2 single crochets, *1 chain stitch, 3 single crochets*, repeat between ** 6 times, at the end of the row 1 air loop, 2 single crochets. On the left side of the shirt-front, 5 rows of 28 single crochets are knitted.
We begin the work by casting on 79 loops. We knit 22 rows of elastic - one knit stitch, one purl stitch. From the 23rd row, 6 rows we knit a hollow elastic band (one knit stitch, followed by a purl loop, is removed). All subsequent rows: knit stitches are removed, and purl stitches removed are knitted with knit stitches