Adult shirt-front with knitting needles description. How to knit a shirtfront with knitting needles for a child and a man
Knitting a shirtfront can be a good replacement for a regular scarf. Knitting a shirt front for men is not as common as for children, but it has its own positive sides, especially for those who spend a lot of time outside in the cold.
Dickies for men
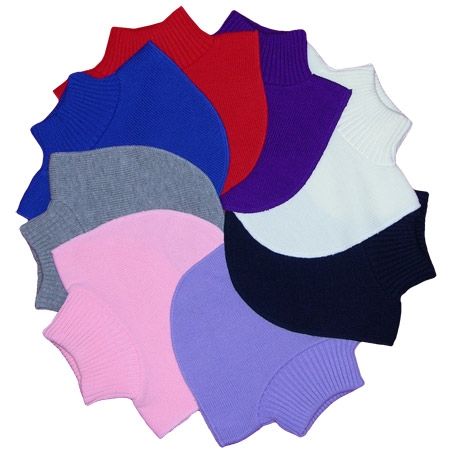
Simple models of bibs
Most simple model should be knitted with a simple elastic band or rope, you can choose an openwork knitting - it is better from hemstitch, it is easier to make increases in order to widen the collar.


How to knit a shirtfront
Usually, a shirtfront is knitted with circular knitting needles, and starts from the stand-up collar. For a model that is knitted with an elastic band, you will need 150 grams of yarn and four mm knitting needles on a fishing line. Before starting knitting, it is best to knit a 10 by 10 cm report, which will make it possible to calculate the number of loops required for casting on.
When you have about 80 stitches on your knitting needles, start by knitting 3 rows in plain stockinette knitting. After this, you need to switch to a 2 by 3 elastic band.
When you knit the collar height you need, at the end of each front “track” of elastic you need to add 1 front loop from the stretch between the loops. In the next row, these loops must be knitted purlwise to prevent a hole from forming.

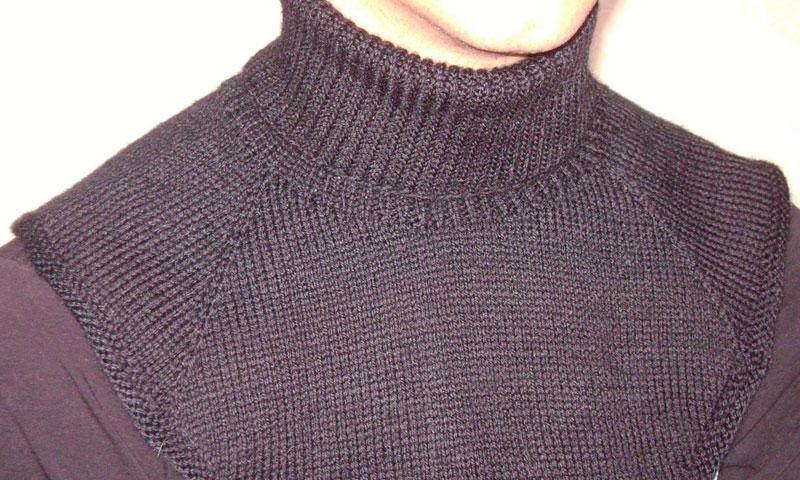
Note that knitting a shirt-front for a man is not a very labor-intensive process. Actually, we will do everything according to the same scheme as for women, only its shape will be slightly different from the women’s: it is a little “brutal”. To knit it, you need to lengthen the front part of the collar, knitting something like a classic shirt shirt that covers the chest. Accordingly, you need to choose the color of the coat: black, white, muted soft shades, or a melange combination. Let's start knitting the stand-up collar and the shoulder with an elastic band, after that we will not close all the loops, but only 4/3, leaving some of the loops on the chest uncovered. Next, we will knit a straight piece approximately 25 cm wide and approximately 20 cm long. After which the loops must be closed. For a tighter edge, it is best to knit the first and last 8-10 stitches with a rope, and also before finishing the work, knit several final rows in this way.
It must be said that knitting a shirtfront with knitting needles should not cause any difficulties even for beginning craftswomen. A more labor-intensive job is knitting a lace shirtfront.
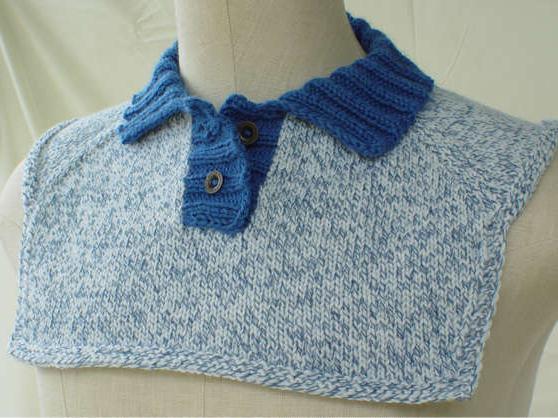
Note that for craftswomen who are good at crocheting, it is best to knit a lace shirtfront in the shape of a “mantle” and collar as a fashionable and quite beautiful addition to the usual knitted dress or a pullover. Knitting a shirtfront from individual lace motifs should begin by knitting each motif separately, in the last row gradually connecting them into one fabric according to the pattern. When the entire mantle is assembled into a single model, it is necessary to knit a round stand-up collar, or “collar,” along the neckline.

Warm shirtfront for a man with knitting needles: diagram and description of work
IN men's wardrobe the shirtfront will perform a purely practical function, so it should not lose its shape. To do this, its yarn must be as dense as possible, so the size of the knitting needles can be smaller than the thread itself. To keep your shirt warm, you should choose natural threads rather than synthetic ones. To ensure that the product has a minimum number of seams, preference should be given to stocking needles. With their help, a shirtfront can be knitted very quickly, especially if it does not have fasteners. You need to start knitting by carefully measuring the circumference of the neck, after which you can cast on loops. It is necessary to add a few more loops to their number so that the accessory is not too tight. It is also important to know how to finish the finished craft. When the desired length of the product is knitted, the process is completed by crocheting the edges of the shirtfront. Single crochets or semi-crochet stitches are suitable. This is necessary to ensure that the edges of the shirt front do not curl up.
In general, creating this accessory is not difficult, since the male gender most often prefers classic knitting. It should have a simple pattern, characterized by conciseness and rigor.
"Rubber"
A standard rubber band is perfect for this purpose. Depending on the neck circumference, you need to cast on approximately 60 or 80 loops. There is an important condition in the set of 1st loops: their number must be a multiple of 3rd. Work on knitting a men's shirtfront always begins with knitting the neckline. Its length is an individual decision, but to make it easier to decide, it is worth trying on a knitted fabric on a future medium. The neckline is knitted using stocking or circular knitting needles. When the required length is reached, the main part is formed, which will cover the chest and lie on the shoulders. The first 2 rows are knitted in the same way as the neckline. After them, the 1st loop should be added to every 6th row. This should be done on each needle at the beginning of the row. You need to add loops so that the shirtfront fits nicely and fits loosely. The length of the main part also depends on personal preference. When the required length is knitted, the loops are closed, and then a couple more rows are tied with a hook in half columns. Thanks to this, the product will have a finished look. You can knit a man's shirtfront using knitting needles using another pattern. For example, the neckline can be designed in the form of a narrow “elastic band”, and the main part can be made with stockinette stitch. This model will look like a continuation of the sweater, especially if it is knitted from threads in neutral shades. You can also knit a bright and colorful shirtfront, complementing it with massive buttons, so it will look like an independent accessory. The shirt front is knitted from top to bottom in the round on 5 needles or on circular needles.This description is basic, based on it you can come up with many design options by replacing sections of the front surface with some kind of pattern (relief, openwork, braids). You can also crochet the shirtfront along the bottom edge, decorate it with knitted flowers, cords, ribbons...
Size: neck girth 33-35 cm, suitable for a medium-sized adult or teenager.
Materials: yarn YarnArt Color Garden 70% acrylic 30% wool, 200m/100g; knitting needles or circular needles 4 mm
Abbreviations:
n. = loop
R. = row
persons = facial
purl = purl
3 persons from 1 = knit 3 knit stitches from one: knit 1 knit stitch from the next stitch, without removing from the knitting needle, make a yarn over and knit another knit stitch from the same stitch. p. In the next p. yarn over knit.
Elastic band 2x2 = in all r. knit alternately k2, p2.
Facial surface = in circular r. all persons P.
Garter stitch = 1 round. - all persons. p., 2 circular r. - all out. P.
Description of work:
Cast on 88 sts on needles and join into a circle without twisting. Distribute the stitches onto 4 knitting needles, 22 sts each. on each one. Next, knit with a 2x2 elastic band to a height of approximately 18 cm. The height of the elastic band can vary depending on your size. Next, knit in stockinette stitch, simultaneously making increases in 4 places of the row in every 2nd r. in the following way:
Row 1 and all odd rows: knit. P.
Row 2: K11, *K3. from 1, 21 persons.,* repeat between * 3 times in total, 3 persons. from 1, 10 persons.
Row 4: K12, *K3. from 1, knit 23,* repeat between * 3 times total, knit 3. from 1, 11 persons.
Rows 6, 8, 10, ..., 24: similar to row 4, but the number of faces. p. between additions will gradually increase.
After row 24 there should be 184 stitches on the needles. You can increase or decrease the length of the shirt front by increasing or decreasing the number of increment rows. Next, knit 4 rows. garter stitch without additions. Close all the loops, thread the end of the thread, and, if desired, carefully steam the shirtfront.
How to knit a man's shirtfront with knitting needles
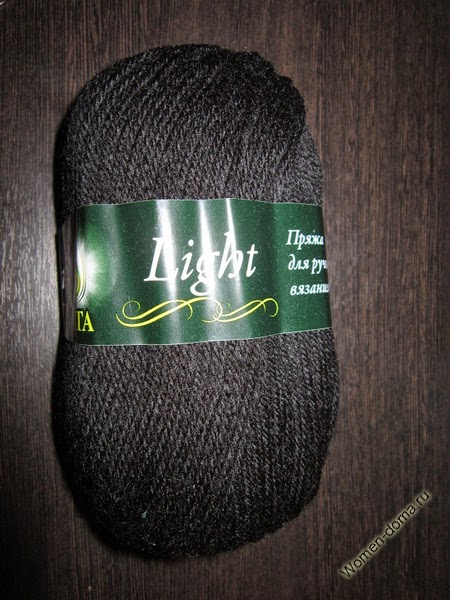
You can knit a great gift for your man on the eve of the upcoming holidays, Valentine's Day and February 23rd. He will definitely appreciate it, because you put the warmth of your hands into it. In addition, the shirtfront is very comfortable - it does not slip like a scarf and protects the throat well. There are a lot of options for shirtfronts, you can knit a circular one, but I settled on a shirtfront in which two parts, front and back, are knitted separately - this is the wish of its future owner. For the size 52 shirt-front I used Uniti Light yarn from the Vita company; I needed 100 grams, that is, one skein. I really liked the yarn I used – it’s soft and lays flat. And for a small decor in the form of stripes I used 30 grams of dark gray yarn from some leftovers. You can knit without stripes or use some other color. And you will also need 5 circular knitting needles, number 4.

Next, we pull out one knitting needle, as usual - be careful, loops fall off very easily from such circular knitting needles. Next, take the first of the circular knitting needles and knit 28 loops with an elastic band 2 by 2. Next, release the first knitting needle, take the second knitting needle and also knit 28 loops with an elastic band. After which we release the second knitting needle again and take the third circular knitting needle - we knit the remaining 32 loops with an elastic band. Please note that after knitting all the loops, the elastic pattern should match - that is, if the first two loops on the first circular knitting needle were knit, then the last two loops on the third circular knitting needle will be purl.
I used 4 knitting needles - one for working and 3 for fabric. Three knitting needles are quite enough for such a fabric and knitting is easier and faster.
In the end it turns out like this:

After this, we move from the elastic to the regular stockinette stitch, but for now we continue to knit with circular knitting needles. When moving to the stockinette stitch, I switched the fabric to 4 knitting needles to make it easier to follow the increases.
So, we begin to knit the next row after the elastic band, at the same time we distribute the loops and begin to increase as follows:
We knit with the first knitting needle - 1 knit, 1 increase from the broach, 20 knit stitches, 1 increase from the broach, 1 knit;
We knit with the third knitting needle - 1 knit, 1 increase from the broach, 20 knit stitches, 1 increase from the broach, 1 knit;
We knit with the fourth needle - 1 knit, 1 increase from the broach, 20 knit stitches, 1 increase from the broach, 1 knit.
In total, we used all 88 loops of our neck and added 8 new loops. Before adding, for beauty, we simply leave the knit stitches, they will delimit our canvas - in the photo in the center you can just see this decorative strip of knit stitches. There are four such demarcation stripes in total - two on the shoulders, one in front and one in the back.
Next, we knit 14 rows of black yarn in stockinette stitch, adding 8 loops in every second row according to the same pattern. We knit the first row - 1 knit, 1 increase from the broach, 22 knit stitches, 1 increase from the broach, 1 knit. We simply knit the second row all knit stitches. We repeat the first and second rows, the only difference is that with each repetition, two will be added to the average 22 knit stitches, which we also knit with knit stitches.
After this, we switch to contrasting yarn, in my case, dark gray, and knit 3 rows with it, also making 8 stitches per row in each second row. In total, we get 38 loops on each knitting needle.
After we have knitted the third row with gray yarn, we divide our knitting into two parts, which we will knit separately.
We take black yarn and cast off 5 loops from the first circular knitting needle, after which we knit one knit stitch (on the knitting needle, in addition to it, there will already be one edge loop, after closing the loops) and decrease with a slant to the left. Next, we knit 29 stitches from the first circular knitting needle, increase from the stretch according to the pattern, and knit one knit stitch from the first circular knitting needle. After this, we do not change the working knitting needle, since we have already finished circular knitting, but with the same knitting needle we begin to knit loops from the second circular knitting needle - 1 knit, 1 increase from the broach, 29 knit stitches, 2 loops together with a tilt to the right, 1 knit, 1 edge. We still have 5 loops left on the second circular knitting needle - they will need to be closed, but later, so as not to interrupt the knitting. Therefore, we throw these 5 loops onto the third circular knitting needle and for now we forget about them, just as we forget for now about the loops on the third and fourth circular knitting needles - we will finish this part later.
We now have 62 loops on the main working knitting needle - we will usually knit them with two knitting needles. At the same time, in order to maintain the slope of our stripes, in every second row we will make increases from broaches in the central part. And so that the shirt front narrows a little towards the bottom, we make decreases in each row, front and back. Thus, the second row (purl) of our knitting will be like this: 1 selvedge, 1 purl, 2 purl with a slant to the left, 54 purl, 2 purl with a slant to the right, 1 purl, 1 selvedge. All other purl rows will be knitted in a similar way, only the number of middle purl loops will change, each time decreasing by 2 loops.
The third row (knit) of knitting will look like this: 1 knit, 1 knit, 2 knit with a slant to the left, 52 knit, 2 knit with a slant to the right, 1 knit, 1 knit. All other facial rows will be knitted in a similar way, only the number of middle facial loops will change, each time decreasing by 2 loops.
At the same time, every three rows we change the color of the yarn - in total I got 4 dark gray stripes. You can lengthen the shirtfront, but I don’t recommend shortening it – it will ride up.
After knitting the last dark gray strip, I knitted 10 rows in black garter stitch to prevent the fabric from pilling. At the same time, I also followed the whole scheme of increases and decreases, otherwise it will turn out ugly and the fabric will tighten.
After knitting one part, we still have the back part of the shirtfront - we do it in absolutely the same way. The difference in the first row is that we must cast off not 5 loops, but 10, since we still left 5 loops from the front so as not to interrupt the knitting.
And we will also have to close the last 5 loops - to close them, I took a small piece of black yarn and closed them separately so as not to break the main thread.
A knitted shirtfront may well act as a replacement warm sweater with a high collar or scarf. Cold air does not get under it, snowflakes do not fall. At the same time, a shirtfront for your beloved man can be knitted from good yarn, making him an excellent and useful gift for his birthday. New Year or Christmas.
Any experienced craftswoman will easily cope with such a task as a men's shirt-front with knitting needles. But even for beginners, you can find a way to knit this wardrobe item without much difficulty.
What you need for knitting
Although variations are possible, the basic set includes the following:
About 100 grams of thin yarn (or 150 grams of thick yarn);
Knitting needles 2.5 mm thick.
Can be used for a shirt front different ways knitting, for example, elastic - it’s easier to guess the size (if you want to give a man a surprise and don’t take his measurements in advance).
Another option (or an option for combining with an elastic band) is knit stitches or the so-called knit stitch.
Men's shirtfront with knitting needles: diagram
The number of loops with which to start knitting depends on the neck circumference of its future owner. It’s good if you can measure the girth in advance or, after knitting the first few rows, try on the product and see how well it fits over your head. The average option, which you can use as a starting point when planning to knit a shirtfront for a man of average build, is 90 stitches.
We knit the first two dozen rows with an elastic band - this will be the neck of our product. The rib knitting pattern is 2X2, that is, 2 knit stitches and 2 purl stitches.
After completing the “elastic band”, we continue working with facial loops. In this case, in each next row, a yarn over is added, which must be done in alternating one loop. As a result, the number of loops will double. As soon as the width of the shirt front is twice as wide as the neckline, leave the resulting number of loops and continue knitting in stockinette stitch for approximately 7-10 rows.
To determine the length of the shirtfront, you can attach the product to your man’s sweater or try it on him. If the length seems sufficient (keep in mind that the shirtfront should cover the chest if the coat collar is open), then close the loops and sew the product.
If you want to give a “winter” gift to your man, then today’s lesson will come in handy more than ever! We will tell you how to knit a shirtfront for a man with knitting needles; the work pattern is quite simple and, following our description, you will easily knit the models we propose, even if you have not previously had such experience. Made with your own hands, the shirtfront will reliably protect you from cold and wind.
A simple knitted shirt front for beginners
You can knit a shirtfront in different patterns and ways, but now we will consider a simple option - the product will consist of two separately knitted parts.
We will need:
- black yarn Unity Light (48% wool, 52% acrylic, 200 meters per 100 grams) – 1 skein;
- yarn for decorating stripes of light gray color Unity Light (48% wool, 52% acrylic, 200 m per 100 grams) - about 30 grams;
- five circular sp. No. 4.
The finished men's shirtfront is ideal for sizes 50-52.
Scheme and description of work
We start knitting with knitting needles from the neck of the product: use 2 circular sp., cast on 88 loops (you can change the number of loops, but their number should be a multiple of four).  We take out one of the joints. and knit 28 stitches with it using an elastic band 2 x 2, release this sp. and take another one, we also use it to knit 28 stitches with an elastic band, lower it, and make the third circular sp. we knit the remaining 32 loops with the same elastic band.
  We connect all the loops in a circle, then we need to knit 36 rows with a 2 x 2 elastic band. The neckline is ready:
  Now we move on to the front surface. We transfer our canvas to 4 sp., instead of three. We make increments.
First sp: 1 l. p., 1 approx. from prot., knit 20 l. p., 1 approx. from prot., 1 l. P..
The second, third and fourth - the same.
We knitted 88 stitches at the neckline and added 8 additional stitches. We need to knit 13 more rows in this way using black thread in stockinette stitch, adding 8 stitches in every second row, as described earlier.
Next, as mentioned above, the first row: 1 l. p., 1 approx. from prot., knit 20 l. p., 1 approx. from prot., 1 l. p., second - only l. p.. We alternate 1-2 stitches, if you do everything correctly, then in each new row there will be 2 more loops than in the previous one.
We change the thread to light gray and continue knitting: 3 rows, making increases every other row of 8 stitches (1st row without increases, second - with, third - again without). On each sleep we get 38 p.
After the third knitted row, we divide the work into two parts, we will finish them separately.
Change the thread to black and bind off 5 stitches. from the first cr. sp., then make 1 l. p. (on the sp. it will be + 1 chrome p., after closing the p.) and make a decrease to the left.
Now we need to knit 28 l. p. from the first cr. sp., increase from prot. according to the drawing, add 1 liter. p. from the first cr. sp.. The same sp. we knit a stitch from the second sp.: 1 l. p., 1 approx. from ave., 28 p. persons., 2 p. vm. right, knit 1 p., 1 chrome. st.. Drop the remaining 5 sts onto the 3rd sp. – we will knit them later, exactly like stitches on 3 and 4 cr. sp..
On the main sp. we have 66 stitches, we will knit them in 2 sp. To maintain the slope of the stripes, in every 2nd row. we will make increases from broaches to the center. parts. So that the shirtfront narrows a little at the bottom, in each r. we will make reductions. We knit the second row with knitting needles in this way: 1 cr. p., 1 i. p., 2 i. p. with incl. ow., 58 i. p., 2 i. p. with incl. ex., 1 i. p., 1 cr. p.. Using the same principle, we need to knit everything inside out. pp., We will only change the number of medium and. etc., decreasing them by 2 each time.
3rd r. (front): 1 cr. p., 1 l. p., 2 l. p. with incl. left, 27 l. p., 1 p. from broach, 2 l. p., 1 p. from broach, 27 l. p., 2 l. p. with incl. ex., 1 l. p., 1 cr. p.. We will also knit all the other l. r., changing only the number of average l. p. before and after the dividing strip, each time decreasing by 1 p..
Don't forget every 3 r. change thread color. We got 4 gray stripes, but you can lengthen the product.
After last gray stripe knit 10 r. garter stitch with black thread, completing the entire pattern of increases and decreases.
We do the back part by analogy with the front, only in the first row. close not 5 p., but 10. Last. We also close 5 sts with a separate piece of thread so as not to break the main one. Ready!
Men's large knit shirt: video master class
Men's warm shirt-front knitted with a pigtail pattern
 This option can also be knitted on two or five circular sp., it all depends on your desire. In the case of working on two bedrooms. You will have to take into account one point when casting on loops - add 2 chromes. etc., you need to knit on the front side and on the back, if in a circle - only on the front side, and you need to sew the product along the raglan of the back.
We suggest you try working on 5-sp. this time to avoid seams.
We will need:
- yarn (100% wool, 110 meters per 100 grams) – 2 skeins;
- five circular sp. No. 4;
- hook number 4.
Scheme and description of work:
We cast on 72 stitches with knitting needles, knit an elastic band of 1 x 1 19 cm. Now we proceed to stocking stitch - 4 rows, mark (we divide by sp. stitch, if we work on two stitches, or mark with a thread of a different color) shoulders, back , chest, between which we leave two liters. p., before and after them we will need to add p. through the row.
We start working from the shoulder in stockinette stitch (1st sp.): 2 l. p., 1 yarn over, 10 l. p., 1 yarn over, 2 l. P..
Now back (2nd sp.): 1 yarn over, 20 l. p., 1 yarn over.
Shoulder (3rd sp.): 2 l. p., 1 yarn over, 10 l. p., 1 yarn over, 2 l. P..
Chest (4th sp.) – “pigtail” pattern:
1 rub.: 1 n., 3 l. n., *1 i. p., 3rd p. from left sp. Prov. knits., throw over 2 sts, make 1 yarn over, 2 sts. l.* – this pattern is repeated 4 times, 1 and. p., 3 l. p., 1 we throw on.
2 rubles: 4 l. n., *1 i. p., 3 l. p., the scheme is repeated 4 times, 1 and. p., 4 l. P..
3 rubles: 1 n., 4 l. p., 1 i. p., 3 l. n.* x 4 r., 1 i. p., 4 l. p., 1 n..
4 rubles: 5 l. n., *1 i. p., 3 l. n. * x 4 r., 1 i. p., 5 l. p.. We repeat the “pigtail” pattern from ** 1 r. up to ** 4 r. in a circle of 14 cm, close the sts of the shoulders and back, continue to knit the chest, without adding sts, but starting to decrease them one by one every 2 r. on each side of the panel (we work with two joints). As soon as the decrease in stitch reaches our pattern, we close all the loops. If desired, you can tie the product around the edge using a hook with double stitches.
Video
The man's shirtfront is ready!
We hope that our lesson today will help you knit a practical and stylish accessory for your man. You can read about how to crochet a shirtfront in this article. Even loops!


