How to make a shirt from paper diagrams. A simple origami model made from money: a shirt. Master Class
If you have a question about how to make a shirt from paper or from a banknote, then most likely you want to surprise and delight your friends unusual entertainment. It's very simple!
This old and almost “harmless” trick is still a hit at parties. In addition, you can make a shirt out of paper, and then use it as decor for a postcard, or as a postcard itself. How to make a postcard shirt? How to make a shirt out of paper or banknotes for fun?
If we're talking about about a party, you can ask someone for a “rental” bill, such as a dollar bill, promising an interesting gambling. Please note that the higher the denomination of the bill, the more “exciting” the game will be. When you receive a banknote, in front of the amazed owner of the bill and other guests, you fold it into a shirt. The very essence of the game is that end result the player gets his bill back, but in a slightly different form. And now, it will depend on him whether he will “lose” everything or not. That is, whether he can unroll your folded shirt without damaging his money. Although, it is not necessary to make a shirt out of a bill, you can make a shirt out of paper, which can then be used as a card. Below is how to make a shirt from paper or banknotes.
How to make a paper shirt
Before making a paper shirt, it would be a good idea to find double-sided paper with different colors sidesIn order to fold a shirt, you need to take a piece of paper with a side length of 2:1, that is, a square cut in half, or a bill. The color of the paper on the side facing you when you start will end up being the color of the cuffs and collar of the finished shirt. If a banknote is used as the material, it is necessary to make an adjustment for the proportions, which may not be 2:1, which will affect the proportions of the folded shirt. Sometimes it is first necessary to “format” the bill. For example, when making a shirt from a dollar bill, it would be advisable to change its proportions by first making a fold. After this, you can safely continue working with the bill.
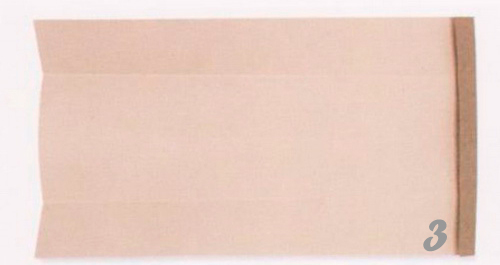
1) Fold the paper or banknote in half along the long sides of the sheet. Then unfold the fold you made. Bend the top and bottom long edges of the sheet to this fold. Then place the folded sheet as shown in the photo.
2) Unfold the resulting folds during operation No. 1, and turn the sheet over.

3) On the right side of the paper, bend a thin strip, no more than 0.5-1 cm wide. This strip will subsequently become the color of the collar of the future paper shirt.
4) Turn the sheet over again and fold the long edges along the previously marked fold lines, towards the center line.

5) Fold a strip of a different color from the right side of the paper back along the fold that runs along the edge of the paper. So, you re-fold the paper along the same line.
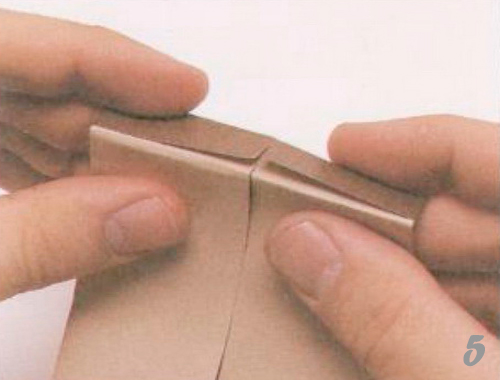
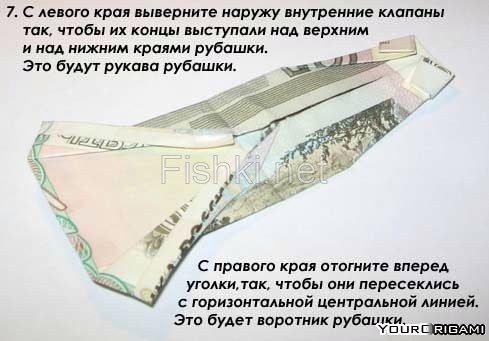
6) Bend the corners located on the right edge of our model forward so that they intersect with the central horizontal line. The corners on this line meet at an obtuse angle; at a certain distance from the right edge of the paper, due to this, a V-neck as shown in the photograph. This turns out to be a shirt collar. On the left side of the model, turn the inner flaps outward so that their ends protrude below the bottom and above the top edges of the model. These turned out to be the sleeves of a paper shirt.

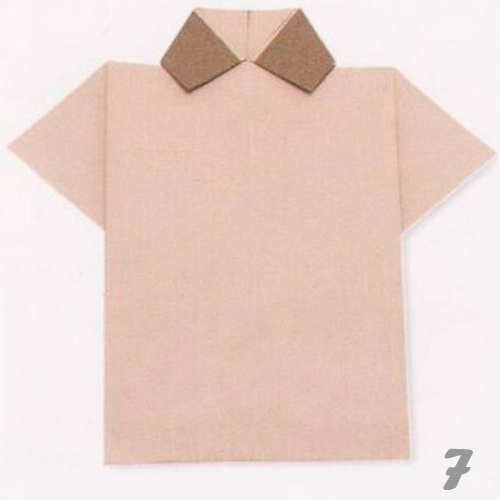
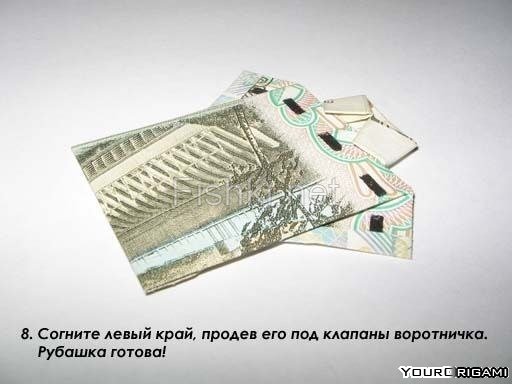
7) Rotate the paper 90 degrees, then bend the bottom edge of the sheet upward, threading its edge under the collar flaps. Carefully smooth out the resulting model.
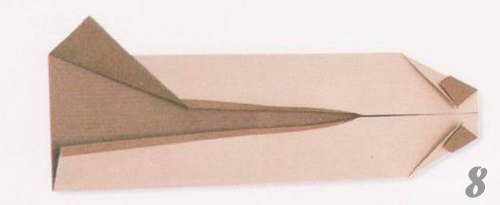
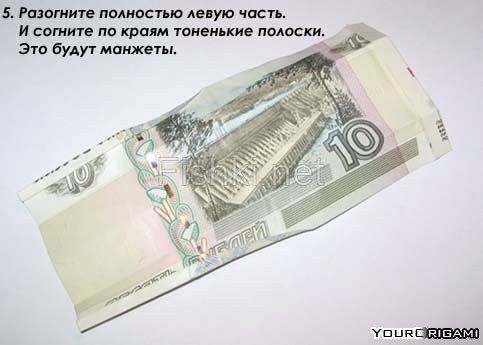
8) If you want the shirt sleeves to have cuffs, then return the model to the look it had before operation No. 6, unfolding the valves of the future sleeves. Fold a thin strip along the edge of each flap, gradually bringing it towards the center line to nothing. Having made colored stripes, fold the sleeve flaps along the folds that remained after operation No. 6.
9) Repeat operation No. 7. Now the sleeves of the paper shirt have cuffs.

That's all! The shirt is ready!
Our daily life surrounded by many cute little things that, when they catch our eyes, remind us of past events, meetings and loved ones. If you give someone an unusual souvenir, it will delight and remind you of the person who gave it for a long time. As an original addition to the gift, we suggest making a shirt out of paper. It can act as a standalone postcard, packaging for a small present, or a small business card indicating who the surprise was from. For those who love crafts, a shirt made of paper is a matter of minutes, and even a novice needleworker can cope with this task without any problems, following the detailed instructions.
What you need to make a paper shirt
List necessary tools and materials for work:
- white and colored paper;
- scissors;
- glue;
- pen or felt-tip pen.
To begin with, it is advisable to try your hand at a monochromatic craft; moreover, the finished shirt can be painted in any color, inscribed with inscriptions and drawings - this way it will become unique. Several multi-colored small ones will be a wonderful addition to your desktop, enliven the atmosphere, and the notes on them will definitely be remembered. An origami craft will not even require glue, unless you decide to glue a tie or other decorative elements to it.
How to make a shirt out of paper? You will need a rectangular sheet, for example, A4 size. It is folded in half (portrait orientation), marking the middle line, and straightened. The left and right parts are folded, connecting in the center along the original line. The upper corners are bent outward - these will be the sleeves of the shirt. Turn over reverse side up and sleeves down, fold a line of 3-4 cm towards themselves from above. Turn it right side out again and fold the corners towards the middle line - you get a collar. Now the lower part is lifted up, folding the craft in half, tucked under the corners of the stand. 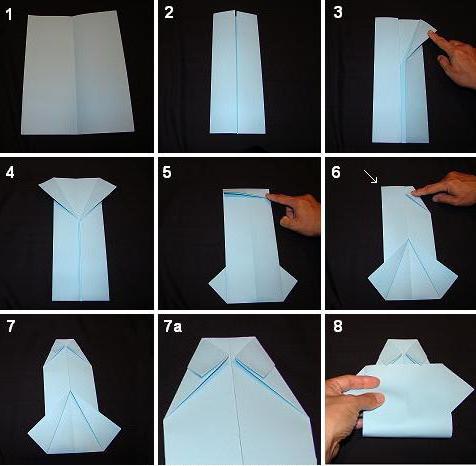 If from of this description The whole process of how to make a shirt out of paper is not entirely clear, refer to the diagram provided, it contains a step-by-step image.
Other ways to make a similar card
The easiest way to make a paper shirt without using glue and scissors was described above. But if you want to do more long sleeves, modernize the style of the collar - it is not necessary to follow the instructions given. Estimate what size the shirt and all its parts will be, cut them out of paper and fasten them with glue. In the same way, the craft is complemented by any decoration popular for a shirt - a tie or bow tie, buttons cut from paper of a different color or drawn with a felt-tip pen, pencil or paints.  If you involve children in the process of creating this unusual craft, then here they will be able to show all their imagination by coloring the faceless white postcard bright flowers.
Decorating the finished craft
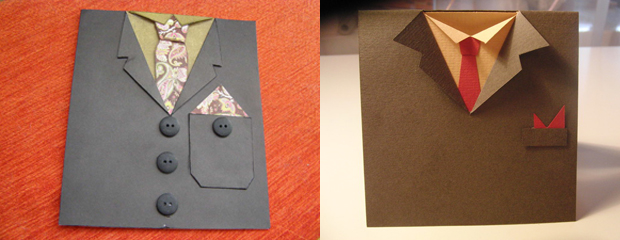
Skilled craftswomen do not stop there. Having made a paper shirt, they move on to the process of decorating, decorating each finished card to their taste. For example, instead of buttons they use rhinestones, beads, satin bows, pasta and others suitable elements, including real fasteners. Along the bottom of the shirt, a ribbon with a bow or buckle (like a belt) or a wide strip of fabric (like a tuxedo) is used as a belt. The same trim is applied to the collar and sleeves.
A New Year's card-shirt made of paper (the diagram is given above), decorated in the form of a Santa Claus or Father Frost costume, looks very nice. To do this, take red paper, fold it as described, and decorate. On the collar and sleeves there is a white edging, like a fallen snowball, in the center there are black buttons, and at the bottom there is a black or dark blue belt with a white buckle...  Surely such an addition to New Year's gift will be remembered no less than the present itself.
How to use a paper shirt
So that the postcard not only gives positive emotions his appearance, but also carried a semantic load; inside (before folding the craft in half) you can write a text of congratulations or just warm words to the person to whom the gift is addressed. The text is written by hand or printed on other paper and pasted inside. If to the shirt big size glue the sides, you get a gift bag, packaging for a light present. All that remains is to attach the handles, and you can safely give a gift to a man for any occasion. And if you decorate the craft in pink or red tones, add feminine accessories, beads, ribbons and bows, any lady will be delighted with such gift packaging.
We hope that after reading the information provided, the question of how to make a shirt out of paper will no longer worry you. Be creative, create masterpieces, give joy and positive energy to your loved ones!
Origami is the art of folding paper shapes that came from Japan and later spread throughout the world. Instead of a regular sheet of paper, you can use a banknote, which can make an original souvenir in the form of a shirt and tie. Today we will teach you how to make a shirt and tie from banknotes with your own hands.
To work, you only need a banknote and knowledge of a certain folding pattern.
Shirt without tie
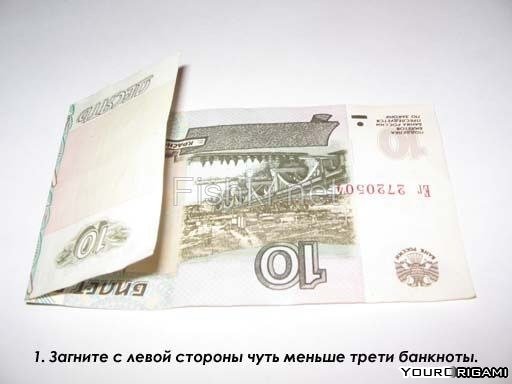
In order to make a souvenir, you will need a banknote of the appropriate denomination and a little time. First of all, you need to prepare the bill, then identify a little less than a third of the bill on the left side and fold it over.
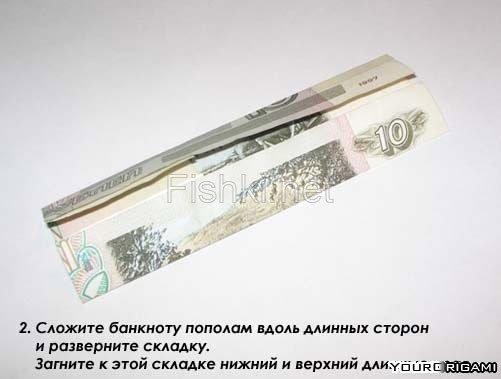
Then you should fold the bill in half and always along the long sides, then spread out all the folds.
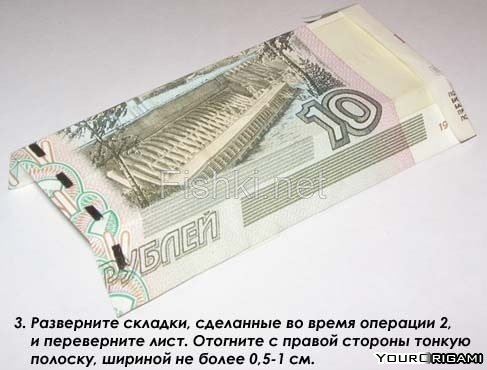
Next, you should fold one side edge of the bill up, and the other side edge down, then spread out the side folds and turn the bill over. On the right side you should bend a thin strip, the width of which should be no more than one centimeter.
After this, you need to turn the bill over and bend the long sides towards the center and, without smoothing it, bend the strip again on the side on the right side.

Then the folds on the left side need to be straightened and thin stripes made on the sides to form the cuffs of the future shirt.
Next, the long sides should be bent towards the center, and to make sleeves, you need to turn the inner strips outward, and from the right edge you need to turn the corners so that they intersect with the center line horizontally - this is the collar.

Shirt with tie
In order to make a dollar shirt, you need to prepare the corresponding bill, bend it in half, then straighten it and bend the left edges towards the middle, and the resulting triangle should be placed towards the middle of the bill. To make a tie, the sides of the triangle need to be slightly bent and symmetrical folds made.
Then you should divide the bill two more times and thus the tie will be closed, so we place the corners of the tie on top and the left side of the bill is ready. When folded, the right side of the bill must be bent one centimeter, then turn the bill over and divide only right side into four parts and bend the two outer parts towards the middle. After this, the bill can be turned over and bent in half, then straightened.
Between the folds formed, you should unfold the center, then bend it in half again and make a collar. This scheme will help you make an interesting souvenir that can serve as a gift.
![]()

Video on the topic of the article
Here is my new article on men's shirt cards, as I promised you. There are a lot of different ideas out there and I'll try to give you as many options as possible to get creative with. That's why I collected various options With different sources. Essentially that's all Greeting Cards for men: dad, grandfather, brother, husband, boss, colleague, friend, boyfriend...
Making cards like these won't take you much time. Before you start work, prepare necessary materials: double-sided colored paper, paper with colorful patterns, ribbons, buttons. You can use such crafts not only as postcards. I will explain in more detail below.
Let's look at the proposed options!
Postcard – shirt
This is a reworked version of the postcard from the previous article. In those postcards the fold line was vertical, but here it is horizontal. All other actions have not changed. The cuts must be made below the fold line. The card will not fall into two parts, since the cuts are small, and the resulting collar will not allow this. Well, this is too simple for a postcard.
Postcard shirt with tie
I really like this option. Very elegant and aesthetically pleasing. By adding a shirt and tie, a jacket or vest, we change the entire look of the postcard. The first two copies are postcards with one main horizontal fold. Further, the postcard is similar to a double-door wardrobe, but not in appearance, but in the way the postcard is opened. I probably completely confused you. I think that after looking at the picture, you will understand everything yourself, without my comments.
With each subsequent sample, the postcard gradually becomes more complex.
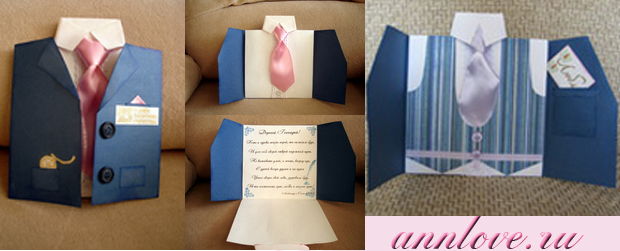
These pictures have been added two new elements. First of all, it's a tie. Please pay your attention to the tie, see? By replacing the paper tie with a satin ribbon, the card seemed to be transformed. Agree that this is no longer just a postcard, but a whole work of art. Secondly, congratulations the words are not written on the shirt itself, but as if in the inside of her. The shirt is folded at the bottom and the back is glued to the jacket. A couple more little things were also added - an internal pocket and a vest.

Look at these amazing cards. These may not be postcards, but a menu or a concert program. A speech for a speech can be made in the form of a postcard like this.
Postcard envelope for money
It is very easy to make an envelope postcard with your own hands. It will be a little like origami, but the result will be more beautiful.
Looking for new ideas for DIY souvenirs for men? Read the article, prepare materials. You will have a stylish DIY shirt card made. Step-by-step instructions will tell you how to make a base and a tie from paper different ways. Either option won't take much time, however, if you need to make a lot of gifts, choose the simple method. In a single copy, the souvenir can be made according to a complex pattern - with additional decor.
Stylish gifts for men for any date
It doesn’t matter what holiday you are preparing for - February 23, a regular birthday or anniversary, the question always arises: what to write a congratulation on? The choice of printing products is now huge. Postcards in the form of shirts - with or without ties, with bow ties, vests and jackets - are stylish and perfectly suitable. Popular destination now is making Prepare a nice gift from paper in the form business suit even a beginner can do it. If you don't know how to make a shirt card, read on carefully.
What materials can be used
Most often they take paper or cardboard. In specialized stores you can find very beautiful design options in various colors and textures. Velvet, embossed, mother-of-pearl, metallized sheets are sold. Just use a pretty base. And even if you choose the simplest manufacturing method, you will still end up with an excellent DIY shirt card. The step-by-step instructions given in the article will become the basis for your work.
In addition to paper, fabric is used for decorating or sewing ties or bow ties. If you are making a souvenir for a guy in youth style, denim patches, lacing, stripes, stickers will be quite appropriate, which are more suitable than a tie, especially when a young man prefers sportswear in life.
What techniques can you use to give such a gift?
As a rule, a card-shirt is made of paper; accordingly, you can work using the appliqué method, when the cut-out parts are connected together, or by folding origami. The second option is more complicated, but looks more impressive.
As for decoration, the most suitable technique is scrapbooking. This is how memorial albums with photographs were originally designed, but this is also a suitable method.
By the way, the shapes of the products may also differ. Use single options with a vertical or horizontal fold. The postcard is made directly in the form of a shirt or contains it as an additional element glued on top of a rectangular sheet. 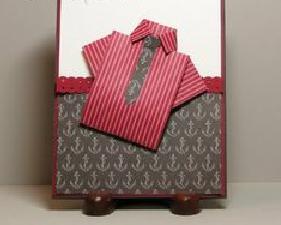
A very complex souvenir - a suit package with a tie. You should start making it only after mastering the flat gift.
How to fold the base
If this is your first time doing something like this, it's better to use a template. The shirt card is made from the usual rectangular format, although the folding options still differ. The following photo shows the sequence of steps you need to follow to get a shirt with a collar and sleeves. 
If you add another outer layer you get a jacket. Using the appliqué method you can glue on a vest or tie. Once you master one template and folding method, you can easily make many different models, changing the color and texture of the paper, as well as the decor. You can easily make your own collection of samples, such as those shown in the first photo in the publication.
The most complex technique is origami. A shirt postcard made using this method turns out to be quite voluminous, and the paper can be folded so that the tie appears as one piece with the base.
![]()
This craft can be given as a stand-alone original souvenir, or can be used as a part of a postcard. By the way, it is quite acceptable to place several such elements of a paper wardrobe on the latter.
How to make a tie
The easiest way is appliqué. There are no difficulties here, and the sequence of actions will be as follows:
1. the base of the tie and the knot element.
2. To make a plain surface decorative, prepare many multi-colored pieces of paper. If you don’t have a designer one, pages from unnecessary magazines or catalogs will do just fine. Fast way- use of stickers.
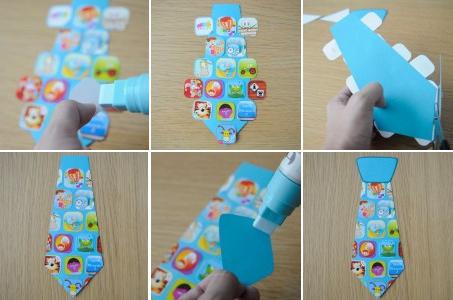
3. After the pattern is distributed, cut off the excess parts along the contour of the workpiece.
4. Glue top part products (trapezoid).
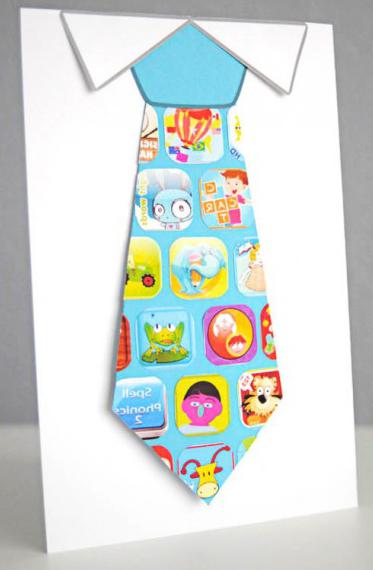
You can make a postcard-shirt with a tie in a complex way - so that main element the decor looked voluminous. This is done from a square blank in the sequence shown in the following photos.
A few more folds and the tie will be ready.
DIY shirt postcard: step-by-step instructions (simple option)
The base, as well as ties, are made by any of the indicated methods, and both objects can be made using either one technology or different ones. The simplest thing is an applique on a card without fold lines. Even a child can easily make this option. This idea is quite suitable as a lesson in artistic creativity with the guys on the eve of the men's holiday.
You will need:
- rectangular sheet of paper;
- cut blanks of parts;
- stickers for decoration.

We discussed how to make a tie in this way in the previous section. After this element is completed, you need to glue the parts to the base. All is ready.
So, you've seen how to make a shirt card using the appliqué method. Despite the fact that as an example we chose the option of using a white base rather than designer paper, the souvenir looks decent, especially if it was created by the hands of a child.
Postcard-shirt: master class on making
This option is much simpler than origami. This card can be either double or single. In the second case, the front part will be slightly higher than the back part, since an additional strip for the collar is required. Sometimes it is performed from a separate paper tape, inserting into the slots made in the appropriate places on the base. Choose what is most convenient for you.

Just a few simple folds and you have a stunning card-shirt. The master class clearly conveys the entire process in just a few illustrations. Notice how well they fit together. In many ways, the impression made by the gift depends on this. Try to use contrasts, but don't go overboard with the number of shades and patterns.
How to decorate and surprise
Even when you don't feel like doing origami, a shirt card can be stylish and impressive if you use additional decor. On ready product 3D parts are glued on or, conversely, shapes or numbers are cut out using a stencil or with scissors. If you have handwritten inscriptions or use printed or printed cards with standard wishes or exclusive congratulations. Glued real buttons look original.
So, after a few simple manipulations with available materials There will be a postcard-shirt in front of you. With my own hands ( step-by-step instruction will help you with this) such an interesting souvenir is quite easy to make. Our master class is the basis for further creative research. When the manufacturing technology is clear, you can easily create your own versions of products. You will quickly cope with creating a gift for your brother, boss, or friend. Use the card to write nice wishes or as an envelope for a cash gift.


