Drawings are simple and easy dolphins. Who doesn't know how to draw dolphins yet?
The topic of today's lesson is how to draw a dolphin step by step with a pencil. Dolphins are amazing creatures, always cheerful, intelligent, inquisitive and playful. The amazing abilities of these good-natured mammals are legendary. Having seen dolphins once, you can fall in love with them for life!
How to draw a dolphin step by step
If you don't know how to draw a dolphin so that it turns out beautiful, then make a sketch first with a simple pencil. Lines drawn with a simple pencil can always be corrected.
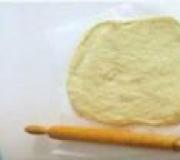
First you need to draw the shape of the torso.

When the shape of the body is ready, draw the nose, eye, dorsal fin and tail.

Now take an eraser and erase the extra lines so that the nose and upper fin connect to the body.
What else are we missing in the picture? That's right, pectoral fins. Draw the pectoral fins and the sketch of the dolphin is ready!

I take a pencil of blue color and I trace the contours of the dolphin.

Using the same pencil, I begin to decorate the dorsal fin, pectoral fins and eye. I did not decorate the tail fin completely, but only half of it.

All that remains is to take a pencil of a different color and decorate the body and nose. I took a pencil blue color. You can take a different color, but choose a shade that is lighter than the fins. If the color is darker, it will not be beautiful.
The dolphin is a kind, friendly and intelligent animal. That's probably why everyone young artists Interested in how to draw a dolphin? Fortunately, this is not the most difficult mammal to depict, so drawing a dolphin will not be difficult even for children.
1. Outline the torso

I want to tell you how to draw a dolphin step by step, so we'll start with a rough sketch. To begin, draw the body of the animal in the form of an irregularly shaped oval.
2. Nose and tail

Now gradually complete the dolphin drawing with the line of the nose and tail. Do not be afraid! It's easier than it seems at first glance.
3. Finish the sketch

Instructions on how to draw a dolphin for beginning artists cannot do without a rough sketch. Add fins, outline the line of the mouth and eyes. Now you can move on to the final version.
4. Draw all the contours

Adding and removing excess, draw the final contours of the animal onto the paper. Use an eraser to correct any inaccuracies as you go.
At this stage, you already know how to draw a dolphin with a pencil step by step, moving towards the final goal step by step. If you want to stop at this point, use light shading to darken some areas of the body, and better work out the lines of the nose and eyes. This will make your dolphin drawing in pencil look more complete.
5. Moving on to color

Now let's figure out how to draw a dolphin with paints. To do this, choose the main tone of the body. It can be gray, blue-gray and even lilac. It all depends on your imagination and the desired end result.
On a note: A step-by-step guide will help you draw a dolphin easily. It is suitable even for children 7-10 years old.
6. Tone accents

Use lighter and darker colors on different areas of the animal's body. This will help you ultimately get a high-quality image of a beautiful painted dolphin, which you will want to keep as a keepsake or gift to a loved one.
7. Background
The background is an important part real picture. This stage will help you understand how to draw a dolphin in the sea, in its natural habitat.
Look at the photo of the drawing of the dolphin, how I depicted the splashes in the place where the dolphin jumped out of the water. I'm sure you can draw no worse!
In this article we will pay attention to the practice of drawing dolphins. It's probably no secret that for a person who learns to draw, practice is the most important thing. And train your skills artistic skill preferably on simple drawings. Therefore, today we are learning to draw a dolphin; anyone can master this drawing. There is one feature in the process of creating this - the presence large quantity smooth lines. This is exactly what will help us to properly train and expand our drawing skills.
Stages of creating a drawing
Before answering the question of how to draw dolphins, you need to carefully understand the body structure of the sea pet. After all, this will allow you to depict more clearly important details. After scrolling through the photos of dolphins, we get down to drawing.
Drawing a line of movement
First of all, we need to take a closer look at the movement curve of animals, since this is what we have to depict. It is known that our sea friends have a very flexible body, so it is important to emphasize this detail in the drawing. So, in order to depict the curve of a dolphin’s movement, it is enough to draw one smooth line. After this, you need to estimate the outlines of the future animal by eye. Only after completing this task can you proceed directly to depicting the volumetric parts that form the basis of our hero’s body.
Step-by-step image of a dolphin's body
So, main line we spent. Let's continue to deal with this: Let's start with the dolphin's body - it consists of two curves, with the lower one being curved upward. If we talk about the second one, then it should be located higher and also curved upward. Only, unlike the bottom, the top curve should be more convex. Now we know that in the question of how to draw dolphins, the basis of the drawing is important.
Now let's start creating the fins and tail of our beloved friend. Don't forget that the top fin needs to be drawn close to the center, but a little closer to the head, and the two lower ones should be placed immediately below it. As for the tail, it should be small in size and have a triangular shape. When it comes to how to draw dolphins, it is important to maintain proportions so that all the details look harmonious. Therefore, you should not make the tail huge.
Adjusting the drawing
After we have done a great job with the main parts of the dolphin's body, it's time to start additional details, namely to the muzzle. It can be depicted as shown in the figure, or you can turn on your imagination and create unique image. Now all that remains is to correct our drawing. To do this, we make a more realistic shape from the triangular tail. We erase unnecessary lines with an eraser.

That's all, our dolphin is ready. However, the picture can be enlivened by adding, say, notes of nature. To make the picture more interesting, draw a dolphin surrounded
Master class with step by step photos For primary school"Dolphin"
Panfilova Nadezhda Pavlovna, teacher primary classes MBOU "Razdolnenskaya school-gymnasium No. 2 named after L. Ryabika" Republic of CrimeaSilhouette drawing in elementary school. Master class with photo "Dolphin"
Description: The master class will be of interest to primary school teachers, educators additional education, creative children and parents. July 23 is World Mammal Awareness Day. Every year, about 200 thousand dolphins die from poaching and environmental problems around the world. 2015 is dedicated to the dolphins of Maui. This is the rarest and smallest species of these mammals.
Purpose: work will become good decoration home interior, gift or exhibition item.
Target: creating a drawing "Dolphin"
Tasks:
. give general idea about the silhouette
. improve your stencil skills and abilities,
. develop a sense of harmonious color combinations,
. bring up artistic taste, love and careful attitude to nature,
. cultivate accuracy and hard work.

Dolphins are the most intelligent creatures on the planet. Nature makes amazing riddles, and one of the riddles remains the dolphin.
Dolphins are the most intelligent mammals after humans.
Dolphins are the most toothy mammals. They have 272 teeth in their mouth.
Dolphins “feel” the emotions of humans and other animals from a distance.
Dolphins serve in the army. There are so-called fighting dolphins, which are trained for military purposes. They look for underwater mines and carry out special underwater missions. During training, Crimean fighting dolphins help divers of the Russian Ministry of Emergency Situations in searching for explosive objects at the bottom of the Black Sea.
Materials:
. watercolor paints, sheet of paper A-4
. black, orange gouache, golden pigment,
. brushes, sponge,
. water, scissors,
. sample. frame.

Safety precautions when working with scissors:
. use scissors with rounded ends;
. keep closed in certain place;
. hold the scissors with the blades down;
. don't walk around with scissors;
. The scissors must be passed closed and the rings forward.
Master Class.
Place the sheet of paper vertically. Visually divide the sheet into two parts. Draw a horizon line.

We begin to paint the evening sky with purple paint.

Let's add orange and white watercolors. Above the horizon line we will apply more orange color.

The sea in the evening sun appears golden. Let's apply yellow paints. Let's carry out horizontal lines green paint.


Using vertical lines we write a splash of water. First green, then white. We will paint the waves with golden pigment. Select the horizon line. The background of the picture is ready.


Silhouette drawing-view graphics. Silhouette is the outline of an object, where it is impossible to see the details of the object.
The dolphin in the graphic image is a monotonous black spot.
Draw a dolphin on cardboard with a pencil. Cut out. This is a dolphin stencil.


Place the stencil on the background, secure it or hold it tightly. Sponge with black paint stamp the outlines of the dolphin. Remove the stencil.


Sample.

Dolphin drawing

Today I will tell you how to draw a dolphin step by step with a pencil and for beginners it will be a simple master class. We haven't depicted aquatic mammals yet, today I'll finally show it to you. The picture will not be large but elongated; the dolphin took up two-thirds of my A4 sheet, since in principle I do not like making small drawings.
The general position of the picture is horizontal, we will start as usual with the head or details on the head. A novice student will be able to depict something like this very easily; dolphins come easily to many. The main thing is to pay attention to the curves on the back, so that you understand how the dolphin’s body narrows from head to tail. Another important part is the fins and scallop; they need to be made small to fit correct size the overall picture.
So let's start drawing a dolphin with a pencil step by step.
Let's start with the so-called beak, approximately like a bird's. Draw a small stick on the beak, this is the hole through which dolphins partially breathe. The overall size of the mammal will depend on the size of the beak.
Above and below the beak we depict part of the dolphin’s head. Almost down below straight line draw, and at the top curved line outlining the animal's head.

Now is one of the most difficult stages. At the top we continue to draw a line that goes into the dolphin’s scallop. And below, next to the line, we make a fin. Both the fin and the comb are almost the same size, but are inverted in relation to each other. We also need to make an eye next to the beak. And from the beak, draw a curved line like this, encircling the eye and tending to the middle of the body. At the end the line bends down.

Next, we simply make the body extend into the tail, begin to narrow the lines from above and below and make an upward turn of almost ninety degrees, where the tail fins will be. The bottom line should intersect with the one that came from the beak and outlined the eye.