How to draw big beautiful eyes. Drawing the eyes
In this lesson I will tell you how to draw an eye step by step. First, let's understand what the eye consists of; knowing all its components, you can easily achieve a realistic image of it.
Structure of the eye
We have analyzed the structure of the eye, let's move on to the drawing of the eye
Drawing an eye
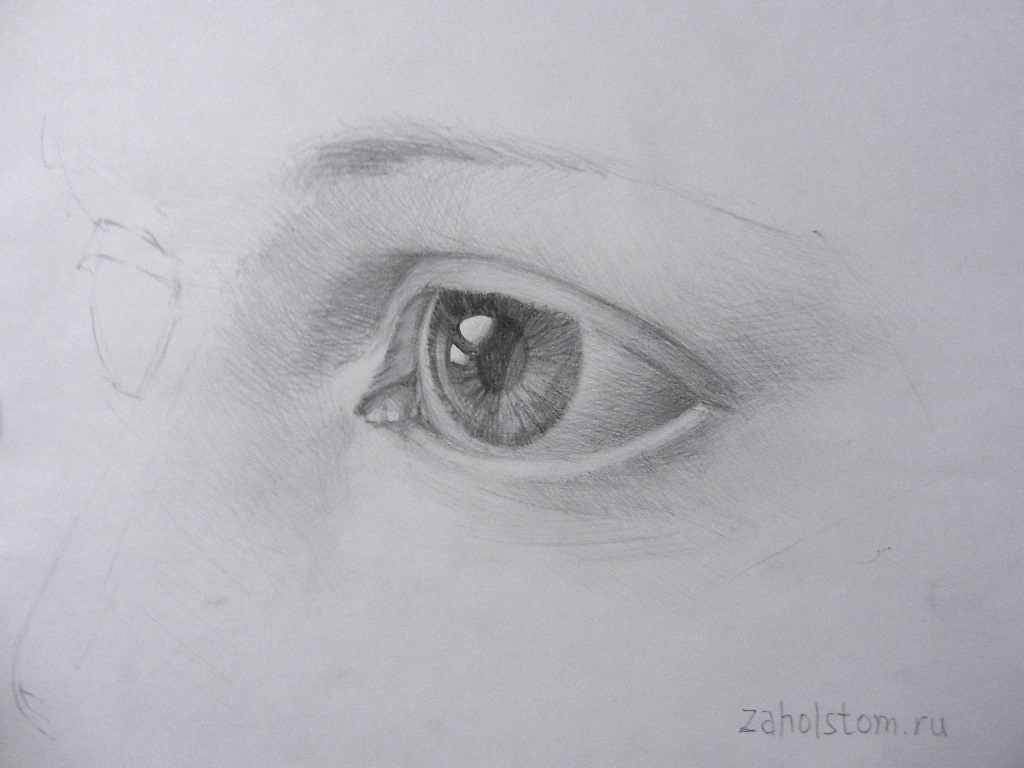
Let's start with the pupil, you can use a circle or draw it freehand. We draw a larger circle - this will be our iris, and in it a smaller circle - the pupil.

Next stage. Draw the upper and lower eyelids. In order to do this correctly, let’s imagine that the shape of the eyelids resembles a fish. If we stretch our imagination a little, we should get something similar.

Draw a few highlights on our pupil - this will give the eye realism. Don't forget about the 3rd eyelid, about the thickness of the upper and lower eyelids. Once you are completely satisfied with the shape of our eye, we can forget about fish and fins.

No less important detail in drawing eyes - eyelashes. You need to understand for yourself exactly what shape your eyelashes are, in which direction they grow, and how not to draw them. Eyelashes are usually shaped like a reverse comma. They are thicker at the base and taper at the end. Eyelashes are never straight and of the same thickness, otherwise you will end up with rays of sunshine like children draw. Pay attention to how not to draw eyelashes and how to depict them correctly.

Practice separately until you get it right. Now let's move on to the direction of eyelash growth. On the eyelid, eyelashes usually grow in different directions depending on their location. In the figure below I will show with arrows where and in which direction they grow. Do not forget that closer to the corner of the eye (3rd eyelid) the eyelashes decrease in size. Under no circumstances make them the same size, otherwise it won’t look believable.

In order to make our eyelashes look thicker, we stroke a little at half strength at the base of the eyelashes. This will give your eyelashes volume and thickness.

Let's move on to the tone, volume and realism part of our eye. In this lesson, our eye will be black and white to highlight the basics and structures. Let's divide our eye into tones. The lightest part will be the highlight on the pupil. We will not touch it, but later we will completely erase its contours. Please note that the darkest thing in our eye is the pupil, then the eyelashes follow the tone, then the 3rd eyelid, the iris, and the lightest will be the white of the eye (don’t leave it white, it also has a tone).

To correctly apply the tone, I will mark with red lines where it should be applied so that you do not make a mistake. Remember that the highlight should remain pure white. The arrows indicate the direction in which your tone should weaken and merge with what you applied earlier.

You should be able to similar image eyes

Finally, add some contrast to your eye. If necessary, increase the tone where you applied it. If you wish, you can draw in volume upper eyelid which closes the eye. This will give our eye even more volume and realism. Pay attention to the structure of the iris. Draw it, it will only be a plus for your eye.

People who learn to draw are often interested in the question: how to draw eyes so that the drawing seems to be alive? Indeed, the eyes are always playing main role in a portrait. Therefore, when learning to draw a person, of course, you need to pay enough attention to drawing the eyes. In this lesson I will tell you and clearly demonstrate, using my own drawing as an example, how to draw eyes. If you don't get distracted by the details, there are a few key ideas you need to grasp.
1. So, first. The eye is spherical in shape. Therefore, this is not a flat, but a three-dimensional form with the name “ eyeball».

2. Second. The eyeball is protected from above by the eyelids, which form the usual contours of the eyes.

3. Third. The eye is located in a “recess” in our skull called the orbital socket. Therefore, drawing an eye does not mean drawing the contours of the eyelid, but “sculpting” the volumes of the eyeball and what surrounds it.

4. Each eyelid is thick and rises above the surface of the eyeball. In addition, the eyelids form characteristic folds of skin.

5. To learn how to draw eyes, you need to understand the shape of the eye socket, eyelids, and eyeball. To do this, I draw a conventional line in my drawing that repeats the “relief”. With this line, the shape of the eyes and all the curves are clearly visible. In the final version of the drawing, this line, of course, should not be drawn. I added it only for educational purposes.

6. For even greater clarity, I apply conventional shading according to the shape of the surface. The lines of this hatching show all the bends. Our drawing seems to consist of planes or edges with the help of which the form is “molded”. Such a “faceted” drawing helps to understand the essence of the form, without being distracted by unimportant details. This greatly simplifies the drawing process for beginning artists.

In conclusion of this stage of the drawing, I will also add that each person, of course, has his own unique shape of the eyelids, eyebrows, bridge of the nose... But we are all united by a number of features inherent in all people. Therefore my drawing wears conditional character, conveying these key features.
7. Next, I begin to convey volume using shading (read about how to shading). As you know, volume is conveyed according to the well-known law of chiaroscuro: the brightest place is the highlight, followed by light, after light - penumbra, then shadow, and finally - reflex. The result is a tonal stretch - from light to dark. Depending on the direction of the light, a person's face can be illuminated from above, below or from the side. Therefore, the transition from light to shadow can be not only from left to right, but also from top to bottom. Therefore, I shade the eyeball, eyelids, bridge of the nose, and eyebrow area, taking this moment into account. For example, the area between the eyebrow and the eye will be the lightest on the left and top, and the darkest part will be on the right and bottom. The same applies to the upper eyelid - it will be the lightest on the left, and the darkest on the right. This results in a tonal stretch from left to right. But the direction of light may be different. For example, a person’s head is illuminated not by the sun from above, but by a lamp from below. Then everything will be different. But the principle I'm talking about will remain. Therefore, you need to understand how light is distributed according to shape, on which side the light source is located, etc.

8. Now I am enhancing the shadows that were only outlined at the beginning of the drawing.

9. I continue to work, working on the tear duct and lower eyelid.

10. I draw the iris and pupil of the eye. This stage always interests people the most. How to draw eyes so that they look “life-like.” To do this, you need to understand a simple principle, which I have clearly outlined in the diagram below. If opaque spherical objects are light on the light side and dark on the shadow side, then transparent spherical objects can look exactly the opposite. Depending on what surrounds such a transparent object, it may look different. For example, often on the side of the illuminated part it is dark, and on the side of the shadow, on the contrary, it is light. It turns out that the usual chiaroscuro (flare, light, penumbra, shadow, reflex) will be absent here, since the object is transparent and shiny. Therefore, here you need to convey glare and reflexes (reflections) on the surface of the eyes. The iris and pupil are located under the transparent lens-shaped cornea of the eye. The shiny surface of the eye (cornea) reflects light in the form of glare. In addition, everything that surrounds the eye is reflected on the surface of the eye. These reflections (reflexes) will not be as noticeable as glare. The artist does not have to list all these reflections. You should choose the most interesting ones and focus on them. An excess of such details will not only complicate the work, but also spoil the drawing. Having completed this stage of the drawing, the eyes will turn out “alive”, with a “sparkle”.

11. Now about the eyelashes. Most often, you should not draw them in detail in a drawing. It is enough to simply outline a dark line on the upper eyelid. This line will look like a row of eyelashes. However in this tutorial I do detailed drawing. That's why I draw eyelashes in more detail than usual. But even in this case, they should not be drawn in the same degree of detail. For example, on one edge I make the eyelash row darker, and on the other, lighter. Those. I emphasize the center of the picture. Also, the clarity of drawing the eyelashes will be different: in some places they are more blurry, and in others they are clearer.
Have you wondered how to draw eyes realistically? It's not that difficult, just follow some rules and tips. Of course, the result will be far from perfect (only an artist can draw eyes as shown in the picture), but at least the eyes will not resemble motionless frozen balls. Some people think that the eye is like a tennis ball - round and that's it. They are mistaken: this organ is very complex in design, mobile, and in order to display the mentioned characteristics, it is not enough to draw a circle in the frame of the eyelashes. Many amateurs start drawing the eye from the pupil. But the drawing technique described below will teach you how to correctly depict this complex organ.
Drawing tutorial: step-by-step instruction
1. Be patient blank slate, a 2H soft graphite pencil, and a good soft eraser. First, draw an outline that resembles the shape of a tree leaf. Don't be afraid to mess up your drawing, because you're just learning. The lines should be light, barely noticeable; you will draw the rest of the details later.

2. Draw a circle for the iris and tear duct, the crease of the upper eyelid and the edge of the lower eyelid. The lower eyelid is usually poorly defined in portraits, but its presence is important. We do not clearly outline the middle of the upper eyelid.

3. Most eyes catch glare, and the angles at which it appears are clearly visible on the iris. The size and shape of the reflection may vary. How to draw eyes to make them look alive? Draw some highlights and see which arrangement you like best. If you end up with quite a lot of them, it doesn’t matter, you can erase the extra ones later.

4. Each person has an individual iris pattern, but each of them looks like the spokes of a bicycle. We continue to draw the pupil and iris with a unique pattern in a circle, because straight lines are boring. Create a more chaotic pattern of the iris, because this way its structure will look more natural.

5. Then darken the edges in the center of the iris and outside, thereby making the pupil three-dimensional. The pupil itself must be well painted over.

6. Leave the eyeball white, and the pupil and top part darken the irises as much as possible. You also don’t paint over the highlights, just slightly draw out the contours to make them look more natural. Learn to draw eyes that are realistic and beautiful.

7. Now we work on the white of the eye, applying shadows with strokes around the contour above the lower eyelid and under the upper eyelid, and slightly outlining the tear duct. The eye comes to life in a matter of minutes, all that remains is to add some important elements.

8. Deepen the eye using pencil shading: apply thin short strokes along the outer edges of the eye, highlighting the outer and inner corners of the eyelid.

9. To make the eye look natural, add some wrinkles at the inner edge of the lower eyelid. The lines are smooth, very light.

10. Now very important point- image of eyelashes. They should be natural, not twisted like a doll's. Be patient and move forward towards achieving your goal! You have practically mastered the basic techniques and now know how to draw life-like eyes. There is very little left. We draw the eyelashes as if they were sticking out of the paper. When you have marked the required number of hairs, go over them with a pencil again, only this time with pressure. You need to draw with jerky movements so that the ends of the eyelashes are thin, natural, and not cut off.

11. Then you need to add thin eyelashes with light tear-off strokes. The last two steps will create a natural look effect. And don't worry if the hairs look stuck together. Add a few thin lower eyelashes below, they should not be thick and dark like the top ones. Draw more boldly: even if they are not perfectly smooth, they look natural.

12. Add light volume around the eye with scribbles (if desired), using shading to highlight the inner corners of the eye and the outer corner of the eyelid. The eye is now just like a real one, isn’t it?

We hope that the given step-by-step instructions, which detail how to draw eyes in several steps, were useful to you.
In this tutorial we will look at natural eye drawing basics in profile, sideways and closed. Then we'll learn draw anime eyes characters from different angles, and also consider the examples given different styles eye.
Eyes are the mirror of the soul...
After all, they are the ones who make all people unique, showing our inner world. And in order to draw them correctly, we will look at the basics.

Consider a photograph of an eye (front view).
This is the real eye of a middle-aged man.
The eye has an almond shape, along the edge of which there are eyelashes of varying lengths, and folds and wrinkles around the eyes emphasize the contours of the eyeball.

In the drawing I indicated in which direction, from the edge of the eye, the eyelashes go. Please note that the eyelashes are curved and of different lengths. I also indicated which long eyelashes located around the eye (B-large eyelashes, M-small). Eyelashes are usually taller in the center of the eye and smaller towards the ends of the eye, but long eyelashes can also be drawn at one end (which is further from the nose).

Let's look at a photograph of an eye (side view).
Now the basic shape of the eye is triangular rather than almond shaped.
Eyelashes are curved and of different lengths. In the side view, the location of the lengths of the eyelashes around the eye is more clearly visible (B-large eyelashes, M-small eyelashes).


Half of the lower part of the almond shape is clearly visible near the eye, along the edge of which there are eyelashes of different lengths. Wrinkles at the top of the eye emphasize the contours of the eyeball.
Eyelashes are longer in the center and smaller towards the ends of the eye (B-large eyelashes, M-small).

Anime characters eyes

Let's take a look at the basic eye shapes.
The shape of the eyes expresses the character's personality. And also keep in mind that large eyes with large pupils are mainly suitable for girls and children, narrow eyes with small pupils for guys, men and women, and single-line eyes for older people.

When drawing anime eyes, always start with the shape of the eyelashes. Having decided on the shape, draw two straight lines that intersect at one point and touch the edges of the upper eyelash shape. This way we will define the contours of the eyeball. Then we complicate the eyelashes and draw the pupil.


If you want to draw a rounded eye shape, consider the following example.
At the base of these eyes, I always draw a circle first. Then I decide on the shape of the eyelashes and complicate them. After that, I make sure to erase the auxiliary circle. Now I’m finishing the pupil.

Examples of eyes (front view) with in different forms for reference.

Examples of eyes (side view) with different shapes for your reference.

There are mainly two types closed eyes: Curl the eyelashes up and down.
When the eyelashes bend upward, the emotion of happiness, joy and laughter is conveyed.
Eyelashes with a downward curve are drawn when they kiss, sleep, think, or are in a calm state.

Examples of closed eyes (front view) with different shapes for reference.

Examples of closed eyes (side view) with different shapes for your reference.
You can also see how the eyes change when drawing emotions by going to the lesson How to draw emotions.
This concludes the lesson! I hope it helps you in your creativity!
It has long been said that the eyes are the mirror of the soul. That they radiate warmth, love and tenderness. Or they can talk about pain and hatred. How to convey this on paper using a simple pencil? How to draw a human eye? You won't get any portrait if you can't draw it correctly. human eyes, convey the feelings and thoughts that shine in them. This short lesson will show you how to draw eyes correctly step by step.
Step 1. Preparation. Before you start drawing, choose what technique and what you will use to draw. In this lesson we will draw with simple pencils different hardness - B, 3B, 8B. This makes it possible to achieve greater depth and realism. It is best to use thick drawing paper that has smooth surface, the strokes on it are more expressive and of higher quality. Watercolor paper has a grainy texture, which is not very suitable for pencil drawing. In addition to pencils and paper, we will need a pencil sharpener, a rubbing cloth and a pen-shaped eraser.

Step 2. Let's start with the outline of the eye. Let's figure out how to draw a realistic eye with a pencil. To do this, we use a mirror to see our eye and draw it from life. We draw a sketch very thin lines, trying to press as little as possible on the pencil. This will allow us to easily erase everything unnecessary. If you press it hard, dirt and pressed lines will remain on the paper - our work will have a very untidy appearance. In order for the drawing to be of high quality, the pencils must be sharpened throughout the entire work.

Step 3. First, let's draw the pupil, for this we use the softest pencil - it will give saturation to the dark pupil without special effort. Then, using a pencil of the greatest hardness, shade the iris of the eye. She always has more dark color along the edges, so we carefully apply shading along the outer contours and more on top soft pencil. This will give the eye more depth.

Step 4. To make the surface of the iris look more impressive, gently rub the strokes using a soft cloth. Then we shade the dark part again with a 3B pencil and carefully rub it again. We repeat this procedure until we are satisfied with the result.

Step 5. So that the iris has more realistic look, you need to add small uneven radial strokes to its surface. They have a wave-like appearance and are directed from the center of the gas to its edges. Such strokes need to fill the entire surface of the iris.

Step 6. How to draw realistic eyes without touching the eyeball? This is impossible. After all, it has a spherical shape, which means it cannot remain just white. Therefore, we carefully apply shading to its edges. In this case, the closer to the outer edge, the strokes should be a little darker.

Step 7. Now let's draw the tear duct. We add depth to the darkest places with shading. You need to try to convey its moisture.

Step 8. Draw the lower and upper eyelids. Using shading we give them volume. We emphasize the fold of the upper eyelid with more intense shading. On the lower eyelid we highlight more bright places eraser.

Step 9. Now let's add eyelashes. The upper eyelashes are beautifully curved upward. To make them look more realistic, you need to draw the eyelash from the bottom line of the upper eyelid, go a little onto the eyeball and, turning the line, insert it upward. We finish the eyelash just above the crease. The growth line of the lower eyelashes is located at a short distance from the beginning of the lower eyelid. We draw them according to the same principle as the top ones, but make them much shorter. It is advisable to draw the eyelashes a little in different directions, which will give them a more natural look.