Paint like watercolors on wet in Photoshop. Light table - light table
Watercolor illustrations are very popular as a style in design projects. But you don't need to be a master at drawing on paper to get this image. With help Adobe Photoshop You can achieve a realistic watercolor effect using a set of filters. In today's lesson you will learn how to turn into watercolor drawing any photo.

The effect will imitate a hand-made watercolor painting. With help Photoshop filters We'll create a base for the effect, then bring the work to realism using paper texture and watercolor brushes.

To begin, open the photo of your choice in Adobe Photoshop. In our example, this is a photo of Golden Gate Bridge by Patrick Tomasso. Right-click on the photo layer and select Convert to Smart Object.

From the Filter menu, select Filter Gallery. Open the Artistic category and select Dry Brush. Specify the following options. Brush Size: 10, Brush Detail: 10, Texture: 1. Click OK to apply the effect.

Go back to the Filter Gallery, in the same section, and select Cutout. Set the parameters as follows: Number of Levels: 5, Edge Simplicity: 4, Edge Fidelity: 1.

In the Layers palette, double-click on the small options icon next to the filter name. Select blending mode/Pin Light/Spot light.

Go back to the Filter menu and select Blur > Smart Blur > Smart Blur. Specify the parameters as in the picture above.

Double-click on the filter settings icon and select the Screen blend mode at 50% opacity.

Select Filter > Stylize > Find Edges from the menu. Set the filter's blending mode to Multiply. This way, only the result of the selected edges will remain in the drawing, which will look like the sketch lines.

Find a paper texture like Ivory Off White Paper Texture. Paste the texture into the document and scale it to the desired size. Set the texture layer's blending mode to Multiply.

Download and install a set of watercolor brushes Watercolor Photoshop Brushes. Give the photo layer a mask and fill it with black. This will hide the entire photo. Take the Brush tool and select one of the watercolor brushes.

Select White color and clicking the brush in the layer mask, restore the image. Use the plus and minus keys to quickly vary the brush size. This way the result will be more realistic.
After a few clicks, select a different brush and other settings and continue working.

Now the good news. All filters and changes were applied to the photo in Smart Object mode. This means that if you want to apply the same effect to another photo, just double-click on the smart object, replace the photo in it and you won’t have to do anything else.
Translation – Duty room
In this tutorial we will create a watercolor illustration in Photoshop. In this tutorial, you'll learn how to create a spring abstract watercolor Adobe Photoshop illustration by combining photos, using splatter brushes, applying textures, and more.
Step 1.
Create a new document (Ctrl + N) 1200 x 800 px and fill it with white (Alt + Backspace). Open the first paper texture and drag it into your document, then select from the menu Editing > Transform > Rotate 90° counterclockwise (Edit > Transform > Rotate 90 CCW). Right-click on the layer and select Convert To. Then click Ctrl + T, right-click and select Flip Horizontally.
Reduce Layer Opacity up to 30%:


Step 2.
Open the second paper texture and using Rectangular Marquee Tool (M), make a selection in the upper left corner. Then take Move Tool (V) and drag this part into our document. Change Opacity up to 30%:

Step 3.
From the menu, select Layers > New Adjustment Layer > Color tone/Saturation (Layer>New Adjustment Layer>Hue/Saturation) and set the values: Hue +52; Saturation -59; Brightness +15.

Step 4.
Center the photo of the model in the document, then add a layer mask by clicking the Add Vector Mask icon (Add vector mask) at the bottom of the layers panel. Now, painting with a soft black brush in the mask, lightly erase the edges of the model so that it does not stand out from the background.

Step 5.
Next we use several adjustment layers (Layers > New Adjustment Layer – Layer > New Adjustment Layer) to reduce saturation and lighten the photo of the model:
1) Adjustment layer Hue/Saturation: Saturation -64;
2) Adjustment layer Color Balance:
Tone: Midtones, set the sliders to these values: -23; 0; -42; check the box Preserve Luminosity
3) Adjustment layer Curves (Curves): move the curve to the position shown in the figure.
Then I created a layer mask with curves and soft black Brush – Brush Tool (B) with Opacity 100% and 30% Hid some parts of the adjustment layer. See how it looks in the mask and in the image.


Step 6.
Drag the watercolor 1 file into the document and place it above the model layer. Convert to smart object (Convert to Smart Object) Multiply with Opacity 100%, then, adding a mask, erase the edges with a black brush:
Duplicate the layer (Ctrl + J) and move it to the right. Flip it horizontally (Ctrl + T, then right-click – Flip Horizontally). Use a mask to get a result similar to what you see below:


Step 7
Take the watercolor 2 file and place it under the model layer. Use a layer mask to hide the unwanted parts:
Duplicate the layer (Ctrl + J) and flip horizontally as you did in step 6. Use a mask to hide some parts. Thus, we “painted” the shoulders of our model in watercolor.


Step 8
Place branch 1 file in document, convert to smart object (Convert to Smart Object), resize (Ctrl + T) and place them on top of the model's head. Add a layer mask and use Polygonal Lasso Tool (L) to make a selection, then black hard (!) brush – Brush Tool (B) hide unnecessary parts of branches.

Step 9
From the menu, select Layers > New Adjustment Layer > Curves (Layer>New Adjustment Layer>Curves) holding Alt, left-click between the adjustment layer and the branches layer (this will snap the adjustment layer to the branches layer).
Change the position of the curve as shown in the picture to lighten the branches a little.

Step 10
Open the second image of branches. Any tool convenient for you (for example, Magnetic Lasso - Magnetic Lasso Tool (L) or Pen - Pen tool (P) select part of the branch, copy it and place it in the document to the right of the model's head and make two copies (Ctrl + J), flip one of them horizontally (Flip horizontally), you can also erase part of the third branch so they don't all look the same.


Step 11
The branches look darker than the rest of the illustration, so we'll lighten them. Group everything 3 branches (Ctrl + G) and change the blending mode to Normal. With the top layer active from the group, select from the menu Layers>New Adjustment Layer>Curves (Layer>New Adjustment Layer>Curves) and move the curve as shown below.
Due to the fact that we changed the group's blending mode to Normal The adjustment layer only affects layers within the group.


Step 12
Create a new layer (Ctrl + Shift + N) and place it on top in layer order. Select main color #a8ba81 and background #012955. Use Tool Rectangular Marquee Tool (M) to create a selection (see picture), then from the menu select Filter> Render> Clouds (Filter> Render> Clouds), apply it. Next, select Filter> Design> Mosaic (Filter> Pixelate> Mosaic), set the Cell Size parameter to 30.
Apply Filter > Distort > Polar Coordinates, check the Polar to rectangular box.


Step 13
Convert the resulting result to smart object, reduce its size and change the layer blending mode to Hard Light with Opacity 100%. Use transform (Ctrl + T) to rotate and place the layer on the model's right cheek. Erase unnecessary parts using a layer mask and a black brush.
Duplicate this layer (Ctrl + J) and move it to the left cheek, under the model’s eye. Hide the left part in the layer mask with a black brush.
Apply to layer Adjustment layer Color Balance in Clipping Mask mode- as we did in step 9. Adjustment layer options:
Tone: Midtones, set the sliders to these values: +33; +15; -17; check the box Preserve Luminosity


Step 14
Create a new layer, use hard Brush – Brush Tool (B): color #012955, size 10 px, press F5 and repeat the brush settings as shown below.
Draw a few dots under the model's left eye.
Double click on the layer and apply a style Gradient Overlay with the following settings:
-blending mode Hard Light
- Opacity: 100%
gradient from #012955 to #ffffff color
- uncheck Reverse
- check the box Align with Layer
- Style: Linear
- Angle: 90
- Scale: 100%


Step 15
Create a new layer and outline the shape of the lips using Pen tool (P). To create a selection from a path, right-click and select Select Area (Make selection). Fill the selection with color #779370 and change the layer blending mode to Hard Light with Opacity 100%:

Step 16
Create a new layer, select brushes from the set that you downloaded in the beginning, namely brush number 681 size 100 pixels. Select the main color #83192d. Holding Ctrl, left-click on the layer with the colored outline of the lips, and make a brush stroke. Change the blending mode of the brushstroke layer to.
Create a new layer and using the splatter brush no. 481 , select the main color #83192d and make one click on the model's chin, then also change the blending mode to Overlay (Overlay) with opacity 100%


Step 17
Place watercolor file 3 in the document in the area of the model's right eye, as shown below. Change the Blend Mode to, then use a layer mask and a soft black brush to hide the edges.

Step 18
Use adjustment layers Curves (Layer>New Adjustment Layer>Curves) and Color Balance (Layer>New Adjustment Layer>Color Balance) in Clipping Mask mode to change the color of the watercolor. Color balance settings: Tone: Midtones, set the sliders to these values: +100; +64; -100


Step 19
Place it in the document on a new layer watercolor file 4 and change the blending mode to Multiplication (Multiply) with opacity 100%.
Right-click on the layer and select Blending Options Hold down the Alt key drag the slider as shown below:
Then use a layer mask to hide the effect on and around the model's face.


Step 20.
Add an adjustment layer Curves (Layer>New Adjustment Layer>Curves) in clipping mask mode (Clipping Mask) and configure according to the picture below:

Step 21
Open the watercolor splatter set 5 and select the one shown in the picture, place it on the top right side of the model, then click Ctrl + T, right-click and select Warp, change the shape of the fragment.


Step 22
Use another watercolor piece from the set and place it to the left of the model's head. Repeat with the blending mode and mask as in the previous step.
Select from menu Layers > New Adjustment Layer > Hue/Saturation (Layer> New Adjustment Layer> Hue/Saturation) and set the values: Hue (Hue) +109; Saturation -32; Brightness +0.


Step 23
Add another watercolor piece from the set and place it as shown. Repeat the steps with the blending mode and mask as you did earlier.
Duplicate this layer (Ctrl + J), move it to the center of the model's head and use a mask to hide unwanted parts.


Step 24
Group watercolor layers (Ctrl + G) and change the group blending mode to Multiply (Multiply) with opacity 100%. Next, reduce the saturation using an adjustment layer Hue/Saturation with the following settings: Hue -124; Saturation -69; Brightness +0

Step 25
Place an image of a flower in the document and drag it to the center of the model's forehead. Create a new layer below the flowers layer and use a soft black brush with opacity 40-50% draw a shadow from the flowers.

Step 26
Change the shade of flowers using a layer Hue/Saturation: Hue +28; Saturation -33; Brightness 0

Step 27
Place one of the halftone set fragments into the document and place it to the left of the model. Then change the blending mode to Soft Light with 100% opacity, hide unnecessary parts using a mask and a black soft brush.
Next, select a bright fragment from the halftone set and place it in the center of the flowers on the model’s head. Change the blending mode to Multiplication (Multiply) with opacity 100% and erase the bottom part.


Step 28

Step 29
Create a new layer and place it above all layers . Use a soft brush with color #b4ad92 draw spots above the model's head, then change the blending mode to Overlay (Overlay) with opacity 100%. This will make the top part of the illustration a little brighter.

Step 30.
Select a few butterflies and place them in your document. Group the butterfly layers, change the group blending mode to Normal (Normal) with opacity 100%. Then create Layers> New Adjustment Layer> Curves (Layer>New Adjustment Layer>Curves) inside the group and change the position of the curve as shown in the figure.


Step 31
Create a couple more adjustment layers above all the layers for the final effect:
adjustment layer Gradient Map:
- gradient colors: #094b64 - #692e6a - #faf4d6
- uncheck the Dither and Reverse boxes
Set the blending mode of this layer to Soft Light with 100% opacity.
Color Balance:
Tone: Midtones, set the sliders to these values: -19; -18; -thirty; check the box Preserve Luminosity
3) Adjustment layer Levels: set the middle slider to 0.90


Step 32

What You'll Be Creating
In this tutorial I'll show you how to create a stunning watercolor effect. I will try to briefly describe all the steps so that anyone who opened Photoshop for the first time can follow this tutorial.
The effect that is created in the image above - I will show you how to create it in this tutorial. If you want to create more complex watercolor effects like the image below, but still create this effect quickly and easily, then you can use my Photoshop action TechnicalArt 2.
What you will need
To create this effect, you will need the following photo:
1. Let's Get Started
First, open the original photo you want to work with. To open the photo, go File – Open(File > Open), and then in the browser window, select your original photo. Click the button Open(Open). Now, before we get started, there are a couple of things that we need you to clarify:
- Your original photo must be in color mode RGB, 8 bit/channel(8 Bits/Channel). To check this, let's go Image - Mode(Image > Mode).
- For best results, the dimensions of your original photo should be within 2000–4000 px in width/height. To check this, let's go Image - Image Dimensions(Image > Image Size).
- Your original photo should be the background layer. If she isn't, then let's go. Layer - New – Background from layer(Layer > New > Background from Layer). Translator's note: The layer with the original photo should have a lock and represent the background.
2. Create Brushes
Step 1
In this part of the tutorial we will create five watercolor brushes that we will need. You can either download the textures attached to this tutorial and then repeat the entire process of creating brushes, or you can refer to Ivan Gromov's tutorial to find out or you can download my Photoshop Action TechnicalArt 2 and get over 60 watercolor brushes High Quality and permissions (in in this case. you can skip the entire paragraph).
Step 2
If you chose the first option and downloaded the textures, then open the first source texture in Photoshop. Next, let's go (Edit > Temporary_Brush_1(Temp_Brush_1).
Step 3
Editing - Define Brush(Edit > Define Brush) To define a texture as a brush, name this brush Temporary_Brush_2(Temp_Brush_2).
Step 4
Open the second source texture in Photoshop. Next, let's go Editing - Define Brush(Edit > Define Brush) To define a texture as a brush, name this brush Temporary_Brush_3(Temp_Brush_3).
Step 5
Open the second source texture in Photoshop. Next, let's go Editing - Define Brush(Edit > Define Brush) To define a texture as a brush, name this brush Temporary_Brush_4(Temp_Brush_4).
Step 6
Open the second source texture in Photoshop. Next, let's go Editing - Define Brush(Edit > Define Brush) To define a texture as a brush, name this brush Temporary_Brush_5(Temp_Brush_5).
Step 7
Now that we've defined our brushes, we need to adjust their settings and then redefine them as new brushes. Press the key ( B), and then right-click anywhere inside the canvas and in the window that appears, select the created brush Temporary_Brush_1(Temp_Brush_1), press the ‘ key Enter’. Next, let's go Window – Brush(Window > Brush) and in the brush settings window that appears, set the following settings, which are listed below:
Step 8
Now save this brush with the new settings as a new brush, to do this, click on the icon New brush Brush, name this brush Watercolor_Brush_1(Watercolor_Brush_1).
Step 9
Press the key ( B Temporary_Brush_2(Temp_Brush_2), press the ‘ key Enter’. Next, let's go Window – Brush(Window >
Step 10
New brush(new brush), which is located in the lower right corner of the panel Brush(Brush), name this brush Watercolor_Brush_2(Watercolor_Brush_2).
Step 11
Press the key ( B), and then right-click anywhere inside the canvas and in the window that appears, select the created brush Temporary_Brush_3(Temp_Brush_3), press the ‘ key Enter’. Next, let's go Window – Brush(Window > Brush) and in the brush settings window that appears, set the following settings, which are listed below:
Step 12
Now save this brush with the new settings as a new brush, to do this, click on the icon New brush(new brush), which is located in the lower right corner of the panel Brush(Brush), name this brush Watercolor_Brush_3(Watercolor_Brush_3).
Step 13
Press the key ( B), and then right-click anywhere inside the canvas and in the window that appears, select the created brush Temporary_Brush_4(Temp_Brush_4), press the ‘Enter’ key. Next, let's go Window – Brush(Window > Brush) and in the brush settings window that appears, set the following settings, which are listed below:
Step 14
Now save this brush with the new settings as a new brush, to do this, click on the icon New brush(new brush), which is located in the lower right corner of the panel Brush(Brush), name this brush Watercolor_Brush_4(Watercolor_Brush_4).
Step 15
Press the key ( B), and then right-click anywhere inside the canvas and in the window that appears, select the created brush Temporary_Brush_5(Temp_Brush_5), press the ‘ key Enter’. Next, let's go Window – Brush(Window > Brush) and in the brush settings window that appears, set the following settings, which are listed below:
Step 16
Now save this brush with the new settings as a new brush, to do this, click on the icon New brush(new brush), which is located in the lower right corner of the panel Brush(Brush), name this brush Watercolor_Brush_5(Watercolor_Brush_5).
3. Create a Background
Step 1
In this part of the tutorial we will create a background. Let's go Layer - New Fill Layer - Color(Layer > New Fill Layer > Solid Color) To create a new fill color layer, name this layer Background Color(Background color), set the fill color to #e5e5e5 .
Step 2
Now right-click on the created fill layer and in the window that appears, select the option Blending Options(Blending Options), apply a layer style Gradient overlay(Gradient Overlay). Set the following settings as listed below:
4. Create a Sketch
Step 1
In this step we will create a sketch. Go to the background layer (Background), and then press the keys ( Ctrl+J) to duplicate it. Next, move the duplicate background layer to the top, placing it on top of all other layers.
Step 2
Now press the keys ( Ctrl+Shift+U) to desaturate this layer. Next, let's go Filter - Filter Gallery - Stylization - Glows on edges(Filter > Filter Gallery > Stylize > Glowing Edges). Install Edge width(Edge Width) on 1
, Edge brightness(Edge Brightness) on 20
, And Mitigation(Smoothness) on 15
.
Step 3
Press the keys ( Ctrl+I) to invert this layer. Next, let's go Filter - Sharpen - Unsharp Mask(Filter > Sharpen > Unsharp Mask). Install Effect(Amount) on 500%
, Radius(Radius) on 1px, And Isohelium(Threshold) on 0
Levels.
Step 4
Change Blend Mode(Blending Mode) for this layer on Multiplication(Multiply), and also reduce the value Opacity(Opacity) up to 47% . Name this layer Sketch(Sketch).
5. Create a Watercolor Painting
Step 1
In this part of the tutorial we will create watercolor painting. Let's go Layer - New - Layer(Layer > New > Temporary_1(Temp_1).
Step 2
Brush(Brush Tool (B), set Watercolor_Brush_1(Watercolor_Brush_1). Set the brush diameter to your liking, and then paint with the brush as shown in the screenshot below.
Step 3
While holding down ( CtrlCtrl+J Temporary_1(Temp_1).
Step 4
Now reduce Opacity(Opacity) of this layer to 56% and then name this layer WP_1.
Step 5
Let's go Layer - New - Layer(Layer > New > Layer) to create a new layer, name this layer Temporary_2(Temp_2).
Step 6
Now set the color foreground to #000000 , select a tool Brush(Brush Tool (B), set Watercolor_Brush_2(Watercolor_Brush_2). Set the brush diameter to your liking, and then paint with the brush as shown in the screenshot below.
Step 7
While holding down ( Ctrl), click on the thumbnail of this layer to load the active selection. Next, turn off the visibility of the temporary layer, and then go to the background layer (Background), press the keys ( Ctrl+J) to create a new layer using the selection. After that, move the new layer to the top of the layers panel, placing it below the layer WP_1.
Step 8
Now reduce Opacity(Opacity) of this layer to 40% and then name this layer WP_2.
Step 9
Go to layer WP_1 and then we go Layer - New - Layer(Layer > New > Layer) to create a new layer, name this layer Temporary_3(Temp_3).
Step 10
Now set the Foreground color to #000000 , select the tool Brush(Brush Tool (B), set Watercolor_Brush_3(Watercolor_Brush_3). Set the brush diameter to your liking, and then paint with the brush as shown in the screenshot below.
Step 11
While holding down ( Ctrl), click on the thumbnail of this layer to load the active selection. Next, turn off the visibility of the temporary layer, and then go to the background layer (Background), press the keys ( Ctrl+J) to create a new layer using the selection. After that, move the new layer to the top of the layers panel, placing it below the layer WP_2.
Step 12
Now reduce Opacity(Opacity) of this layer to 62% and then name this layer WP_3.
Step 13
Go to layer WP_1 and then we go Layer - New - Layer(Layer > New > Layer) to create a new layer, name this layer Temporary_4(Temp_4).
Step 14
Now set the Foreground color to #000000 , select the tool Brush(Brush Tool (B), set Watercolor_Brush_4(Watercolor_Brush_4). Set the brush diameter to your liking, and then paint with the brush as shown in the screenshot below.
Step 15
While holding down ( Ctrl), click on the thumbnail of this layer to load the active selection. Next, turn off the visibility of the temporary layer, and then go to the background layer (Background), press the keys ( Ctrl+J) to create a new layer using the selection. After that, move the new layer to the top of the layers panel, placing it below the layer WP_3.
Step 16
Now name this layer WP_4.
Step 17
Go to layer WP_1 and then we go Layer - New - Layer(Layer > New > Layer) to create a new layer, name this layer Temporary_5(Temp_5).
Step 18
Now set the Foreground color to #000000 , select the tool Brush(Brush Tool (B), set Watercolor_Brush_5(Watercolor_Brush_5). Set the brush diameter to your liking, and then paint with the brush as shown in the screenshot below.
Step 19
While holding down ( Ctrl), click on the thumbnail of this layer to load the active selection. Next, turn off the visibility of the temporary layer, and then go to the background layer (Background), press the keys ( Ctrl+J) to create a new layer using the selection. After that, move the new layer to the top of the layers panel, placing it below the layer WP_4.
Step 20
Now name this layer WP_5.
Step 21
Go to layer Temporary_1(Temp_1), and holding down the key ( Shift), click on the layer Temporary_5(Temp_5) to select all intermediate layers. Next, right-click on the selected layers and in the window that appears, select the option Delete layers(Delete Layers).
Step 22
Now go to the layer WP_1 and then we go Filter - Filter Gallery - Imitation - Watercolor(Filter > Filter Gallery > Artistic > Watercolor. Set Detailing(Brush Detail) on 14
, Shadow depth(Shadow Intensity) on 0
, And Texture(Texture) on 1
.
Step 23
Now repeat the previous step to apply the same filter to the remaining watercolor layers.
Step 24
Go to layer WP_1, and holding down the key ( Shift), click on the layer WP_5 to select all intermediate layers. Next, let's go Layer - New - Group of layers(Layer > New > Group from Layers) to create new group from the selected layers, name this group Watercolor painting(Watercolor Painting).
6. Create a Texture
Step 1
In this step we will create a texture. Let's go Layer - New - Layer(Layer > New > Layer) to create a new layer, name this layer Texture(Texture).
Step 2
Now let's go Editing - Fill(Edit > Fill). Install Content(Contents) on 50% gray(50% Gray), Mode(Mode) on Normal(Normal) and Opacity(Opacity) on 100% .
Step 3
Let's go Filter - Filter Gallery - Texture - Texturizer(Filter > Filter Gallery > Texture > Texturizer). Install Texture(Texture) on Canvas(Canvas) Scale(Scaling) to 200%
, Relief(Relief) on 4
, And Light(Light) on Above(Top) as below:
Step 4
Now change the blending mode of the texture layer to Soft light(Soft Light).
7. Conduct Final Color Correction
Step 1
In this part of the tutorial we will make some final color adjustments to complete our effect. Let's go Layer - New Adjustment Layer - Curves(Layer > New Adjustment Layer > Curves) to create a new adjustment layer with curves. Name this adjustment layer Color Look_1.
Step 2
Properties(Properties), set the settings as shown in the screenshot below:
Step 3
Reduce Opacity(Opacity) up to 46% .
Step 4
Go to layer Texture(Texture) and then go (Layer > New Adjustment Layer > Color Look_2.
Step 5
Double-click on the thumbnail of this adjustment layer and in the panel window that appears Properties(Properties), click on the gradient scale to open the window Gradient Editor(Gradient Editor). Set the settings as shown in the screenshot below:
Set the left color control point to 290a59 and the right color control point to ff7c00.Step 6
Soft light Opacity(Opacity) up to 33%
.
Step 7
Go to layer Color_Look_1. Press the key ( D) to set the default foreground and background colors, and then go Layer - New Adjustment Layer - Gradient Map(Layer > New Adjustment Layer > Gradient Map) to create a new adjustment layer with a gradient map. Name this adjustment layer General contrast(Overall Contrast).
Step 8
Now change the blending mode for this layer to Soft light(Soft Light), and also reduce Opacity(Opacity) up to 37% .
Step 9
Let's go Layer - New Adjustment Layer - Vibration(Layer > New Adjustment Layer > Vibrance) To create a new adjustment layer with vibration, name this layer General Vibration/Saturation(Overall Vibrance/Saturation).
Step 10
Now double-click on the thumbnail of this adjustment layer and in the panel window that appears Properties(Properties), set the value Vibrations(Vibrance) on +33
, and the value Saturation(Saturation) on +19
, as shown in the screenshot below:
Step 11
Press the keys ( Ctrl+Alt+Shift+E) to create a merged layer, and then press the keys ( Ctrl+Shift+U) to desaturate this merged layer. After that we go Filter – Other – Color Contrast(Filter > Other > High Pass). Install Radius(Radius) on 2px, as shown in the screenshot below:
Step 12
Change the blending mode for this layer to Hard light(Hard Light), name this layer Overall Sharpness(Overall Sharpening).
We have completed the lesson!
Congratulations, you did it! You can see the final result in the screenshot below.
If you want to create more complex watercolor effects like the image below using one click of the mouse and still create this effect quickly and easily, then you can use my Photoshop action TechnicalArt 2.
The way the action works is that you simply brush over your object that you want to apply a watercolor effect to and run the action, and the action does the work for you, creating the effect with all the layers that are easily customizable. The action also includes 60 high-quality watercolor brushes that you can use in your other projects. The action also creates four textures (watercolor, canvas, paper and halftone) and offers) 25 color solutions to choose from.
Using this action, you can turn your photos into professional artistic watercolor works without any work! All you need to do is paint over your photo with a brush and start the action. The action will do all the work for you in just a couple of minutes, creating an effect with all layers that are easily customizable.
Do you want to create beautiful picture watercolor without any complex manipulations? With Photoshop, you can turn any photo into a stunning watercolor painting in just a few minutes. simple steps! In this tutorial, you'll learn how to use blending modes and a filter gallery to turn your photos into... art paintings! So let's get started!
Final result:
Step 1
Open the original Venice image in Photoshop program. For the best effect, try to choose photos with landscapes or architecture. They are best suited for transmission traditional style watercolors. Duplicate the Venice layer (Ctrl+J).

Step 2. Apply filter Imitation (Artistic)
Being on the duplicate layer, go Filter - Filter Gallery - Simulation - Sponge(Filter > Filter Gallery > Artistic > Sponge). Install Brush size(Brush Size) 1, Contrast(Definition) 4 and Mitigation(Smoothness) 3.

After applying the filter, the result should be like the screenshot below.

Step 3: Finishing Effects
Now copy/paste the Watercolor texture onto our working document. Using a tool Free Transformation(Free Transform (Ctrl+T)), apply scaling to the watercolor texture to fit the size of the working canvas. Place the watercolor texture below the duplicate Venice layer.

Step 4
Let's create a watercolor effect! Change the blending mode of the Venice duplicate layer to Hard light(Hard Light).

Next, change the blending mode of the watercolor texture layer to Glow(Luminosity). Make sure the blending mode for the original Venice layer is set to Normal(normal).


And that is all! I hope you enjoyed this tutorial. Good luck, feel free to post your work! See you again!
Final result:

We recently looked at seven simple watercolor painting techniques, and if you've mastered them, then it's time to move on to something more complex and interesting. Today we will look at six more interesting techniques that will help you create your own masterpiece.
Spray
We wet the bottom of the paper to see what would happen.
This technique quite simple. Just put paint on the brush and start tapping the bristles of the brush on your finger so that the splashes scatter chaotically
If your brush is too wet, it will be difficult to control the splatter. Therefore, shake a few drops off it, and only then get to work.
If you don't like hitting your fingers with the brush, you can use any improvised means, a pen, for example.

Before we start splashing our paint, we'll place some pieces of paper in the top corner of our canvas.
We also wet the bottom edge of the sheet clean water and painted it light purple.
Look for the old one toothbrush, rinse it and remove all remaining toothpaste. And get ready for chaos.

There are several ways to get paint onto your toothbrush. You can dip it in paint, which makes it very difficult to fill the bristles with paint. You can try filling your toothbrush using a brush. This way you can control the amount of paint.

Take a toothbrush and swipe thumb along the stubble. You can also use improvised means. Choose a tool that you can use to spray paint off the bristles. Notice how the speed of your movements and the distance of the brush from the paper affect the paint atomization.

When you want to spray paint of a different color, rinse your toothbrush thoroughly and dry it with a towel.
Don't worry if you don't get this technique as well as you'd like. Practice and you will succeed.

As you can see, it turns out quite interesting effect. Use the available tools that you have, use your imagination and be creative in your drawing.

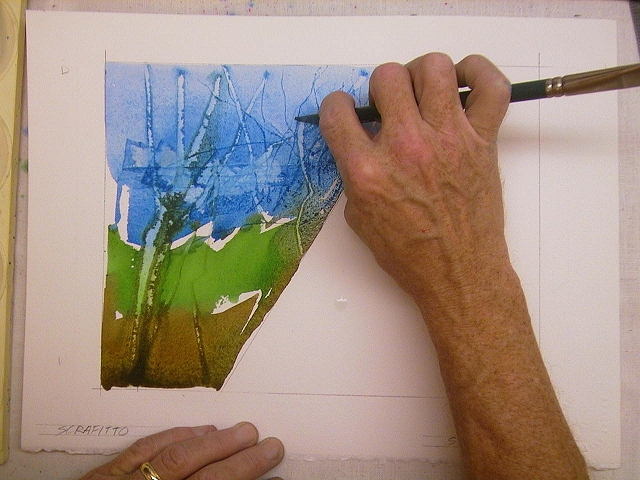
Sgraffito and stamps
Sgraffito is Italian term, which refers to a scraping technique associated with wearing away the top coating of ceramics to expose the layers underneath.
In the example, we scraped off the paint using a pocket knife. If you haven't scraped yet dried paint, which has been absorbed deeply into the paper, you will get dark lines.
If used wisely, this technique can be used to create interesting landscapes by scraping out the shapes of trees and other flora.

You can use old credit cards to scrape off paint. Use a smooth side card to sweep away any remaining paint.

Many brushes have a pointed edge. You can use these brushes to create fine lines.
It is very important to understand at what interval you need to start scraping. Practice on a separate sheet of the same paper and with the same colors.
A stamp is the application of paint by pressing other objects onto paper. You can choose any material to create stamps. Try everything you can get your hands on.
In this example, we are using facial tissues. Let's fill them with paint and put stamps on them. top part paper.

You can also use a sponge. With its help we will depict grass.
You can play with textures using various materials. Experiment!

Don't be afraid to use body parts for stamps. Everything can be used!

Washing out
Relatively simple technique will help you create unusual and interesting textures.
First, cover the top of the paper with blue paint.

Then quickly paint the rest of the canvas red. This is what our drawing will look like at this stage.

Now rinse your brush thoroughly and refill it with clean water. Using light brush strokes, sprinkle drops of water onto the still wet paint.

Continue spraying water until you are satisfied with the result.
How far the paint has dried can be determined by the force of the water on it. Note that what more water fell on the same area, the lighter the shade of paint there became.

Don't be discouraged if you can't control the blur. You most likely will not succeed, since it is quite difficult to influence this process.

Experiment with the amount of water, colors and how dry the paint is. This technique can help you create an interesting and textured background.

We use alcohol
You will need cotton swabs and alcohol.

Paint your sheet thickly with paint.

Create the background color you want and get ready for the fun.

Dip a cotton swab into alcohol and start dripping it onto the paint.
Alcohol, when it gets on the paint, repels it, creating a light spot.

Try dripping alcohol onto the paint as it dries to see the effect.
It turns out quite nice, doesn't it?

This interesting technique allows you to create unusual textures.

We use salt
Obviously we will need salt for this technique.

Let's draw the sky and the hill.

Our second hill will be raspberry in color, let's mix it a little with the first hill to get an interesting transition.

Now take salt and sprinkle it on our drawing. After a few minutes, add a little more salt. It pushes the paint away from itself, creating an unusual texture.

Let's wait until it all dries and see what happens next.

Once the design has dried, the effect the salt created becomes more visible.
Shake the salt off the drawing and enjoy the result.

It is better to use a sponge to brush off the salt. This way you don't damage the paint. Clean the drawing with light movements, try not to rub it.

The salt absorbed the paint, creating great amount star-like specks.
It is worth noting that coarse salt will leave larger specks, and fine salt will leave smaller ones.