How to sew men's pants. Pattern for men's trousers step by step.
Size from 58 and above, White color, checkered, striped, pattern selection + 30% to the order cost
Sewing men's trousers
Trousers- number one clothing for any man, especially those involved in business. Wool trousers will keep you warm cold winter, linen - will allow the skin to “breathe” in the summer. They can be worn with a sweater or light pullover every day.
Tailoring men's trousers to order
Tailoring to order has a number of advantages compared to buying them. Firstly, tailoring any trousers is an entire art, so only tailoring to order according to individual measurements allows you to achieve the ideal line exactly according to your figure. In addition, in the studio you can order a model that best suits your appearance, age and physique. Combining different styles, colors and styles, you will achieve a variety of wardrobe and definitely will not go unnoticed. In addition, when choosing custom tailoring, you can be sure that the clothes will not lose their original appearance for a long time.
We invite you to visit our studio in Moscow. One of the areas of activity is tailoring men's trousers to order. We do modeling and tailoring inexpensively compared to other Moscow studios.
The atelier will tailor tailor-made trousers of any style:
- Classic straight trousers
- Skinny men's trousers
- Tapered men's trousers
- Original cut: Bermuda shorts, cargo shorts, chinos
- Other styles are inexpensive!
The studio is constantly improving the technology of sewing trousers and updating equipment. Modernized equipment, combined with the experience and skill of experienced Moscow workers, gives us the right to guarantee the quality of tailoring and claim that you will be satisfied with your order. Pay inexpensively and enjoy the results for a long time. We are waiting for your orders in the Moscow studio!
Patterning men's trousers is simple and doesn't take long. Classic pants always made a man stylish and elegant. In stores, suits are sold in standard sizes, but most often it happens that the figure has flaws and needs to be hidden.
Patterning trousers is not that difficult to make, the main thing is to know the basics for its construction.
Materials and tools
Tape measure;
Large sheet of paper;
Pencil;
Master class on pattern making
Before making a pattern, you need to take a measuring tape and take measurements. The full length of the trousers, knee length, step length, hip and waist circumference are measured. Creating a pattern is not particularly difficult, but you need to be careful.
To do this, take paper and draw a right angle in the upper left corner. The top is point T. From this point, set aside the length of the trousers and mark point H at the bottom. From point T, set aside the circumference of the hips with a margin of 2 cm, mark Y.
From bottom to top, draw the length of the step (it coincides with point I). Now, from point T, set aside the length of the trousers to the knee and mark with point K. In order to set aside the waist line, you need to draw a line to the right of point T, then set aside half the waist circumference on it with a margin of 6 cm for the fold and mark with point T1.
Now let’s set the step width. From Y1 we set aside 1/10 of the half-circumference of the hips to the right with a margin of 0.5 cm, place point Y2. Now from point Y1 we put 7.5 cm up and put point Y4. Then connect Y2 and Y4. After this, we divide the resulting line in half with point B (for the codpiece). Now connect the same points P2 and P4, only with a curved line.
From point K we draw a line to the right, on which we mark 30 cm (regardless of the size). Mark point K1. Do the same on the bottom line. Now connect H1 with Y2 and K1.
For a side cut, you need to set aside cm from K1 and mark point K2. Then connect I and K2. From H, move 2 cm to the right and place point H2. Connect K2 and H2. The segment R2 must be divided in half and point R3 must be placed. From this point, draw a line to the waist line and down to the knee line and place points K3 and H3 respectively.
To draw the bottom line, you need to set aside 1 cm from point H3 and draw a line to points H and H1. In order to make a side pocket, set aside 4 cm from point T and mark A. Set aside 18-20 cm from it, this will be point A1 and connect these points with a smooth line.
We do the back half of the trousers like this: from I, measure 1/8 of the half-circumference of the hips with a margin of 4 cm, this is point Z5. From point T2, draw a line upward, put 1/10 of the half-circumference of the hips on it, and mark point T3. From it we lay a line to the right 6 cm, mark point T4.
From Y1 we measure 7.5 cm up and mark point Y6. Smoothly connect T4, R6, R5. The result is the outline of the posterior elephant. Then we measure 4 cm from K1, put point H4. We connect H4, K4, Z5 with a straight line. As a result, we get the outline of the back half of the trousers (stepping).
In order to draw a waist line, you need to draw a line at an angle to the left of point T3, passing through T. On the line, measure half of the half-circumference and place point T5. Now you need to connect K2, T5, H2 - this will be the side contour of the back half of the trousers.
For the dart, you need to set aside 10 cm to the right from H5, also mark the closed dart with a depth of 3 cm and a height of 10 cm. For the lower back half of the trousers, you need to set aside 1 cm down from H3, put points H5. Connect the points H2, H5, H4.
The pattern is ready!
Video materials on the topic of the article
Jeans pattern:
How to cut trousers directly on the fabric:
Basic pattern:
How to take measurements:
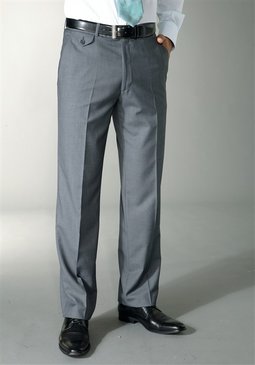
Look at these chic men's trousers! They fit perfectly! Is it really possible to sew these? Can! - we convincingly declare. We invite you to sew men's trousers using our basic pattern. If you have never done this before, believe me, sewing men's trousers is not much more difficult than women's.
The pattern of men's trousers is constructed in a similar way women's pattern, and we will tell you in detail the technology of modeling and sewing men's trousers.
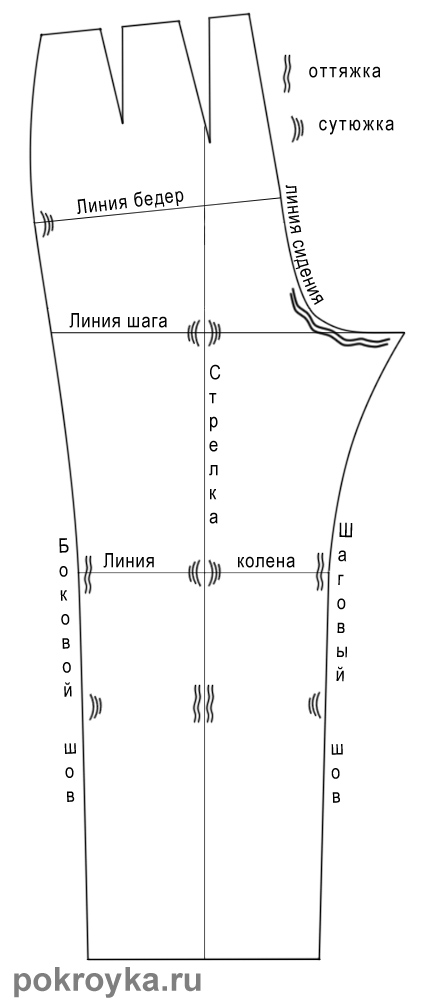
Rice. 1. Pattern of the front half of men's trousers
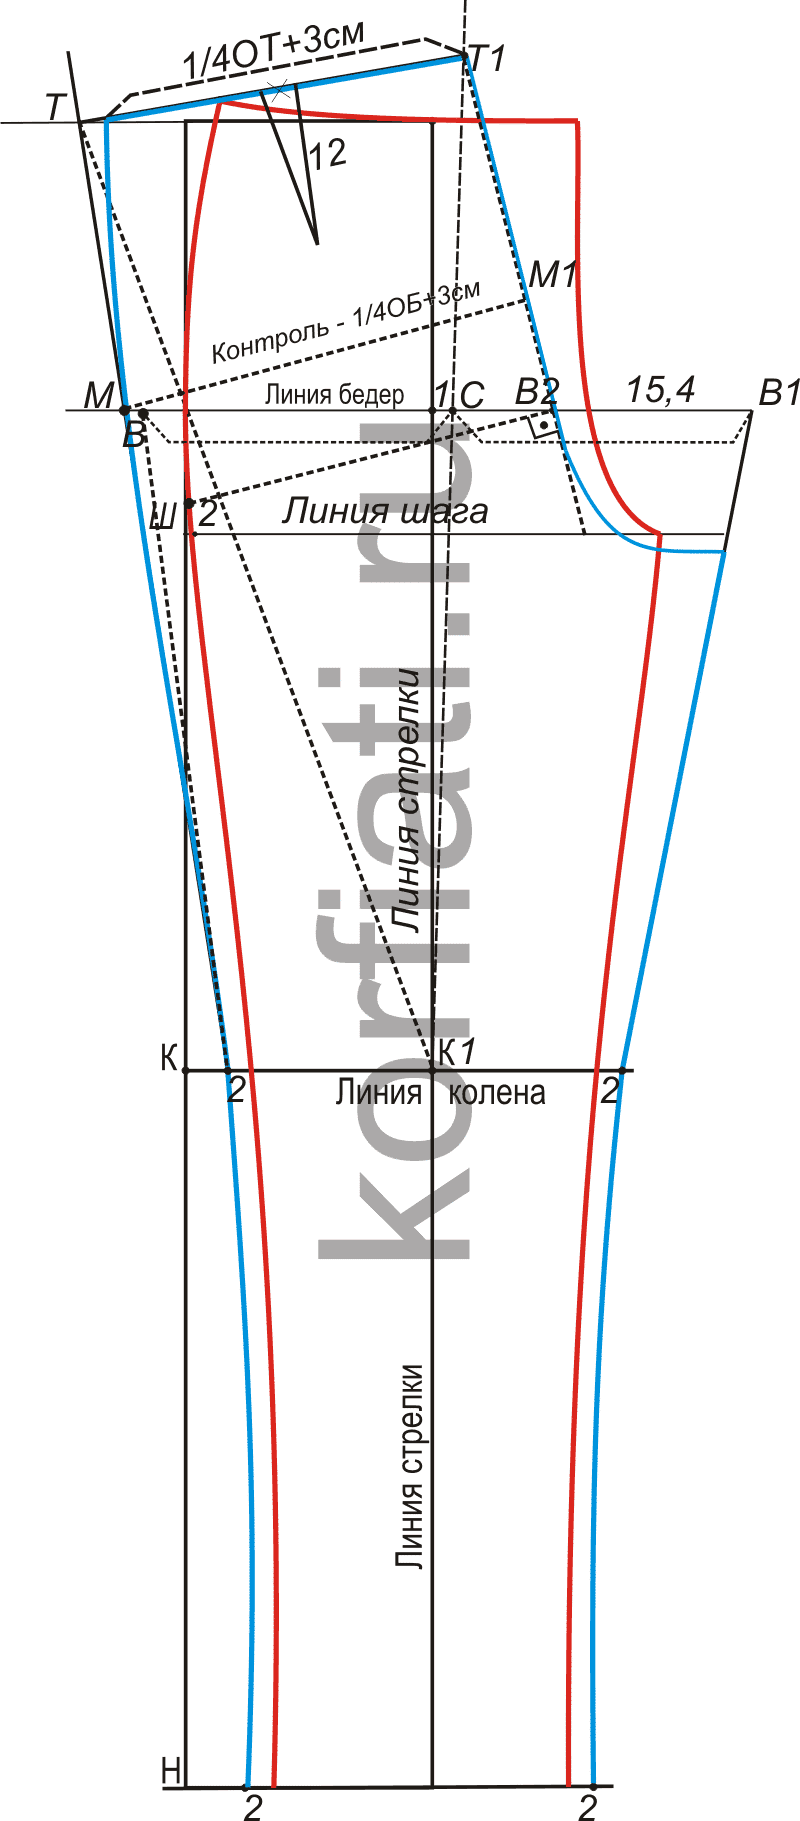
Rice. 2. Pattern for the back half of men's trousers
Construction of the basic pattern for men's trousers with a pleat
1st stage of pattern construction
Before you start creating a pattern for men's trousers, you need to take the following measurements:
…………………………………………………1/2 1/4
Waist circumference (FROM)– 88 cm 44 cm 22 cm
Hip circumference (H)– 102 cm 51 cm 25.5 cm
Width of trousers at the bottom (WH) – 47 cm 23.5 cm 11.75 cm
Side trouser length (DB) – 106 cm
IMPORTANT! If the customer has excess volume on the stomach and it is more convenient for him to wear trousers just below the waist line, all measurements should be taken along the waist line at waist level (). In this case, the length of the trousers is measured from line 2a to the floor.
Leg length by inside(Step length) – 81 cm
Seat height (VS)– 25.5 cm (Measured in a sitting position along the back from the waist to the seat surface, see).
Knee height – 46.6 cm (1/2 LW +1/10 LW minus 2)
2nd stage of pattern construction
Additional calculations for creating a pattern for men's trousers
Width of the front half of the trousers (SHPPB) = 1/4 OB +1 cm = 25.5 + 1 = 26.5 cm
Total step width (GSW) = 1/4 OB – 4 cm = 25.5 – 4 = 21.5 cm
Step width of the front half of the trousers (SHPB) = 1/10 x POB (half hip circumference) + 1 cm = 5.1 + 1 = 6.1
Step width of the rear half of the trousers (ШШЗП) = ОШШ minus ШШПБ = 21.5 - 6.1 = 15.4 cm
Width of the back half of the trousers (SHZPB) = 1/4 OB + 3 cm = 25.5 + 3 = 28.5 cm
Total width of the back half of the trousers = ShZPB + ShShZP = 28.5 + 15.4 = 43.9 cm
½ OSHP = 43.9: 2 = 22
Construction of the basic pattern for men's trousers
3rd stage of pattern construction
Construction of the front half of the trousers
Place point A in the upper left corner and move down from it - AN = 106.5 cm - the length of men's trousers on the side.
From point H, move up - Knee height NK = 46.6 cm - point K, Step length NS = 81 cm - point W.
Trouser hip line. From point W (Step Length), set aside 1/10 of ½ Hip Circumference plus 3 cm: 51/10 + 3 = 8.1 cm – point B.
Draw horizontal lines from points A, H, K, W, B.
From point B to the right along a horizontal line, measure the Width of the Front Half of the Pants (SHPPB) = 26.5 cm - point B1. From point B1, swipe up and down vertical line until it intersects with the top and bottom lines.
Extend horizontal line BB1 to the right. From point B1 to the right, set aside the Step Width of the Front half of men's trousers - 6.1 cm - point B2.
Arrow line. Cut BB2 in half and draw an arrow line through the resulting point on the front half of men's trousers.
From the arrow line along the bottom of the pattern of men's trousers, measure to the left and right the width of the front half of the trousers, calculated by the formula ¼ Width of the bottom of the trousers according to the measurement minus 1 cm: 11.75 - 1 = 10.75 cm.
From the obtained points, set aside 0.5 cm inward and connect the obtained points with points B and B2 with straight lines - auxiliary lines of the side and step cuts.
Narrow the pattern of men's trousers at knee level by 1.5 cm, drawing the side and step cut lines along the patterns.
Front waist length of trousers. A1A2 = ¼ FROM (waist circumference) plus 3 cm - on the fold - 25 cm.
Raise the side cut line by 0.5 cm. Design the waist line of men's trousers as shown in pattern 1.
Bow line of men's trousers. Set aside ½ Ш1Ш2 up. From point B1, set aside 0.5 cm to the right. Draw a bow line along the pattern as shown in the pattern of men's trousers 1.
4th stage of pattern construction
Constructing the back half of the trousers
The pattern for the back half of men's trousers is based on the front half of men's trousers.
Extend the horizontal lines on the front half pattern to the left and right.
To obtain side and step cuts at the bottom line of the trousers and the knee line of the trousers, set aside 2 cm outward and connect the resulting points.
Arrow line. On the line of the hips from the arrow line of the front half of the trousers, set aside 1 cm to the right - point C - draw the arrow line of the back half of the men's trousers.
From point C, to the right and to the left, measure ½ of the Total Width of the Back Half of the Pants - 22 cm each - points B and B1.
Connect these points with the points at the knee level - auxiliary lines of the side and step sections of men's trousers are obtained.
From point B1 to the left, set aside the Step Width of the Back Half of the Pants - 15.4 cm - point B2.
On the front half of the trouser pattern, from the step length line - point W - set aside 2 cm upward to create a line for the middle cut of the trousers for the back half. Connect points 2 and point B2. Draw a perpendicular ( auxiliary line construction) to line 2-B2.
The hip line of the back half of men's trousers MM1 is drawn parallel to line 2-B2 so that point M lies on the hip line and the length of the segment MM1 is equal to ¼ OB + 3 cm.
ADVICE! If you want your pants to fit around your hips, reduce the increase to 1 or 2 cm.
The length of the crotch seam of the back half of the trousers is equal to the length of the crotch seam of the front half of the trousers minus 0.7 cm. The crotch seam of the back half of the trousers is drawn slightly concave. Draw the line of the middle seam of the back half of the trousers according to the pattern.
Waistline of the back half of the trousers. Connect point 2 on the knee line and point M - at the intersection with the waist line of the front half of the trousers we get point T.
K1T=K1T1. point T1 must lie on the perpendicular to the segment 2B2. TT1 – the waistline of the back half of men’s trousers.
Calculation of the waist length of the back half of the trousers. The waist length of the back half of men's trousers is 1/4 FROM + 3 cm for the dart - 22 + 3 = 25 cm. The dart is made in the center, 12 cm long.
Design the side of the back half of men's trousers and the line of the back seam of men's trousers according to the pattern.
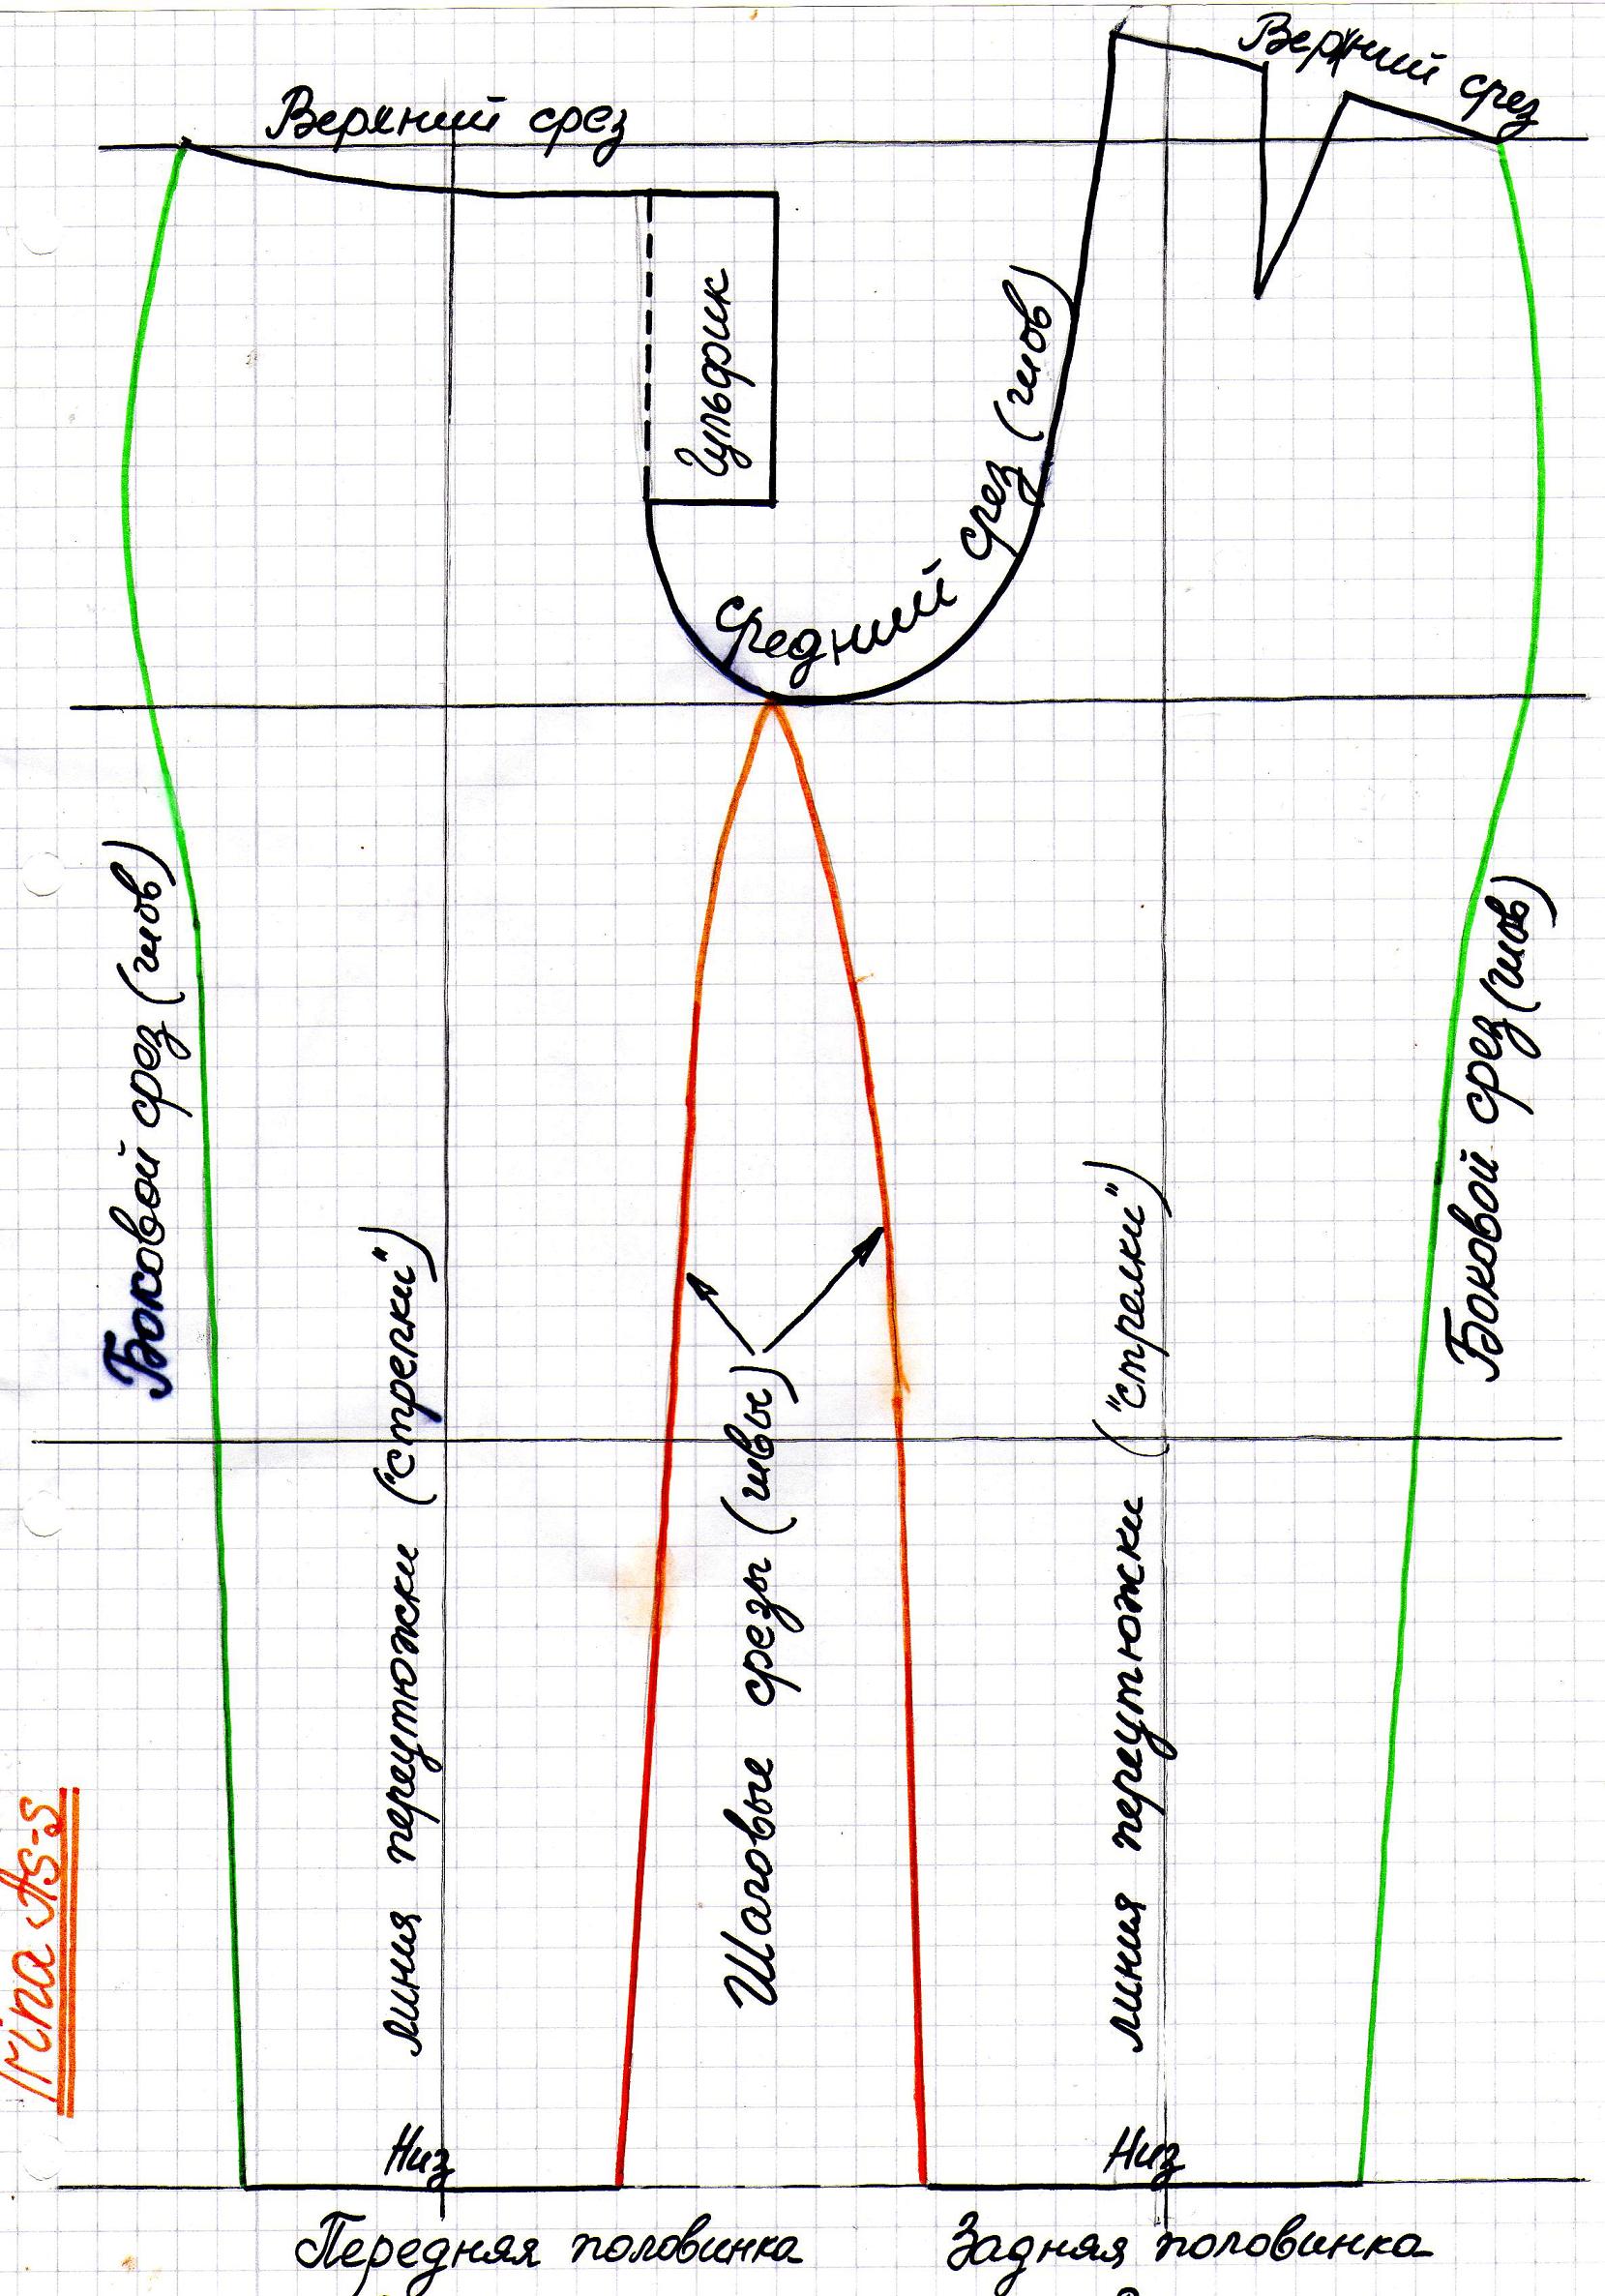
Trousers are the most popular type of clothing. Today they are worn by both men and women. That is why this master- the class on sewing trousers is very popular.
When sewing there is not much difference between men's or women's pants you are sewing. Men's ones generally have a complete “gentleman's set”: side and back pockets, a codpiece fastener in the front, and a belt with belt loops.
While women's may or may not have all this, and then their tailoring is much simpler. But in this sewing lesson we will look at sewing men's trousers as the most complete. If your women's trousers have all these elements, then you do everything in the same way.
When considering the technology of sewing trousers, we proceed from the fact that we have tested the pattern. And the trousers themselves are unlined. All elements " gentleman's set“We have already covered it in the preliminary master classes and now we will go through the entire cycle.
 f.1
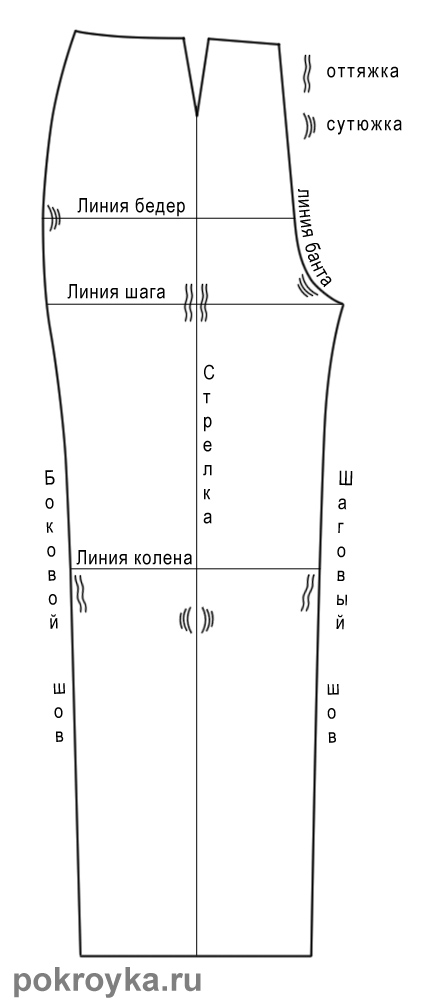
By look again at the names of all the seams on the trousers to have an idea if they are mentioned.The middle seam is the same as the seat seam
f.1
By look again at the names of all the seams on the trousers to have an idea if they are mentioned.The middle seam is the same as the seat seam
Sewing occurs in the following order:
1. If you If so, then perform x first of all on the parts of the front halves of the trousers.
2. Complete if available. Next, process the side and step cuts with an overlock or zig-zag
3. Now a little about the so-called preliminary wet-heat treatment
trousers
General trends in the field of factory fashion, they are taking the path of reducing the time for WTO (wet heat treatment) in general and for preliminary wet heat treatment in particular. Therefore, these technologies are gradually being forgotten. Modern fabrics with an admixture of stretchable fibers have partially eliminated the need for preliminary WTO, but if the fabric is without elastane admixtures, then it is better to do such treatment, because it is not possible to achieve the desired fit by cutting alone.
From all of the above, decide for yourself whether or not to perform a preliminary OBE in your case.
Below is the show only parts of the required preliminary WTO , since the trousers shown in the example are made of cotton fabric, which also only partially requires modification of the cut by ironing.
But on jeans, I note, they do not do any preliminary Wet-Heat treatment at all, although they are also cotton. Preliminary WTO is needed for trousers with arrows, i.e. classic shape.
The model in the example is made of cotton fabric with arrows. These trousers cannot be called completely classic, but they are not jeans either, so I decided to do at least a partial preliminary OBE.
You can see how to completely carry out preliminary wet-heat treatment.
So:
Photos enlarge when clicked!
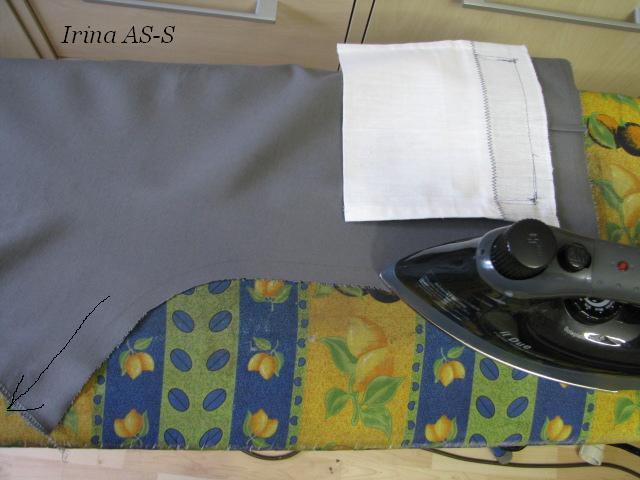
Work with rear halves , middle seam guy. This seam is subjected to heavy loads; when sewing, it is even stitched twice because of this. Preliminary tightening is also intended to give this area more elasticity and readiness for subsequent loads.
 f.2
Right hand hold the iron and move it along the middle seam, with your left hand pull the step cut from top to bottom as the arrow shows (your left hand is holding the camera at this time, so it is not in the photo)
f.2
Right hand hold the iron and move it along the middle seam, with your left hand pull the step cut from top to bottom as the arrow shows (your left hand is holding the camera at this time, so it is not in the photo)
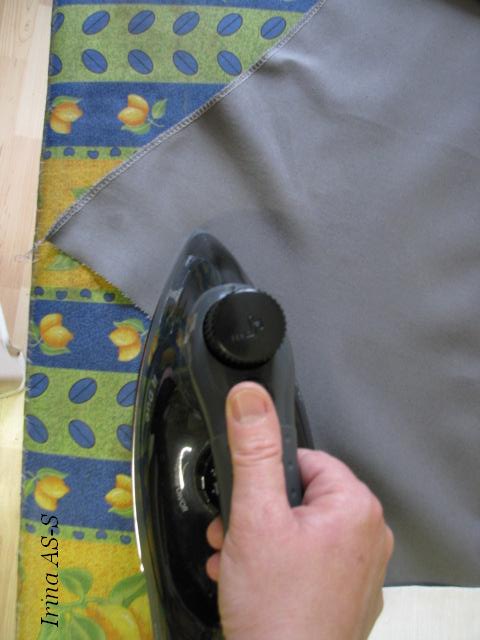
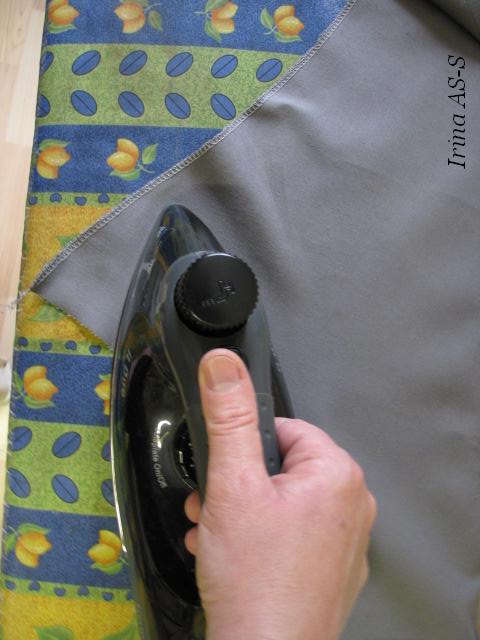 f.3-4
On the step cut, folds begin to form from these pulling movements. That's how it should be. After performing the steps sequentially on each half, let the parts cool slightly by lying down
f.3-4
On the step cut, folds begin to form from these pulling movements. That's how it should be. After performing the steps sequentially on each half, let the parts cool slightly by lying down
If there are arrows on the trousers according to the model, do them right now
Continuation of the article closed in the article: - the continuation of the abbreviated version of the WTO and the entire further process of sewing trousers are described. Contained 29 large photos(!) With detailed instructions. To gain access read here:
1. After constructing a drawing of the trousers, it is checked for coincidence of the control lines: bottom, knee, step, hip, waist. Check the measurements of SB and ST, taking into account their loose fit. Check the DP measurement.
2. Before cutting begins, the fabric is decanted and only from the wrong side. Moreover, each type of fabric has its own processing method, since shrinkage various materials not the same.
You can read more about fabric decating in the article -
3. When cutting trousers, lay out the main parts of the front half of the trousers and the back half of the trousers on the main fabric, folded in half, face inward, so that the grain along the ironing line is preserved, and to save fabric, lay out the parts in a jack. The exception is fleecy fabrics.
After this, they place in the intervals additional details with shared threads as indicated in the modeling: yokes, valances, facings, flaps, belts.
4. To make sure that the direction of the grain thread of the main parts coincides with the pressing line, it is necessary to measure the distance from the edges of the fabric to the pressing line on the pattern in two or more places. By combining these points with a soap line, we get an ironing line on the fabric. If the fabric has a checkered stripe, then the ironing line is aligned with the selected stripe.
5. For fleecy fabrics (velvet, corduroy) it is done only in one direction. Most often, the pile goes from top to bottom, although the bright color is lost. Therefore, when placing the pile, you need to look at the fabric and the model.
6. The details of the patterns are pinned, outlined with soap, all control lines are marked and, having removed the pattern, they are drawn. After cutting, these lines are marked with spacer stitches or notches. The ironing line can be marked by ironing.
7. All allowances for parts when cutting are given as indicated in the diagram. An allowance of 2-3 cm along the seat line in the waist area is usually given in men's trousers, and in women's trousers when the pattern has not been corrected and checked.
8. Baste and stitch the waist darts on the back half of the trousers and iron them towards the seat line.
9. Perform wet heat treatment
Wet heat treatment of trousers (WHT)
Under wet heat treatment understand the pulling and tightening of individual sections of trousers to give them a shape that matches the contour of the body. As a result of the OBE under the buttocks and below the knees, the trousers become ironed and their length is reduced. In the area of the calf muscle, the trousers, on the contrary, are pulled back and lengthened.
For narrow trousers, WTO is necessary in to a greater extent than for loose-fitting trousers. It is better not to subject fabrics with stripes or checks to WTO, since ironing and pulling the fabric will disrupt the pattern. The arrow line along the front half of the trousers is ironed from the waist to the bottom, and along the back half of the trousers from the hip line to the bottom. WTO can be avoided on wide and short trousers (it is enough to iron the crease), as well as when using fabric made of cotton, silk, or viscose.
To make the fabric easy to iron and stretch, you can soak the ironing iron in different solutions:
- 0.5 liters of water + 2 tablespoons ammonia+ 1 tablespoon of vinegar essence or 3 tablespoons of vinegar + you can add 1-2 teaspoons of PVA;
- 0.5 liters of water + 1 tablespoon of vinegar essence or 3 tablespoons of vinegar;
- 0.5 liters of water + 1 tablespoon of PVA.
Note. Any of the solutions must first be checked on a piece of fabric to see if it is fading.
If there are darts in the trousers, then before the WTO, first sew them up, iron them well and iron them in the stops.
Wet heat treatment of the front half of the trousers
1) Lightly iron the arrows of the left and right halves or mark with loose interfacing stitches.
2) Place the halves together face to face, pin together, aligning the control lines, darts and arrow lines.
3) Place the halves of the trousers on the table with the right or left up, but so that the side seams are laid towards themselves, and the waist is to the left or to the right.
4) The pull starts with side cuts in the area of the popliteal part (middle of the calf) from the knee line down. The bulge of tissue formed in the area of the calf muscle is tightened.
5) Unfold the front half of the trousers in incremental cuts and pull and tighten the area of the calf muscle in the same way.
6) The bulge in the hip area is slightly pressed only for stretchy fabric and steep hips. This stitching can be replaced with machine stitching along the seam allowance. If the fabric does not stretch or the thigh is flat, then the stitching is not done. If the thigh is very convex, then a pull is performed along the ironing line in the step area. The larger the thigh, the greater the draw.
7) If the fabric stretches and when cutting there is a wave along the bow line, then stitch in this area using a machine stitch.
8) Both halves of the trousers are turned to the other side and all operations:
- or repeat (for poorly stretchable fabric);
- or complement (for WTO average fabrics);
- or they don’t (for obedient fabrics).
9) After removing the pins, each front half of the trousers is folded separately along the fold with the wrong side inward, aligning all the reference lines.
10) Place one of the halves on the table with the cuts facing you and first lightly iron the ironing line.
11) The step and side cuts are aligned in the knee area so that there is no broken line. You can remove it by lightly pulling it back or by adjusting the arched line with scissors.
12) The ironing line is further tightened under the knee, and the side and step sections are further stretched. After this, when the final beautiful shape trouser legs, the pressing line are finally pressed firmly.
13) These operations are performed separately on the right and left halves, trying to make them the same. Then, these halves are finally checked for equality by placing them on top of each other.
Wet heat treatment of the back half of the trousers
1) Lightly iron the arrows of the left and right halves.
2) Place both halves face to face, pin down all the control lines of the knee, step, and hip.
3) Place the trousers on the table with the right or left side up, but with the cuts facing you.
4) To create a concavity in the area of the calf muscle, the step cuts are tightened, and to create a convexity along the arrows, a pull is performed.
5) Upper part The step cut (knee area and above) is pulled back and ironed along the arrow.
After tightening the step cut of the back half of the trousers, make sure that its length is equal to the length of the step cut of the front half of the trousers.
6) Pull the seat seam. The guy is such that in the area of the largest recess (the area on which we sit) the seat line lengthens by 1-1.5-2-2.5 cm. It depends on the stretch of the fabric and the size of the pants.
Pulling back the seat line, the iron moves towards the waistline and slightly towards the buttocks, without disturbing the position of the trouser halves.
7) The resulting slack in the area under the gluteal folds is very well tightened, without affecting the bulge of the thigh.
8) Turn the trousers towards you with the side cuts and perform a small pull in the knee area, while simultaneously tightening the resulting slack in the knee area.
9) The area of the calf muscle along the side seam is ironed, then pulled along the ironing line.
10) If a bulge has formed in the area of the hip line, then it is ironed out or simply secured with machine stitching.
11) Both halves of the trousers are turned to the other side and all operations are either repeated, or slightly supplemented, or not performed, and only under the gluteal fold they are pressed as well as on the reverse side.
12) Remove the pins and fold each back half of the trousers along the arrow with the wrong side inward, while strictly aligning the line of the step and the knee.
Note. The pressing line in the back half of the trousers, depending on the drawing, is laid out starting from the knee line up to the waist - as it lies. An exception may be striped or checkered fabrics. Here the arrow is moving along these lines.
13) A slight pull is made along the ironing line in the area of the calf muscle, and the resulting or remaining slack in the area of the seams is ironed.
14) The knee area is tightened along the arrow, and pulled back at the seams.
15) Once again, press well under the gluteal fold.
16) Check the equality of both back halves of the trousers by placing them on top of each other, making sure to align the reference lines.
17) Finally iron the arrow lines, bringing each half to the desired shape.
Note. After the WTO, be sure to check the control measure of the DPR; it should be equal to the sum of the length of the bow line and the seat line. If a discrepancy occurs and the DPR measurement turns out to be smaller, then strengthen the guy line along the seat line.
10. Take off the trousers, do the first fitting, at which:
- clarify the overall fit of the trousers
- clarify the position of the ironing line
- clarify the position of the waist line, and if the waist needs to be lowered according to modeling, for example, by 1-5 cm, then it is better not to cut off the excess fabric first, but only add new interfacing stitches for sewing in the belt
- clarify the hemline (with shoes)
- location of darts and their depth
- location of pockets
11. After trying on the trousers, sweep out the trousers, if necessary, finally complete the WTO of all halves separately, check their equality and finally iron the ironing line.
12. Use adhesive pads to secure the pocket sewing area, allowances for the zipper, and secure the folds with a dowel.
13. Baste and stitch soft folds.
Note. If the trousers have a lining, then the soft folds and darts are sewn together.
14. Pockets are processed, if they are adjusted, welts are sewn.
15. Overlock the sections of the four halves of the trousers along the contours with the exception of the waist line (if the fabric is very loose, then overlock the waist line as well).
16. Baste the trousers and do a second fitting, at which you will finally clarify the waist line, hem line, general fit of the trousers, and check for any defects. After this, the trousers can be laid out and finishing details can be added.
17. Process and stitch the bow line at the same time.
18. Place the waist line in each half of the trousers either on a braid (edge), or with a fine stitch, or with an adhesive strip to secure it from stretching.
19. Harvesting small parts: belt, valves, belt loops.
20. Adjust and prepare the bottom of the trousers for sewing the crotch and side seams. If you have a regular hem at the bottom, you can immediately glue the inside of the hem and its seam allowance, and if you have a hem with a cuff, you can glue it depending on the type of cuff.
21. Sew the side seams
Stitching side seams
1) Fold the zipper and the front half of the trousers face to face along the side seams, strictly aligning the control lines of the hip, step, knee and align the snares. Cut the sections not only along the control lines, but also in the spaces between them.
2) Sweep along the back half of the trousers from the knee up and down. The pins are removed and the basting is ironed.
3) It’s better to use a pattern and a ruler to draw a soap line on the side of the front half of the trousers along which the stitching will go. Scribble from the front half of the trousers:
- from the waist to the bottom of the trousers
- from the knee line up and down, pulling the fabric well
4) Iron the seam while pulling it back.
For adjustment seam sew along the back half of the trousers, stitch along the front half of the trousers. Press the seam on each side, pulling it apart. Iron both allowances towards the back half of the trousers, check the fabric flow from the face and iron here using an iron. On the front side of the trousers, at a distance of 0.1-0.5-0.7 cm from the inner seam, place a second finishing line, pulling the fabric well, iron.
22. If the trouser belt consists of two halves, then sew them separately to each half of the trousers and iron them. If the belt is cut in one piece, then it is sewn on at the end of sewing the trousers.
23. Stitch the crotch seams.
Stitching crotch seams
1) Fold the front half of the trousers and the back half of the trousers face to face, aligning the knee lines. Baste along the back half of the trousers from the knee up and down, iron.
2) Sew along the front half of the trousers, pulling the seam from the bow line to the knee line and below.
3) Iron the seam, iron it through the paper using a small ironing board
24. Strictly chip the upper and lower folds of the waistband, sew down the seam of the seat and finish it at the bow line.
Stitching and finishing the seat line
1) Allowances along the seat line are most often overlocked, but if the fabric is loose, it is better to process the allowances with an oblique strip using an open-cut edge stitch. By processing and ironing the edge seam, it is pulled back well. If the trouser belt is cut from two parts, then these parts are sharpened, then a edging is made, which extends to the belt.
2) The seat line is swept out with a light outline, a fitting is made and the width of the trousers at the waist is checked, as well as the height of the seat when sitting on a chair. If the trousers are tightened or relaxed in the groin area, then accordingly, the inseam allowances in the groin area are released or taken in more.
3) Using pins, clearly chop off the belt at 2 points: at the top along the fold and at the bottom along the seam of the belt.
4) Sew the seam of the seat with two small lines, pulling the line of the seat. Start the line from the waist line, end at the bow line, then go back exactly along the first line and also pull it back. At the end there is a large bartack at the waistline.
5) Iron the seam of the seat from the waist line without reaching the very bottom.
6) An allowance of 2-3cm along the waist is attached:
- manually from all sides;
- into the seam split;
- machine tack up to 1 cm, located along the seam of the seat.
25. The bottom of the trousers, with or without a cuff, is finally hemmed.
26. Finish the belt by sewing on buttons, loops, and hooks.
27. The trousers are finally ironed.


