What to do if the canvas goes in waves. What to do if the canvas in the painting is sagging? Subframe and preservation of the painting
Canvas sagging is quite common occurrence. It can be caused by fluctuations in temperature and humidity conditions, defects in the stretcher and uneven tension of the canvas, as well as prolonged sloping, and even more so horizontal position paintings. The reason for persistent sagging can be the blind connection of the corners of the stretcher, when there is no way to regulate the tension force of the canvas.
Canvas sagging and folds not only change appearance paintings, but also affect the pictorial surface: breaks and cracks appear in the paint layer and ground; Due to uneven tension of the canvas, the connection between the soil and the canvas is weakened and there is a danger of shedding of the paint layer and soil.
Mechanical damage to the canvas
Paintings on canvas are most susceptible to mechanical damage. Pushes, rough touches, blows to the canvas or paint layer leave dents and dents in the painting, and sometimes tears in the canvas can occur.
In most cases, these are various forms of elongation of individual sections of the canvas in the form of extrusion of the front or back side or in the form of folding at the edges. There are also holes, punctures, and breakthroughs various shapes, cuts and loss of canvas. Breakthroughs can occur without the edges coming apart, but in most cases the edges are coming apart due to the tension of the canvas. The threads at the edges of the breakthrough mostly become frayed and crumble. Sometimes you see paintings whose edges have been cut or folded to fit an inappropriate frame. Mechanical damage to the canvas also includes creasing and breaking. Wrinkles occur, as a rule, at corners and edges. Breaks can happen anywhere. Both of them occur when the canvas is bent or hitched, not stretched on the stretcher. The imprint of the internal edges of the stretcher slats on the canvas is observed when the stretcher has no bevels, due to the painting being pressed against the stretcher when storage conditions are violated.
Deformation of seams
On stitched canvases, the seam shrinks over time.
Damage to the paint layer of the painting
One of the common damage to the paint layer is a spherical and web-like craquelure that forms at the impact site. Scree and loss of the paint layer and soil appear along the edges of the canvas break and at the impact site. A common damage to paintings is scratches on the paint layer.
Buying canvas in a roll is good opportunity save on the cost of the product itself and on its shipping. From us you can purchase paintings both in rolls and on a stretcher. In the first case, even the shipping itself is much cheaper.
But the canvas cannot be hung on the wall just like that, without a stretcher. It is the stretcher that holds the canvas in a well-stretched state. To ensure that the canvas does not sag and the painting retains its attractive appearance, we suggest using the following instructions.
How to stretch fabric onto a stretcher
The following materials will be required:
- subframe made of slats;
- crosses needed to eliminate distortions and deflections of the main bars, as well as increase the strength of the structure;
- set of staples for stapler.
You will also need the following tools:
- regular roulette;
- hammer (especially if you plan to use nails);
- wood stapler
- special tool for tensioning.
In general, there are two types of stretching and it depends on you which one you have to give preference to: gallery or classic. The first involves frameless design, when the canvas is stretched so that the image continues on the sides. It must be said that if it is fixed with reverse side stretcher and neatly wrapped in the corners, then everything looks great even without a frame. Therefore, today this method is considered very stylish and modern. This kind of design can be found quite often.

There are also classic look stretching, when the ends remain white, and the picture itself is prepared under baguette frame. Like everything classic, this method will always be popular. In any case, it is important that the frame is made exactly to the size of the canvas, and that the timber is dry, without cracks or knots. The fibers should be directed lengthwise.
Size matters
In modular versions of the subframe, the slats are moved apart using wedges, which are made from dry hardwood. There are main slats that have external chamfers, and their internal bevel is approximately five degrees, which protects the image from damage.
The stretchers are strengthened with crosses, and then, so that the canvas does not come into contact with them, the picture is fastened to the main slats at a distance of 5 mm from the plane of the canvas. The ratio of the thickness and width of the stretcher slats can be different - it depends on the size of the larger side of the picture.

Almost 200 years ago, standard sizes for paintings appeared, thanks to which they can be classified. All formats are divided into three groups. For example, the most elongated format is called “marina”, a rectangle that approaches a square is called a “figure”, and a “landscape” is medium view format.
There are also markings that depend on the length of the longer side. For example, sizes 16x54 are called 15F, sizes 65x50 are called 15P, and 65x46 is a format numbered 15M. There are a total of 50 international sizes that fall within the listed standards. The standard row of paintings also corresponds to the standard dimensions of the stretcher frames.
Steps to success
Step-by-step instructions depend on which subframe you are using. If it is modular, then you will need to follow several steps described below.
- Measure the diagonals of the subframe. If they are the same, then you can staple the corners using two staples for each corner. In order for the staples to be driven in well, the stapler must be pressed well and then driven in. It may happen that the staple is not driven in - then you need to twist the round knob on top and thus adjust the stapler. Nails can be used instead of staples. Only they cannot be hammered in completely. You need to hit it obliquely to bend the head to one side, and then the canvas will not fly off the nails in the future. To make sure everything is done symmetrically, after the first staple or nail, turn the canvas upside down, pull it a little and hammer it right in the middle of the opposite side.
- Place the design evenly on the stretcher so that the threads of the canvas are parallel to the edges of the stretcher.
- Using a special tool, staple the canvas on all sides. There is also a faster option: wrap the stretcher in canvas and, stretching it quite tightly, drive a staple in the center.
- Secure the canvas with a stapler every two to three centimeters, moving from the center to the edge. It is necessary that the tool is tensioned with the same force. After this, continue to stretch the canvas, carefully tucking it at the corners and shooting it with a stapler.
- Pull out the brackets that hold the corners of the subframe together. Fold and staple the remaining excess canvas.
- Insert two wooden wedges each into the slots at the corners of the subframe and tap them with a hammer, but carefully.

If you stretch the canvas onto a blind stretcher, then you need to do everything as indicated in the first paragraphs for a modular stretcher. It is important that the canvas is stretched by the tool with the same force and quite strongly. This is necessary, because if the canvas sags, you will have to re-tighten it again. The canvas is also folded at the corners and the stapler is adjusted. Then the excess canvas that you will still need is folded and secured.

The subframe can be secured to the frame using metal corners 13 mm wide and 10 mm high. The corners can be mounted on a subframe or on a frame (depending on whose height is greater - the subframe or the frame). If the subframe protrudes above the level of the baguette, then you can use D-shaped plates to secure it. You can also use Z-shaped brackets (for example, to fasten double frames), which are attached to the frame with screws.
You can watch the process of stretching canvas onto a stretcher using the gallery method in the following video:
Primary requirements
- Uniformity. The main requirement is not to distort the picture, so as not to distort its position. You also need to distribute it as evenly as possible across width and height;
- The frame frame should not sit tightly on the subframe. Otherwise, due to changes in temperature and humidity, the dimensions of the baguette will change, and it will begin to put pressure on the stretcher, which is why the canvas will then sag unsightly.

There is another way
The stretcher is a very important part of the painting, but stretching the canvas onto the stretcher yourself is an option for the handy and economical. If you don’t want to waste time or you doubt your abilities, then you can purchase the painting already on a stretcher. The masters will do this for you and their level of professionalism will ensure the tension of the required quality, and you will be able to immediately hang the purchased picture on the wall.
The stretcher serves as the basis for stretching the canvas. There are 2 types of stretchers: modular(prefabricated, wedge) and deaf.
Modular (prefabricated, wedge) stretchers can be bought in almost all art stores. They are sold in slats of 2 pieces (in increments of 5 cm in length) and are slightly more expensive than blind stretchers.
Modular subframes have a huge advantage - their corners are not rigidly fastened and if they sag, the problem can be easily and quickly corrected at home - you just need to knock out the wedges (Figure No. 6). This must be done very carefully so as not to damage the canvas with a hammer or overtighten it.
In blind stretchers, the corners are rigidly connected and if the canvas sag, it will have to be re-stretched. Canvas reupholstery should only be done by a specialist!
As a rule, for a medium-sized painting, a stretcher with a thickness of 1.8 cm is used, and for a gallery stretch - 3 cm.
Subframe and preservation of the painting
A low-quality subframe negatively affects safety. Paintings by modern painters very often have bad stretchers. Unfortunately, not all artists give great importance quality of the subframe.
Defects in the stretcher do not allow the canvas to be properly stretched over it, which ultimately leads to the destruction of the soil and the painting layer of the painting.
A high-quality stretcher is the basis for the long-term preservation of paintings.
Let's look at the main defects of the subframe
- A blind connection of corners, which does not make it possible to regulate the tension of the canvas, causing deformation of the canvas and its sagging.
- Artists nail plywood triangles to the “blind” corners of the stretcher, which make the stretcher even more rigid and motionless.
- The absence of a cross or crossbar - for large-sized paintings. A subframe with a cross or crossbar will not warp and the corners will remain straight.
- No bevels on internal sides stretcher, causing creases and screes of the paint layer to occur.
- It is better to choose a stretcher that has all points of possible contact with the canvas rounded (all sides on the front of the stretcher), so you will avoid serious damage to the canvas during transportation.
- A fragile stretcher that distorts when stretching the canvas.
- Step-like, loose connection of planks at the corners and on the cross. With this defect, the canvas is deformed, creases and screes of the paint layer appear, and it is impossible to tightly connect the painting to the frame.
- The subframe is made carelessly, from raw wood, as a result of which, after a fairly short period of time, the subframe will “lead” and will have to be replaced (in some cases, the frame will also have to be replaced).
- The subframe is made of wood with knots. Even a well-made subframe that has knots will eventually “lead” and will have to be replaced.
- Subframe with a grinder beetle. Thanks to the activity of these insects, the tree disintegrates, turning into dust.
- The subframe is contaminated with mold.
Tools
To stretch the canvas you will need a stapler with staples (Figure No. 1), a special tool for stretching paintings (Figure No. 2), a tape measure and a hammer.
Canvas Tension Strength
Untreated canvas is not stretched too much, because... It will stretch considerably during priming. The final touch will be stretching the primed canvas by tapping wedges in the corners. For a blind stretcher, it is advisable to use primed canvas. It must be pulled tightly, like a drum.
It is strictly not recommended to stretch canvas when wet., since the threads of such a canvas are irrevocably deformed. Cotton canvases or canvases with a mixture of cotton suffer from wet stretching many times more. Wetting the canvas has Soviet roots, when our artist was dealing with hard and brittle canvases. Such canvases were so inconvenient to use preparatory work, that they were invented to “wet” them to facilitate tension on the subframe. At the same time, such a practice has never existed in Europe.
Stretching canvas on a modular stretcher
- Measure the diagonals of the subframe, they should be the same!!! Secure the corners with a stapler (2 staples per corner).
- You need to stretch the canvas with a tool to stretch the paintings evenly with the same force.
- When stretching, do not wet the canvas on the unprimed side, this may lead to peeling of the primer.
- Pull out the brackets holding the corners of the subframe.
- Fold and staple the excess canvas (Figure No. 6).
- Insert two wooden wedges into the grooves at the corners of the subframe and carefully tap them with a hammer (Figure No. 6).
Stretching canvas on a blind stretcher
- If possible, it is better not to use such a subframe at all!!!
- Check the diagonals, they must be the same!!!
- Place the painting on the stretcher exactly horizontally. If you simply have unprimed canvas, it is important to position it so that the direction of the canvas threads is parallel to the edges of the stretcher.
- Using a stretching tool, staple the canvas on 4 sides, as shown in Figure 3.
- Secure the canvas with a stapler every 2-3 cm around the entire perimeter of the stretcher, moving from the center to the edge, as shown in Figure No. 4.
- You need to stretch the canvas with a tool for stretching paintings evenly with the same force and quite strongly, because if the canvas sag, you will need to re-stretch it.
- Continue stretching the canvas onto the stretcher as shown in Figure 3. At the corners, the canvas is carefully tucked and stapled.
- Fold and staple the excess canvas (Figure No. 6); you will also need it when reupholstering the painting.
Gallery stretched canvas
Gallery-stretched canvas is usually used for frameless painting. At gallery stretch the canvas is secured to the back of the stretcher and carefully wrapped at the corners.
At home, it is quite difficult to stretch canvas in this way, so it is better to contact a framing workshop that has professional equipment - a gallery stretching machine.
How to buy ready-made canvas on a stretcher
- Do not buy ready canvas on a blind stretcher.
- Carefully inspect the subframe for defects.
- Check the softness of the stretcher material; if the wood is too soft, then do not buy such a canvas. Such a subframe is easy to identify - it is two times lighter than a regular subframe.
- Do not buy ready-made canvas on a stretcher "Sonnet" from the manufacturer "Nevskaya Palitra". If you have canvases with a stretcher from this manufacturer, we strongly recommend replacing the stretcher immediately.
The stretcher is modular but made from very soft wood that is softer than pressed paper. If you want to tighten the canvas, then nothing will work - the wedges fit into this tree like in butter room temperature.
|
drawing No. 1 A stapler for attaching canvas to a stretcher. |
|
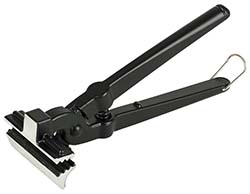 |
drawing No. 2 Canvas stretching pliers |
 |
drawing No. 3 |
If you want to tighten up a sagging canvas, but at the same time kill the painting, then the “best” advice is a very common misconception that the canvas needs to be dampened on the back side.
The durability and vitality of this incredible bad advice
, apparently, is due, firstly, to the availability ( “home craftsman, do it yourself, your own director, skillful hands,” etc.), and, secondly, a lack of understanding that the canvas is a load-bearing base on which a primer and a painting layer are applied - two immobile materials that are unable to undergo such changes as fabric. Pulling up the canvas using this method is strictly prohibited!
Wetting the canvas will lead to the destruction of the soil and its detachment from the base (due to shrinkage of the canvas). The consequences of such actions will be the most catastrophic: from cracking of the painting layer to its full depth to partial and sometimes complete crumbling (detachment).
So what are the ways to solve the problem? There are two of them, but fundamentally they come down to re-upholstering the canvas. However, only a professional can do this kind of work.
The ideal option is to drag the canvas onto a sliding stretcher. Then, using blades, gradually moving the sides of the stretcher apart, you can very accurately and accurately regulate the tension of the canvas.
You can also stretch the canvas onto a stationary stretcher, but then the craftsman who will be making it must very accurately determine the required allowance based on the dimensions of the sides.
Another option is possible, which is often used, but it is far from the best; this is to drag the canvas onto a “native” stretcher. It should be taken into account that the painting will break at the edges, i.e. inevitable gross destruction of the soil and the picturesque layer along the perimeter.
Now, if you are asked,
The warping of the painting canvas occurs for two reasons. Firstly, from changes in the atmosphere of the room in which the paintings are stored, from abnormal conditions, from sudden changes in temperature and air humidity; secondly, from various mechanical influences on the canvas of the painting from the back or front side of it. Deformations of the canvas can be of a very diverse nature; they are determined both by the technology of the material and the reasons that caused this or that change. The degree of deformation also depends on this. The following types of warping are most often encountered in restoration and storage practice: weakening of the tension of the canvas, expressed in sagging, large waviness, general corrugation, gathering at corners in diagonal directions, etc. These defects for the most part appear from changes in temperature and humidity conditions. They are not that dangerous and do not require immediate correction. Furthermore, intervention may turn out to be unnecessary and even harmful, since often these defects are of an unstable nature and correct themselves upon the onset of normal conditions.
Under the influence of high humidity, canvas, due to its inherent hygroscopicity, becomes moistened and weakens (sometimes, depending on the special property of the fiber, the opposite happens). The weakening is expressed in various forms of warping and depends on the quality of the painting's tension and the uniformity of the applied primer and paints. An inexperienced custodian may be puzzled by this and will hasten by any means to eliminate the phenomenon that bothers him - he will drag the paintings or stretch the canvas with blades. What happens to the tightened fabric when the air humidity in the room decreases? It is clear that the canvas, which sagged and warped at high humidity, will stretch itself. If it was tightened during its weakening, then when the previous normal conditions return, it will stretch even more, it may exceed the limit of possible tension, and if the elasticity of the old canvas, primer and paint layer is low, ruptures may form.
Correcting this type of warping must be approached very carefully - try to create a normal atmosphere and only after quite a long time, making sure that the defects do not correct themselves and can take on a stable form, correct them using the techniques described below.
When it is necessary to eliminate the sagging of the canvas, they resort to stretching it using the blades available in a properly made stretcher. The blades are located two in each corner and one at each of the crossbars. If the painting is on display and properly hung on cords to the rods, you should take it away from the wall, support it in this position with the assistance of assistants, stand between the wall and the painting (if the painting is large, then on a stand or stepladder) and carefully tap the blades with a small hammer . The hammer blows should be very light, since the force of the wedge, if used inappropriately, can lead to ruptures of the soil, the paint layer and even the canvas itself. After a few light blows, you need to look at the painting from the side and, making sure that your actions are appropriate, continue or stop them. When striking the blades, do not allow contact, much less the hammer to slide across the canvas of the painting; this can also damage the soil and paint layer. The hammer should be small, like a wallpaper hammer, and, for greater safety, the hammer should not be struck directly on the blade itself, but through a small wooden block or plank placed on the end of the blade. If the entire area of the canvas sags evenly or if it is all covered with large waves, all blades should be tapped evenly. If warping is observed only in one place, for example in the upper right quarter of the picture, the blades of the upper right corner of the stretcher are knocked out, etc. Unless absolutely necessary, not a single blow should be made.
It may happen that the painting was previously unevenly stretched, and the resulting corrugation near its sides will not be eliminated by pulling it with blades - in this case, they resort to partial re-stretching of the canvas. To do this, in the required place, remove the nails holding the painting canvas from the stretcher, use special pliers with wide flat jaws to grab the canvas by the edges, tighten it to the required degree and secure it again with nails. This technique is called local constriction; In addition to caution, it requires great skill from the worker, since the assemblies of the canvas can be very bizarre and cannot be corrected immediately. It is not always even possible to straighten them using general re-upholstery. Often you have to deal with small assemblies of the canvas located along the sides of the picture in a vertical position in relation to its edges. These warpings occur from an increase in the volume of the canvas (stretching) only in these places, acquire an old stable shape, and with all attempts to pull the canvas, the assemblies do not disappear, but seem to move from place to place. In such cases, a more complex and responsible method of eliminating them is required. The task arises of compacting the fibers and threads of the canvas, “planting” them in their places, reducing the volume while simultaneously smoothing them out. To do this, the painting, placed face down (preferably on a marble slab), is freed from the stretcher. Using a heated (not too much) iron, iron the fabric at the assembly points, observing their condition. Sometimes the fabric “sits” very quickly and well, and the gathers disappear even with a short ironing, but it also happens that you have to iron the same place for a long time to warm up the fabric more. If you need to iron the painting from the face, this should be done through a paper pad. For complex textured relief, flannel or other fleecy material is used. It is also recommended to place it under the front side of the painting when ironing the canvas from the back. If these actions do not lead to the desired results, you can resort to moistening the canvas and then ironing it. You don’t need to moisten the canvas too much; it’s best to spray water through a good spray bottle. With some caution, you can wipe the canvas with wrung out cotton wool. When ironing the moistened canvas, the adhesive substance contained in the soil is steamed, and under the influence of a warm press, the unevenness of the canvas is straightened out, often very successfully. For this a necessary condition is that the moisture introduced into the soil completely evaporates at the end of ironing; traces of dampness (dark spots) should not remain on the canvas. This operation is permissible only if normal condition paint layer. You cannot straighten folds using this technique if there are screes, lags, peeling, etc. You must first protect the paint layer by fixing it, which will be discussed below.
In paintings that are not stretched on a stretcher and not mounted in frames under glass, warping may also occur due to long-term storage and improper handling. Sometimes you have to deal with canvases rolled into a tube without any base (cardboard or plywood shaft). In such cases, the cylindrical shape of the tube becomes flattened over time under the influence of its own gravity. When such a picture is unfolded, the canvas acquires ribbed surface, and if the painting is old with dried primer and paint, then the folds will be very stable. In such cases, in addition to warping, other defects and damage may occur, for example, broken primer and paint, their lag, peeling of various shapes and degrees, etc. How to enter similar cases? First of all, you need to examine the paint layer and protect it from falling off. The unfolded picture is placed on the table (with large size on a special board or on the floor) face up, then one of the edges parallel to the folds is attached with nails to the base on which the thing lies, the opposite edge is taken with hands and stretched as far as possible without damaging the corrugated fabric, and then secured and this edge. Then they humidify the air in the room (sprinkle the floor, put in baths or evaporate water from an electric pan) and leave the painting lying in a calm state. In the following days, moisturizing is continued. The canvas absorbs some of the moisture, which makes the soil more elastic, and the canvas straightens under the influence of its own gravity. From time to time you can help straighten it by pulling the blade by the edge and moving the nails. Subsequently, the painting is pulled onto a stretcher using tongs, and the warps are completely straightened. In some particularly unfavorable cases, smoothing, as mentioned above, may be required.
Large paintings are usually stored on shafts. If the shaft has irregularities (bulges, depressions, scars, etc.), then from lying on such a shaft for a long time, these irregularities are transferred to the canvas of the painting, and when it is rolled out, warping may be revealed. They can be general- in the form of scars along the verticals or horizontals of the picture, coinciding with the scars of the shaft at the joints of plywood or cardboard with which its frame was upholstered. In this case, the scars on the canvas alternate rhythmically with each revolution of the shaft. Sometimes, in the areas of these scars, irreparable cracks (breaks) form in the soil and paint layer. In case of partial unevenness of the shaft - depression of plywood or cardboard, convexity, holes, flaws from wood knots, etc. - local distortions form on the painting canvas in the form of “bubbles” from the elongation of the canvas in one direction or another or small breaks. For the most part, these defects are like an imprint of shaft defects. But warping of the canvas can also occur with a properly made shaft. If several paintings are rolled onto one shaft without following certain rules, then defects are inevitable. Let us assume that three or four paintings of a size much smaller than the size of the shaft itself are rolled onto a shaft and a painting is rolled on top of them bigger size. What will happen? The middle of the top picture will lie against the previously knurled ones, and its edges will sag. If stored in this form for a long time, the top painting will develop warps or scars in places that coincide with the edges of the paintings lying below.
If, when rolling paintings onto a roller, the edges are not carefully straightened, this can also lead to the formation of warped canvases, both for this painting and those rolled over it.
When viewing the picture from the side, sometimes there are bulges in the canvas of a rectangular or square shape and folds diverging from them in the form of rays; these are warps caused by sticking on reverse side canvas of any label with the name of the painting, the name of the author, etc. The glue with which the label was smeared pulled the canvas together, which is why warping occurred.
It is necessary to mention the frequently encountered defects in the painting canvas, which occur as a result of careless handling. When moving paintings that are stored in the open, moving them to another building or stacking them, museum workers they do not always observe the necessary accuracy. Sometimes paintings are placed in such a way that their canvas touches the corner of the stretcher of another painting, the corner of a table, etc. Often inexperienced or careless workers take the painting by the cross of the stretcher, putting their fingers under it, and press their hands on the canvas. As a result, depressions or bulges, “bubbles”, which can also be called small warps, are formed on the painting canvas, often accompanied by damage to the paint layer.
What methods of elimination are used? latest species warped? Warps resulting from an irregular shaft, warping of large folds of the canvas or large waviness, as well as those formed from rolling larger-sized paintings onto smaller-sized paintings or from rolling a painting with poorly straightened hard edges, are often reduced or eliminated completely by prolonged lying of the painting on a flat plane in free condition. By properly tensioning the canvas on the stretchers, these types of warping can also be eliminated. In cases where the methods described above do not give the desired effect, they resort to ironing the warped areas with an iron, according to the method we have already described.
The warping caused by sticking paper labels on the reverse side of the painting is eliminated as follows: without removing the painting from the stretcher (if it is on it), it is placed face down on a flat surface - a table, a shield, or, best of all, on a marble slab. They try to separate the paper from the canvas by prying it with a knife or scalpel from a corner that is more loosely glued. If the label can be removed in this way, it is necessary, if possible, to subsequently remove the glue remaining on the canvas. It is scraped off with the same knife. After removing the glue, straighten the warped area by ironing it with an iron. If it doesn't give desired result, the warped area is slightly moistened and ironed again. If it is impossible to separate and remove the sticker using this method, you can try the following: wet a cotton swab with water, squeeze it out and moisten the sticker with it. The paper will absorb moisture, and the glue, if it is soluble in water, will soften. Softening of the glue may not occur immediately, so moistening should be repeated, being careful, however, of an abundance of water. When the glue softens, the paper can be easily removed, after which, without allowing the glue to dry, you need to clean it off with a knife. The warped area is ironed through the paper, often moving it so that it does not stick.
It should be noted that glue has different properties. The sticker is most often made with so-called office glue, which is silicate (liquid glass), or some other waterproof solution. In such cases, the sticker must be removed with a knife, carefully cutting it off in small pieces.
As already mentioned, you have to deal with local small warped areas - “bubbles” formed from the elongation of the canvas threads. Correcting such “bubbles” is not a complicated operation, but still requires some knowledge and skill. The simplest and effective technique next: place "bubble" with back side The painting is not very moistened with cotton wool soaked in water and wrung out. The glue that is part of the soil (the first sizing) absorbs moisture and softens, and then, when it dries, it shrinks and tightens the elongated canvas. Thus, the “bubble” disappears and the plane of the canvas is leveled. This operation should be performed on a painting stretched on a stretcher. The tension of the fabric itself already helps to align the elongated fibers. The operating technique is very simple. The places located under the slats or the cross of the subframe are moistened using a thin wooden plate wrapped in cotton wool. This plate is inserted between the stretcher bar and the canvas and moved along the canvas in the “bubble” area. Excess moisture can also have a negative effect, so it is better to under-moisten the canvas and repeat the operation than to damage the soil and paint layer.
When eliminating “bubbles,” humidification sometimes has to be accompanied by temperature effects. To do this, iron the moistened area on the back of the painting or on its front side (through paper) with a not very heated iron. The result is steaming, a kind of warm compress. This gives faster results due to more intensive drying under a moving press.
When debris, pieces of plaster and other objects get between the chamfers of the perimeter strips of the subframe and the canvas, “bubbles” and folds can also form. In order not to remove the painting from the stretcher when removing them, proceed as follows: use the thinnest wooden plate to remove foreign objects that form bubbles. Then a small amount of cotton wool is rolled onto the same plate in a ribbon-like manner, which is moistened, after which the operation described above is repeated. After moistening the canvas, a piece of glass of the required size is placed between the chamfer of the stretcher and the canvas and the painting is placed face up, and the “bubble” is ironed through the paper with the tip of a warm iron. If there is no danger that the iron can burn the varnish or paint, it can be left in the form of a press on the “bubble” for three to four hours and even until the next day. Then the glass is removed (1.
Elimination of “bubbles” can be done using similar methods only in cases where their appearance has not yet resulted in the paint leaving the primer, cracks, screes, etc. If the latter has already happened, then straightening out all kinds of depressions must be done while simultaneously fixing the paint layer and primer ( We will get acquainted with the fastening process below).
There are cases when warping of the canvas cannot be eliminated by any of these methods, then it is necessary to use a more complex restoration method called “duplication”.
1) In some cases, it is advisable to correct warps using warm and cold irons alternately. A cold iron, by cooling the heated area, often improves the effect of the operation.


