How to stretch a painting onto a stretcher. How to make a canvas stretcher with your own hands? Construction technology
Today we will tell you something that will be interesting and useful for all art lovers to know about the components of a painting on canvas, which is made in oil, acrylic or tempera. I will also share information that mainly only the artists or restorers themselves know. So, the main parts of the painting are the canvas itself, on which the painting is applied, a stretcher and a frame.
It is important to know the difference between a frame and a subframe. The fact is that the frame plays a decorative function, so, in principle, in some cases it may not exist, in some special cases the painting looks self-sufficient without a frame. The stretcher is a frame for stretching the canvas.
But what is this information for, you ask, and what to do with it? Since we are also for the practicality of knowledge, we come to the main thing.
The canvas must have sufficient tension. None good picture cannot be painted on a sagging canvas. If over time the tension of the canvas has become too weak, or small folds have appeared on the canvas in the corners, in some cases you can solve this problem yourself.
Having an idea of what a subframe is, you can easily find the right element. Turning the picture towards you back side, You can determine what type of subframe it is, it’s very simple, there are only two of them: sliding and blind. By the presence of grooves in the corners of the subframe, you can determine whether the subframe is moving apart or not.

As a rule, wedges can already be found in these grooves. If there are grooves, but no wedges, don’t worry, you can buy them at any art store for little money.

Now you need to break the picture on wedges; to do this, you just need to tap the end of the wedge with a hammer, and the stretcher will begin to move apart. Try to ensure that all sides are broken equally so that the tension of the canvas remains uniform, which will prevent later
In addition, it should be noted. After reading this article and encountering a description of this problem, you begin to understand one important thing - the picture frame should not be flush with the dimensions of the stretcher, otherwise there will be nowhere to break it. Unfortunately, any painting painted on canvas will sooner or later reach this stage. Therefore, you should not buy a ready-made frame for a painting on canvas; you will have to order it again from a framing workshop, specifying that the size of the baguette is not 40x50, but 40.6x50.6. Good employee When accepting an order, the framing workshop will add a sufficient number of millimeters if you specify that the picture needs to be divided into wedges.

Thus, you can save time and money if you are sure that everything will work out for you, because in fact there is nothing complicated in this operation. But you need to understand that when the canvas already has serious deformations, you need to contact a restorer.
In the case when coattails have appeared on the surface of a painting that pleases your eye, it is better not to delay resolving the issue - this can cause even greater complications. And if the stretcher turns out to be fixed, there is only one way out - change the stretcher and re-stretch the canvas, in which case you will need a specialist.

Master class by Natalia Derevyanko with YAM
IN Lately, with the development of technology, new materials and the speed of life, I looked at printing in a new way, and especially printing on canvas, because all my originals were made using the oil on canvas technique. I really love the texture of the canvas, the volume of the stretcher, and a new plus: a painting on a stretcher can be hung on the wall without a frame. Today it is very popular. At one time I lived in Italy, as you know, their frames are excellent, but the prices are not low, so everything modern works hung in houses without frames - the so-called gallery stretch.
I want to tell and show you printing on canvas and its design.
First of all, prepare the digital file for printing. I scan my work for higher quality, sometimes even at 800 dpi. If this big job, I scan it in parts and assemble it into a single whole. After this, it is necessary to add, namely, to complete (not stretch) margins of 3 cm on each side, which will be an organic continuation of the drawing. For what? These fields will go to the ends of the stretcher and at the same time, the picture itself will not be distorted - the cat’s tail or the girl’s hat will not bend at the ends. Yes, it is painstaking, but necessary. The best way to do this is in Photoshop using the Clone tool.
In my store on YAM I sell digital images already with margins and the size you need. Since they weigh quite a bit, I send them via a file hosting service. This is very convenient for sending to Russia, because delivery services have restrictions on the size of paintings, and they are on the safe side by requiring permission to send, but you receive a digital file and feel free to go to the printing studio.

With the finished digital file on a flash drive (resolution 300 dpi, RGB palette, natural size), I go to the printing studio. In principle, if we have a good wide-format inkjet printer, we can print it at home :) But it wasn’t available, so I went to a studio, not the nearest one, but the one that specializes in printing on canvas. Why? Because the price for those who do not specialize in this is five times higher, secondly, they take the cheapest artificial canvas, and they simply don’t have enough experience... I order a print on German cotton canvas, this is the same canvas that is used for painting oil and acrylic. This canvas comes in different widths: 61 cm, 91 cm, 107 cm, 127 cm, 152 cm. Therefore, of course, it is more profitable to order printing of several works at once. Here is the result after printing

After this, we cut, but do not trim off the excess margins; they will be needed to grip the canvas with your fingers and bend it to the ends and back. We buy stretchers or order them from a framing workshop. Today in any hobby or art store you can buy ready subframe or blanks for it, the range of sizes is huge.

We take a stapler and start pulling. If ordinary canvas is wetted before stretching, canvas with printing cannot be wetted because We will damage the image. We always pull starting from the middle, driving the staples opposite each other

We reach the corners and carefully wrap the corners. This is how it is wrong to “overlap” corners. So they look sloppy and resemble a candy box.

That's right. The “overlap” is hidden in the middle and you get clear corners

After this, use a soft brush to open it with damask varnish for finishing work. There are other varnishes, the main thing is that they are for finishing, and not for painting.

Several works look very good, and it is not necessary to hang them in one line, you can experiment yourself :)
15.03.2016
How to properly stretch canvas onto a stretcher
SUBFRAMES
The stretcher serves as the basis for stretching the canvas. There are 2 types of stretchers: modular(prefabricated, wedge) and deaf.
Modular (prefabricated, wedge) stretchers can be bought in almost all art stores. They are sold in slats of 2 pieces (in increments of 5 cm in length) and are slightly more expensive than blind stretchers. As a rule, for a medium-sized painting, the thickness of the stretcher is 1.8 cm.
Modular subframes have a huge advantage: their corners are not rigidly fastened and if the painting sag, you can fix everything at home, you just need to knock out the wedges. This must be done very carefully so as not to damage the canvas with a hammer or overtighten it.
In blind stretchers, the corners are rigidly connected and if the canvas sag, it will have to be re-stretched. Canvas reupholstery should only be done by a specialist!
STRETCHER AND PRESERVATION OF THE PICTURE
A low-quality stretcher negatively affects the preservation of the painting. Paintings by modern painters very often have bad stretchers. Unfortunately, not all artists give great importance quality of the subframe. Defects in the stretcher do not allow the canvas to be properly stretched over it, which ultimately leads to the destruction of the soil and the painting layer of the painting. A high-quality stretcher is the basis for the long-term preservation of paintings.
LET'S CONSIDER THE MAIN DEFECTS OF THE SUBFRAME:
§ blind connection of corners, which does not make it possible to regulate the tension of the canvas, which causes deformation of the canvas and its sagging
§ Artists nail plywood triangles to the “blind” corners of the subframe, which make the subframe even more rigid and motionless
§ absence of crossbar or crossbar - for paintings big size. A subframe with a cross or crossbar will not warp and the corners will remain straight
§ no bevels on internal sides subframe, which causes creases and scree of the paint layer
§ a fragile stretcher that distorts when stretching the canvas
§ step-like, loose connection of planks at the corners and on the cross. With this defect, the canvas is deformed, creases and screes of the paint layer appear and it is impossible to tightly connect the painting to the frame
§ the subframe is made carelessly, from raw wood, as a result of which, after a fairly short period of time, the subframe will “lead” and will have to be replaced (in some cases the frame also has to be replaced)
§ the subframe is made of wood with knots. Even a well-made subframe that has knots will eventually “lead” and will have to be replaced
§ stretcher with grinder beetle. Thanks to the activity of these insects, the tree disintegrates, turning into dust
§ the subframe is infected with mold
STRETCHING CANVAS ON A MODULAR STRETCHER
§ Measure the diagonals of the subframe, they should be the same!!! Secure the corners with a stapler (2 staples per corner)
§ Place the painting on the stretcher exactly horizontally. If you simply have unprimed canvas, it is important to position it so that the direction of the canvas threads is parallel to the edges of the stretcher
§ Using a stretching tool, staple the canvas on 4 sides as shown in the picture.
§ Secure the canvas with a stapler every 2-3 cm around the entire perimeter of the stretcher, moving from the center to the edge, as shown in the figure.
§ You need to stretch the canvas with a tool to stretch the paintings evenly with the same force
§ Continue stretching the canvas onto the stretcher as shown in the picture. At the corners, the canvas is carefully tucked and stapled
§ When stretching, do not wet the canvas on the unprimed side, this can lead to peeling of the primer!! So let's start! .


The next step is stretching the canvas onto a stretcher.
How and many things in life, it can either work out the first time or only after some time, but it will definitely work out if you just keep trying.
Buying canvas.
To do this, you need to understand the pros and cons of the material from which the canvas is made.
On the modern market there are canvases made of linen, cotton and synthetics, as well as mixed ones. Don’t forget that you don’t have to buy the material at an art store; you can also find canvas at a fabric store.
Material
Cotton
This material is strong and absorbs moisture more strongly than linen material. It is also generally accepted that cotton canvases are the most susceptible to rotting and sagging.
But one of its undoubted advantages is that the cotton thread is much thinner and smoother than linen, which allows you to write even the most small parts. In addition, cotton canvas has a low cost, so it is considered an ideal option for beginning artists.
It is easier to stretch such a canvas than linen; it is less deformed. In addition, when sizing canvas, this canvas significantly outperforms linen.
Linen
The most durable and resistant to temperature and humidity. He is also the most popular among professional artists. Linen canvas is the densest and least susceptible to abrasion , which allows you to protect the work from possible deformations.
A significant drawback of this material is the price - linen canvas can be two or even three times more expensive than cotton canvas. Also, if the linen canvas is not very dense, there may be a problem when filling the “holes” during sizing.
Synthetics
This material has not yet been tested by time, so it is impossible to judge its durability. On the one hand, it has a number of unconditional advantages - strength, durability, low price. The synthetic fabric is absolutely smooth, which is a significant advantage for students. Besides, creative people It is undoubtedly more pleasant to write on natural canvases.
It is also worth noting that there are combined canvases, with different ratios linen, cotton and syntheticswhich combine the characteristics of these materials.
After the choice of canvas material is completed, you need to decide on the structure of the fabric. According to the structure, canvases are coarse-grained, medium-grained, fine-grained. This factor depends on the thickness of the fabric threads.
Grain.
Coarse-grained The canvas is suitable for painting medium and large format paintings. Large grain provides additional protection of the canvas from sagging. However, on such a canvas it will be quite difficult to paint small details, the paint will lie unevenly, so it is designed to work with broad strokes.
Medium grain canvas is a cross between coarse-grain and fine-grain. Such a canvas is considered universal and is recommended for purchase if you do not know in advance the nature of the future work.
Fine-grained canvas is ideal for glazing and “smooth” painting. Such a canvas allows the artist to register all the clear and small details, to create smooth transitions colors. Considering all the properties of fine grain, this type of canvas is suitable for students art schools and studios.
It is necessary to understand that the choice of canvas, including its texture and material, depends on a number of circumstances, whetherpersonal preferences of the artist, painting style or money factor.
TO at this moment we decided on the canvas and we have it readya stretcher made by yourself or bought in a store.
What tools do we need:
Scissors
Construction stapler and paper clips (or nails and a hammer)
Canvas stretching tongs (optional)
For the first time, it is better to take a medium canvas, for example 40/40.
So, we place the stretcher on the straightened canvas and cut off the excess material, leaving an allowance of 4-7 cm on each side of the stretcher (depending on the size of the stretcher).
After this, having straightened the canvas, select the first side and straightening it along the side to the right and left, we drive in the first three staples (let me clarify that we are driving in staplesthe thickness of the subframe) the gap between them is 2-4 cm.
The next step is to turn the subframe over with the fixed side down and on the opposite side we repeat everything the same, with one IMPORTANT AMENDMENT, before attaching the paper clip, you need to forcefully stretch the canvas.
We do the same with the two remaining sides, be sure to use force so that the canvas does not sag in the future.
Next we return to the first side,
to where our first three paper clips were,stretch the canvas again and fasten one more paper clip on the right and left. We repeat the action along the entire stretcher until we reach the corners.
The corners should be folded into an envelope or carefully trimmed so that they do not interfere with the frame in the future.
The sound of your fingers on the stretched canvas should resemble the sound of a drum.
You can also stretch already primed canvas purchased from an art store onto a stretcher. The peculiarity of stretching it will only be that before stretching the canvas must be moistened with water from the inside, and all other actions are the same.
Your first one is ready stretched canvas! Congratulations!
Subsequently, I want to make a video on this fascinating process.
The stretcher serves as the basis for stretching the canvas. There are 2 types of stretchers: modular(prefabricated, wedge) and deaf.
Modular (prefabricated, wedge) stretchers can be bought in almost all art stores. They are sold in slats of 2 pieces (in increments of 5 cm in length) and are slightly more expensive than blind stretchers.
Modular subframes have a huge advantage - their corners are not rigidly fastened and if they sag, the problem can be easily and quickly corrected at home - you just need to knock out the wedges (Figure No. 6). This must be done very carefully so as not to damage the canvas with a hammer or overtighten it.
In blind stretchers, the corners are rigidly connected and if the canvas sag, it will have to be re-stretched. Canvas reupholstery should only be done by a specialist!
As a rule, for a medium-sized painting, a stretcher with a thickness of 1.8 cm is used, and for a gallery stretch - 3 cm.
Subframe and preservation of the painting
A low-quality subframe negatively affects safety. Paintings by modern painters very often have bad stretchers. Unfortunately, not all artists attach great importance to the quality of the stretcher.
Defects in the stretcher do not allow the canvas to be properly stretched over it, which ultimately leads to the destruction of the soil and the painting layer of the painting.
A high-quality stretcher is the basis for the long-term preservation of paintings.
Let's look at the main defects of the subframe
- A blind connection of corners, which does not make it possible to regulate the tension of the canvas, causing deformation of the canvas and its sagging.
- Artists nail plywood triangles to the “blind” corners of the stretcher, which make the stretcher even more rigid and motionless.
- The absence of a cross or crossbar - for large-sized paintings. A subframe with a cross or crossbar will not warp and the corners will remain straight.
- The absence of bevels on the inner sides of the subframe, which causes creases and screes of the paint layer.
- It is better to choose a stretcher that has all points of possible contact with the canvas rounded (all sides on the front of the stretcher), so you will avoid serious damage to the canvas during transportation.
- A fragile stretcher that distorts when stretching the canvas.
- Step-like, loose connection of planks at the corners and on the cross. With this defect, the canvas is deformed, creases and screes of the paint layer appear, and it is impossible to tightly connect the painting to the frame.
- The subframe is made carelessly, from raw wood, as a result of which, after a fairly short period of time, the subframe will “lead” and will have to be replaced (in some cases, the frame will also have to be replaced).
- The subframe is made of wood with knots. Even a well-made subframe that has knots will eventually “lead” and will have to be replaced.
- Subframe with a grinder beetle. Thanks to the activity of these insects, the tree disintegrates, turning into dust.
- The subframe is contaminated with mold.
Tools
To stretch the canvas you will need a stapler with staples (Figure No. 1), a special tool for stretching paintings (Figure No. 2), a tape measure and a hammer.
Canvas Tension Strength
Untreated canvas is not stretched too much, because... It will stretch considerably during priming. The final touch will be stretching the primed canvas by tapping wedges in the corners. For a blind stretcher, it is advisable to use primed canvas. It must be pulled tightly, like a drum.
It is strictly not recommended to stretch canvas when wet., since the threads of such a canvas are irrevocably deformed. Cotton canvases or canvases with a mixture of cotton suffer from wet stretching many times more. Wetting the canvas has Soviet roots, when our artist was dealing with hard and brittle canvases. Such canvases were so inconvenient to use preparatory work, that they were invented to “wet” them to facilitate tension on the subframe. At the same time, such a practice has never existed in Europe.
Stretching canvas on a modular stretcher
- Measure the diagonals of the subframe, they should be the same!!! Secure the corners with a stapler (2 staples per corner).
- You need to stretch the canvas with a tool to stretch the paintings evenly with the same force.
- When stretching, do not wet the canvas on the unprimed side, this may lead to peeling of the primer.
- Pull out the brackets holding the corners of the subframe.
- Fold and staple the excess canvas (Figure No. 6).
- Insert two wooden wedges into the grooves at the corners of the subframe and carefully tap them with a hammer (Figure No. 6).
Stretching canvas on a blind stretcher
- If possible, it is better not to use such a subframe at all!!!
- Check the diagonals, they must be the same!!!
- Place the painting on the stretcher exactly horizontally. If you simply have unprimed canvas, it is important to position it so that the direction of the canvas threads is parallel to the edges of the stretcher.
- Using a stretching tool, staple the canvas on 4 sides, as shown in Figure 3.
- Secure the canvas with a stapler every 2-3 cm around the entire perimeter of the stretcher, moving from the center to the edge, as shown in Figure No. 4.
- You need to stretch the canvas with a tool for stretching paintings evenly with the same force and quite strongly, because if the canvas sag, you will need to re-stretch it.
- Continue stretching the canvas onto the stretcher as shown in Figure 3. At the corners, the canvas is carefully tucked and stapled.
- Fold and staple the excess canvas (Figure No. 6); you will also need it when reupholstering the painting.
Gallery stretched canvas
Gallery-stretched canvas is usually used for frameless painting. When gallery stretched, the canvas is secured with reverse side subframe and neatly wrapped at the corners.
At home, it is quite difficult to stretch canvas in this way, so it is better to contact a framing workshop that has professional equipment - a gallery stretching machine.
How to buy ready-made canvas on a stretcher
- Do not buy ready-made canvas on a solid stretcher.
- Carefully inspect the subframe for defects.
- Check the softness of the stretcher material; if the wood is too soft, then do not buy such a canvas. Such a subframe is easy to identify - it is two times lighter than a regular subframe.
- Do not buy ready-made canvas on a stretcher "Sonnet" from the manufacturer "Nevskaya Palitra". If you have canvases with a stretcher from this manufacturer, we strongly recommend replacing the stretcher immediately.
The stretcher is modular but made from very soft wood that is softer than pressed paper. If you want to tighten the canvas, then nothing will work - the wedges fit into this tree like in butter room temperature.
|
drawing No. 1 A stapler for attaching canvas to a stretcher. |
|
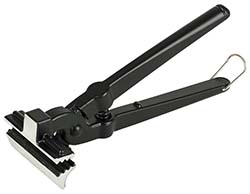 |
drawing No. 2 Canvas stretching pliers |
 |
drawing No. 3 |


