Draw a picture in pop art style. Photo in Pop-art style
Art in any form English language sounds like art. To the common man The most famous concept is “pop art”. Many artists work in this style, and now this type art has become accessible to everyone. Those who are interested in the question of how to draw pop art portraits should know that there are two main ways:
- With my own hand,
- On the computer.
To create a portrait, you will need to purchase a canvas and paints, and then start creating.
How to create pop art with your own hands
People first started talking about the pop art direction in the fifties of the twentieth century. Artists designed new technology letters that allowed you to capture a face famous person or any other portrait in different colors. The image of Marilyn Monroe, which is made in four colors, has become very popular.
Before you start studying the question of how to draw a portrait in the pop art style, you need to purchase everything you need:
- Aerosol paint in two shades;
- Canvas;
- Thicker paper to make a stencil.
When everything has been purchased and the subject for the painting has been chosen, you need to start working.
How to draw pop art portraits: work progress
A necessary condition for the painting to turn out professional is a canvas with a pre-applied primer. You can do this procedure yourself, or you can purchase ready-made material.
- The canvas must be stretched onto a stretcher. For a portrait, you can use a canvas of any size from 30x40 to 60x80.
- The choice of paint does not allow flights of fancy. You need to choose two shades of one color range. The entire canvas is covered with a lighter or neutral color and then dried for 10-15 minutes. The paint layer should not be thick, so as not to complicate further stages of work.
- To highlight the shadow, you need to use a computer and Photoshop. Need to download the desired portrait and correct the image, and then release the resulting template through the printer.
- Dark spots You need to cut it out on the template sheet, and attach the remaining stencil to the canvas and secure it. Next comes more dark paint. The entire portrait is worked out for her, taking into account the template.
- When the paint dries, you need to remove the stencil. The portrait is ready and can decorate any room in the house.
Having learned how to learn how to draw pop art portraits, everyone can try their hand and get a decent result, even without professional skills.
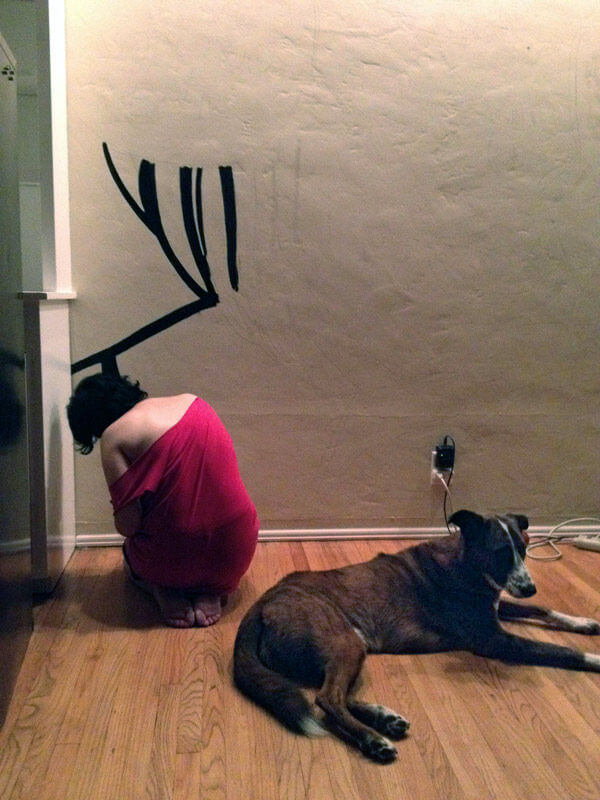
Does your apartment or house have big wall which can be used for pop art art?
How about painting a picture on this wall with your own hands?
Even if you don’t have the skills of an artist, if you follow these simple instructions, you can do it.
Stage 1: Prepare materials and tools

To draw a picture like the one in the photograph, you need the following:
- A projector that will project on the wall the selected image in the required size
- computer or laptop to select and edit the image
- pencil
- small brush with stiff bristles
- acrylic paints
- paper towels
- glass of water
- roller
Stage 2: Select a picture

Google is your best friend
I simply typed “pop art” into the Google search bar and clicked on the image button to find and select a picture that I liked. The first image I liked was too small size 350px x 450px. I narrowed the search by selecting an image size of at least 2 megapixels in the search settings. So I managed to find exactly the same picture only in good resolution, namely 2400px x 2400px. Such a picture will look much better when enlarged by a projector.
If you find an image in a magazine or book, you will have to convert it into digital form using a high-resolution scan.
Keep it simple
It is much easier to draw an image on the wall that only contains a few blocks of different colors. I chose a painting that is easy to transfer to the wall because it only uses a few simple flowers: yellow, blue, red, white and black. I didn't have to mix different colors to get a specific shade, the colors were used straight from the tube.
Stage 3: Project and trace

Projection
At this stage, you need to connect your computer or laptop to the projector in order to project the selected image on the wall. You will have to move the projector closer or further, lower or raise, tilt until the image takes up the entire space of the wall. It is also necessary to center the image and focus it. In my opinion, this is the most difficult stage, it is possible that you will have to look for a more suitable picture.
Tracing
After we have adjusted the image, we can start tracing its contours. You need to trace or outline each line and color. To begin, draw an outline, using light pressure on the pencil so that if necessary, you can easily erase these lines. Never move the projector until you have completed your pencil sketch! It is very difficult to re-find the original projector position. If you are not sure whether you have drawn all the lines on the wall, carefully turn off the projector (but do not move it) and check. If you find a pass, turn it on and complete the picture.
Stage 4: Paint!


Use the right brush
I painted the entire panel using a small flat brush. For outlining and working on joints different colors I turned the brush with the narrow edge, and then filled it with color using the wide edge. You need a brush with fairly stiff bristles, especially if your wall is not perfectly smooth. In addition, it is more convenient to work with acrylic paints with just such a brush.
Use the right paint
Acrylic paint is quite viscous, for such a large area you will need to apply 2 coats, especially if you apply dark color on a light wall. In order to colored paint(except for black) did not show through, you can add a little white.
Work in the correct order
Start coloring the area from its outline. If you start coloring straight from the center, you run the risk of painting over your pencil sketch and not being able to find it later.
Stage 5: Final touches
The “speech” cloud is a territory for creativity. You can write whatever you want here. And even after some time, erase and change the inscription in accordance with your mood. 🙂
So, a very beautiful and original painting on the wall.
December 31, 2015 Sergey Somov
In this article I will reveal to you terrible secret, namely, it’s not worth paying money for a fashionable portrait in the pop art style. Why? Yes, everything is very simple). You are able to make it yourself, on canvas, with your own hands, even if you don’t professional artist! And it's not " magic pill“, you will still have to work, but the whole process will be interesting, exciting and perhaps captivating to you. How to make it?
Material for DIY pop art portrait:
1. We will work on canvas. It is sold in any art store. If you suddenly live in Moscow, read this article. 
2. Brushes and paints. I suggest using acrylic paints (quick-drying, color-fast, not the most expensive), and brushes of your choice (kolin, synthetic, bristles).
3. Prepared sketch in the program (we covered this topic in the article). If you have any difficulties at this stage, contact any company that creates portraits in the pop art style, they provide a free sketch), tell them what you plan to order, and they will make you a series of sketches. Cheat a little!). 
4. A sharpened pencil, a piece of charcoal or sepia (all this is sold for pennies in art stores). 
The most interesting thing is that the portrait itself on canvas in any workshop will cost from 5,000 thousand rubles, but to make it yourself, with your own hands, will cost no more than 1,000 rubles). How do you like it? Just imagine what its cost is and how much people overpay!
Let's make a pop art portrait together on canvas?
Take your sketch, in electronic format, and print at any printing house, of which there are plenty in any city. Printing will cost approximately 50 rubles. It is important that the size of the image on the sheet is the same as your canvas (what size you will have is up to you). 
You have printed it. We take this sheet of paper, turn it over and place it on the floor or any flat surface. With our piece of charcoal or sepia (I use sepia) we begin to rub on back side paper until the surface is completely covered.  Now, put this image on the canvas so that your sepia or charcoal is in contact with the surface of the canvas. We secure it all with tape so that the paper does not move.
  And with a sharp pencil we outline all the lines of our future pop art portrait.
We're filming everything. Voila!!!  There is no need to waste time drawing, worrying about what will be similar or not similar. Now you are absolutely sure that it will be exactly the same as in the sketch. May my brothers in art and the numerous workshops that I deprive of income forgive me. But the truth is that each of us can make a stylish portrait with our own hands. Well, there's little left to do. Mix the desired color and simply paint it in the right place, as in the sketch. As a rule, in the pop art style, the colors are not complex, but bright, and almost straight out of a tube.
We paint the ends of our portrait, wait 10 minutes, and that’s it! The portrait you made yourself, saving at least 4 thousand rubles, is ready! 
Well, now, by the way, you can open a fashion workshop and earn good money). And believe me, absolutely anyone can do this in one day! I am confident in the result, but if something is not clear, you can call or write to the contacts indicated on the website. Good luck to all!
We provide lessons for both beginners and experienced artists. Our drawing and painting studio is located on Tsvetnoy Boulevard in Moscow.
Subscribe to our VKontakte group
A portrait in pop art style looks unusual, interesting and is often used by designers in various projects. The Photoshop program will help us create it. In this lesson we will use the Russian version. There are several ways to make pop art in Photoshop. Let's look at one of the simplest ones. You can use any photograph as a source, including those with animals or plants. But most often images of people are used. You can process a photo of any quality, but, as practice shows, it is more convenient to work with a higher resolution, about 300 pixels. It is much easier to process high-quality source material in Photoshop.
Getting started with the program
First, let's select an image to process to turn it into an art object. Then we create a new document by selecting the appropriate item in the “File” menu. In the window that opens, set its size to 1400 x 1200 pixels and resolution to 300 pixels. This size is suitable for printing a future poster. Leave the background white. Click the “ok” button. Drags an image with a portrait onto a new file and stretches it to the desired size, holding down the Shift key, taking into account that there will be a frame along the edges of the poster.
How to select an object
Select the human figure using the Quick Selection tool. You can switch to the Quick Selection tool by pressing the W key. In the settings, set the size to 4 pixels. If the background is light, there should be no problems. If the contrast is insufficient, select all areas one by one and delete them with the Delete key. Before you make art in Photoshop, you need to correct all the shortcomings. You can remove excess selection using the same tool, but with the Alt key held down. If distortion occurs along the contour of the object, you can correct it using a layer mask or the Eraser tool with maximum hardness and opacity. The most convenient way to move around the image is by holding down the space bar and dragging the object with the left mouse button.

Working with filters
Before making an art portrait in Photoshop, we prepare the object. To do this, right-click on the picture and copy the selected area to a new layer using the “Selection” menu. Turn off the visibility of the background and desaturate the object using the keyboard shortcut Ctrl+Shift+U. In the next step of our lesson on how to make a “pop art” portrait in Photoshop, we need to apply a special filter to the image. Go to the “Filter” menu, select the “Filter Gallery” item and in the “Simulation” tab find “Outlined Edges”. In the parameters we indicate following values: “Intensity” - 0, “Pasteurization” - 2. You can change the second point at your discretion, choosing the optimal parameters for a particular image. Apply the filter and close the window. Add an adjustment layer to the current layer with the “Pasteurization” value. This can be done in the layers menu by clicking on the round black and white icon. In the parameters we set the value to “20” and hide the palette. The pasteurization value can also be changed based on the quality of your image. It is advisable to choose parameters with the least amount of noise.

Fill color
Before you make art in Photoshop CS6 or any other version of the program, you need to color it in the desired colors. Create a new adjustment layer, this time with the value “Gradient Map”, and open the editor window. In it, select any gradient you like and set your own colors:
- at position 0% - dark blue;
- at position 25% - dark red;
- at the 50% position - light blue;
- at the 75% position - neutral orange.
Copy the neutral code orange color and insert its value instead of the last shade. The colors can be changed to suit your taste, but it is important to choose shades that match.

Adding texture
Using filters will help you create art in Photoshop like a professional. Textural elements look beautiful in some portraits in this style. Therefore, before making art in Photoshop, let’s add a texture to one of the shades on the person’s face. Go to the layer with the object and use the “ Magic wand"Select the face. Then create a new empty layer and add a mask to it. Fill the layer gray with opacity 50%. To do this, set the “B” value on the color palette to 50%, and reset the remaining parameters to zero. Apply the action, close the window and fill the image with color using the Alt+Delete key combination. In the “Filter” menu, select “Filter Gallery” and in the “Sketch” tab, select “Halftone Pattern”. We set the contrast to maximum, reduce the size to zero, and “Pattern Type” - line. Now a striped effect will appear on your face.

Creating a Frame Around a Poster
Now we need to work on the photo and create a frame. We pin the adjustment layers and the texture layer above the portrait so that they do not move. To do this, simply click on the layers, hold down the Alt key, and drag the layer with the shape down. Using the Selection tool, draw a rectangle, the right side of which should be located exactly in the middle of the photo. Then, using a pipette, select dark blue color and fill their selected area. We do the same with the second part of the background, filling it with dark red color. Remove selection using the Ctrl+D key combination. Now go to the topmost layer with the gradient map and create a new layer. Select it entirely, go to the “Selection” menu and select the “Modification” item. In the window that opens, set the value to “Compress by 45 pixels.” We invert the selected area using the keyboard shortcut Ctrl+Shift+I. In the palette, select a light yellow shade and fill the frame by pressing Alt+Delete. Remove selection using Ctrl+D. Now you know how to make art in Photoshop.
The purpose of the lesson
In this lesson we will learn how to create a vector portrait in Pop style Art. We will try to reproduce the style of one of the best representatives of this movement, Roy Lichtenstein. To create a raster effect and fine-tune it, we use a plugin for Adobe Illustrator- Phantasm CS. You can use any photo to complete this tutorial, so why don't you own portrait in Pop Art style?
Roy Lichtenstein (October 27, 1923 - September 29, 1997) - one of the most famous American artists, working in the style of Pop Art. We will reproduce his style.

Step 1
We will use a photograph as a reference. I took a portrait of Marilyn Monroe. I enjoy working on a portrait beautiful woman. You can, of course, take your photo and create a self-portrait.

Place the photo in the document workspace (File > Place...), then click on the Embed button on the top toolbar

Let's lock the layer with the photo in the layers palette so as not to move it while working.
Step 2
Create a new layer above the first layer. This is the layer we will be working on. Now let's take Pen Tool(P) and create the contour of the face.

While doing these steps, you should convey the general proportions of the face, you should not convey all the minor anatomical details of the image. Don't forget, we are creating a stylized portrait, not a copy of a photograph.
Step 3
At Help Pen Tool (P) create the outline of the neck and hair.


Let's replace the stroke of the created objects with a fill and evaluate the harmony of the created forms. I always perform this action after manually tracing a sketch or photograph.

Continuing manual tracing, I again change the fill and stroke in places or turn off the visibility of the created objects in the layers palette.
Step 4
Let's start creating the eyes. Take the Pen Tool (P) and create a path that conveys the outline of the eye and the shape of the shadow around it (I filled this shape with red just for clarity)

Creating eyes is the most important job because human eyes we see every day, and any disproportion will be immediately noticeable. I would advise you to rely more on your feelings in this work than on photography. Take the Ellipse Tool (L) and create a circle with a fill blue color and black outline.

This circle will be the iris of the eye. Take the Scissors Tool (C) and cut the circle at points A and B, then delete top part circles.

Now let's connect points A and B using the Pen Tool (P) as shown in the figure below.

Step 5
Using the same technique, let's create the pupil.

Take the Ellipse Tool (L) and create a highlight of light on the surface of the eye.

To create eyelashes, use the Pen Tool (P), applying a triangular profile from the Stroke palette to the created curves.


In the same way we create the second eye.

Step 6
Based on the photo, we create the elements of the mouth. The teeth are filled with solid white color, this is the style of the works of Roy Lichtenstein. As in all work, simplify the outline, conveying only the main proportions.

I created a highlight on the lower lip using the Pen Tool (P) and applied a suitable profile from the Stroke palette to the line.

Step 7
Using the Pen Tool (P) I created eyebrows, nostrils, and using the Ellipse Tool (L) a mole on the cheek.


Now let's create folds of skin near the eyes and nose using the Pen Tool (P) and profiles from the Stroke palette.

Create shadows on the neck.


We have all the elements of the face ready.
Step 8
Let's start creating stylized hair. This is not an easy task, since Marilyn has a rather complex hairstyle. In this work, the main thing is to separate (differentiate) hair curls and understand their direction. I printed out some portraits of Marilyn and tried to create some sketches in pencil.

You, of course, don't have to do this if you don't have such a complicated hairstyle. After such exercises, I confidently took the Pen Tool (P) and created curved lines that convey the direction of the hair.

Now we group all the lines and lock the group in the layers palette. We will use this group as a template. Take the Pen Tool (P) and create new lines using the template and apply different profiles to them, setting their width in the Stroke palette.

The template can now be deleted.

Step 9
A characteristic feature of Roy Lichtenstein's works is an exaggerated imitation of a raster. Having Phantasm CS at our disposal, we can easily repeat this effect and even experiment a little. Copy the shape of the face and neck and paste them in front (Cmd/Ctrl + C; Cmd/Ctrl + F), fill them with burgundy color and combine them into one shape by clicking on the Unite button from the Pathfinder palette.

Move the burgundy shape in the Layers palette so that it occupies correct position, as shown in the figure below.

Step 10
Without removing the selection from this object, go to Effect > Phantasm CS > Halftone…. The dialog box contains many options that allow you to fine-tune the effect.

To imitate Roy Lichtenstein's style, I set the Grid Angle to 45 degrees and the point shape to circle. The DPI parameter affects the detail of the image; Scale, as you might guess, affects the size of the pixels. You can watch the effect change by changing the parameters in the dialog box, this is very convenient.

You probably noticed that the dots protrude beyond the outline of the neck, let's hide this effect. Copy the burgundy shape and paste it in front (Cmd/Ctrl + C; Cmd/Ctrl + F), remove the Halftone effect from the Appearance palette.

Now select both burgundy shapes and press the key combination Cmd/Ctrl + 7, creating a Clipping Mask.

Portrait in Pop Art style is ready.
Step 11
Phantasm CS allows you to create a more complex Halftone effect. Let's play with it a little more. Let's turn off the visibility of the Halftone effect obtained in the previous step, skin folds and shadows on Marilyn's neck.

Let's move the photo in the layers palette so that it occupies the position shown in the figure below.

With Phantasm CS you can adjust the levels of a raster image directly in Adobe Illustrator without pre-processing in Photoshop. In addition to being convenient, there is another advantage, which will be discussed a little later. Select the photo and go to Effect > Phantasm CS > Levels..., leave the effect parameters unchanged for now and click on the OK button in the dialog box.

Step 12
12. Now go to Effect > Phantasm CS > Halftone... and set the effect parameters in the dialog box.

Of course, you don't have to stick to my parameters, because you can create your own unique effect. For example, instead of round dots, you can use squares, lines, Characters, and even Symbols if you previously saved them in the Symbols palette.


After setting the parameters for the May effect, the work looks like this.

Step 13
Now we can adjust the levels of the bitmap. Let's open the Appearance palette (Window> Appearance). We see that our object has two Phantasm CS effects applied to it, which we can customize. Open the Phantasm CS Levels dialog box by clicking on its name in the Appearance palette, control the layer sliders, observing the changes that occur. We got a good result, click on the OK button

Step 14
Let's hide the points that extend beyond the outline of the head using the Clipping Mask technique described in step 10.

Step 15
In my opinion, we need to correct some places in our portrait. In the figure below, arrows indicate problem areas.

Select the object with effects and go to Object > Expand Appearance

As a result of these actions raster image turned into a group of vector circles that we can edit (reduce or enlarge) in the usual ways. After editing, the portrait looks like the image below.

Step 16
All we have to do is create the background. We will use a paper raster texture as the background. You can download such textures here (link). Insert the texture into the document field (File > Place...) and set it to Multiply Blending Mode in the Transparency palette.
Works for you!


