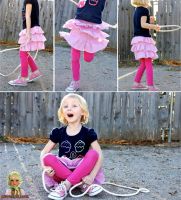
Multi-layered long skirt. We sew a multi-layer skirt with our own hands. Full skirt today.
This cute skirt can become a favorite in the wardrobe of both a little girl and an adult fashionista. Women of all ages wear such stylish multi-tiered skirts of different colors and lengths, considering them the most profitable and spectacular item in their wardrobe!
Finish sewing the clothes together. Wear the overlay and main skirt separately. Choose a suitable base for your main skirt. For application, use a rolled edge or baby sole. This is a super girly cool skirt! Each layer is a circular skirt with a scarf edge.
You will need some kind of stretchy fabric, about one yard per layer. If you want the skirt to be longer, you will need more fabric. It's best if you choose a fabric that won't fray, so you don't have to heat up the layers. This will save time and your skirt will be much floatier! If your fabric is sheer like mine, you will need about 1 yard of another type of fabric to line the skirt. You will also need an elastic waistband, fabric scissors, sewing pins, a measuring tape, thread that matches your fabric, two large safety pins and a pattern, a compass and paper to create your own pattern. easier and much faster than sewing by hand!
Such a skirt sits great and has graceful look , and sewing it is quite simple. Do you want to learn how to sew a multi-layered skirt with a belt? Then let's get started instructions and tips for making it.
|
|
 |
 |
 |
 |
 |
There are so many ways to make a full, layered skirt. It’s likely that you’ve already bought or seen something similar in the market and store windows, and asked yourself how to make one yourself? But it's much simpler than you might think.
Additionally, stretch fabric can be very difficult to sew, so although the design of this skirt is quite simple, it can be tricky to sew. Lay out your top fabric and cut it to about 1 yard. You will cut 1 section for each layer. Carefully measure and align the fabric. It's better to take more time to check your measurements than to cut your fabric too small or too short. Line up your pieces on top of each other and trim the end pieces with paint boxes.
Remember making those paper fortune teller things when you were younger? And you had to make a square piece of paper from a rectangle by folding one corner and cutting off the rest? This is how we're going to make our first square. Lay out one layer of fabric and fold one corner down, lining up the sides. Now you can use this square as a template for other layers. Lay it on top of the other fabric and cut off the excess so that each piece is square.
You can easily change and mix layers, add more layers or make a round vintage skirt instead of ruffles, use jersey and any other materials.
Required fabrics
The example used is a crumpled Indian cotton fabric striped. This lightweight header is ideal for sewing skirts with a similar cut. The material is very elastic and easy to work with. But you can use any light cotton, knitwear, satin, chiffon, tulle, nylon chiffon, etc. Do not use thick or heavy fabrics.
Step 4: Create a Waist Opening Template
Measure around your waist or hips, wherever you plan to wear the skirt. If you have a template, use the appropriate size. If you don't want to, divide your measurement by 28 to get the radius. Take your paper and mark the length of the radius from the corner. Use a compass or pencil and string to make a circle the size of four circles. your quarter circle and you have a pattern for opening your waist!
Step 5: Cutting Holes in the Waist
One layer at a time, fold your fabric into quarters. Attach the waist opening template to the corner with no exposed edges and cut it out. Remember, it's better to double check than to make the wrong cut and ruin a piece of fabric.
Step 6: Cutting and Stitching Your Lining
You can make your lining like the edge of a scarf or a circle skirt. If you want this to be the edge of the scarf, cut it the same way as the layers. For a circle skirt, line your lining to a quarter. Attach the waist opening to your template as you did for the layers but didn't cut it out yet.Fabric quantity
The amount of material used depends on the size of the skirt you want to make; for a girl aged 4-5 years (as in the picture), 0.9-1 m of fabric is just right. You may need less, but don't worry, the leftover scraps can always be used for decorations and accessories for yourself and your home. For example, sew a flower, brooch, hairpin, headband, potholder, pillow, etc.
Figure out how long you want the lining to be and add 1 for the waist seam and hem. Measure this distance from the curved edge of your waist. Using a pencil or pen on a string, make a light line on your fabric so you have marked a quarter circle, basically a much larger version of the waist opening pattern. Cut a hole in the waist and along your line. If you have a pattern for a circle skirt or other lining that you want to use, use it! Raise the bottom edge of your lining by folding it twice, or sewing it with a zigzag stitch and then folding it once.
Dimensions
This skirt is made of tiers. Instead of a simple skirt with two or three layers from the waist up, we're going for a tiered full skirt with ruffles.
Width
To determine the width you need for your skirt, measure your child or yourself around the waist (or where you want the skirt to start; if you want a low-slung skirt, measure around the hips).
It's much easier to warm up the lining when it's not attached to the rest of the skirt. Use a thread color that matches your lining. Decide whether you will see your lining directly on the skirt. Also, decide whether you want all your edges lined up or staggered. If you are sewing your lining to a skirt, place it on your work surface. Take your first layer and line up the waist holes if you were sewing on a lining.
Take each of your other layers and place them the way you want them, edges lined up or staggered, making sure to keep the sashes lined up. Once you like how your layers are arranged, pin them together at the waist opening. Using thread that matches your fabric, sew the layers together using a zigzag or stretch stitch.
The elastic should be the same length as your waist size (plus 3cm for overlap).
The width of the connecting parts is calculated by multiplying the waist size by 1.5.
The width of the lush gathered parts is multiplied by 2.
Length
Decide how long your skirt should be: a couple of centimeters above the knee or a little below? Measure from your waist to your desired length and then do your little math.
Cut a piece of fabric 1 inch longer than your waist measurement and 3-4 times wider than your elastic to make your waistband. If you want to use the same fabric as your skirt layers and it may be sheer, you may need to layer several pieces for strength and to hide the stretch. Sew the ends of your belt fabric together so you have big ring. Fold the ring in half so that it becomes an inner tube of sorts. Sew it closed with a zigzag or stretch closure, leaving a space open for inserting elastic material.
Figure out how many frills you want and how wide and full you want them to be.
The frills in the example were cut out to be about 10 cm wide, but after all the layers were sewn together they were about 7-8 cm wide. Note: connecting and fluffy parts should have the same width.
Also keep in mind that the belt adds extra length to the skirt.
Step 10: Elastic Insertion
Attach the tube to the top of the skirt. Sew them together using a zigzag or stretch stitch, making sure the elastic opening is not untied. Cut a piece of elastic that fits comfortably around your waist or hips but is tight enough to hold up your skirt. Attach one safety pin to one end of the elastic and use the other to slide the other end of the elastic over the skirt so it doesn't stretch all the way through the waistband. Pull the elastic through the waistband, making sure not to twist it.
Example skirt sizes:
Waist = 50 cm.
Connecting part = 75 x 10 cm.
Frill = 100 cm x 10 cm.
Elastic band = 3 cm wide, 53 cm long.
If you want to make the ruffles fuller, increase them by making them 2.5 times or even longer.
Is the meaning clear?
Look carefully at the photos of the master class, and if you have questions, ask them in the comments, we will be happy to answer you!
Pin the ends of the elastic together and try it out. Once you are satisfied with the application, sew the elastic and stitch the hole in the waistband. If you've already sewn in your lining, you're done! We will show you some of the most beautiful boho wedding dresses today.
The Catalan modem models inspire a successful combination of classic elegance and Czech casualness. The design of the aerial suits on the clothes was influenced by fashions from the seventies. Flattering cuts and bold slits provide ideal leg freedom. Romantic and playful embellishments highlight a woman's beautiful cleavage, while the back dresses are particularly elegant and seductive. Made from fine, sheer fabrics, the bodice allows beautiful skin to shine. Sheer fabric can be combined with a very deep cut.
 Let's start making:
1. First you need to cut out all the strips. You need 1 connector and 1 frill in 1 tier. If the width of the fabric is narrower than you need, sew a couple of strips together for each.
A hippie wedding dress doesn't have to be white. Also the cream and champagne colors are very effective and reminiscent of the beach. Even short dresses and trousers find their place in the collection. The focus is on skirts and loose fabrics. The hippie look is also enhanced by details such as fringe, floral appliques, tassels and pleats. They give a boho dress a very nostalgic charm and exude a cheerful naturalness. Special attention focuses on accessories such as belts, coats and scarves.
A floral wreath chosen straight from the meadow, or individual flowers woven into the hair - the best choice. Wedding dress with long sleeves Abedul is inspired by the romance of the Victorian era. The skirt consists of a mixture of different fabrics such as soft tulle with plumet, lace and ruffled tulle. The magic of the Passiflora dress unfolds. The dress is made up of silk stripes that fall from the knee-length neckline, creating a beautiful waterfall effect. The petticoat is made of Chantilly lace.
2. Once you have cut out all the strips, fold each connecting piece in half and sew the ends of the fabric together on the right side, 1cm from the edge. Then finish the edges with a zigzag stitch, overlock stitch, or leave them as is. But it’s still better to zigzag along the edges, this will ensure that the skirt will not tear or fray over time and many washes. Set the connecting pieces aside and start working on the frills.
True craftsmanship that inspires! The Narciso Ivory Hippie Wedding Dress features beautiful ethnic details. The Empire neckline is characterized by a high seam waistband. From there the dress falls freely down. The skirt is made up of tulle and different stripes which provide a varied look.
The off-the-shoulder style is wonderfully feminine and gives every dress a romantic touch. The sleeves loosen over the arms and become a seductive highlight of the model. Two slits in the skirt allow for great movement with every step. Thin spaghetti straps add slack to clothing. Gold-colored rings are the highlight of the Hydra and Endrino models. Chiffon makes dresses light and airy, and the details add something special. Skirt design thrives on asymmetry. Tall, loosely worked georgette crepe belts that start at the waistband hang at varying heights.
 3. Decide how you want to finish the edges. If you have a serger, just finish the edges. This makes the skirt even lighter and airier and looks quite cute. If you don't have a serger, don't worry! Simply run an iron along the edges of each strip, folding in 1cm, and press the edges. Then stitch them.
Both chiffon dresses look delicate and romantic. The Tomillo long-sleeve wedding dress is reminiscent of the hot Sahara. The design is full of detail and consists of graphic lace with floral motifs. It looks like a noble version of a tank top. A thin belt ensures a slim waist.
The Granado wedding dress is characterized by an original neckline, where various strips of fabric intersect and create interesting effect tattoos on the skin. The play between transparent and opaque brings a lot of variety to rock design. This dress featured tulle, lace and gorget fastenings, with an emphasis on the seams.
4. Once you have finished finishing the edges, gather each of the strips to create a ruffle. The purpose of each is to be the same length as the connecting parts. There is a simple A way to make this task easier: just make the stitches very long.
The number of layers or tiers in a multi-layered skirt can be any. The volume of the skirt depends on this. If the skirt consists of large quantity tiers, they should be narrow. Most often, such a skirt has a yoke that fits tightly around the hips. The tiers are attached to this yoke. Thanks to this cut, the skirt looks interesting and original. A very full skirt is suitable only for those who wear slim figure. If the skirt is made of flowing fabric and the layers are not overlapping, it will also suit curvy hips. After all, in in this case The main thing is to balance the figure by disguising the heavy bottom. But thin girls are absolutely not limited in their choice of fabric. They can choose silk, chiffon, satin, tulle, lace or heavier materials: linen, chintz and cotton.
Cut - figure concrete and waist. "Manzanilla" - Wedding Dress dreams with a trumpet. The dress only figures up to the thigh and is displayed from there. Thanks to the special section, women's curves can be perfectly emphasized. The bodice is made of embroidered silk and made of exclusive tulle with Swarovski crystals. The skirt consists of several layers of tulle, durable organza and feather fringe.
The ivory wedding dress is hung and runs into a wide skirt. The organ frill on the mesh base adds a playful touch. Ideal for brides looking for simple silhouettes, but rich in detail. The dress from the seventies "Kanamo" is characterized by a mermaid silhouette and sleeves. The lace at the neck is perfect for a boho style. They just manage to make the trip different. They may sometimes charm us, excite us, amaze us or amaze us, but in any case add additional color and emotions as they can.
Choose the length of the skirt depending on the purpose. So, multi-layered maxi skirts are great for relaxing and traveling. A short skirts wear to parties and discos.
Wear a fitted top with a layered and full skirt. If there is any pattern on the skirt, the top should be plain. A simple, tight white tank top is perfect for summer. A cropped jacket and a high-neck top also look good with a layered skirt. Pumps, ballet flats, platform sandals, and ethnic sandals with a lot of straps are suitable for footwear.
It’s good that girls on the paths are getting bigger and bigger, so for their relaxation we have prepared a special bouquet of products offered by our partners especially for women who love to ride a bike. Dear sirs, don't look back! It makes sense to start with women's bikes first, doesn't it? Regardless of city or mountain, a bike should be comfortable, and although many women have no problem with completely standard models, many manufacturers offer special bikes for ladies, with the difference not only in colors, but also in the lower top tube. The seat is usually chosen for female anatomy.
Almost any jewelry goes well with a multi-layered skirt: long natural beads, wooden bracelets, ethnic earrings and so on.
How to sew a multi-layered tulle skirt?
In order to sew a multilayer skirt 30 cm long by yourself, you will need: 1.8 m of black tulle, 0.9 m of raspberry tulle. The width of both pieces of fabric must be at least 1.5 m. Please note that the skirt will be short, suitable for a disco, club or bar. Cut the crimson tulle into strips - 2 strips of 20 cm and 2 strips of 23 cm. Black tulle should make 6 strips: 2 strips of 25 cm, 2 strips of 28 cm and 2 strips of 30 cm. The main part for the skirt will be the remainder black tulle. Sew the ruffles onto this base. Minimum ruffle length: hip circumference + 50 cm. So, start sewing the stripes onto the main part of the skirt. You can gather the flounces directly under the foot of the sewing machine. First, sew the fuchsia tulle that has the smallest width. Then sew the second layer of tulle a little higher. Sew black tulle over pink. Next, sew the main fabric and gather it to the length of your waist. All that remains is to sew the belt onto the skirt. You can choose the width of the belt at your discretion. However, keep in mind that wide belts look great with layered skirts. Therefore, a belt 8 cm wide is great option. Cut out a strip of elastic fabric 17 cm wide and fold it in half. Determine the length of the belt by your waist circumference. Sew the fabric to the skirt, fold it in half and stitch again. Match the side seam of the skirt and the seam of the waistband. Leave a hole in this place where you will insert the elastic. The skirt is ready!