Square crochet pattern and description. Fairytale grandmother's square. Schemes and description. Ideas
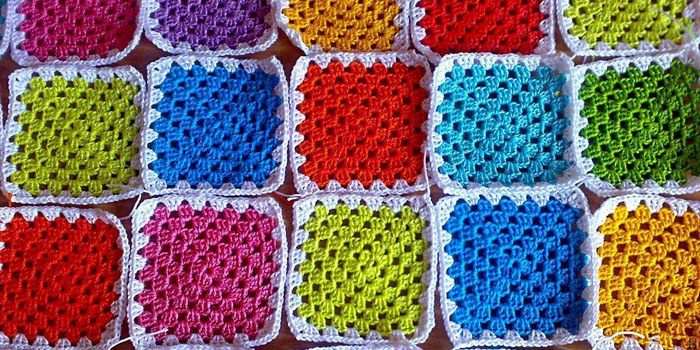
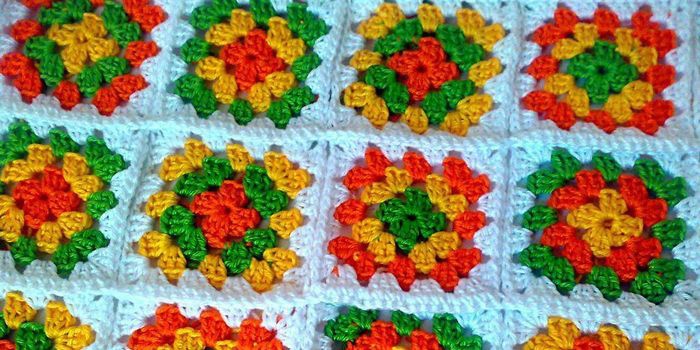
A popular crochet motif is the granny square. It is easy to perform, and at the same time looks beautiful and original. The pattern is named this way because it began to be knitted a long time ago. Interested in a similar motif? Then use the instructions below on how to crochet a square and what things you can use it to create.
Where are crochet squares used?
This motif has several different modifications, each of which has its own characteristics. Having learned to knit the simplest of them, you can create many interesting products or items of clothing, both adult and children's models. Among the latter, the following are performed in this pattern:
- cardigans;
- poncho;
- topics;
- scarves and hats;
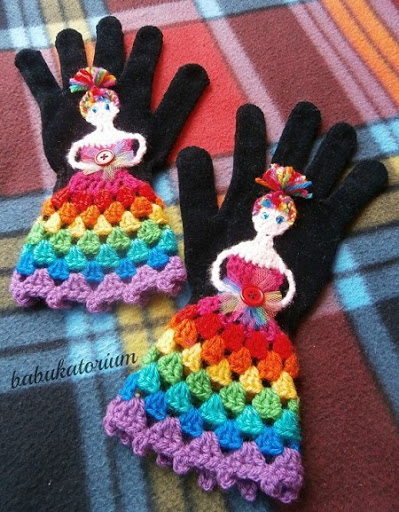
- gloves;
- slippers;
- skirts;
- dresses;
- sundresses.
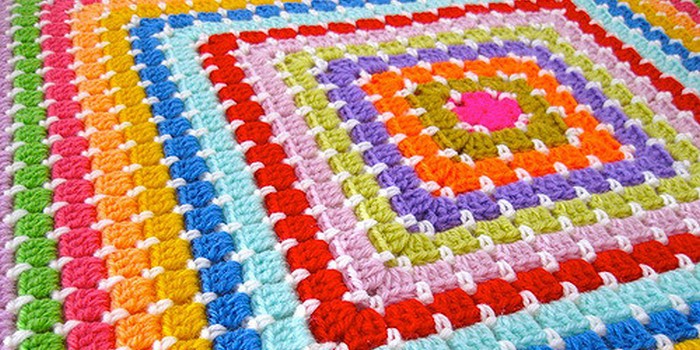
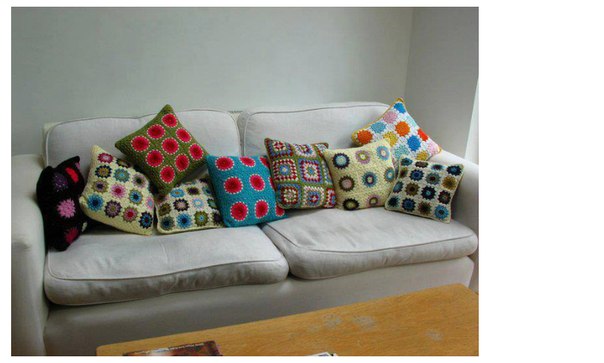
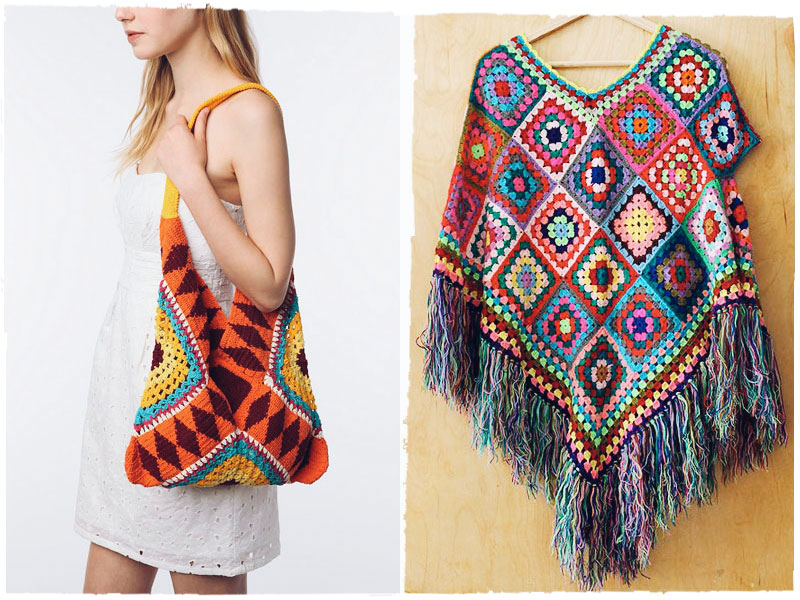
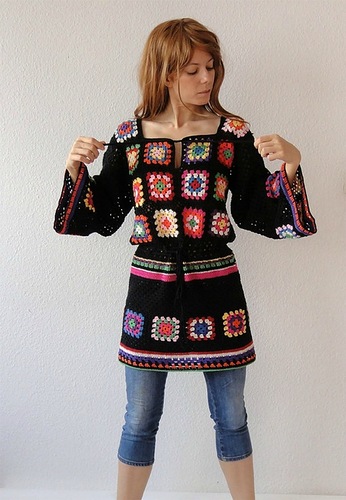
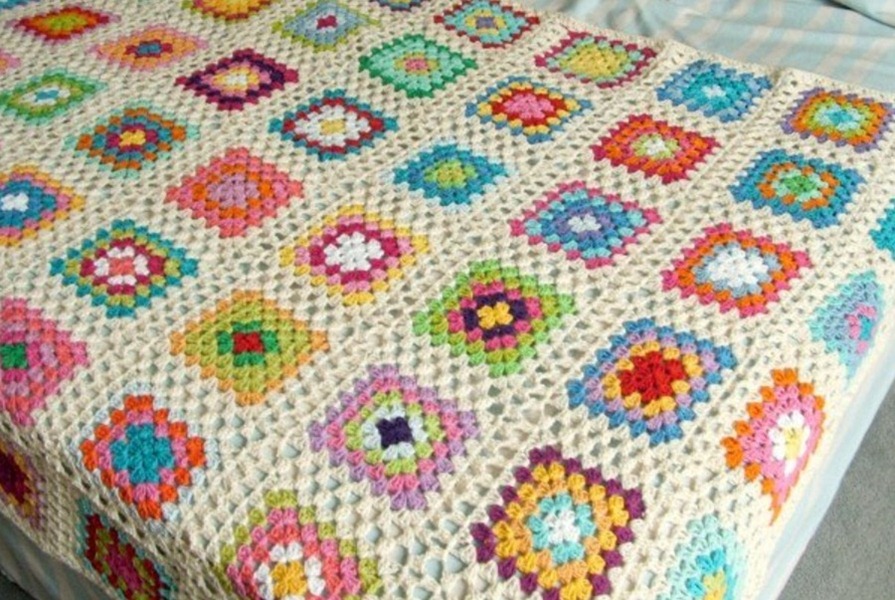
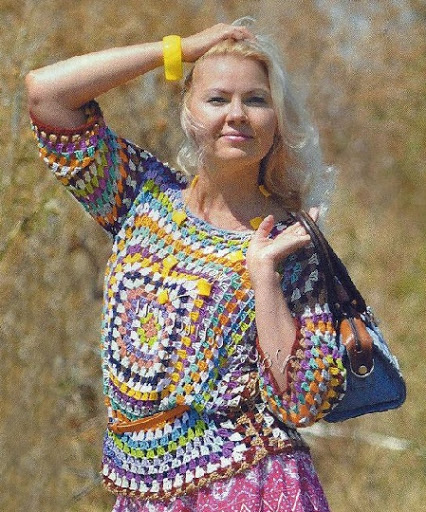
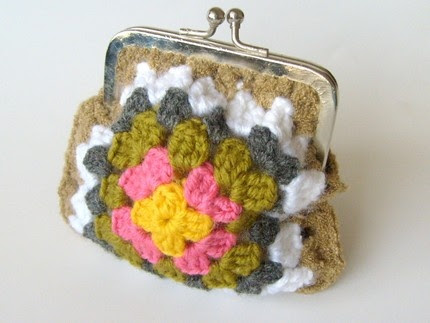
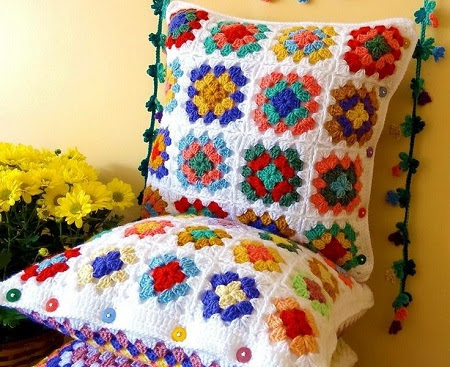
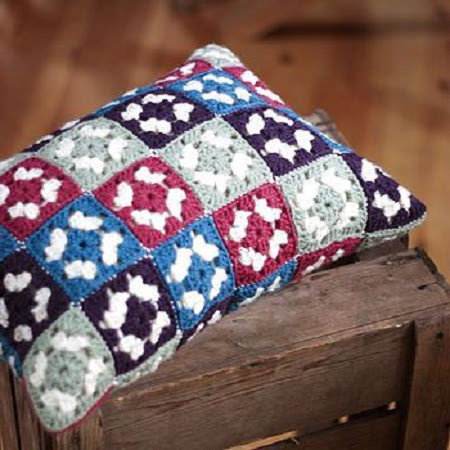
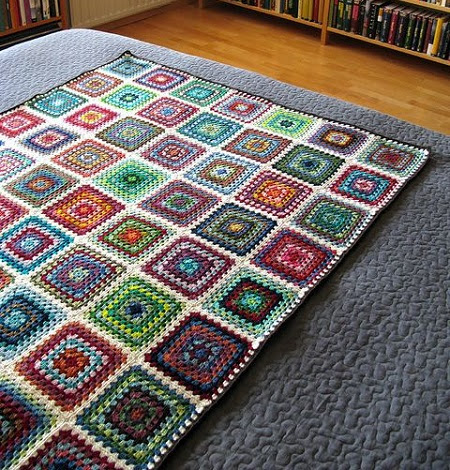
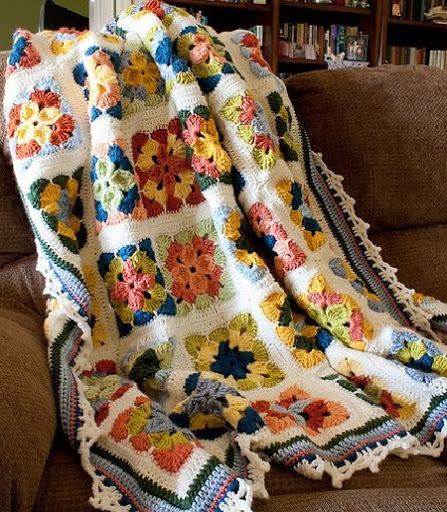
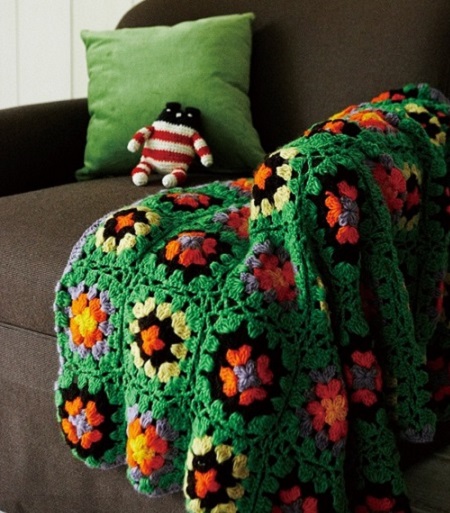
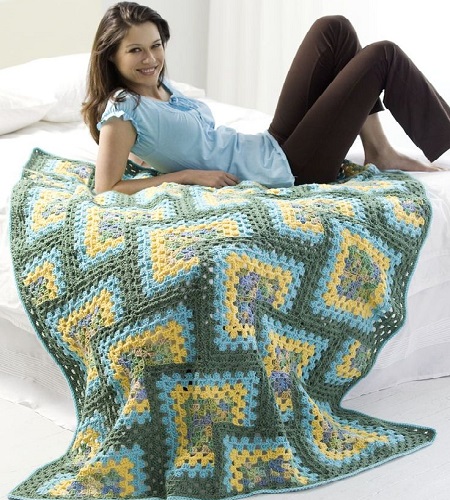
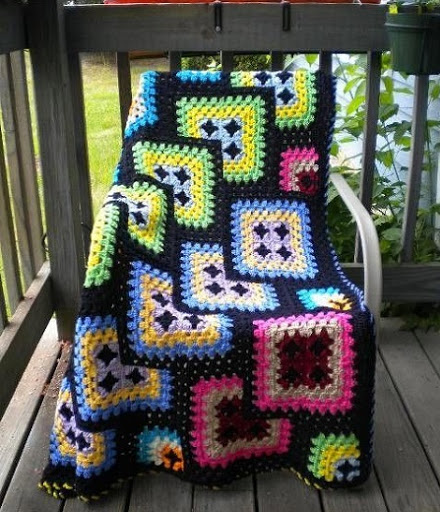
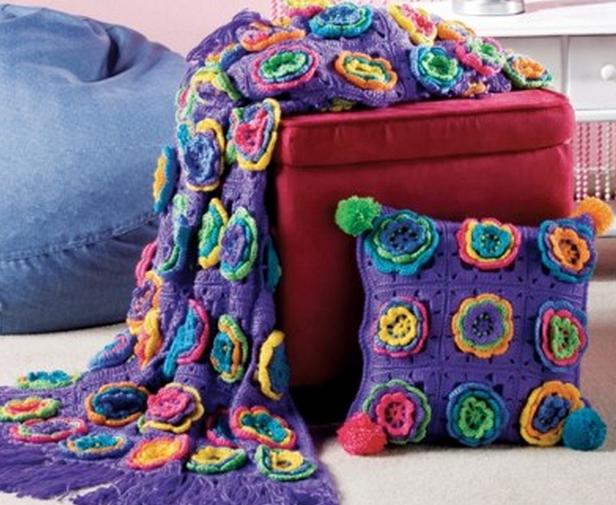
Along with cardigans and dresses, bags and wallets made from granny squares are very bright and juicy. From it they are created various items comfort, for example, rugs, blankets, pillowcases, tablecloths, floor mats, potholders, mug coasters and much more. Some people are simply fascinated by ideas in the form of curtains or armrests for a chair or sofa.
Pets will look very cute wearing clothes with a square motif. What explains this popularity? The granny square is crocheted very easily in large quantities, because the elements themselves are small. Then all that remains is to combine them in order into the finished product. It is very convenient and fast, especially for beginners, so this pattern for a long time remains popular. This base is used for knitting various products, be it a cardigan or a simple blanket.
How to knit a granny square
In the classic version, the granny square is crocheted from the center in the round. Then make several air loops (VP) for lifting, and then continue to alternate double crochets (DC) and VP. This is how the required number of rows is completed depending on the required square size. The edges of the product are tied with double crochets to make them smoother. As you work, you can change the shade of the yarn, creating interesting color combinations.
The given option is far from the only one, because there are several more modifications of the square motif. They are made in the form of snowflakes, triangles or hexagons, hearts, flowers and others. interesting elements. They differ from each other, but the principle of their knitting remains the same - these are stitches that are made by inserting a hook into the gap or air loops located between the stitches in the previous row.
A grandmother's square in Spanish looks completely different. For it, contrasting yarn is used, threads of the same tone or multi-colored. The beginning of knitting here is no different from the classic version. The difference lies in the subsequent alternation of long broaches through the row in combination with a change in tone. Ready product results in a smoother color transition.
Simple crochet square from center
For beginners, it is better to crochet first classic version. It is very easy and quick to create. Complete the beginning of the square and the first row according to following instructions:
- Cast on 4 VPs, using a half-column, close them into a ring.
- Make 3 VP lifts, connect 2 Dcs and 3 more VPs.
- Repeat the cycle of 3 dc and 3 ch 3 more times.
- Find the 3rd loop from the very beginning of the row and make a connecting loop in it.
A ring of chain stitches does not count, so the first row includes points 2 to 4. The next row is knitted like this:
- Perform 3 VP lifts again - they need to be done at the beginning of each next row.
- Knit the following complex in one corner - 3 dc, 3 ch, 3 dc.
- On the sides themselves, knit 3 dc under the chain stitches of the previous row, and between them make 2 ch.
This is how row 2 is done. All subsequent ones are also knitted according to this principle - make double crochets into the hole between the groups of dcs below. Using this technique, knit a square to the size you need. At the end of the work, tie the edges with single crochets. This will make the product more even and dense. Then all that remains is to knit the required number of elements and connect them using one of the methods described below.
Grandmother's Square in Spanish
The next version of the square motif will be a little more difficult for beginners to complete, but with the diagram and instructions it is quite possible. To create the first row, use the description from the previous section, because it is suitable for both types of this pattern. The most interesting thing starts from the 4th row - here you need to start making hoods. It is recommended to take a thread of a different color for this. Although you can use matching yarn. The knitting sequence for row 4 looks like this step by step:
- Make 3 ch for lift, 3 dc and 2 ch.
- Then start knitting the following cycle in a circle - 1 DC under the arch, insert the hook into the loop of the 1st row and freely pull out the broach, align it along the length to the double crochet and knit it: 2 VP. At the same time, knit the corners according to the classical pattern.
The next row will be the fifth. Continue knitting according to the same principle, only pull the loop higher from the arch than in the 4th circle. The result should be an offset of 1 group of columns. After 2-3 rows you can already enter the next shade. The number of circles and colors can be any, but it looks especially beautiful smooth transition from light yellow to terracotta and black.
Crocheting granny squares
An important detail Creating products from crocheted squares is their connection. For this experienced craftswomen came up with a lot different ways. The beauty of the product directly depends on the quality of the assembly, so it is better to think through methods for connecting the squares right away. There are 4 main methods:
- Single crochets. Another thread is taken and it is used to tie 2 squares folded with the front part inside. The hook is inserted under the back walls. At the end of the assembly process, the edges of the product are additionally processed twice with the same single crochet stitches. In the corners, 3 RLS are made into 1 arch.
- Half columns. The seam here turns out to be very even, so it adds decorativeness to the product, especially when using a contrasting shade of yarn.
- Openwork. In this case, certain patterns are used for connection, which is why the seam becomes almost invisible. A popular pattern is “picot”, which is knitted along the edge of one element and then attached to another.
- By using sewing needle. The easiest option is to simply sew the squares together with one decorative stitch or another.
If you have already mastered the basics of knitting, but don’t know where to start creative path, we invite you to familiarize yourself with the patterns of openwork crochet squares. Square-shaped motifs are the most common, because they are quite simple to perform. And by combining such details, you can create a real masterpiece.
The origins of handicraft
If the ancient Romans knew about knitting, then the crochet hook began to appear as a creative tool in the 19th century.
This type of needlework originated in Europe, during industrialization. Needlewomen who use knitting needles and crochet know that the second type of knitting requires a significantly larger amount of thread. How openwork pattern, the greater the material consumption. This is what slowed down the development of crochet. The Industrial Revolution made it possible to mechanize cotton processing processes and significantly reduce the cost of thread.
Crochet has become very popular. Needlewomen complicated the patterns, borrowing them from other types of creativity - weaving and embroidery. The finest lace took a lot of time to make, so it was highly valued. This type of needlework has gained great love, because learning to crochet is much easier. A large number of patterns and motifs allows you to create unique handmade things and crafts.
Grandmother's square
One of the simplest and most common square motifs is granny square.
Yours unusual name he received it due to the fact that mainly elderly peasant women were engaged in home improvement. They could no longer do hard work, but such painstaking work was quite within their capabilities. The “multi-color” of the motif is explained by the fact that during the war years it was difficult to get material for knitting and it was taken from old things. Each piece of thread went into action, creating a unique canvas.
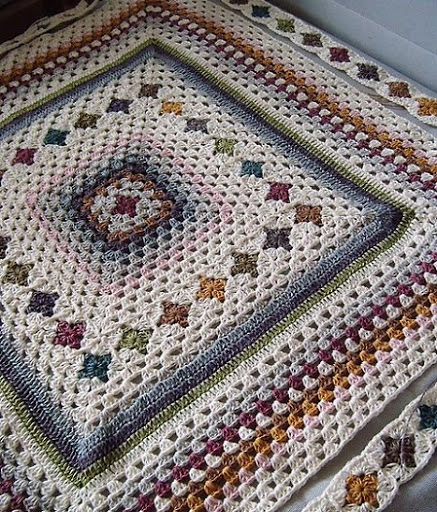
They used granny squares to decorate their home. They were combined into a large canvas to create capes, blankets, pillowcases and garments.
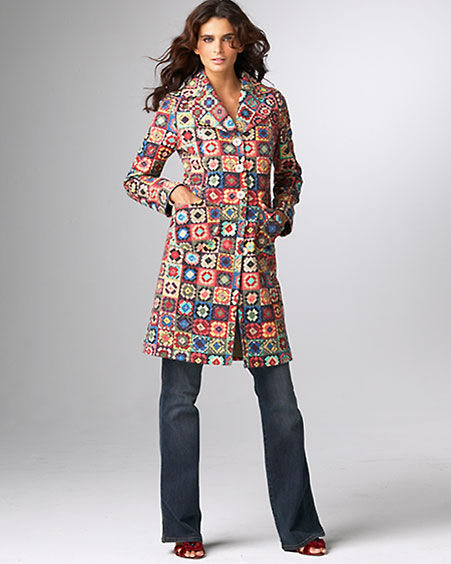
IN modern fashion he also fit in perfectly; he was chosen by clothing designers and fashion designers. They create unique items that show that the granny square is unlikely to ever go out of style.
Step by step execution
We are offering to you detailed master-Class to create a granny square motif. It is so easy to perform that even a novice master can do it.
To work you will need:
- Multi-colored wool or cotton threads of the same thickness;
- Hook corresponding to the number.
Most yarn manufacturers specify what number of knitting needles or hook to use for the project.
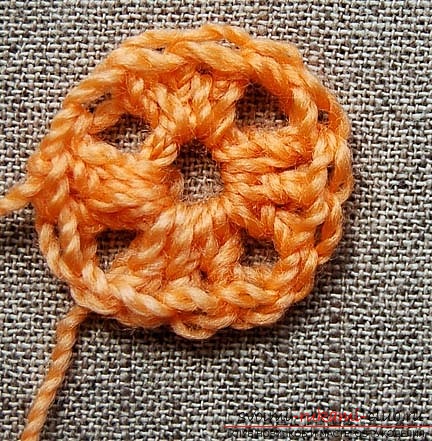
Knitting the motif should begin with a ring of four air loops.
![]()
To complete the second row, you need to knit three lifting air loops. Next, in the center of the ring, knit: two double crochets, one chain stitch, three double crochets, a chain loop. Knit 3 stitches and a loop twice more. The result will be a part that can hardly be called a square.
Fasten the thread and change the color of the yarn. Perform a lift of three air loops. This row is knitted into arches from the air loop of the previous row. In the first arch, knit 2 double crochets and a chain stitch, then three stitches and a chain stitch. Let's move on to the second arch. Knit 3 stitches and an air loop into it twice. Repeat filling the arches until the end of the row.
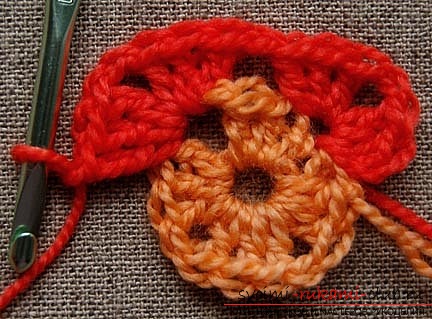
The third row is knitted similarly. The only difference is that 3 double crochets, an air loop and three double crochets are knitted into the corner arches. And only three double crochets are knitted into the central arches. The step-by-step process of filling the arches can be seen in the photo.
![]()
The end result is this:
The number of rows may vary. They are made in the same way: two bundles of three stitches are knitted into the corners, between which there is an air loop (or several loops), and one bundle of three double crochets is knitted into the remaining arches. More details can be seen in the diagram of a multi-row granny square.
You can create various things from it:
Connection of motives
You can connect the squares together by simply sewing them together. Or use a hook connection. There are variations here.
You can make a connection using half-columns. To do this, align the two squares and insert the hook behind the outer sides of the loops as shown in the diagram.
Another option involves not just combining motifs, but also expanding the canvas. Prepare the required number of squares.
Fasten the thread to the corner of the first motif, make 3 lifting air loops.
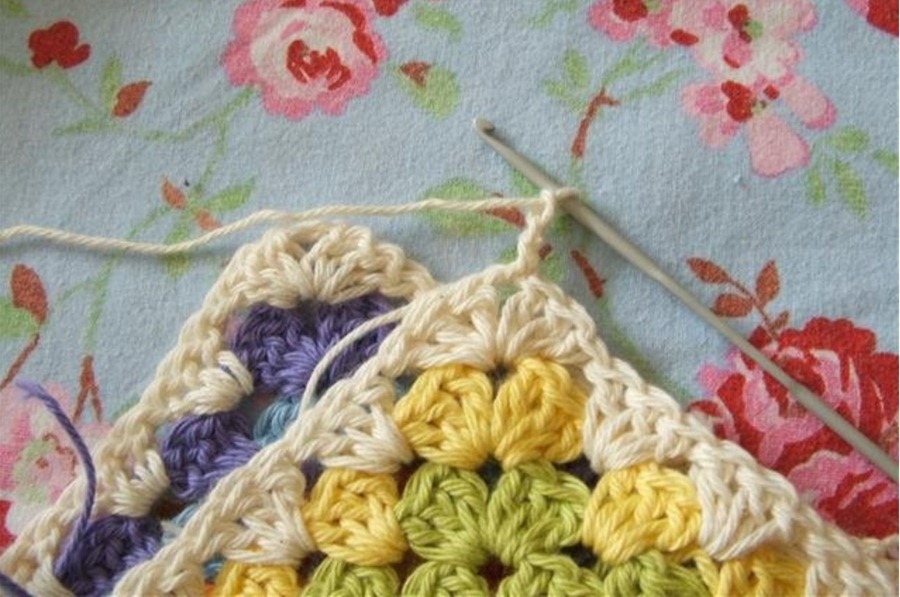
Add 3 chain stitches and 2 double crochets to the corner of the second square.
Let's move on to the first motive. Knit three double crochets into the arch.
Continue knitting until the end of both squares.
First, connect the motifs into stripes.
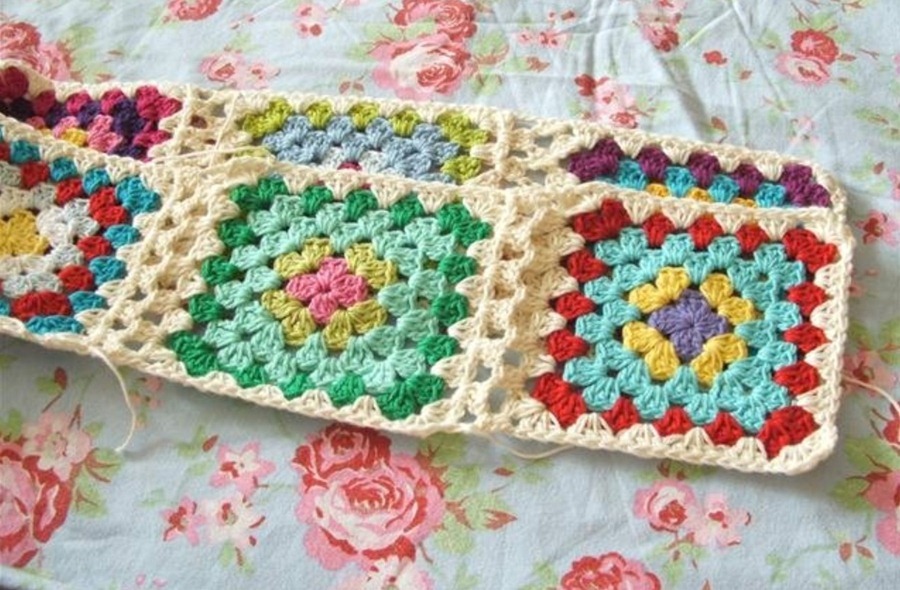
Then, assemble the strips in the same way into a single canvas of the size you need.
All that remains is to carefully tie the edges and the chic blanket is ready!
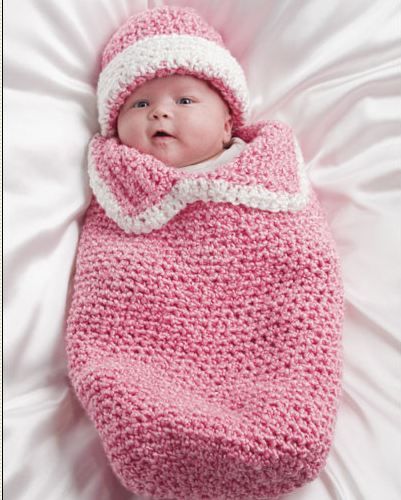
Good afternoon dear friends!
Do you know that the granny square motif is back in fashion? And they use it not only for knitting blankets and pillows, but also in completely unexpected things.
However, the granny square has always been crocheted and crocheted, and today I will offer you a pattern and description of its crocheting, tell you how to combine motifs from the granny square, as well as ideas for using it.
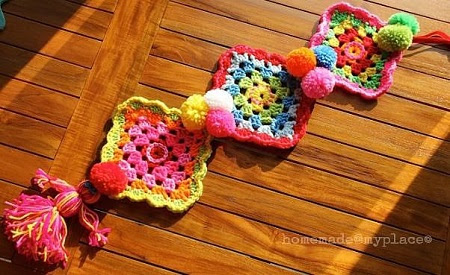
I'll start with ideas. Maybe after seeing these photos you will want to knit one of the models.
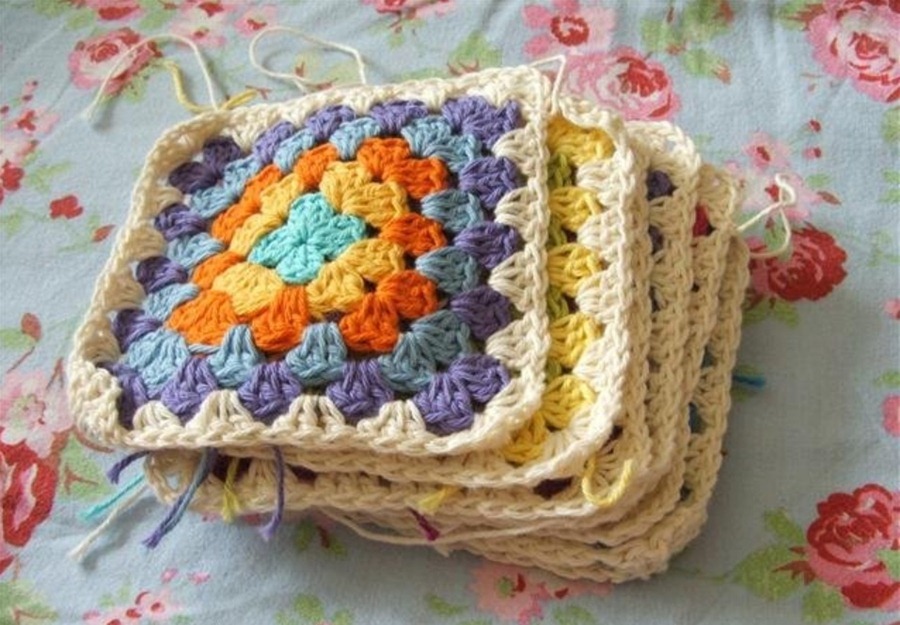
Models from granny squares
I was wondering why the granny square pattern is called that, but I couldn’t find the answer. My opinion is that our grandmothers have been knitting this pattern since ancient times, and this motif is very simple, you can start learning to crochet with it.
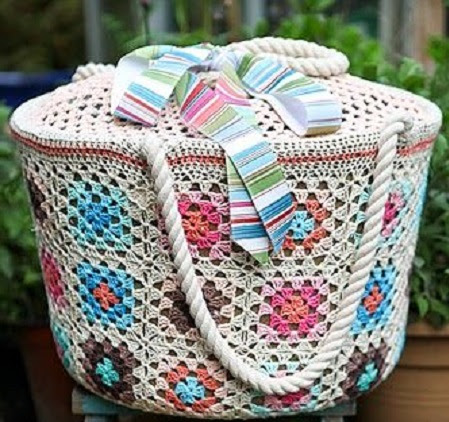
You can knit anything from it! These can be bags, wallets, dresses, sundresses, skirts, cardigans, tops, shawls, ponchos, scarves, gloves, slippers and other clothes, even clothes for animals.
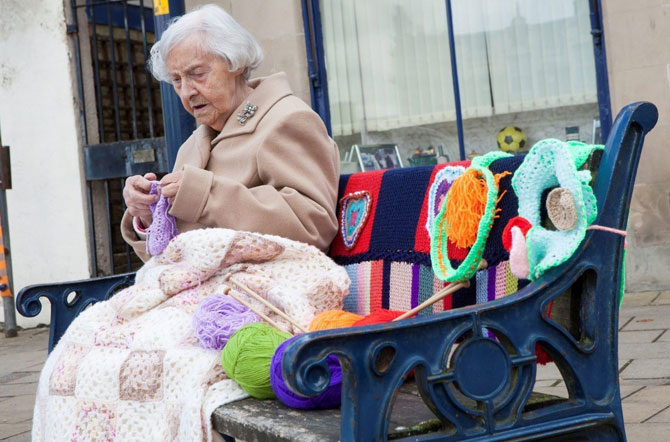
Now in many cities, objects on the streets and in parks are dressed up knitted clothes, our favorite motif is very suitable for just these cases.
Granny's square crochet is also used for knitting home comfort items. When I was preparing the material and analyzing what readers most often search for on the Internet, it turned out that needlewomen are interested in to a greater extent blankets
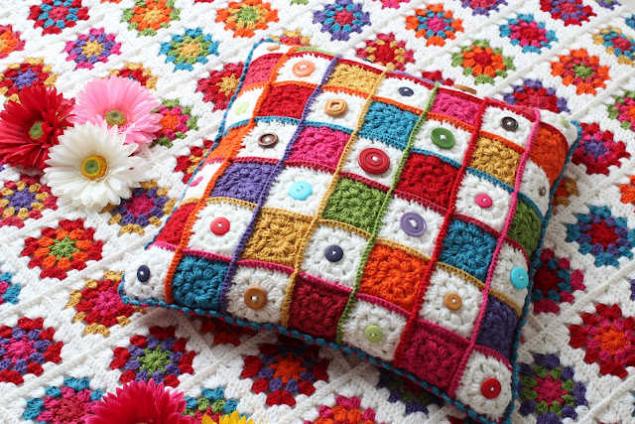
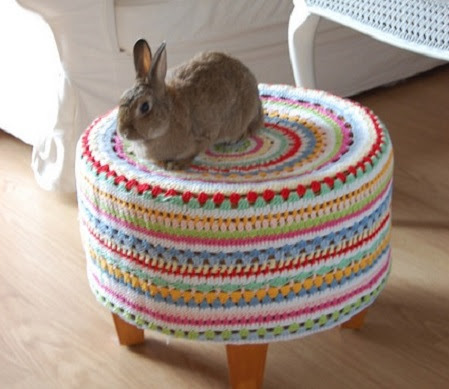
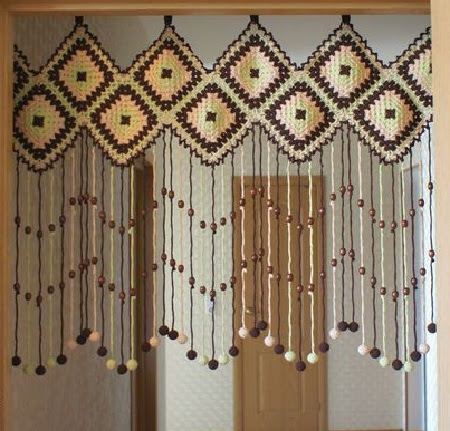
But from granny squares you can also knit pillows for the sofa, rugs for the floor and chairs, covers for the armrests of the sofa and chairs, napkins and panels, , baskets, and much more. And the knitted curtain made from granny squares especially fascinated me.


Now we will talk about how to knit a granny square, and below I will give more variants of models in different colors.
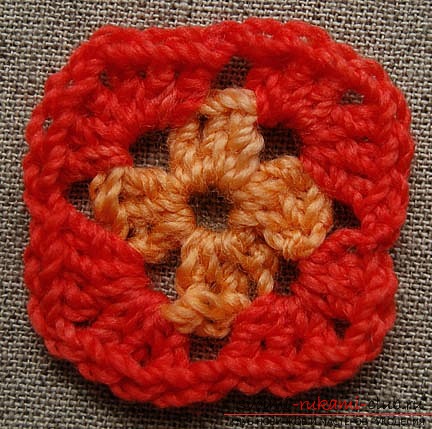
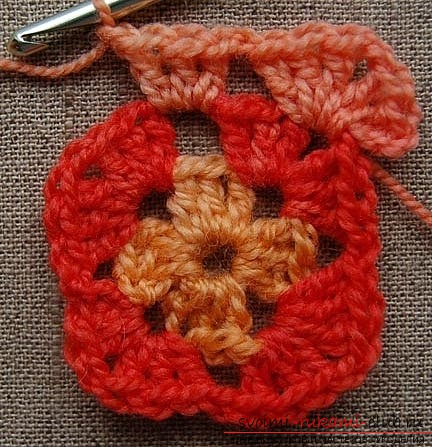
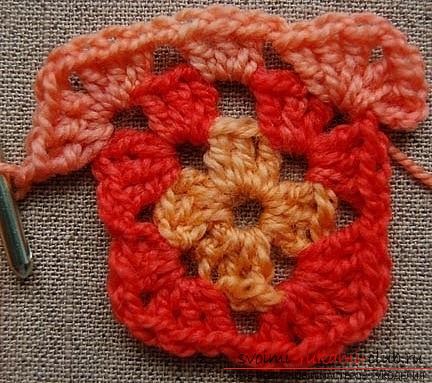
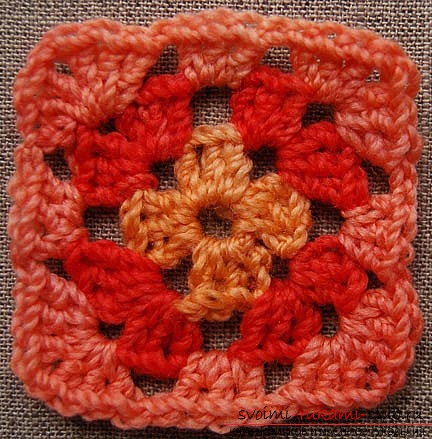
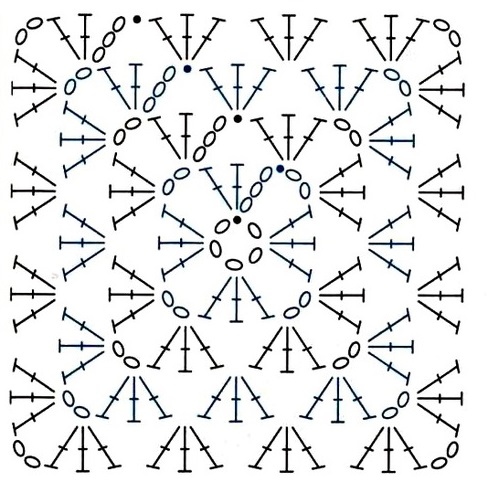
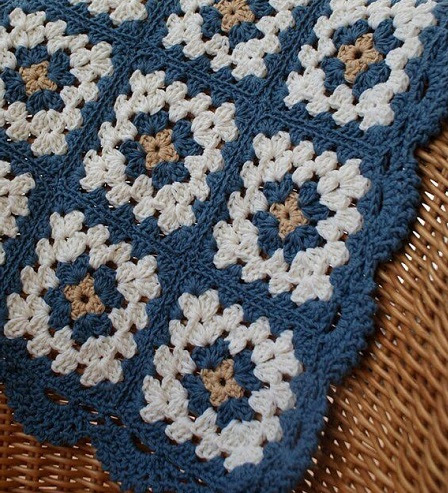
Grandmother's Square. Diagram and description
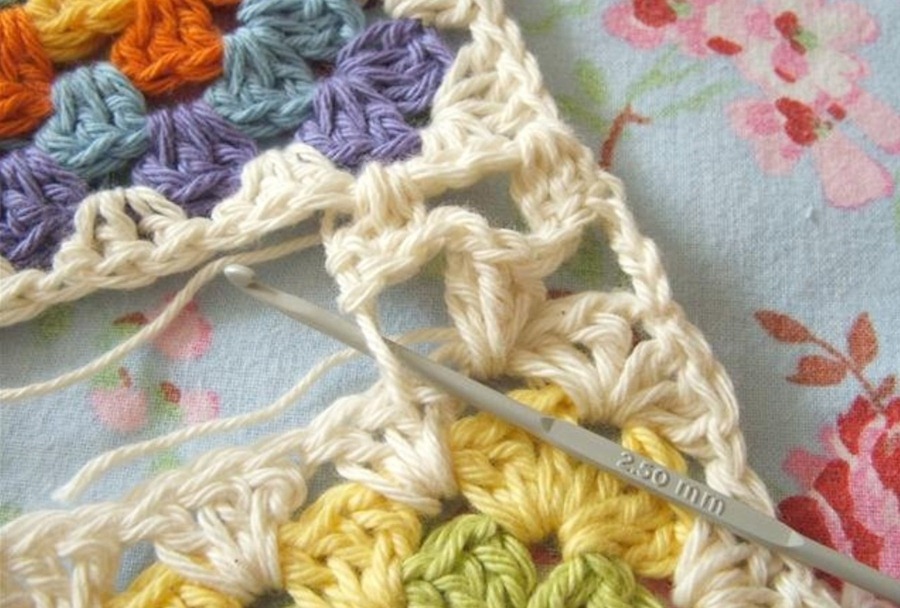
The classic crochet granny square, the pattern of which is in front of you, is crocheted in the round, starting from the center.

We cast on 6 loops of the chain and close it in a circle with a connecting post.
1st row: 3 chain stitches for lifting, 2 double crochets, 2 ch, 3 double crochets, repeat 2 more times;
In the 2nd and all subsequent rows we knit 3 double crochets under the chain stitches of the previous row, with 2 chain stitches between them.
To form corners you need to knit 3 single crochets, 2 chain stitches, 3 single crochets.
In this way, you can knit as many rows as you like to the desired size of the motif.
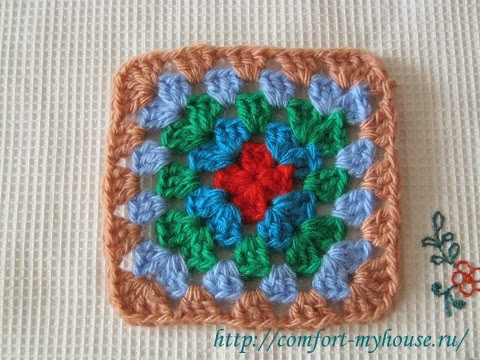
In the last row, to obtain an even, tight row, you can knit single crochet stitches over all the loops of the previous row or tie the motif with single crochet stitches. Or you may not need to do this, depending on the pattern that we will knit.
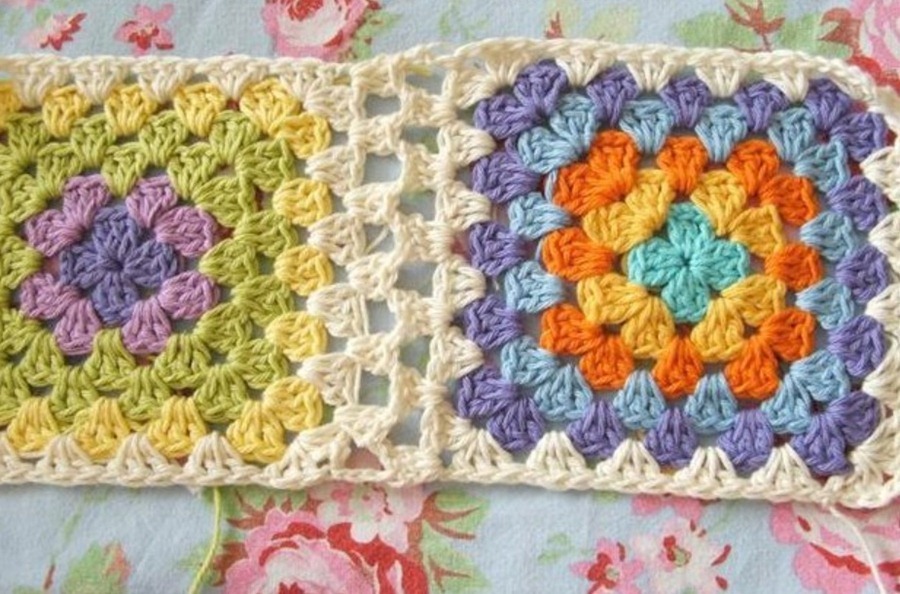
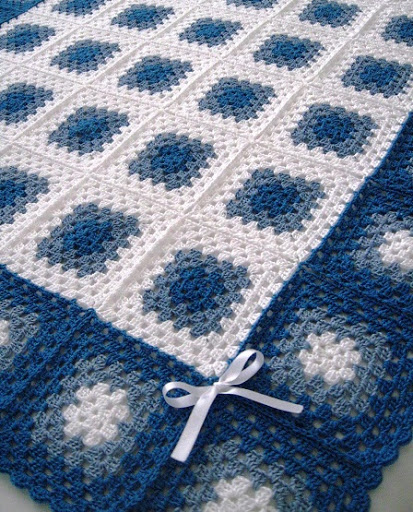
Very often, multi-colored granny squares are crocheted, changing the color of the yarn when knitting the next row or even in the same row. In this case, it is important to correctly make the transition from knitting one color to another. You can find out more about this .
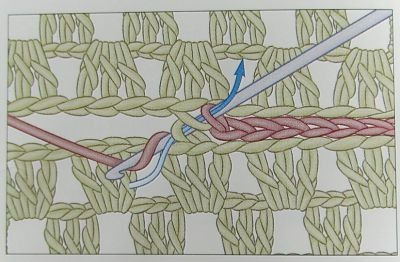
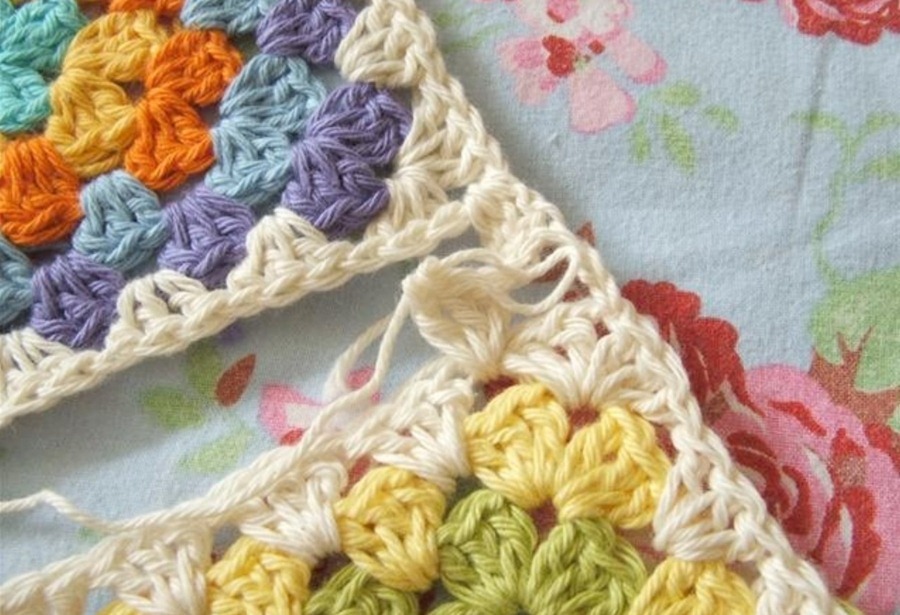
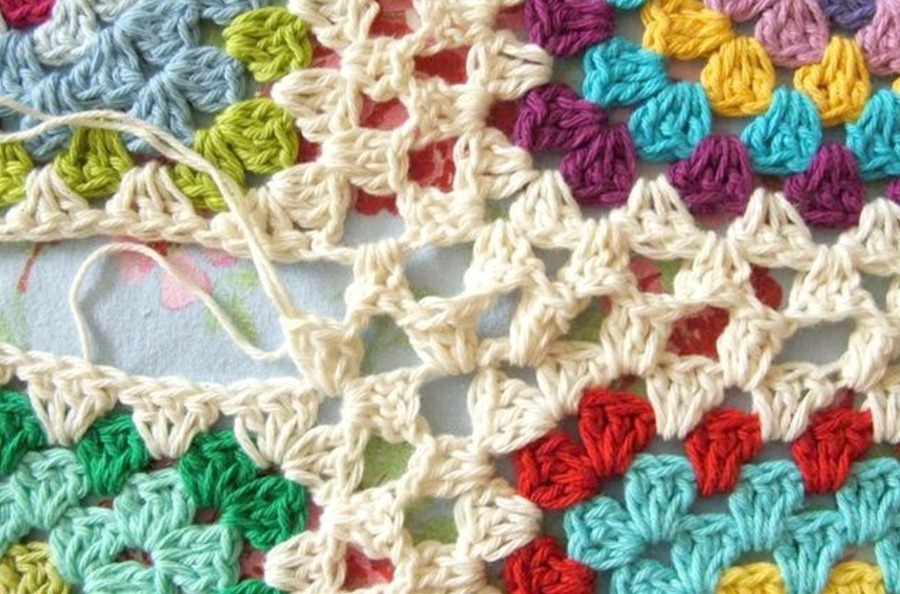
Connecting granny squares crochet can be done as follows: you need to fold two motifs with each other facing inward, and then connect them using a hook with connecting posts. In this case, the hook must be inserted under the back walls of the loops of both motifs.
To obtain a beautiful hem in some models of blankets and pillows, the motifs are connected from the front side. In this case, the hook can be inserted under the back walls of the loop, and under both walls, and connected either with single crochets or connecting stitches.
Still exists openwork method connecting granny squares, which produces a knitted fabric without visible seams, as if everything is knitted entirely with one pattern.
I found an interesting detailed master class on combining motifs, you can watch it.
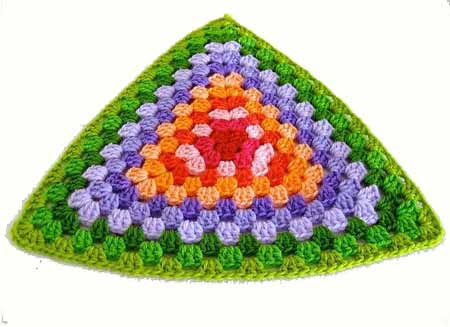
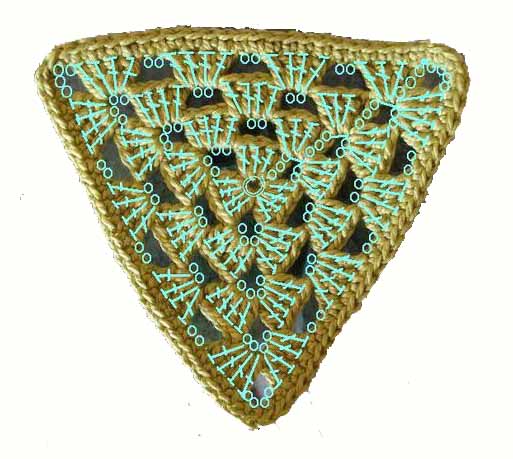
Non-square granny square
I told you how to knit a classic granny square (square). But in this way you can knit a triangular motif, a hexagonal one, and a circle.
Despite the fact that these are no longer square motifs, they still say that they are connected by a grandmother’s square. There is simply one knitting principle here, namely: the stitches are knitted, always inserting a hook into the gap or air loops between the stitches of the previous row.
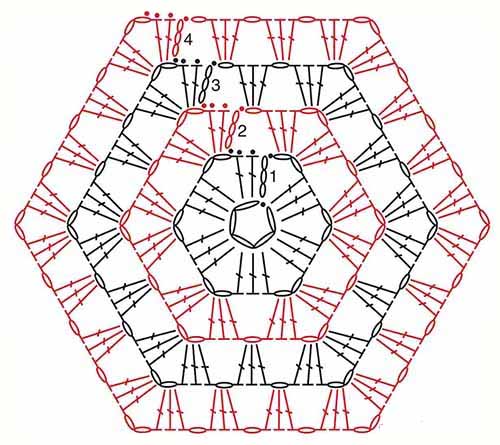

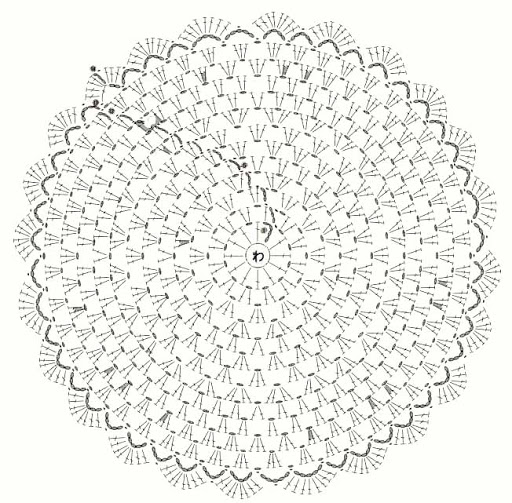
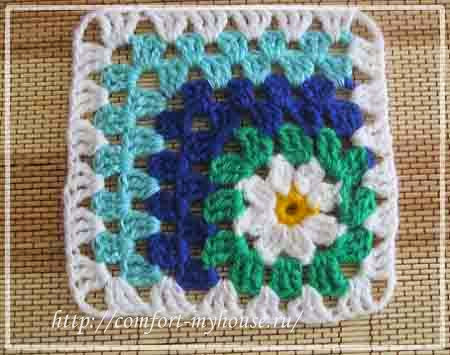
In addition, a granny square can be knitted not only from the center, but also with a flower in the middle and in other ways.
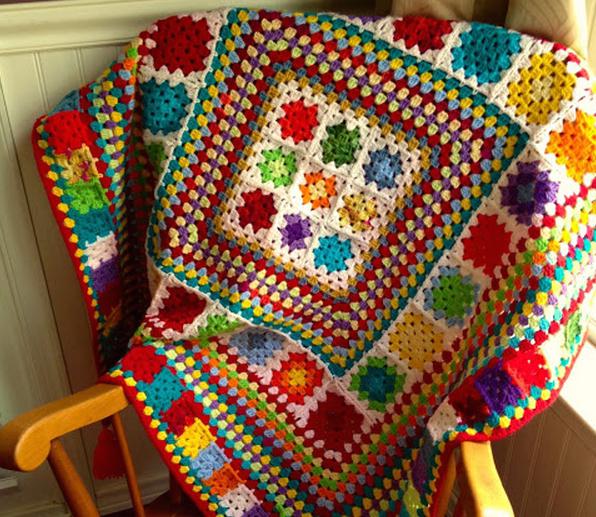
Play of colors and arrangement of motifs in the product
Products with a granny square pattern can be knitted from well-matched color leftover yarn or from new yarn. Different shades colors and arrangement of motifs can create interesting effects.
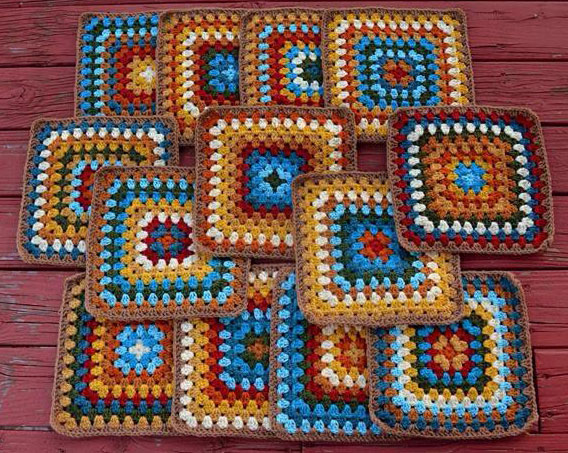
Look how different crochet blankets from granny squares look.
I have another one interesting idea sharing the pattern of granny square and spider in.
My regular reader and even assistant Yulechka Vyrskaya (helped me make correct description knitting
Crocheting not only calms your nerves, but also allows you to acquire beautiful things own production. Needlewomen skillfully weave threads and get real designer items. Knitted wardrobe items have always looked attractive. Women from the people and royalty dressed in clothes made from openwork motifs. New patterns are regularly invented, which become more complex and complemented by yarn overs and air loops. But the diagram of such an element is presented in the article below.
Square motifs
Square crochet motifs with patterns are presented in our article. They are of varying complexity. Of course, on the one hand, things from motives are easy to make. But there is also a second side to this needlework. You need to knit dozens of squares to create a real masterpiece. Needlewomen love to knit a square pattern that can be of any complexity. During such creativity, all leftover yarn is used. The color scheme can be very diverse. It all depends on the person's preferences. In yarn stores you will find many colors and shades. The size of the motifs will depend on the thickness of the thread and the hook number.
It usually takes quite a bit of time to crochet square motifs. Diagrams and sequence descriptions describe each step in detail. Any square begins with a set of chains of air loops. After which they close in a circle. Next, use columns with different numbers of crochets.
Square motifs with a simple pattern
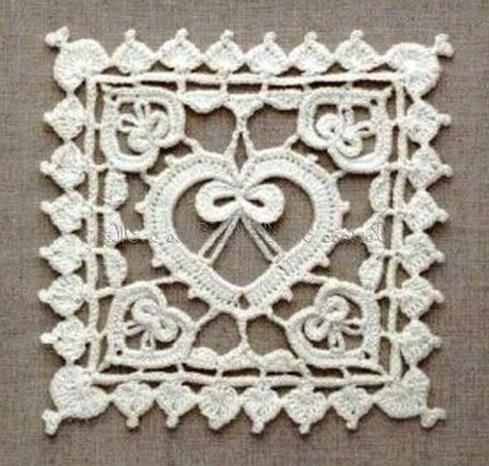
Let's look at a simple square crochet motif. The scheme is easy to decipher. In the picture you see that you need to start knitting with a ring. It is knitted from eight chain stitches. Next, the circle is tied with single crochets. In order for the square to have a proportional shape, each row must begin with a lifting loop. The third row consists of alternating a double crochet stitch with five chain stitches.
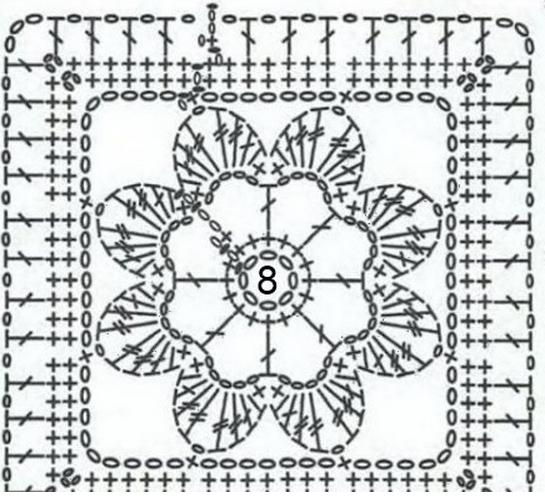
From the fourth row the flower petals will form. Each leaf is knitted from a set of stitches: one half stitch, one double crochet, chain stitch, two double crochets, one single crochet and one half double crochet. Each petal is closed with a single crochet. It turns out to be an obvious flower. Now the motif must be enclosed in a square. To do this, we collect seven air loops from the top of one petal and connect them to the new top of the other petal using a single crochet. The corner parts require nine air loops. We tie the resulting row with single crochets. The next one is done in the same way. We knit the last row, alternating a single crochet stitch and one chain stitch.
Motifs with complex patterns
Of course, beautiful square crochet motifs look more impressive. The circuits of such elements are more complex. Take your time to complete such patterns. You need to start with the simplest ones. Learn to understand and decipher circuits with simpler sets of loops. To tie them, only initial skills are needed.
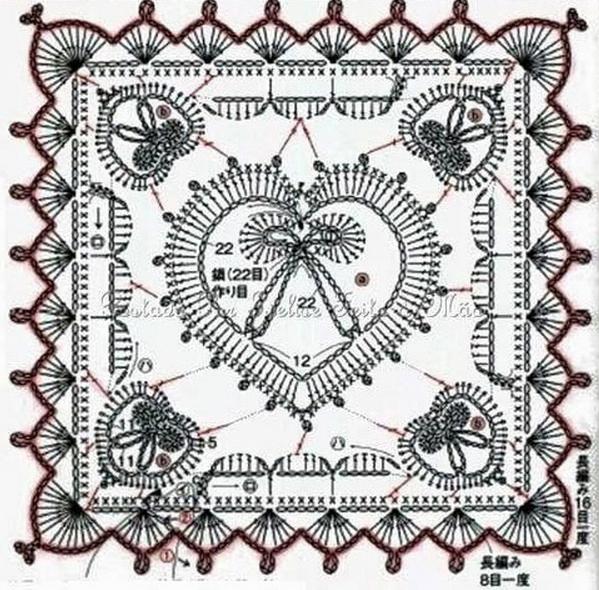
There are more complex motives. They contain unusual pictures in the center of the composition. There are also square motifs that are knitted with voluminous flowers in the center. They are knitted only by professional needlewomen. It’s difficult to crochet such a square motif the first time. The pattern contains a set of columns with a varied number of crochets.
Motifs with children's drawings
Very often, motifs are used for knitting clothes for children. Square crochet motifs with patterns depicting flowers look good. They fit perfectly into dresses and skirts for girls. But not only these elements can be created with your own hands. If you show your imagination, you can enclose any shape in a square.
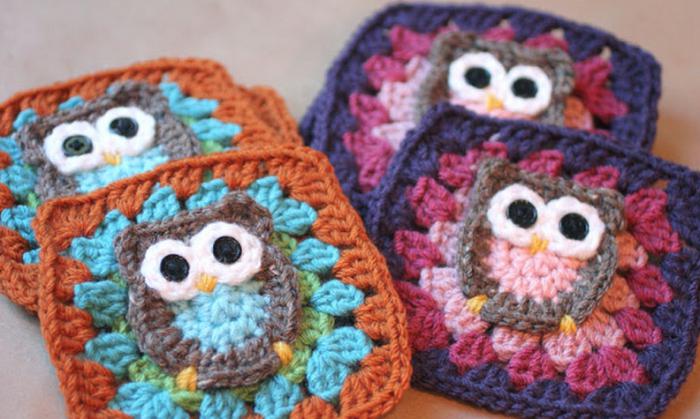
We bring to your attention cute owls that will be a wonderful decoration for children's clothing. Your child will definitely appreciate such efforts. You can knit a unique blanket from them that will decorate your baby’s bed. Pillows and rugs will also look unique. If desired, any hero can become a decoration for an interior item. The main thing is to correctly enclose it in a square.
Square patterns in the interior
Knitted elements always attract attention. Crochet is often used to decorate the interior. Schemes of square motifs are especially often used by famous designers. You too can decorate your home with unusual bright things. It is only at first glance that it seems that such things take a long time and are difficult to create. Of course, masterpieces are not created in a few hours.
In any case, the process is worth the result. Use openwork square crochet motifs to create many interior items. Schemes can be chosen of any complexity. If desired, alternate between a variety of motifs. Let's see what exactly can be connected in this way.
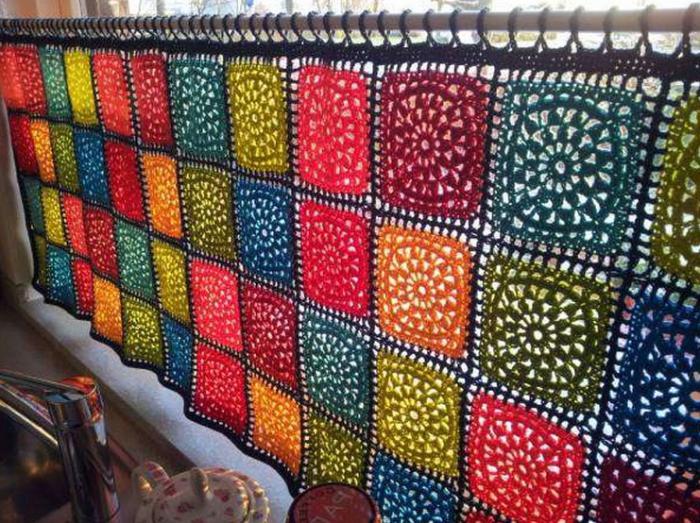
Curtains and blanket
Square motifs can decorate any indoor window. Interesting openwork curtains will add comfort and attract attention. If you want to create something special, then be sure to use this knitting method. Curtains made from yarn look especially advantageous in country house. It is not necessary to use different colored threads. One tone looks noble and stylish. Pay attention to color scheme the entire interior.
Pillows and blankets will be a great addition to a bedroom or living room. It's always nice to pour a mug of hot coffee, turn on your favorite movie and cover yourself with a soft warm blanket. From the motives, such a thing looks very attractive. Everyone knows how well crocheting calms the nerves. Schemes of square motifs can be varied. It depends on your skill.
Pillows will decorate a sofa or armchair. Voluminous knitting looks especially attractive. Such things will not leave anyone indifferent. They can be a wonderful gift for your loved ones.
Bolero from motifs
These are always cozy and warm sweaters. Or even skirts. Crocheting requires a lot of patience. Schemes of square motifs allow you to create real masterpieces. Every fashionista will love the bolero, which is made from ten attractive squares. This item will decorate any dress or blouse.
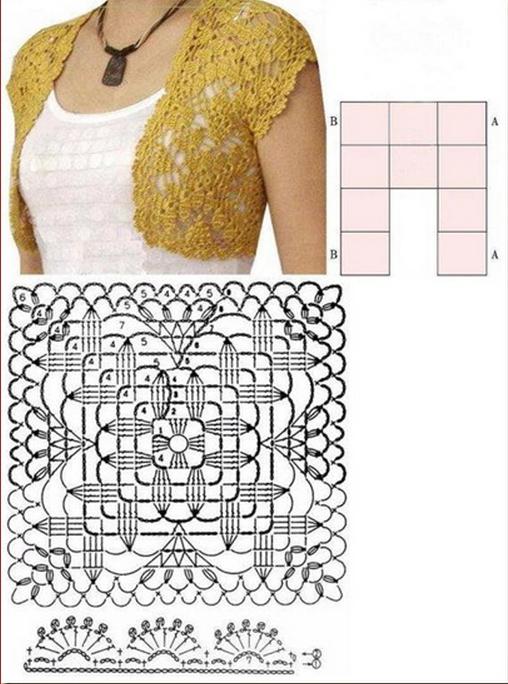
The color of the product can be any. If you are afraid to experiment with bright colors, then opt for the classic color - black. He always looks chic and expensive. If you have a daughter, be sure to update her wardrobe with such a feminine item. Even the smallest lady should have beautiful things in her wardrobe.
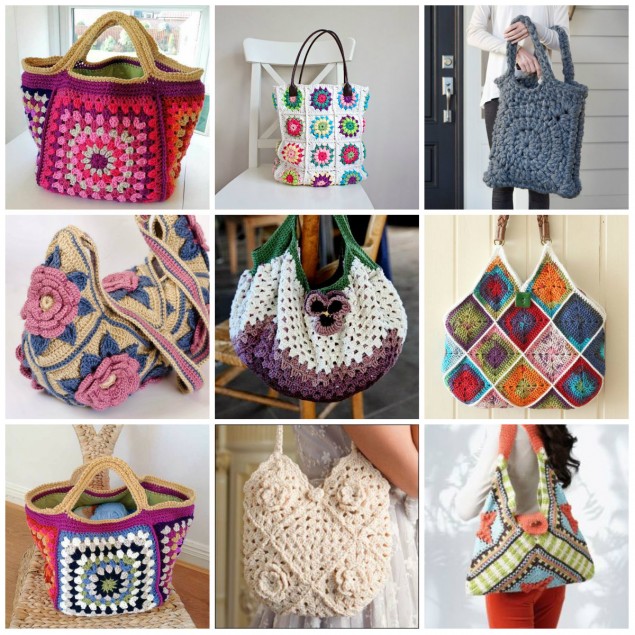
Bags made from square motifs
We crochet square motifs; a wide variety of patterns are presented in the article. In fact, every needlewoman can easily create her own exclusive models. After all, this is how new patterns and openwork elements are born. It's hard to imagine something more beautiful than products made from yarn. Crocheting allows you to create light and unique interior items and wardrobe items.
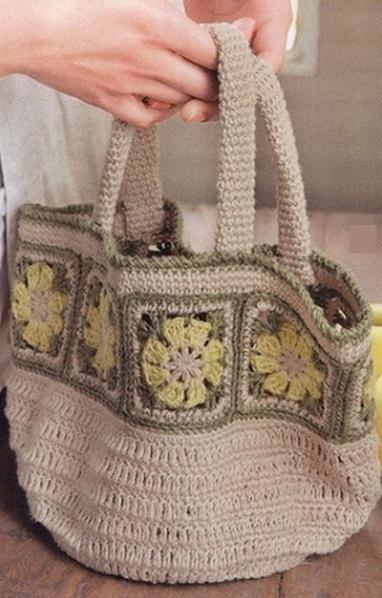
If you like square motifs, then use them in your bag. Knitted accessories are in special demand. A hand-knitted bag always attracts attention. You can knit it yourself. Squares will be a wonderful decoration. It is not necessary to use the same patterns. By combining elements, you will create an exclusive item. You can always give it as a gift to your beloved friend or sister.

You need to use your talent to the fullest. Decorate your home with unforgettable motifs. Knit clothes and any accessories. This is how you express your individuality and show the world your creativity. Don't be afraid to be bright and catchy. Improve your technique and you will learn how to create unforgettable objects from motifs. They come in not only square shapes, but also triangular, round and even multi-faceted.
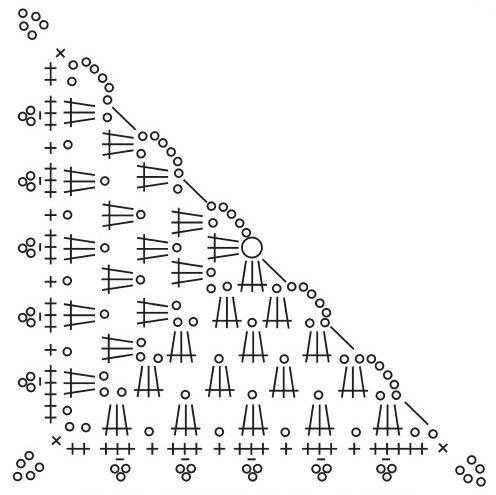
And today I’ll tell you how I selected square motifs for it, and at the same time I’ll give patterns and descriptions of knitting openwork squares.
This square was the first one I knitted. Children's new yarn (100% high-volume acrylic, 200m/50g), hook No. 2.5.
Diagram and description:
Detailed photo master classes on crocheting each square, I think, are not needed here. But verbal description For those who find it difficult to read the diagrams, I will give it.
Instead of the first stitches in the row, we knit a VP rise: 1 VP - instead of a double stitch, 3 VP - instead of a double stitch. We end each row with a connecting column.
1 rub. We dial 6 VP (air loops);
2 r. 1 VP rise and 11 single crochets (st.b/n);
3 r. 3 VP lifts and 1 double crochet (dc) in the same loop, then 2 double crochets in each st. previous row;
4 rub. 3 VP lifting and another 2 treble s/n with a common top, 7 VP, 3 treble s/n with a common top, 7 VP, etc.;
6 rub. Connect columns to the middle of the arch, * 3 treble s/n, 3 VP, 3 treble s/n in the central loop of the arch, 4 VP, 3 treble s/n, 9 VP, 3 treble s/n in the central arch loop, 4 VP*, repeat from * to * 3 more times;
7 rub. (3 treble s/n, 2 VP, 1 treble s/n, 2 VP, 3 treble s/n), (3 treble s/n with a common top, 2 VP, * 1 treble s/n , 2 VP* repeat 4 times, 3 treble s/n with a common top).Next, alternate the first brackets () and the second;
8 rub. (3 tbsp. s/n with a common top, 6 VP, 4 tbsp. b/n, 3 tbsp. s/n with a common top), (4 tbsp. s/n, pico from 5 VP, 5 tbsp. s/n, 9 VP, 5 tbsp s/n, pico from 5 VP, 4 tbsp s/n). Next, alternate the first brackets () and the second.
The square motif turned out beautiful, but I wanted more “holeiness” for the knitted pillowcase. And I tried knitting according to the following pattern.
Scheme No. 2 of the square crochet motif:
Description:
We collect 5 VP,
1st row: alternate 1 treble s/n and 2 VP.
2nd row: we knit 1 tbsp in the treble s/n of the 1st row and 3 tbsp in the arches of 2 VPs.
3rd row: alternate 1 treble s/n and 5 VP.
4th row: 1 st.b/n in the st.previous row, in each arch we knit (1 half-st.s.s/n, 1 tbsp.s/n, 3 tbsp.2/n, 1 tbsp.s/n, 1 semi-central s/n). We knit the leaves in the corners like this: 1 st.b/n in st.b/n, 7 VP, and in this chain of 7 VPs we knit 1 tbsp.b/n, 1 tbsp.s/n, 2 st.2 /n, 1 tbsp.s/n, 1 tbsp.b/n.
5th row: connecting columns to the top, then 1 treble s/n, 7 VP, 1 treble s/n, 7 VP, 1 treble s/n, 8 VP, etc. (the diagram shows the number of VPs).
6th row: knit 7 tbsp in arches of 7 VPs, 8 tbsp in arches of 8 VPs, 1 tbsp between them in the column of the previous row , and in 4 corners - 3 tbsp in 1 loop.
7th row: almost the same as the 6th row, only picots are added in the places marked with triangles in the diagram (I did not knit picots, but simply 3 VP).
8th row: arches of 8 VP and st.b/n between them.
9th row: in each arch: 4 tbsp, picot, 3 tbsp, picot, 3 tbsp, picot, 4 tbsp.
I attached ready-made square crochet motifs to the pillow and realized that I had neither the time nor the desire to knit 18 such squares (9 on each side) :) I started looking for another scheme...
and found it! Here all the stitches are knitted with 2 yarn overs, so the size of the motif is almost 2 times larger than the previous ones. Just right for my pillow!
By the way, the side length of the first two square motifs is 12.5 and 13 cm. And the third is 23 cm.
I knitted the pillow, and now I’m planning to knit something else (I’ll show you when I do it :)
And I began to knit square motifs from thinner “Chamomile” yarn (100% mercerized cotton, 330 m, 75 g) with a No. 1.5 crochet hook.
Scheme of square motif No. 3
Description for the diagram:
Dial 10 VP, close it in a ring.
1 row. Tie 20 tbsp into a ring.
2nd row. We knit 4 arches from 9 VP and st.b/n between them.
3rd row. In each arch: 1 treble, 1 half-st., 11 treble, 1 half-st., 1 treble.
4-5 rows - arches of 5 VPs and st.b/n between them. Instead of the last arch in the row, knit 2 VP and 1 treble.
6th row. The arches are made of 5 VPs, and in the 4 corners - from 9 VPs.
7th row. The arches are made of 5 VP, and the corner arches are tied: 8 treble s/n, 5 VP, 8 treble s/n.
The result is a Square with a side equal to 9 cm.
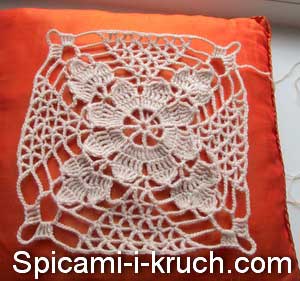
Openwork square with a flower in the center (diagram):
Description
4 VP in the ring.
1 row. 1 VP lifting and 11 st.b/n
2nd row. 1 VP lifting, * 2 VP, 1 st.b/n in the column of the 1st row*, etc.
3rd row. 1 VP lifting, * 3 VP, 1 st.b/n in the arch of 2 VPs of the 2nd row*, etc.