How to sew a summer jumpsuit using a one size pattern.
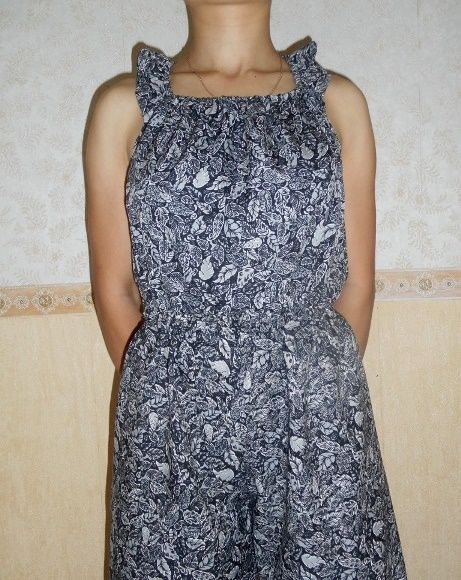
This summer, women's overalls are at the height of fashion! And despite all their secretiveness, they look very sexy. We invite you to sew this cute women's jumpsuit for the summer. The colorful printed pattern gives the women's jumpsuit practicality, while the boat neckline and cap sleeves add romance. We will tell you in detail how to sew a women's jumpsuit.
How to sew a women's jumpsuit: pattern
Before you cut and sew a women's jumpsuit, you need to create a pattern. The overalls pattern is modeled using and.
ADVICE! Construct both patterns on graph paper, transfer them to tracing paper and begin modeling. And patterns built on graph paper can be used many times to model the styles of trousers, dresses and women's overalls.
IMPORTANT! Use for sewing women's jumpsuit cotton satin with a small addition of elastic threads.
Sew a hidden zipper along the back of the women's overalls.
Rice. 1. 1. Pattern for the front of women's overalls
Rice. 2. Pattern for the back of a women's overalls

Rice. 3. 3. How to sew a women's jumpsuit: sleeve pattern
Model the front and back of the women's jumpsuit as shown in drawings 1-2.
Shorten the sleeve to 15 cm from top point okata (see Fig. 3).
How to cut a jumpsuit
Top front of women's overalls - 1 piece with fold
Bottom front of women's overalls - 2 parts
Top back of women's overalls - 1 piece with fold
Bottom back of women's overalls - 2 parts
Sleeve of women's overalls - 2 parts
Oblique facing for processing the neck of overalls, 3 cm wide and length according to measurements.
How to sew a women's jumpsuit: job description
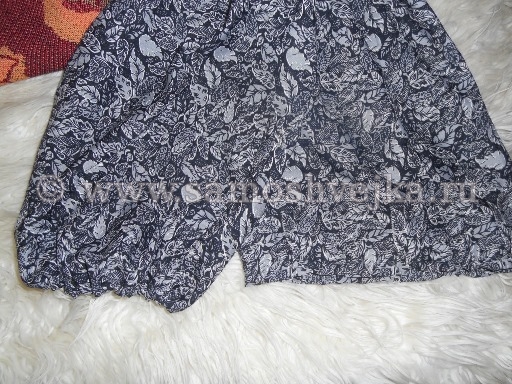
Baste and stitch the parts of the overalls shorts along the side seams, crotch seams and center seam. Baste and stitch the side seams on the front and back parts of the women's overalls. Along the back of the overalls from the neck 25 cm long. Sew top part to the bottom. Sew the waist allowance at a distance of 1 cm from the connecting seam, and insert the elastic into the resulting drawstring. Baste and stitch the shoulder seams and sleeve seams. Sew in the sleeves, tuck and stitch the allowances along the bottom of the sleeves and the bottom of the legs.
Hello, dear readers! Our lesson today will be devoted to a spectacular, stylish jumpsuit, the model of which we spied on the streets of New York.Street Stile is a new direction in the fashion world, practical use fashionable looks in everyday life. Agree that not every woman knows how to combine things from her wardrobe; not every woman has an innate sense of style. Those same fashionistas who have been given all this successfully demonstrate their brightness, individuality, and style, proudly walking along the streets of fashion capitals (and not only capitals). We will learn from them! Having looked at some techniques and combinations, we can boldly bring them to life in our own appearance.
What should a women's jumpsuit look like in summer 2016?
The model we have chosen combines several must have season spring - summer 2016. Firstly, this is a jumpsuit. Jumpsuits are very popular and fashionable this summer, as well as in winter. Their models are so diverse that they will suit any woman, regardless of age, and you can choose a suitable option for any type of figure.
Photo sources
https://celebinspire.tumblr.com/ https://modavmode.ru/ , https://allforfashiondesign.com/ https://modagid.ru/
Secondly, open shoulders. The shoulders and arms look very impressive in a blouse with such cutouts. Elegant and sophisticated, and not at all vulgar!
Third, luxurious palazzo pants.
Fashionable trousers
The cut of trousers like these would have been created in 1951 Italian designer Emilio Pucci. And then only the bravest fashionistas dared to wear them, including Coco Chanel herself and Marlene Dietrich. Greta Garbo.
 photo from the site https://womanwiki.ru/
Flowing, wide pants They rather resembled a skirt and for some time they were called that - skirt-pants. Such trousers perfectly mask imperfections in the shape of the legs, but, unfortunately, they are not suitable for everyone. But how effective they are! Their length should be maximum and almost completely cover the shoes - this is a must. A stiletto heel is inappropriate and inconvenient (it’s so easy to get tangled in the folds of your trousers), but you can wear platform shoes, which are so popular today, and then your legs will appear even longer. The material for palazzo trousers should be selected depending on the season; preference is given to monochrome colors, stripes, checks, and also, in the warm season, various printed fabrics (very interesting article on the use of print in clothing on our website is here). Well, one more piece of advice - when composing an ensemble, the top should not be too voluminous.
 photo sources https://womanwiki.ru/ https://omode.info/
Building a jumpsuit pattern
The following photos will help you look at the jumpsuit in more detail.

photo from the site https://ru.pinterest.com
Let's consider technical drawing models.
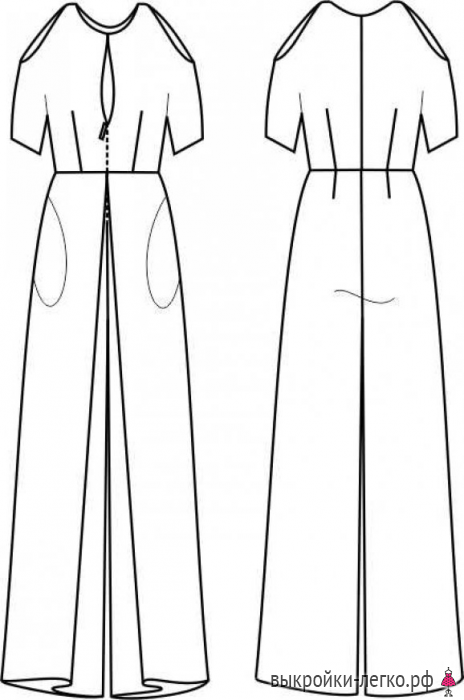
The jumpsuit consists of two parts: bodice and trousers, and they are made in different colors. Bodice with one-piece sleeves to the elbow, with a cutout in the shoulder area. The neckline is a boat, there is a cutout in the center of the front - a slit and in it there is a fastening with a hidden button at the neckline. The trousers are expanded due to two deep soft folds. It is better to use flowing, elastic, natural fabric such as linen, linen with silk, heavy silk.
For modeling we will need a basic one and a basic one. All this can be taken from our website using , the program will build drawings according to your measurements, and you can print them on a simple printer. Learn more about how it works
1st step of modeling.
First of all, let's model the details of the bodice pattern. Let's transfer the dart on the back into the armhole, to do this we will make a cut from the point at the top of the armhole to the top of the dart and close it. The dart has opened in the armhole, but we will not sew it down, we will leave it for freedom. We will do the same and from the chest we will only transfer it down to the waist, and we will also open part of the solution in the armhole. This must be done when constructing a one-piece sleeve.
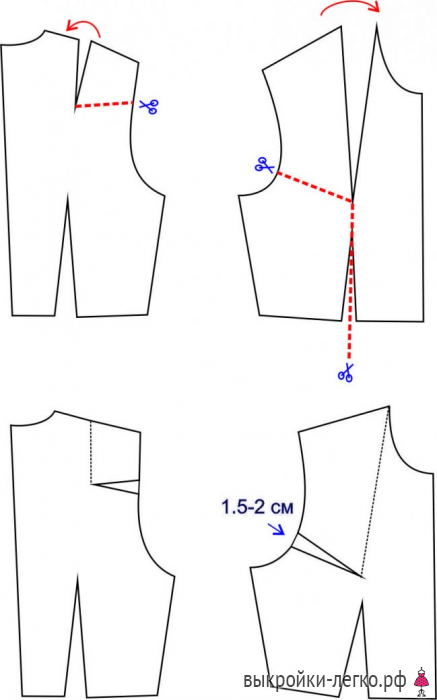
Modeling step 2.
Construction of the sleeve. Continue the shoulder line of the backrest, this auxiliary line, at an angle to it of approx. Equal to 15-20 degrees, draw a line for the upper cut of the sleeve. Sleeve length 30 cm. The width of the sleeve at the bottom is equal to the circumference of the arm just above the elbow, plus an increase of 5-7 cm for freedom of fit. In the area of the back, its value is – general meaning divide by 2 plus 1 cm. Decorate the lower cut of the sleeve with a smooth curve passing from the side seam to the line of the bottom of the sleeve. Having previously lowered the armhole by 2 - 2.5 cm. Similarly, construct a sleeve on the pattern of the front part.

3rd step of modeling.
Let's draw the cutout lines on the sleeves according to the picture. We will also adjust the neck line. Let's check the lengths of the side seams that go into the lower sections of the sleeves; they should be the same on the back and front, and adjust them.

4th step of modeling.
Let's start modeling the lower part of the overalls. To do this we need a trouser base pattern. You can also take it on our website using the pattern generator. Let's make the following changes: expand along the side seams, lowering the perpendiculars from the most protruding points (hip line, seat height line) to the bottom line of the trousers. On the back half, the line may not be perpendicular, but it will be auxiliary; based on this line, we will build a new smooth one, at an angle of 90 degrees to the bottom line. (see picture). We will move the dart on the front half of the trousers to the side seam, i.e. we will simply shorten the waist line of the front half by the amount of the opening. Mark the line for the location of the fold (blue line) and cut the pattern along it.
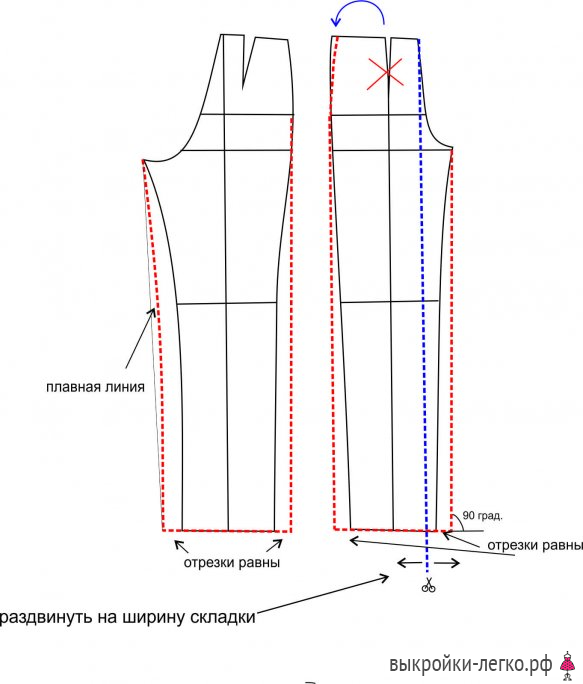
5th step of modeling.
Let's move the pattern pieces apart, after cutting, to the depth of the fold, i.e. 30-35 cm at the top and 45-50 cm at the bottom. Let's mark the location of the pocket 7 cm below the waist level, the length of the entrance to the pocket is 14 cm. On the upper part of the back of the overalls (on the back of the bodice), lower the waist line in the area of the middle seam by 2 cm, for convenience (so that the seat line does not stretch when sitting down), in the side area, leave it in its original place. Next, you need to check the length of the waistline at the junction of the top and trousers, adjust it, taking into account the location of the waist darts on the back and the size of your own measurements.

The overalls pattern is ready. Good luck with your sewing and creative mood!
Few of them modern fashionistas knows that they love him rompers originated from men's workwear. Having undergone significant metamorphoses and temporary trials, this item of clothing has become a favorite modern woman who values comfort, convenience and has a sense of style. Depending on the model, overalls may be appropriate for a business meeting, beach party, a romantic date or just on a city walk.
The good news is that the patterns of such clothes can be completely different, and with their help you can make a jumpsuit with tapered or, conversely, deliberately wide legs, with shorts, a top or a T-shirt as the top, with straps, elastic bands, etc. Whatever option is chosen, it is sewn quickly and without any problems, using a single pattern, into which the required changes and additions are made.
Before sewing a jumpsuit with your own hands, stock up on light, but not transparent fabric of the desired color. You will need about 1.5 meters of satin, satin, silk, linen or cotton. Don't forget about matching threads, buttons, decorative elastic straps and wide elastic bands for the chest and waistline.
The final set of consumables depends entirely on which product model is selected, what will serve as decorative finishing, and what parameters the person for whom the new thing is intended has.
Building a basic pattern
Get ready for the fact that you won’t be able to decide on your own how to sew a women’s summer jumpsuit without a DIY pattern. Fortunately, you will have to create it not from scratch, but using ready-made drawings, according to which the details of the dress and tight trousers are cut out. For the dress we will need a pattern for the back and front, and for the trousers we will need absolutely all the measurements.
With all these developments you need to proceed as follows:

- The lines of the ischial suture and recess need to be increased by a couple of centimeters, which will make
subsequent wear is more comfortable; - It will also add 0.7-1 cm to the value of the step width of the rear and front halves;
- Fold together the pattern for the back of the dress and the back half of the legs, achieving a single jumpsuit pattern with a clearly defined waistline;
- The outlines of the future new thing need to be supplemented with auxiliary stripes of the side sections;
- Do not include darts, since this guide concerns solving the problem of how to sew any women's jumpsuit with a straight silhouette.
Jumpsuit with straps
Using basic pattern, you can create a mock-up of one more thing, namely a light jumpsuit with legs that reach mid-calf.
It is done like this:

- The seat height deepens by a couple of centimeters, and the step width of the rear and front halves increases by 0.5-1 cm;
- The pressing strip or fold is shifted towards the step cuts. The offset value is equal to half the added step width of both halves of the legs;
- The selected width of the bottom of the trouser legs is measured from the newly formed fold. The latter is divided by 4, and then 1 cm is subtracted from the value acceptable for the first half, and, on the contrary, the same 1 cm is added to the value relevant for the back half;
- A new step cut is made for the modified front half of the semi-overall;
- The side cut on the back halves of the trouser legs is corrected, the notches are moved along the knee lines;
- A new step cut is made for the modified rear half of the semi-overall;
- The waist line is drawn on the front of the trousers, and under it, at a distance of 3.5 cm, another similar strip is drawn. It will serve as the junction between the front of the item and the front half of the shortened legs. The top line remains an imitation seam or a real seam (optional);
- Pocket cuts are drawn (if any are required);
- A middle cut stripe is aligned on the back;
- The top part of the thing is drawn, which represents the top of the dress pattern;
- Allowances are made for fasteners and accessories, straps are drawn, the width of which should not be more than 3 cm, and the length should not be more than 55 cm.
Cutting and sewing
Let's move on to how exactly it is best to cut and sew a summer jumpsuit for a woman or girl. Patterns are laid out on a piece of fabric, taking into account the location of the grain threads. Centimeter seam allowances are made along all edges, and shorts or the bottom of trousers are increased by two centimeters for hemming.
The general algorithm for how to sew a jumpsuit with your own hands, whether it has shorts at the bottom, full legs or cropped ones, is as follows:

- The edges of all individual components are processed using an overlocker;
- Both front parts of the legs are folded face to face. The seat line is initially ground down, and only then sewn together for good. Similar actions are done with the back parts of the trousers, after which everything is ironed;
- The already sewn front and back parts of the legs are folded face to face, the sides are ground and stitched, after which comes a series of step cuts;
- The bottom of the shorts or trousers is turned up, basted and sewn with a machine;
- The top is basted, stitched, ironed and decorated with ruffles, stripes, buttons and other elements. Treated straps are sewn to it (if the model implies their presence);
- The bottom of the top is stitched to the top of the pants, stitched and the clothes are turned inside out. The finishing stitch is made 0.5 cm below the main one, and a narrow or wide elastic band is threaded between them.
What to wear with it?

Once the women's jumpsuit is ready, it's time to think about what it can be combined with. With short models everything is very simple: they are a self-sufficient thing, beautiful without any additions. But the maximum length of the product should be combined with a wide belt, neckerchief, jacket and classic pumps. For an informal event, you can wear a long-legged jumpsuit accompanied by ankle boots, a massive neckpiece and a bright belt of any color.
It is appropriate to play up a business version of a shortened jumpsuit or a school model for a girl with the help of a blouse, jacket, thick tights and shoes with platform heels.
Otherwise, the jumpsuit is a universal wardrobe item, suitable for any occasion. life situation, and loyal to literally all other clothes. Be sure to get such a thing, and not only its summer version, but also its warm version.
Wishing you bright images and successful styles!
Jumpsuits are still in fashion, changing only the styles and colors. I’ll tell you how to very quickly sew a summer women’s jumpsuit to fit your figure. I am not a professional and have not studied sewing, but I will be happy to share with you simple method sewing this product.
How to sew a summer women's jumpsuit from knitted fabric with your own hands
To work you will need:
- knitted fabric: for a height of 156 cm it took 1.8 m of fabric with a width of 1 m;
- underwear elastic;
- scissors;
- threads;
- sewing machine.
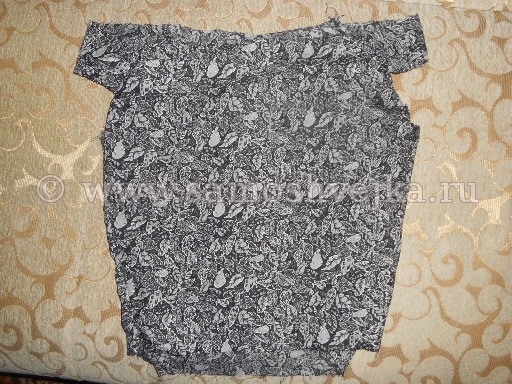
Cutting out a jumpsuit
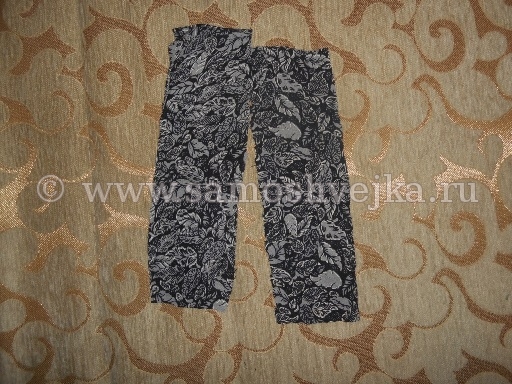
A pattern for a summer jumpsuit can be found on the Internet by choosing the desired style and shape, or you can use another method and cut out the details using your clothes. This will significantly reduce work time, and it will fit one hundred percent in size. To create a pattern for a knitted overalls, it is better to use wide clothes so that the fabric gathers at the waist and does not hug the body, so the jumpsuit will look light and airy.
We begin to cut out the lower part of the future overalls. Fold the knitted fabric in half to the width of your trousers with some allowance for allowances. We fold the trousers you have and place them on the fold of the fabric, so that there are no seams on the front of the thigh (you can increase the width of the trousers at your discretion, to do this, just place the trousers a little further than the fold line of the fabric). Now we raise the waistline to the maximum (there will be a row of elastic bands here).
We fix the trousers on the fabric using safety pins and transfer the design to the fabric using chalk or soap. Don't forget about allowances of 1.5-2 cm and cut out the details of the trousers. We will need two symmetrical parts.

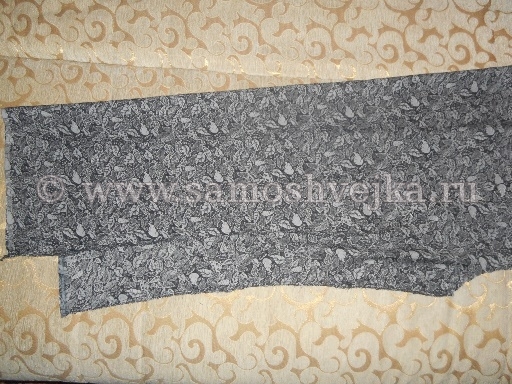
We cut out the upper part of the future overalls. We fold the knitwear according to the same principle as when patterning the lower part of the overalls. We attach the jacket folded in half, pin it with safety pins and transfer the design to the fabric. Add allowances of 1.5-2 cm, cut out the details.
My back piece is just above the front piece. To do this, I simply cut off the neckline by 10cm.

We will also need two rectangles for the straps measuring 7x20cm (you can make them wider, this is all at your discretion).
When all the details are cut out, you can safely start sewing our product.
Sewing overalls
We sew the details of the trouser legs along the crotch seam. At the same time, I process all open cuts with an overlock stitch so that I don’t have to go back to the same stitch a second time.
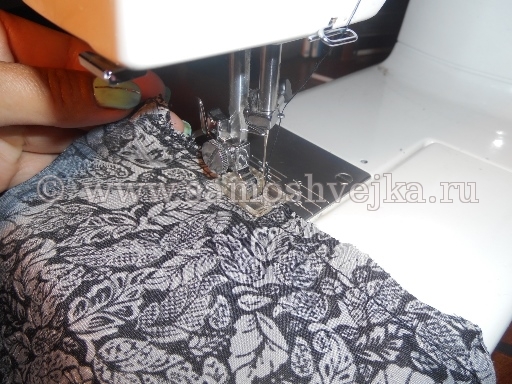
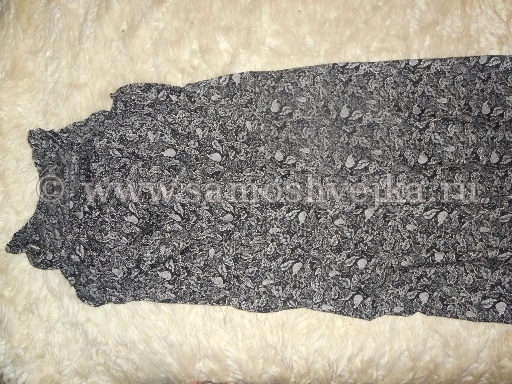
We connect the two trouser legs together to form pants and process the open sections with an overlocker or a zigzag seam.
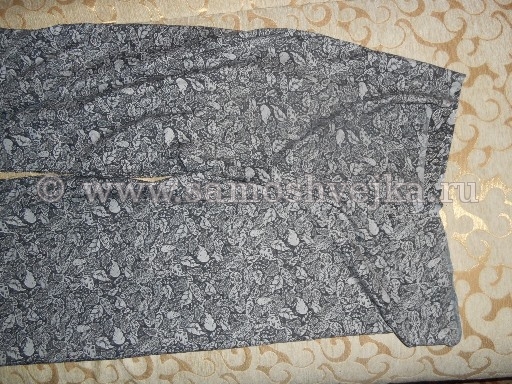
Our trousers are almost ready.
Let's move on to the top of the suit. Sew the side seams.

Along the edges of the armpit, we sew the straps so that they continue the line of the neckline (not to the top, but to the sides).
We process the armholes in a circle with a double closed lapel or use bias tape for processing. Sew elastic along the bottom edge of the armhole, on the wrong side. We use a zigzag stitch with a large step, stretch the elastic a little, you should get small gathers.

We process the neckline in a circle, with a double flap with a closed cut, so we form a drawstring for inserting an elastic band. We leave a small gap into which we will thread the elastic. We put on an elastic band.
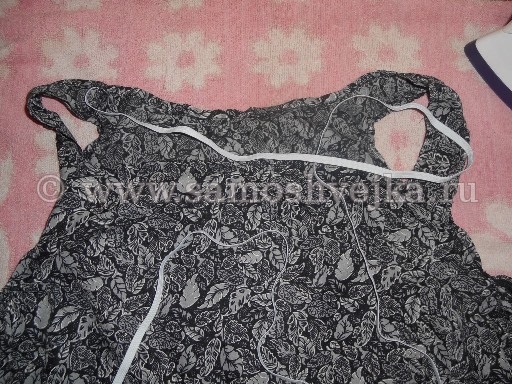
We process the lower open cut of the top with an overlock stitch and the top is ready.

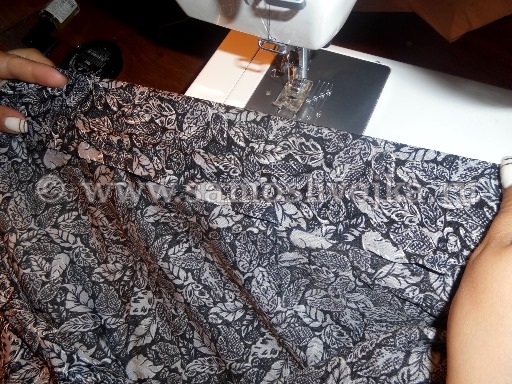
Let's return to the pants. Fold the top edge (at the waist) inward and sew three drawstring lines (more is possible), leaving a gap for inserting an elastic band.
We connected them to make a jumpsuit along the waist line.
We determine the length of the elastic bands by trying them on; they should not be too tight, so they should be applied to the waist and only slightly pulled. We insert the elastic bands into the drawstrings, you need to start with the top and end with the last strip, sew the edges of the elastic bands into a ring.
We process the bottom of the legs with a double lapel with a closed cut, and leave room for inserting an elastic band; if you want, the bottom can be left free. I inserted an elastic band.


Our overalls are ready.

The most difficult thing for beginners is to create a pattern for women's overalls, and I hope that the method I described will be useful to you and you will start creating. Experiment with colors, styles, decor and your wardrobe will become unique. Good luck.
Many representatives of the fairer sex will agree with the opinion that such a thing as overalls is quite practical and comfortable. The main thing is to choose the right style so that it fits perfectly on your figure. This wardrobe item has quite attractive and interesting features, so it should be present in every woman’s closet. If you were unable to find a ready-made option in the store, you can make it yourself. In this fascinating article we will look at how to sew a jumpsuit with your own hands so that it fits as closely as possible individual characteristics figures.
We sew a light jumpsuit for the summer ourselves
With a little effort, you can sew a women's overalls quickly and easily, the main thing is to strictly follow the step-by-step instructions.
Materials
To make it you will need:
- a piece of knitted fabric 1 m wide and 1.8 m long;
- linen elastic;
- threads;
- scissors and sewing machine.
Important! You can take a ready-made pattern so that it matches the desired shape and style, or you can cut out all the details yourself. By choosing the second option, you will be sure that ready product 100% true to size. To create a pattern, it is better to use wide-cut clothing, so that you can then gather the fabric at the waist into gathers. In this case, it will not tightly fit the body, and the jumpsuit itself will be airy and light.
Preparation
So, before you sew a women’s summer jumpsuit with your own hands, we prepare a pattern, following the recommendations presented:
- We begin work by preparing the lower part of the future product. Fold the material in half, allowing for the width of your trousers. Take your old trousers and place them on the fold of the fabric so that you end up with no visible seams on the front of your thighs. Now you need to raise the waistline as much as possible in the place where the elastic will be attached. Using safety pins, secure the trousers to the fabric and transfer the design using soap or chalk.
Important! Remember about allowances of about 1.5-2 cm, and now you can cut out the details of the trousers. To work you will need two symmetrical parts.
- Pattern for the top of the overalls. Using the same principle, fold the fabric and attach the double folded jacket. Pin it to the fabric and transfer the design. Add 1.5-2 cm to the allowances, open out two parts. The back piece will be slightly higher than the front piece, so you will need to cut 10cm off the neckline.
- You will need two more rectangular pieces of fabric to make the straps. In size they should be 7 cm wide and 20 cm long. All the details are ready, you can start sewing the overalls.

Sew
How to sew a summer jumpsuit with your own hands:
- The leg parts need to be sewn along the crotch seam. At the same stage, you need to overlock all open cuts so as not to return to this line.
- Connect the trouser legs together to form pants, overlock all the cuts or use a zigzag stitch.
- Sew the side seams of the top of the overalls.
- Sew the straps along the edges of the armpit openings to create the effect of continuing the neck line.
- Using a double closed lapel in a circle, work around the armholes.
- Sew the elastic from the wrong side along the bottom of the armhole, using a zigzag stitch with a large pitch. Be sure to stretch the elastic so that you end up with gathers.
- Work the neckline in a circle with the same double flap to form a drawstring into which the elastic will be inserted. Leave a small gap for the elastic to pass through, then insert it.
- Using an overlocker, process the open bottom edge of the top. The top of the product will be completed.
- Let's return to the pants. In the waist area, fold the top edge inward, sew three lines of drawstrings, not forgetting to leave a hole for inserting an elastic band.
- Now connect all the parts of the jumpsuit along the waist line.
- The length of the elastic bands is determined by trying them on so that they do not sting later. You need to attach them to your waist and pull them a little. Then we insert elastic bands into the scenes, starting from the top and ending with the last strip. Now sew the edges of the elastic bands into a ring.
- Process the bottom of the legs and again leave room to insert the elastic. In principle, you can make the bottom free - this is at your own discretion.
The product is ready!
As it turned out, sew knitted jumpsuit women's is not difficult, the most important thing is to make the pattern correctly. But if you follow the instructions provided, then even a beginner should not have any problems. You can easily experiment with colors, styles and decor.
Transforming a dress into a summer jumpsuit
Surely you will like the idea of how to make a jumpsuit out of a dress in just 15 minutes. Perhaps you have an old sundress or dress made of thick silk crepe with a stretch effect. If yes, then you are incredibly lucky, because you can turn it into a beautiful thing that will hold its shape and drape perfectly. To make a pattern, you must first rip the dress apart at the seams, resulting in a large piece of fabric.
- We are making a pattern. We fold the material in half; you can also use some of your own trousers as a basis. They will need to be attached to the center, and first draw the back and then the front halves. Be sure to leave room for hems and waistbands. Cut out all the details.
- Connect the parts of the lower part of the product, sew the seams and overlock them. The seam located in the center will need to be sewn using a sewing machine.
- To make the top of the overalls, you need to measure the width of your waist and draw a rectangle on the fabric of the appropriate length and width of approximately 55 cm. Cut out the resulting piece, then fold it in half and sew.
- Connect both parts.
- Make a drawstring to pull in the elastic and sew.
- Sew straps on the front of the product.
Original summer jumpsuit made from a long skirt
Now let's look at the most interesting option how to sew a women's jumpsuit with your own hands from an old one long skirt. The manufacturing process is quite simple:
- Try on a skirt, measure the length of future shorts on it, cut the fabric a few centimeters lower.
- Place the cut top on a flat surface, straighten it well and define the middle in front and back.
- Cut the fabric to the level of the crotch - it is better to leave a couple of centimeters of reserve.
- Sew the legs of the shorts and hem them at the bottom.
- Now take any top you have and apply it to the rest of the fabric. Trace, cut and sew the jumpsuit top.
- Sew the top and bottom of the product together.
So we learned how to sew a jumpsuit with our own hands from new fabric or redo some old thing that you haven't worn for a long time. And to do this, you don’t have to be a seamstress at all - even a novice craftswoman who once attended labor classes at school and knows how to handle a sewing machine and overlocker can cope with such work.