How to sew a simple straight skirt. How to sew a skirt: drawing a pattern. Constructing a pattern for a straight two-seam skirt.
The more carefully the measurements are taken, the fewer changes there will be after trying on. How to sew a straight three-seam skirt.
Required measurements
Half waist (St)- removed around the narrowest part of the waist. Recorded at half size.
Half hip circumference (Sb)- removed around the widest part of the hips. Recorded at half size.
Skirt length (Du)- can be removed from the waist to the desired length on the side.
Make sure that measurements St and Sat are taken strictly horizontally, the correctness of the measurements depends on this.
Construction of a drawing
On the drawing sheet, the measurements are written down in the upper left corner in abbreviated form.
For convenience, all subsequent calculations can be made here.
To construct, we will use the measurements of a typical figure (average statistical measurements obtained on the basis of mass measurements of the population) size 48:
Dia = 50 cm (measurement chosen arbitrarily);
Pb = 1 cm (if you want to get more freedom on the hips, take a larger increase);
(Fig. 2)The construction begins in the upper left corner, and point T is randomly selected here.
From this point T, draw a vertical segment down, equal to the length of the future skirt, and place a point H, TH = 50 cm (length of the skirt to the knee).
From point T, a segment TB = 19 cm (18-20 cm) is laid down along the vertical TN - the level of the hips, which can be specified according to the figure by taking measurements from the waist line to the protrusion of the hip.
From points T, B, H, horizontal lines are drawn, the waist line is obtained - a horizontal line from point T, the hip line - a horizontal line from point B, the bottom line - a horizontal line from point H.
On the line of the hips from point B, lay a segment BB 1 equal to Sb plus Pb:
BB 1 = Sat + Pb = 52 + 1 = 53 cm.
On the waist and hem lines, respectively, TT 1 = NN 1 = BB 1
Section TT 1 is divided in half and point T 2 is placed:
TT 2 = TT 1 / 2 = 53 / 2 = 26.5 cm.
The segment HH 1 is divided in half and a point H 2 is placed.
Points T 2 and H 2 are connected, the resulting segment determines the side line of the skirt.
The result is a drawing in the form of a rectangle - this is the basic mesh of the skirt. A skirt drawing is based on it (Fig. 3).
Balance
They are lowered in the center of the front panel (vertical TN), for this, 1.5 cm is laid down from point T (for a proportional figure) and point T 0 is placed.
TT 0 = 1.5 cm - balance value.
Lower along the middle seam of the back half (vertical T 1 H 1), to do this, put 1 cm down from point T 1 (for a proportional figure) and place point T 10.
T 1 T 10 = 1 cm - balance value.
Determination of the solution of waist darts
Since the volume at the hips is greater than the volume at the waist, for a good fit you need to calculate the difference and put the excess in the undercuts.
To do this, subtract St + Fri from the sum Sat + Fri:
Dart solution (excess) = (Sb + Pb) - (St + Pt) = (52 + 1) - (38 + 1) = 14 cm.
The resulting solution of the darts is distributed in the drawing as follows: in the side dart - half of the total solution:
T 21 T 22 = 14/2 = 7 cm
The remaining 7 cm is distributed between the front and back panels of the skirt.
If the stomach is flat or weakly expressed, then put a dart on the front panel from 1 to 3 cm. Take 2.5 cm.
T 31 T 32 = 2.5 cm - front dart solution.
The remaining 4.5 cm of solution is distributed on the back half. If you leave all 4.5 cm in one dart, then it will not be ironed at the end and will stick out. Therefore, the value is divided into two darts - 2 cm and 2.5 cm deep:
T 41 T 42 = 2 cm - solution of the 1st back dart.
T 51 T 52 = 2.5 cm - solution of the 2nd back dart.
Side dart. Distribute the solution of the side dart evenly relative to point T 2:
T 21 T 2 = T 22 T 2 = 7 / 2 = 3.5 cm.

T 0 is connected by a straight line to point T 21, obtaining the segment T 0 T 21:
T 0 T 21 = 26.5 – 3.5 = 23 cm.
Connect points T 21 and T 22 with point B 2.
T 21, B 2, T 22 - side dart.
Front dart. In order to build a dart on the front panel, divide the segment T 21 T 0 in half and put a point T 3:
T 0 T 3 = T 21 T 0 / 2 = 23 / 2 = 11.5 cm.
Relative to point T 3, lay down the tuck solution of the front panel evenly:
T 31 T 3 = T 3 T 3 2 = 2.5 / 2 = 1.75 cm.
From point T 3, a perpendicular is lowered down to the segment T 0 T 21, 8-10 cm (the length of the dart) is set aside on it and point T 33 is placed. Connect points T 31, T 33, T 32 with segments - you get a dart on the front panel.
Back darts. Point T 10 is connected by a straight line to point T 22:
T 10 T 22 = T 0 T 21 = 23 cm.
In order to construct darts on the back panel, divide the segment T 10 T 22 in half, subtract 5 cm and put a point T 5:
T 10 T 5 = T 22 T 10 / 2 - 5 cm = 23 / 2 - 5 cm = 6.5 cm.
T 22 T 5 = 23 - 6.5 cm = 16.5 cm
Relative to point T 5, lay out the tuck solution T 51 T 52 evenly:
T 51 T 5 = T 5 T 52 = 2.5 / 2 = 1.25 cm
From point T 5, a perpendicular is lowered down to the segment T 10 T 22, 10-14 cm (the length of the dart) are set aside on it and point T 53 is placed. Connect points T 51, T 53, T 52 with segments - the 1st dart on the back half.
To construct the 2nd dart, divide the segment T 22 T 5 in half and place a point T 4:
T 4 T 22 = T 22 T 5 / 2 = 16.5 / 2 = 8.25 cm
The tuck solution T 41 T 42 is distributed relative to point T 4:
T 41 T 4 = T 4 T 42 = 2 / 2 = 1 cm
The length of the dart is 8-10 cm.
Side line design
Divide the segments T 21 B 2 and T 22 B 2 in half and place points 1 and 2, respectively. At the resulting points, an overestimation of 0.5-0.7 cm is made.
Draw up lateral lines smooth lines: T 21 - 1 - B 2 - N 2 - lateral line of the front panel, T 22 - 2 - B 2 - N 2 - lateral line of the rear half.
N - T 0 - T 31 - T 33 - T 32 - T 21 -1 - B 2 - H 2 - N - front panel.
T 10 - H 1 - H 2 - B 2 - 2 - T 22 -T 41 - T 43 - T 42 - T 51 - T 53 -T 52 - T 10 - back half.
Spline
On the segment T 10 H 1, the required height of the slots is set aside and a point W is placed.
H 1 W = 20 cm (arbitrary).
(Fig. 4)Construct a rectangle with side AB equal to the length of the belt:
AB = St x 2 + 4 cm (transition section) = 38 x 2 + 4 = 80 cm, and side AC equal to twice the width of the belt, AC = 5 cm.
Line names
Front panel
- T 0 N - middle of the front panel, fold
- T 0 T 21 - waist line of the front panel
- T 21 N 2 - lateral line of the front panel
- NN 2 -- bottom line of the front panel
Rear half
- T 10 N 1 - midline of the posterior half
- T 22 T 10 - waist line of the rear half
- T 22 N 2 - lateral line of the rear half
- H 2 H 1 - bottom line of the rear half
- AB - belt stitching line
- AC - end of the belt
Making patterns
- Take tracing paper and transfer all the details of the skirt onto it with a pencil.
- Add 1 cm evenly to the waist lines on tracing paper
- To the lateral lines - 2 cm
- To the bottom lines - 4 cm
- To the midline of the back half - 2 cm
- Slot allowance - 6-8 cm
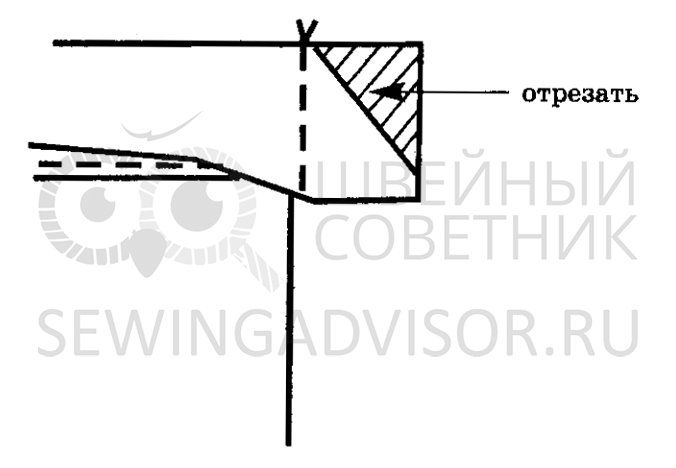
- Create an allowance as shown in Rice. 13, at an angle of 45° to the segment ШН 1 and connect the resulting line with the line limiting the width of the slot
- On the belt parts, allowances of 1 cm are added on all sides.
- The resulting patterns of the front panel (with a fold in the middle), the back half, and the belt are cut out
Reveal is one of the the most important stages making clothes: the more accurately you cut, the faster and better quality you will sew.
There are several ways to lay out fabric for cutting
- In a spread, when the fabric is laid out widthwise. This method is convenient when cutting complex asymmetrical patterns, when cutting checkered or striped fabrics, when the fabric is narrow.
- In the fold, when the fabric is folded in half lengthwise, edge to edge. The fabric is placed with the edge towards the edge of the table, and the fold away from the cutter. The same method is used when cutting wide fabrics. Lines are drawn and cut on the wrong side.
We will use the last way, since it is simpler and faster. Check the direction of the pile; if it is clearly expressed, then the parts being cut should go in the same direction and without distortions.
Lay the patterns from right to left with the bottom lines of the skirt to the right cut of the fabric. Since the front panel has a fold, place it with the middle towards the fold of the fabric, and the back half with the vent edge towards the edge. Lay out the belt. Trace the patterns with thin soap and cut along the marked lines. (Fig. 5).
Parts received
- front panel - 1 piece with fold
- back half - 2 parts;
- belt - 1 piece
The fabric consumption for this skirt is 62 cm.
Shorten the patterns of the front panel and the back half of the skirt by 8-10 cm (or by the height of the vents). The resulting patterns are placed on a piece of lining, outlined with thin soap and cut out. The lining is also cut into a fold, that is, it is first folded in half lengthwise, edge to edge, edge to the edge of the table. Lines are drawn and cut on the wrong side.
The amount of lining for this skirt is 40 cm.
To give the product a shape that matches the shape of the human body, darts are made on the main parts (fronts, back, parts of trousers and skirts), i.e., with the help of darts, the flat surface of the material is converted into a three-dimensional one.
The size of the dart opening and their number depend on the model, the features of the figure, the degree of fit to the body and the properties of the fabric.
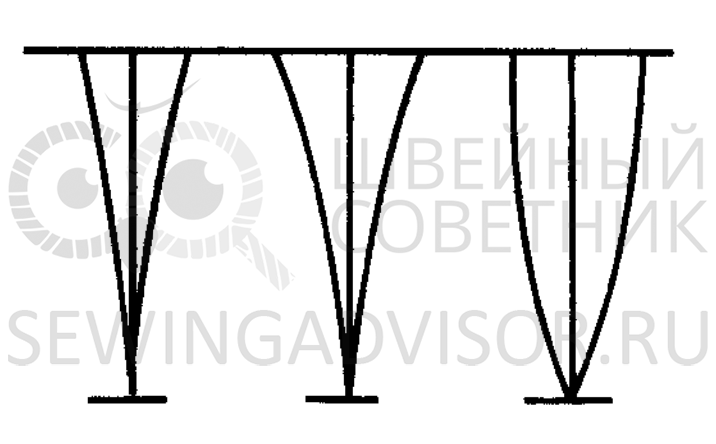
The dart can be located in the middle or at the edge of the part. The tuck is made closed and open, soft, continuous and cut, simple and complex - figured (Fig. 7).
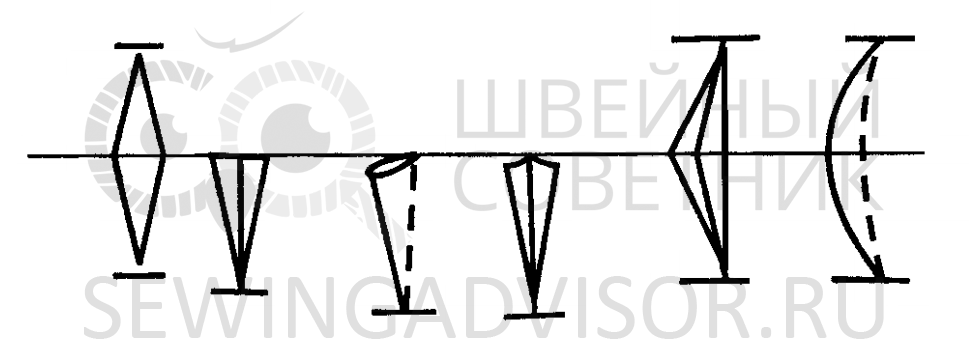
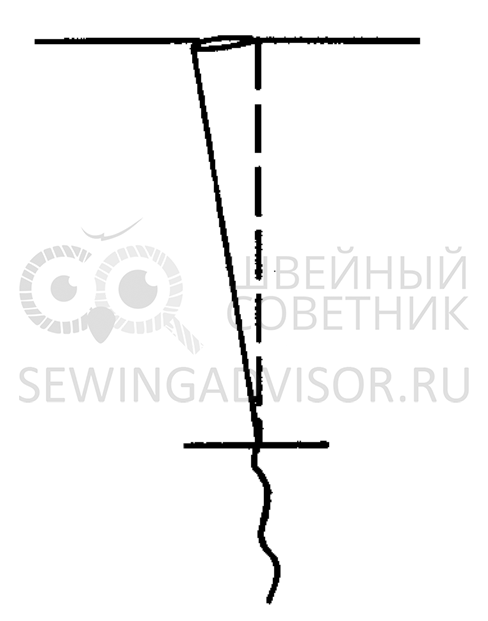
The contour lines of the dart are of great importance for the shape. On Drawing 8 a The basic contours of a simple tuck are given: straight, concave and convex.
A simple dart is marked with four lines: two lateral lines, one axial line (middle of the dart) and one line defining the end of the dart.
The main requirements for making darts: symmetrical arrangement on the product, the absence of slack at the end of the dart and the absence of an allowance.
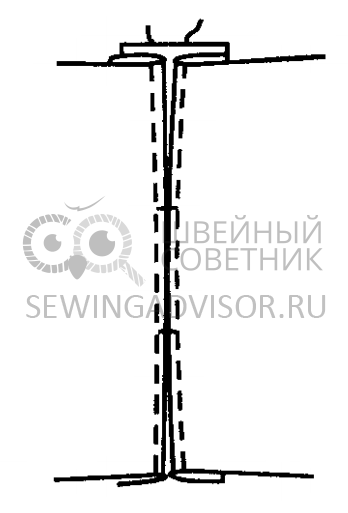
Baste the darts, matching the side lines, starting from the waist cut and tapering off towards the end, using basting stitches 1-1.5 cm long (Fig. 8 b).
The darts are also sewn from the waist, making a tack. If the skirt is made of thin fabric, then do not put a bartack at the end of the dart, but secure the end by tying the remaining threads. If the skirt is lined, then the ends of the threads can be cut off, leaving a tail of 1.5-2 cm. But it is best to thread the remaining threads into the needle and insert them into the dart allowance so that they are not visible.
You can stitch the dart cleanly without any thread formation at the end. This method is convenient when sewing from transparent thin fabrics. Remove the top needle thread from the machine and from bottom to top, starting from the needle, thread the machine with thread from the bobbin. The bottom thread seems to follow the path of the needle thread, only threading the machine occurs in the reverse order. Having threaded the machine, they begin to sew the dart from its end to the waist cut. There is no need to secure the end of the dart.
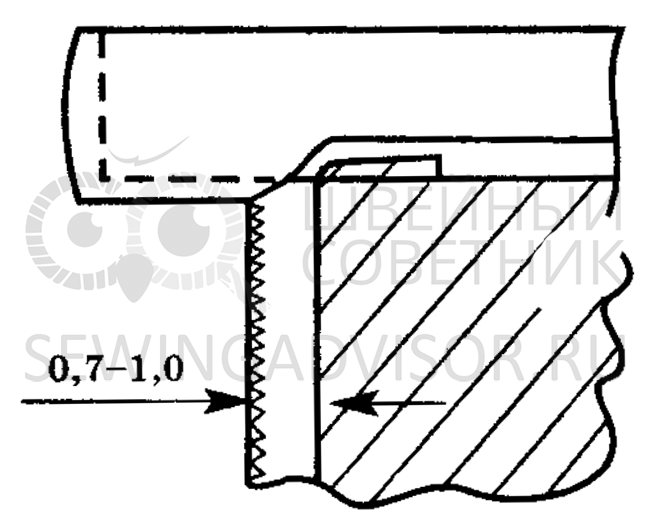
If the product is sewn from thick fabric such as drape, then in order to avoid unnecessary thickness, the dart allowance can be cut off, leaving 0.7-1 cm.
Remove the basting.
Iron and press the darts towards the center.
Lay a snare along the bottom line on all parts.
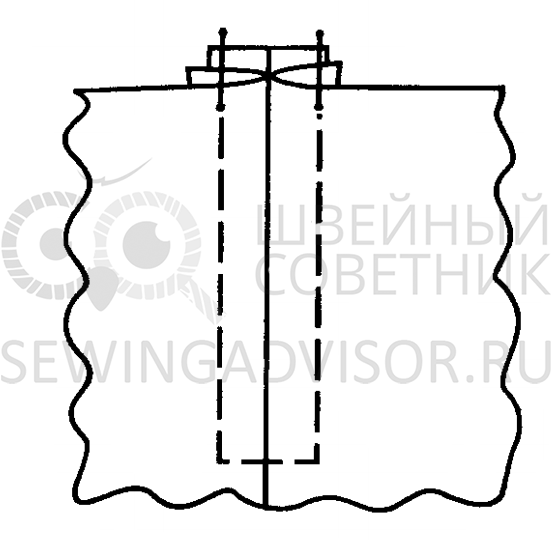
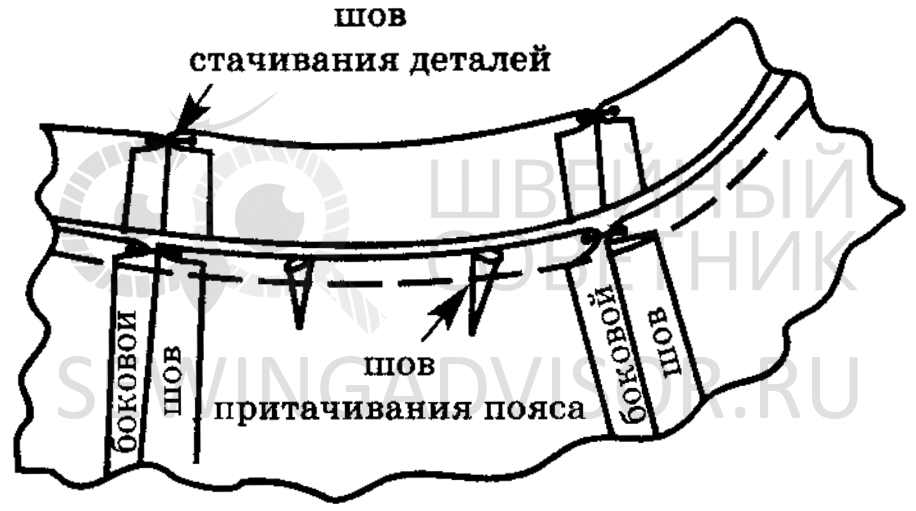
Baste the middle seam on the back halves to the beginning of the vents. The slot is marked out. Swinging in "lightning" (Fig. 9).
Sweep the side seams, aligning the cuts, from the side of the back half. The seam width is 2 cm. Sew the side seams towards the back panel.
Notice the bottom. Strengthen the belt with an adhesive pad.
Iron the belt along the fold, ironing along the fold and pulling along the stitching seam.
Baste the belt to the skirt, attaching the top section of the skirt.
Carrying out the first fitting
They put on a skirt and check
- the direction of the side seams - they must be perpendicular to the floor (if they go back or forward, they correct the defect);
- the appearance of the slot (it may diverge or, conversely, its parts may overlap each other);
- waist width;
- hip width;
- bottom width;
- length;
- belt width;
- slot height.
Basics
After trying on, remove the basting on the bottom, evaporate the belt, rip out the side seams, mark out the zipper and vent.
When fitting, the configuration of the skirt parts is clarified and all changes are made after fitting.
Before assembling, the parts are folded right sides together and the darts are cut off.
The skirt parts are laid side by side, with side cuts facing each other.
- Excessive width at the waistline. All excess along the waistline is removed into darts (front, back and side). 0.2-0.3 cm is taken into the darts along the front panel and the rear halves, the rest of the excess goes into the side darts.
- Excessive width along the hips and bottom. In this case, the side sections of the skirt are adjusted.
- High slot. You can reduce the length of the vent cut by adjusting the skirt along the middle seam allowance.
- Wide belt. When adjusting the belt, set aside the desired width plus allowance.
If after trying on there were no changes, then the skirt is not adjusted, but processed further.
Lightning processing
The “zipper” in skirts is processed in the middle seam or in the left side seam. If the style of the skirt has both a zipper and a vent, then they are placed in the middle seam.
Glue the allowance for sewing in the zipper so that the interlining fits into the seam and overlaps the end of the fastener.
The end of the fastener is determined as follows: from the cut of the waist, set aside the length of the “zipper” plus 1 cm (set-in seam). To protect the edges of the slots from stretching, their allowances are glued: cut the slots of the right half with a longitudinal strip of width
cm, cut the slots of the left half with a lobar strip 7-8 cm wide.
All adhesive spacers must fit into the seam and protect it from stretching.
The sections are overcast.
Sew the middle seam from the end of the zipper to the beginning of the vent.
The zipper seam is swept away and ironed. The basting is not removed.
(Fig. 10)
The zipper is laid from the inside out so that the teeth of the zipper are flush with the seam. The folds are basted onto the zipper on both sides. Sew the zipper with a seam of 0.5-0.7 cm, starting the line from the cut of the waist on the left rear half of the skirt, at the end of the fastener the stitch is turned at a right angle, through the seam with the zipper, again turned at a right angle and laid along the right the back half to the waist.
With shift (Fig. 11)

First, baste the fold of the right rear half to the teeth of the zipper end-to-end and sew with a seam 0.2 cm wide. Baste the fold of the left rear half, overlapping the zipper, and sew from the top edge with a seam 0.7-1 cm wide.
Offset (Fig. 12)
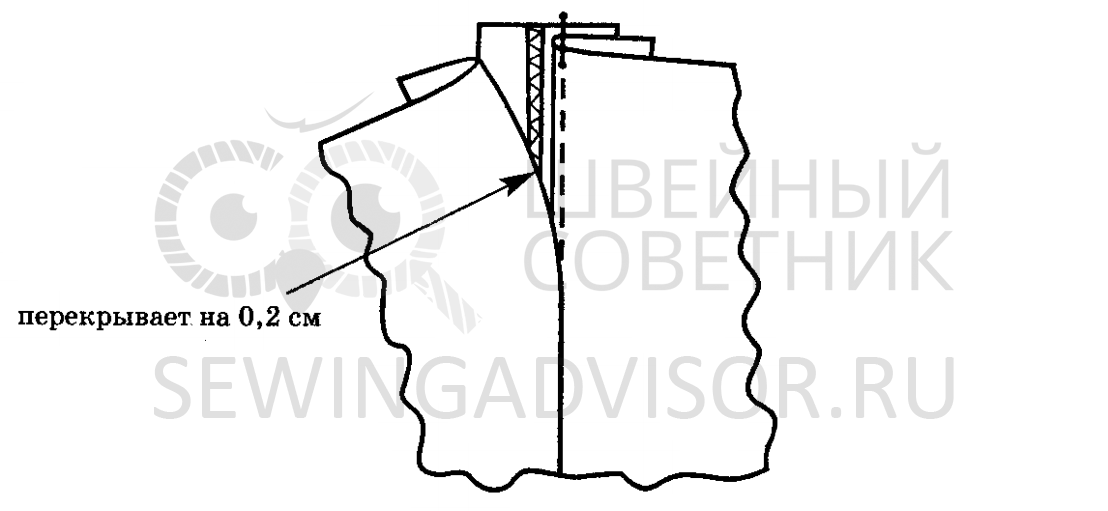
The seam allowance of the right rear half is ironed and released 0.2-0.3 cm towards the left. Baste over the zipper, lay end to end against the teeth, stitch with a 0.2 cm seam. Then baste the fold of the left rear half, overlapping the zipper, stitch from the top edge with a 0.7-1 cm seam.
You can process the zipper with a valance, and then the fastener will look like in trousers. To do this, cut out a valance 4-5 cm wide and a length equal to the length of the fastener plus 2-3 cm. Overcast and insert into the stitching seam of the right rear half.
Choose any way you like to process the zipper.
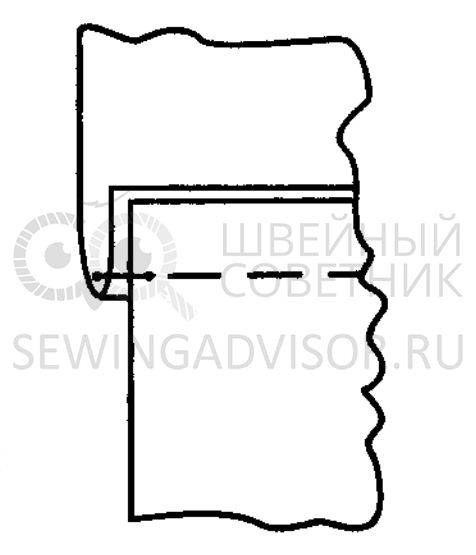
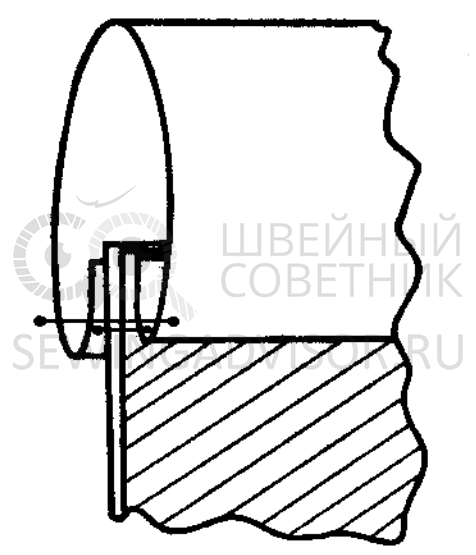
Grind the ledge of the slots, not reaching the end of the cuts by 1 cm (Fig. 13). The cut of the right half is swept 1 cm.

Iron the fold.
Place the finishing stitch 0.5-0.7 cm from the fold. Remove the basting and iron the fold again.
Turn the back half over to the front side and iron the fold of the left half of the skirt.
You can tape the fold of the left half of the skirt.
Mark on the front side and place a finishing stitch on the slot.
Processing a watch pocket
Usually in classic skirts They don’t make pockets, but for convenience you can make an inconspicuous miniature pocket, which is processed in the seam of the belt. It is convenient to process it at this stage, when the side seams have not yet been sewn. Pocket length - 11 cm.
A valance made from the main fabric, 3-4 cm wide and 11 cm long, is cut across the warp thread.
Burlap from lining fabric 11 cm wide, 20 cm long, cut across the warp thread (Fig. 14).

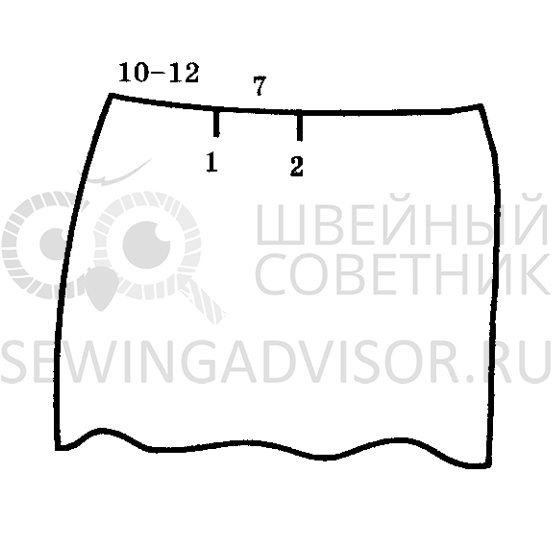
Mark the location of the pocket: set aside 10-12 cm from the side cut and draw the first control line.
Overcast the lower edge of the valance and stitch it onto the burlap, aligning the upper edges of the burlap and the valance. The burlap is placed with the bottom cut on the top cut of the skirt with the right sides facing each other, extending 2 cm beyond the ends of the pocket (beyond the control lines), and stitched to the top cut of the skirt between the control lines with a 0.8 cm seam.
The top cut and burlap are cut along the control lines, not cutting to the line 0.1 cm.
The burlap is folded over on the wrong side, a 0.2 cm wide edge from the top edge of the skirt is ironed and secured with a finishing stitch.
The burlap with valance is aligned with the top cut and the side cuts are hemmed with a 1 cm wide seam with bartacks at the ends.
The sections are overcast.
Iron the finished pocket through the iron from the inside and the front side.
Processing side cuts
The straightened sections are overcast. Sew the side seams along the back halves, aligning the cuts. Sew along the marked seam lines. The seams are pressed and pressed.
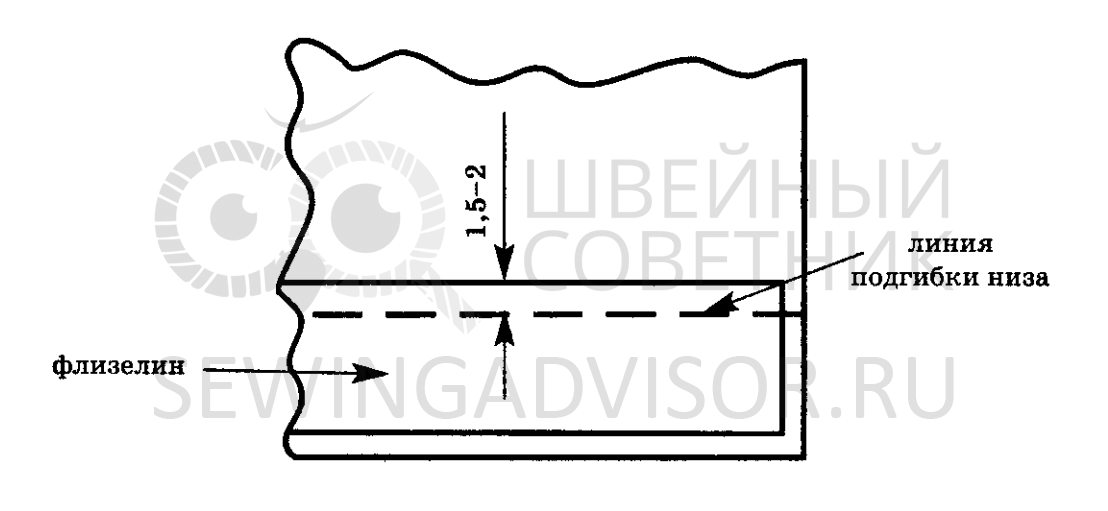
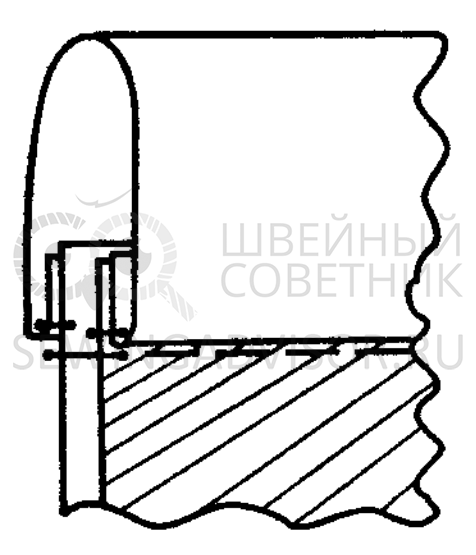
The adhesive pad for the bottom cut is cut 1.5-2 cm wider than the hem allowance for the bottom. Thus, the interlining fits into the fold and protects the bottom from stretching (Fig. 16). Stitch the bottom cut.
Note the hem at the bottom. Iron the bottom through the iron from the inside out. Hem the bottom with any hidden seam. The allowance for the slots is covered, making sure that it does not peek out from the front side. To do this, make an allowance with a bevel on the wrong side. Remove the basting and iron again.
You can fasten the bottom not by hand, but glue method. To do this, insert an adhesive edge into the swept and ironed fold and seal it with steam.
If the skirt is sewn from non-flowing fabric, then the lower edge can not be overcast, but finished with a hem seam with an open edge.
Lining processing
If changes were made during the fitting, they are made to the cut of the lining. Stitch the side and middle sections. Baste the middle seam on the back halves. Place a reference line on the seam, defining the end of the fastener. For a “zipper” 20 cm long, set aside 20 + 1.5 = 21.5 cm from the top cut. Stitch the middle seam from the reference line to the end. The seams are pressed and pressed through the iron from the inside out.
Remove the basting.
Sew down the side seams.
The seams are ironed again and pressed through the iron from the inside out.
IN in this case the lining is much shorter than the skirt and the length should reach the point of the vent (so that the lining is not visible when walking). Measure the resulting length, and if necessary, cut off the excess.
Stitch the bottom cut. Cover the bottom and iron from the inside out.
(Fig. 17) and remove the basting.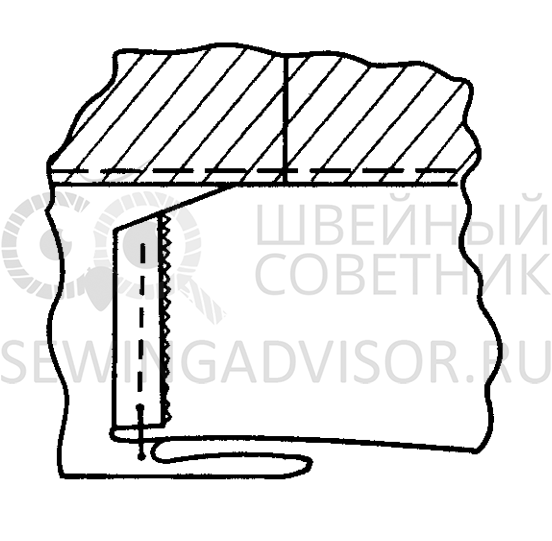
Belt processing
Depending on the thickness of the fabric, the belt can be processed in the following ways.
In thick, non-flowing fabrics, the upper section of the skirt is evenly basted onto the belt, seated 1-2 cm along the entire length. The fit is ironed and the top edge of the skirt is turned along the waist. Be sure to check by closing the zipper so that the belt stitching seam is at the same level. The basting is removed, the belt is turned at both ends.
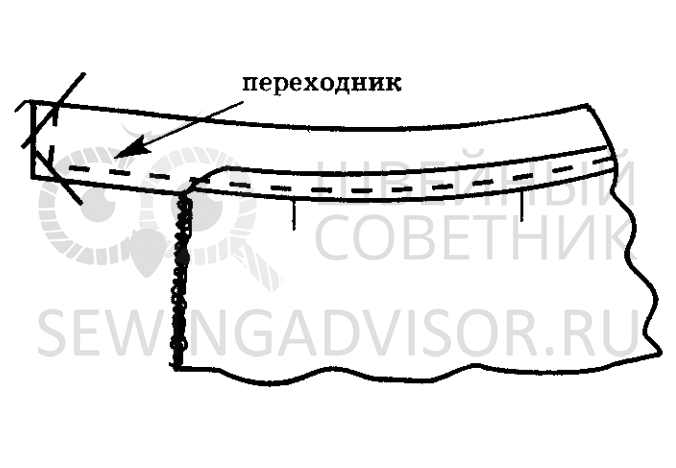
If the belt is fastened with a button, then it is turned flush with the “zipper” along the left rear half and on the right one the adapter for sewing on a button is processed.
The adapter is left 2-3 cm long and ground as shown in Rice. 19.
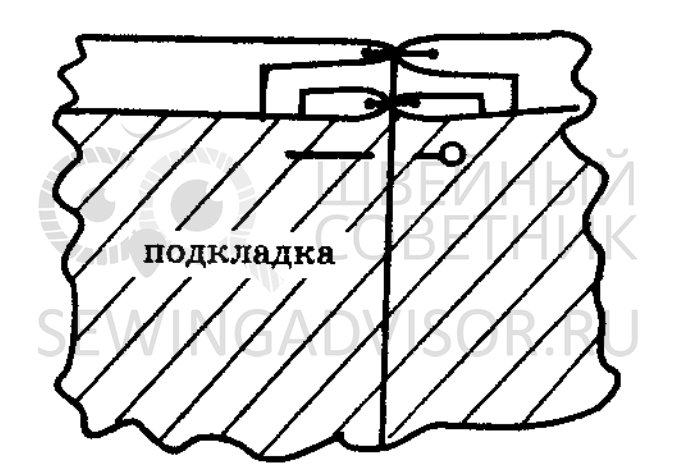
The resulting excess lining along the upper edge is placed in soft folds next to the darts, basted and stitched on the lining side.
Allowances in the corners of the belt are cut out, the belt is turned inside out and basted with straight basting stitches in three steps. Rice. 21 b  Rice. 21 in
The belt is basted on the lining side, covering all the allowances. (Fig. 22), and iron it. A finishing stitch is placed into the stitching seam along the front side ( Rice. 23).
All basting is removed and the belt is ironed in finished form.
In loose fabrics, the lower section of the waistband, which overlaps the allowances on the lining side, is overcast.
There is a “cleaner” way to process such fabrics. One side of the belt is stitched to the top section of the skirt, and the other to the top section of the lining. The first seam is basted and ironed towards the waistband (Fig. 24).
The belt is turned at the ends, the excess is cut out, turned inside out, swept out and ironed. The belt parts are connected to each other using running stitches and a finishing stitch is placed in the sewing seam. (Fig. 25).
In thin loose fabrics in belts with finishing stitching, first grind the belt from the lining side, grind it at the ends, sweep it, and iron it. And then they baste the belt from the front side, iron it and lay the finishing stitch (Fig. 26).
If there is not enough fabric for a one-piece belt, then you can cut it out of several parts
- If the fabric is not long enough, then you can cut the belt from 3 parts so that the seams of the parts fall into the side seams. They are ironed and ironed (Fig. 27).
- If the fabric is not wide enough, you can cut 2 parts of the belt so that the seam runs along the fold. The belt parts are stitched along the top edge with fastenings, folding them right sides together. The seam is ironed, the belt is turned right side out (Fig. 28). Next, the belt is processed using any of the above methods.
After the second fitting, the skirt is completely ironed, first from the front side, and then the lining.
If you are a beginner dressmaker, this skirt pattern is just what you need to start practicing sewing! How to sew a skirt? First, you need to build a base pattern, and then model the model you want to sew. However, you can sew a straight skirt using a base pattern, without modeling. In this case, you will get a straight skirt with six darts - 2 darts at the back, 2 at the front of the skirt, and 2 at the sides (meaning the sides curve towards the waistline).
STRAIGHT SKIRT WITH SIX DARTS (size 46) (building the base pattern)
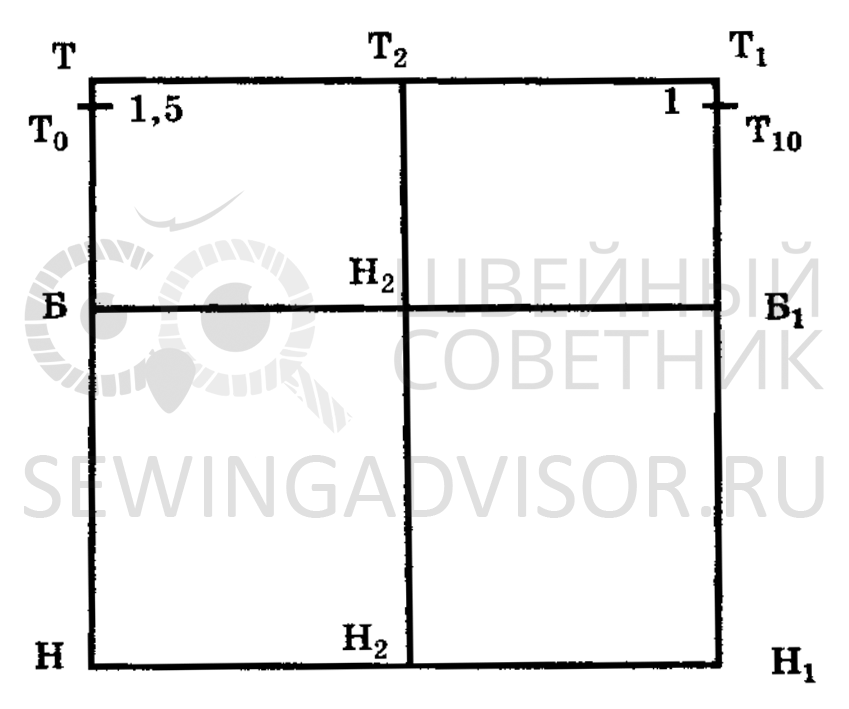
. To draw a pattern drawing for the base of a straight skirt (Fig. 1), you need to take the following measurements:
1. Skirt length 72 cm
2. Waist semi-circumference 38 cm
3. Semi-circle of hips 50 cm
How to sew a skirt: drawing a pattern
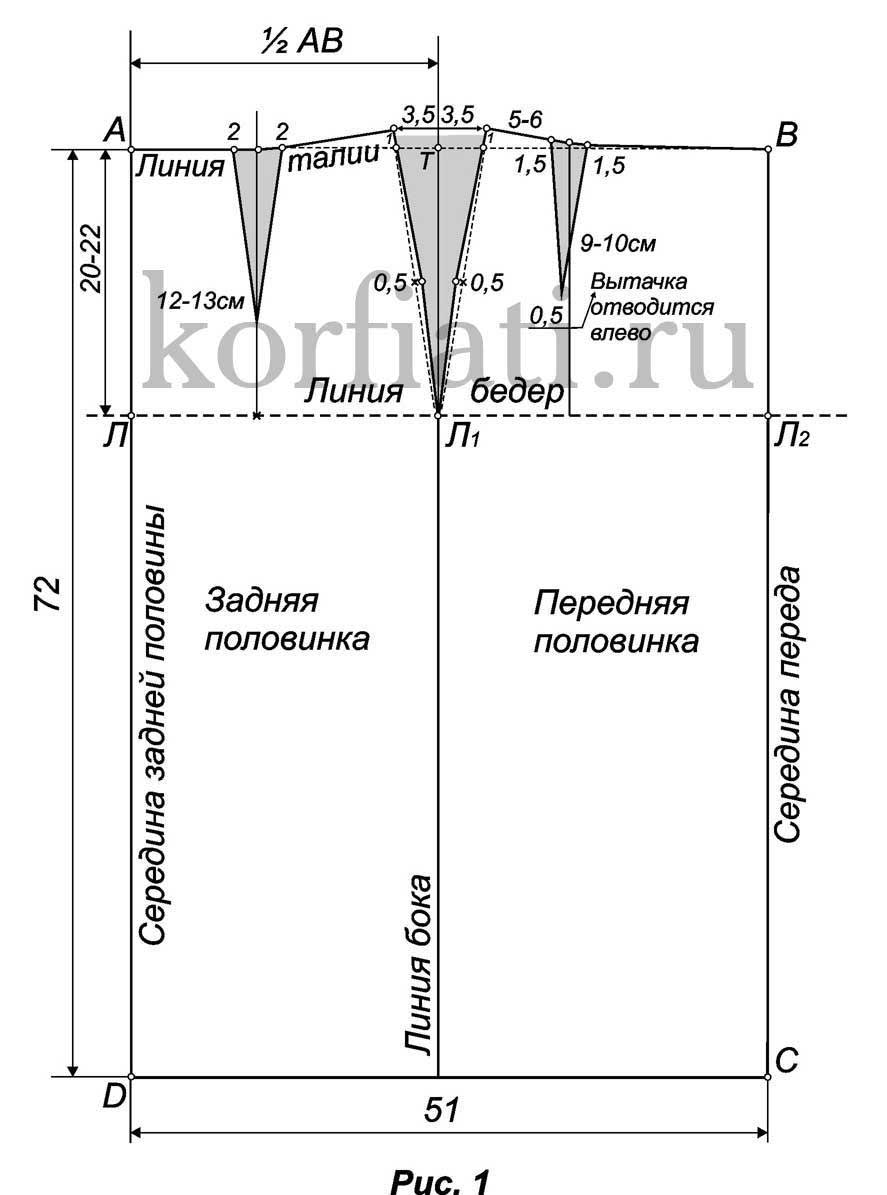
Draw rectangle ABCD.
How to sew a skirt: skirt width. The lines of the rectangle AB and DC are equal to 51 centimeters (the semicircle of the hips by measurement plus 1 centimeter for all sizes): 50 + 1 = 51.
How to sew a skirt: skirt length. The lines of the rectangle AD and BC are equal to 72 cm (the length of the skirt as measured).
How to sew a skirt: side line. From point A, 25.5 centimeters are set aside to the right and point T is placed (1/2 of the semicircle of the hips according to the measurement with an increase of /2): 51:2 = 25.5.
From point T, a perpendicular is lowered down until it intersects with line DC.
How to sew a skirt: hip line. From points A, T, B, lay down 18-20 centimeters, put points L, L1 and L2 and connect them with a dotted line.
Calculation of the depth of darts at the waist line. Determine the difference between the semi-circumference of the hips according to the measurement (together with an increase of 1 cm) and the semi-circumference of the waist according to the measurement (with an increase of 1 cm): 51-37 = 14 cm.
The difference is 14 centimeters. 7 centimeters (half the difference) are removed into the side dart, 3 centimeters into the front dart, and 4 centimeters into the back dart (the remainder of the difference).
How to sew a skirt: side dart. The side dart is 7 centimeters. From point T, 3.5 centimeters are set aside to the right and left (half the depth of the side dart): 7: 2 = 3.5.
From points 3.5 upwards, 1 centimeter is laid down. Points 1 are connected by dotted lines to point L1, divided in half, and 0.5 centimeters are set aside from the division points left to the right and right to the left. The line on the left is drawn through points 1, 0.5, L1, the line on the right is drawn through points 1, 0.5, L1.
How to sew a skirt: front dart. The depth of the front dart is 3 centimeters. Line L1L2 is divided in half and drawn upward from the division point dotted line until it intersects line AB. From the intersection point to the right and left, 1.5 centimeters are set aside (half the depth of the front dart) 3: 2 = 1.5.
From the division point, the hip line is laid upward 2 centimeters. Points 1.5, 1.5 and 2 are connected.
How to sew a skirt: back dart. The depth of the back dart is 4 centimeters. The line of the hips of the rear half (LL1) is divided in half and 2 centimeters are set aside from the division point to the left. From point 2, draw a dotted line upward until it intersects with line AB. 2 centimeters are laid upward from point 2. From the intersection point to the right and left, 2 centimeters are set aside (half the depth of the back dart) and all 2 points are connected.
How to sew a skirt: the waistline of the back half of the skirt. Point 1 is connected to point 2 (darts).
Waist line of the front half of the skirt. Point 1 is connected to point 1.5 (darts).
You can also have your blouse tailored to your own measurements. Detailed instructions In chapter
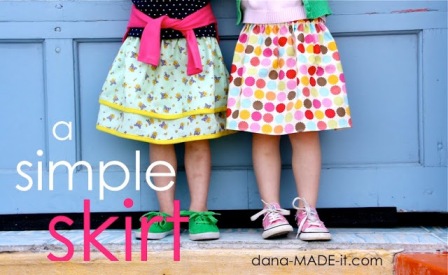
I probably won’t tell you anything new about how to sew simple skirt. The idea is not very original, but is shown simply and clearly in the photographs. And the idea with a double skirt is very interesting.
This skirt can be made single or double-layered, straight or flared. And if you make original details, such as, the skirt will look complicated.
Even a novice dressmaker can sew such a simple skirt. Here are some more skirt ideas:
Pattern of a skirt with bright polka dots
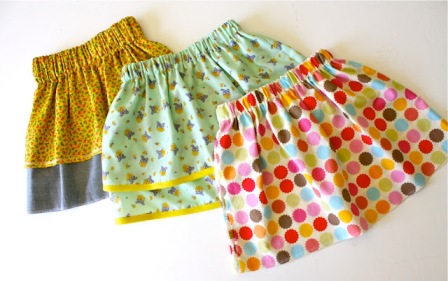
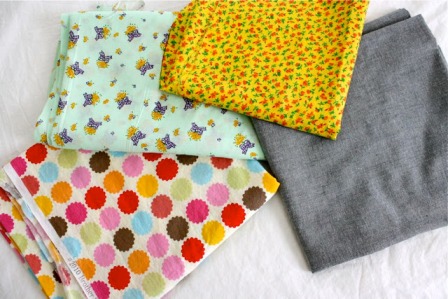
This is a skirt pattern. Yes, this is the most ordinary rectangle. The skirt does not have to be made in one piece. It can be made from several pieces sewn together.
Skirt width: measure the waist and, depending on the desired fullness, multiply this number by 1.5 or 2. This is the width of our pattern. Everything is clear with the length of the skirt: measure the desired length, add a couple of centimeters to the bottom hem and 5 centimeters to the waistband under the elastic band. If you will be using wide elastic band, then you need to leave more than 5 cm for the belt. If you are making a double skirt, then for the second layer we make the same part, but 10 cm shorter in length. Also, if you wish, you can make a single-layer skirt, but with a beautiful edging at the bottom with bright fabric of a different color .
Even a novice tailor can sew a skirt himself. This requires equal parts time and diligence. In this article we will look at several features of sewing a long skirt.
How to sew a straight skirt with elastic
The elastic can be attached in two ways, both of which are equally complex. Firstly, you can sew the elastic into the skirt itself, then it will not be visible at all, which means it doesn’t matter at all what color and thickness the elastic itself is. Secondly, the elastic band can be attached with inside. In this case, you need to choose an elastic band suitable color, width and texture.
The first method involves the following steps.
- It is necessary to turn the top edge of the product 0.5 cm and stitch it.
- After this, you need to tuck the fabric to the width of the elastic, but so that you can insert the elastic into the resulting “pocket”.
- Sew, but leave about 10 centimeters to insert the elastic.
- Insert the elastic using a pin and stitch it closed.
- Sew the remaining 10 centimeters, the skirt with elastic is ready.
The second method of sewing a skirt with an elastic band is presented in the video.
How to sew a straight skirt with a vent
Sewing a skirt with a vent on your own is not difficult if you perform all the steps carefully and consistently. Use as a basis.
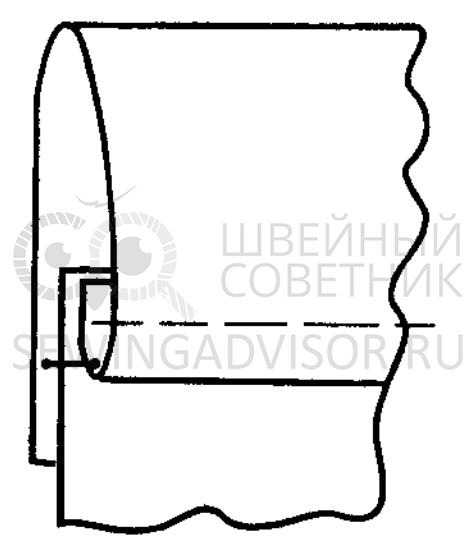
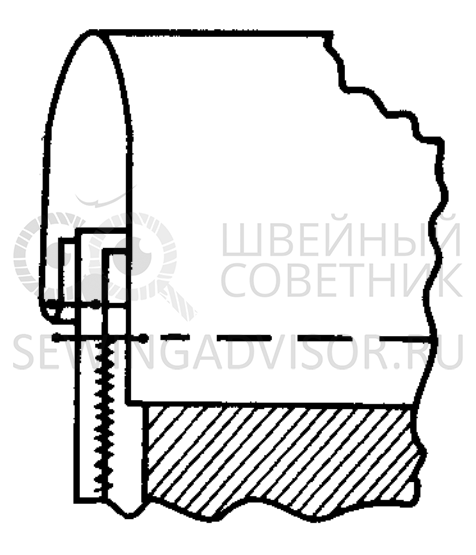
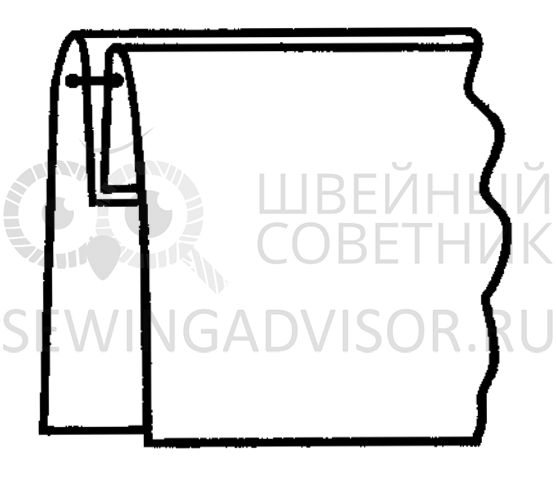
- First, you need to wrap the vent along the vertical fold line and stitch the bottom of the part along the hem line of the skirt. You need to stitch it tightly so that the skirt in this place does not become deformed later. The described action is shown in the photo below.
- Then it is necessary to turn the skirt right side out and iron the entire hem of the bottom of the skirt.
- After this, secure the slot on both sides using finishing stitches. If you are new to sewing, then it is better to first draw the lines with chalk, and only then stitch them.
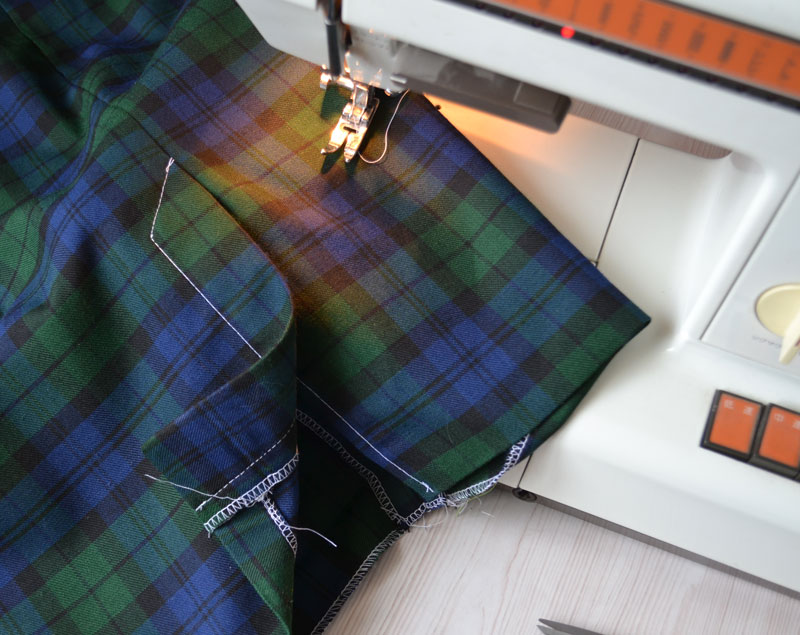
- Check that the lower level of the spline parts (when suspended) is at the same level.
How to sew a straight long skirt
The first requirement for long skirts is ease of use. If you want to do this, you don't have to use the flare angle when cutting the fabric, but be sure to make a seam at the bottom of the skirt, at the back or on the side, depending on your preference.
If you want a straight skirt without a seam, then it is best to use an extension angle of 20-30 centimeters. Then you will be comfortable walking, and the skirt will look straight.
If the fit of the skirt is low and elastic, then you don't even need to taper the skirt from the hips to the waist. It is enough to use 2 measurements - hip circumference and product length.
How to sew a straight skirt with a straight cut
Incision - The best way make a straight line long skirt comfortable. The cut is best placed at the back, since a symmetrical cut minimizes distortion of the fabric.
The video provides instructions for sewing a straight skirt with a straight cut.
How to sew a straight wrap skirt
The fabric consumption for a wrap skirt should be calculated as follows: one and a half lengths of the skirt plus 15-20 centimeters for allowances and processing of the upper edge of the skirt.
A wrap skirt is sewn according to standard rules, but the width of the wrap must be taken into account. Usually 20-40 centimeters are left for the smell, depending on the circumference of your hips.
To sew a skirt, by the way, only two measurements are enough: hip circumference and length of the product. In this case, all darts are made immediately on the fabric.
It is enough to trim the top of the wrap skirt with bias tape and use decorative fasteners or buttons for fastening. Moreover, it is necessary to fasten the skirt at the waist in two places: one fastening is secret, used where the smell begins (where the fabric begins to lie in two layers), and the second fastening is external, used in the place where the smell ends. The hidden fastening securely holds the smell so that it does not fall down when you wear the skirt.
A wrap skirt can come in different lengths and shapes. With a wrap you can sew a pencil skirt, a tulip skirt, a straight skirt, a long and loose summer skirt.
The video below shows several options for sewing a wrap skirt.

How to sew a straight skirt for a girl
Sewing a skirt for girls is very easy even without patterns, since the children's body structure allows you to not calculate the difference between the waist and hips.
If you want to sew a skirt for a girl, be sure to ask your child what length of skirt she will be comfortable playing and moving in. For active girls, it is better to choose a length up to or below the knee.
A girl's skirt can be made with only one back seam and without a slit.
- To do this, measure your waist circumference, add 10-20 centimeters to it and cut the fabric in accordance with the resulting data.
- After this, sew the fabric, you will get a canvas of the same width.
- First sew the resulting seam from the inside out, and then work the top edge of the skirt.
- After attaching the elastic or belt, you can proceed to the final step - hemming the skirt and, if you want to create original skirt, creating decorative elements: patch pockets and/or appliqués.
How to sew a straight skirt video
How to sew a straight two-seam skirt? Pattern of a straight two-seam skirt.
.
In order to create a pattern for a straight two-seam skirt, you will need the following marks:
- PO (half waist);
- POb (half hip circumference);
- Du (length of the skirt from the waist to the side);
- Dp (length of the skirt in the middle of the front);
- Ds (back length of skirt);
- Dst (back length to waist).
And allowances for loose fitting:
- Fri (increase along the waist line) = 1 cm;
- PB (increase along the hip line) = 2 cm.
Constructing a pattern for a straight two-seam skirt.
The line of the middle of the rear panel.
In the upper left corner of the sheet we will put a point T and from it we will draw vertical line.
Bottom line.
From point T along the middle line we will set aside a segment equal to the measurement of the length of the skirt from the waist at the back, and put a point H: TN = 71 cm.
From point H, draw a horizontal line to the right.
Hip line.
From point T along the line of the middle of the back panel, we will set aside a segment equal to 1/2 of the length of the back to the waist minus 1 cm, and place point B:
TB = Dst/2 – 1 cm = ... cm.
In practice, when constructing patterns, the distance from the waist line to the hip line is taken to be 8-20 cm for all sizes.
From point B, draw a horizontal line to the right.
The line of the middle of the front panel.
From point B along the hip line, we will set aside a segment equal to the measurement of the half-circumference of the hips with an increase for a loose fit along the hip line, and place point B1.
BB1 = POb + Pb = ... see.
Draw a vertical line through point B1. Let's denote its intersection with the bottom line by the letter H1. From point H1 upward vertically, we will set aside a segment equal to the measure of the length of the front, and place point T1:
Н1Т1 = Дп = ... see.
Side cut line.
From point B along the hip line, we will set aside a segment equal to half the measurement of the semi-circumference of the hips with an increase for loose fit minus 0-1 cm, and place point B2:
BB2 = (Pob + Pb)/2 – 1 cm = ... cm.
From point B2 we draw a vertical line. Its intersection with the bottom line will be designated by point H2. From point H2 up, set aside the length of the skirt and place point T2:
H2T2 = ... see.
Note.
The line of the side cuts can be shifted both towards the rear and towards the front panel or pass through the middle of the mesh width. For skirts of small sizes and wider at the bottom, the latter option is recommended.
Front and rear panels.
Waistline.
Connect points T, T2 and T1 using a ruler.
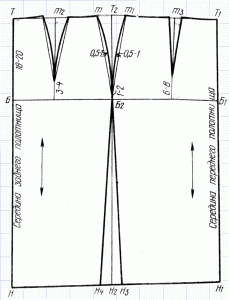
Pattern of a straight two-seam skirt.
Darts.
It is customary to make three darts on a two-seam skirt pattern.
The sum of the solutions of all darts ΣB is equal to the difference in the finished product between the width of the skirt along the hip line and the width along the waist line:
ΣB = (Pob + Pb) – (NOt + Pt) = ... see.
The side dart opening is equal to half ΣB.
From point T2 to the left and to the right we will put aside half of the solution and put points t and t1:
tT2 = t1T2 = 1/2*ΣB/2 = ... see.
Connect points t and t1 auxiliary lines with point B2 and divide the resulting segments in half. From the dividing points into the dart we will restore perpendiculars, on which we will set aside 0.5-1 cm. The dart does not reach the hip line 1-2 cm. We connect points t and t1 to the point 1-2 cm with smooth curves with a bend at points 0.5 -1 cm.
The back dart opening is 1/3*ΣB.
From point T to the right along the waist line, we will set aside a segment equal to 1/4 of the half-circumference measurement of the hips minus 2 cm, and place point T2.
Tt2 = POb/4 – 2 cm = ... cm.
From point T2 we will draw an auxiliary vertical line to the hip line, and to the left and to the right we will put aside half of the tuck solution:
1/3*ΣB/2 = ... see.
The dart does not reach the hip line by 3-4 cm.
We connect the marked points on the waist line with a point 3-4 cm with slightly concave curves.
The front dart opening is 1/6 ΣB.
From point T1 to the left along the waist line, we will set aside a segment equal to 1/4 of the hip circumference measurement minus 1 cm, and place point T3:
T1t3 = POb/4 – 1 cm = ... cm.
From point T3 we will draw an auxiliary vertical line to the hip line, and to the left and to the right we will put aside half of the tuck solution:
1/6*ΣB/2 = ... see.
The dart does not reach the hip line 6-8 cm. We connect the marked points on the waist line with the 6-8 cm point along the ruler.
Let's align the sides of the darts along the larger side.
Notes:
1. The solution of the front and back darts can be calculated as follows:
- for the rear panel:
1/4*ΣB + 1 cm = ... cm; or 1/3*ΣB = ... see.
- for the front panel:
1/4*ΣB – 1 cm = ... cm; or 1/6*ΣB = ... see.
2. In a skirt for a figure with a large difference between the measurements of half-hip and half-waist, it is recommended to make 10 darts (in the drawing they are built with 2 front and back and 1 side).
The interval between two darts both front and back is 3-4 cm.
When constructing the second darts, it is necessary to ensure that the sides are parallel: on the front panel the right sides of both darts should be parallel, on the back panel the left ones should be parallel.
3. In a skirt for a figure with a narrow waist and low hips, 10 darts are also made.
The sum of their solutions is distributed as follows:
- the solution of the back dart, located closer to the side, is equal to 0.25*ΣB;
- second rear – 0.2*ΣV;
- front, located closer to the side, 0.2*ΣV;
- second front – 0.15*ΣV.
The first back dart is placed at a distance of 9-10 cm from the middle of the back panel, the second - in the middle between the first and the side. Their length is 13-15 cm.
The first front dart is placed at a distance of 10-11 cm from the middle of the front panel, the second - in the middle between the first and the side. Their length is 10-12 cm.
4. For a figure with a large protrusion of the buttocks, the back dart solution is increased and divided into two. The opening of the side dart is 0.3-0.4*ΣB, the two rear darts are 0.5-0.55*ΣB, the front dart is 0.1-0.15*ΣB.
Side cuts.
The width of the back panel along the bottom line in a straight skirt is equal to the width along the hip line, in a slightly widened one it is 2-6 cm more:
H2H3 = 2-6 cm.
Let's connect points B2 and H3 using a ruler.
The width of the front panel along the bottom line in a straight skirt is equal to the width along the hip line, in a slightly widened one - 3-4 cm more:
H2H4 = 3-4 cm.
Let's connect points B2 and H4 using a ruler.
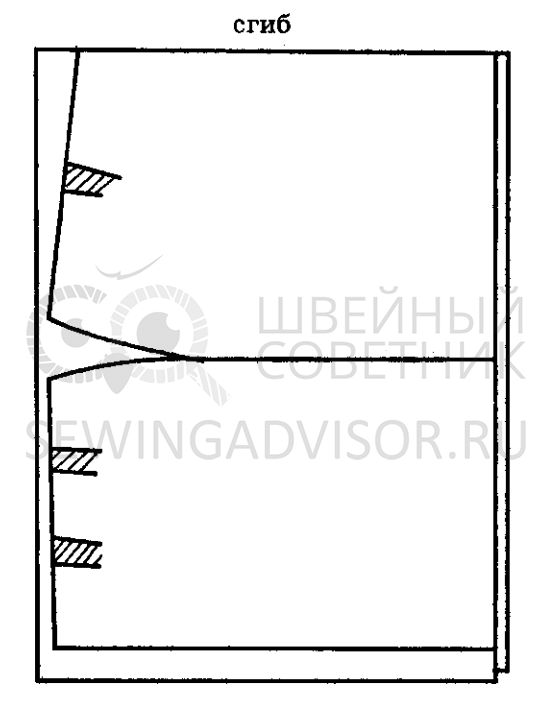
The upper cut is designed with a slight bend when the dart is closed.
Cut out a straight two-seam skirt.
Fabric consumption is planned as follows: with a width of 140 cm - one skirt length + 5-8 cm, with a width of 80-100 - two lengths + 10-15 cm.
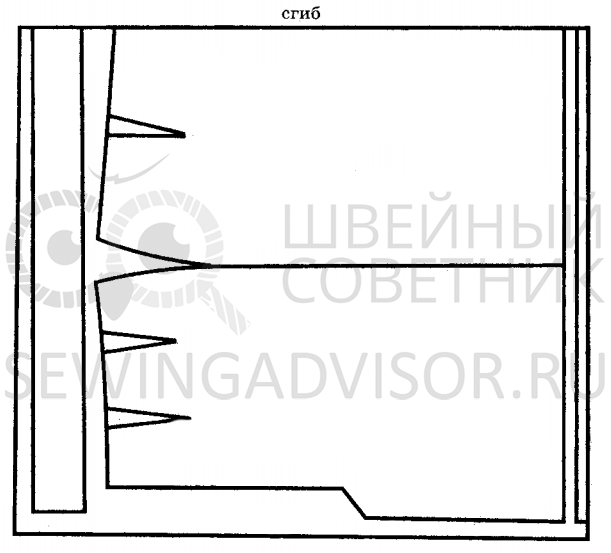
We will attach the patterns of the front and back panels to the fabric folded lengthwise with the right side inward, with the centers of the panels to its fold. Let's give allowances for the seams and hem of the bottom of the skirt.
The fastener is placed on the left side, its length is 16-20 cm. The darts on the seam allowances continue in vertical lines.
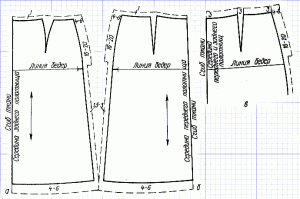
Cut out a straight two-seam skirt: a - back panel; b - front panel; c - an increase for decorating the upper cut with corsage braid.
Sequence of processing parts of a straight two-seam skirt.
We will lay snares along the contour lines of the patterns. We mark the middles of the panels with spacer stitches.
We sweep away the darts, then the side sections, previously pinned with pins, leaving 16-20 cm under the fastener unswept.
We attach a bodice loop or belt to the upper cut, after which you need to try on the skirt.
We sew darts. At the end, we reduce the line to nothing and tighten the resulting slack.
Stitch and then process the side cuts.
Let's process the clasp. Let's process the top cut.
Let's hem the bottom and iron the skirt. Then we sew on loops and hooks.
Using the constructed pattern of a straight two-seam skirt, patterns for many other skirts are constructed, for example, pencil skirts.
+++++++++++++++++++++++++++++++
SKIRT MODELING
http://www.bulav-ka.ru/atel.files/m...ubki/ub1020.htm
Flared skirt with asymmetrical hems that flare out at the bottom 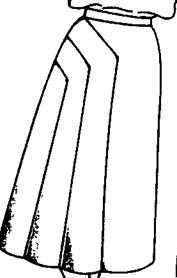
The back panel is smooth and flared.
Zip closure.
Fabric - wool, half-wool, fine cloth, raincoat.
Fabric consumption for a width of 1 m 40 cm - two skirt lengths plus 15 cm (Half hip circumference no more than 52 cm).
We model on the unfolded pattern of the front panel of the flared skirt.
To the right of the waist line downwards we mark 2-2.5 cm, then twice 6-8 cm, from the bottom from the middle to the right - twice 7-9 cm, and from the waist line along the line of the middle front down - 8-10 cm. Connect the segments , as shown in the figure, maintaining parallelism.
Let's number each part and mark the direction of the grain thread parallel to the middle of the pattern.
Let's cut the pattern along the marked lines.
Layout on fabric.
Lay out the details of the front panel on the fabric, turning it from the wrong side, setting aside 3 cm from the cut for the bottom hem.
To the right of the edges, along the drawn line, we will set aside an allowance along the side line - 2.5 cm.
Let's attach the 4th piece, combining the shared thread, and pin it.
Let's calculate the width of the slider along the bottom of the part. To do this, from the width of the folded fabric, subtract the width at the bottom of the unfolded pattern of the front panel with a double allowance along the side line (2x2.5 = 5 cm) and allowances for the seams of stitching parts (6x1.5 = 9 cm).
Divide the remainder by the number of extensions (in this example, 6) and get the value of one extension. If the width of one extension is insufficient, you can use the fabric extension from the rear panel layout.
After preliminary calculations, we will make an extension along the bottom of the 4th part (from the side of the cut line) by 7-8 cm and mark the allowance for the stitching seam - 1.5 cm.
We will connect the expansion allowance, which provides flare along the bottom line of the skirt, to the hip line. Let's mark the seam allowances: along the side line of the skirt - 2.5 cm, along the flare and cut line - 1.5 cm. Let's step back from the seam allowance along the bottom line to the 4th part 1.5 cm and 7-8 cm for the extension , attach the 3rd piece, combining it with the shared thread. Pin it, outline it, mark the line of the hips. On the opposite side of the part, also along the bottom line, mark the allowance for the flare - 7-8 cm and for the stitching seam - 1.5 cm and connect the flares to the hip line. Let's note the seam allowances for the part: along the side line - 2.5 cm, along the flare and cut lines - 1.5 cm.
Let's do the same for the layout of the 2nd part.
On a free section of the fabric, we will lay out the 1st piece with seam allowances of 1.5 cm and 7-8 cm for spreading along the hem line of the bottom, aligning with the grain of the fabric. Mark the line of the hips and connect them to the opening allowance. Let's note the seam allowances: along the waist line - 0.7 cm, along the side line - 2.5 cm, along the cutting and sliding lines - 1.5 cm.
Fold the remaining piece of fabric in half and apply it to the fold in the middle of the back pattern, flared due to the closed waist dart.
Let's mark the detail of the belt (the length is 4 cm more than the half-circumference of the waist, and the width is 6-8 cm). Let's mark the seam allowances for the waistband detail - 0.7 cm all around.
Let's cut out the parts according to the marked allowances. Let's cut the lining into a belt from the side fabric (length - along the length of the cut belt, width - half the width of the cut part of the belt).
Let's lay a snare along the back panel.
Mark the middle of the parts with a spacer seam.
Let's fasten and make notches on the inner corners of the front panel.
We sweep away the details of the front panel in the sequence of layout on the fabric, matching the lines of the bottom and hips. Baste the side seams, leaving 16 cm unsewn in the left seam for the fastener.
Let's try it on, clarify the fit of the skirt on the figure, the shaped lines. Using a ruler, we will clarify the bottom line from the floor on your bare foot.
We will make changes if necessary. Lay out the skirt on the table and align the bottom line. Let's mark the allowance for the hem.
Let's open all the seams.
Let's hem the bottom of the skirt on each piece separately. Let's steam it.
We sew the parts of the front panel, process the cuts along the seam, and steam them on the edge.
Let's make cuts at the hip level or in the corners. From the notch downwards, the seams remain on the edge, and in the upper part we iron them onto the lower part. If desired, secure the top seams with a finishing stitch.
We sweep and stitch the side seams, leaving 16 cm unstitched in the left for the fastener.
We will process the cuts. Steam on edge and iron.
We will process the zipper and the top of the skirt with a belt and steam it.
Skirt with asymmetrical flounce

Drawing style lines on the base pattern - front panel 
Drawing style lines on the base pattern - back panel 
The waistline is decorated with a stitched belt.
Zip closure.
Fabric - soft thin wool or wool mixture.
Fabric consumption for a width of 1 m 40 cm is one skirt length plus 60 cm (half hip circumference no more than 52 cm).
Drawing style lines on the base pattern.
We will draw curly lines on the unfolded patterns of the front and back panels of the base of a straight two-tone skirt.
From the bottom line, along the left side seam, we will set aside 20-25 cm, and from the bottom line, along the right side seam, 30-35 cm, along the middle line, from the bottom line up, two segments - 30-33 cm and 15 - 18 cm.
For ease of processing during the sewing process, we designate the corners with control points Kt. Let's connect all marked segments.
Divide the bottom lines into 10 equal parts and connect the division points with a curly line, draw lines from each point parallel to the middle of the pattern. We use arrows to indicate the direction of the cuts (from the bottom up) to move the parts apart on the fabric.
Let's number the parts starting with the front panel. Let's mark the direction of the grain thread on each parallel to the middle of the pattern.
Let's cut the upper parts from the lower ones. We cut the lower parts along the marked lines in the direction of the arrows, undercutting 0.2 cm to the top level.
Layout on fabric.
We lay out the asymmetrical style skirt on unfolded fabric. First, let's lay out the top parts, matching the grain of the fabric and the parts. Let's outline the outline, mark the lines of the hips and the middle, seam allowances: along the waist line - 0.7 cm, along the side line - 2.5 cm, along the cutting line - 1.5 cm (for sewing the facing).
Let's mark CT control points on the fabric.
Then we will lay out the lower parts, spreading them evenly along the lines of the undercuts, mark the side sides parallel, taking into account two allowances for the side seams of 1.5 cm to each, and place the grain of the fabric along the side lines.
Let's mark control points and seam allowances: along the bottom lines of the parts - 0.5 cm (for processing with a seam with a double cut hem or a small “zigzag”), along the upper cut - 1.5 cm (for stitching the facing).
The skirt can be decorated with a edging made of fine silk fabric to match the main color.
If edging is not provided, we will place undercut facings on the free areas of the fabric (cutting width - 5 cm).
Let's mark the belt piece (the length is 4 cm more than the half-circumference of the waist, and the width is 6-8 cm), the seam allowances for the belt piece are 0.7 cm all around.
Let's cut out the parts according to the marked allowances, from the side fabric into the waistband (length - along the length of the cut belt, width - half the width of the cut belt part).
Let's cut a piece of calico to process the zipper (length - 16 cm, width - 2.5 cm).
Layout of skirt parts on fabric 

Fitting and processing sequence.
Mark the middle and hip lines of the upper parts with an interfacing stitch.
We sweep away the darts, the upper parts along the side seams, leaving 16 cm in the left for the fastener, the lower parts along the side seams.
We sweep the upper part of the skirt from the lower part, combining the control points Kt.
We sew a thin, dense braid around the waist.
Let's try it on and clarify the fit of the skirt on the figure, the hem line, and the bottom.
We will make changes if necessary. Open the bottom part and side seams at the top of the skirt.
We sweep and stitch the side seams of the upper parts, leaving 16 cm in the left for the fastener.
We process the cuts, steam them on the edge on both sides through a moistened flannel iron. Let's straighten the seams and steam again from the wrong side.
Let's process the zipper and steam it.
Treat the top of the skirt with a belt and steam it.
Sew the side seams of the bottom piece. We process the cuts and steam them on the edge.
We sew the bottom of the skirt with a hem seam with a closed cut or a small “zigzag”, making notches in the hem. Let's steam the treatment, compacting it, but not stretching it in oblique cuts.
Connect the top piece to the bottom piece, placing them right sides together. On the wrong side of the lower part we will apply an undercut facing, processed along the outer cut.
We chip along the side seams and at the level of the control points all three parts.
We sweep and stitch the seams, steam them on the edge.
Then, together with the facing, we fold the seams to the upper part without rolling, and stitch them with a soft thread.
Iron lightly, fixing the fold.
Place a finishing stitch 0.5-0.7 cm from the stitching seam (if provided for by the model).
Sew the facing with blind stitches to the side seams of the top piece.
Let's steam off the processing, placing paper under the seams and facings so that there is no mark left on the front side.
Let's iron it completely ready product.
Skirt (for special occasion), complemented by a flounce asymmetrical in length. 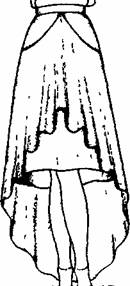
The waistline is decorated with a stitched belt.
Zip fastening on the left side seam.
Fabric - thin, soft, well-draped wool or wool mixture, heavy, soft silk.
Fabric consumption for a width of 1 m 40 cm is one skirt length plus 2 m for an additional detail.
The model is designed for a tall, slender figure.
Drawing style lines on the base pattern.
On a large sheet of paper, mark the lines of the front and back panels of the two-seam skirt along the pattern, aligning the sides. (see fig1)
Mark the hem line: from the intersection of the waist line with the middle of the front pattern, to the hip line at a distance of 20-25 cm from the middle line of the back pattern. Let's connect the marked segments.
Mark the lines of the finishing detail. ( green color).
On the front pattern, along the middle line from the beginning of the hem, we will set aside 30-35 cm, and on the back we will extend the middle line from the end of the hem down by 80-85 cm, that is, to the floor level. From the bottom point, mark 10-15 cm to the right and connect it with a segment (30-35 cm) on the line of the middle front in a straight line, rounding it off at the end. On the finishing part we will mark the undercuts taking into account the sliding into the folds. Let's set aside 2-3 cm along the top line on both sides of the segment and divide the remainder into 8, the bottom line into 10 parts, connect the division points. We use arrows to indicate the undercut lines (from bottom to top). Copy the finishing detail onto an additional sheet of paper.
Let's number the parts, mark on each the direction of the grain thread parallel to the middle of the pattern.
We will project the center of the dart on the front panel of the pattern onto the cutting line, which will allow it to be closed.
Let's cut the parts along the cut line and close the dart on the front pattern.
Layout on fabric.
Fold the fabric in half, on one half we place the main part of the front panel of the pattern along with seam allowances, applying the middle to the fold of the fabric of the front panel, and on the other - the details of the back panel in accordance with the grain of the fabric. The distance between the parts along the cut line is 3 cm (1.5 cm to each part for the seams). Mark the hip line, seam allowances: along the waist - 0.7 cm, along the hem line - 5 cm, along the side lines - 2.5 cm.
Cut out the parts according to the marked allowances.
On the remaining fabric, folded in half along the transverse thread, we mark the finishing piece, spreading it along the cut lines so that the extreme sides align along the seam allowance lines (1.5 cm on each side). Let's connect the upper levels with a smooth line. Seam allowances on all cuts are 1.5 cm.
Let's mark the detail of the belt (the length is 4 cm more than the semicircle of the waist, and the width is 6-8 cm). Let's mark the seam allowances for the waistband detail - 0.7 cm all around.
We will cut out the parts according to the marked allowances, and a hem for processing the cut on the main patterns (length - along the length of the cut, width - 4.5-5 cm). The facing part can be ground.
Let's cut the lining into a belt from the side fabric (the length is the length of the cut belt, the width is half the width of the cut part).
Let's cut a piece of calico to process the zipper (length - 16 cm, width - 2.5 cm).
Fitting and processing sequence.
Mark the middle of the skirt panels with spacer stitches. We will lay the snares along the contour and shaped lines. We sweep the darts along the waistline. We sweep the finishing detail along the middle line. Fold the seam allowance to the wrong side and baste, first marking the fold of the hem with an interfacing stitch.
We sweep away the side lines of the upper and lower parts of the front and rear panels. We baste the seam allowance for the hem of the skirt.
Place the finishing piece on the front side of the top piece, and then the bottom piece. Let's combine the sections, the middle of the panels and the sides, and sweep them away.
We baste a thin thick braid along the waist line.
Let's try it on, clarify the fit of the skirt on the figure, the position and length of the finishing detail, and the length of the skirt.
We will make changes if necessary. We will spread the parts along the cut lines and side seams.
We sew and finish the darts along the waist, the side seams of the upper part, leaving 16 cm in the left for the fastener. We sew the side seams of the lower part of the product, and process the cuts. Steam on both sides of the rib using a moistened flannel iron. Let's straighten the seams and steam them again from the wrong side, placing paper under the seams.
Let's process the zipper and steam it.
Let's decorate the top of the skirt with a belt and steam it.
We sew the finishing part, the front seam is stitched with processing of open sections with an overlock, the back seam can be stitched with edged sections or behind the sewing seam, steamed. We hem the bottom of the finishing piece with a hem seam and steam it without stretching it in the oblique cuts.
Let's hem the bottom of the skirt and steam the treatment.
We sweep the parts along the cut line, apply a facing on the bottom part of the skirt from the wrong side, processed along the cuts, and stitch. Steam the seam on the edge. Fold the facing seams onto the top piece without rolling. Sweep with soft thread. Iron lightly, fixing the fold. You can lay a finishing stitch 0.5-0.7 cm from the stitching seam. Attach the facing with blind stitches to the side seams. At waist level, tuck the facing inward, supporting the basting.
With draped wrap and curly hem lines 
The skirt is straight, with a draped wrap and curly hem lines. (Fig.3)
The back panel is smooth with darts at the waist. The waistline is decorated with a stitched belt.
Fabric - wool, wool mixture, velor.
Fabric consumption for a width of 1 m 40 cm is two skirt lengths plus 25 cm for seams and processing.
The style of the skirt is designed for a tall slender figure
Drawing style lines on the base pattern
On the unfolded front panel (Fig. 1) we will apply lines (in yellow) of the wrapping parts, having previously marked half of the segment along the bottom of the skirt from the middle of the panel to the side line and 10-12 cm from the bottom line along the middle line or along the model. Connect the opposite corners on the waist line with the marked levels. We transfer the lines of the left part with a cutter onto an additional sheet of paper. Divide the waist line from the wrap line to the second waist dart into 8-9 equal parts (in green), not taking into account the dart opening, and connect the marked division points on the waist line parallel to the wrap line with the side line. We will move the centers of the darts to the cut lines (sliding into the folds of the drapery), without cutting them to the side line (0.3 cm).
The left part of the front panel is smooth with allowances for wrapping.
Layout on fabric
Layout of the rear panel and the left part of the front panel.
Using the fabric folded in half, we will lay out the back panel with an allowance along the side line of 2.5 cm.
Let's outline the outline, mark the line of the hips and waist, allowance along the bottom line - 5 cm, along the one-piece belt - 0.7 cm, cut it out.
The wrap line can be treated with a facing with an allowance of 0.7 cm, 6 cm wide, or edged with an oblique facing.
From the opposite end of the fabric we will lay out the right part of the front panel wrap. Let's attach a non-spreadable part in accordance with the direction of the grain thread. Then we straighten the panel in a fan-like manner, taking into account the folding folds: the widest at the line of the smell is 9-11 cm, and each subsequent one is 0.5 cm less than the previous one.
Let's outline the outline (red dotted line), mark the seam allowances: along the waist line - 0.7 cm (with ledges above the folds), along the side line - 2.5 cm, along the wrap and bottom line - similar to the left part. Mark the line of the hips along the edges of part (B) Fig.3.
Let's mark the belt piece (the length is equal to the length of the back and front panels with closed darts, width - 6-8 cm), seam allowances for the belt piece - 0.7 cm all round.
Let's mark the details of the facings - oblique or undercut.
Let's cut out the parts according to the marked allowances; from the side fabric, a lining in the belt (length - along the length of the cut belt, width - half the width of the cut part of the belt).
Fitting and processing sequence.
Mark the middle of the panels with a spacer seam.
Let's lay a snare on the back panel.
We sweep away the darts on the rear and left front panels. Place folds along the waistline on the right panel.
We sweep the side seams, sweep the back panel along the bottom line. The hem allowance on the back panel should be 0.7 cm when processing with a bias or lining hem.
We sew a thin, dense braid around the waist.
Let's try it on and clarify the fit of the skirt, the hemline, and the folds of the drapery.
We will make changes if necessary.
We sew the side seams, process the cuts, steam them on the edge through a moistened flannel, iron them and steam them again from the wrong side.
We stitch and process the darts.
Sew the folds along the outer folds from the wrong side. Let's turn the folds of the folds towards the cut line of the smell and steam them at the level of the lines, fixing their position. To make the folds of the drapery lie better, the right wrap can be placed on the lining (without folds).
We will process the sections of the smell and the bottom with a bias or hem, and steam.
Let's finish the top of the skirt with a belt. Let's steam it.
We will finally iron the finished product.
Options for "godet" skirts