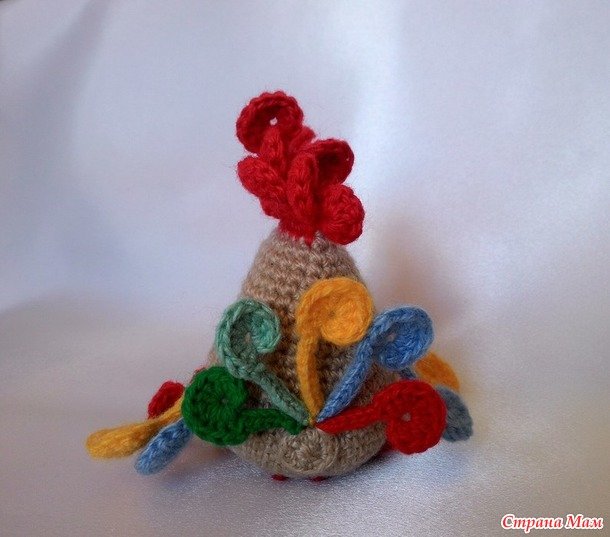
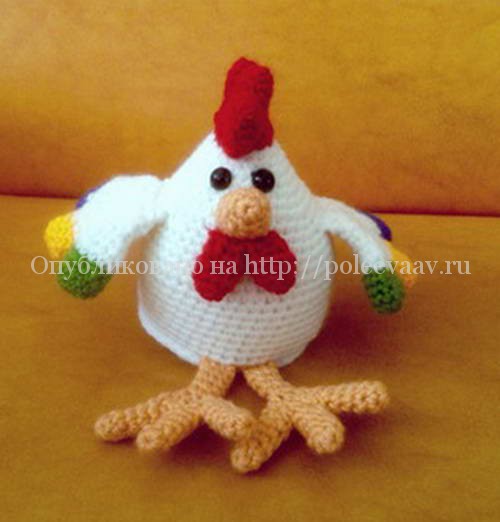
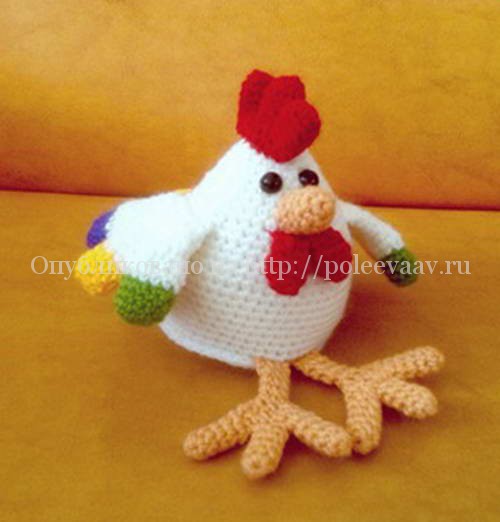
Crochet a rooster in the form of a napkin. How to crochet a cockerel, master class with photos.
According to the eastern calendar, 2017 passes under the sign of the Rooster, and this bright symbol can be made for yourself or as a gift with your own hands. For this you can use the most different techniques, we will tell you in detail about one of them, namely - crochet rooster, master class with detailed description knitting simple and beautiful model will help even novice needlewomen knit a charming toy.
This small amigurami cockerel (about eight centimeters in height) is knitted easily and quickly, and the toy turns out bright and cute.
Before starting work, we will prepare everything you need.
- For crocheting a cockerel, multi-colored leftover yarn of approximately the same thickness is suitable: the main color (or several) to choose from, red for the comb, yellow for the beak.
- Depending on the thickness of the yarn, it is necessary to select a hook of the appropriate size.
- The toy will need to be filled; for this you can use cotton wool, padding polyester, etc.
- We will also prepare special eyes for toys, or beads. suitable color and size.
Body and head
We start by knitting the main part, which will act as the body and head. We collect a chain of 6 air loops with a thread of the main color and close it into a ring. We knit in the circle with single crochets, making even increases and decreases according to the following pattern:
2-8 row: 6 increases in each row, resulting in 48 single crochets;
Rows 9-12: knit in the round without increments;
Row 13: decrease 6, leaving 42 sc;
Rows 14-16: knit in the round;
Row 17: 6 decreases, 36 sc left;
Rows 18-19: knit in the round;
Row 20: decrease 6, 30 sc remain;
Rows 21-22: knit in the round;
Row 23: decrease 6, leaving 24 sc;
Rows 24-25: knit in the round;
Row 26: decrease 6.
We fill the resulting product tightly with filler.
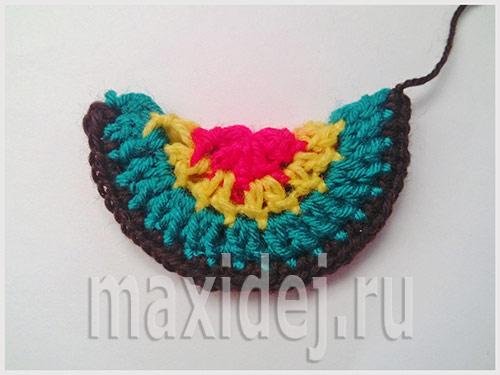
Scallop
We continue to knit with a red thread - this will be a comb. We knit one row in a circle with single crochets, fold the piece in half, knit 9 sc, connecting the two edges together, we get the base for the scallop.
Now we cast on a chain of 13 chain loops, insert a hook into the third ch, knit 10 double crochets from it, knit the remaining 10 chains with single crochets, and complete the row with a double crochet in the same loop. Next, we knit scallops from each warp loop in the same way, casting on a chain one loop less than the previous time. That is, the second scallop is 12 ch, we knit 10 dc from the third loop, then 9 dc. Third - 11ch, etc. So we knit five scallops.
From the sixth to the ninth scallop we knit 7 double crochets from the third loop.
The scallop is ready.
Wings
The wings can be knitted with yarn of the main color or any other. We cast on a chain of 4 ch, knit 3 sc from the second loop, air lifting loop, unfold the work. We knit the next row with one decrease, it turns out 2sc and 1ch, then another row with a decrease - 1sc, 1ch. We knit 9 chain stitches, insert a hook into the third loop, knit 10 double crochets from it, knit the remaining six loops with connecting stitches, and finish with a connecting stitch in the same loop.
The next row is 11 ch, 10 double crochets from the third loop, 8 connecting stitches, 1 dc.
The last row is 9tr, 10dc from the third loop, 6dc, 1dc.
We knit the second wing in exactly the same way.

Tail
Using the main yarn, we cast on 4 air loops, knit 3 sc, 1 ch from the second loop, turn the work, the next row with a decrease - 2 sc, 1 ch, turn, then another row with a decrease - 1 sc, 1 ch.
first - 9 ch, insert the hook into the third loop, knit 10 double crochets from it, 6 connecting stitches, 1 dc in the same loop;
second - 11ch, 10dc from the 3rd loop, 8dc, the last connecting stitch in the same loop;
third - 13 ch, 10 dc from the 3rd loop, 10 dc, the last connecting stitch in the same loop;
the fourth - the same as the second;
the fifth is the same as the first.
Beak
Thread yellow color We cast on a chain of 4 ch, then we knit, making increases along the edges:
2nd row: 4sc, 1ch, turn;
3rd row: 6sc, 1ch, turn;
4th row: 8sc, 1ch, turn;
5th row: 10sc, 1ch, turn;
6th row: 12sbn.
Fold the part in half, knit 6 connecting posts, connecting the two edges.
Goatee
Using a red thread, we cast on 8 ch, insert the hook into the third loop, knit 7 half double crochets from it, and knit the remaining 5 stitches with connecting stitches. Next, we knit 6 ch, from the third we knit 7 hdc, the remaining 3 dc.
Paws
The last details are the paws. They can be knitted in red, orange or brown.
We cast on 16 ch, from the second loop we knit 6 dc in each loop, we cast on 6 ch, we knit 6 dc from the second loop, we knit another 6 ch, we knit 15 dc from the second loop.
Assembly
First, we sew the beak to the main part, fix the eyes and comb, as in the photo below.
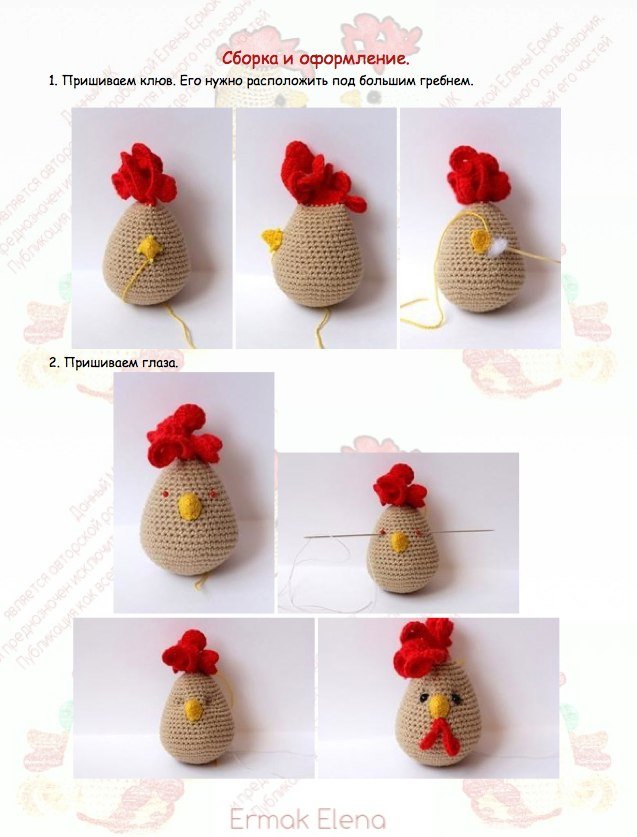
Sew on the remaining details.
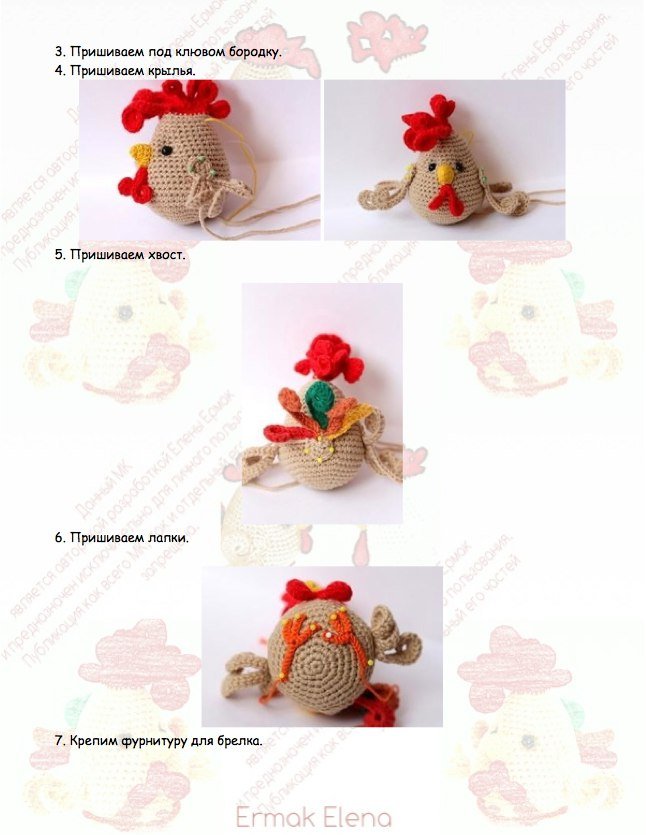
The cockerel is ready!
A selection of videos on crocheting a rooster
We offer you to watch several videos with master classes on crocheting cockerels.


Here, meet Petya. Even a novice “master” can knit it.


Row 2: 1 sc, inc. =9 sbn.;
3rd row: 9 sc;
4th row: 2 sc., approx. =12 stbn.;
5th row: 12 sc.
Sew the beak to the cockerel after filling it with padding polyester.
4. Now move on to the beard of the crocheted cockerel. Knit two parts in red.
1st row: 2 chain stitches, 6 sc. in the 2nd loop from the hook = 6 sc.;
Row 2: 1 sc, inc. =9stbn.;
3-4 rows: 9 sc;
Row 5: 1 sc, decrease = 6 sc.
The beard also does not need to be filled, fold and knit 3 sc.
5. What’s a cockerel without wings?! Knit three pieces of different colors:
3-5 rows: 12 stbn.;
Row 6: connect all the pieces with threads white=36 stbn
Row 7: 4 sc, decrease. =30 stbn.;
Row 8: 3 sc, decrease. =24 stbn.;
Row 9: 2 sc., decrease. =18 stbn.;
10-11 rows: 18 sc;
Row 12: 1 sc, decrease. =12 stbn..
Fold the edges and knit 6 sc. behind two walls.
1st row: 2 chain stitches, 6 sc. in the 2nd loop from the hook = 6 sc.;
Row 2: approx. in each stbn. =12 stbn.;
3-6 rows: 12 stbn.;
7th row: Connect all parts with white threads = 36 stb.;
8th row: 4 sc., decrease. =30 stbn.;
Row 9: 3 sc., decrease. =24 stbn.;
Row 10: 3 sc, decrease. =18 stbn.;
Row 11: 1 sc, decrease. =12 stbn..
Do not fill, fold and work 6 sc. behind two walls.
7. Knit the legs with orange threads (two parts).
Start with the toes (three for each leg).
1st row: 2 chain stitches, 6 sc. in the 2nd loop from the hook = 6 sc.;
Rows 2-5: 6 sc;
Row 6: join three pieces together = 18 sc;
Row 7: 1 sc, decrease. =12 stbn.;
8th row: 6 decrease. =6 stbn.;
Rows 9-12: 6 sc.
Also leave without filling, fold together and work 3 sc.
8. Pin all the pieces and sew. All, ready!!!


The symbol of the coming 2017 is the bright and beautiful bird- rooster! Therefore, we offer you a master class - with step by step photos. Such a cute knitted cockerel will become good decoration for the New Year's interior or an original souvenir for friends and family, it can also be used as New Year's toy and hang it on the Christmas tree!
Knitting such a cockerel will not take much time, and does not require any special skills. This New Year's souvenir is very easy and quick to prepare!
For a crocheted cockerel we will need:
- Yarn in red, yellow, green, brown and orange;
- Hook;
- Scissors;
- White felt or foamiran;
- Black bead;
- Glue.
How to crochet a cockerel description.
We knit 10 dc in a slip stitch. We knit with red yarn.
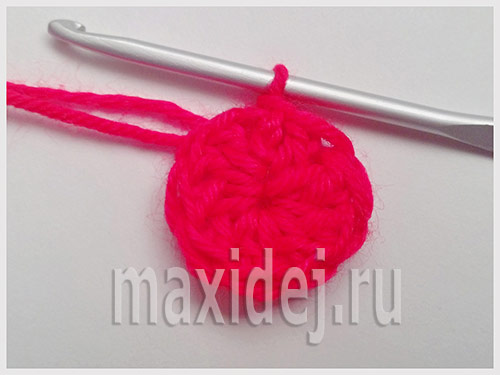
We need to double the number of loops. Therefore, we will knit 2 dcs into each loop.
Now we have 20 loops, we need them to become 40. Therefore, we again knit 2 dc in each loop.

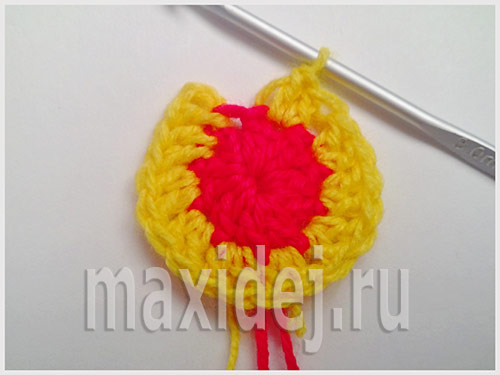
Now fold the resulting circle in half and stitch the sc with brown yarn.
The cockerel's body is ready. Now let's make a scallop.
Let's take red yarn again. We determine which side our head will be on and knit a chain of 5 loops.
We make 1 more VP and stick the hook into the same loop where the chain comes from.
We knit SP.
And again we collect 5 VP.
We repeat the steps.
And we do the same thing again.

We will knit the tail in the same way as the comb, only now we will cast on 8 VPs in the chain.

Now you need to tie the paws.
We collect 8 VP from the body of the cockerel with orange threads.
Then we knit 3 more VPs. And we knit 2 SS.
Again we knit 3 VP and 2 SS.
And we do the same thing again. And 1 more dc to join all 3 fingers into a paw.
One leg for our cockerel is ready. Let's knit 1 more in the same way.
We knit the beak.
We join the side of the rooster where we have the comb knitted.
We collect 3 VP with orange yarn and SS in the same place where this chain comes from.

All we have to do is tie the beard and make the eyes.
For the beard we take a red thread.
Attach a thread and knit 5 VP. Then we make a SS in the same place where the chain comes from. And we repeat this element again.
To make the eyes we will need white felt. It can be replaced with white faomiran.
Cut out a circle and attach a black bead to the center. Glue the eye. You can use ready-made eyes that are sold in craft stores.
Her knitting tutorial with diagram and description:
So that our cockerel can be hung somewhere, we will make a loop.
We join the center of the cockerel and knit air chain the required length.
![]()
This is how you can quickly and easily knit a souvenir in the form of a symbol of 2017! We will be glad if you like the master class crocheted cockerel diagram and description and, in gratitude, you share the article with your friends from social networks by clicking on one of the buttons below! Good luck with your creativity!
The coming year 2017 Eastern calendar will be the year fire rooster. Its symbol can be chosen as a gift for family and colleagues. Traditional options include magnets and rooster figurines. A more original and interesting gift would be a handmade souvenir. For those who know how to knit, a crocheted rooster will be easy to make and a unique gift for loved ones.
Options for making a knitted rooster
On the Internet you can find a wide variety of options for making a knitted toy in the shape of a cockerel. They are all very beautiful, interesting and unusual. Even inexperienced needlewomen can crochet a rooster. There are both complex and very simple circuits execution.
Some useful ideas
- Some master classes on crocheting a rooster allow you to create three-dimensional figures with filling.
- You can make useful gifts: napkins, hats in the shape of a rooster's head, rattles, decorative capes, etc.
- Knitted rooster figurines can be standing or sitting.
- The color design, shape and size of the craft depend entirely on your imagination. Don't be afraid to experiment. Your friends will definitely like this unusual bright souvenir.
- You can decorate the rooster with additional accessories. For example, a hat and glasses.
- Crochet the rooster can be made in the form amigurumi toys. These are miniature figures, most often round in shape, with filling and disproportionate details.
Master class: crochet a rooster
In the process of crocheting a rooster you will need:
- yarn different colors to your taste;
- hook;
- needle and scissors;
- filler (sintepon, holofiber);
- silicone glue;
- a piece of felt.
Process description
- Let's start with the bird's head. Cast on 5 loops and close the chain into a circle. We knit the rows with a single crochet. Each next row will be increased by several stitches. Having received the desired diameter, we will begin to form the head-ball. To do this, we will gradually reduce the number of loops.
After narrowing, we will make the bird’s neck from several rows. To create neck plumage, every 2 loops of the circle you can make 8-9 air loops and knit them with a single crochet.
- In a similar way, we will make the body of the bird, making it more elongated. Try using a different color of yarn.
- Let's start making the rooster's legs from the toes. Let's cast on 5 loops and connect them in several rows. So let's do 3 fingers. To combine them we use the single crochet method. Having removed several loops, we will make 4 more rows. We knit 8 more loops in a circle to the height we need.
- Let's fill the body, head and legs of the knitted rooster with filler. Let's connect them together using a hidden seam.
- Cut out the bird's eyes from pieces of black felt and glue them on using silicone glue.
- We will knit a comb from red yarn. Let's cast on a chain of 20 chain stitches, close it and knit 3 rows with a single crochet. Fold the ring in half, divide it into 3 parts (crest waves). We will knit each part separately, reducing the number of loops towards the top. Let's fill the comb with padding polyester.
- Let's make the bird's tail in the same way, but we won't fill it with filler. Let's tie three flat “tridents”, imitating tail feathers.
- For the wings, take green yarn. We will collect 5 air loops into a ring. Using the single crochet method, we will form a circle. Let's sharpen it at one edge, getting the shape of a drop. We tie the wings with a single crochet.
- Let's make the comb and beak in the same way, using yarn of a different color.
- Let's assemble the rooster by connecting all the elements with a decorative seam.
Job is done! This crocheted rooster will be a great surprise for your family and friends.
Good afternoon friends!
Today, I will tell you how to crochet a cockerel using a hook.
New Year's holidays are just around the corner, and the symbol of the upcoming 2017 is the Rooster. On New Year It is customary to give not only gifts, but also souvenirs in the form of a symbol of the New Year, which can be made from various materials. IN in this case I suggest crocheting a cockerel from half-wool and acrylic.
To tie a cockerel we will need:
- Hook No. 2.5.
- Yellow yarn (acrylic) – 20g.
- Purple yarn (wool blend) – 35 g.
- Red yarn (acrylic) – 5g.
- Black beads – 2 pcs.
- Glue gun.
- Scissors.
- Sintepon.
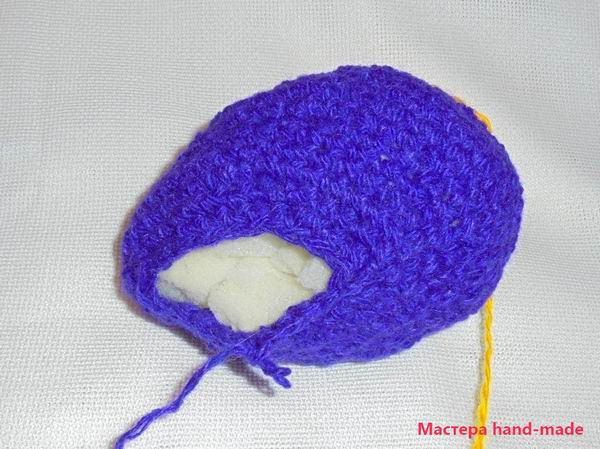
Making a cockerel made from knitting individual parts, which are then glued together. The head and body of the cockerel are knitted as one piece, and it is this part that needs to be knitted first.
We knit the cockerel's head and body
To knit the head you will need yellow yarn, and to knit the body we will take purple yarn. Wool blend is denser than acrylic, so it is just right for knitting the body of a cockerel. We start from the head and take the yellow yarn, cast on 3 loops and connect them.
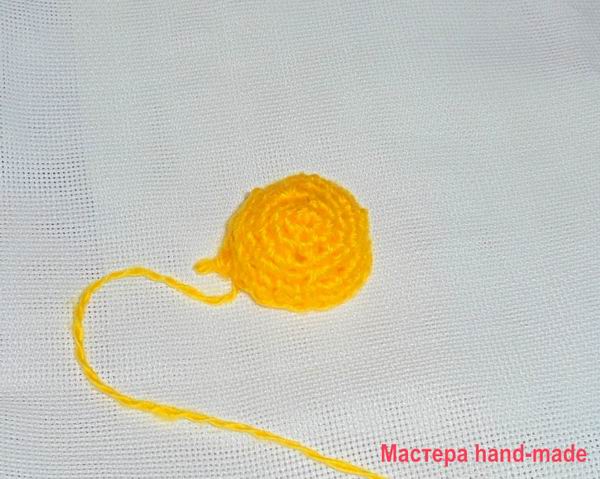
3rd row: this row is tied in a circle.
4th row: add loops in every second loop of the row, that is, after 1 loop.
Rows 5-9: These rows are knitted in a circle.
Row 10: in each loop of the row, add 1 loop, thus doubling the number of loops.
Row 11: the head is ready, now we change the yellow yarn to purple yarn. We knit a row in a circle, but we do not thread the hook through as usual, but trying to grab the loops from the inside.

Row 12: in each loop of the row, add 1 loop, thus doubling the number of loops.
Row 13: This row is knitted in a circle.
Row 14: now we visually divide the knitting into 2 parts: upper and lower. Cut 1 loop along the edge of the lower part, and knit in the upper part, adding after 1 loop.

15-16 row: these rows are tied in a circle.
Row 17: simply knit the bottom part, and add 1 loop at the top.
Row 18: knit in the round.
Row 19: knit in a circle, and in the upper part knit 10 loops with an increase after 1 loop.
Row 20: Cut in circle in every 3rd stitch.
Row 21: now top part Just knit, and at the bottom make a reduction in every 3 loops.
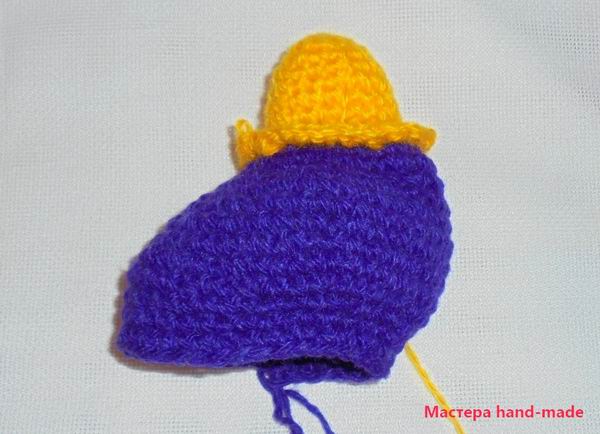
22-23 row: these rows are tied in a circle.
Rows 24-25: cut along the edges at the top and bottom. Fill with padding polyester.
Row 26: This row is knitted in a circle.
Row 27: connect the two halves and crochet or sew with thread and needle.

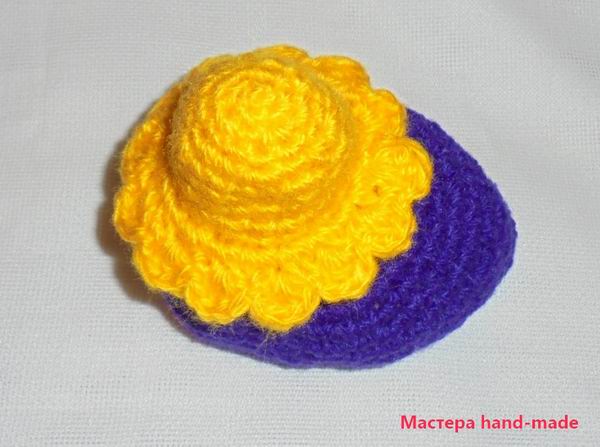
The cockerel's head ends with a pattern of yellow yarn. Therefore, when the body has been knitted, it is necessary to knit the pattern. To do this, you need to make 3 double crochets in one loop, 1 loop is knitted between them and so on in a circle.
Knitting a cockerel's tail
The tail is knitted from yellow and purple yarn. Cast on 3 loops and join into a circle.
1st row: in each loop of the row, add 1 loop, thus doubling the number of loops.
2nd row: add loops in every second loop of the row, that is, after 1 loop.
Row 3: Double crochet in the round.

Row 4: Simply knit in the round.
Row 5: add loops in every second loop of the row, that is, after 1 loop.
6th row: knit with double crochets.
Row 7: tie purple yarn around the edge of the tail.

We knit wings for a cockerel
The wing is knitted in this way: cast on a chain of 5 loops, knit these five loops with a stripe 4 times. Then knit only 4 loops, then 3 loops, 2 loops and 1 loop. Tie the resulting part around the edge. Knit the second wing in the same way.

Knitting paws
The most interesting and a little difficult thing is knitting paws. For one paw you will need three pieces, knitted in this way: cast on 3 loops, knit with an increase in each loop, then simply knit 2 rows in a circle. For the second leg, also knit 3 parts.
Connect the three parts and knit in the round. Cut 1 loop along the edge and knit 4 rows like this. Fill with padding polyester. Knit the second leg in the same way.

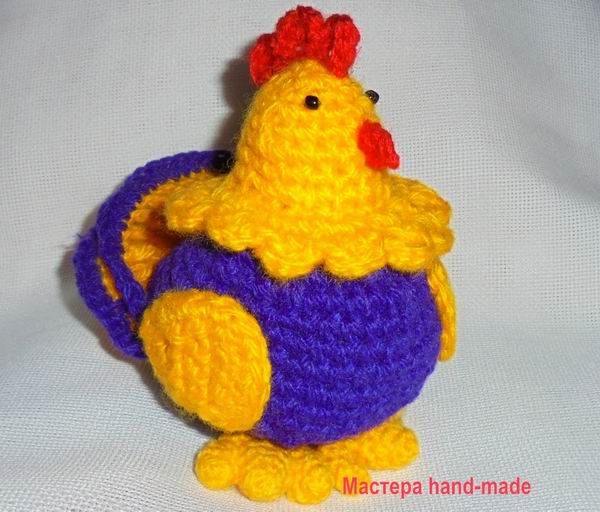
Glue the wings and legs to the body. Fold the tail in half and glue it to the body. The comb is knitted like this: cast on a chain of 7 loops. Knit 3 double crochets into one loop, simply knit 1 loop, 3 double crochets, 1 loop, 3 double crochets, 1 loop. The beak is knitted very simply. Cast on 2 loops, knit in reverse side and knit 1 loop. Glue the beak and comb to the cockerel's head. Glue black beads.
How to crochet a cockerel
The cockerel is ready for the New Year 2017! This knitted cockerel can be given to children or friends for New Year.

How to crochet a cockerel
This is how you can tie a cockerel.
By the way! Friends, if you like to knit toys as much as I do, check out my other master classes on crocheting toys:
- .
To the post “How to crochet a cockerel, master class with photos” 4 comments


