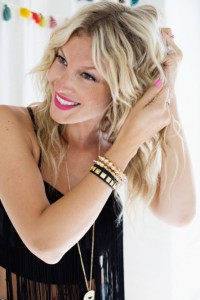
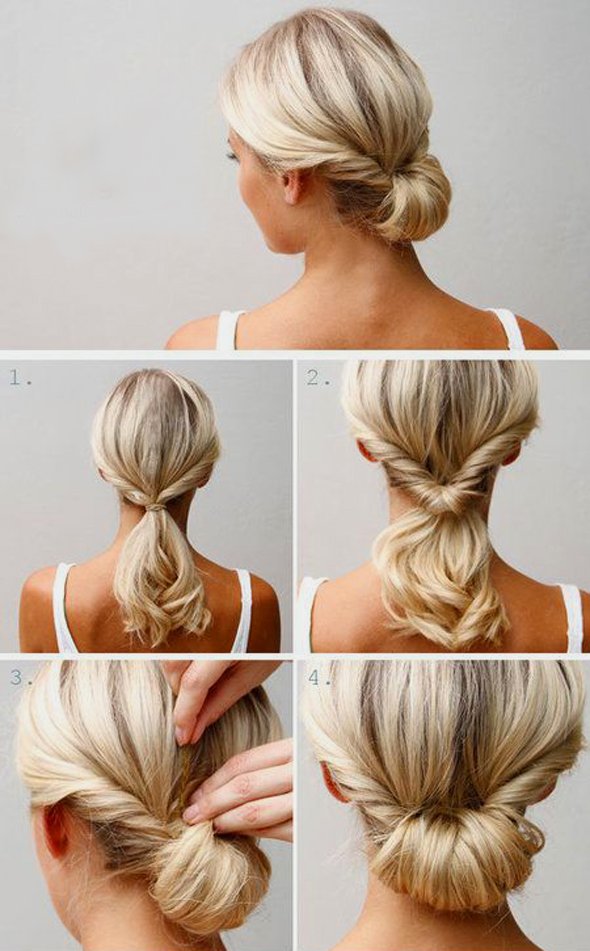
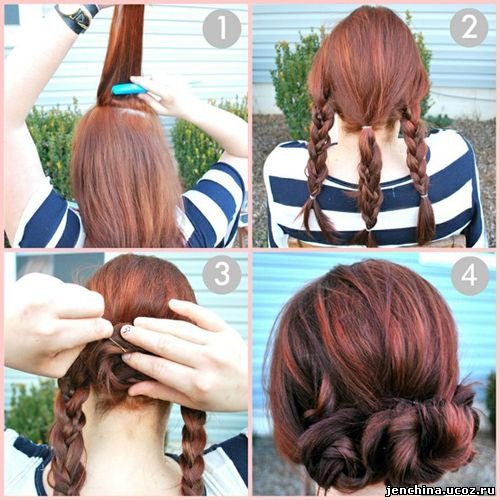
Hairstyles for medium hair instructions. Hairstyle without using a comb. Wet hair effect.
Long hair is always beautiful and feminine, but constantly walking around with loose hair gets boring, and in some cases it’s inconvenient or out of place (especially if you have Small child, who tries to grab his hair). In addition, in the hot summer you just want to braid or lift your hair, and at some holiday show off an original and stylish look.
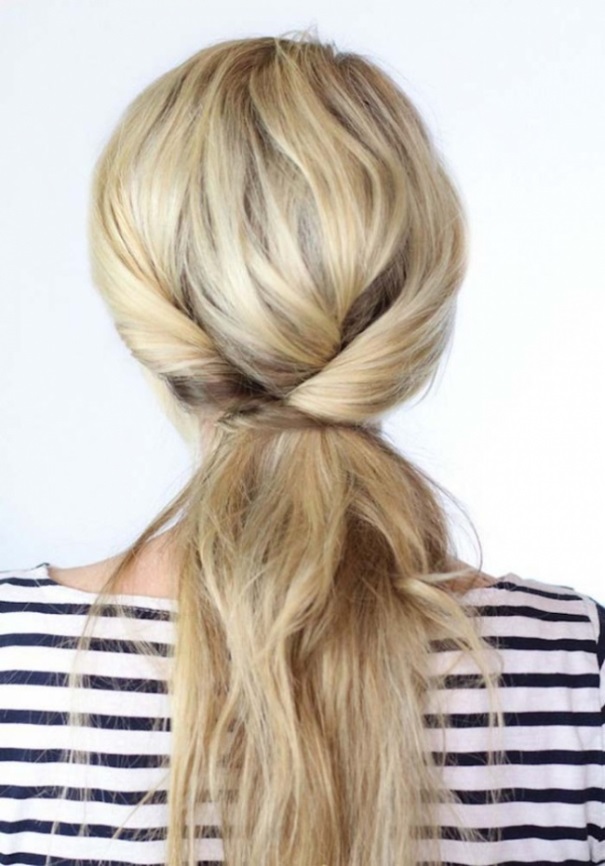
I would like to present to your attention photo instructions on how to lay your own long curls. The most popular hairstyles for long hair are various braids, ponytails and buns. These are actually what we will be talking about.
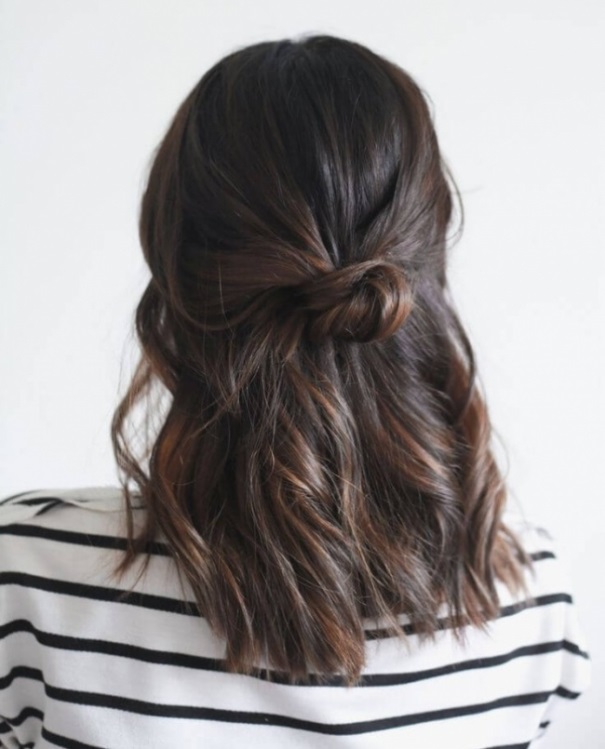
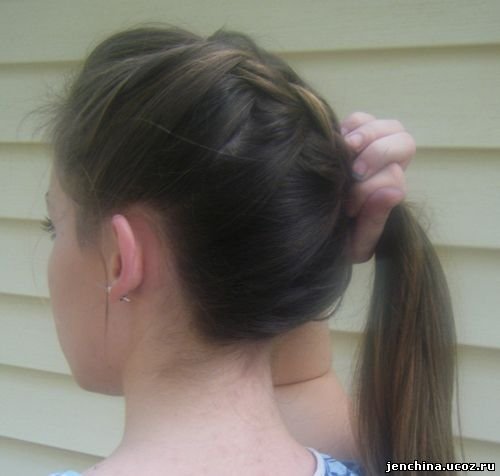
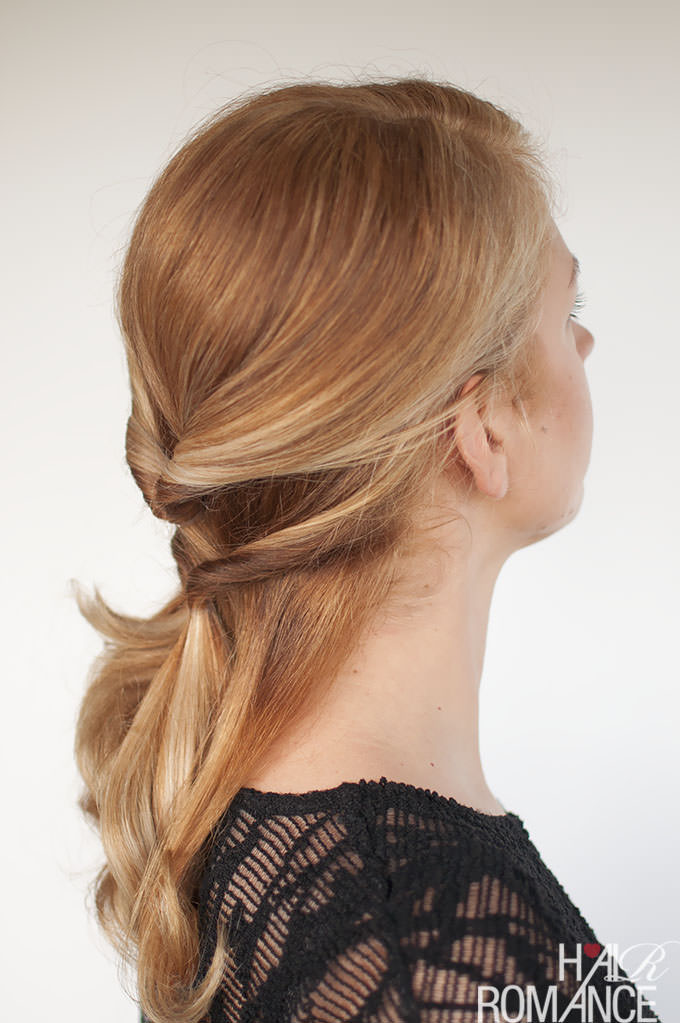
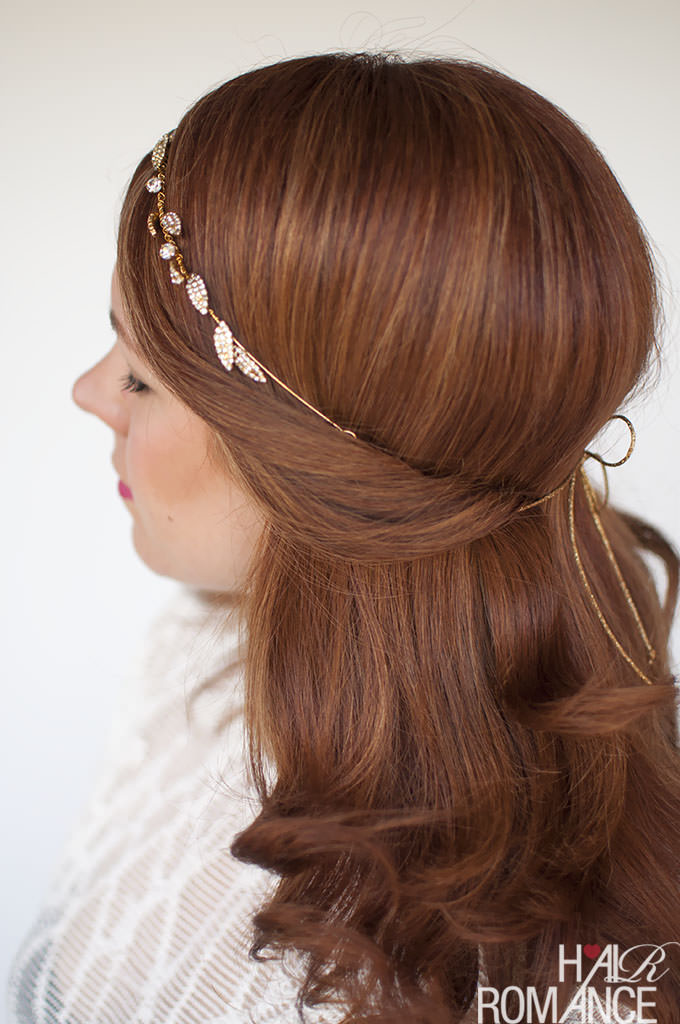
Romantic image straight from France
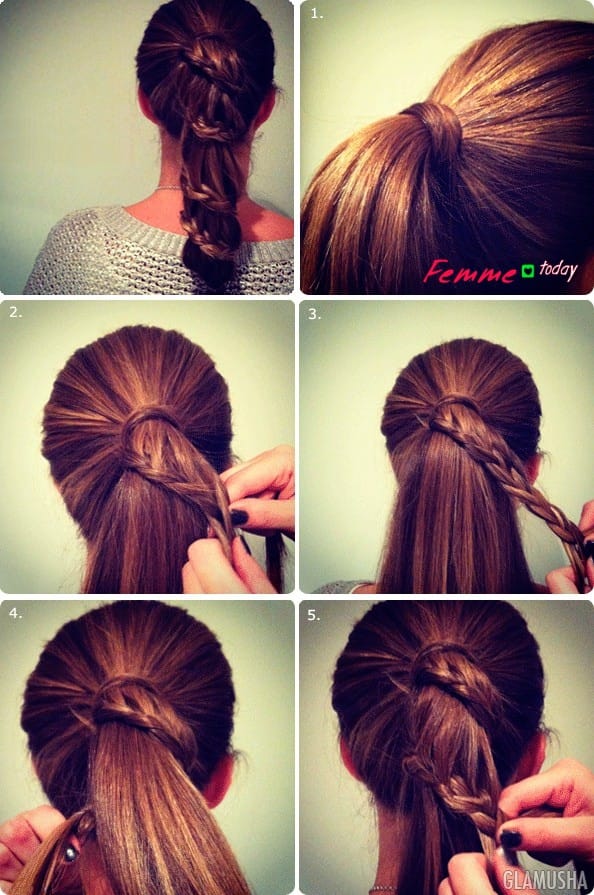
This is a very comfortable hairstyle that is suitable for both a romantic walk and a celebration. To perform it, you will need a headband with an elastic band and the ability to braid a braid.
Put on the headband, separate a strand of hair from one of the sides and start braiding, covering the headband with it; it won’t take long to braid, because starting from the middle of the strand, the strands will need to be thrown around the rim. On the other side, also cross over all the hair, and where the strands meet, make a ponytail. Then roll it up like a roll and secure with pins. A neat and comfortable hairstyle is ready!
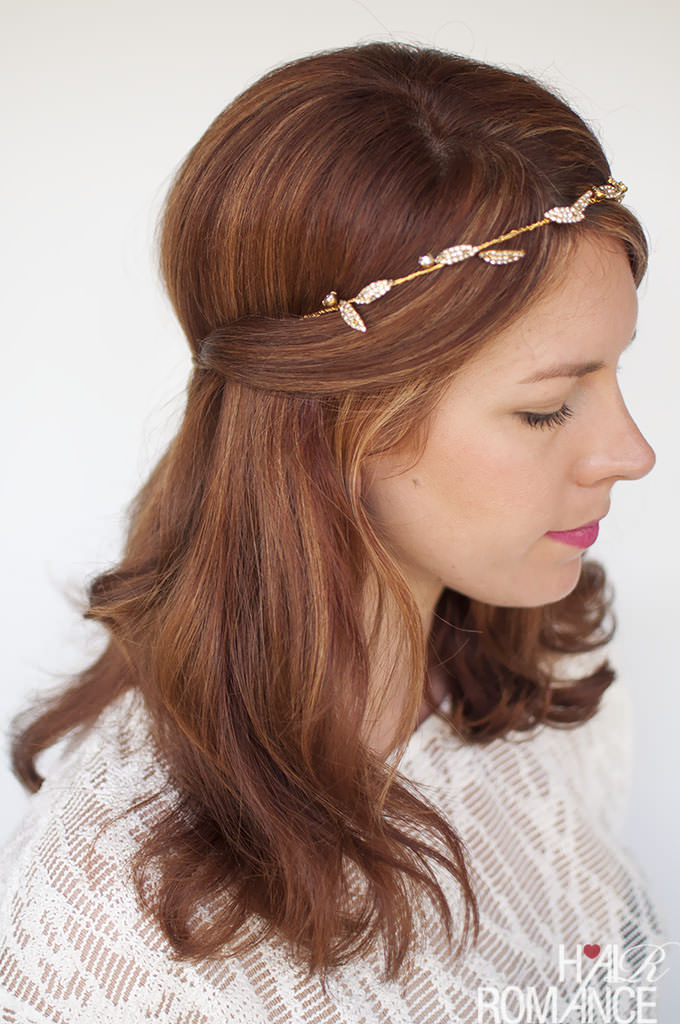
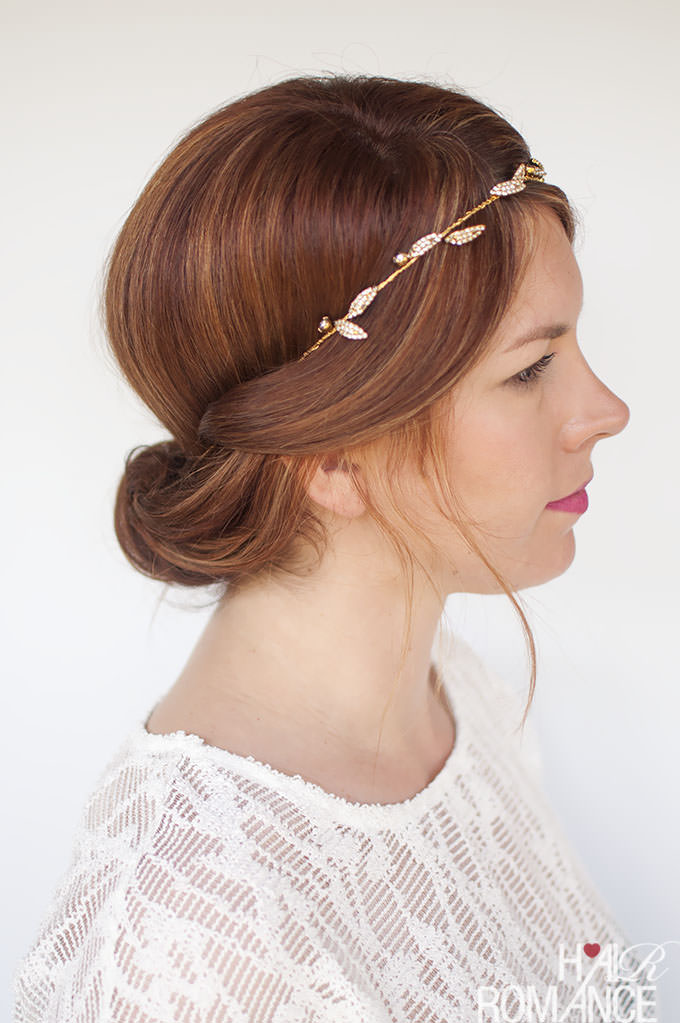
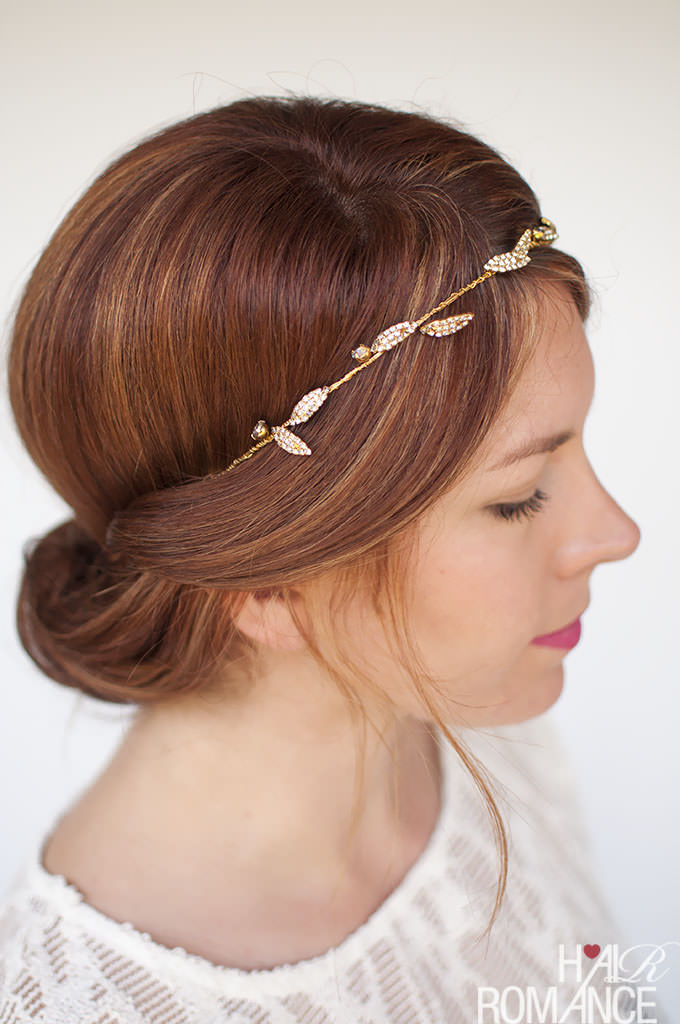
Alternative with your hair down and without braiding:
Hippie braids
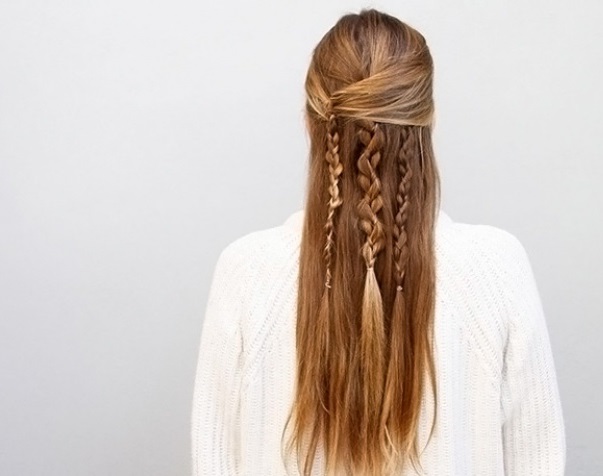
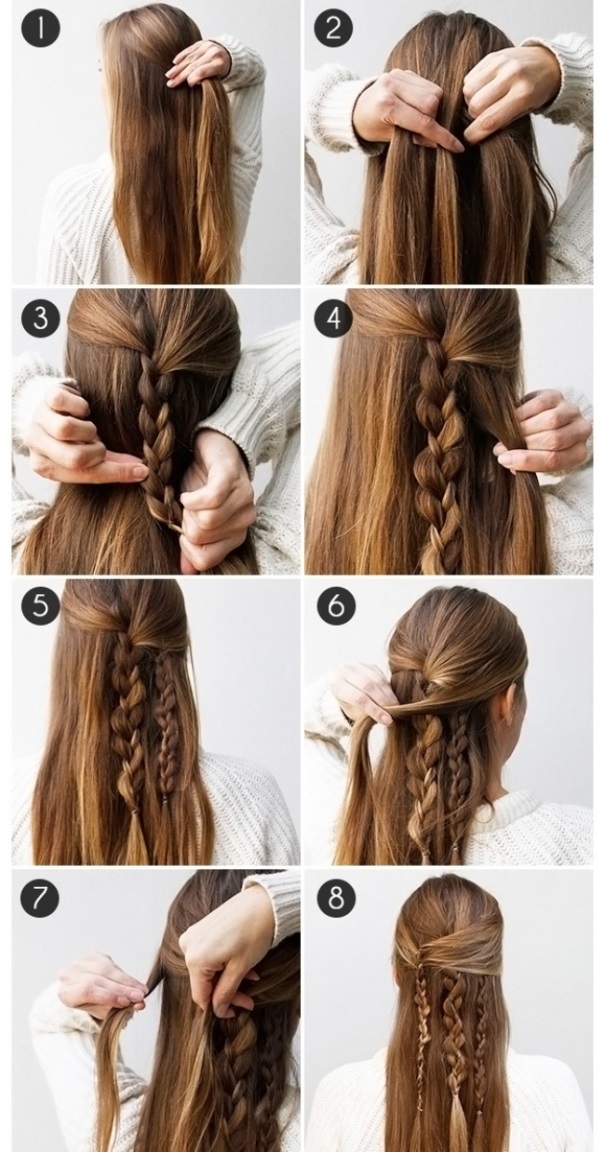
Who said that braids must be symmetrical; if you braid them chaotically, you will end up with a hippie style! Here's how to do it!
Game of thrones hairstyle
Braid one neat braid somewhere in the middle on both sides, secure them together at the back of the head. Twist the front strands, the rest of the hair should be simply loose. And you will have hair like Cersei and Margaery.
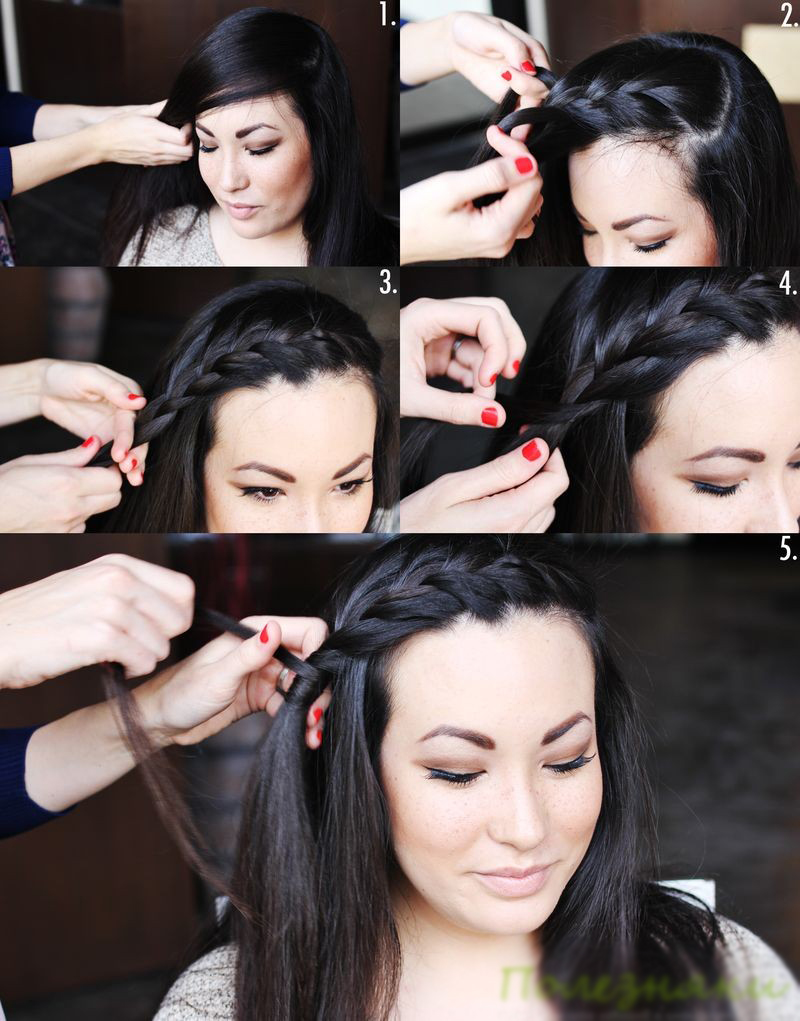
Braids around the head
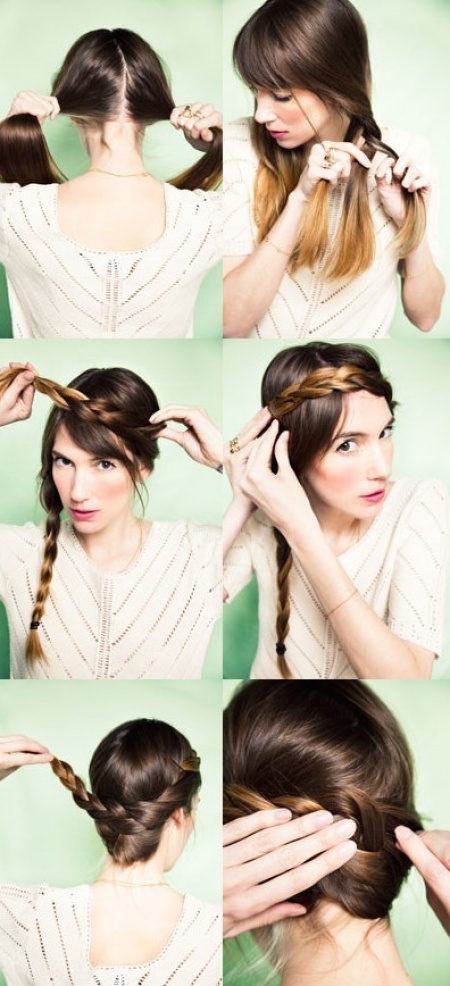
Here's how you can play on this topic a little differently. Looks like a completely new hairstyle.
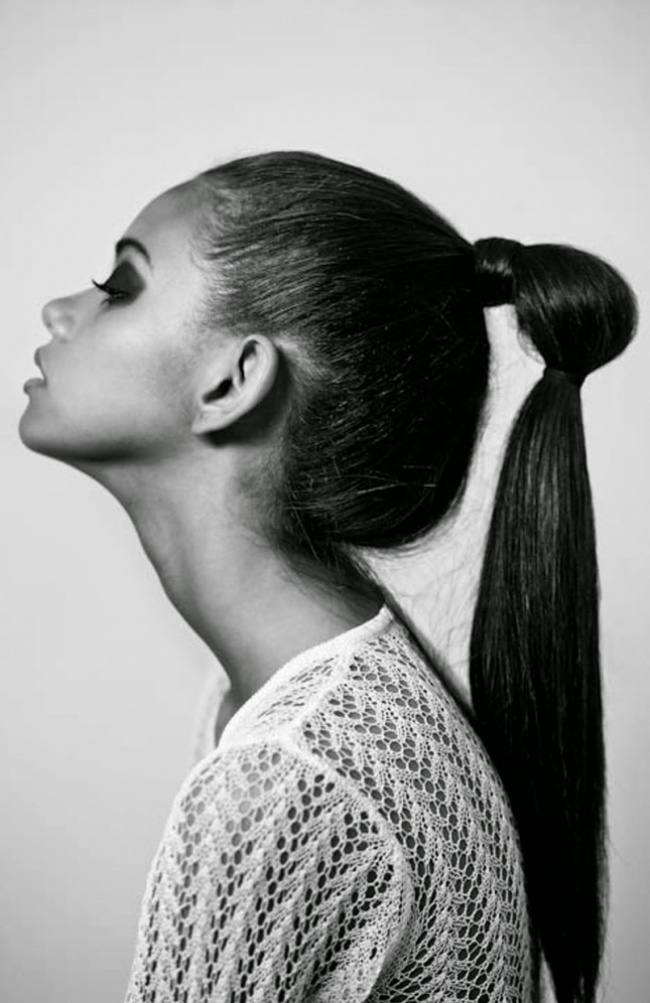
Tails
Twisted Tail
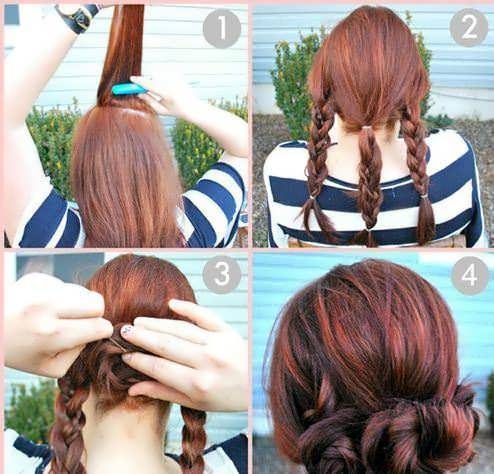
Divide the curls into three strands, each of which must be twisted and secured in one place with hairpins.
Everything ingenious is simple
If you have well-groomed long hair, and you really like ponytails, how do you like this original and extremely simple version of a ponytail?
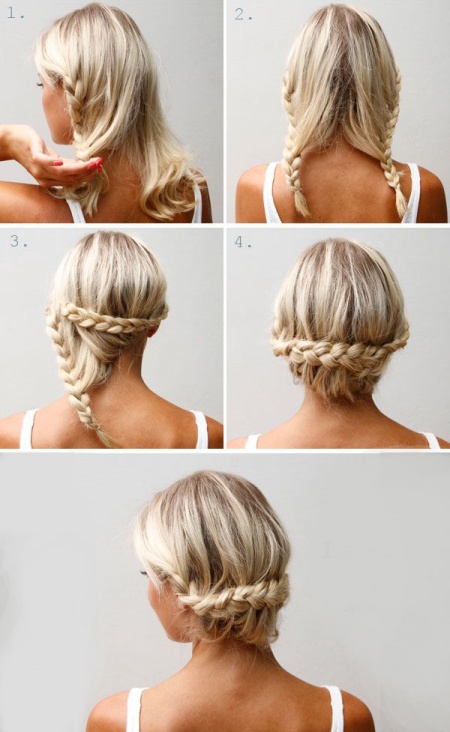
Braided ponytail
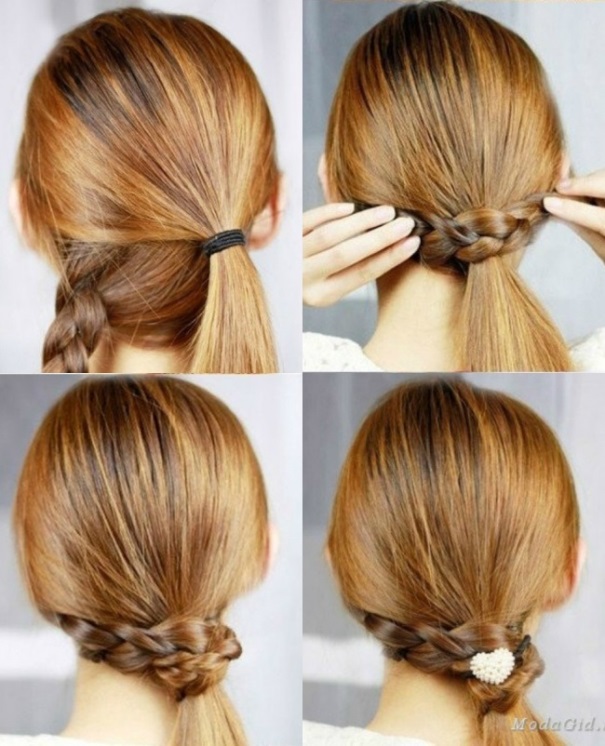
Don't know whether to put your hair in a ponytail or braid it? But what if you combine these two options, you get a very stylish and pretty result.
Divide your hair slightly diagonally into two parts - an upper and lower bun. Make a ponytail from the top one, and a pigtail from the bottom one. Wrap the elastic band of the ponytail in a braid and pin it with an elegant hairpin.
Bow ponytail
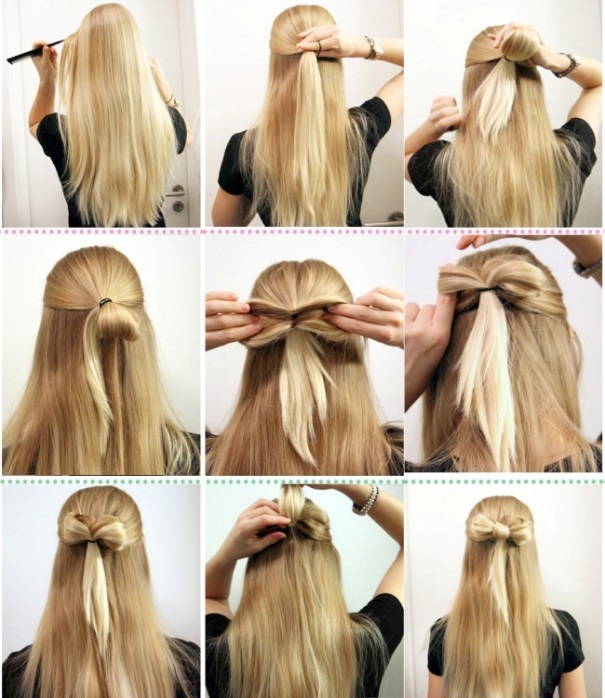
The basis of the hairstyle can be a bow made from hair. Simple and very original.
Ponytail with a rose
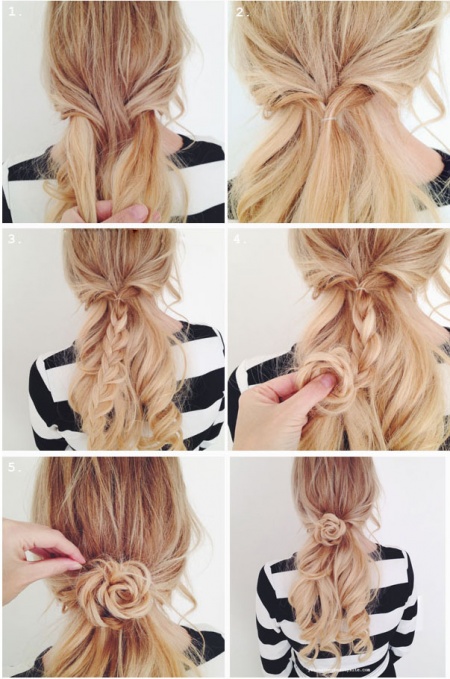
You can weave not only a bow from your hair, but also a rose. Looks very romantic.
A hippie ponytail or a little casual look
Lush tail
Even if you don't have much Thick hair, the ponytail can be given additional volume using a crab clip and backcomb hidden between the strands.
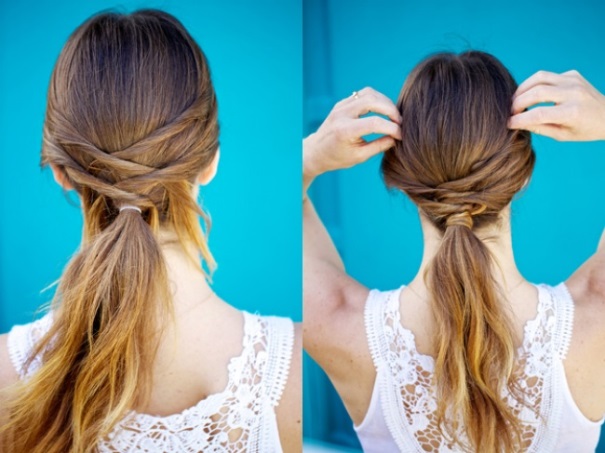
Side knot ponytail
Bunches
Bundle of twisted strands
![]()
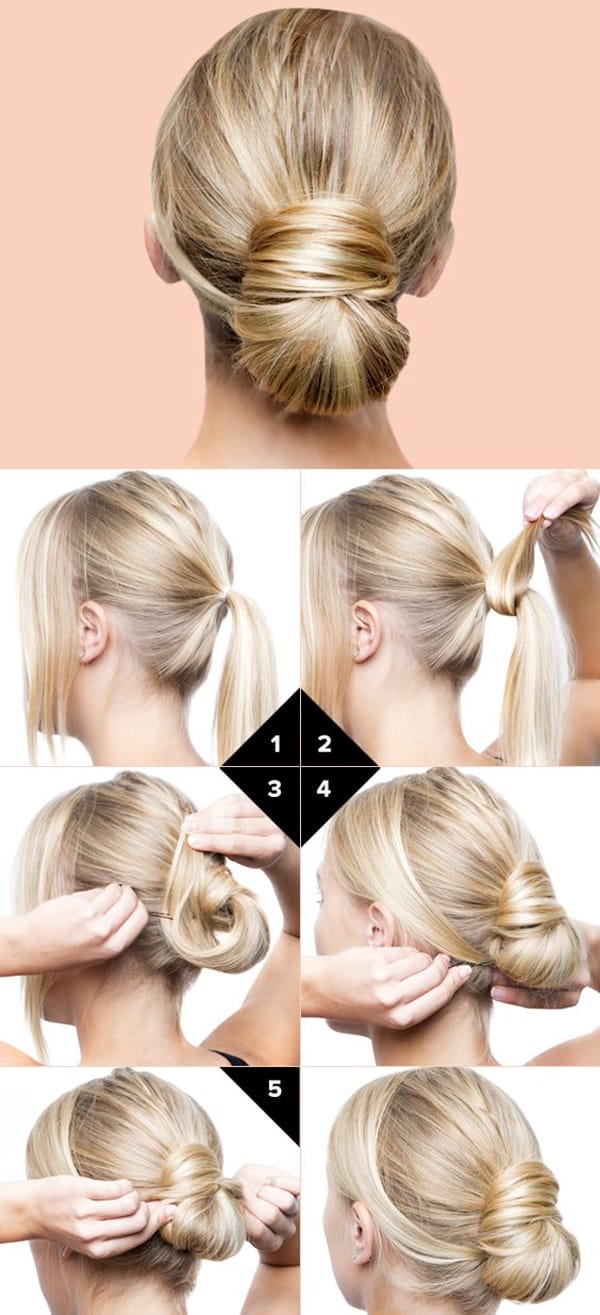
Make a high ponytail, divide your hair into two strands and twist them and twist them together, you will get something like a braid, but from two strands. Attach an elastic band to the end and wrap your hair in a bun, helping yourself with hairpins.
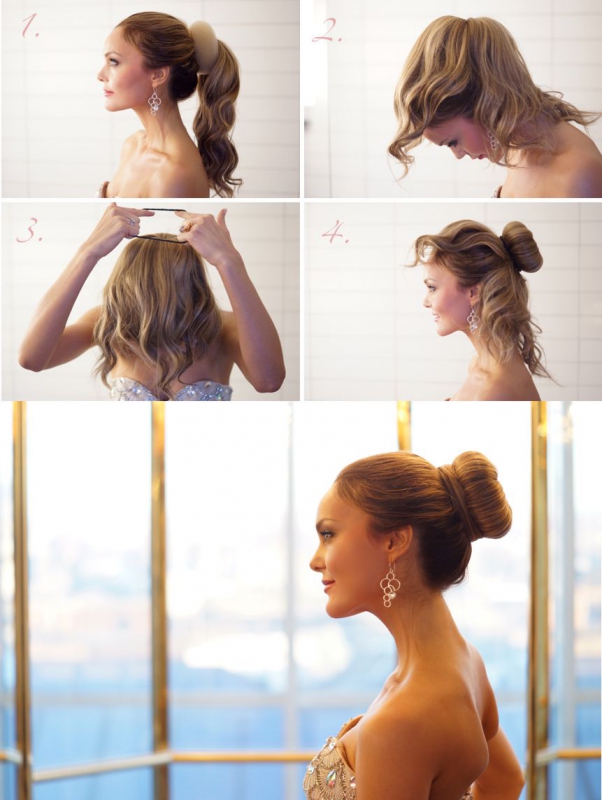
High bun
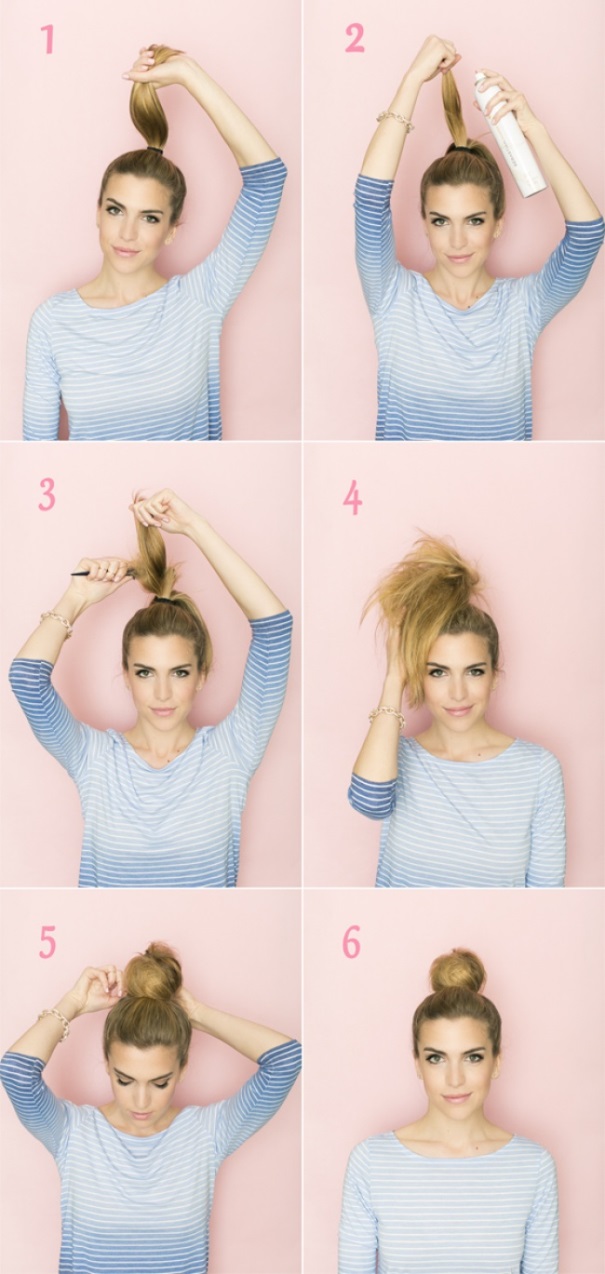
Make a ponytail at the very top of your head, then backcomb your hair into a bun.
And this is what it looks like variation complemented by a braid.
Mini bun
With this hairstyle you will have more flowing hair, but you will remove the side strands so that they do not get into your eyes and the rest of your hair gets tangled in windy weather.
High half bun
Who said you have to put all your hair in a bun? And if you leave half of your hair down, you get this result.
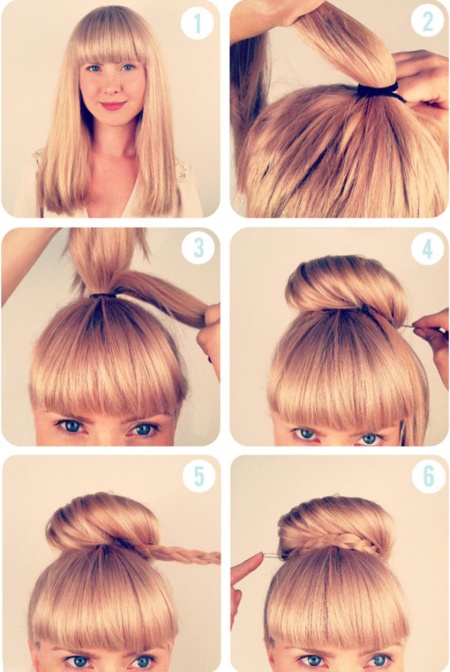
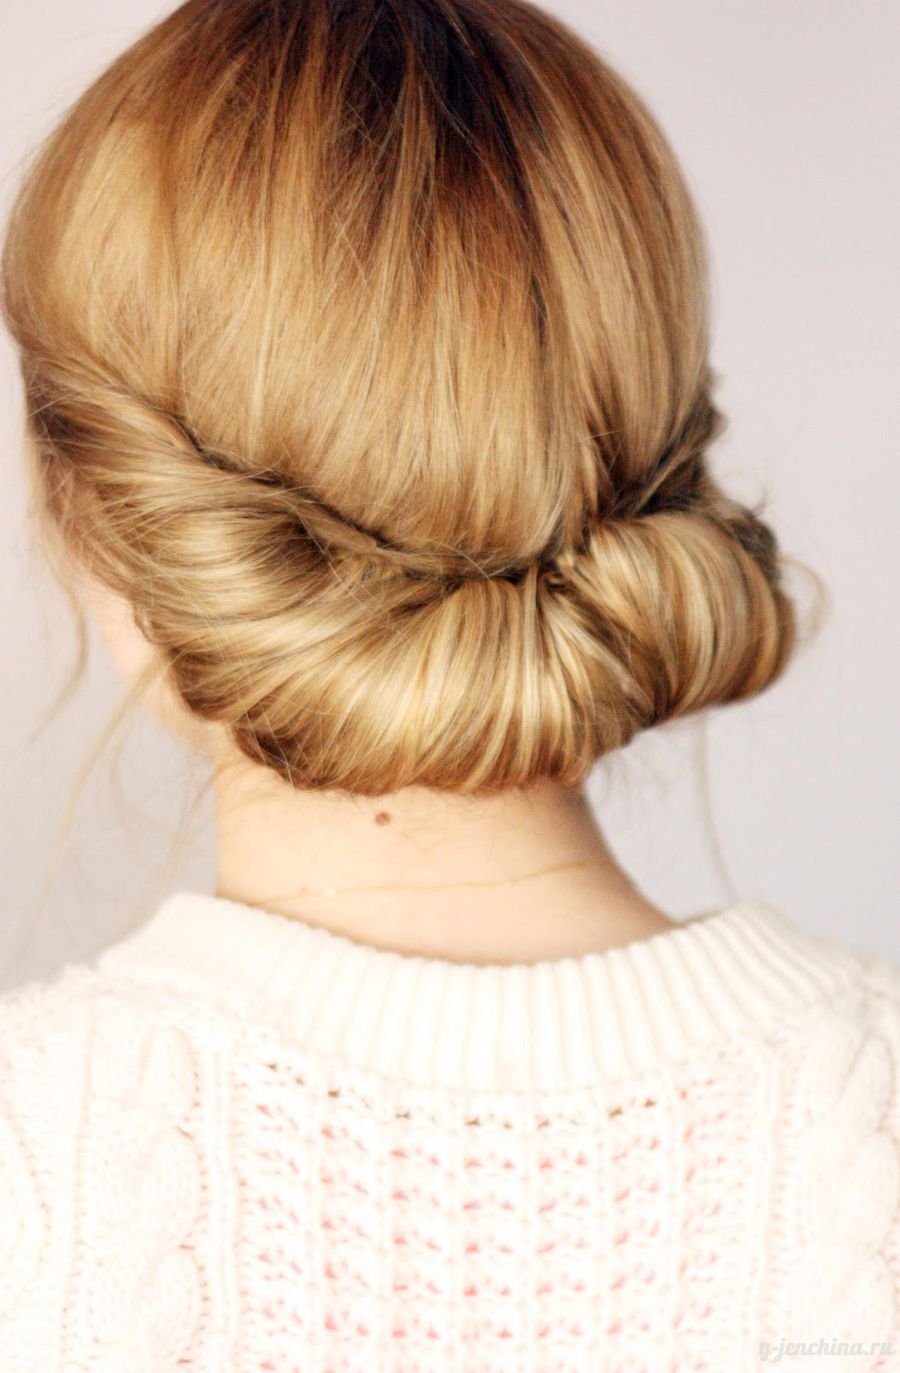
Bun with a braid
The classic bun looks a little old-fashioned, but you can freshen it up if you braid one side, which smoothly turns into a bun. This is how you can update the well-known simple hairstyle.
Bun with an elastic band

French style
From braids

Alternative
Other
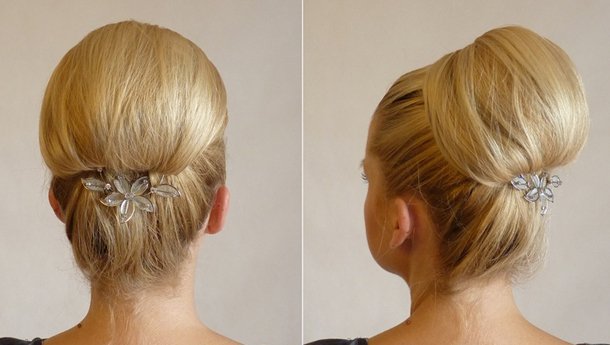
Hair collected at the back of the head

![]()
Divide your hair into two parts along the parting. Begin to carefully twist your hair into a plait, securing it to your head with hairpins, and secure an invisible elastic band at the end. Do this on both sides, secure the ends with hairpins or bobby pins.
Retro style
Loose hair can be given a certain charm with the help of a playful curl, which was done in the 40s and 50s. Divide your hair diagonally into two parts, make a curl around the comb on one side (see photo), secure the hair with hairpins and hairspray. You can curl the remaining hair a little.
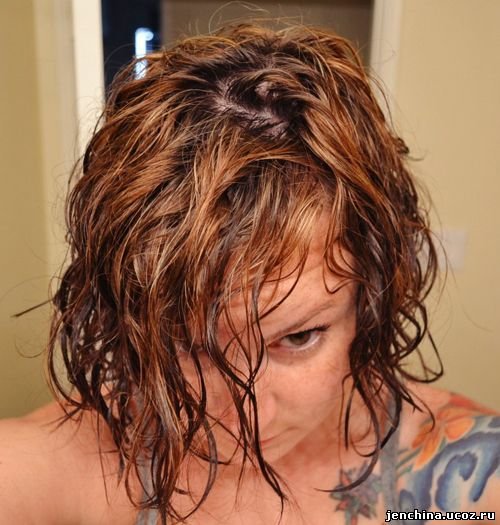
Effect wet hair
Apply mousse to damp, clean hair and squeeze it from below with your hands. No need to comb.
Medium hair length has always been popular among fashionistas. After all, this optimal length in order to look feminine and easily create a variety of hairstyles for yourself. And it’s much easier to care for medium hair than long hair, which requires special products, a lot of accessories, and a lot of time for all this care.
Today we will give you detailed photo instructions on hairstyles for medium hair. You can find a variety of them, fortunately now in free access There are video tutorials and photographs of possible options. In this article you will find step-by-step recommendations in pictures and photos. So, let's go!
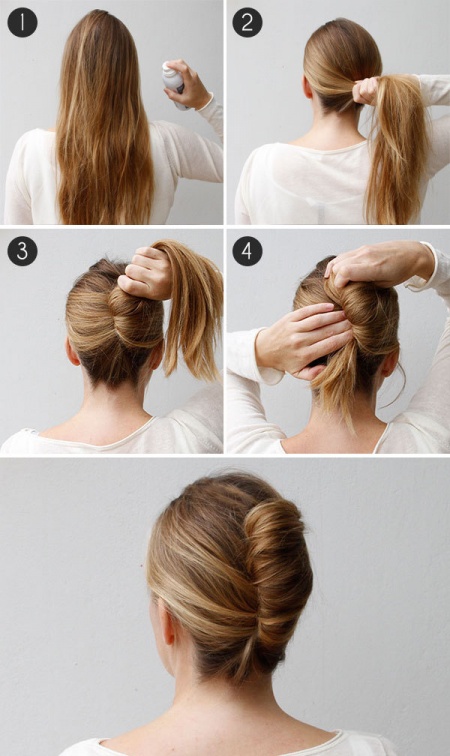
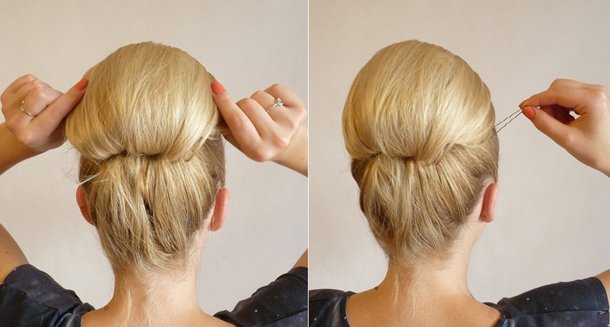
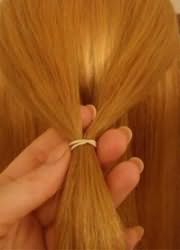
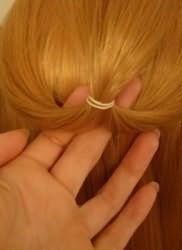
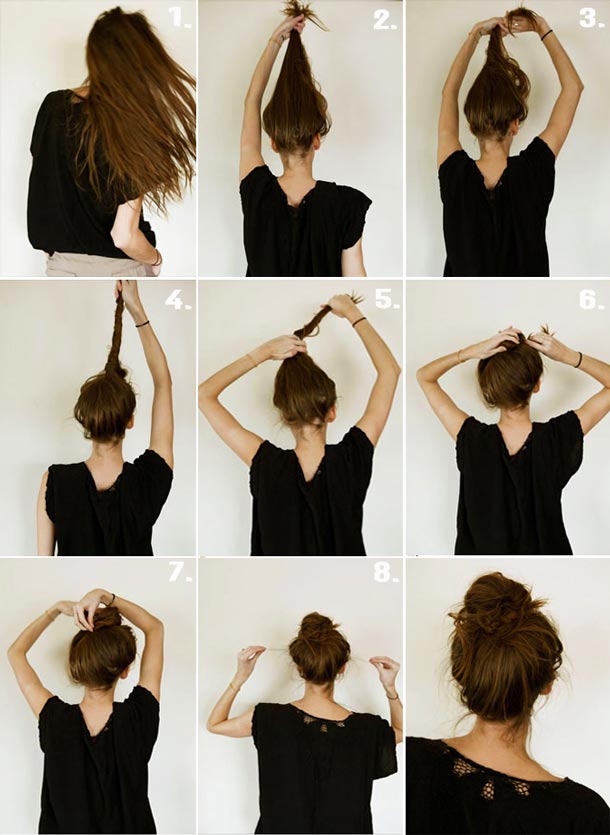
A simple and quick option - a fluffy bun
How to make it tall and very beautiful hairstyle for medium hair? Follow the instructions below.
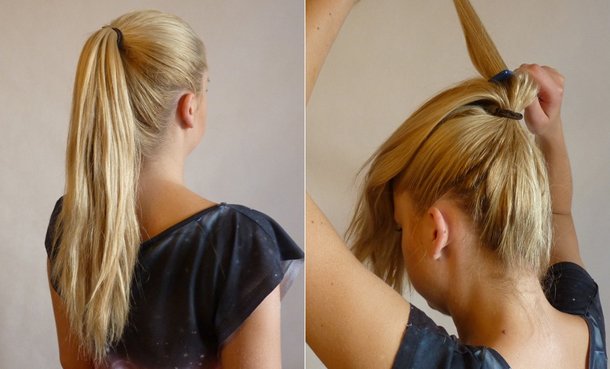
Step 1. You need to gather the hair at the back of your head into a ponytail. The higher the ponytail is, the higher the hairstyle will be. You can adjust the height yourself.
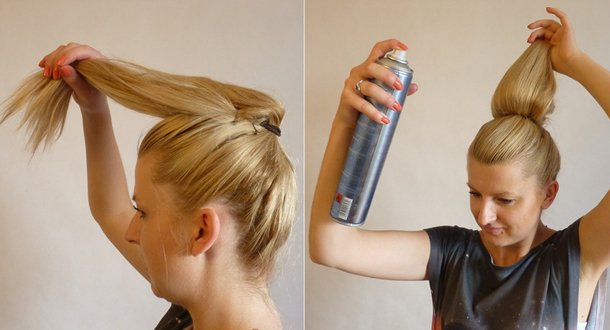
Step 2 . We secure the resulting ponytail with hairpins to the rest of the hair.
Step 3. We make a kind of roller from the hair of the tail, attach it with various hairpins or invisible hairpins.
Step 4. As a result, we will get a bun. It is necessary to fluff it in different directions.
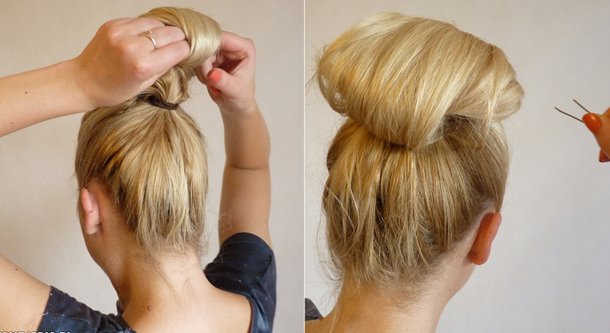
Step 5. Secure the edges of the resulting bun of hair with hairpins.
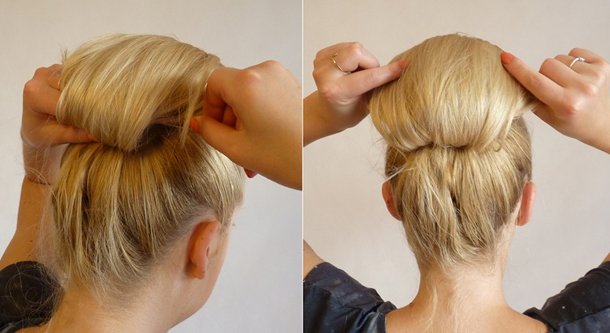
Step 6. Decorate the final beautiful hairstyle with all kinds of combs, hairpins, and flowers.
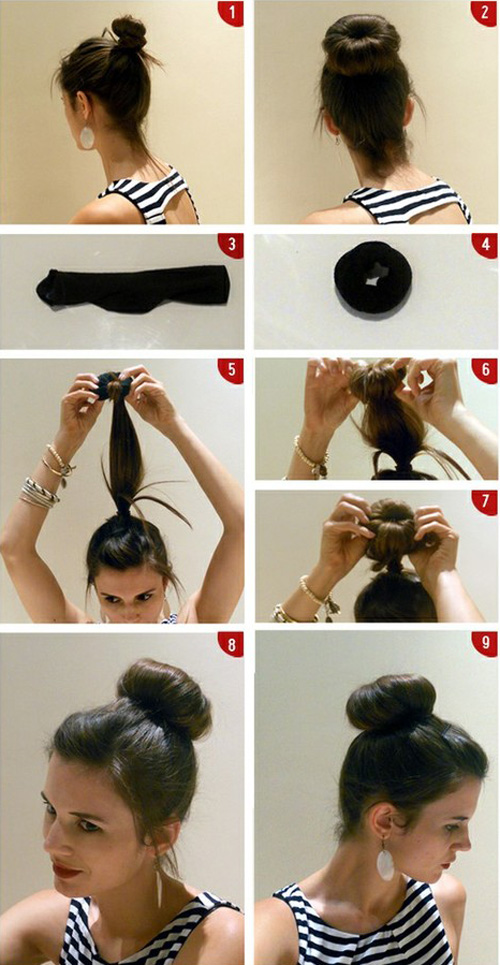
To go out
The next hairstyle will be excellent option for a visit to a restaurant or even a theater. In order to make such a beautiful hairstyle, you will need available items: a sock made of soft fabric or any other soft material, hairdressing scissors, hair ties, and a lot of hairpins or bobby pins.
![]()
Five-minute styling
You can also make easy hairstyles with your own hands, also without much effort, for different occasions. Including for a festive event.
The simplest hairstyles and instructions for them
Let's look at another feminine and unusual hairstyle. And it will help us do it step by step photo instructions. It will take no more than 20 minutes to do it.
Step 1. Make sure you have prepared everything you need: curling iron, comb and hair brush, hairpins, bobby pins for fixation. You can also use varnish.
Step 2. Don't most Separate the hair from the top of the head and backcomb it. Carefully place this large part back. Do as in picture 1.

Step 3. Look carefully at the pictures with numbers and try to do the same. You will succeed.
Step 4. Curl small sections of hair using a curling iron as shown in picture 2. Then connect them directly under the backcombed part of the hair.
Step 5. Pin them with a hairpin, as shown in the picture number 5.
The finished hairstyle and the result of the work can be seen in picture 6 and in the photo below.
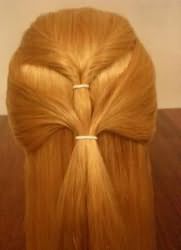
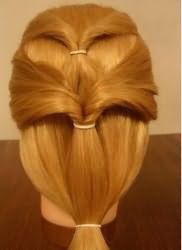
An excellent option for medium hair would be a hairstyle with a braid tied into a bun.
Below there are detailed step-by-step photo instructions.
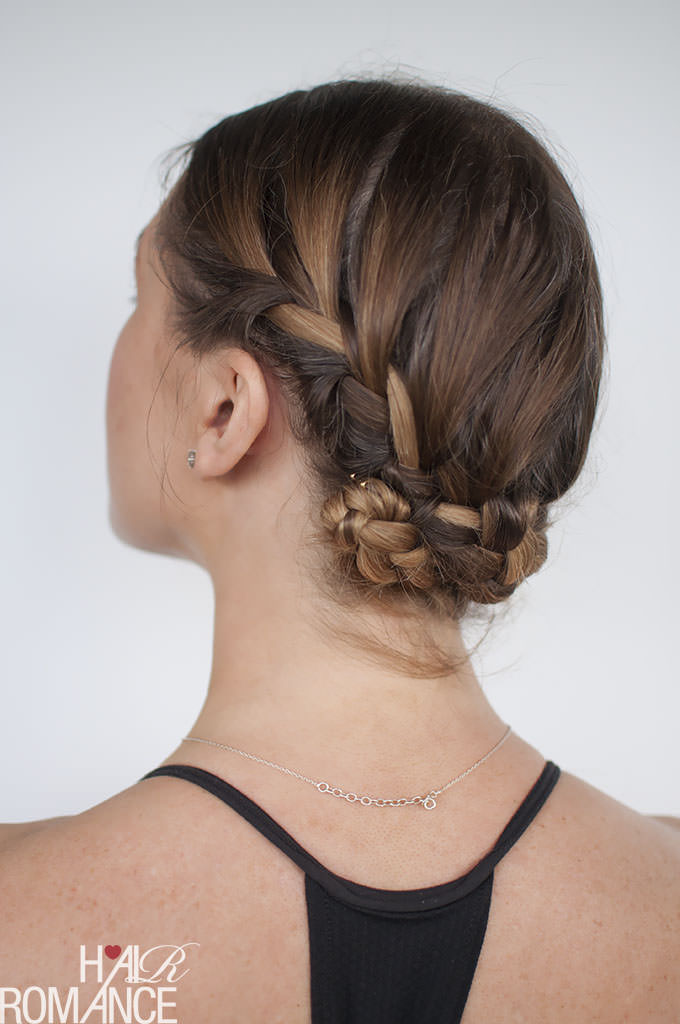
Step 1. Select part of the hair near the temporal lobe and braid it like a spikelet.
Step 2. After the braid is ready, twist the hair into an elastic strand and arrange it in the form of a bun.

Step 3. Pin the bun to the main hair. Use all kinds of hairpins, hair clips, and bobby pins.
There is another cool hairstyle for shoulder length hair. Before making it, wash and dry your hair, but not until it is completely dry.
Then you need to apply a light mousse to your hair. Total number in a full palm. Next, you should distribute the mousse with a comb over all your hair.
Then you should blow dry your hair until completely dry. This will make a great diffuser.

3 elastic bands, 2 hairpins - the styling is ready!
Can be done on medium hair light beautiful hairstyle using just three elastic bands and a couple of bobby pins.
The hair needs to be divided into equal 3 parts and braided from them. Then twist the resulting braids into buns, and secure these bundles with bobby pins.
An excellent option for every day for walks in the park, relaxation and picnic simple hairstyle for medium length hair. Let's look at the step-by-step photo instructions.
Step 1. Divide the hair into two parts - you can part it, you can do it without. Apply styling liquid to hair.
Step 2. Braid two braids. We don't make them too tight.
Step 3. Roll the braids into small ropes and heat them with a hair straightening iron. It is advisable to do this along the entire length of the hair.
Step 4. Wait for the hair to cool. Unravel the braids and spray them with hairspray. The hairstyle is ready.
You can see more hairstyle options for this hair length in the video tutorials below.
They say that hair is a luxury and the longer the better. But in life everything is a little different, because it is the average length that is considered the most optimal and common. Usually this is shoulder length hair and three fingers below the shoulders. They are easier to care for, style and maintain in proper form. And how many different hairstyles you can do! This is what this article is dedicated to, where we have collected simple, but certainly beautiful hairstyles at home for medium hair with step by step instructions and photo.
Medium hair length is always universal. They look well-groomed, stylish and elegant. Determining the length of your hair is easy and simple - hair that reaches your shoulders and goes down three fingers is average length. If more, then the hair is long. This length suits any hairstyle. Let's look at hairstyles for medium hair at home step by step for every day , photos of which are on the Internet.
Let's start with quick hairstyles for medium hair at home with photos that only take a few minutes (ponytails).
The simplest and fastest hairstyles are hairstyles with ponytails, so let’s look at them in more detail:
Interesting ponytail for medium hair step by step
1
 2
2
 3
3
 4
4
 5
5
 6
6
All we need is some regular rubber bands. We divide our hair into several zones, make a ponytail from each, and turn them inward. Then, at the base of the elastic, we divide the hair into two parts and insert a ponytail into the resulting hole, through the top.
Ponytail and braid at home
First you need to comb your hair and divide it into two zones - top and bottom. Upper part we tie it in a ponytail on the right, and braid the bottom one in a pigtail on the left, after which we wrap the bottom one around the top one, securing the end with a bobby pin. Can be decorated with a decorative hairpin.
Unusual side ponytail with photo
We comb the curls, then divide them into two parts, in a ratio of 20% to 80%, and throw the larger one onto the right shoulder. We divide the smaller strand into two more equal parts, make a tourniquet from them, gradually adding new ones from the larger part. We weave until the tourniquet reaches the other shoulder. We secure everything with an elastic band near the ear.
We divide the hair into three parts, tying the middle one into a ponytail. We divide the remaining strands into two more zones and weave them into a loose fishtail over the middle one, 6-8 times will be enough. Then we wrap the strands around the tail.
Beautiful and simple hairstyles for medium hair at home (bun):
Perhaps the simplest hairstyle is a bun. But even on this theme there are many variations and interesting approaches.
Comb your hair and then divide it into three equal parts. We tie an elastic band on the middle part and braid it, securing it with elastic bands. We roll each of the braids into a bun and secure with hairpins.
You need to comb your hair and tie it with a regular elastic band. We slightly pull back the elastic and use our finger to make a hole in the hair through which we thread our ponytail. Then we braid a hairstyle like a fishtail and tie the end. We add volume to the braid by pulling out the strands a little, lifting it up, hiding the ponytail and securing the result with hairpins.
We tie a low ponytail, leaving a strand near the face on one side. Separate one strand from the ponytail and wrap it around it, securing it with a bobby pin. We wrap the remaining curl around the first, making a bun. We fix the front strand at the bottom of the bun.
We make a tail from below, pull the elastic a little, and then pull it through the resulting hole. Now we do a good backcombing, take the hair and wrap it to the top, securing the result.

To do this, we need to make light waves on our hair with a curling iron. We make a light backcomb on top and tie a ponytail. We wrap it downwards so that we get a bun, and turn the strand so that it hides the elastic band, after which we fix it with hairpins or bobby pins.
Everyday hairstyles for medium hair at home (braids):
First of all, we need some very thin elastic bands. We separate two small strands from the hair on the sides, wrap them like strands to the middle, tie them with an elastic band and thread the resulting ponytail through the top hole. We take two more strands and tie them over this tail and also thread it through. We do the same machinations with the next two curls. We begin to weave a fishtail out of all the hair, lightly tousle it and tie it.
We comb our hair thoroughly and do a light backcombing. We braid the dragon from the roots, then lightly protrude the strands to the very bottom and fix the effect with hairspray.
Divide the hair into 5 parts. We begin to weave our braid on the right side. We put 5 strands on 4, 3 on 5, then 1 on 2, 1 on 5. And so we continue until the end, tie with an elastic band.
Hairstyle of two braids at home step by step
We divide the hair into two equal parts, and braid each of them. We lay them in opposite directions and secure them.
We begin to weave a free spikelet from right to left, ending on the right side. Then we fasten the hair into a beautiful braid on top, and it lines up in a beautiful shell.
To keep your hair out of your face, you can create a very simple, but at the same time cute hairstyle. For her, first of all, we separate the strands from the frontal part and weave braids from them on both sides. We fix them parallel to each other in the middle.
You can also twist the hair near the forehead into bundles on the sides, tie it in the middle and make a fishtail out of it.
There is another interesting variation of the tail. We braid a dragon (not tight) until the middle of the hair, after which we make a ponytail. It will also look beautiful with curls or light backcombing.
As a hairstyle for some celebration, you can curl your hair and, on one side, begin to wrap the curls from bottom to top (like a tourniquet) to the next shoulder, secure with bobby pins.
Hairstyles with corrugation for medium hair at home
An interesting combination with corrugation is the waterfall hairstyle. To do this, of course, you first need to make yourself a small corrugation in the area in the middle of your hair. Then we begin to weave a braid with the addition of strands, but we take them only from above, and we seem to replace the strands from below with the next ones, lowering one down and taking the nearest one, adding it to the braid.
You can also make an interesting ponytail. To do this, we already make corrugation along the entire length. We tie a ponytail, divide it from top to bottom into 3 equal zones, tying thin elastic bands on each of them, but do not tighten the hair too much.
And in general, here you can fantasize as you like! Braiding various braids, buns, hairstyles or slightly tidying up the hair with bobby pins.
So, everyday hairstyles for medium hair at home have many variations and do not take much time.
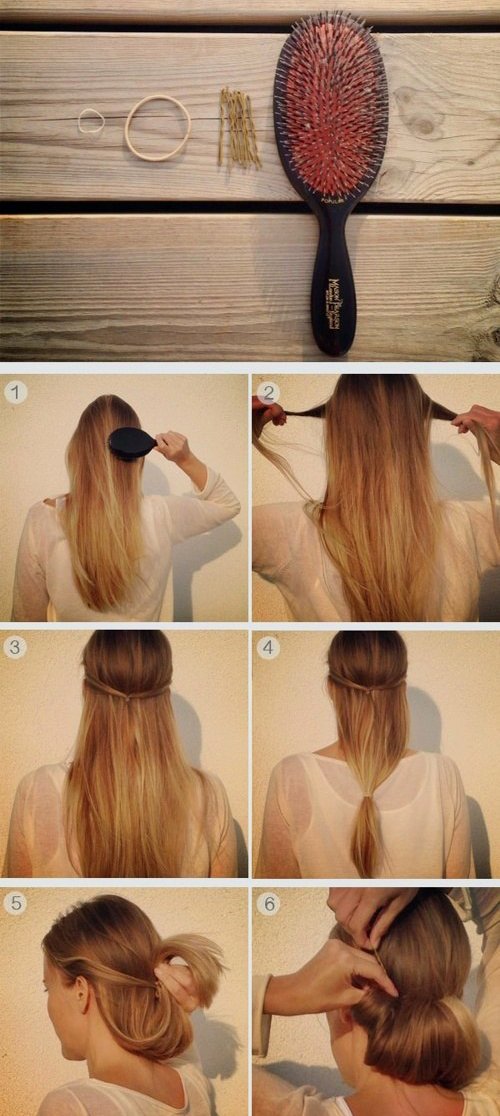
Owners of long and medium hair every day are faced with the question of how to quickly and without special professional skills style their hair so that the hairstyle looks stylish and fashionable. Do not forget that long hair is an ideal opportunity to create both casual styling and complex hairstyles for special occasions.
There are several secrets, or rather several classic ones, that do not go out of fashion, look original, and are created very simply. These include almost all hairstyles that are based on braiding (braids), ponytails and buns, backcombing, ringlets and curls.
DIY braids
A braid is not only a hairstyle in itself that does not go out of fashion, but also an element for more complex and more interesting designs.
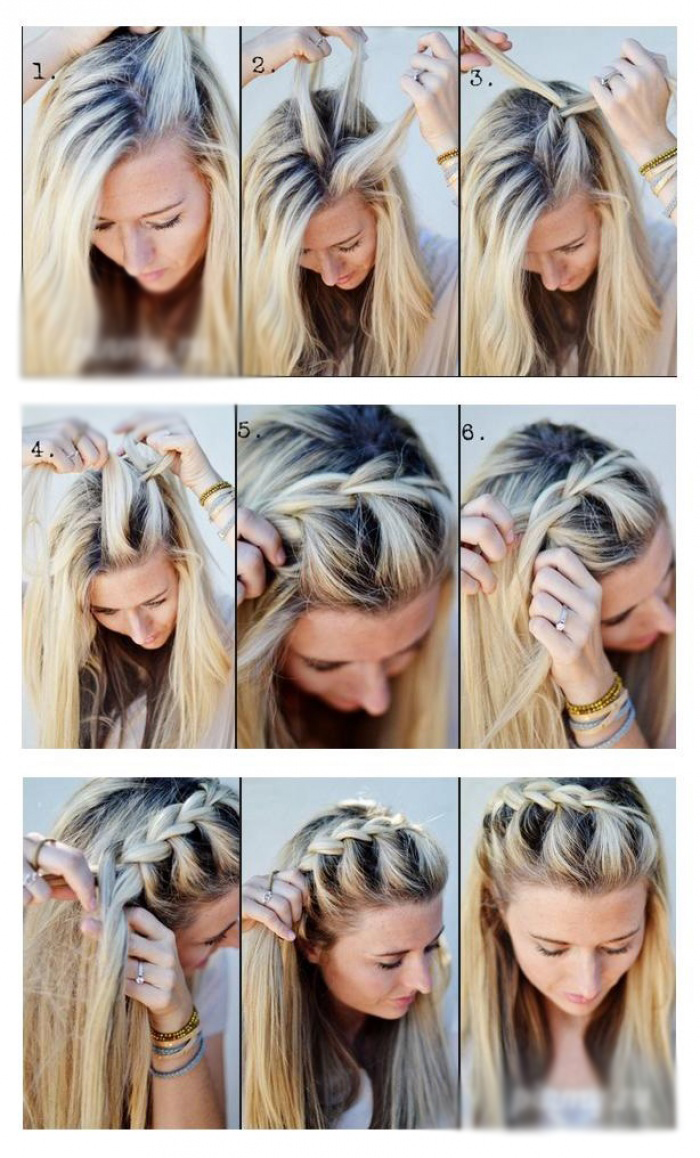
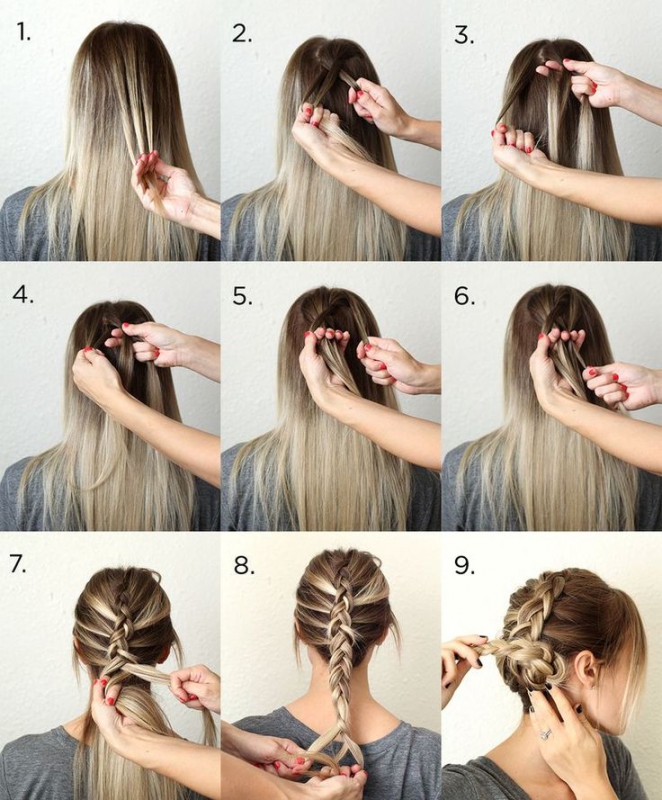
Spikelet (French braid)
The first and simplest option is a spikelet, it comes in several types:
— Classic version it is done as follows - three equal strands are separated at the top of the head and intertwined, collecting the loose hair one by one, first on the right, then on the left, and so on until all the hair is braided, at the end a simple braid is braided and tied with an elastic band;
— “Fishtail” - the hair is separated into two main parts, from which thin strands are taken and alternately intertwined;
— French Falls – ideal for thick hair. It is woven along the forehead, starting from the temple, like a regular spikelet, only strands are added not from the right and left, but from below and above. And when they intertwine, the bottom strand remains free and is not woven into the braid in such a way that loose hair remains below.
You can even braid two identical French braids, turning into a bun or a bun, or, for example, give it a little originality and “shaggyness” by pulling out a centimeter of strands from each weave. It all depends on the taste and imagination of the owner of the hair.
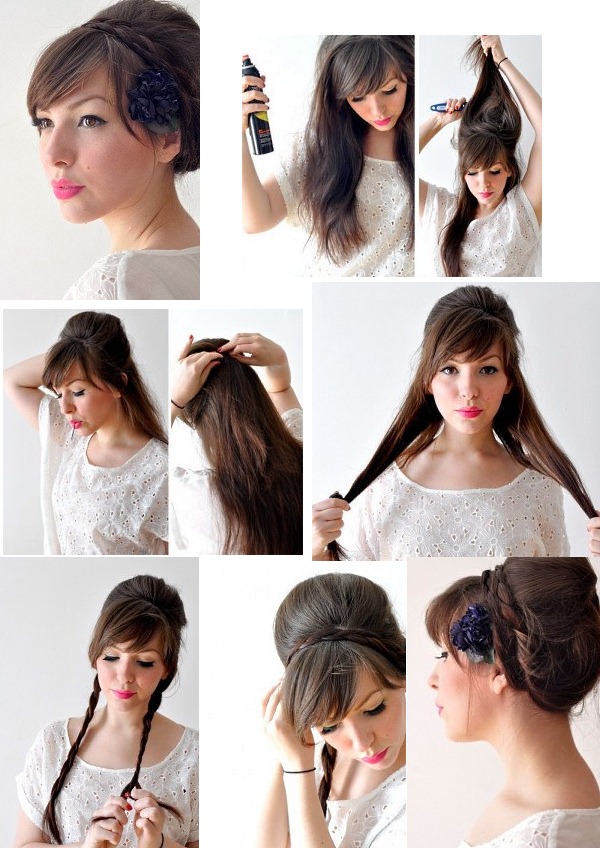
Bohemian braid
A bohemian braid always complements any look in a very stylish and mysterious way and can be created in just a couple of minutes. This hairstyle is especially relevant for the casual boho style and hippie girls. It is one-sided from the roots to the ends of the hair or from ear to ear and is created in several ways - like a regular braid, spikelet or interlacing of hair flagella. You can decorate such a braid with any decorations that match clothes or accessories - hairpins, ribbons, cords and even beads.
Greek braid
Unlike previous types, the Greek braid requires some training and experience, although it is not particularly difficult. It got its name due to the fact that it weaves around the head and its appearance resembles a Greek Laurel wreath. It is braided like a regular French braid, starting from the temple and gradually covering the bangs, the hair at the other temple and the lower strands, and continues to weave until there is no loose hair left (i.e. around the entire head, sometimes several times, depending on skill owners of weaving spikelets). This hairstyle looks romantic and feminine, and is perfect for both everyday wear (since the hair with this weave does not fall apart throughout the day) and for special occasions, giving the image a certain chic and sophistication.
All Greek hairstyles are presented in our corresponding section —
Braids combined with ponytails or buns
The simplest, everyday hairstyle option is hair pulled up into a ponytail, braided into a simple braid at the ends or, conversely, a braided spikelet tied into a low ponytail. A braided braid can also be collected into a bun or bun and decorated with a beautiful hairpin, bow, ribbon or flower.
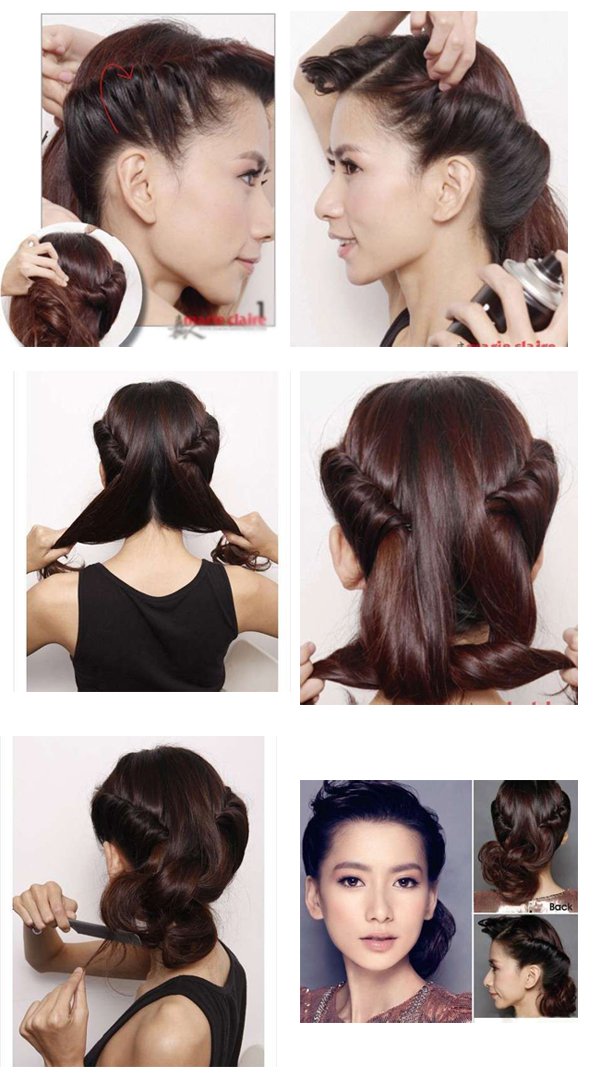
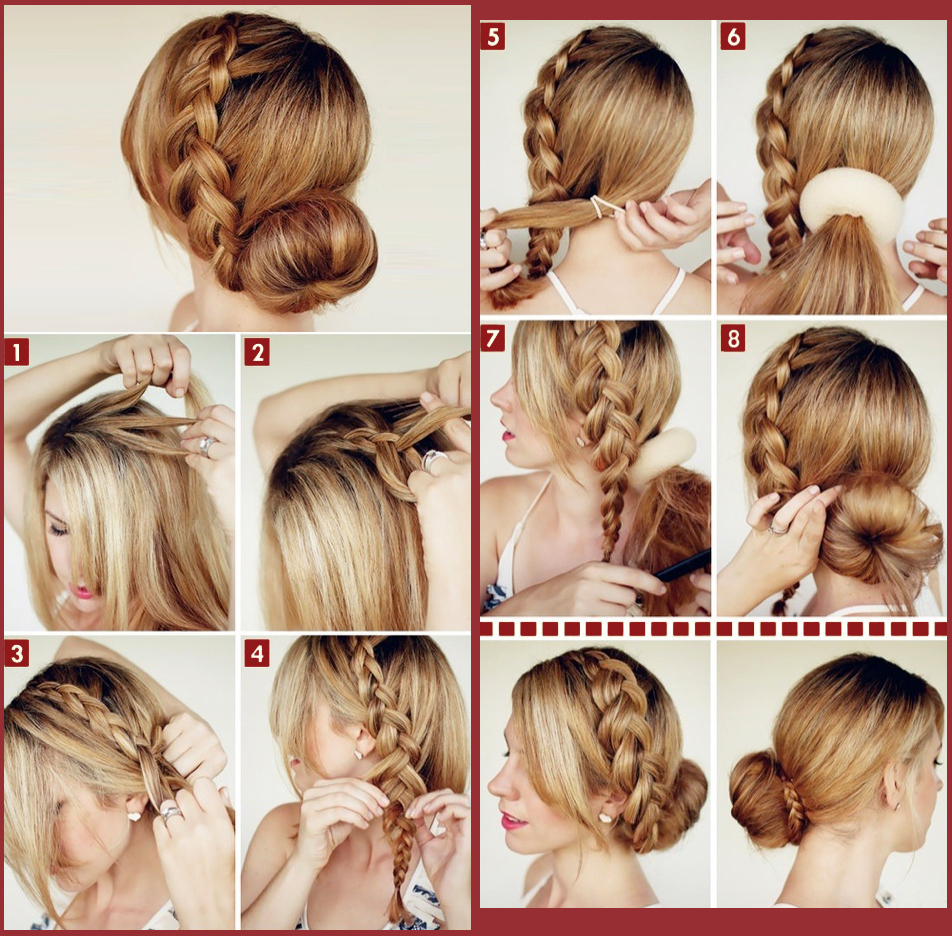
DIY bundles
A bun or bun has long ceased to be associated with “grandmother’s accessories.” Today it is stylish, comfortable, modern hairstyle. For the pomp of the owners fine hair A little trick is recommended - using a special silicone donut that creates a frame (sold in any hair accessories stores) or its cheaper version - a regular sock with the toe part cut off and rolled into the same.
Fashionable bun
To create this simple hairstyle, you need to gather the hair at the back of your head into a ponytail, put a donut on top and put the elastic band back on, but on top of the donut so that the hair covers it. The remaining ends can be wrapped around the bun so that it turns out smooth and neat, or vice versa, then it will look careless and “shaggy”. Another way is to twist your hair into a rope, comb it a little, roll it into a bun and secure it with hairpins.
Shells
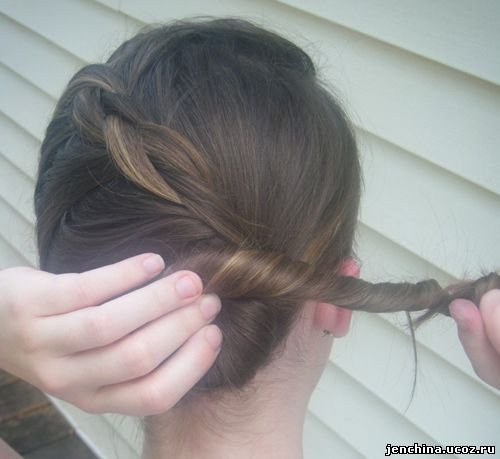
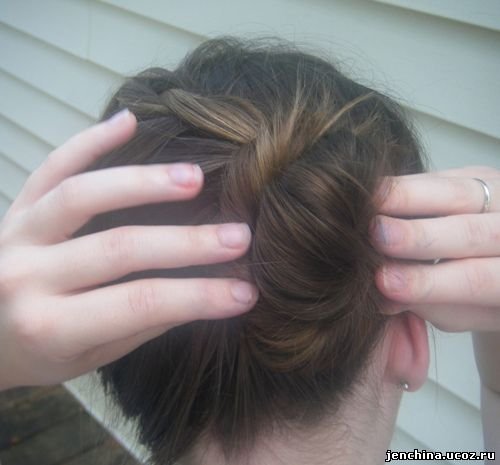
Everything you need for shells different forms and types - elastic and more stilettos. The classic shell is created as follows: combed hair is pinned in one direction (to the left), twisted with a rope (to the right) and pinned with hairpins or a beautiful long hairpin.
You can make an elegant bow bun. To do this, you need to gather it at the back of the head so that the last “threading” of the hair through the elastic does not go all the way. This will leave a loop of hair and the ends threaded through the elastic (about 5 cm). Next, we divide the loop in half and take the two halves to the sides, and wrap the ends in the middle to make a bow, and secure them with bobby pins and hairpins.
You can do everything that is described in the “fashionable bun” description, just leave one strand and at the end wrap it around the resulting bun. This will create the impression that the hair is held in place by this very strand without an elastic band. It is also beautiful to wrap such a bun with ribbon or a wide bandage.
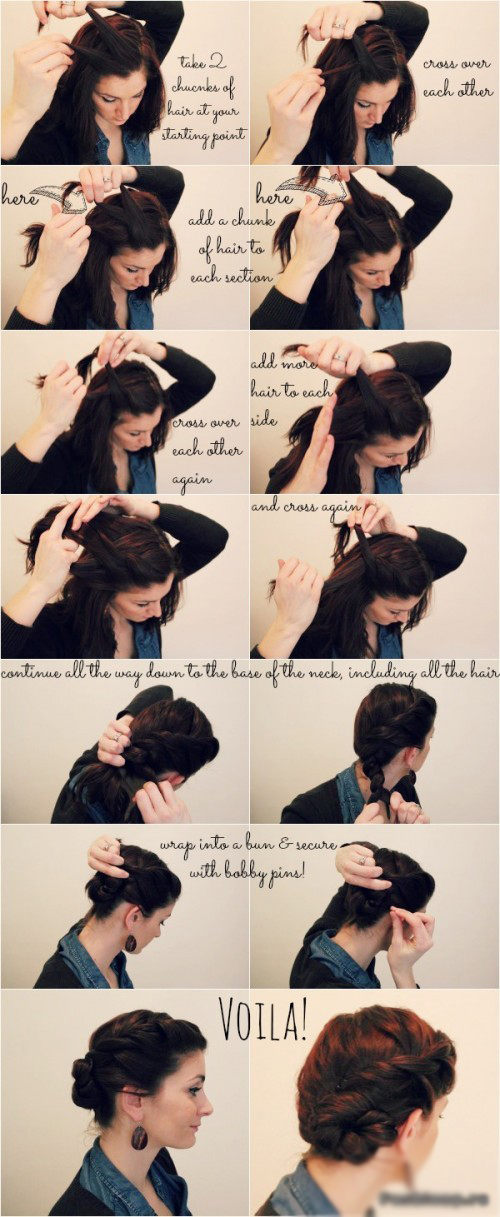
Twisted strands
Twisted strands gathered into a casual or, on the contrary, elegant hairstyle will not leave any girl indifferent, as it is always feminine, stylish and fashionable. There are several options on how you can create this hairstyle without wasting time and materials.
The first is creating a hairstyle in greek style. The hair, divided in half, is twisted into 2 strands (or braided into 2 braids) and connected with an elastic band at the back of the head. The ends are carefully threaded into the recess above the tail, like into a bag, and secured with hairpins. This hairstyle with a thin hoop or headband around the head looks very unusual.
The second option is to do the same thing, that is, twist two strands into bundles and secure them with hairpins or barrettes, but only so that the hair remains loose.
The third option is to make many flagella of approximately the same thickness and randomly fasten them on the back of the head. It will turn out a little sloppy, but if you pin an interesting large hairpin on it, it will turn out very original and romantic.
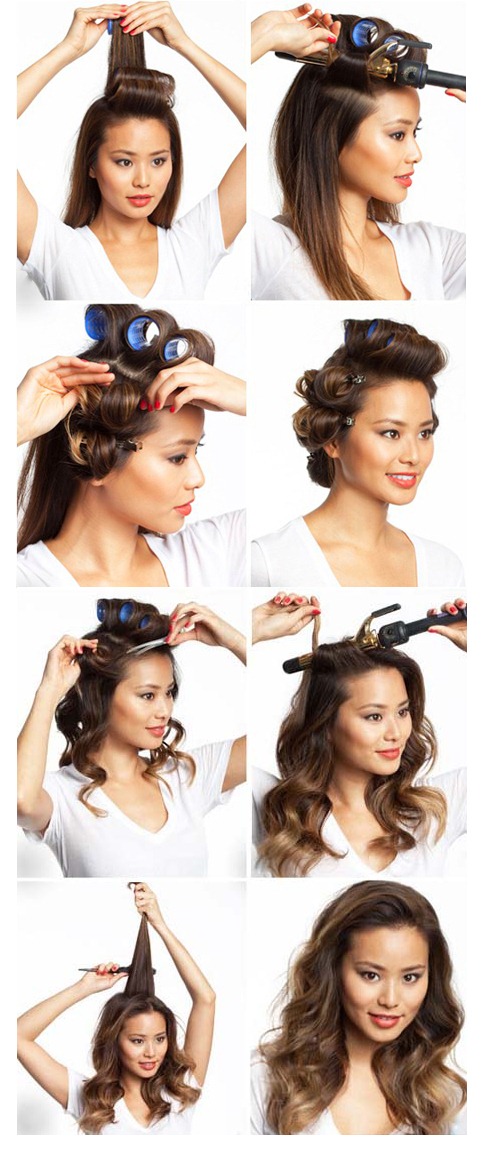
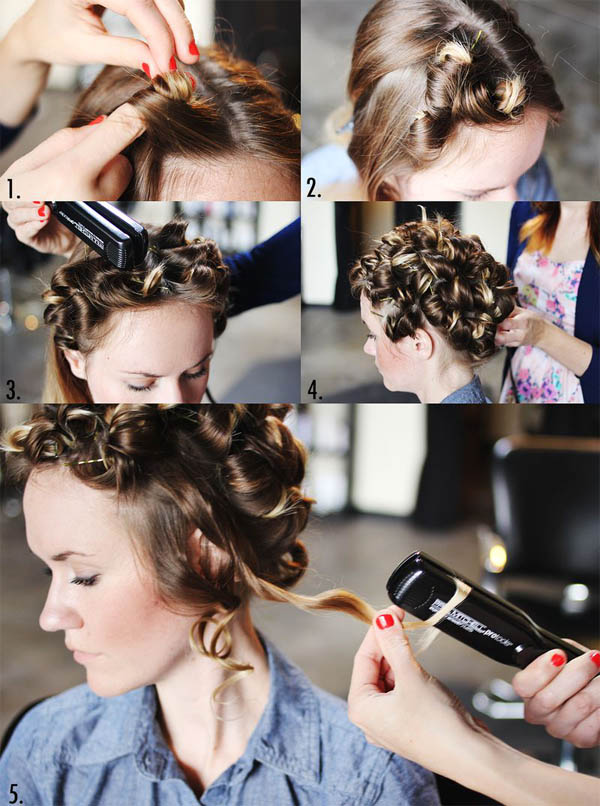
Curls
Large curls or beautiful waves They are quite easy to create at home. As a rule, for curling you need a hairdryer, straightener, curling iron or curlers, round comb, styling mousse, but sometimes you can get by with improvised means.
The most common method is using a conical curling iron or curlers and hairspray. But this method requires a lot of time, which, as a rule, is not always convenient, especially in the morning. A little bit more quick way– use a diffuser when drying with a hairdryer.
The easiest way is to twist your slightly damp hair into buns after taking a shower and secure it with hairpins and leave it overnight or for a couple of hours, depending on the time available, then undo it. Such curls will look natural, and perming will not cause much harm to the hair, unlike heat treatment. In this case, you can adjust the width of the resulting curls - large (depending on the thickness of the hair, 4-6 strands) or small curls (more than 20).

The most important thing in creating and maintaining your image is not to be lazy and experiment daily. Constantly trying new things and going beyond certain boundaries, you quickly create your own unique style. And soon you won’t even notice how those around you will begin to admire and imitate you!
Photos of hairstyles step by step (with your own hands)
There are things that you never tire of learning: for example, recipes for a new hairstyle with your own hands. Videos, photos, text instructions - everything is used. Sometimes you need to find out one single nuance so that you don’t have to think for another month: “What styling should I do today?”
In this article we will present a variety of DIY hairstyles step by step. And at the end you will find 3 bonuses for all occasions: three cute ponytails with a “twist”, three very simple DIY wedding hairstyles for long hair and three hairstyles for the gym. Nine ideas that deserve attention!
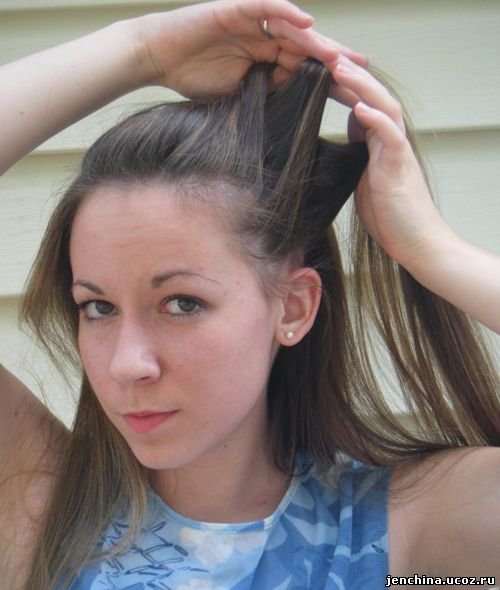
Double waterfall
A very cute and romantic DIY hairstyle for medium hair. We will need a comb and a thin elastic band. It’s better to work with a mirror - this way you can see which strands to pick up. By the way, styling doesn’t last as well on very clean hair, so it’s best to do it on the second day after washing.
Step 1. Comb your hair and place it in a side parting. You can also do it in a straight line, if this style is closer to you.
Step 2. Select the front strand and divide it into three equal parts.
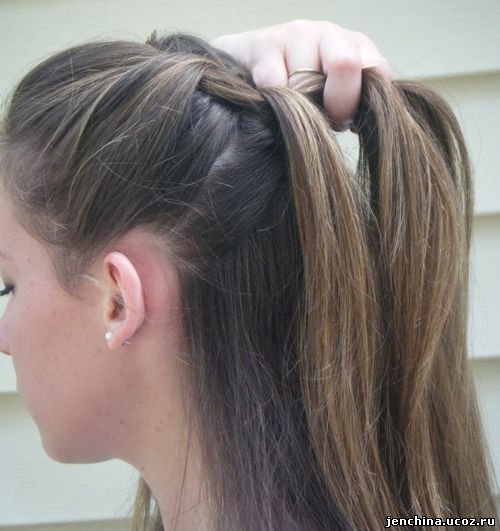
Step 3. For convenience, let's assign a number to each part: the top one will be the first, the bottom one will be the third. Place the first strand on top of the second, then the third on top of the first, then the second on top of the third.
Step 4. Pick up the next strand from the parting and attach it to the second.
Step 5: Release the first strand. In its place, grab the hair from under the braid and lay it on top of the second strand.
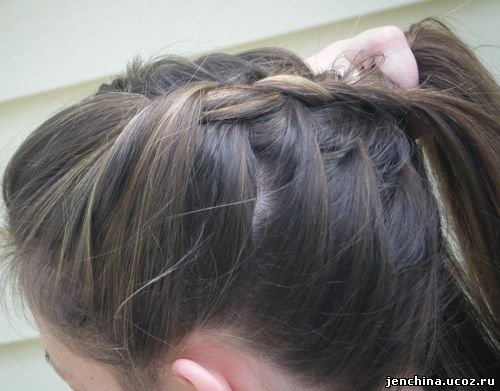
Step 6: Repeat steps 3-5.
Step 7. Repeat steps 3-5, but last stage pick up the first part that is released down and attach it to the weave.
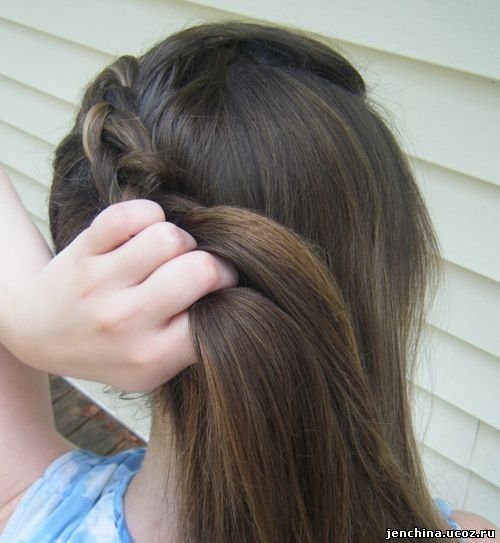
Step 8. Repeat step 7, picking up the other 2 pieces that were released down. This will give you 3 loops.
Step 9. Secure the end of the braid with an elastic band.
Step 10. Straighten the weave beautifully. Ready!
2. Twisted ponytail in a couple of minutes
If you discuss beautiful and quick DIY hairstyles, you should definitely remember this one. We will need a minimum of time and 2 transparent thin elastic bands. This styling is also suitable for curls.
Step 1: Comb your hair back and tie it into a ponytail at the back of your head. Secure with an elastic band.
Step 2. Divide the strands up to the elastic band into 2 halves. Take the tail and insert it into the resulting hole. Pull down and straighten the resulting curls to the sides.
Step 3: Gather the hair behind your ears into a second ponytail. Secure with an elastic band. Repeat step 2.
3. Danish (reverse) braid
It may not be as great as a DIY hairstyle for every day, but the Danish braid is a great eye-catcher and gets a lot of compliments. For this we need a thin, invisible elastic band and 2-3 bobby pins. Remember that freshly washed hair is very slippery, so for a successful DIY hairstyle it is better to apply a fixative or dry shampoo.
Step 1. Make a side parting. Comb part of the hair from the top of the head back.
Step 2. From the parting, we begin to weave a reverse braid. To do this, divide the hair into 3 parts and place the left one under the middle one, and the right one under the left one. Add strands from the sides and continue weaving to the crown.
Step 3. Secure the end of the braid with an elastic band.
Step 4. Stretch the braid to the sides so that volume appears.
Step 5. Pin the tip. Cover it with hair from the sides.
4. Openwork braids
Perhaps it should be included in the most interesting hairstyles on short hair with your own hands. It is generally accepted that girls with bobs cannot afford weaving. Now we will prove the opposite. A successful mixture of romance and rockabilly awaits you. You will need 3-6 bobby pins and a comb. Thin elastic bands and styler - optional.
Step 1. Divide the strands: pin the front so that it does not interfere, divide the back into 3 equal parts.
Step 2. We begin to weave a Danish (reverse braid) from the left side. We try to tighten the strands on the left side a little tighter to maintain the shape. We fix the tip with an elastic band or pin it with bobby pins. If the hair is unruly (especially important for DIY hairstyles for short hair), we also pin it on top.
Step 3. Weave a reverse braid from the middle part. We start a little higher than the left one. Fix the tip in the same way as in step 2.
Step 4. Braiding right side, not forgetting to tighten the strands on the right more strongly.
Step 5. Stretch the right and left braids to the sides.
Step 6. Using a comb, carefully comb the front strand to the back of the head.
5. High bun
How to style curly hair so as not to overtighten them, but also not to suffer from the fact that curls get into your face? Easy DIY hairstyles come to the rescue, namely a bun. For it you will need: a thin hair elastic, a voluminous hair elastic, and bobby pins. Just in case, keep the varnish on hand to seal the result.
Step 1. Using your fingers (this is important!) we straighten the curls and collect the curls on the top of the head.
Step 2. Secure the tail with a thin elastic band.
Step 3. We put a voluminous elastic band on the tail.
Step 4. Evenly distribute the strands over the second elastic band. We turn the ends inward.
Step 5. Pin the ends with bobby pins. If desired, straighten the bun slightly, stretching the strands to the sides.
6. False bob
An extraordinary DIY hairstyle for long hair: change the length without going to the hairdresser! You will need: a fine-toothed comb or brush, hairspray (volumizer - optional), a thin elastic band, and bobby pins.
Step 1. Separate the top half of the hair and pin it up until we need it.
Step 2. Weave a Danish braid diagonally from the bottom of the hair, pinning the ends with bobby pins. We use all the lower strands. If the length does not allow weaving, simply twist it into a tight “snail”.
Step 3. We split off the front strands and begin to methodically comb them from the roots until we get a fluffy head of hair. Take your time and run the comb gently so as not to pull out the hairs. Before starting, you can rub a volumizing product into the roots.
Step 4. Gently smooth the ends of the upper part at the back of the head.
Step 5. We collect them in a low ponytail and secure with an elastic band.
Step 6. Turn the tip of the tail inward and pin it with a bobby pin.
Step 7. See if there are any untucked strands left. We also pin them or leave them free.
7. Flower from bunches
As you can see, we have collected stunning yet simple DIY hairstyles here. Such a flower will look great on curls - finally, you can forget about the daily question: “What should I put on my head?” Head in literally it will stop hurting: if you wear a bun, you know how heavy you feel at the end of the day. But, due to the fact that there are three bundles, a feeling of tightness does not appear. You simply won't find a better DIY hairstyle for every day, especially if you prefer to style your hair when it's wet.
Step 1. Comb the hair back and form a snail at the back of the head, clearly in the middle. We pierce with an invisibility.
Step 2. Divide the remaining volume in half.
Step 3. Twist the bun from the left strand. We fix it with an invisible one.
Step 4. Twist the bun from the right strand. We stab it.
Step 5. Now you need to take a mirror and make sure that all the bunches are in contact with each other, and there are no random strands sticking out.
Owners of long and/or voluminous hair It’s better to replace bobby pins with rubber bands.
DIY wedding hairstyles at home
A skillfully made hoop can work wonders on your hair. Especially if we're talking about about styling for a wedding.
1. Simplicity itself
You'll need a headband and perhaps bobby pins if you have slippery hair. Straight strands can be pre-curled with a curling iron.
We do a light backcombing from the roots. We put on the hoop so that it is at the very height of the hair. If necessary, secure with invisible ones.
2. Romantic curls
In this case, we comb the sides back a little and only then put on the hoop. On both sides, twist the front strands 2 fingers wide over the decoration. You can start from the temples, but more graceful image It turns out if you make a curl behind the ear.
3. Greek style
Here again you will need hairpins and, most likely, hairspray. On thin hair, you can divide the sides into strands 2 fingers wide and twist each of them onto a hoop. For those with a gorgeous head of hair, we recommend not dividing your hair, but styling both sides entirely. We collect the loose tails into a knot and pin them with bobby pins.
![]()
Unusual tails
Ponytails are perhaps the most popular DIY hairstyles. Photos of the following 3 options will help you diversify your usual.
Simple elegant ponytail
You will need: bobby pins, a thin elastic band and, if possible, hair oil.
Step 1. Tie a low ponytail at the back of the head, leaving 1 strand on each side. Secure with an elastic band.
Step 2. Spray the side strands with oil. This will make them more obedient.
Step 3. We bring together the strands at the back of the head. We throw one over the other - we get a simple knot.
Step 4. We hide the free ends of the strands under the tail and pin them with bobby pins.
Step 5. Check whether the knot fits tightly and covers the elastic band.
Romantic tail
You will need: 2 thin elastic bands, a hairpin, a hairpin.
Step 1. Make a side parting. Separate the upper strands from the larger side. We fold some back, and use some to weave a reverse braid.
Step 2. To make the braid noticeable, we actively use the side strands from below.
Step 3. We braid it to the back of the head and secure the tip with an elastic band.
Step 4. Straighten the braid so that it looks voluminous.
Step 5. Cover the tip of the braid with the top strands.
Step 6. Gather all the hair from the back into a ponytail and secure with an elastic band.
Step 7. Wrap the elastic band with a strand of hair, securing it with a hairpin.
Crossed lines
You will need the same elastic band, bobby pins and, if possible, hair oil.
Step 1. Separate the lower side strands on both sides.
Step 2. We collect the remaining (upper) hair into a low ponytail.
Step 3. Moisten the side strands with oil to make them easier to style.
Step 4. Divide the hair on the left side into three parts. We place the first one over the elastic band and pin it under it.
Step 5. We also divide the hair on the right side into three parts. We place the first one over the elastic band, crossing it with the strand on the left side. We stab it.
Step 6. Repeat steps 4 and 5 for the remaining strands.
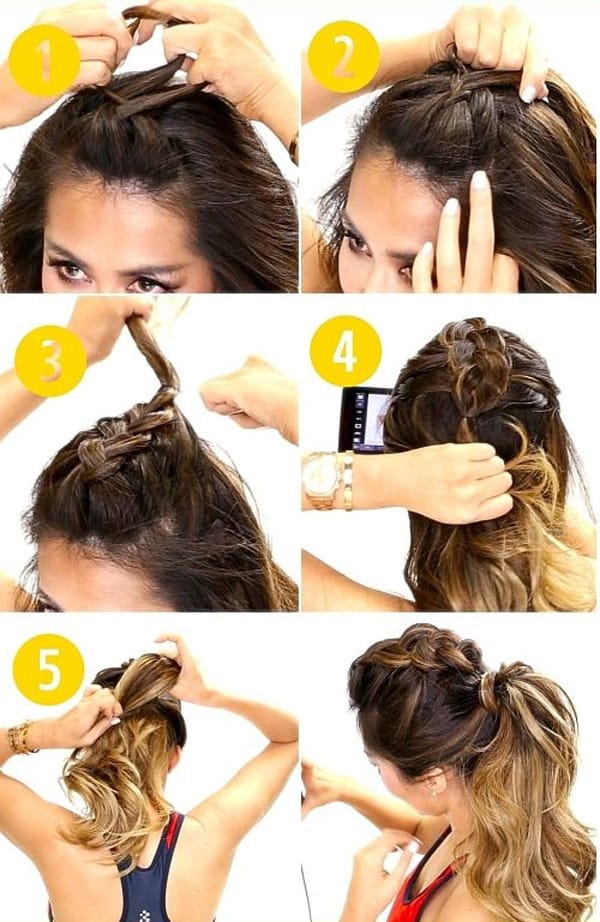
Stylish options for the gym
The gym is not a reason to put off beautiful hairstyles. With your own hands you can make options that are worthy both from an aesthetic and functional point of view.
curly tail
It's simple - all you need is a brush and 5 (or more, depending on the length) thin rubber bands.
Step 1. Comb part of the hair back. Secure with an elastic band. Lightly straighten the strands.
Step 2. Select thin strands from the temples and attach them to the main ponytail. Secure with an elastic band. Let's straighten it out.
Step 3. Select a new batch on the right and left. We fix it. Let's straighten it out.
Steps 4-5. Repeat step 3.
Step 6. We put on the last elastic band at the same distance as the previous ones.
Vintage style
You will need 2 elastic bands and 4-6 hairpins.
Step 1. Comb your hair back. Divide into 2 halves. We'll leave the left one for now.
Step 2. From the very top point(on the right half) we begin to weave a reverse braid, picking up strands from the edge and from the center.
Step 3. After we reach the back of the head, we begin to weave a regular (French) braid.
Step 4. Secure the tip with an elastic band.
Step 5. Repeat steps 2-4 for the left side.
Step 6. Place the free edge of the left braid over the right one, and the edge of the right one over the left one.
Step 7. Pin the ends with pins. We use the remaining invisible ones at the base and in the middle.
Half wreath
You will need 2 elastic bands and 4 bobby pins that are well known to us.
Step 1. Divide the hair into 2 halves. Let's start with the right one.
Step 2. Start weaving from the temple french braid. We pick up the strands from the edge and from the center. We try to braid our hair as low as possible. We fix the resulting weaving with an elastic band.
Step 3. Repeat step 2 for the left half.
Step 4. Cross the braids. We turn the ends inward and pin the composition with bobby pins.
We hope you liked these DIY hairstyles, and the photos will make the styling process accessible.
(Visited 8,413 times, 7 visits today)