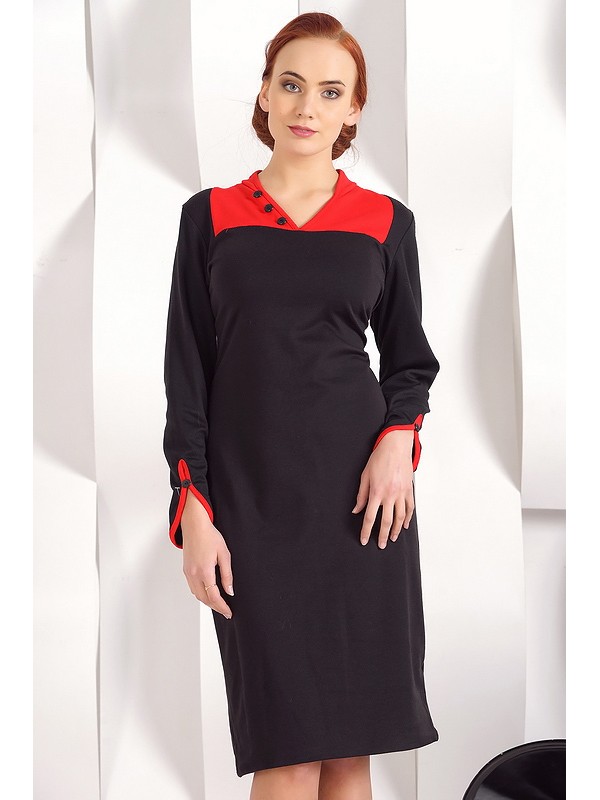
Dress pattern for obese women with yokes. Dress with a yoke for a girl
I recently had an urgent need for cuteness, and so the pink bear Susan was born. Susan's pink teddy bear would look great in a snow-white dress, but I... Lately I’ve already sewn so many of them that I’m starting to feel nauseous from the white cambric (it won’t last long, I assure you). My soul asked for colors and I decided that the dress must definitely be bright.
And then I remembered that a year ago I took a tutorial on sewing a dress of a similar style on my phone, but I couldn’t bring myself to process the phone photos, I don’t like them. I was ashamed. I reshot MK again on a DSLR :)) I tried to do a lot detailed photos, but some moments are completely obvious to me and I didn’t photograph them. I hope you can understand it from the description.
So, first, let's select the materials. We will need: the main fabric of the dress, thin fabric for the lining, fabric for the collar (if too thin, then plus dublerin/non-woven fabric), a piece of elastic for the sleeves, buttons for the clasp, lace for trim.
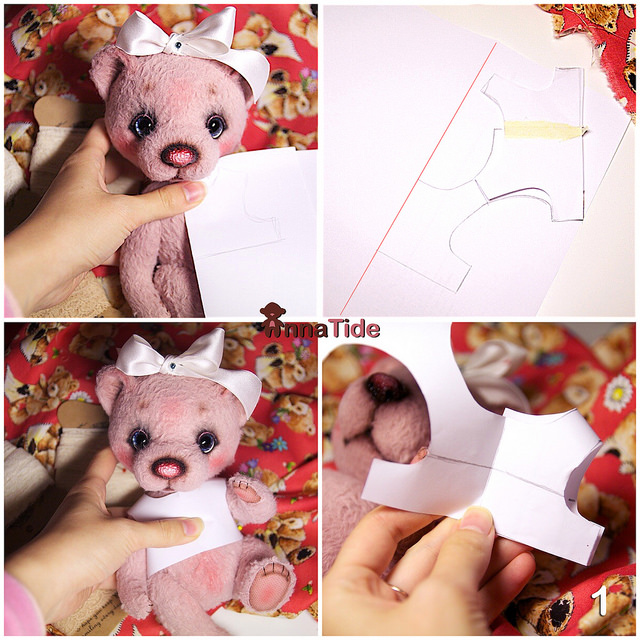
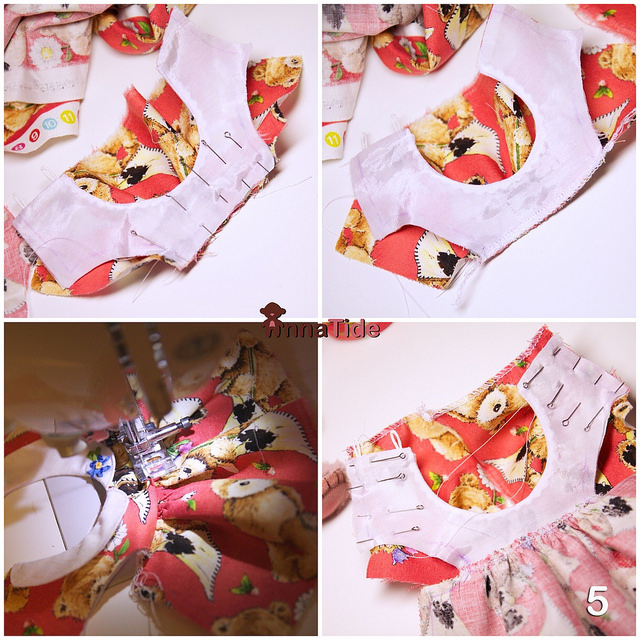
1. Take a bear. Fold the paper in half and draw half the front of the dress by eye. There is no need to draw exactly at this stage, we will adjust and correct it later. Cut out the front part. Apply to the bear. The good thing about bears is that the patterns can be pinned at the construction stage; I pin them in the center, along the shoulder and side seams. If you have a doll, it’s also not scary, the pattern is then fixed with pieces of tape. I lowered the shoulder seam slightly, deepened the cutout for the sleeves, the piece turned out wider than necessary, so I cut it in half and taped it to the desired width.
Again we take the paper folded in half, trace the half of the front at the fold as we fitted it, and immediately apply the front part to the shoulder seam, making a back part from it. For now we leave the middle as at the front (then we will reduce it), reduce the depth of the cutout for the sleeves and raise the “neck”. We cut out, pin the pattern onto the bear, check whether the side seams meet, and adjust the width of the back parts. Now we have the basic dress pattern. You can sew a skirt on the bottom and enjoy life, but we are not looking for easy ways, so the dress will... what is it called... with a cut-off yoke? In general, draw the line from which you want the skirt to begin, do not forget to make a mark on the back so that it is symmetrical.
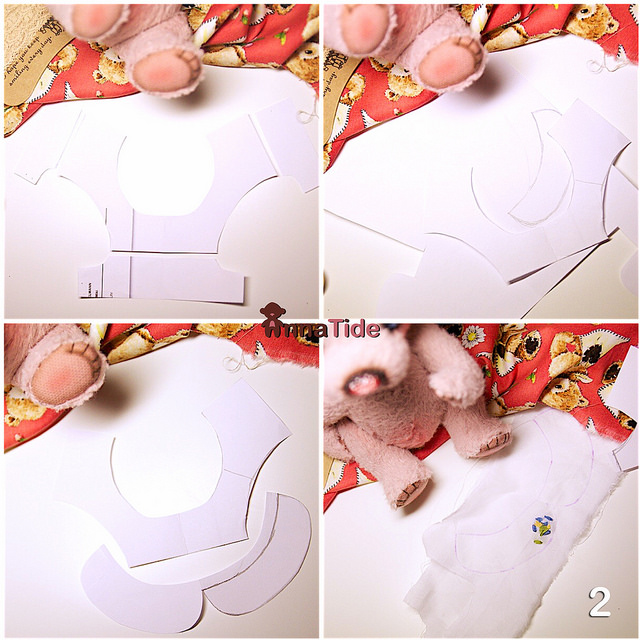
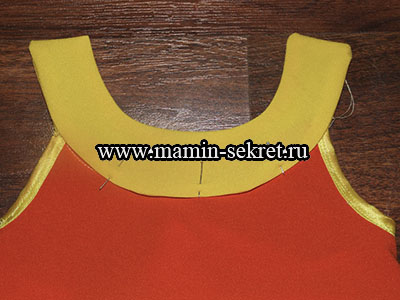
2. Cut off the yoke along the lines, do not throw away the lower parts, we will need them later. Let's start cutting out the collar. If you now simply outline the neckline and draw a collar along it, then after stitching the collar will joyfully stick up, this is not the case. Human collars are cut with a very slight curve, but along the length of the neck... I don’t know how to explain. Search the Internet for “building a collar pattern”, you will understand what I mean. Simply put, our neck is round, while the collar neck is straighter, but the same length. Did you explain it clearly? It is more convenient to cut a double collar for cuckoo bears, so that later you do not have to lay each half separately. I immediately added a neck allowance to the pattern and will cut according to it. Transfer the pattern to fabric. I wanted embroidery on one half of the collar, so first the embroidery, then the cutting.
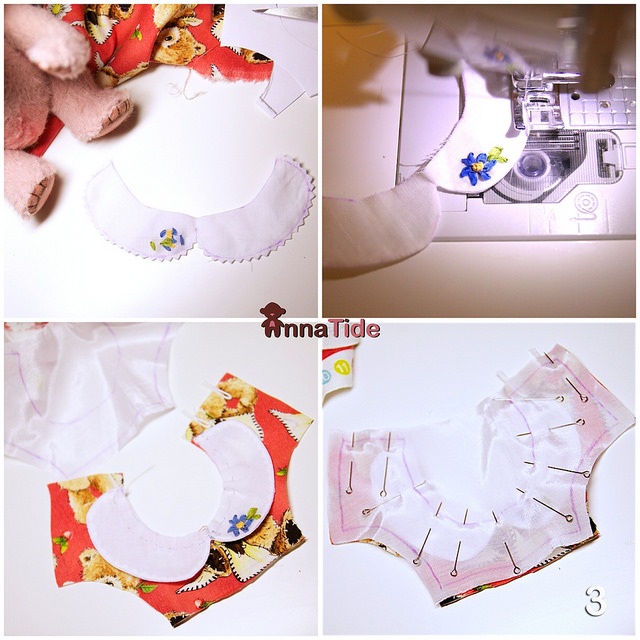
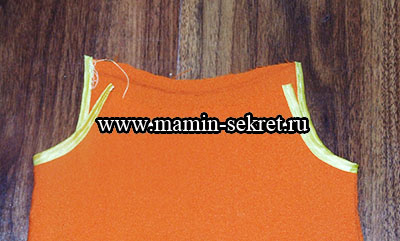
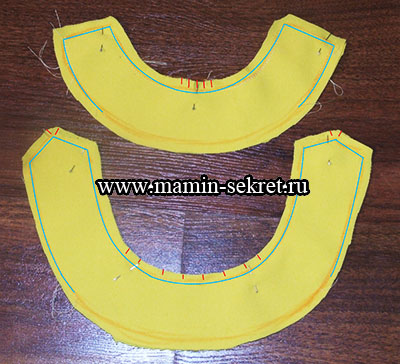
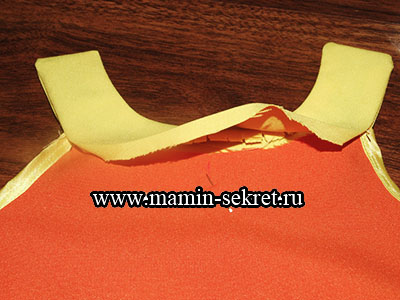
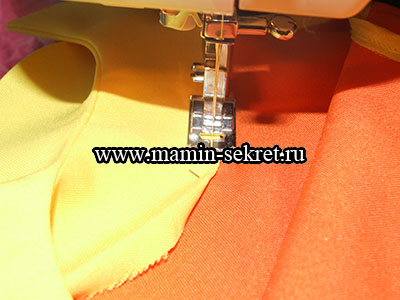
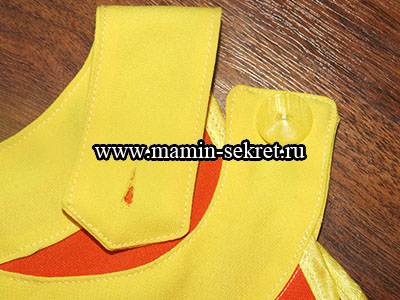
3. If your collar fabric is dense, then you do not need to duplicate it with non-woven fabric. If the fabric is thin, it will not hold its shape well. Then we duplicate one half with non-woven fabric, sew it together, cut it out and either make notches in the places of the roundings (and the collar is practically one big rounding) so that after turning the collar fits well, or we cut off the zig-zag allowance with scissors, as I did. Don't forget about the notch all the way to the line in the center of the collar. We turn it inside out, iron it, and machine stitch along the edge. Next, cut out the yoke piece from the main fabric and attach the collar as in the picture. At this stage, I baste it along the neck line, because, as we remember, the neck of the dress and the neck of the collar different shapes and if you just pin it, there is a high probability of displacement. We cut out the lining of the yoke and pin everything together perpendicular to the neck seam. By the way, in the photo before chipping you can see that on the right I glued two loops to the allowance with textile glue; this is the future fastener. When we sew this place, we sew at the smallest step so that the loops do not pop out during use.
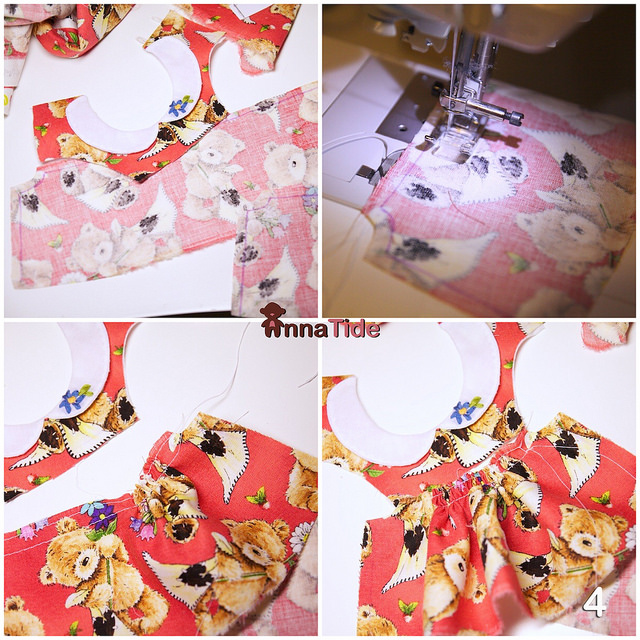
4. Sew along the seam of the back and neckline, cut it out, make notches at the neckline, turn it inside out, iron it. We are building a skirt. To do this, we take out those who made the patterns that we first cut off. The long panel of the skirt is approximately 1.5-2 times longer than the yoke detail. It’s also better to work on the width, otherwise it will look clumsy: we make a small rounding along the hem, the most wide part in the middle, at the edges it is literally 7-10 mm shorter. On both sides of the top we outline a piece that continued the sleeve on the base pattern, from the lower end of the sleeve we make a small flare downwards. We also cut another panel for the back and cut it in the middle into two parts. Collecting fabric. To do this, set the minimum thread tension on the machine (usually I sew at a value of 6-7, depending on the thickness of the fabric and needle, but I lay this line at 1-2) and the maximum stitch length (usual 2.5, for assembly I set it to 4.5 , on my machine this is the maximum). We lay two rows of stitching along the top of the skirt detail at a distance of 1-1.5 cm from each other. Pull the lower ends of the threads; they should easily pull the fabric into folds. Pull it to the width of the yoke.
5. Pin the gathered panel to the yoke, face to face. We sew and process the edge. I finish the edge with an overlocker. We bend the skirt and iron it. You can lay a line along the face of the yoke. We do the same with both parts of the skirt on the back. Before this, I also processed the cut on the backs, and you need to pin the skirt to the yoke so that there is a skirt allowance of about 5mm on the back.
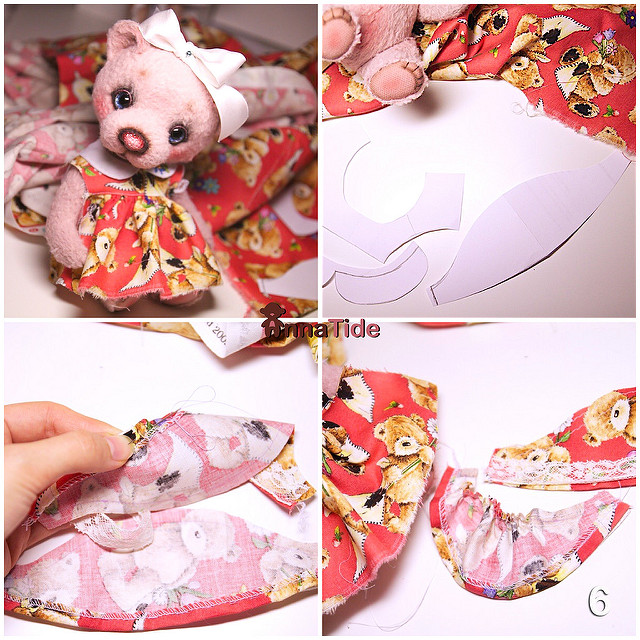
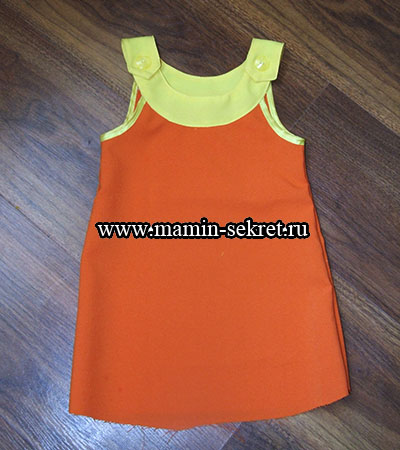
6. Trying it on :) It’s already beautiful, but we still need to make the sleeves. I draw the pattern by eye. The longer the pattern and the higher the roundings at the top and bottom, the more magnificent the puff sleeve. I overlock the edge of the lower cut of the sleeves, bend them 5-7mm (the elastic will be threaded into this allowance, so it should be slightly wider than the elastic that you have), iron it with an iron. I take the lace and baste it to the bottom edge of the sleeve. The lace is wide, so the bottom edge just goes along the fold of the bottom of the sleeve, I stitch along the wrong side 5-7 mm from the edge. We gather the sleeve. We do the same with it as with the skirt (see photo number 4).
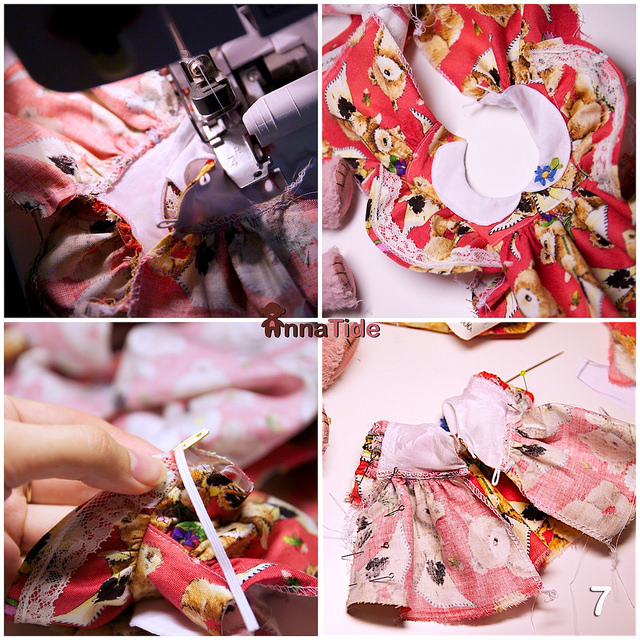
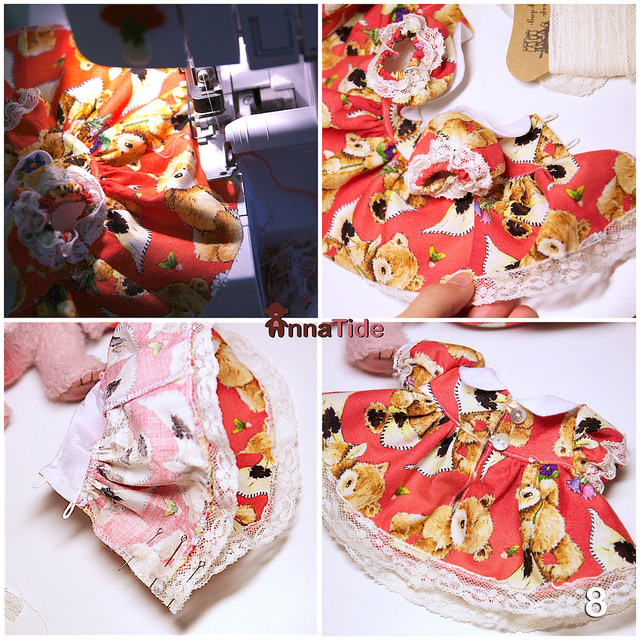
7. We baste the gathered sleeve to the sleeve cutout, stitch it, and process the cut. As a result, we get a vest, which we now assemble into a dress. First, insert the elastic into the sleeves. We measure the circumference of the bear/doll's forearm, add an allowance and thread the elastic into the place provided for it. We pin the dress along the side seam, making sure that both ends of the elastic are fixed, otherwise the elastic will “run away”. We stitch and process the cuts.
The dress with a yoke is modeled on the basis of a regular dress.
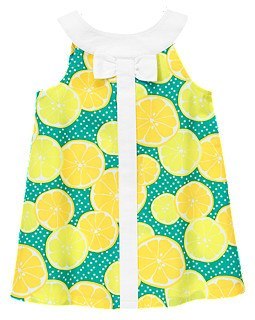
For example, let's simulate something like this: baby dress
First, you need to carefully examine the drawing to determine what shape the yoke has and how the cutting line of the yoke goes.
Yoke is the upper cut-off part of the front (front), back, panels of a skirt or halves of trousers.
In our case, the yoke has the same width in all areas, the lower cut of the yoke runs parallel to the upper cut - the neck cut. The width of the yoke is approximately half the width of the girl’s shoulder, and the remaining width of the shoulder is covered by a frill sewn into the stitching seam of the yoke.
The neckline of the dress is wider than on the basis of the dress, so first of all we apply it to the pattern new line neckline - from point A we lay it along the shoulder line AP1.
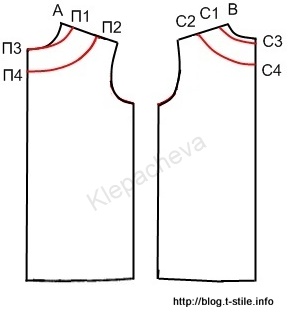
How much to save? I can't say for sure, it all depends on the size of the dress. Perhaps the size of the neck expansion will be 1 cm or 2 cm, or maybe 3 cm. The width of the child’s shoulder is approximately 6 to 10 cm, adult woman up to 14.5 cm. This is the value we need to proceed from. Therefore, I cannot give any exact values, only the modeling principle itself.
Let's continue. Since the front neckline has been widened, the back neckline needs to be widened by the same amount. A P1 = BC1
We set aside the width of the yoke P1P2 equal (or almost equal) to P3P4. And the same thing on the back C1C2 = C3C4.
We check the pairing of the lines (more about this here -), clarify the lines and you can cut off the yoke.
We return to the sketch of the dress and carefully study the lower part of the dress to begin modeling the lower part.
The second half of the shoulder cut can be left or removed. In the first case it will be more closed dress, in the second case - a sundress. The second option seems to me to be more consistent with the model’s drawing, so I’m removing it.
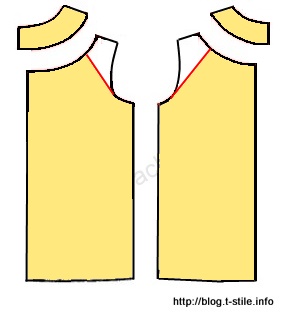
The sketch of the dress shows that the lower part has gathers along the stitching line of the yoke. Therefore, you need to widen the bottom of the dress to create gathers.
Because the dress uses fabric with a coupon (the main part of the fabric is white in green pea, and the edge of the fabric is green, and the transition from the main pattern to the colored edge is not sharp, but smooth, wavy), then we will perform a parallel expansion.
We conditionally divide the upper cut into three parts and draw auxiliary lines from these points parallel to the line of the middle front and back.
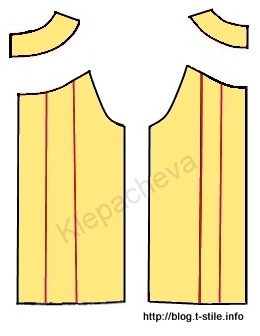
We cut the pattern along these lines and move the pattern pieces apart. How long? The width of the part should increase by 1.5-3 times. It all depends on the type of fabric and the desired pomp of the dress. The thinner the fabric, the more gathers there should be.
Using smooth lines we connect the individual parts of the pattern and the pattern for the lower part of the dress is ready.
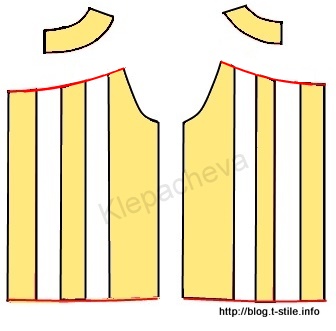
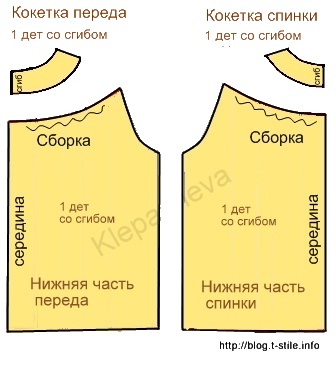
The finished dress patterns should look like this.
All that remains is to decide on the frill located in the seam connecting the yoke to the lower part. The length of the frill should be 2.5-3 times the length of the seam where the frill is sewn. The width of the frill is approximately equal to the width of the yoke. For the frill, you can use ready-made lace of a suitable width.
The modeling process is complete. Good luck!
P.S. Do not forget to provide a fastener if the neck width is not sufficient.
You are fond of sewing, but you have never had to sew clothes, although you really want to. You have a lot of ideas and plans in your head, but they all remain just dreams.
Do you really want to learn how to sew your own clothes, but you don’t know where to start?
I invite you to take part in an interactive online training
“Crash course: I sew myself!
A unique wardrobe with your own hands according to all the rules and without unnecessary complications"

My blog is found using the following phrases
A yoke is a special piece of clothing that gives something a “zest.” What is a coquette in clothes? The yoke is located at the top of the product, and designers can use it to add more appeal.
According to the rules, there should be no collar or belt above the yoke, because the load on it is already considerable. There are blouses with a yoke, and skirts, and dresses, and trousers. So, to increase the wear resistance of the parts, they use both a lining and two layers of fabric. And there are so many different types of coquettes: nothing limits your imagination. And angular, fancy shapes, and armholes, and curves... As a result, the finished item looks interesting and elegant.
For shirts where the yoke is located between the shoulders, the yoke is usually given a rectangular shape, for knitted items - oval or round. Textile dresses or blouses are equally characterized by yokes both on the back and on the chest, composite, solid, minimalistic or decorated.
The triangular yoke is universal: it will visually elongate the silhouette. It is possible to use contrasting fabric: stylish option It turns out with a yoke made of lace, similar in tone to the main fabric, or a color contrasting with it. Items with a quarter yoke sewn into one of the shelves and decorated with embroidery or fittings are original. This is what a yoke in clothes is and how it can transform a thing.

In skirts and trousers, the yokes are located in front, between the hips and waist. For a win-win option, it is better to choose something with a high waist and a yoke. Then the advantages, and not the shortcomings, of the figure will be emphasized. High rise and an asymmetrical yoke - and the thing makes you look slimmer and adds height. If you need to hide your height, a wide yoke is used.

Dresses with a yoke look stylish. They are comfortable every day, and are suitable for a holiday. The office option requires full compliance with the dress code. And an outfit with a yoke will fit into any canons and make the image more harmonious.
Both into the world and into the feast...
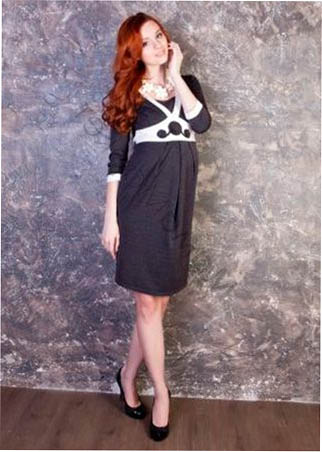
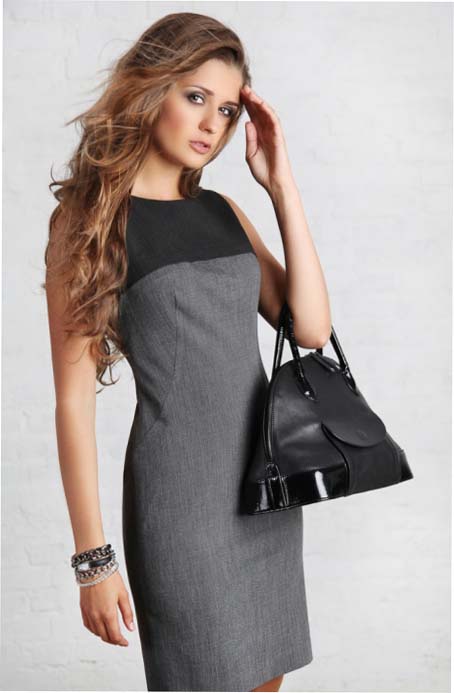
Gray, blue or black outfits with cut-off curly yokes in front with a white border look very impressive. Thin leather horizontal inserts just above the chest will emphasize severity. What is a yoke in clothes? Fashionable and elegant look.
Transparent yokes are good for decorating cocktail dresses. It is possible to smoothly connect the cut-off yoke on the chest and its cut-off part on the sleeves. The image turns out to be exquisitely sophisticated. Such a product will be decorated with sequins, rhinestones, silk embroidery, and beads.
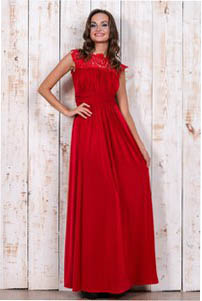
A floor-length dress with guipure inserts along the back and chest is an evening option. Cut-off yoke under the bust – Greek style. The outfit looks light and impressive, emphasizing the lady’s tenderness and femininity, her sophistication and slimness.
Dresses for summer with plain yokes are simple and comfortable. It is important that the color of the outfit includes the color of the yoke. Then the dress looks harmonious. For the hot weather, a three-color cotton outfit with bright horizontal details. A dress made of linen with an openwork yoke will emphasize the lady’s originality, and romantic style will allow you to beat. And look for what a yoke is in clothes and what it won’t be used for.
For a cocktail outfit with a yoke, high-heeled or platform shoes are suitable. The legs visually appear longer, and the figure takes on perfect shape. Add a small round handbag with a pair of handles or a clutch - and everything you need is at hand.
In cool weather, you can complement the dress with a coat or raincoat. made of thin leather and a light scarf – and a modern, elegant look is created. Looks good with an outfit with a yoke and a short bolero on the shoulders. A jacket made of tweed or leather plus a dress with a yoke is a casual style.
Don't forget about decorations. A colored wide bracelet with rounded earrings – and the image becomes playful. Necklace and ring with natural stones – sophistication and taste. And for an evening out, necklaces made of precious metals with inserts of sapphires, amethysts or emeralds.

If your hair is long, then you can change your hairstyle at least every day. And from short haircuts the coquette likes “pixie” and “bob-bob”. The image acquires relevance and glamorous notes. And the cascade will add originality, a touch of outrageousness, and charm.
And don't forget about make-up. In terms of tone, it must be in harmony with the color of the dress. Pedicure and manicure are in the same color scheme. Contrast is also possible, it all depends on preference. It is important that the choice looks not defiant, but charming. This effect will be ensured by a yoke in clothes.
And a drop of your favorite scent will complete the work of creating the image of an elegant and stylish lady - and a light trail of mystery will successfully complete the creation of the image.
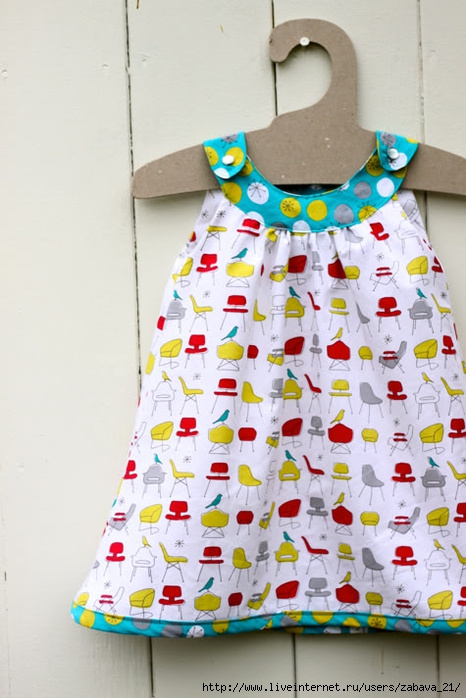
Let's consider step by step process creating a dress pattern with round yoke.
I think you already understand that I don’t like to make complex patterns that contain a bunch of calculations and auxiliary lines. I have already shown you how you can remove a pattern from a finished item without ripping it open. And how to create a basic pattern for a children's dress based on a T-shirt or T-shirt.
First we need simple pattern children's dress, you can download it on the Internet, cut it out of magazines or make it using any of the methods I showed.
We remove a duplicate from the pattern; to do this, we trace it on a second sheet of paper. Next, we will work with the duplicate, and save the main pattern for sewing other dresses.
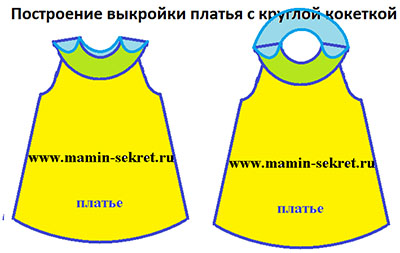
We draw a line of a round yoke by hand; it can be of any size and shape depending on your desires.
After this, we move the upper lines of the armhole a little towards the center, and on the chest we make the dress a little narrower. Both lines are shown in the drawing blue. We get 2 parts of the dress: the yoke (colored green in the diagram) and the hem (yellow in the diagram). You can now cut out the pattern and sew a dress with a round yoke using it. But I want to make fasteners on the yoke, so I will finalize the pattern a little more.
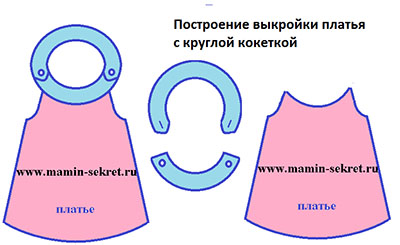
On the yoke we will draw overlaps for the fasteners. If desired, you can raise the neck line at the back to make it smaller. These lines are shown in blue in the figure. After this, we reflect the back of the yoke upward to get the back of the round yoke.
In the final version, the pattern consists of three parts: the hem, the front of the yoke, and the back of the yoke.
 ъ
ъ
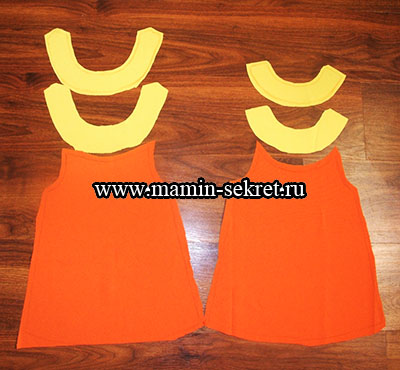
We transfer each part twice onto the selected fabric and cut it out, leaving seam allowances.
Attention! If you raised the neck line at the back, then the hem of the dress needs to be extended upward by the same number of centimeters.
Sew the side seams of the dress and finish the armholes. I finished the sleeves with contrasting bias tape, but you can do them with a piping.
Let's start sewing a round yoke. We connect the parts with the right sides inward and sew the edges on a typewriter. But not completely, but leaving a hole at the bottom equal to the width of the hem of the dress. To make it clearer, in the photo I have highlighted the stitched lines in blue. We need to make cuts so that the product does not bulge when we turn it inside out. We make the cuts carefully, almost to the machine seam; they are shown in red in the photo.
After this, turn both parts of the yoke inside out and iron them. Sorry for the wet spots on the fabric, the iron broke down and started producing a stream of water instead of steam, but there was no time to dry.
![]()
Now you need to sew the yoke to the dress itself. This is one of the most difficult stages in sewing a dress with a round yoke. And to make it easier, it is better to iron the yoke along the hem line.
Then we mark the middles of all the parts. We put the hem inside the yoke. Matching the center line well and pinning it with pins. Please note that we are now connecting the dress to only one side of the yoke (inner), we will sew the front side later.
Turn the dress over to the wrong side and machine stitch the yoke connection line.
Then turn it right side out, pin it again, and machine sew the front seam. In this way, sew both parts of the yoke to the dress.
Sew buttons on the front of the yoke and make holes for them.
This is what a finished round yoke looks like with two button closures. If desired, it is fashionable to make a fastener on one side or replace the buttons with buttons.

The children's dress with a round yoke is ready. All that remains is to process the hem; you can simply fold it or sew it with bias tape.
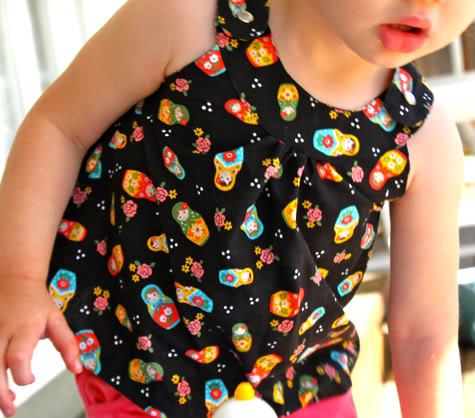
There are many models of dresses with a round yoke, but the basics are the same for all of them. Combining various fabrics and colors in tailoring, you can do it perfectly different models. I'll give you some ideas for inspiration.
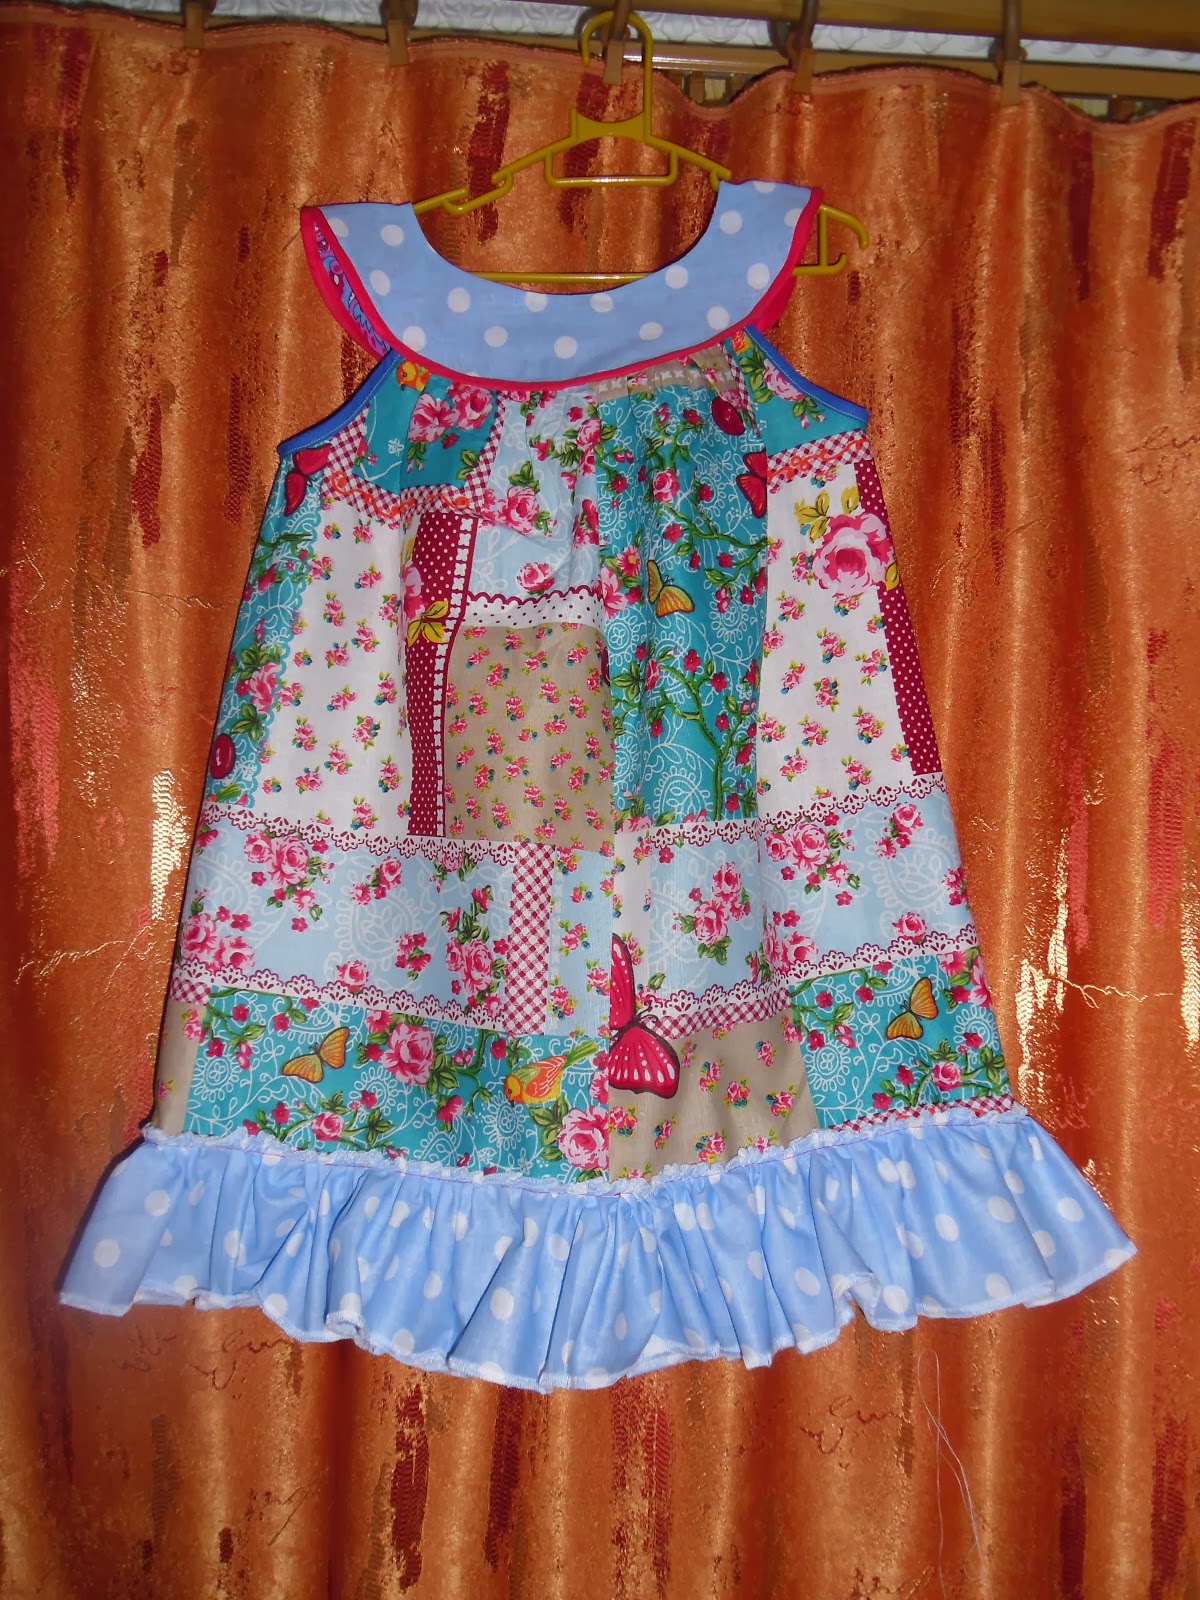
If you liked this material, tell your friends about it on social networks.
You can sew this cute dress with a yoke for a girl yourself in just a couple of hours. To make the dress look impressive, choose three companion fabrics for it: the main one is plain rich in color fabric, fabric with a print for the yoke - for example, with watermelon seeds, as on our model, with polka dots or small flowers, the third fabric must be contrasting - white or milky. It is in this combination that the dress will sparkle summer colors for real!
All you need to model a dress pattern for a girl with a yoke and an inverted pleat is to build a pattern for the base of a dress for a girl
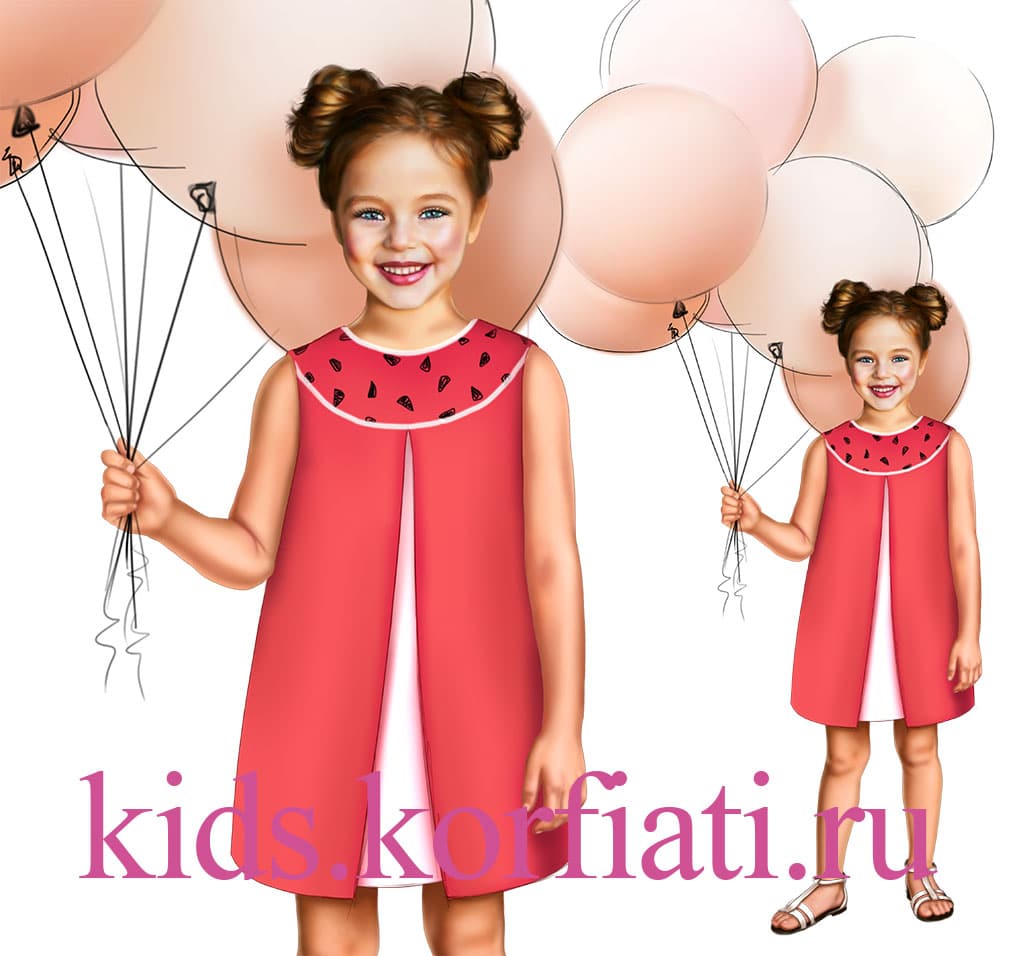
Dress with a yoke for a girl: pattern
Draw modeling lines on the pattern of the front and back of the dress.
Back. From the neckline in the middle of the back, set aside 8-9 cm. Connect the resulting point to the shoulder according to the pattern (see Fig. 1). Cut off the yoke of the back of the dress and cut it out separately.
In the middle of the back, give an increase by counter fold. The width of the increase is 12 cm (see Fig. 2). Cut the fold part and cut it out separately.
Cut out the lower part of the back with a fold in the middle of the back. Cut out the back yoke - 2 parts. The dress is fastened with a button with an air loop at the back neckline.
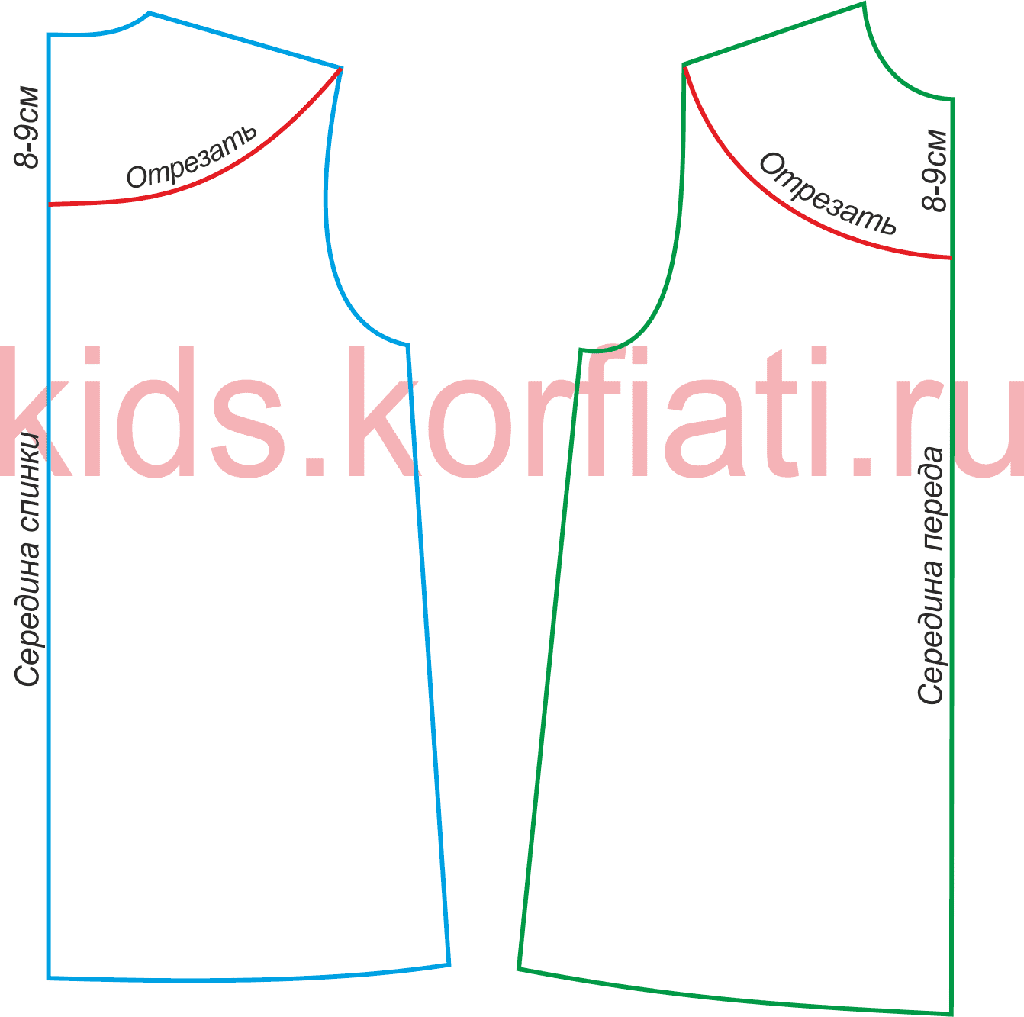
Rice. 1. Modeling the yoke of a dress
Pattern front model in a similar way. (see Fig. 2). The neckline of the dress and the armholes of the dress are finished with bias tape. For the binding, cut it 3 cm wide and length according to your measurements.
ADVICE! The height of the yoke can be changed by making it narrower or wider. You can also change the shape of the yoke.
Along the bottom line of the yoke, release the trim, folded in half - the finished width of the trim is 0.5 cm.
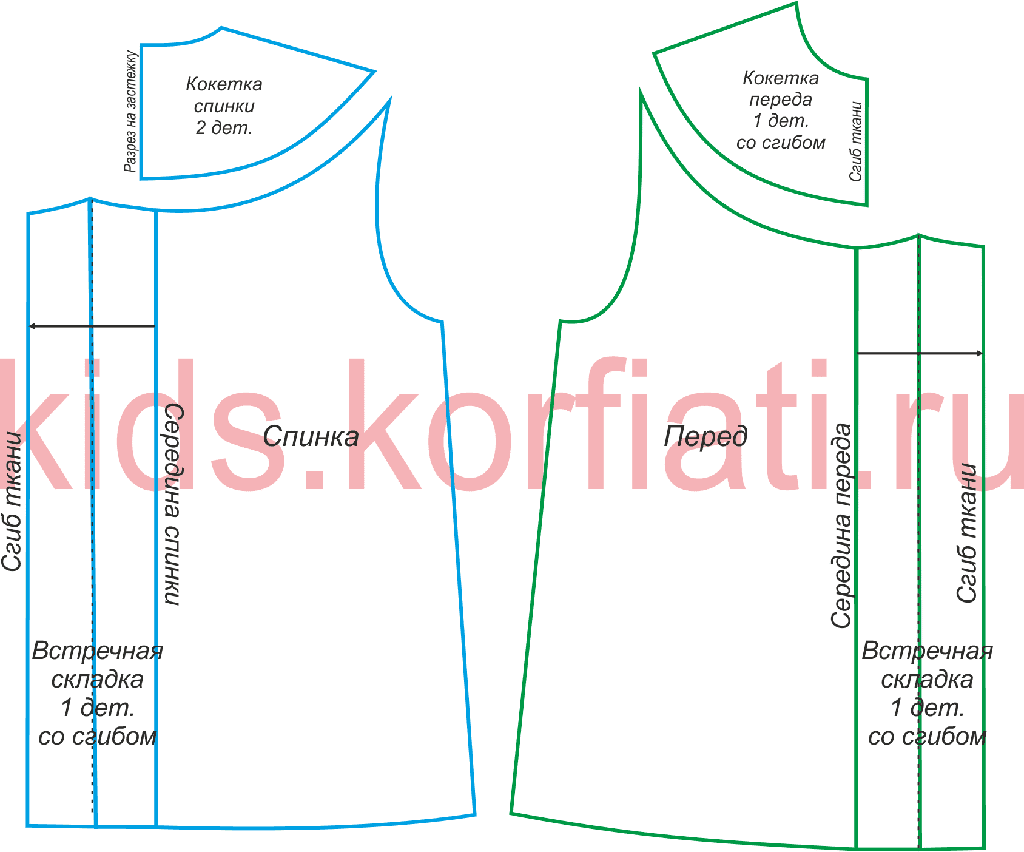
Rice. 2. Modeling a counter fold
How to cut a dress with a yoke for a girl
Cut from plain fabric:
Back of the dress - 2 parts;
The front of the dress has 2 pieces.
2 oblique strips for processing the armholes of the dress, 3 cm wide and length as measured.
From the companion fabric, cut out:
Dress back yoke - 2 parts;
The front yoke of the dress is 1 piece with a fold.
From white fabric cut out:
Counter front fold - 1 piece with a fold;
Counter fold of the back - 1 piece with a fold.
2 oblique strips of fabric for finishing the neckline and finishing the lower edge of the yoke, 3 cm wide and length as measured.
Seam allowances - 1.5 cm, at the bottom of the dress - 2.5 cm.
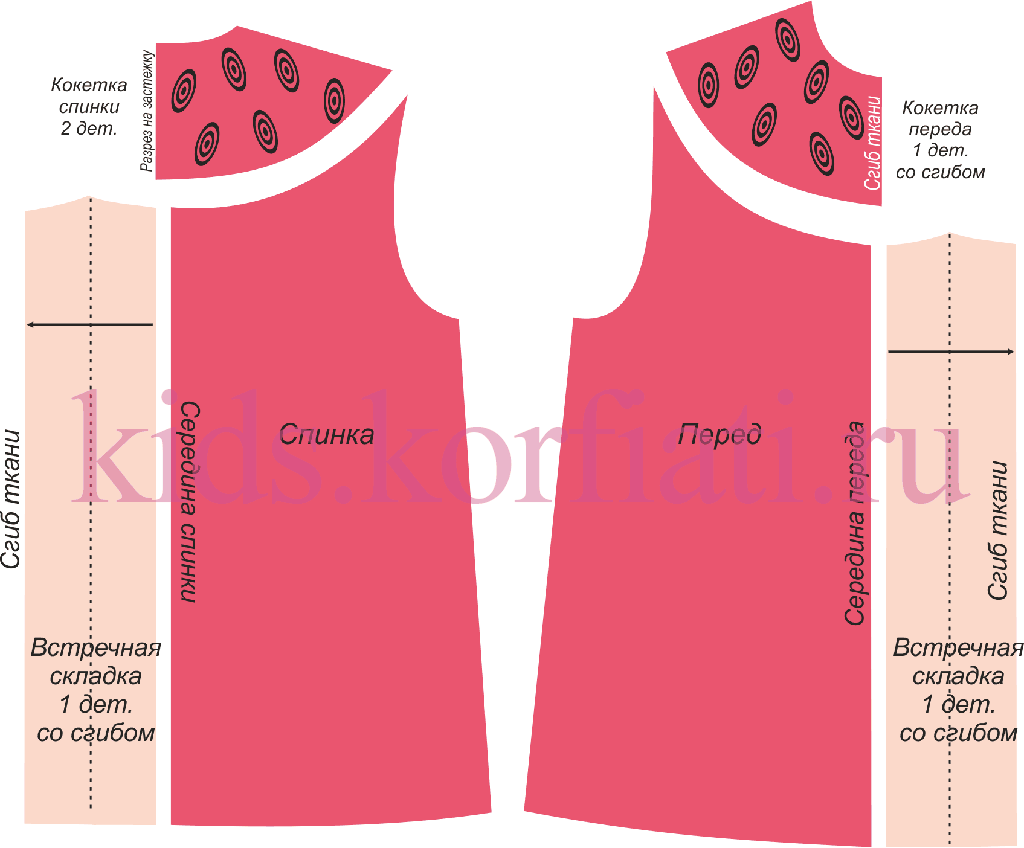
Rice. 3. Dress cut details
How to sew a dress
Fold the details of the back yokes along the cut line onto the fastener, each separately, stitch the allowances close to the edge. The details of the yokes do not grind down (!) - there is a cut for a fastener.
Sew counter pleats made of white fabric to the details of the front and back of the dress. Process seam allowances, iron folds and baste along the top edge.


