Crochet yoke sizes. Crochet blouse with round yoke
04/18/2012 Admin
How to correctly make calculations in order to complete the model with round yoke.
When making any product with any yoke shape, we need to build a pattern in full (or scaled) size, then apply the lines of our yoke to the pattern.
Then we need to take some measurements on linked sample selected pattern and according to the existing pattern.
1. You need to know the volume of the yoke at the top - in cm and in the number of columns - pink line.
2. Know the volume of the yoke by its lower, wide edge - in cm and in the number of columns - green line.
3. Know the length of the yoke of the selected model in cm and in the repeats of the knitted pattern - the brown line.
Depends on:
a) by how many columns should each repeat of the yoke pattern be increased (expanded), in which rows of the repeat is it most convenient to make the necessary increases;
b) the yoke can be of any length from top to bottom, and depending on what pattern it is built on, it depends:
— with a narrow (short) yoke, will we finish all the details with raglan decreases towards the armholes;
— will we issue increases for the armholes themselves;
— are shortened rows needed at the transition to the main fabric, etc.
Example 1. Round yoke with front closure, sleeveless (drop shoulder)
Let's look at specific example, pattern and on a specific model.
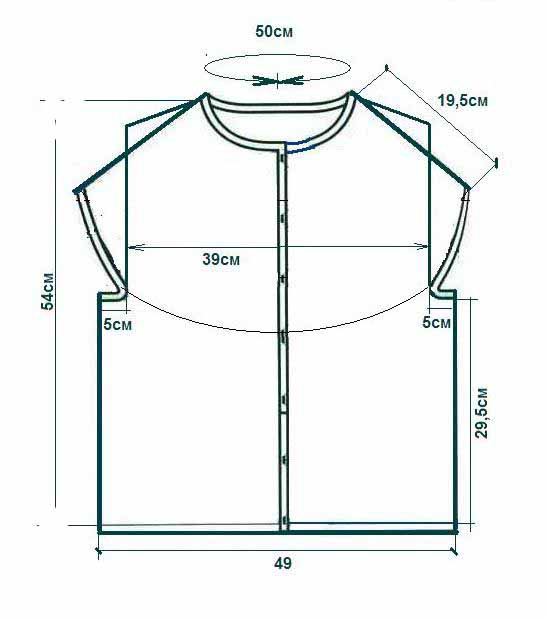
Let's make a model with a dropped shoulder formed by the length of a round yoke, based on a standard pattern with set-in sleeve for 48r-ra. Select a pattern and knit a sample. We make all calculations based on the pattern and knitted sample:
 In the 10x10 pattern we get 25.2 stitches and 12.2 rows. In one repeat - 6 stitches and 4 rows. Around the neck circumference of 50 cm, cast on 126 vp. +1, i.e., we dial 21 rapport. From calculations of the expansion of yokes, we know that the initial number of loops increases no more than 2.8 to three times, and the measurement of cm with tape around the body and lowered arms should be within 130 plus or minus 10 loops, we calculate to which we need to reach the number of columns in the rapport by expanding the yoke.
- measuring cm with tape according to the pattern gives 136-137cm, which according to the sample gives us (136x127p): 50cm = 345.4p. We typed 21 repeats, which means that we must reduce the resulting calculated number of loops to a multiple of 21:
345.4:21 = 16.5 loops = 17 loops in one repeat along the bottom of the yoke.
Let's take a closer look at our sample. With a repeat height of 4 rows and a yoke length of 19.5 cm, we need to knit 23 rows, adding evenly to the lines of the pattern. 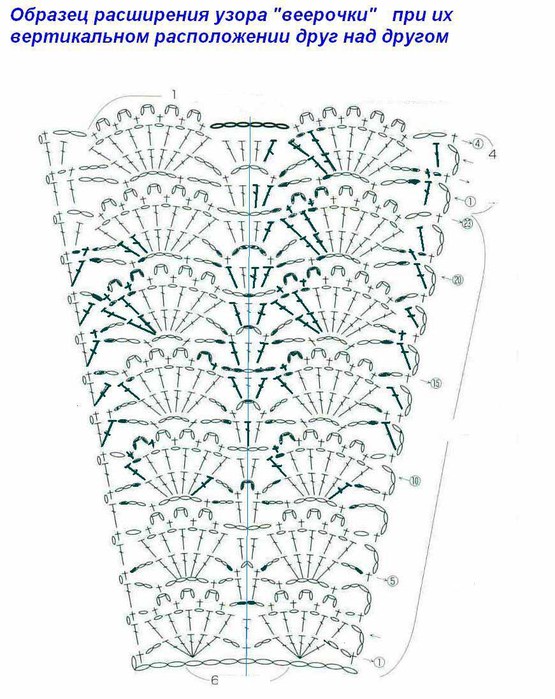 Having knitted the yoke, we proceed to distribute the yoke into two shelves and a back. We have 21 rapports. If we traditionally divide into 3 parts - one for the front, the second for the back and the third for both sleeves, we will get 7 repeats per 1 part, which corresponds to 7p.x17p. = 119 loops, and the width of the back without armholes is 39 cm, which is equal to 6 rapports of the extended circuit.
17px6p=102p. Let's check again: (39cm x127st.): 50cm = 99st.
Therefore, we will separate 6 repeats on the back, 3 repeats on the shelves, and 4.5 repeats on the sleeves.
First, we need to lengthen the back - knit a full repeat of the pattern in height, to obtain a “sprout” - that is, so that the “front” of the model does not “ride” up, does not ride up to the neck.
On the middle 6 repeats of the yoke, which correspond to the back, we knit 4 rows of the pattern. Now we knit with the rapports obtained by expanding the yoke pattern 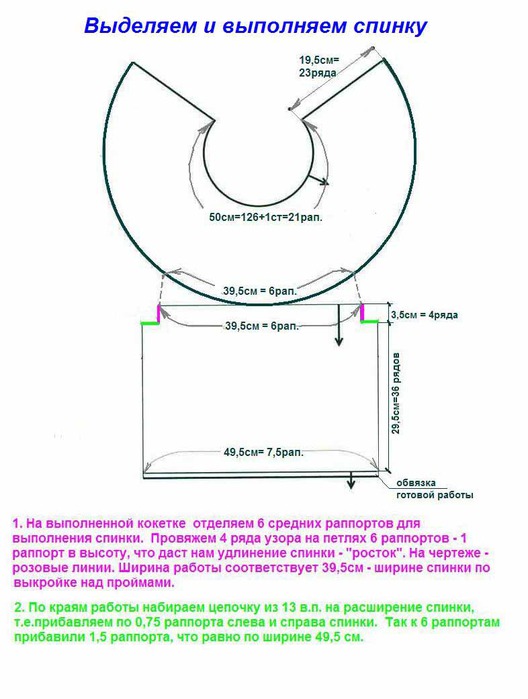 According to the pattern, the width of the back with armholes is 49.5 cm or 7.5 rapport. Let's add armholes to the back on its sides. To do this, after knitting the 4th row of the back sprout, we knit a chain of chain stitches at the end of the row. 5 cm long, make lifting loops and perform 0.75 repeats of the pattern on the knitted chain, 6 repeats of the back pattern, on the other side of the back we similarly add the width of the 2nd armhole, also include them in the pattern and knit the entire length of the back on 7.5 repeats (0.75+6+0.75= 7.5 rap.).
Then let's start doing one, then the second shelf: 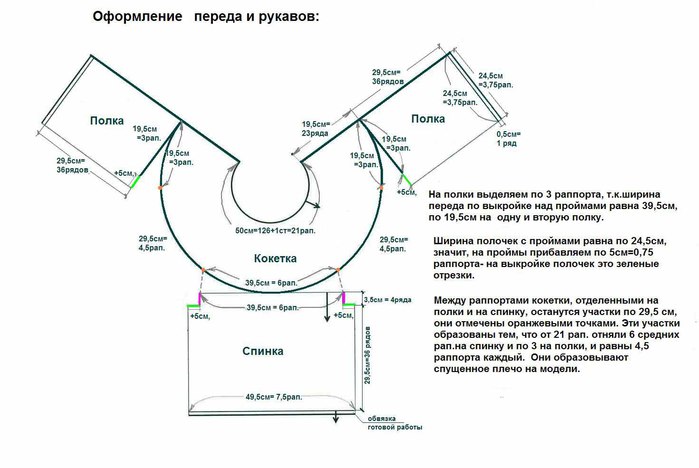 We will tie the formed armholes. We will tie the bottom and fronts by making strips and holes for buttons on the right strip. Let's tie the neckline.
How to correctly make calculations in order to complete a model with a round yoke.
http://club.osinka.ru/
When making any product with any yoke shape, we need to build a pattern in full (or scaled) size, then apply the lines of our yoke to the pattern.
Then we need to take some measurements on the knitted sample with the selected pattern and on the existing pattern.
1. You need to know the volume of the yoke on top - in cm and in the number of columns - pink line.
2. Know the volume of the yoke by its lower, wide edge - in cm and in the number of columns - green line.
3. Know the length of the yoke of the selected model in cm and in the repeats of the knitted pattern - the brown line.
Depends on:
a) by how many columns should each repeat of the yoke pattern be increased (expanded), in which rows of the repeat is it most convenient to make the necessary increases;
b) the yoke can be of any length from top to bottom, and depending on what pattern it is built on, it depends:
- with a narrow (short) yoke, will we finish all the details with raglan decreases towards the armholes;
- will we issue increases for the armholes themselves;
- are shortened rows needed at the transition to the main fabric, etc.
Example 1. Round yoke with front closure, sleeveless (drop shoulder)
Let's look at a specific example, pattern and specific model.
Let's make a model with a dropped shoulder formed by the length of a round yoke, based on a standard pattern with a set-in sleeve for 48 size. Select a pattern and knit a sample. We make all calculations based on the pattern and knitted sample:
In the 10x10 pattern we get 25.2 stitches and 12.2 rows. In one repeat - 6 stitches and 4 rows. Around the neck circumference of 50 cm, cast on 126 vp. +1, i.e., we dial 21 rapport. From calculations of the expansion of yokes, we know that the initial number of loops increases no more than 2.8 to three times, and the measurement of cm with tape around the body and lowered arms should be within 130 plus or minus 10 loops, we calculate to which we need to reach the number of columns in the rapport by expanding the yoke.
- measuring cm with tape according to the pattern gives 136-137cm, which according to the sample gives us (136x127p): 50cm = 345.4p. We typed 21 repeats, which means that we must reduce the resulting calculated number of loops to a multiple of 21:
345.4:21 = 16.5 loops = 17 loops in one repeat along the bottom of the yoke.
Let's take a closer look at our sample. With a repeat height of 4 rows and a yoke length of 19.5 cm, we need to knit 23 rows, adding evenly to the lines of the pattern.
Having knitted the yoke, we proceed to distribute the yoke into two shelves and a back. We have 21 rapports. If we traditionally divide into 3 parts - one for the front, the second for the back and the third for both sleeves, we will get 7 repeats per 1 part, which corresponds to 7p.x17p. = 119 loops, and the width of the back without armholes is 39 cm, which is equal to 6 rapports of the extended circuit.
17px6p=102p. Let's check again: (39cm x127st.): 50cm = 99st.
Therefore, we will separate 6 repeats on the back, 3 repeats on the shelves, and 4.5 repeats on the sleeves.
First, we need to lengthen the back - knit a full repeat of the pattern in height, to obtain a “sprout” - that is, so that the “front” of the model does not “ride” up, does not ride up to the neck.
On the middle 6 repeats of the yoke, which correspond to the back, we knit 4 rows of the pattern. Now we knit with the rapports obtained by expanding the yoke pattern
According to the pattern, the width of the back with armholes is 49.5 cm or 7.5 rapport. Let's add armholes to the back on its sides. To do this, after knitting the 4th row of the back sprout, we knit a chain of chain stitches at the end of the row. 5 cm long, make lifting loops and perform 0.75 repeats of the pattern on the knitted chain, 6 repeats of the back pattern, on the other side of the back we similarly add the width of the 2nd armhole, also include them in the pattern and knit the entire length of the back on 7.5 repeats (0.75+6+0.75= 7.5 rap.).
Then let's start doing one, then the second shelf:
We will tie the formed armholes. We will tie the bottom and fronts by making strips and holes for buttons on the right strip. Let's tie the neckline.
Beautiful model crochet blouses made with a round yoke decorated with a “pineapple” pattern, the main part of the blouse is knitted in a simple openwork pattern. The blouse is crocheted from top to bottom according to the given patterns in circular rows without seams.
Size: 38.
You will need: 400 g of black yarn (100% cotton, 50 g/170 m), hook number 2.
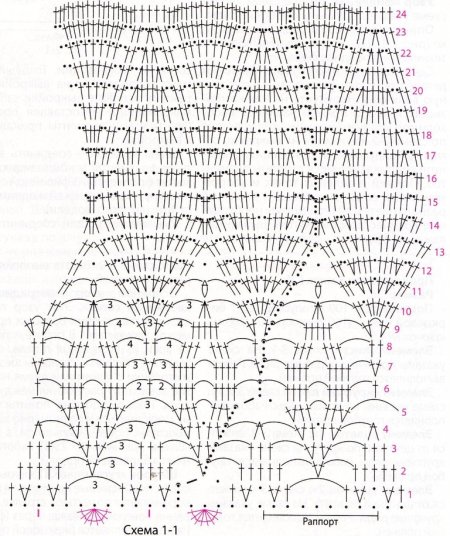
Yoke pattern: pattern 1-1, knit in the round. The diagram shows circular rows.
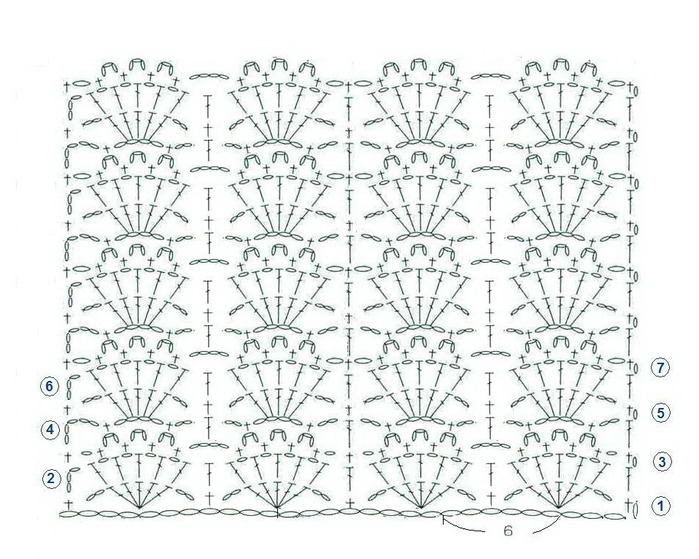
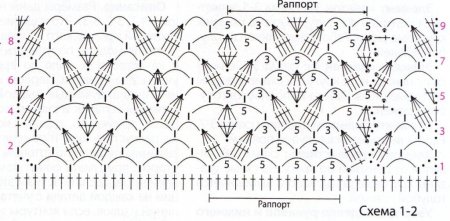
Main pattern: Scheme 1-2, rows 4 to 7 are repeated. The diagram shows circular rows.
Description of crocheting a blouse: The dimensions and direction of knitting are given on the pattern (Fig. 1-1, 1-2). Start knitting the product from the top from the neckline. The work is carried out in stages.
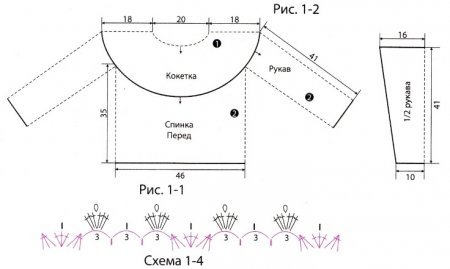
The first stage of crocheting a blouse starts with knitting a round yoke. Dial a chain of 128 v. p. (the number of loops is a multiple of 8), close it into a ring and knit according to the 1-1 pattern, distributing the required number of repeats (in this option 16 rapports). Knit in the round without seams, lifting line on new row Place along the raglan line.
To expand the canvas, make additions as indicated in the diagram. Knit all the rows of the pattern and finish working on the yoke. Tie the top edge in one row and with a pattern according to pattern 1-1 (highlighted in red).
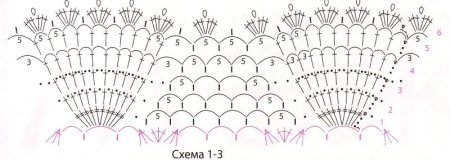
The second stage of knitting a blouse consists of knitting the front and back with an openwork pattern. Divide the fabric into 4 parts (sleeves - 4 repeats, front - 4 repeats, back - 4 repeats). We leave the sleeve armholes out of work for now. Combine the back and front into one fabric and knit from top to bottom in the round without seams with a pattern according to pattern 1-2. Knit to the desired length of the product. Tie the bottom edge in a circle with a pattern according to pattern 1-3.
In the last third stage of knitting a blouse sleeves are knitted. You start knitting the sleeve from the edge of the yoke where you left the armholes for them. Knit from top to bottom in the round without seams using a pattern according to pattern 1-2. Tie the sleeve to the desired length. Knit the second sleeve in the same way. Tie the lower edges of the sleeves according to pattern 1-4.