Cat drawn from behind. How to draw cats
And he demanded that officials correct the shortcomings of the Unified State Examination
The President spent Knowledge Day at a school in Kurgan, which he himself ordered to be renovated about a year and a half ago. The European-quality renovation cost the federal budget 180 million rubles, and for this money the school was stuffed with technical innovations. For example, Putin personally tested a miracle board on which you can draw with your finger. At the same time, one might say, he taught the children the first lesson in zoology this year.
Video screenshot: RIA Novosti
Vladimir Putin already visited Kurgan School No. 7 in February last year and was dissatisfied. The building turned out to be in a deplorable state (one is left wondering why they decided to show it at all). Dissatisfaction with the GDP, of course, resulted in expensive repairs under the personal supervision of the regional governor Oleg Bogomolov. They say he checked the progress of the work every week. As a result educational institution transformed beyond recognition. For 180 million rubles from the federal budget it was made the most luxurious in the Trans-Urals.
But Putin found something to complain about here too. For example, he was not satisfied that machines had not yet been installed in the labor office. After all, as the guest explained, it would be good for students to prepare for training in blue-collar jobs. Because they, according to him, will be in great demand. The head of state named a number of professions as examples: miner, fisherman, metallurgist.
Oleg Bogomolov could not explain the lack of machines.

“You have to control everything yourself,” Putin grumbled and ordered the governor to bring equipment. So 180 million was not the last expenditure on the school, which the president personally runs in the famous “manual mode”.
Although they forgot to install the machines, other technical equipment in the school turned out to be perfect. top level. The president especially lingered in the computer science room: here he was interested in a miracle board on which you can write either with a special “pen” or just with your finger. The head of state immediately went up to the board and drew a strange figure that no one could immediately identify.
“This is a souvenir for you,” the president said to the students and headed towards the exit.
What is this? - one of the guys dared to ask. Putin, who was already at the door, turned and said with a smile: “This is a cat. Back view".
The matter was not limited to this small “lesson” in zoology: the high school students asked the president several questions that concerned them. In particular, they asked what would be done to prevent further scandals during the delivery of the United state exam. Let us remind you that on the eve of the Unified State Examination in social networks KIMs and answers to them appeared, and graduates posted photographs of their assignments on the Internet. Another scandal erupted over the so-called “Unified State Examination” tourism.
Putin admitted that there are flaws in the current rules for passing the state exam. And he advised the Ministry of Education to “promptly” propose measures to eradicate them.
High school students also asked why gold medals received at school with “sweat and blood” no longer play any role in getting into a university.
“I wouldn’t want blood,” Putin smiled, but then took a serious tone. He said that one should strive for a gold medal, but when entering a university, the main thing is real knowledge. It turns out that the president does not consider the medals to be proof of such at all.
Watch the video: Putin draws a cat with his finger. “What is this?!”
Before you start drawing a cat in motion, remember all the proportions well. But keep in mind that they are all capable of change. For example, during a wide jump, the body and paws are extended, and, conversely, the cat contracts before the jump.
When the spine straightens, the chest also extends, since it consists of movable ribs, and the distance between them can increase. Pay attention to the cat’s center of gravity in Figure 8a: it hangs, not supported by anything, and yet the cat is balanced. This is where the laws of mechanics come into force. For a more powerful jump, the cat concentrated the main weight of its body in the rear. She's fit hind legs under the stomach, thereby creating the greatest scope for the jump. A powerful push - and the cat “flies”. In fact, the center of gravity “flies”, because any movement begins precisely from it.
Watch the tail - it should not hang limply. This is not an element of beauty, but an extension of the spine, and it serves as balance when moving. The powerful swing of the tail helps give the spine the desired direction, which makes it possible to make sharp turns when running or climbing trees.

Always remember that the distant limbs, not visible in the figure (Fig. 9, a), are shaded here. At first it’s worth drawing them thin lines so that the paws do not “jump out” from the most unexpected places, as in Figure 9, b.

Another very common mistake made by novice animal painters: when looking at an animal a little from above, the paws farthest from us in the drawing will be slightly higher than the ones closest to us. If you forget about this, you will end up with an incident like in Figure 10, a: the far hind leg is closer to the front leg, which in reality does not happen.
To avoid this, you need to draw (or imagine) a quadrangle, at the corners of which the paws will stand (Fig. 10, b).

The neck begins at the junction of the spine and shoulder blades (Fig. 11, a). It connects to the head at the back of the head, and not at the throat (Fig. 11, b). This is another common mistake.

To correctly construct the far and near limbs in relation to each other, you can draw sections along the cat’s body. One on the shoulders, at the junction of the neck with the body, one on the waist (Fig. 12). When a cat stands sideways to us, the limbs coincide and these planes are not visible. If she stands half-turned, they also turn towards us.
Make sure that the line of the spine is always smooth. In general, a cat is a wonderful animal without sharp edges. If you notice any corners in your drawing, smooth them out immediately. Unless, of course, you strive to develop your own style of drawing and stylization.

Let's return to the spine. A cat's is very flexible, allowing him to climb trees and get into the most inaccessible places. And all of it is so soft, as if it were flowing over the ground.
Try to draw any smooth curved line. I guarantee that no matter what you draw, you can add a cat to it (Fig. 13-14).
“Notice how the cat places her hind legs. The hock joints move slightly closer together, making the cat appear clubfooted. By the way, this applies to all animals.”
Of course, no advice can completely replace direct observation of the animal. You need to choose a time and draw a cat from life. At the same time, there is no need to require the animal to sit still. Try to develop visual memory. Try to take a picture of nature in your memory and quickly transfer everything to paper. This, of course, will not work out right away, therefore, having chosen an interesting pose, try to sketch it in just a few strokes - the bend of the back, the direction of the head, the position of the paws (Fig. 15, a). Knowing the structure of a cat, you can then finish the drawing without looking at nature. The gray oval is the chest. We are looking at it from the side, so its shape is close to a circle.


In the next two stages, do more detailed study(Fig. 15, b, c). Draw paws and a muzzle. Along the contour, where the body bends, mark the fur with several strokes.
The last stage (Fig. 15, d) is to immediately outline the shadows. In this drawing, the light falls on the cat from the right and from above, so we see a falling shadow from the chin on the neck, on the back left paw, and, of course, on the entire right side of the cat.

When working with nature, it is good to use this method: draw several cats on a sheet of paper. While the cat is in one pose, draw it like this. As soon as you change your position, start a new sketch on the same sheet of paper. The cat will still return to its previous position, and then you will finish the first drawing. Look how the wonderful animal artist Vasily Vatagin did it.
Never be a slave to nature. Don't copy her. Even if you want to copy a cat from a photograph. Use all the knowledge you have acquired and be guided by it. Mentally divide the cat in the photo into its component parts. Draw invisible distant paws. Feel the cat. Imagine how it moves. Become a cat for a while.

From the site:
ALL PHOTOS
The president depicted the “rear view” on Knowledge Day on the board of Kurgan school N7. The rash decision of the head of state to give precisely such a gift to first-graders caused a lot of blog posts. And the Dozhd TV channel immediately turned to a psychologist for clarification.“The first thing that catches your eye is the very unusual pose and angle,” said Boris Suvorov, director of the Seven Birds psychological center. He offered several interpretations: “Firstly, we can say that this is a person who is not inclined to contact people, avoids it, is unsociable, withdrawn, lonely, does not like large crowds of people.”
“The second is some claim to originality, pretentiousness, unusualness, but just a claim: a person actually does not have any outstanding creative abilities, but he wants to demonstrate something unusual, non-standard, an original approach,” the specialist continued.
“The third is a clear discrepancy in proportions, this may indicate that a person lives in his head. He is not very in touch with his emotional sphere and his body and bodily needs. He is more in the intellect,” he argues.
The psychologist paid special attention to the cat’s tail: “In the way it is depicted here - strictly vertically in the form of a stick, a certain phallic symbol is clearly visible. It is not shaggy, not fluffy, does not curl. If the subject draws this, this is typical for people who do not "are very confident in their masculinity or do not feel very confident in this regard. Not necessarily sexually, but one should suspect some problems with masculinity."
A journalist from the publication Slon.ru expressed the following opinion: “Look: here is a person entering a class, this person can do anything, and this person, at the first opportunity, draws a cat’s butt on the board. That is, on the one hand, the president knows that this is the whole country will see - the drawing can be regarded as a message to his compatriots, but on the other hand - we are all wondering what he is concerned about statesman Putin, and it turns out that this is what’s in his head.”
It must be said that almost all major newspapers mentioned the president’s drawing in their materials about the beginning school year, some made it into the headlines (a review of articles is on the Headlines website), but they did it as succinctly and neutrally as possible, leaving readers to judge for themselves.
But bloggers were not shy in their comments. Many immediately formed an association with the “Black Cat” gang from Stanislav Govorukhin’s film “The Meeting Place Cannot Be Changed”: with the scene where a member of the Blotter gang, after robbing a store with a cigarette butt, draws a cat’s silhouette on the wall.
Publicist and member of the Yabloko party Sergei Vasin published two drawings side by side in his LiveJournal, offering to compare them. "Is this just a coincidence..?" - he asks a question. And he develops the theory that Putin’s subconscious suddenly “jumped out.” True, not “gangster”, but “chekist”, since Vladimir Vladimirovich, as you know, was a KGB officer.
“Putin draws a “cat in the back” on the board, but in his thoughts is an explosion on a cruiser. Military spirit!” - wrote on his page in
Cats are incredibly graceful and beautiful animals, so drawing them is a real pleasure. For beginning artists who have recently begun to master graphics, master classes on how to draw a cat with a pencil step by step are suitable.
Creating such cats does not require skill, talent or artistic taste. If a child asks to draw a cat, and time is short, then you can limit yourself to funny images.
Sleeping kitten
Anyone can easily draw such a sleeping miracle. All you need for this is an A4 sheet, soft and hard pencils, an eraser, a little patience and perseverance.
Stage 1: We start drawing a sleeping cat from the head. To do this, draw a circle with a hard pencil and mark the thin auxiliary lines. The vertical divides the muzzle clearly in half, and the horizontal goes so that top part accounted for more than half the circle.
Stage 2: Focusing on the auxiliary lines marked in the first stage, we outline the kitten’s eyes, nose and mouth.
Stage 3: Mark the outline of the head with a soft pencil. We draw the ears, protruding fur, and a funny “whirlwind”.
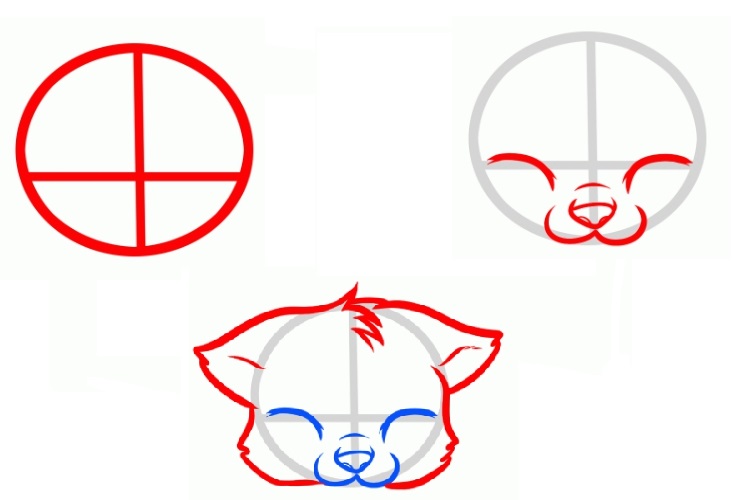
Stage 4: draw the body of the animal and draw the tail. Please note that the kitten is curled up into a ball, so the tail covers part of the muzzle.

Stage 5: At the last stage, the paws and whiskers are drawn. Use an eraser to carefully erase any excess lines and markings. The kitten is ready. If desired, you can color it with paints or colored pencils, or leave it as is.

Mischievous kitten

Any child will love this naughty baby. You need to start drawing a mischievous kitten from the head. Draw a circle, add triangular ears and draw a muzzle. Then comes the drawing of the torso and paws. Play with your kitten's emotions and show your child that... small parts The mood of the cat shown in the picture depends. Surprise can be conveyed using widely open eyes; a protruding tongue will add mischief, and by moving the pupils slightly to the side, you can make a thoughtful or sad cat.
Kitten made of circles

Even a child can make this drawing of a cat from circles with a pencil, since it is one of the most simple ways for beginners. The animal is drawn from the back, so there is no need to draw features and maintain proportions.
First, two circles are drawn on the sheet so that they slightly intersect each other. In this case, the diameter of the lower one should be approximately twice as large as the upper one. Then the ears are drawn to the upper part, and the tail to the lower part. Then the mustache is drawn and the fur is randomly marked.
One circle, two circle
Another clear example how to quickly and easily draw a cat with a pencil.

A larger circle is drawn first, and then another one is drawn inside it, small circle. Add ears, facial features and a tail. Children will love a funny sleeping kitten and can quickly distract a child and cheer him up.
Such a sketch is something between simple schematic images and realistic drawings animals.
We mark the outline of the animal with thin auxiliary lines made with a hard stylus. The sketch of the head looks like an octagon, the ears are triangles, and the body is a rectangle or cylinder. After this we make markings for the paws.
We carry out horizontal line in the center of the head, thus indicating eye level. We draw sketches of the mouth and nose, round eyes. We draw a chin and mustache.
We define the muzzle more clearly. We draw in detail the eyes, nose, mustache and cheeks. Soft pencil draw fibers on the ears, head and muzzle. Then we draw the front paws with claws and pads, and detail the hind paws.


On final stage All auxiliary lines are carefully erased. It's time to draw fur. For these purposes, a 2M (or 2B) lead is best suited, but in principle you can use any soft one.

Realistic
Many people think that realistic portraits pets - not the best simple task for beginners, but in reality not all sketches are difficult. You can verify this using the example step by step instructions to the portrait of the Scottish Fold.
Draw a Scottish fold cat with a pencil
Scottish Folds are loved by many breeders for their disposition and charming appearance. Thanks to distinctive feature breed - with ears curved forward and down, these cats look so cute that it is impossible to resist squeezing such a mustache. We offer simple step by step lesson for beginners how to draw a British cat with a pencil step by step.
At the first stage, auxiliary lines are drawn with a hard pencil: 1 vertical and 2 horizontal. The vertical one shows the center of the muzzle, so it needs to be slightly shifted to the right relative to the center of the page, since the cat is sitting slightly turned.
The horizontal ones should be parallel to each other, as they indicate the size of the animal's eyes. After this, you need to start drawing the contour of the muzzle and eyes.
Important! For a cat to be proportional, the distance between the eyes must correspond to the size of the eye.
When drawing a nose, remember that its size should be less (narrower) than the distance between the eyes.

Then, using an M or TM stylus, we darken the eyes and nose. More experienced artists If you are confident in your movements, you can use a black pen for these purposes.
To make the cat’s look “alive”, do not forget to leave unpainted, white areas, as in the picture.

For the third step, you will need a 2M (or B2) pencil. Carefully, smooth lines, shading the strokes, darken the areas around the pupils. Notice how the color goes from darkest (around the pupils) to lightest. Then, with a hard stylus, arrows are marked in the direction from the nose. They show directions for drawing fur.

Using the softest stylus (it is better to use B4 or 4M), focusing on the arrows, draw the darkest fur. The crown and fur under the ears should be the darkest.

To complete the picture, draw in the remaining fur. The cat is ready
Attention! The color of the bristles depends on the force of pressure.

In this lesson I will tell you how to draw a cat step by step for a child. Quite often children encounter problems when they are just beginning to develop their Creative skills, and the drawing object is very complex. In our lesson we will easily draw a simple but beautiful cat step by step.
We will get this drawing:
And at the very end of the lesson we’ll draw this cutie:

Let's start drawing the cat. If you are drawing with a child, explain to him what parts the cat consists of. In our case, we start drawing from the head - it has a round shape, slightly elongated to the sides.

After the circle is drawn, we proceed to drawing the cat's body. Draw two curved lines from the head, and on the side there are two semicircular lines indicating the cat’s hind legs.

What kind of cat is without ears? Therefore, tell your child that ears are a must. Draw a pair of ears on top of the head in the form of triangles.

At the bottom of the cat’s muzzle we draw a nose in the form of a triangle, and from it – two curls, indicating the cat’s mouth.

On top, draw cat eyes with your child - they are not round, but pointed at the corners and slightly slanted. The pupil has an elongated shape.

Now draw the cat's paws as shown in the bottom picture. We will draw three fingers on each paw, and if your cat is angry, advise your child to draw claws.

And of course, any cat just needs a tail - draw it on the side.

We add fluffiness to the cat by drawing fur on the chest and on the paws.

Our cat is almost ready, we just need to add a few details - fur on the ears, whiskers and a bow. Your child can add some of his own details at his own discretion - for example, draw a bowl of milk or a mouse next to it.

I hope you liked the lesson and learned how to draw a cat with a child step by step. If you like to draw with children, I advise you to visit my website.
Let's try to draw some more cute and cute cats with step-by-step schemes. First, let's draw a realistic cat in full height by using step by step guide with pictures.

The first step is to mark the sheet to indicate the proportions of the cat. Our base will consist of several figures - I draw the shape of the head, body, and triangles of ears on top. Look, it’s already starting to resemble a drawn cat! Try to keep the base lines barely visible, this will allow us not to be distracted by them in the future. Next, I begin to draw the cat's face. It is somewhat pointed, with a nose and mouth located in the lower part of the muzzle. Just above the nose we draw the shape of the cat’s eyes.
Now let's start drawing the cat's ears. I add vertical pupils as well as whiskers. The next step is drawing the paws. Notice how they are located in the picture below.

Now we need to draw the back, hind legs and tail of the cat. I also add touches that will make the cat more detailed. We remove the extra lines, outline the contours and, if desired, color our beauty. This is the cat we managed to draw!

Now let's try to draw a cute cartoon kitten. The drawing is very simple, even a child can handle it!
Let's draw a large oval. Kittens always have a fairly large head cartoon drawings, we will also use this technique. Next I draw lines - they will indicate the body and tail.

Next I will draw ears for our kitten and give a shape to the tail. It turns out pretty cute! Now our cat needs to draw a face - I draw two big eyes, and between them I add a nose and a mouth. A couple of lines on the top and on the ears.

Let's draw the cat's pupils shifted to the right, add antennae and start working on the paws. First the front ones, and then the rear ones. Now I want to add stripes to the cat's head and tail.

On last stages You can outline the sketch and get rid of unnecessary lines. I decided to draw the cat in purple and pink tones, and made the eyes green. The cat looks somewhat unusual, but that doesn't make it any less wonderful. What happened to you?
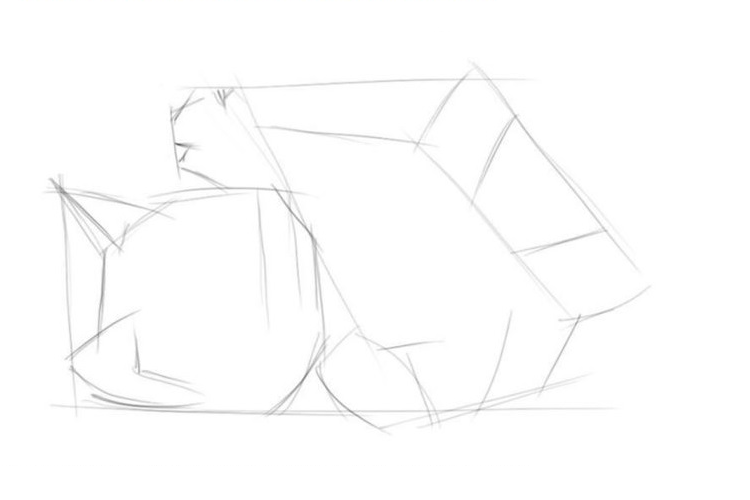
The next cat will be a little more difficult to draw, but believe me, it will be worth it. First, let's mark the sheet with these figures. Practice on a rough draft; after a few attempts you will definitely get it beautiful and neat. Also actively use the eraser, removing unnecessary unsure lines.

Let's draw a figure located under two triangles. In the very center where our lines intersect, draw a nose and mouth. The cat's eyes are closed - it seems that she has warmed her sides in the sun and is simply glowing with pleasure! 
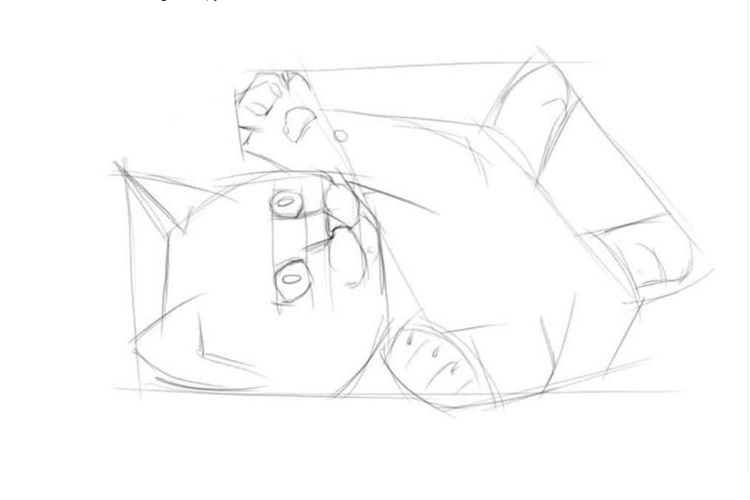
The ears need to be detailed. We shade the side parts with parallel strokes.

We begin to shape the muzzle. We draw on top of the sketch, but now the lines are smoother. I also drew mustaches.

Now we begin to draw the cat's body. She lies with her back to us, so there is no need to draw her paws. I add a few strokes to the place where the spine will be located, this will allow you to immediately understand in what position the drawn cat is lying.


