How to draw a beautiful bouquet in different ways. How to draw a bouquet of flowers beautifully: step-by-step master classes.
Creative people are always looking for ideas and trying their hand at different areas. Someone sculpts from clay, someone or felts toys from wool, and these are not always people who received a special art education. Often these people try to draw, but don’t know which way to approach this process. For example, how to draw roses correctly. The flower is beautiful, but has many petals, and the task seems simply overwhelming.
In this lesson we will tell you how to draw a rose easily. Let's try to lay out each petal on paper step by step, and if you cope with this task, any other flower will no longer be a problem for you.
I would like to immediately clarify what the colored lines in the diagrams mean. Red, blue and grey colour- these are contours to make steps easier to perceive. The blue color will indicate the outline that has already been drawn, and the red color will indicate your next step that you will need to take. And gray is already the color of your creativity, with a simple pencil you will model the petals using light and shadow.
Let's figure out how to draw roses correctly and what we need for this
- Paper - the thicker the better.
- Simple pencils of different hardness.
- Eraser.
- Knife or sharpener for sharpening pencils. In the process, you will need a pencil with a sharp, thin lead.
- Living nature - rose. This is for those who like to overcome difficulties.
Rose, before your eyes.
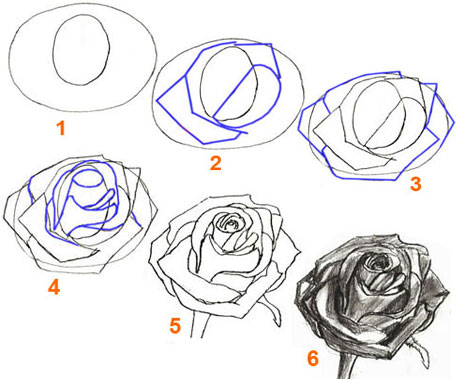
Step 1
Start your drawing with a sketch of the bud; it should resemble a cocoon. Each next step will be adding petals. You must “dress” this bud with petals.
Step 2
Now draw the middle of the flower and start drawing the next petals. Of course, you can simply copy the drawing, or you can use your imagination, make the petals larger or smaller. 


Step 3
When you finish drawing, move on to the leaves underneath. The leaves should be characteristic of roses, sharp and slightly prickly at the tips. 
Step 4
And now it's time for something spicy and soft pencil. With light movements, begin to model the petals and leaves, casting a shadow. This should be done starting from the middle, and gradually move from leaf to leaf. You need to draw everything very carefully and slowly. 
How to draw roses correctly? This question is very creative, everyone draws as they see and as they understand. And if you take it seriously, and you plan to do it, then you will need to study the basics of drawing, human anatomy, or at least leaf through biology textbooks and encyclopedias more than once. Only then will your drawing become conscious. And at the initial level, you are engaged in copying your own content. Don't be afraid to make mistakes and do something wrong, you have an eraser with which you can fix everything. Every great artist I started by copying paintings and from the most basic basics. 
Well, now you will know how to draw roses correctly. Try, experiment, erase everything and start again. Drawing is a lot of work, so you will need a lot of diligence and patience.
Isn’t it a shame when spring flowers and summer herbs remain only as memories in winter? You can stop time and save not only in memory, but also on paper a gifted bouquet of field daisies. You just need to have a pencil and paper in your arsenal, but we will now tell you in detail how to draw a bouquet of flowers.
Learn to draw bouquets
The easiest way to master the technique of drawing with a pencil will be for those who in childhood made applications from dried leaves and buds. But even if you don’t know this type of needlework, it’s never too late to start. In addition, no special tools or materials are required. Everything you need can always be found at the nearest stationery store and flowerbed. By making a flat collage or herbarium, you will gradually understand how best to combine colors and paints, where to place this or that element of the drawing.
The advantage of drawing with a pencil is that there is no need to select the main background of the background and think through the colors of the sketch in advance. But this fact is also considered a minus of the picture. Flowers painted with paint or at least decorated with colored pencil look much more natural. Of course, it’s up to you to decide how best to do it.
It would also be useful to think through the main theme of the drawing in advance. Think about what you want to end up with - an abstract image, a landscape or a simple miniature. In the meantime, while you are making a decision, we suggest that you familiarize yourself with master classes that will tell you in detail how to draw beautiful bouquet colors.
Dahlias, daisies, roses: master class
A very interesting picture is one in which several types of flowers and parts of the composition are drawn. For example, spectacular dahlias combine harmoniously with simple daisies and royal roses. How to draw such a bouquet of flowers with a pencil step by step is described in this lesson. By the way, it will be beautiful if the picture is decorated with watercolors. Such works look very unusual.
Necessary materials:
- graphite pencils;
- eraser;
- blank sheet of paper.
Process description:
The sun in miniature
How to draw classic lush bouquet flowers in a vase? The main thing is to think through the theme of the sketch in advance and outline the main lines. Please note that the flowers should occupy the main background of the sheet, but the jug will only be an addition to the miniature. In the background, if desired, you can draw a window frame or add to the sketch plain background. By the way, it is not necessary to decorate the free space, because you can draw on a colored sheet of paper or cardboard.
Necessary materials:
- blank sheet of paper;
- slate pencils;
- ruler;
- eraser.
Process description:

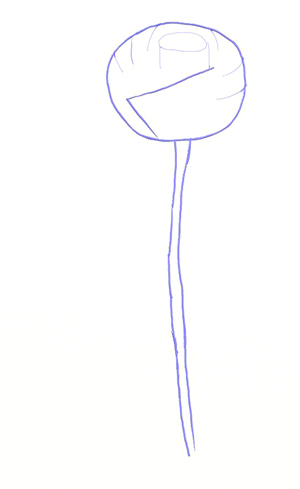
1. The outline of a rose bud is easy to draw

First you need to draw the outline of the rosebud petals. It is not at all difficult to do this by drawing a circle at the top of a sheet of paper. It is not necessary to draw it perfectly even, it is important to take into account that the rose flower will be located inside this outline, so immediately draw the appropriate size of the outline of the bud. Do not forget that the bright lines are secondary and in subsequent drawing steps we will remove them. Draw a rose Let's continue in the next step, but for now add a stem to the bud.
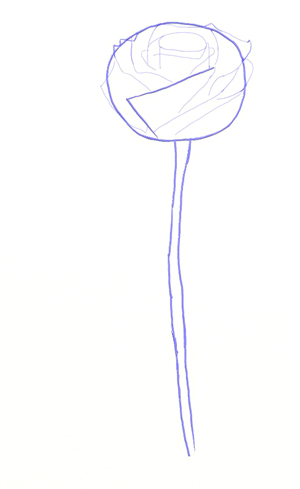
2. How to draw rose petals
First, draw the still unopened part of the bud in the very center of the rose. After this, divide the bud into two parts with a line (in the figure it of blue color). Now it will be convenient and easy to draw lines on the petals of the left and right parts of the bud.
3. Draw the leaves and bud details
Now you need to draw the rose petals in detail. The contours of the petals do not have to be copied exactly from my drawing; they may have a different shape.
4. Continue drawing the petals
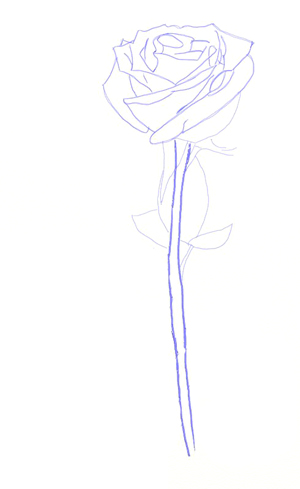
To begin, draw a flower stem with leaves. Draw the number of branches and leaves arbitrarily. The main thing is not to make the leaves too large. Please note that rose leaves have veins. To make them more realistic, you also need to draw them. All that remains is to delete extra contours and draw the petals in detail. The beauty of a rose design lies in the correct depiction of the petals. The top outline of each petal is drawn with two lines connecting at the edge of the petal. This gives the impression that the edges of the petals are curved. This will also help us in the next step to create shadows in the bud, which will make rose drawing voluminous.
5. How to shade a rose with a simple pencil

At this stage, you have already drawn a real rose, all that remains is to add shadows to the drawing of the flower and it will become voluminous. Imagine which side the source will be on bright light to determine which side of the rose will be more illuminated. Where there are indentations between the petals, you need to draw the shadows “thicker”, pressing harder on the pencil. There should also be shadows at the junction of the petals. Lightly rub all the areas shaded with the pencil with your finger. This method smoothes out sharp lines pencil, and rose drawing will look softer.
6. Drawing a rose on a graphics tablet

The drawing will look much more impressive if, instead of tinting with a simple pencil, you color the rose with paints or colored pencils. Be sure to take lighting into account when coloring with colored pencil. Without shadows, the rose will look "flat", two-dimensional. A picture of a rose with a simple pencil can even be slightly “touched up” with colored pencils. This is roughly how I made the rosebud drawing (see below).
Coloring a picture of a rose with paints would be just perfect, but only if you have them and if you know how to use them.

You can draw a rose different ways. This method is convenient for drawing an open bud, drawing out each rose petal in detail. Do not forget that the bright lines are secondary and in the next step of the drawing we will remove them. This step of the drawing lesson is without comments, it is an addition to the main lesson. At each stage, you need to add highlighted lines with a pencil. They are painted blue.
After you learn how to correctly draw a picture of one rose, you can begin a more complex task - draw a beautiful bouquet of roses. Notice how real roses stand in a vase, some of them have small, not yet opened buds, the stems are tilted, the leaves different sizes. Most The best way to draw a bouquet of roses is to sketch a living bouquet, first with a simple pencil, and then color it with paints. But even if you don’t have a real bouquet of roses, you can copy roses from a color picture or photo.
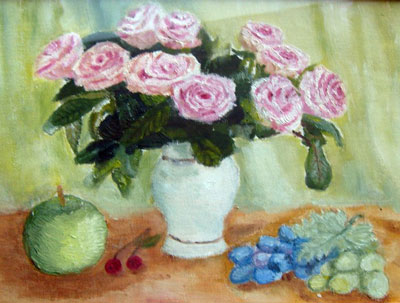
My very first painting with roses. Still life completed oil paints. Please don't criticize too much, I was only 12 years old.
The lesson on how to draw a ballerina is designed for those who already know how to draw well, since drawing a person is not easy, much less being able to convey the grace and elegance of dance. Ballerinas are given flowers, so you can draw a bouquet of roses lying on the stage.
Almost all flower drawings on the site are made in stages on graphics tablet. Color picture you can use a simple pencil to color the flower you drew step by step.
There are millions of flowers on our planet; there are several hundred varieties of roses alone. When drawing a bouquet, you can add tulips or several roses, the main thing is that the color of the rose is combined with other flowers. The bouquet in the picture can be decorated with ribbons and leaves from other flowers.
Drawing a daisy is the simplest task and anyone who is beginning to learn how to draw can do it. Try to draw a daisy; if this task is not difficult for you, then drawing a rose will also be “up to your standards.”
If you are drawing a rose, a butterfly design can decorate and complement the rose design. Draw a butterfly flying up to the rose or sitting on the top leaf. There is no need to draw a butterfly on the bud itself, since this main object rose drawing.
The house can be drawn in many different ways, such as making a tile roof, drawing double doors, or adding a chimney for the fireplace lined with bricks. To enliven the landscape near your house, you can draw roses growing in a flower bed.
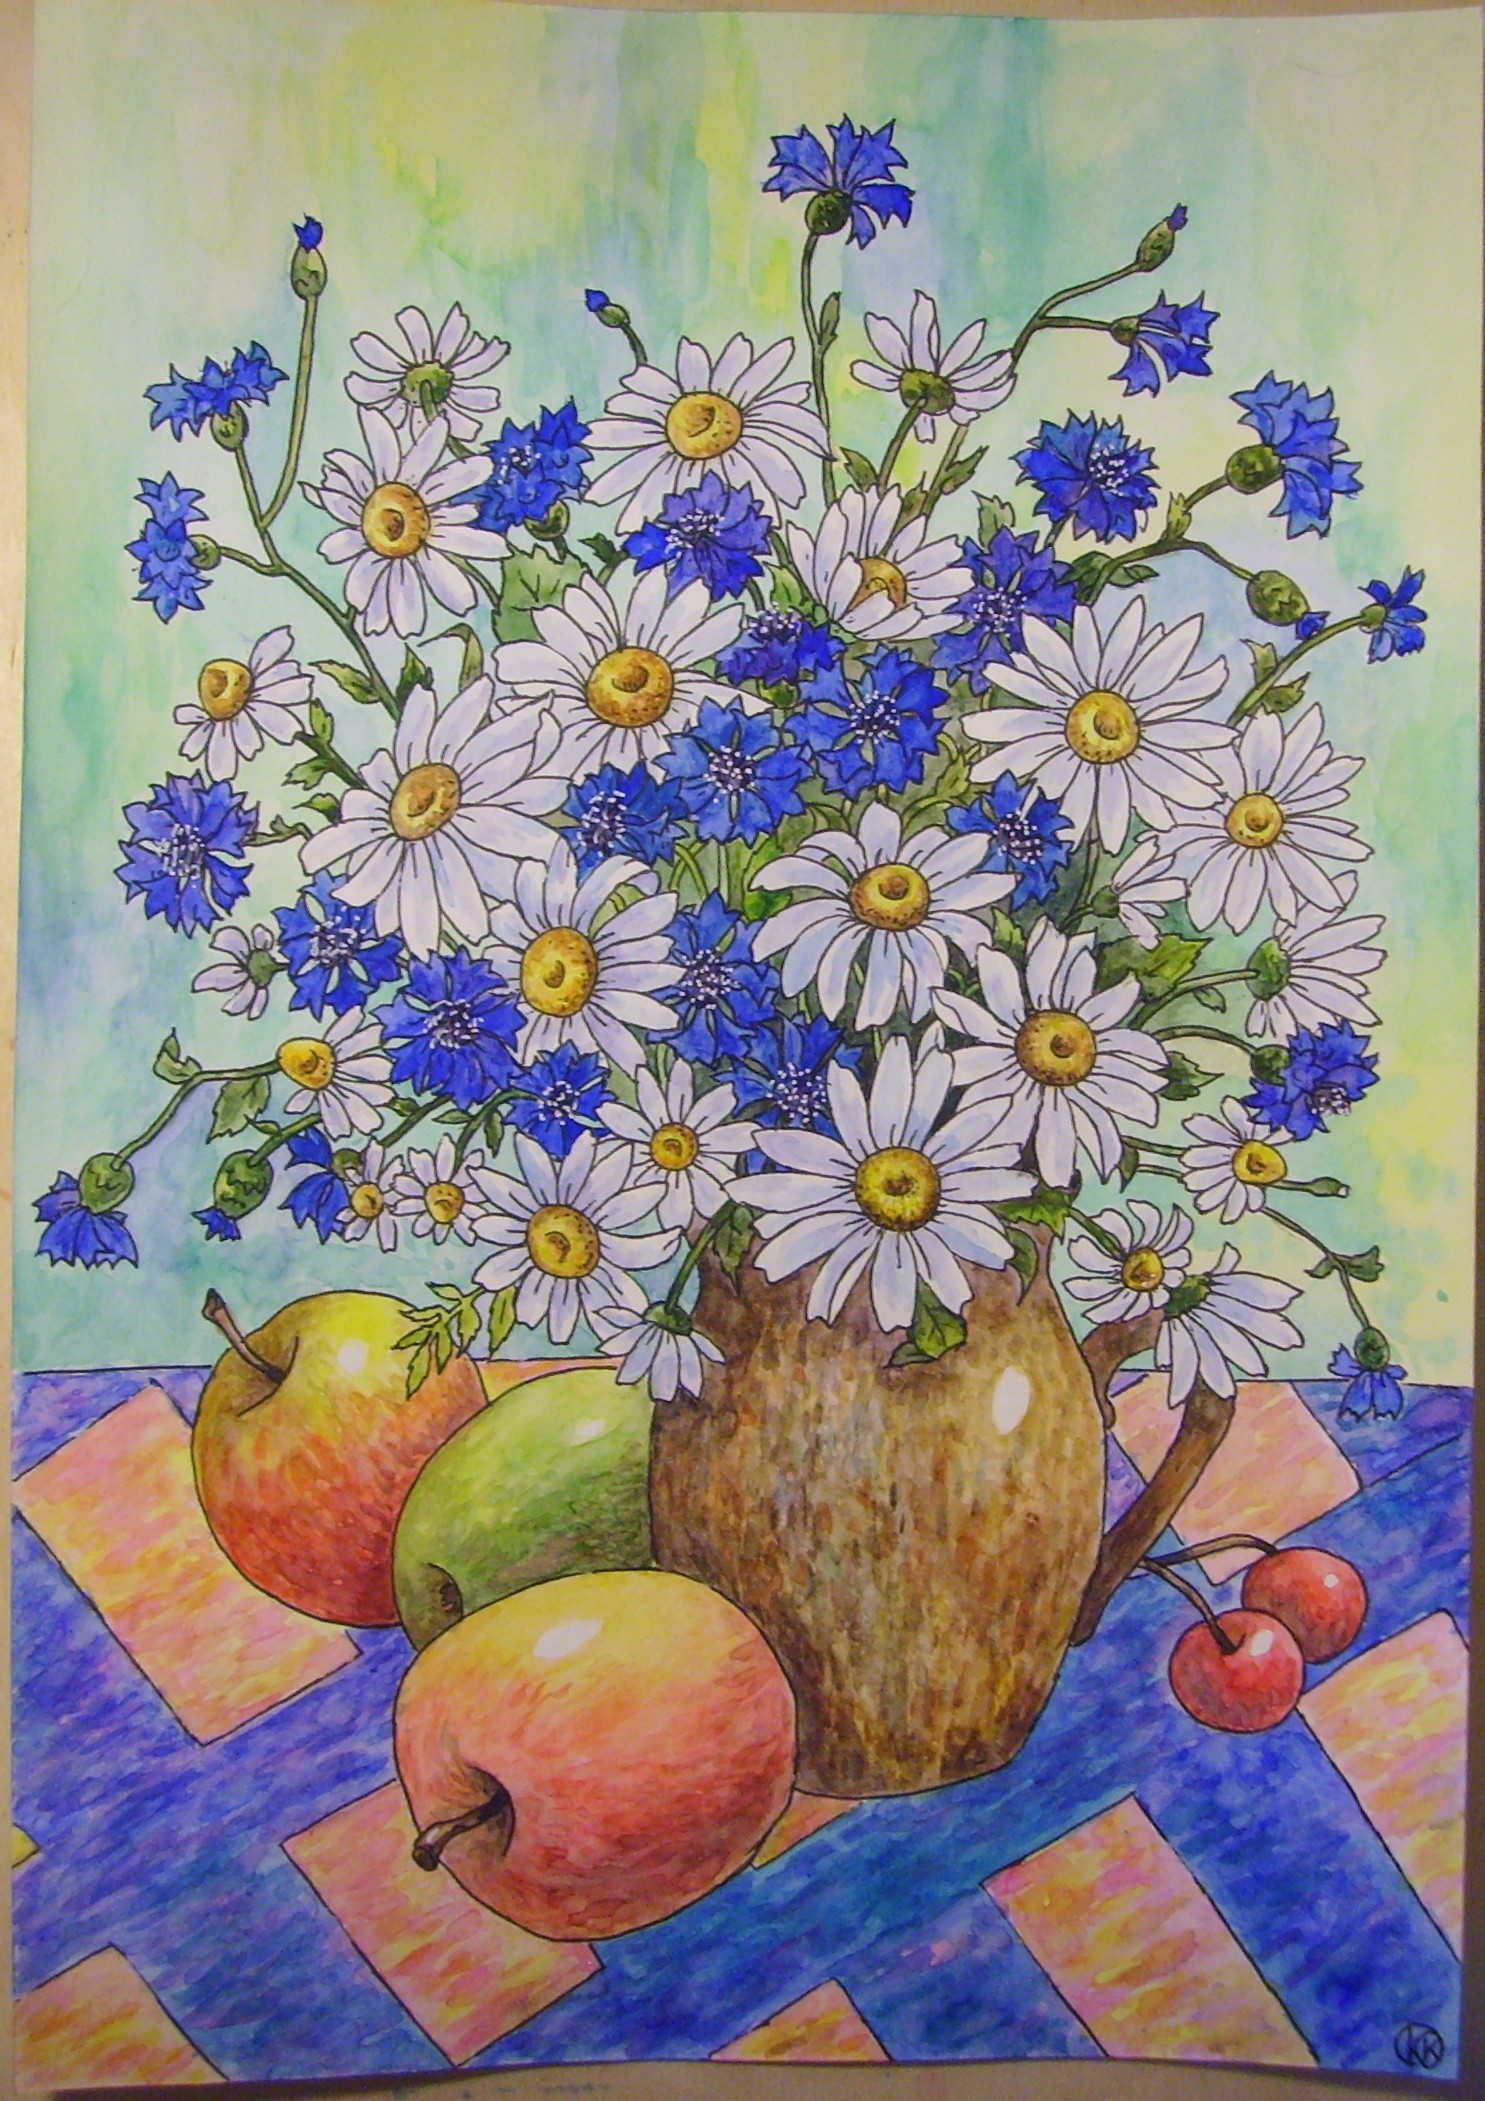
This master class with many step by step photos dedicated to how to draw a bouquet of flowers. A still life is an image of something inanimate objects, for example, flowers, fruits, game or dishes. Many artists who know everything about how to draw a still life in stages have created magnificent masterpieces in this genre. To get acquainted with their works, you can visit any museum visual arts. Modern painters, with no less fervor, paint all kinds of still lifes in the most different techniques. Our lesson will be devoted to how to draw a bouquet of flowers step by step, and then paint it with watercolors.
Before you learn everything about how to draw wildflowers, you should prepare everything you need:
1). Watercolor paper;
2). Set of watercolor paints;
3). White gel pen;
4). Black gel pen;
5). Mechanical pencil;
6). Eraser;
7). Synthetic round brush No. 5;
8). A jar filled with clean water;
9). Palette (you can mix paints on a piece of white paper).
If everything is prepared, then you can start studying the question of how to draw a bouquet:
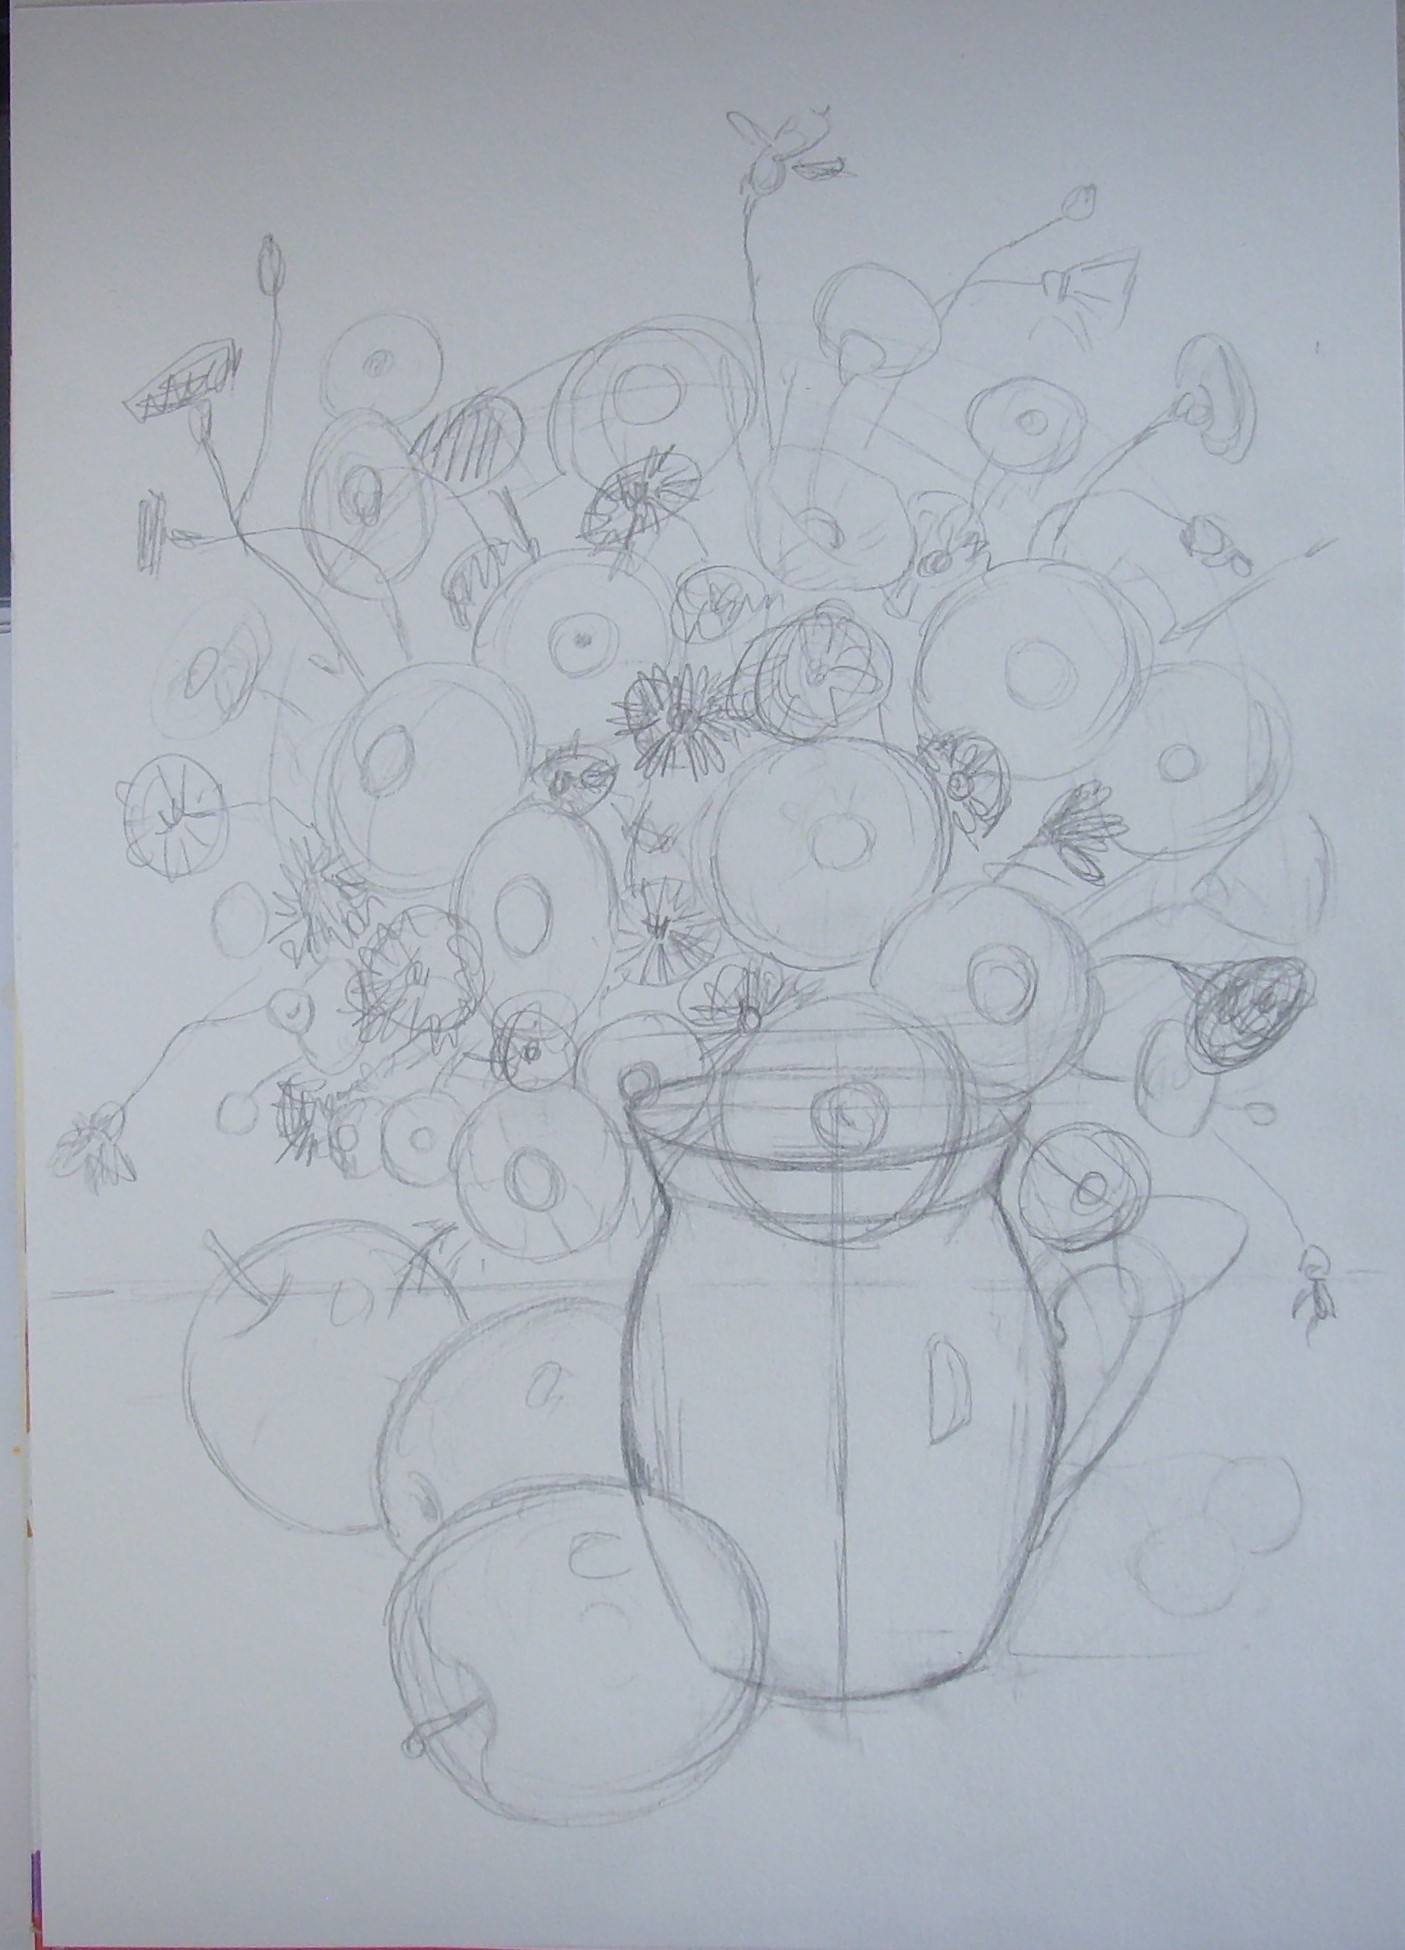
1. First, use very light lines to outline the outlines of the main objects - a jug, apples, a table, cherries. Simply mark the flowers with a cap on top of the jug;
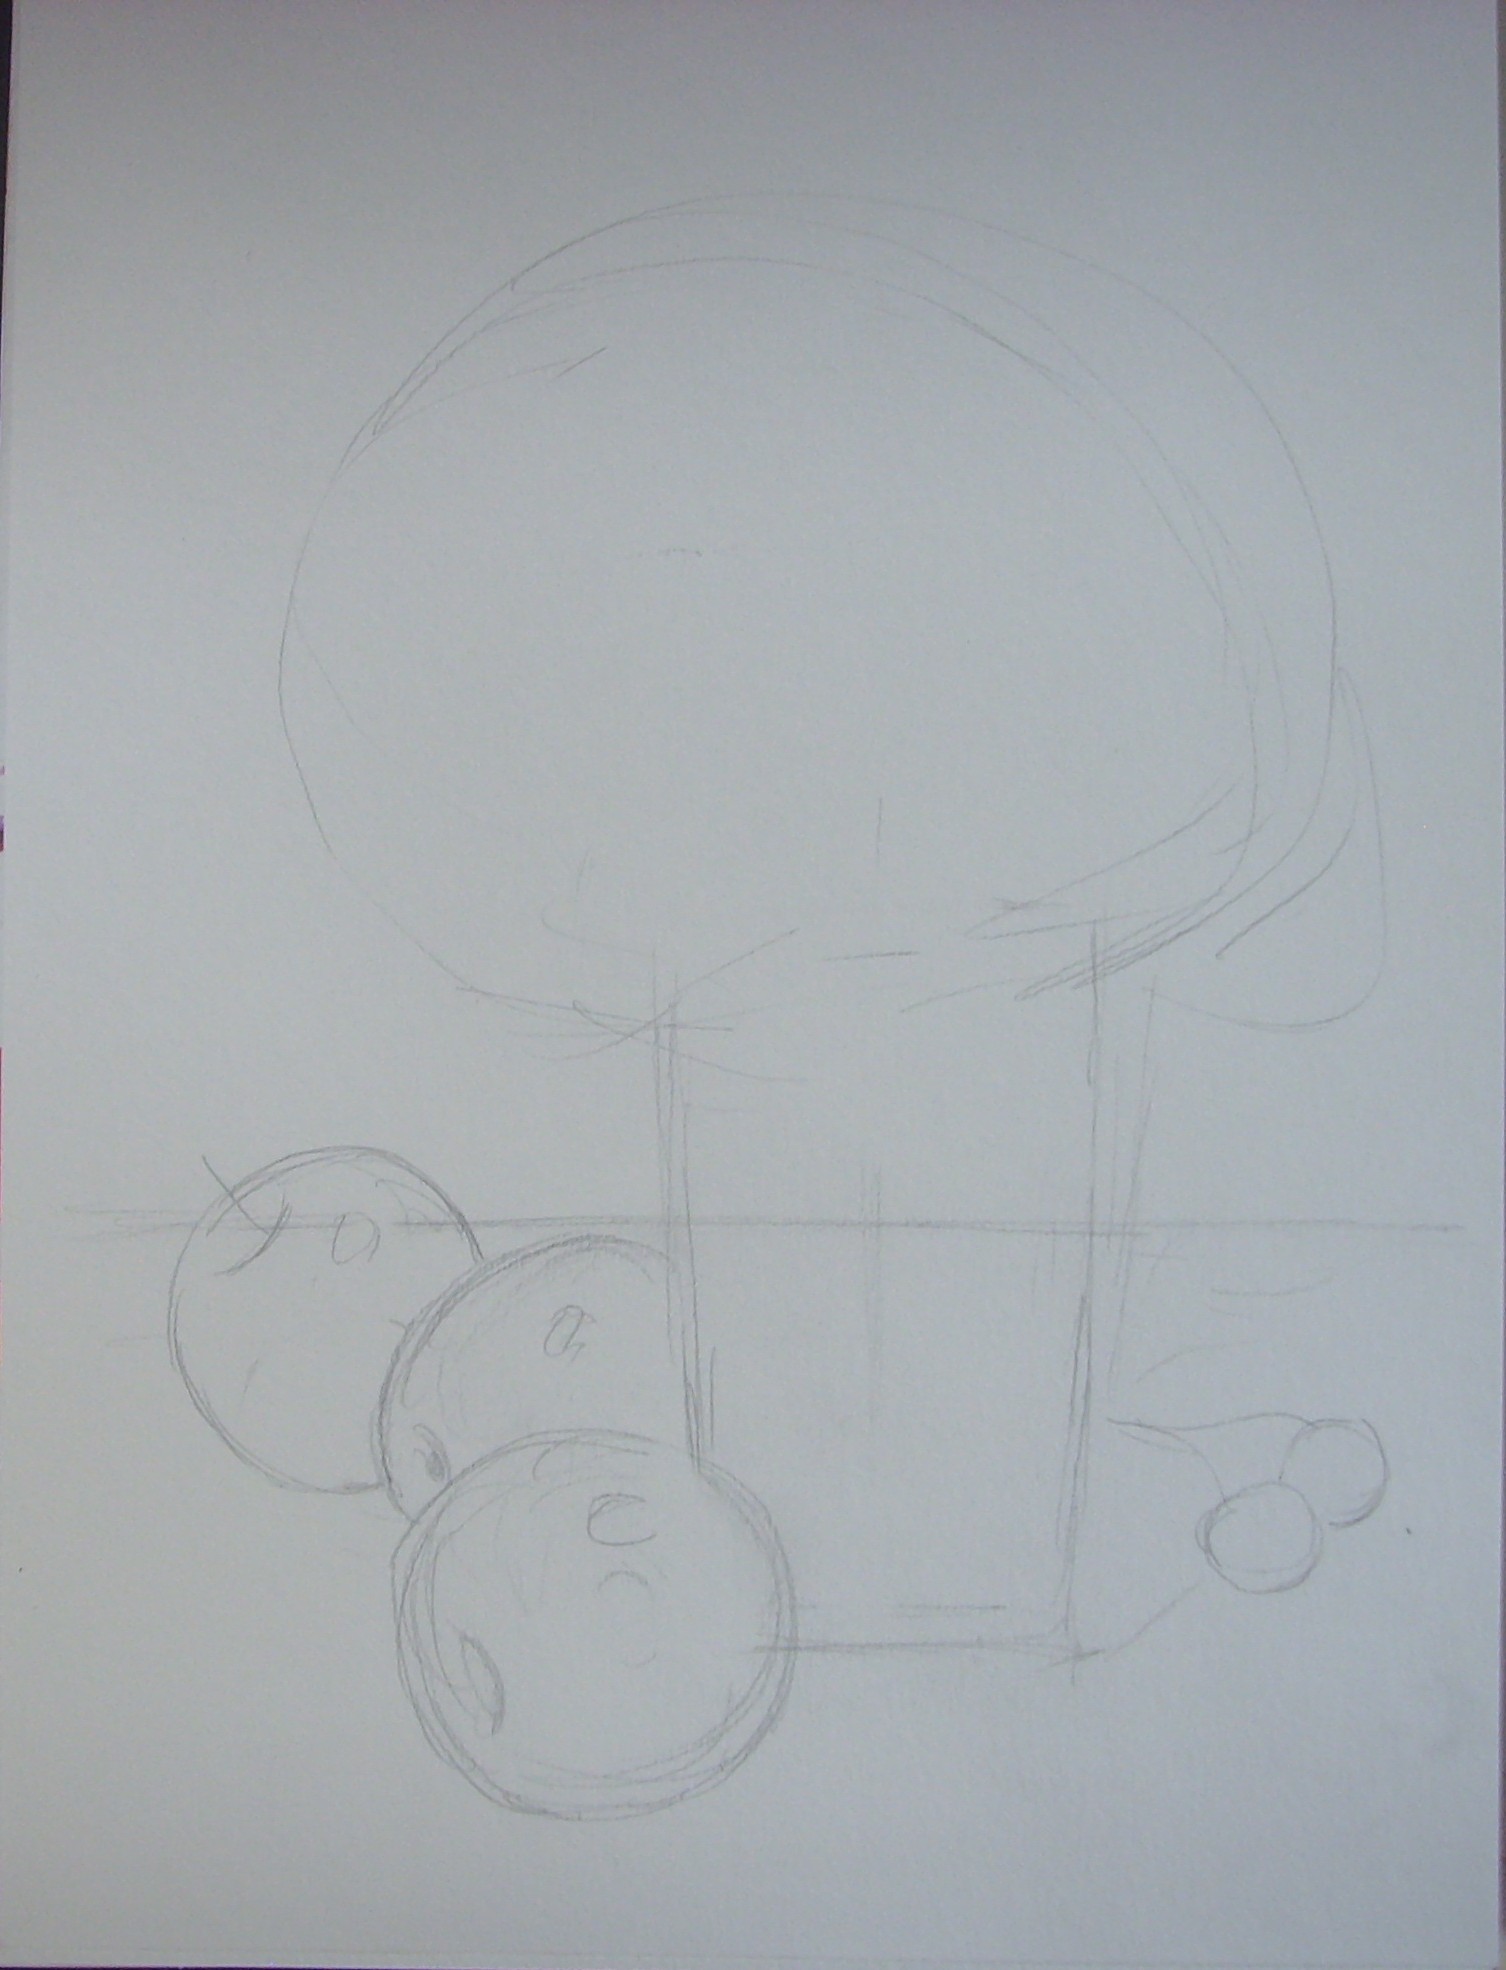
2. Now start drawing the jug in more detail. Draw a small handle to it. Then draw all the flowers quite schematically. IN in this case these will be daisies and cornflowers, as we are drawing a bouquet of wildflowers. Draw tails on the apples;
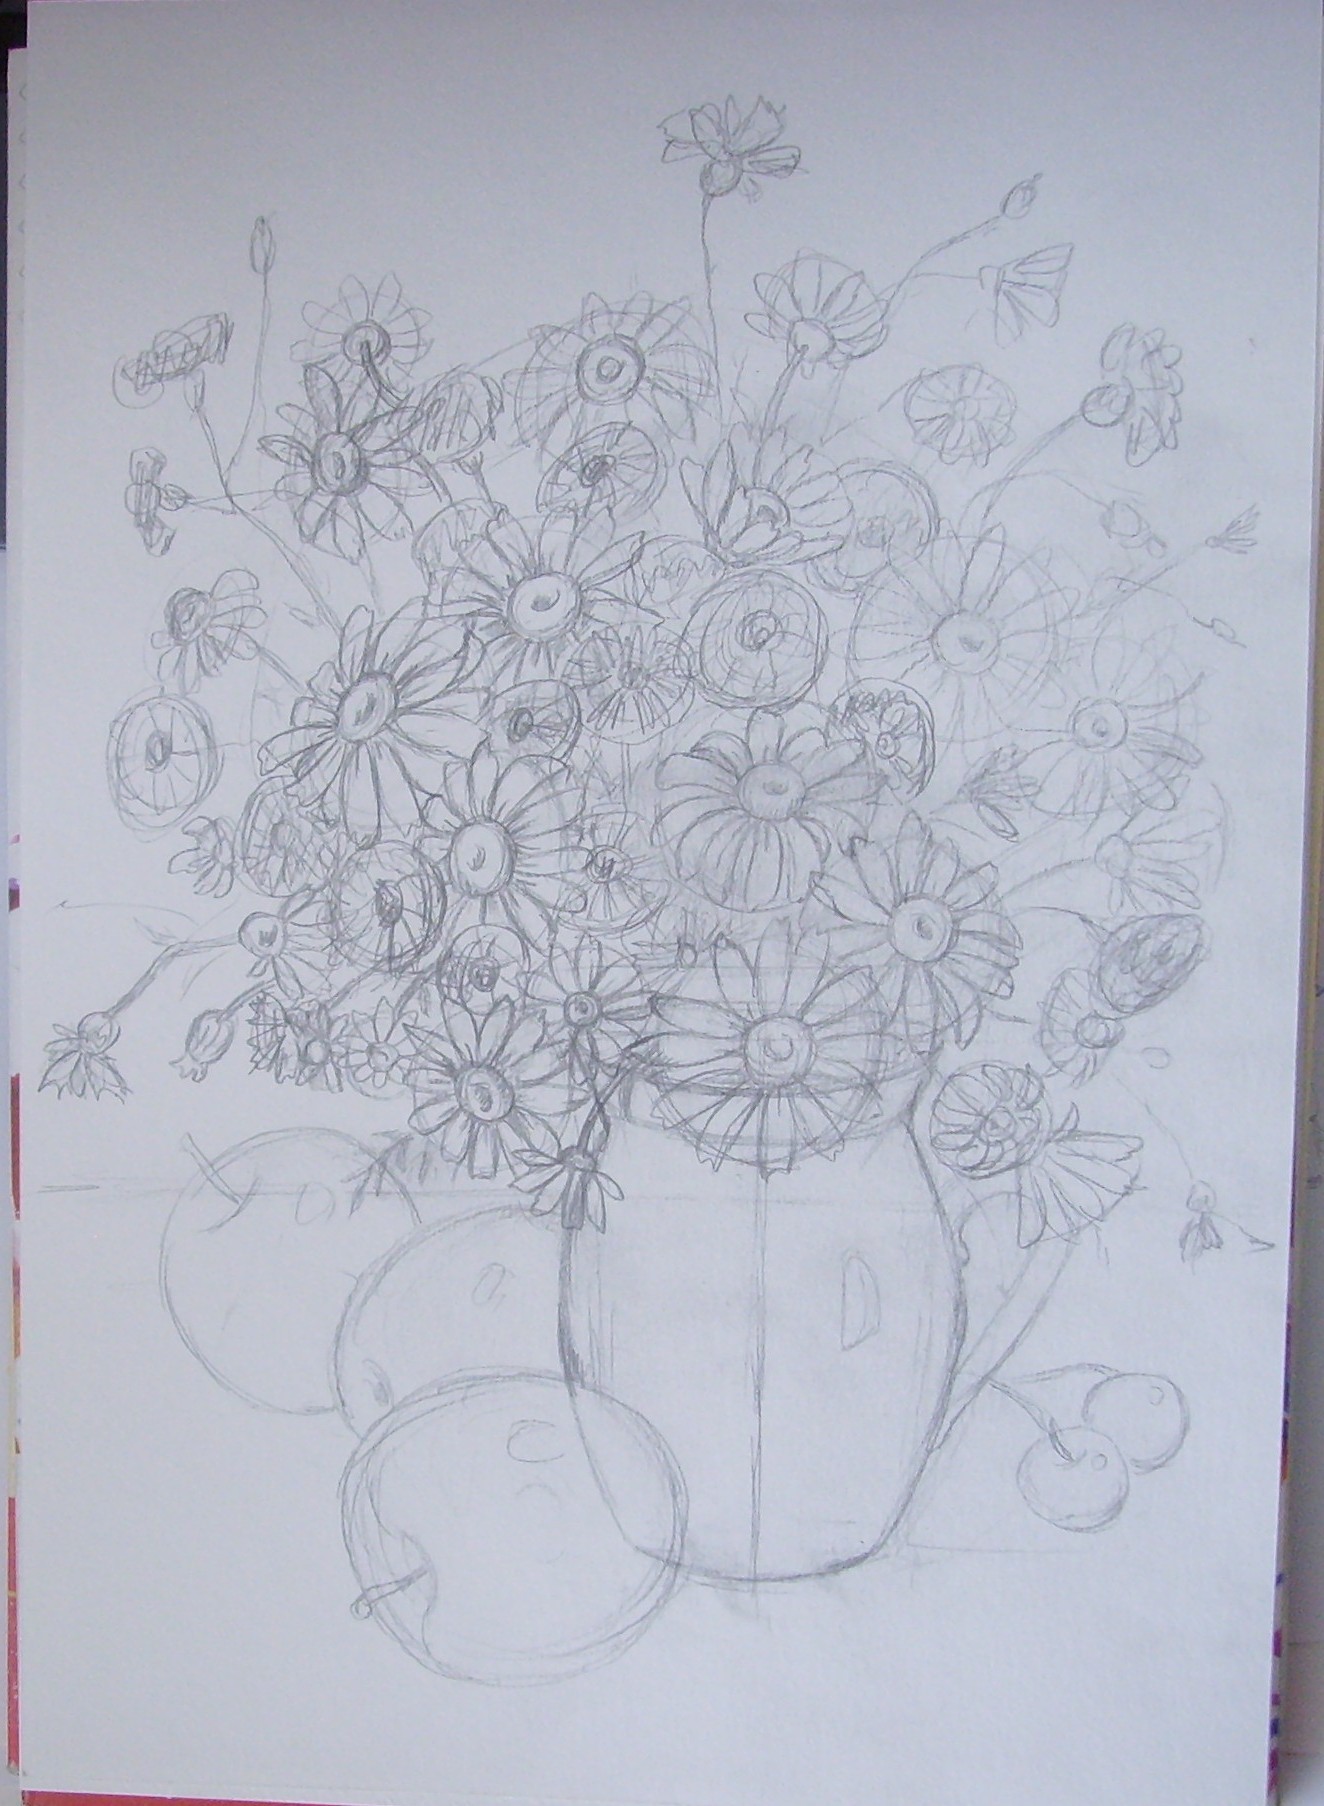
3. Draw the flowers in more detail, depicting their centers and petals;
4. Now you know how to draw a bouquet with a pencil and you can move on to coloring it. Using a black pen, trace the sketch made in pencil;
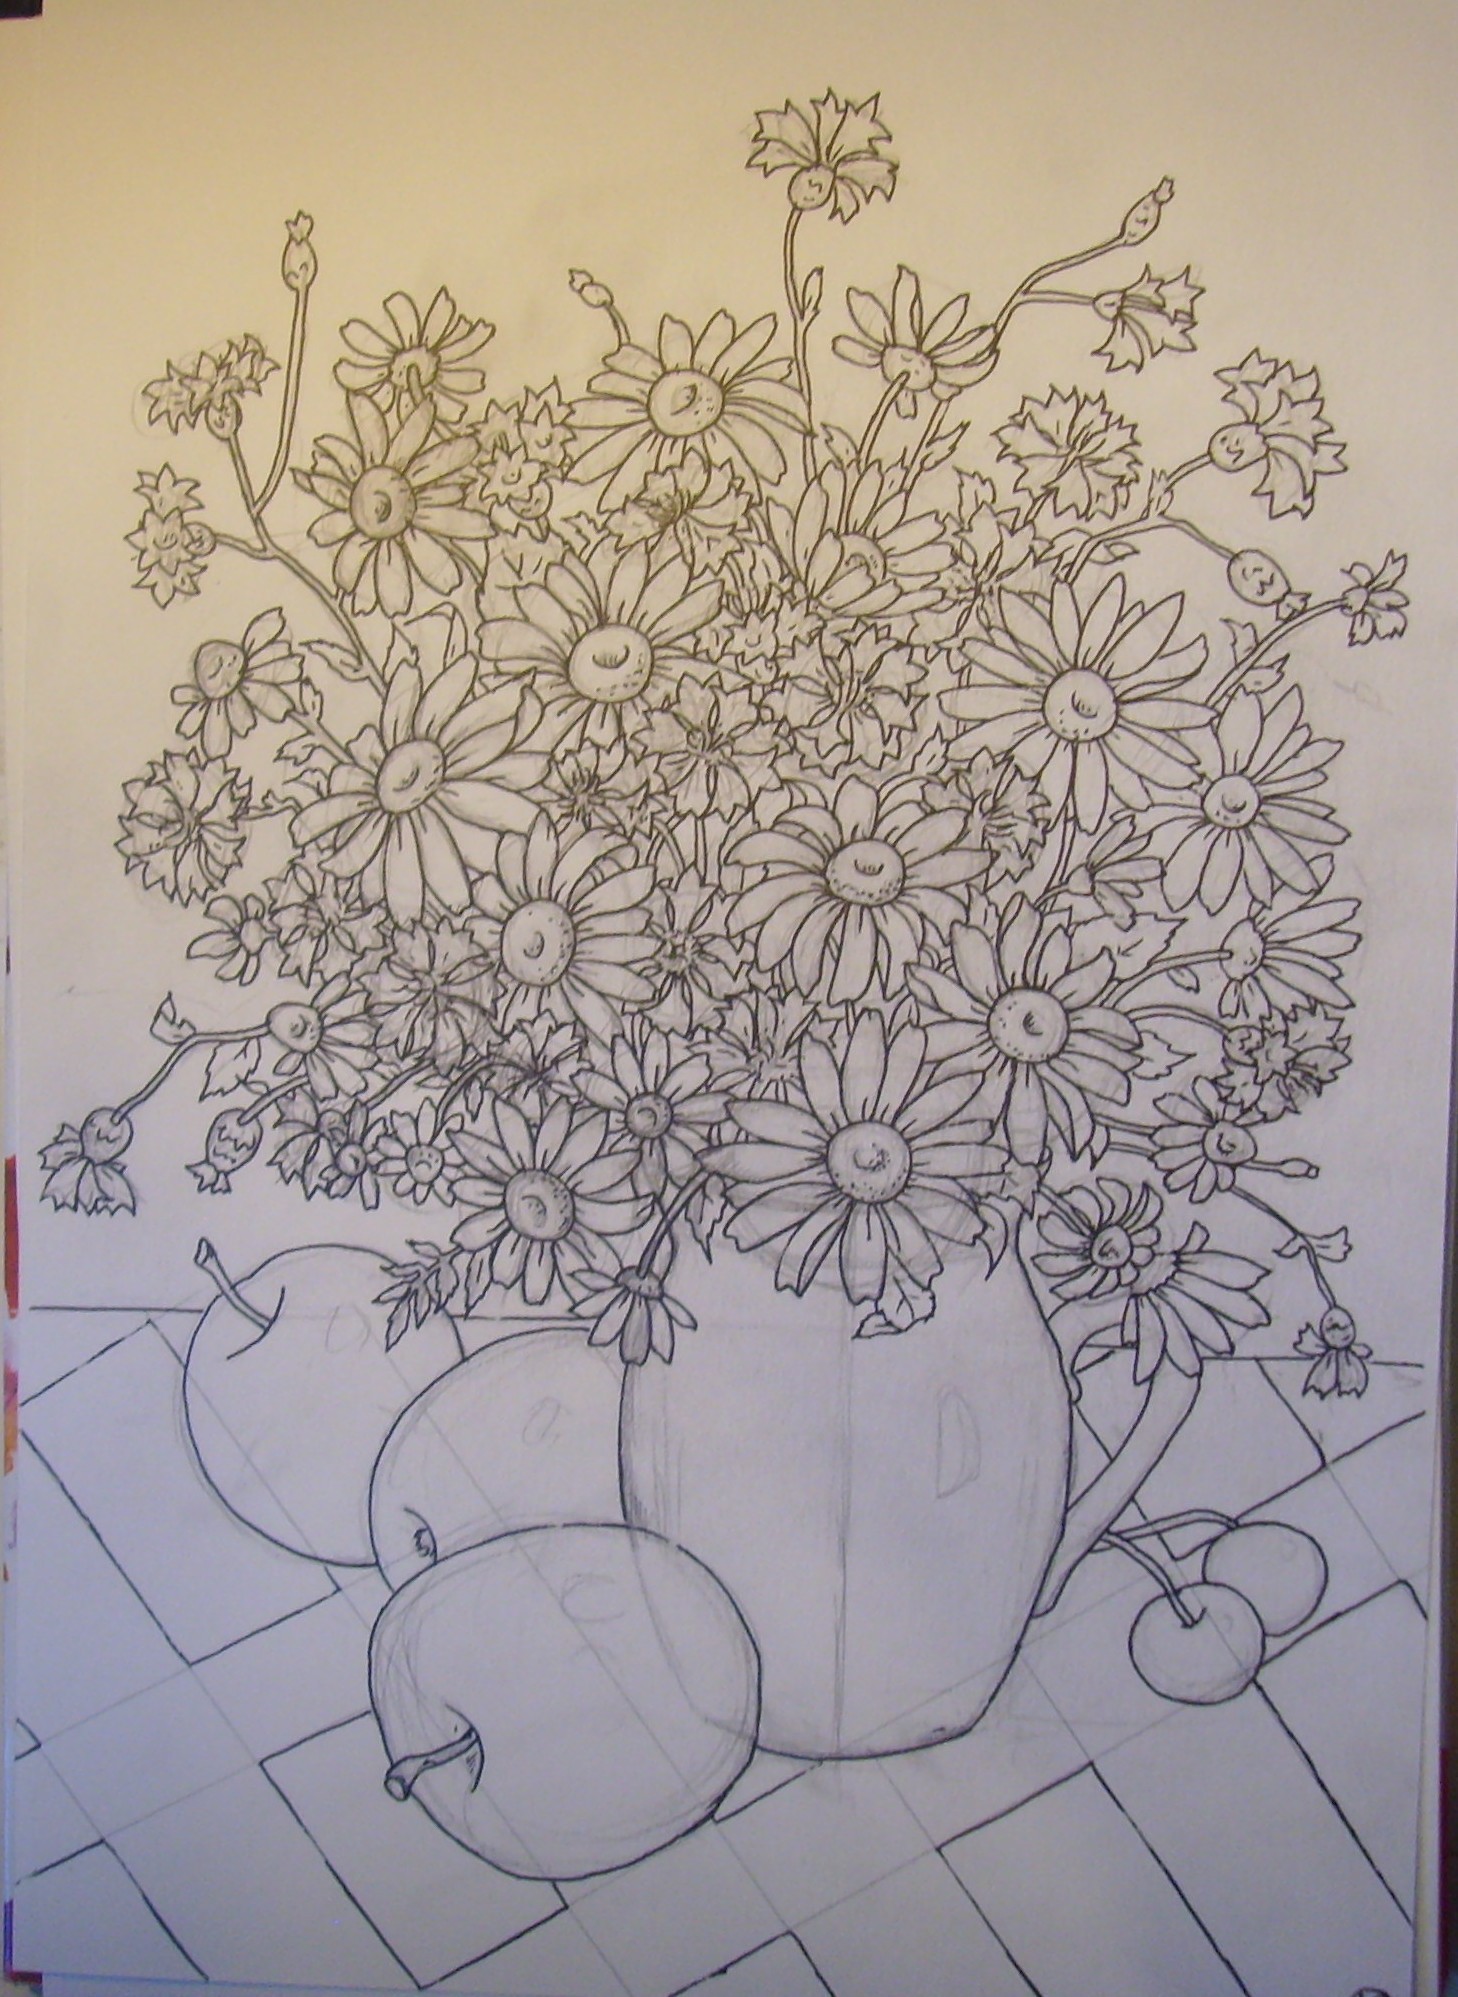
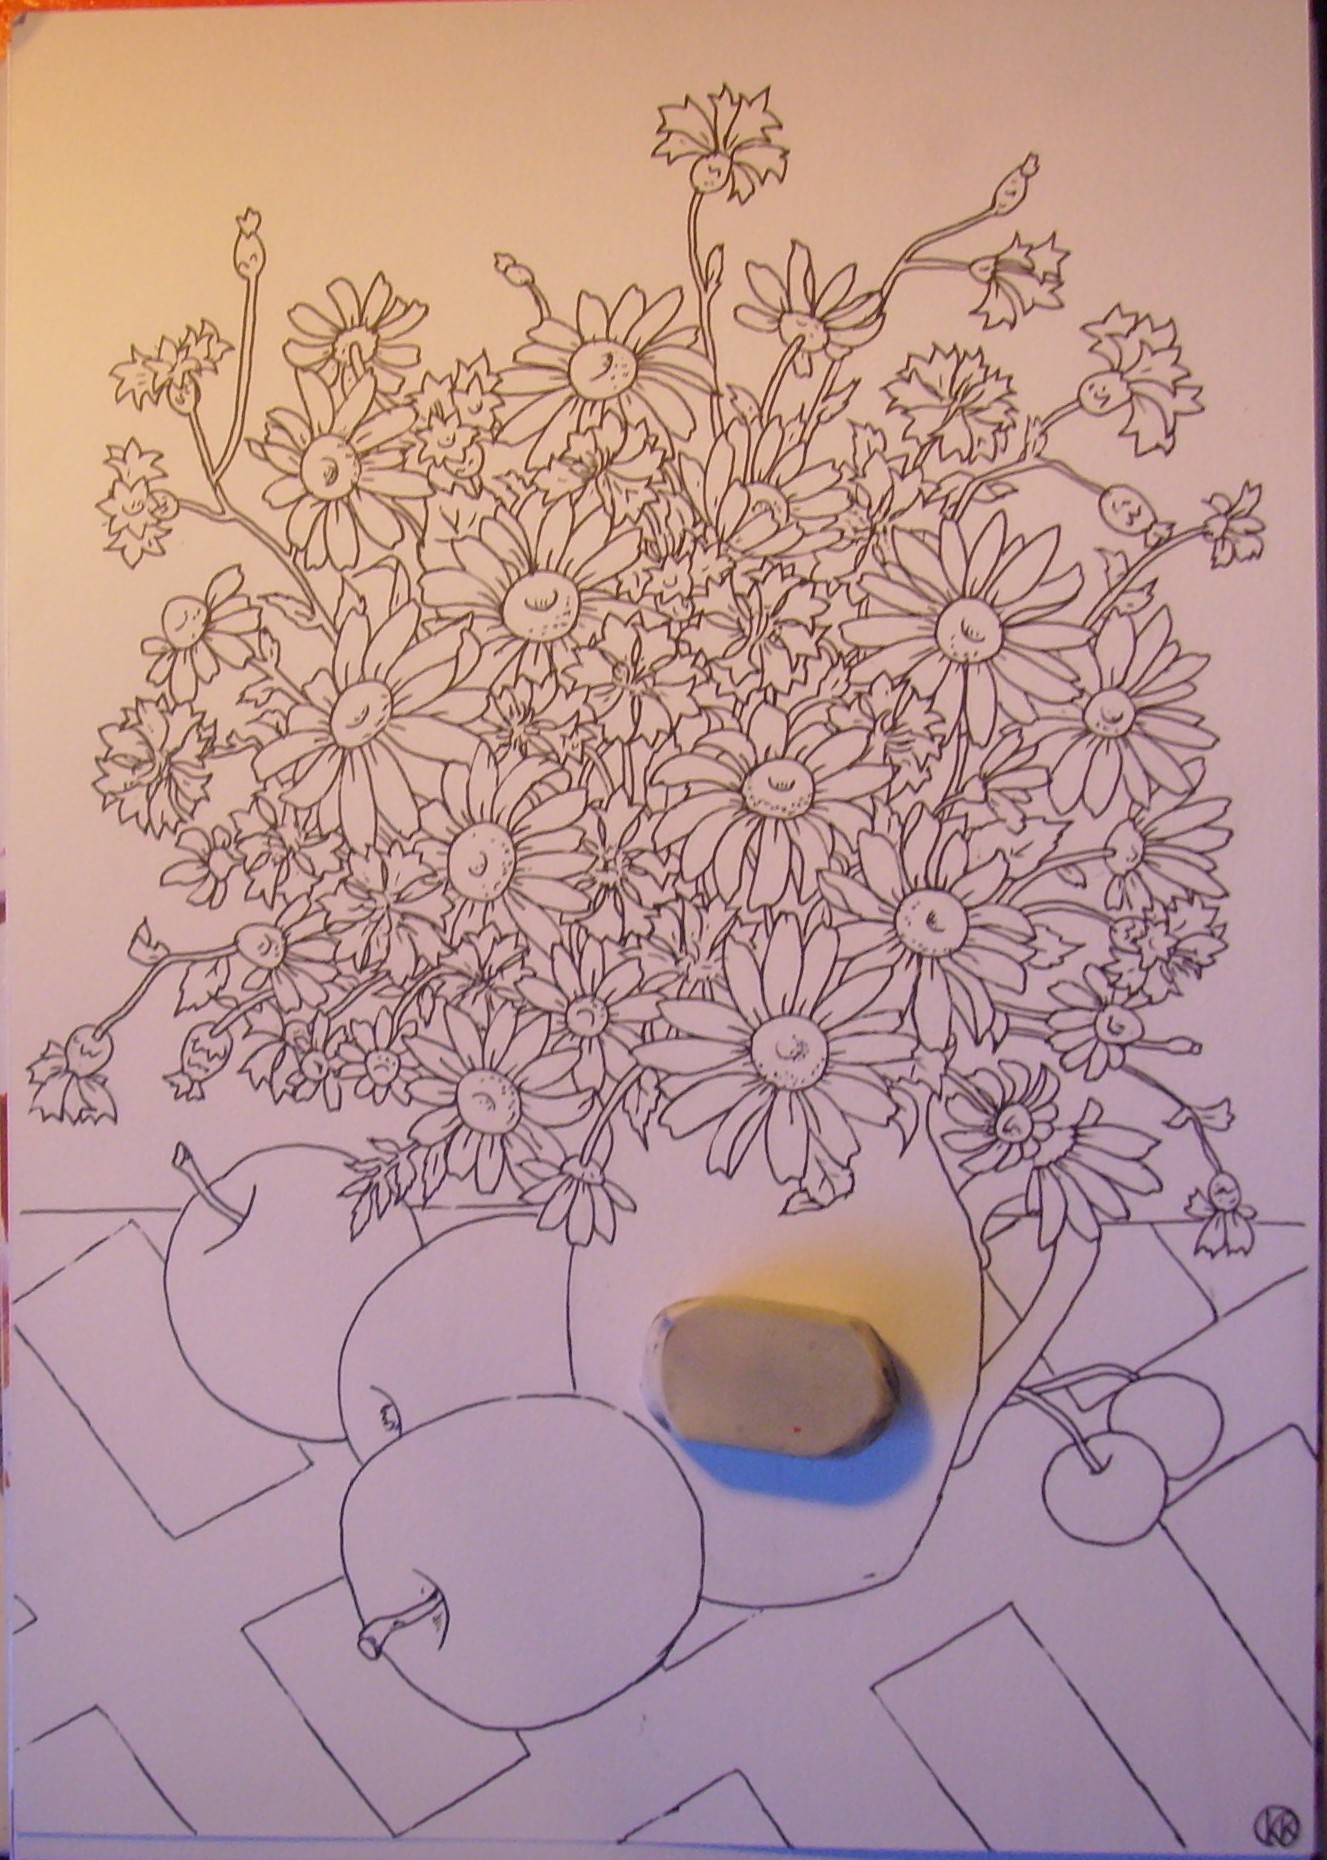
5. Then use an eraser to erase all pencil lines;
6. Start coloring the drawing with yellow and green paint, heavily diluted with water. Also paint over the apples and cherries, achieving smooth transitions from one color to another;
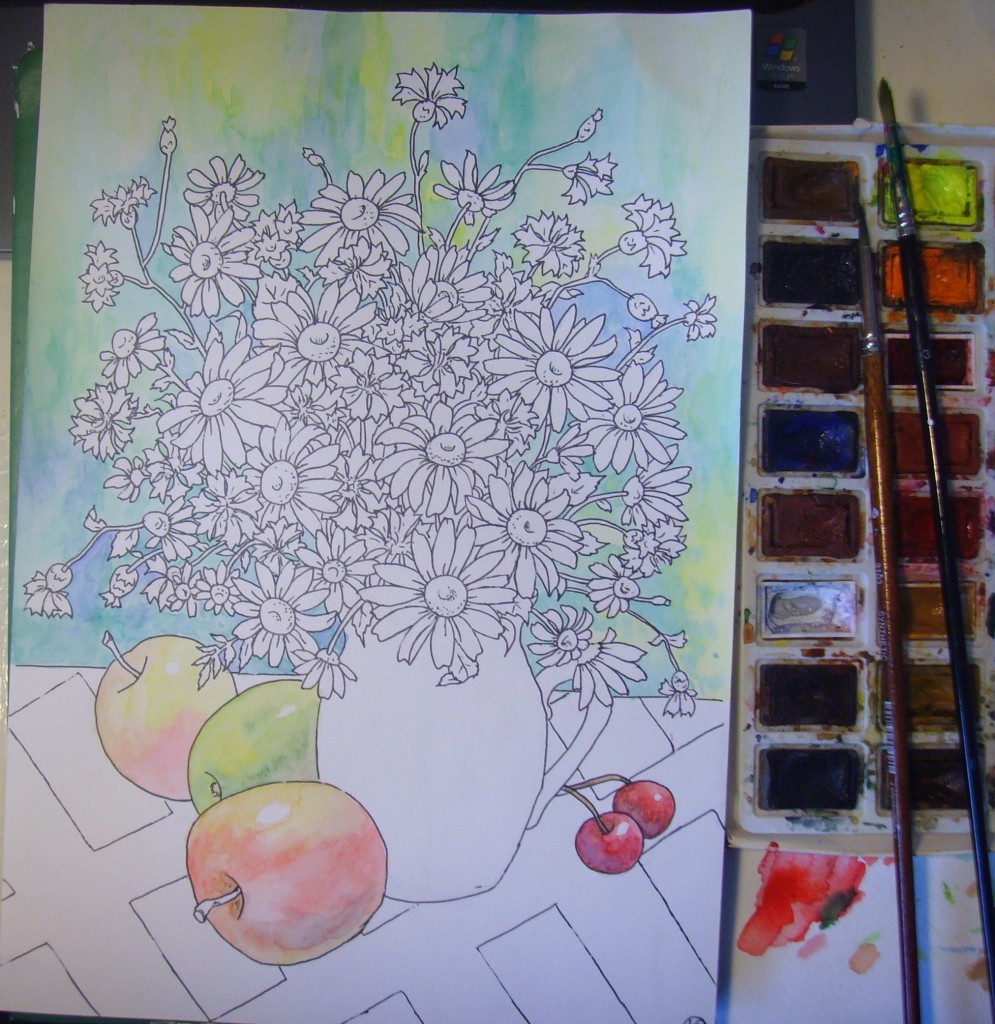
7. Color the jug while mixing various shades brown and adding blue and purple in places. Also rework apples and cherries, achieving deeper and richer shades;
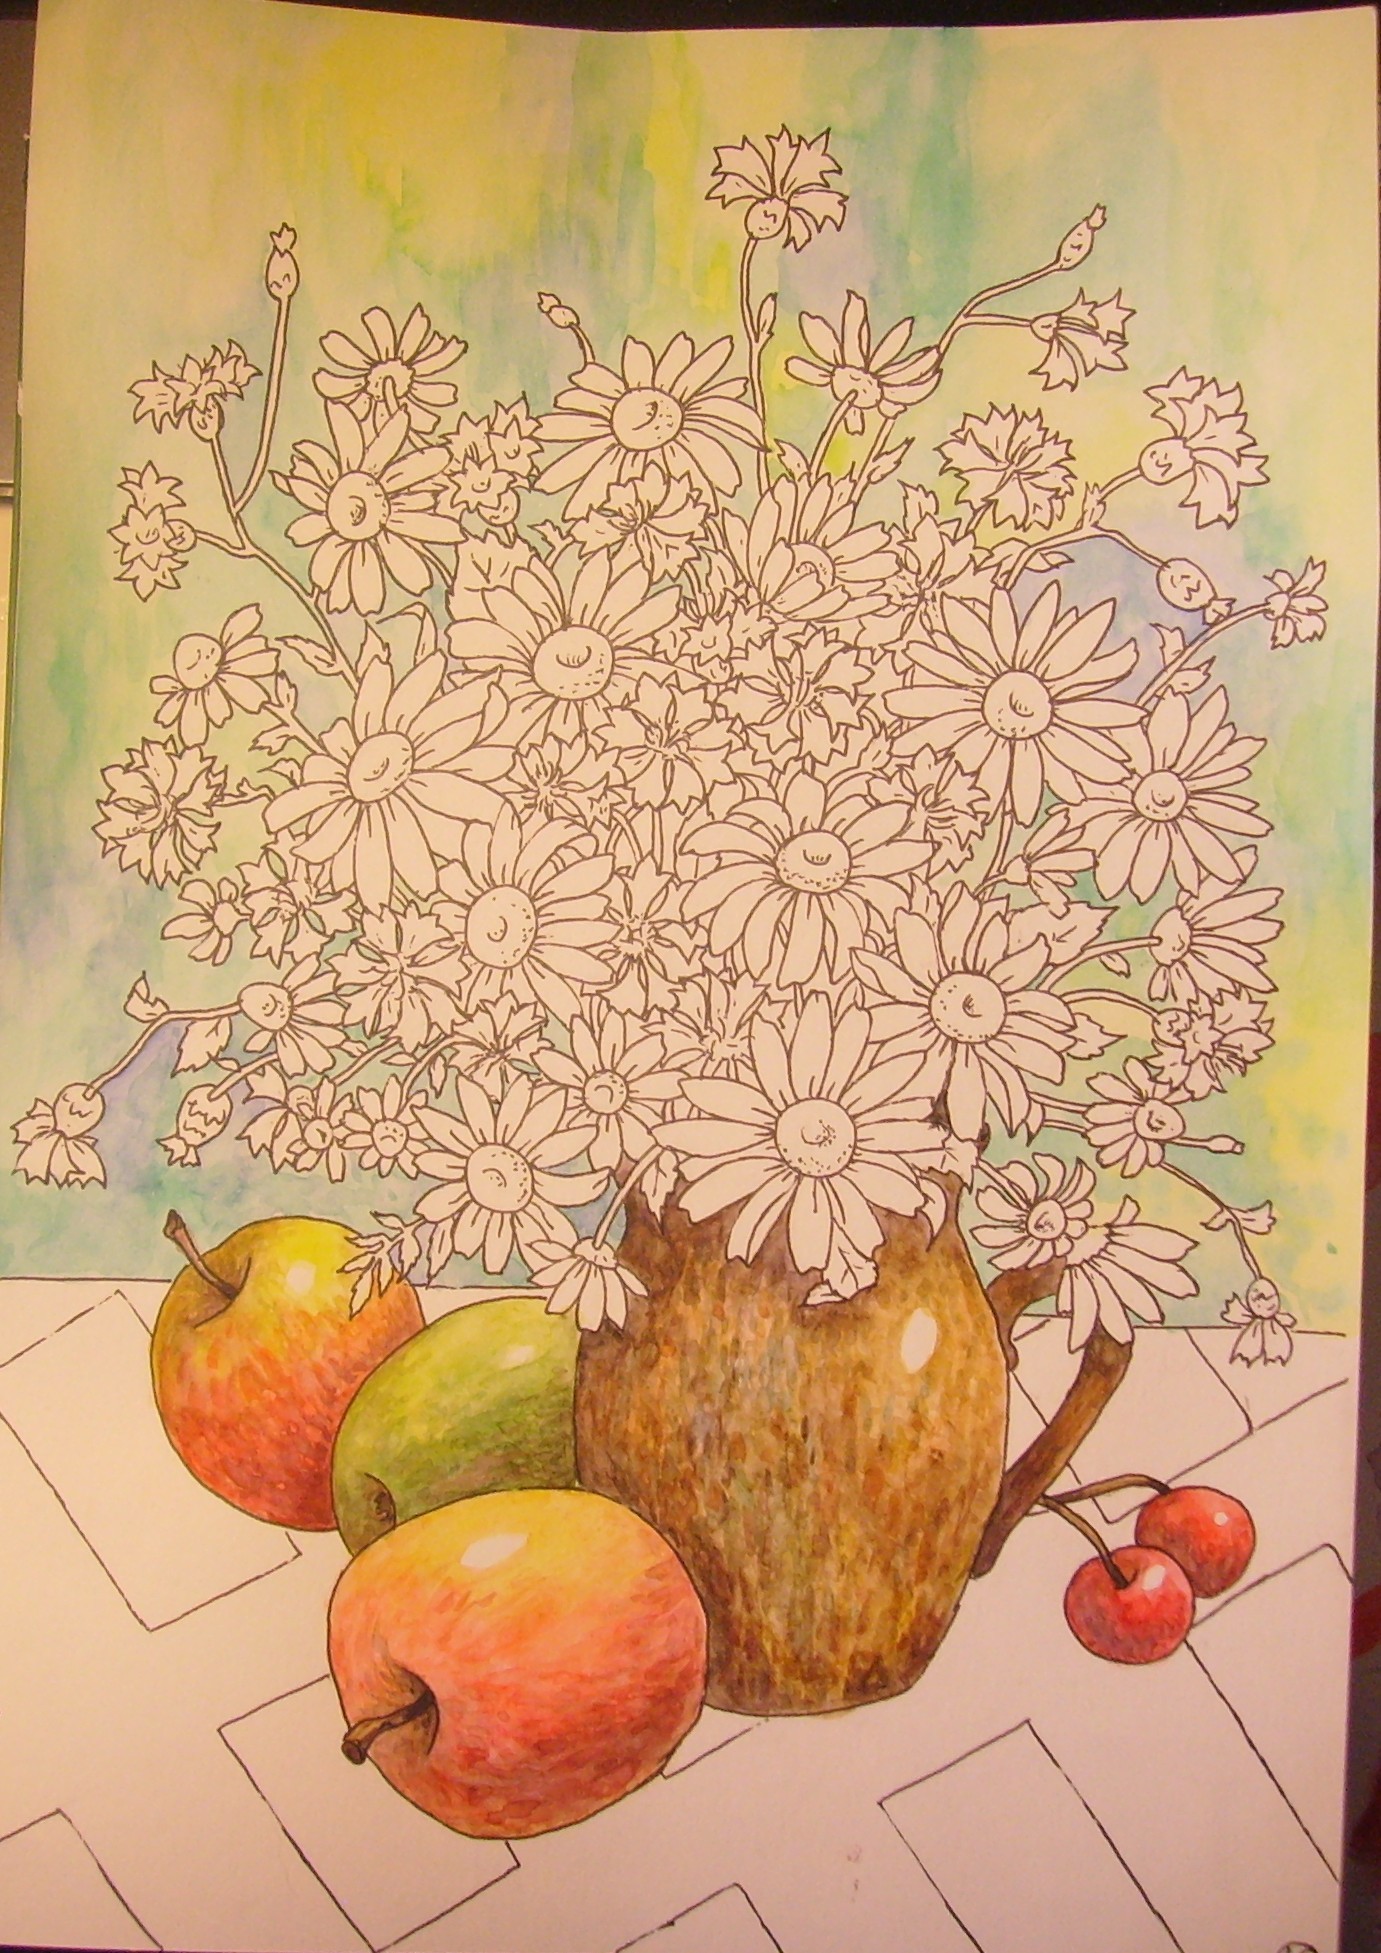
8. Color the centers of the daisies using yellow and brown shades;
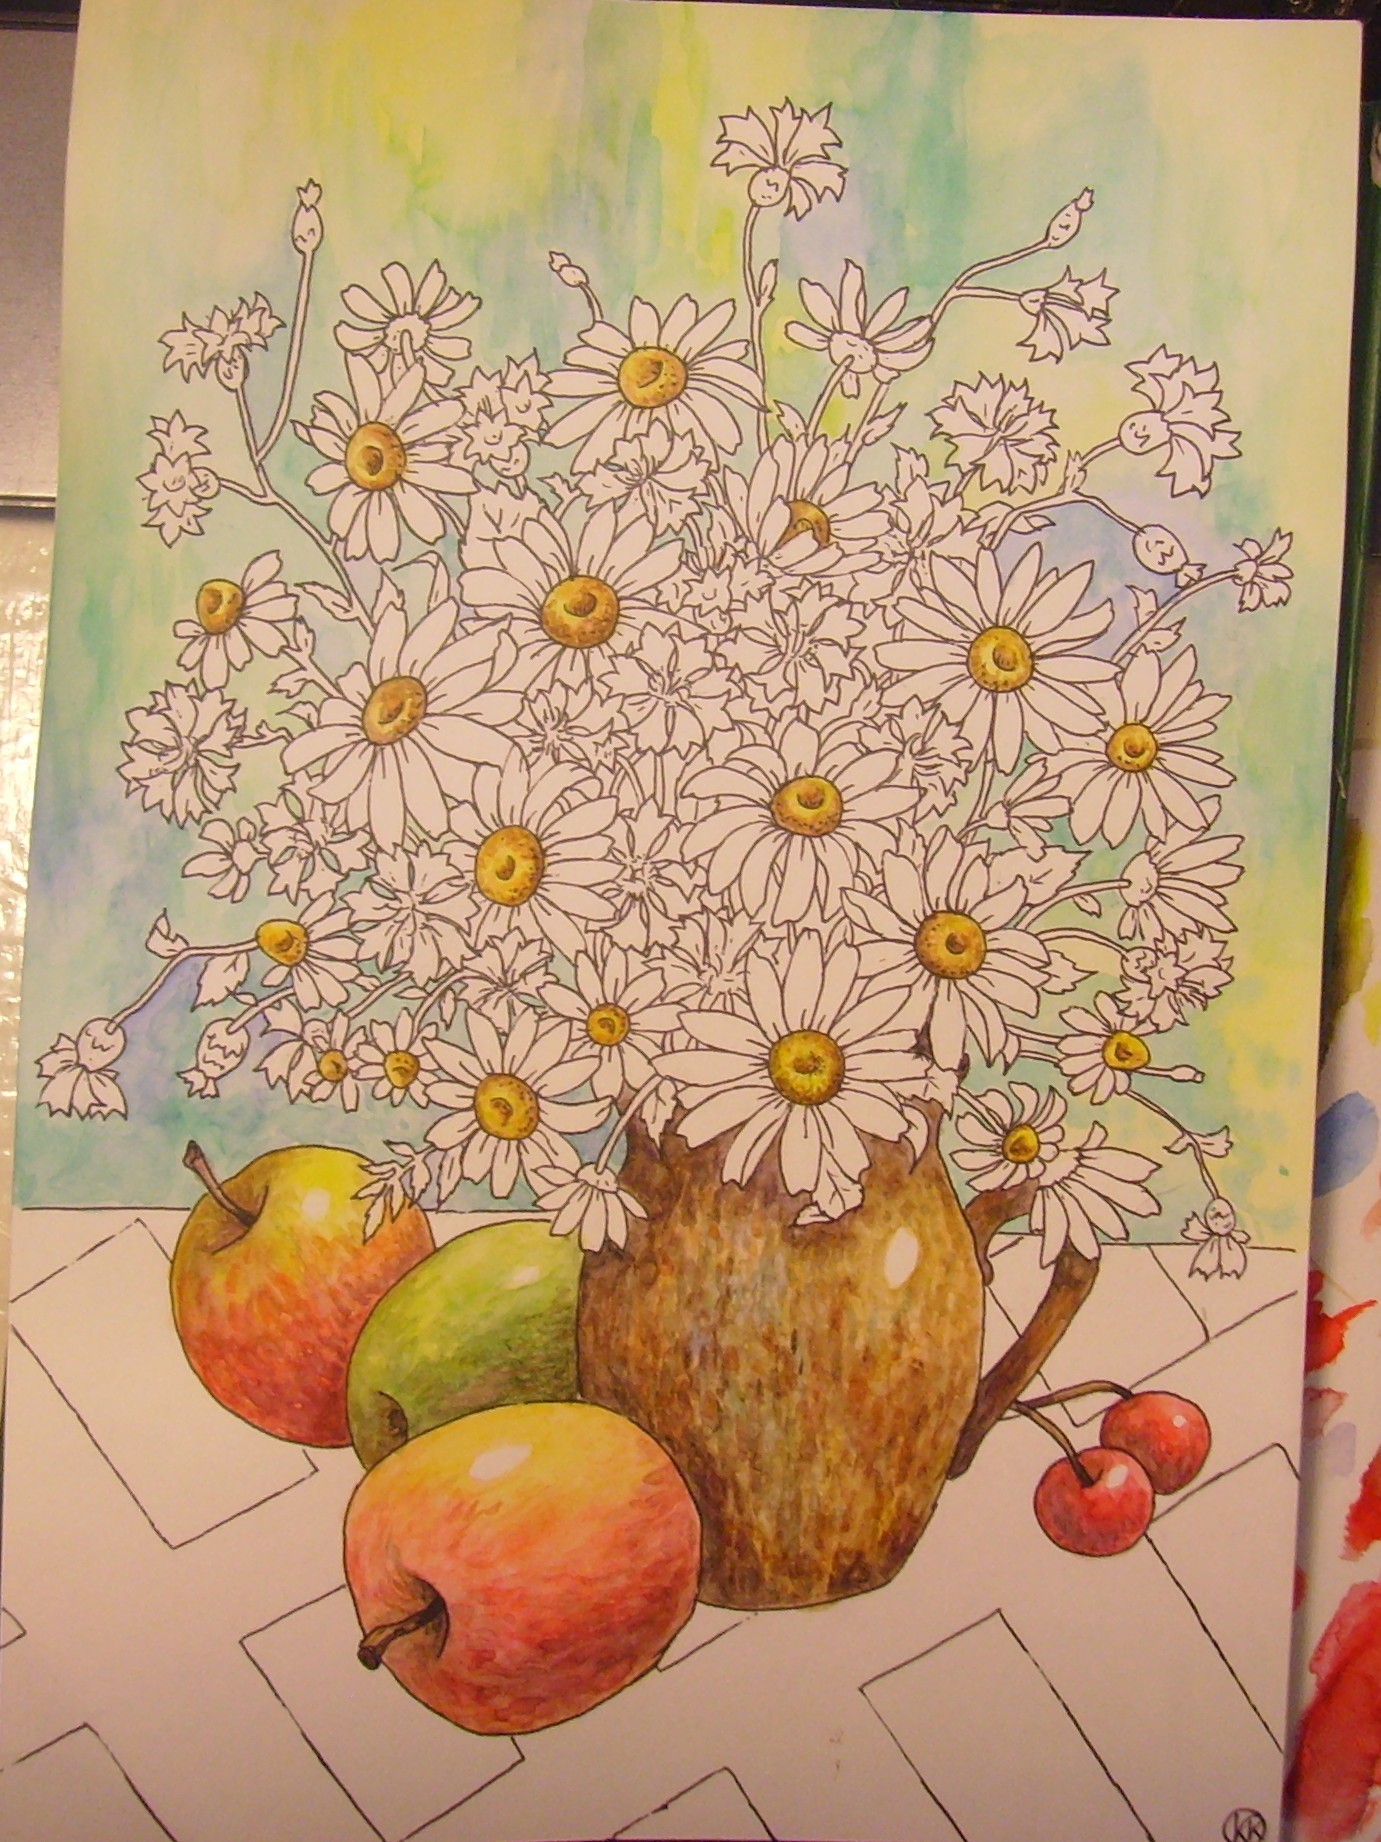
9. Paint the stems and leaves with green paint, and the cornflowers with shades of blue and purple;
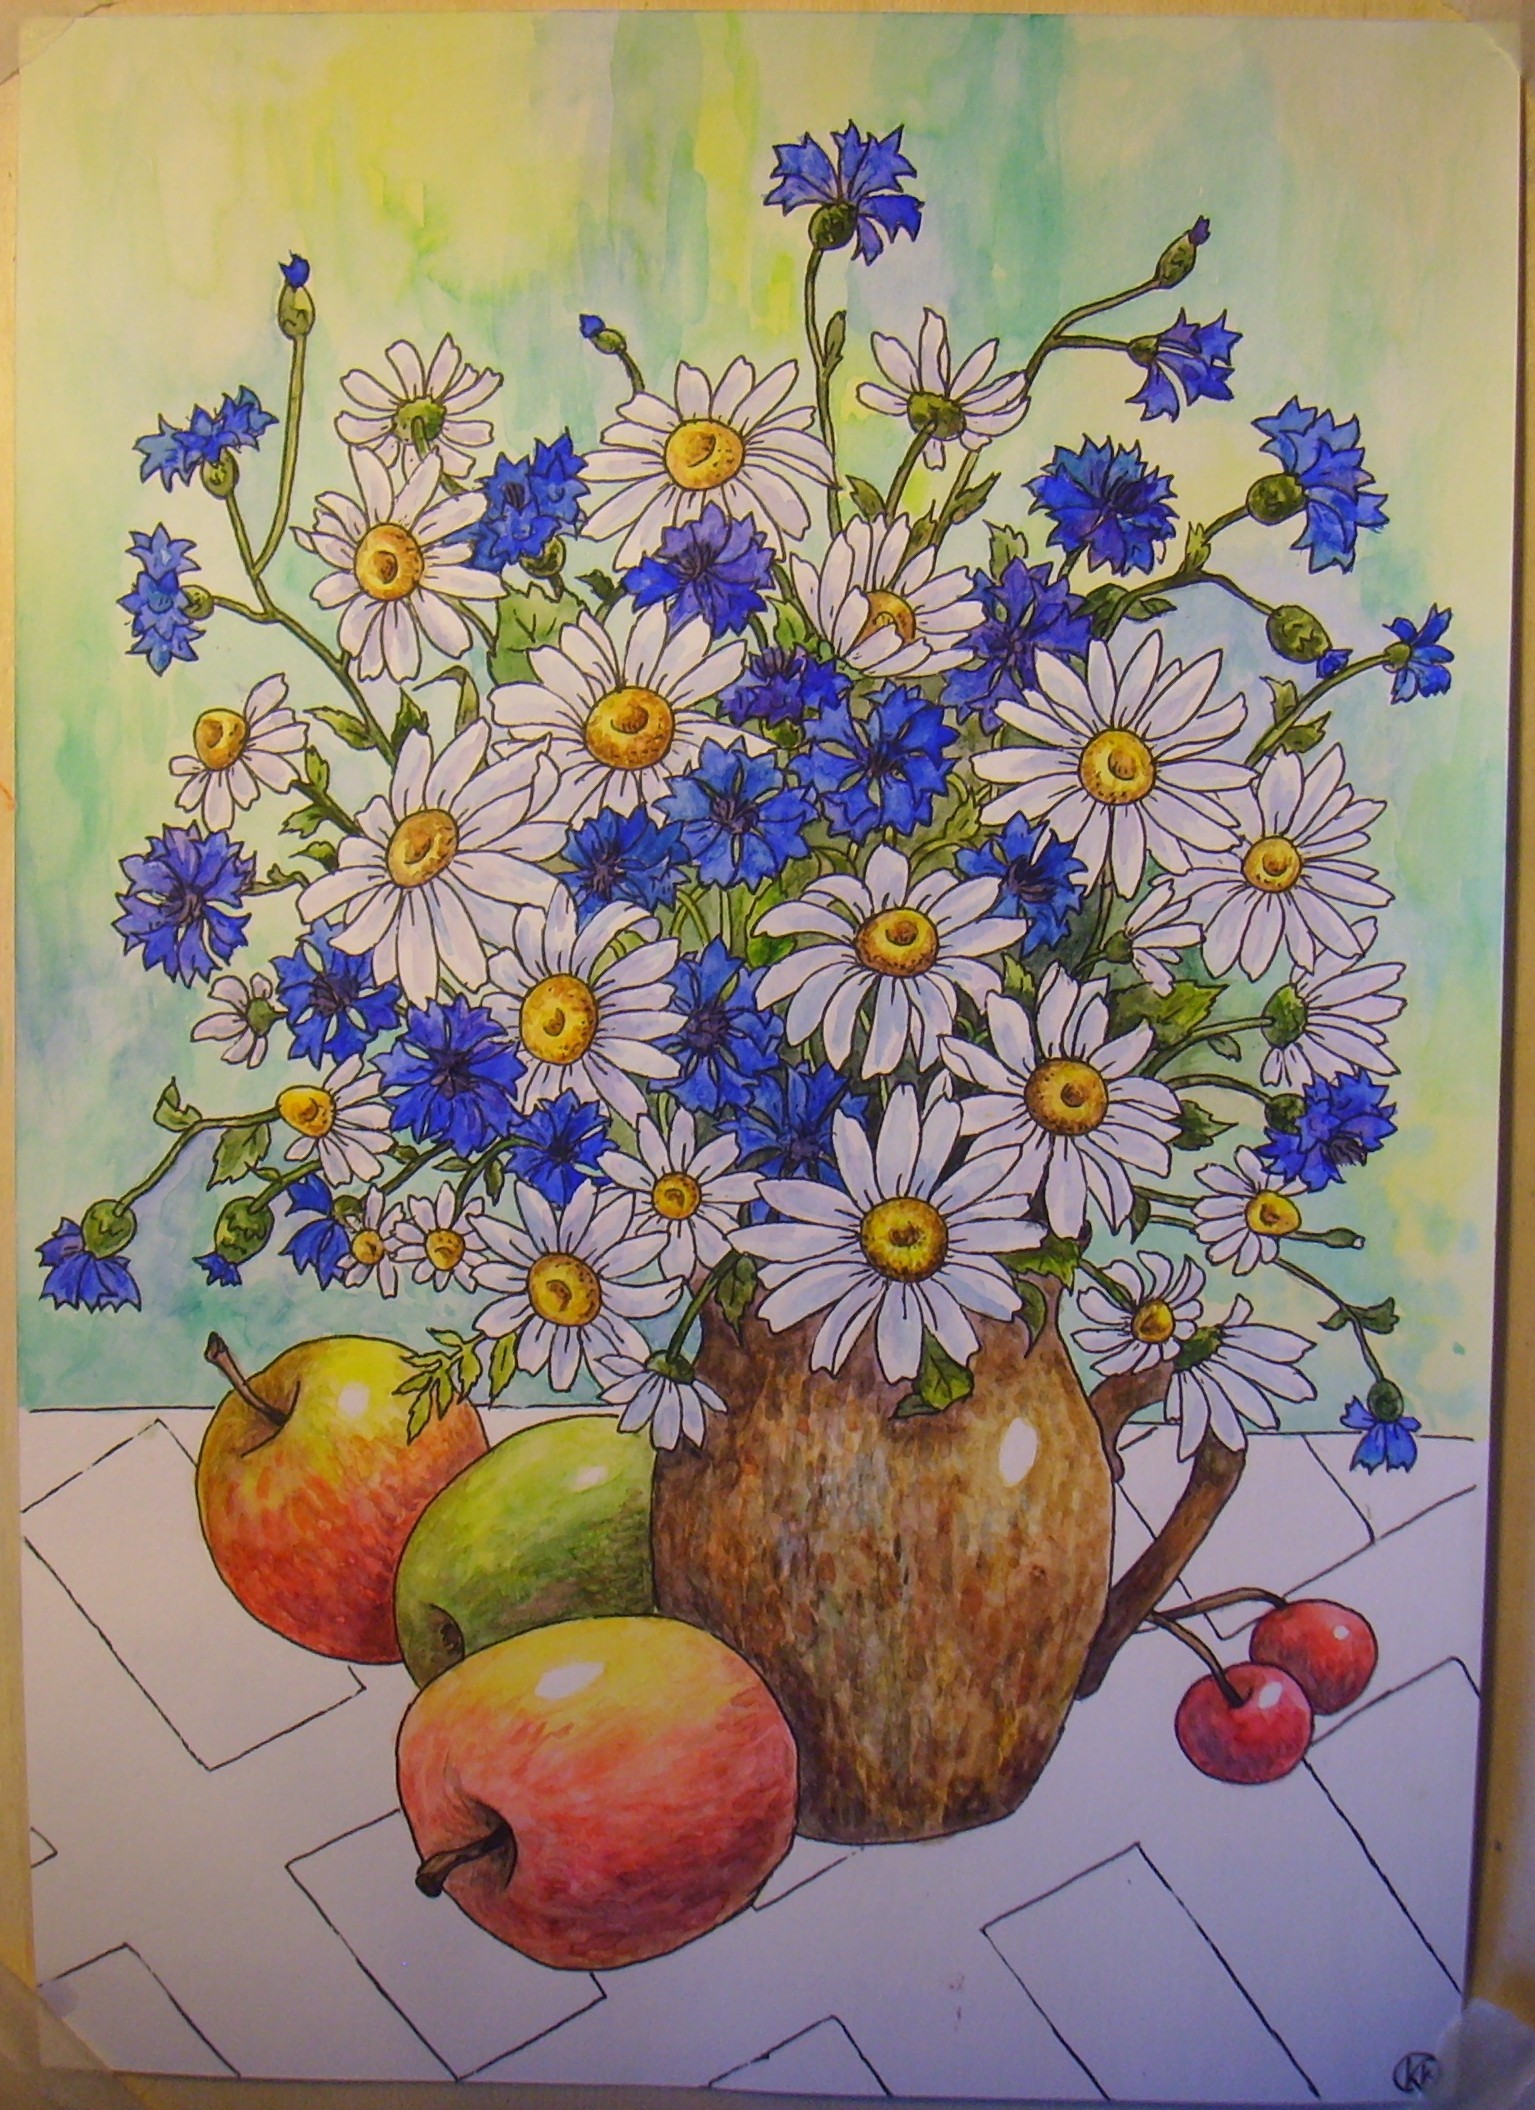
10. Color the stripes on the tablecloth blue, purple and pink tones. Color the centers of the cornflowers with a mixture of brown and purple;
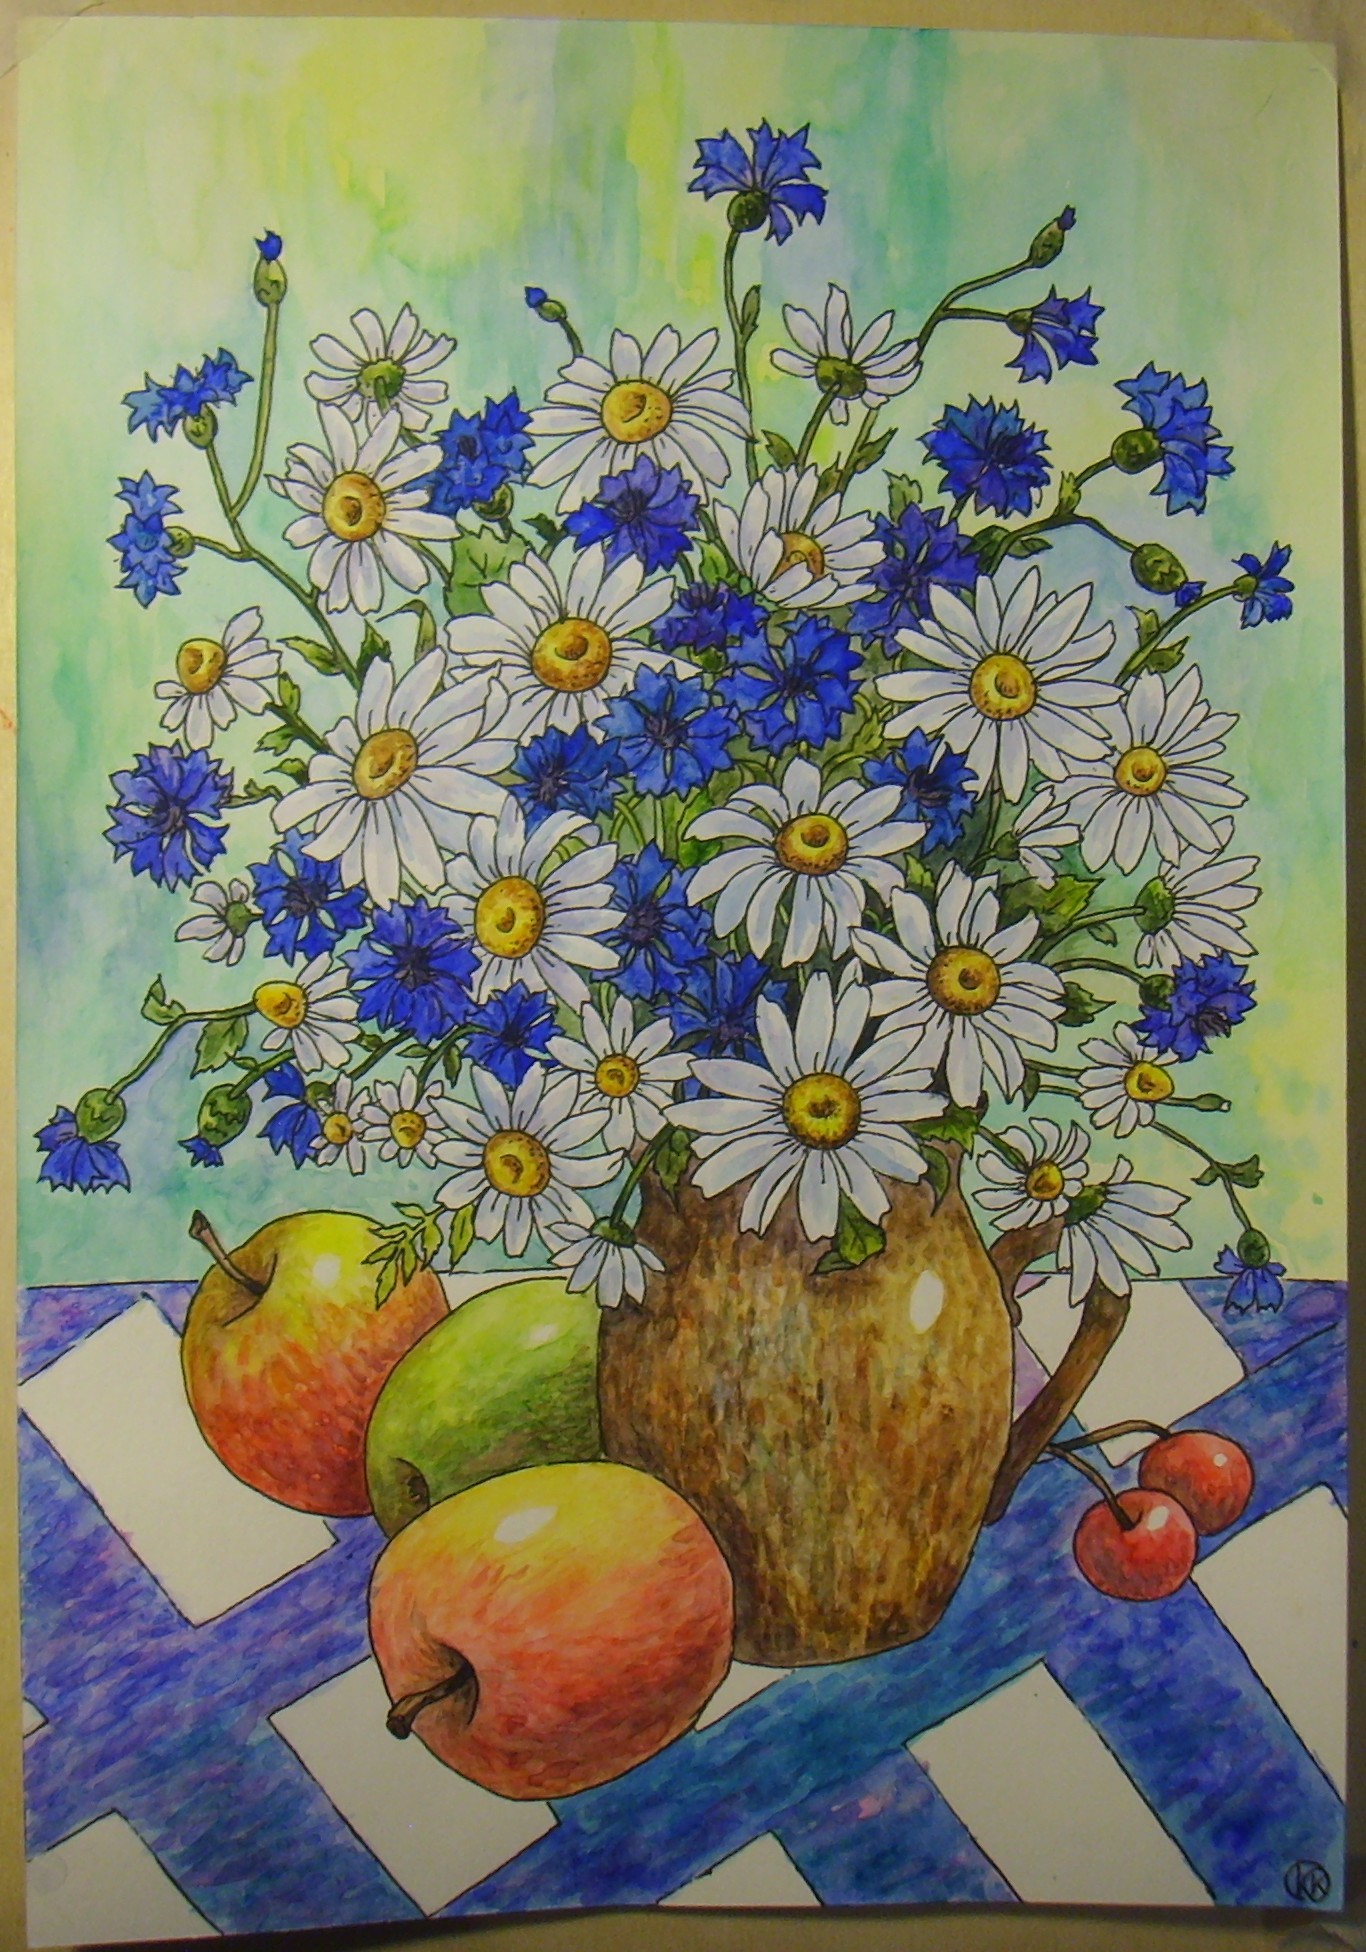
11. Color the squares on the tablecloth pink and yellow;
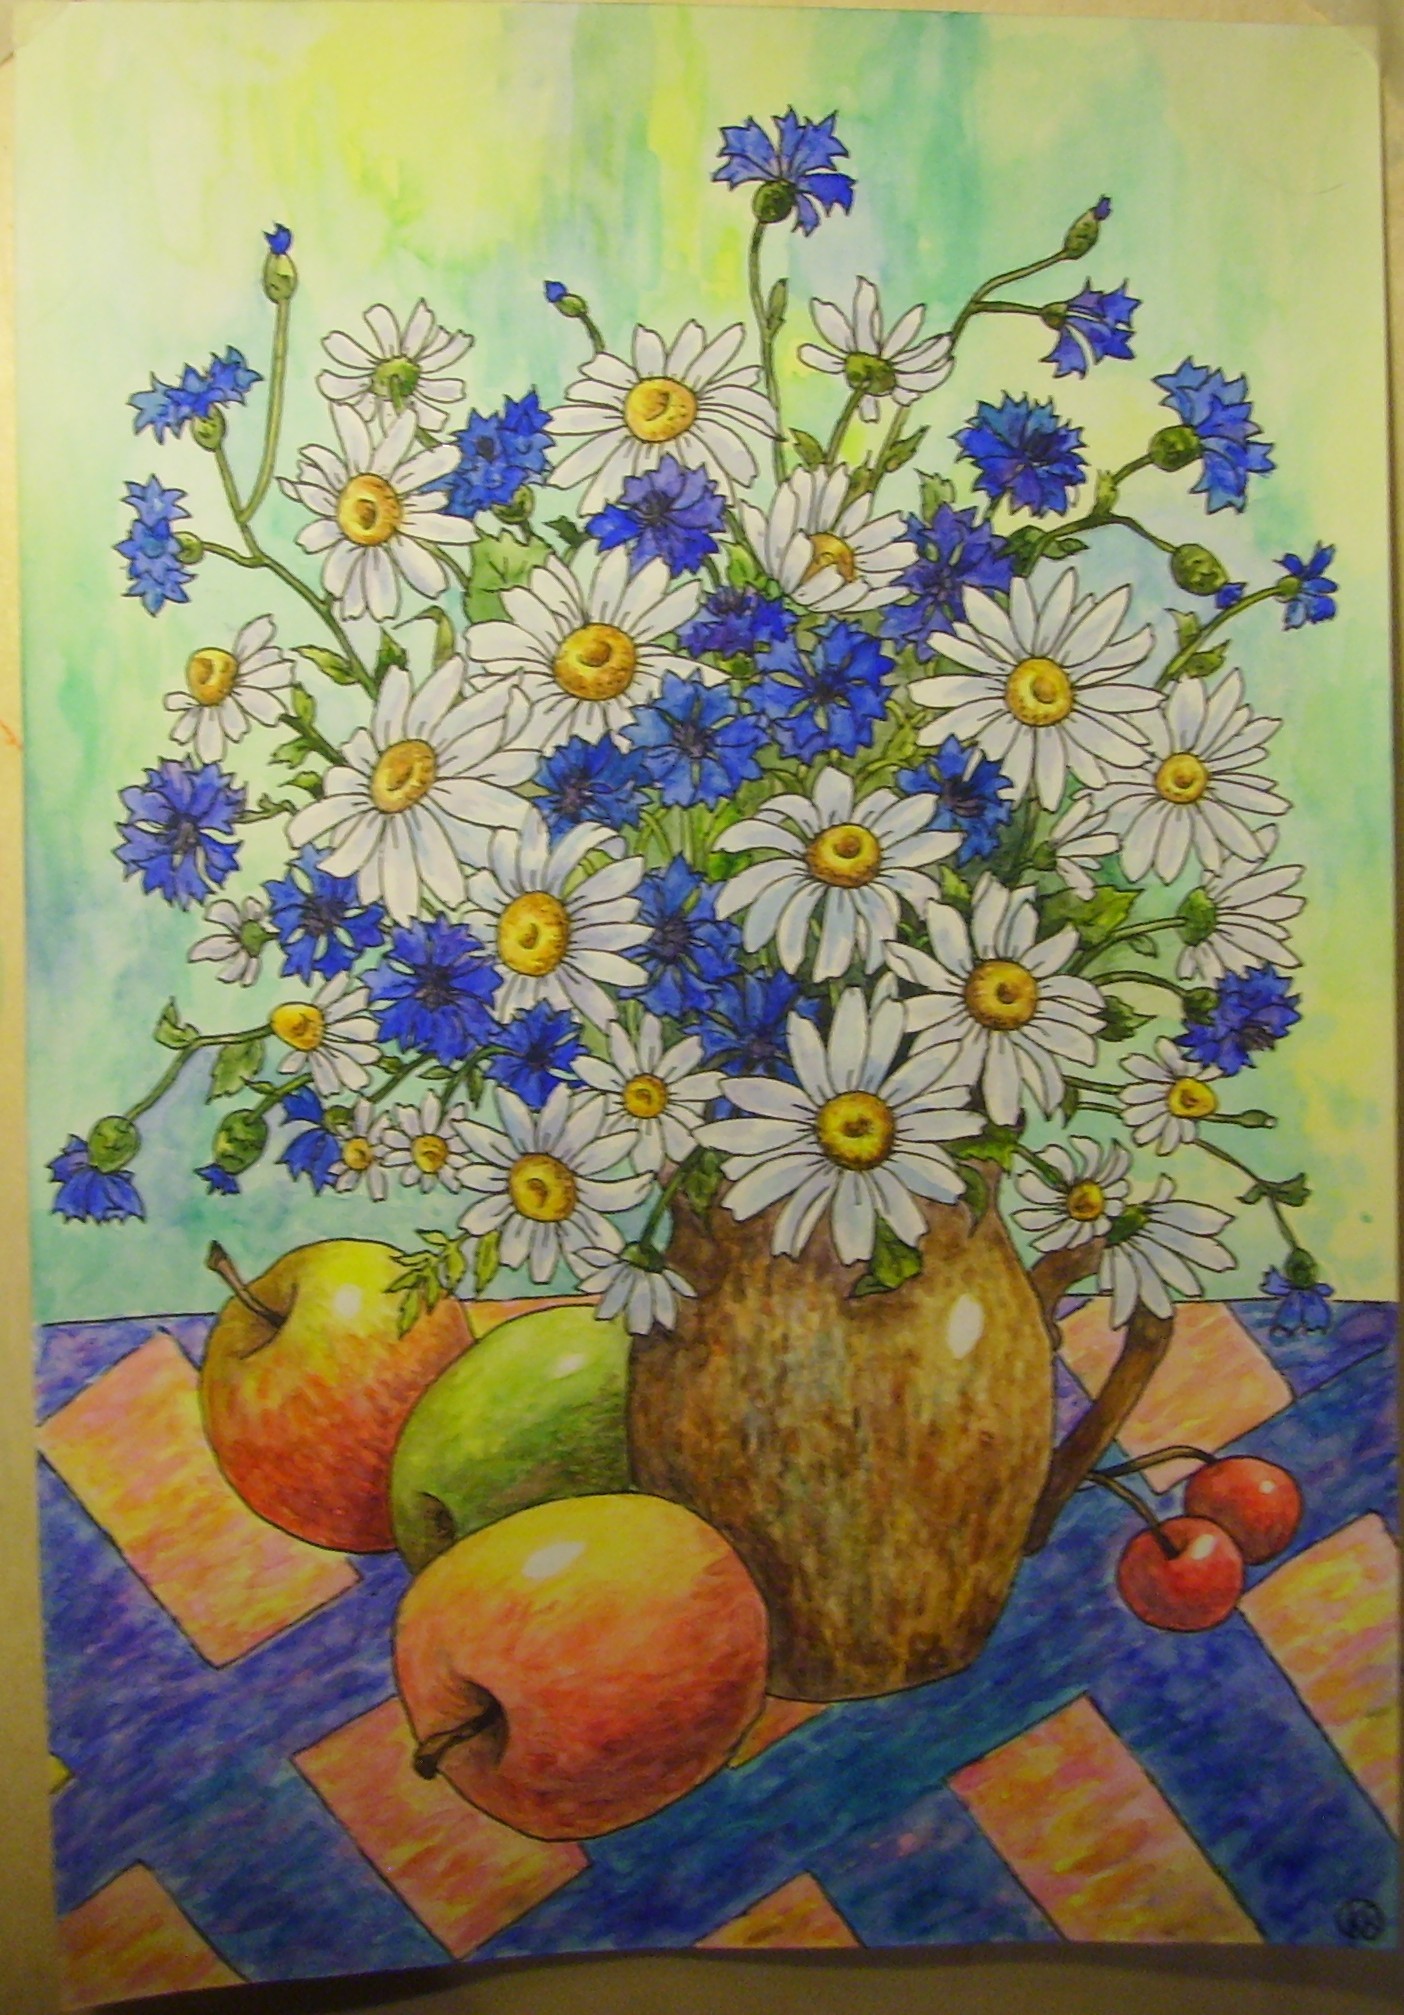
12. Draw dots in the centers of the cornflowers with a white pen.
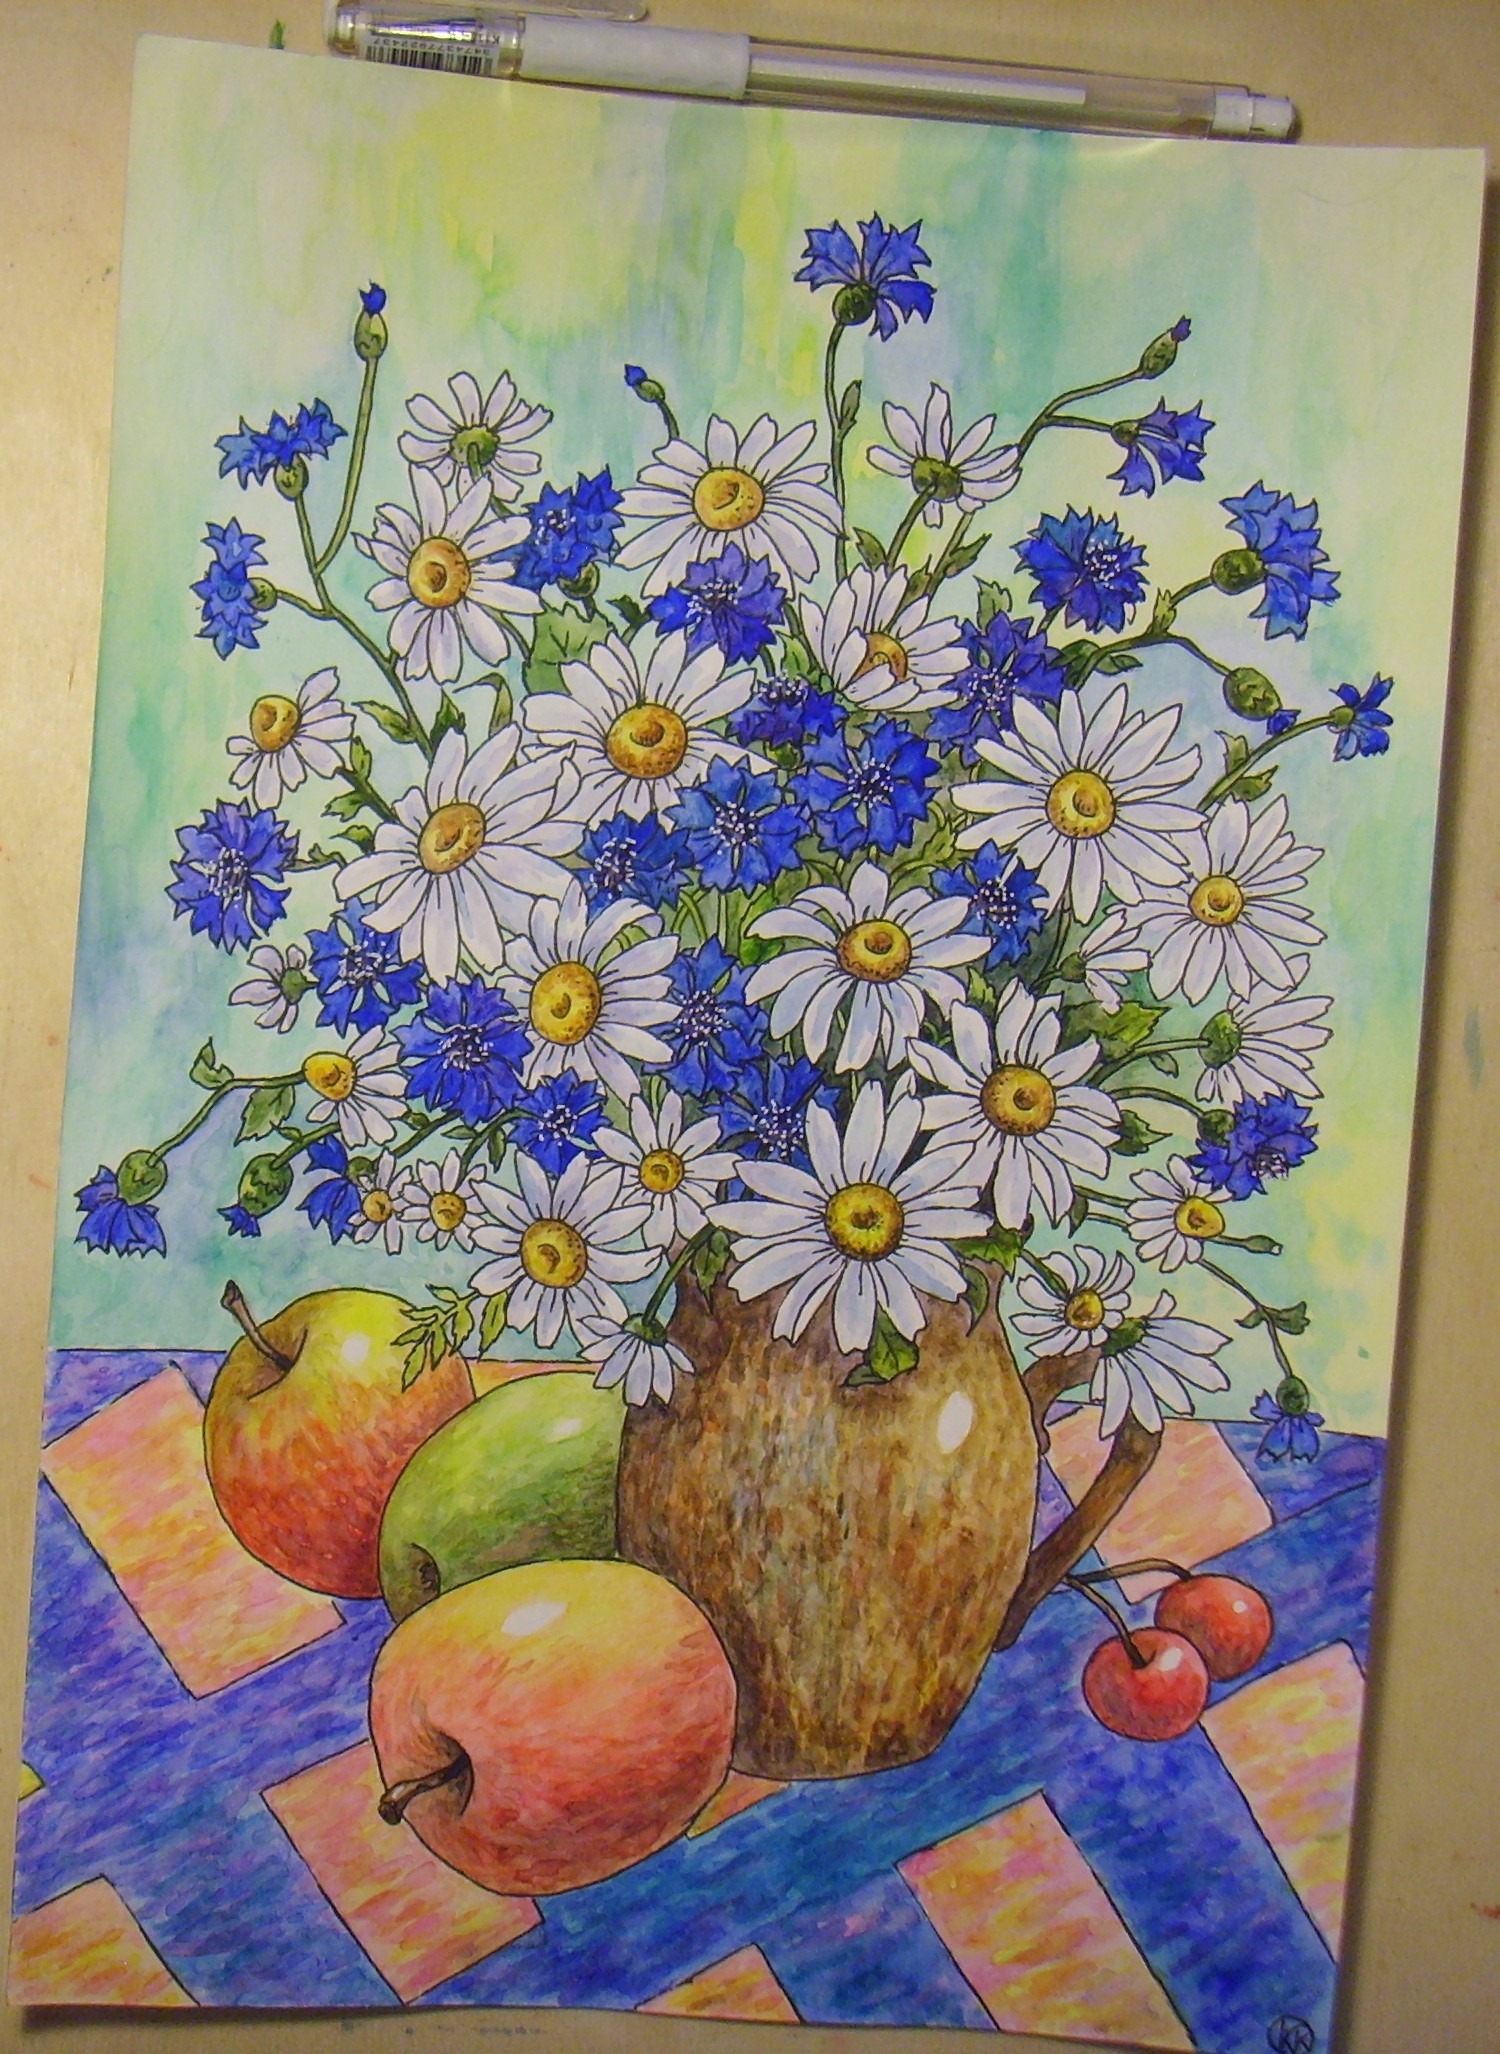
Now the bouquet of flowers in watercolor is completely ready!
As you can see, there is absolutely nothing difficult in drawing such a still life! Knowing how to draw a bouquet of flowers step by step, you can create a magnificent and a bright picture, which can decorate any room in your home. To make it look more attractive, it can be framed. After learning how to draw a bouquet of flowers, you may want to draw beautiful ones!
Watch the video on how to draw a bouquet of flowers:
Chic, magnificent, fragrant, velvety... and that's all that we will draw today. Men sometimes give such wonderful bouquets to their ladies. By the way, you can also give drawn ones. The main thing is to try to make it as natural as possible. Do you know why men give women flowers? Let's imagine what thoughts are born in a man's head:
- You are already eleven years old, and you are in love with a classmate. She's chic, cool and terribly beautiful. You don’t know how to approach such a chick, but the thought comes to you - to give a bouquet. You waylaid her at the entrance one evening and solemnly handed her your broom. Although, stop! It seems like it was last century.
- Now you’re older, you think that flowers are a waste of money and you only give them when you go to a friend’s birthday party. And then you think that it would be better to give a device from DNS. Well, you also give it to your mother on March 8th - that’s a tradition.
- Well, that's it, dude, you got it! Now you are truly in love! And you urgently need to ensure that she becomes yours. But the girl is such a prankster, she doesn’t show up for dates. The phrase made its way into my brain: But it turns out there is love. And this is where a bouquet comes into play, or better yet a bouquet. It’s not a fact, of course, that this will be any good. But there is some possibility
- You are already wise beyond your years. Family, work, work, family and work again. Hmm, isn't it time to freshen things up? And then a wonderful evening has come, and you are already sitting with friends in a bar, and then you have plans for a club, or a bathhouse. It's getting light - it's time to go to bed. But the instinct of self-preservation dictates that at home any item from the kitchen utensil can fall on you. And in order to protect your dear butt, you buy a bouquet at the nearest stall! Here it is, salvation!
We talked about the most interesting things. Now let's get down to the main thing.
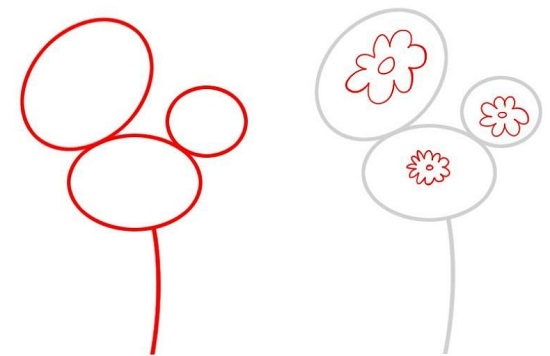
How to draw a bouquet of roses with a pencil step by step
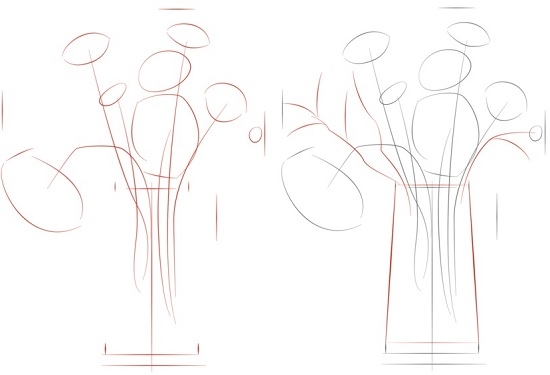
Step one We outline the outline of the entire composition: the bouquet itself, the bow and the vase. All details are large. These are just outline drawings. 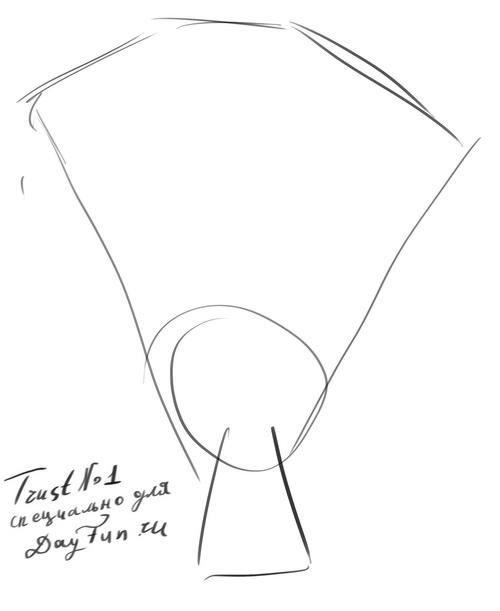 Step two Now we will sketch out the buds in the form of an oval. From each there is a stem going down. All the flowers are tied beautifully gift bow. It must be placed in the existing circuit. Let's make some notes. Let's make the bottom of the vase round.
 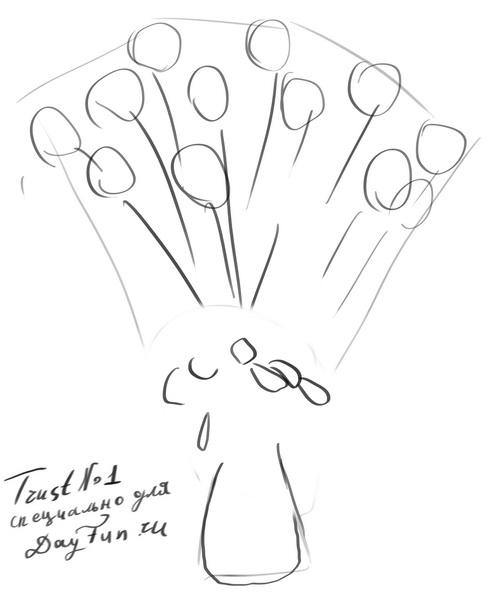 Step Three: Decorate the rose buds. Let's outline them irregular shape. We thicken the stem using the second line. Let's show the curls of the bow. Carefully circle the vase.
 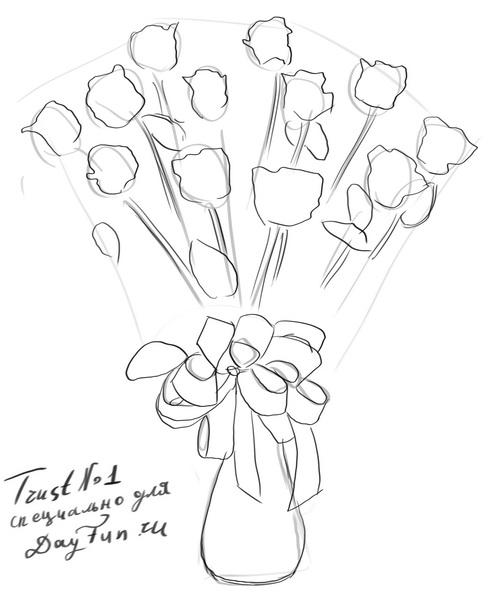 Step four Perhaps the most difficult stage. Inside each bud we draw neatly folded petals. Beneath them are sepals. By the way, botany lessons will come in handy here.
 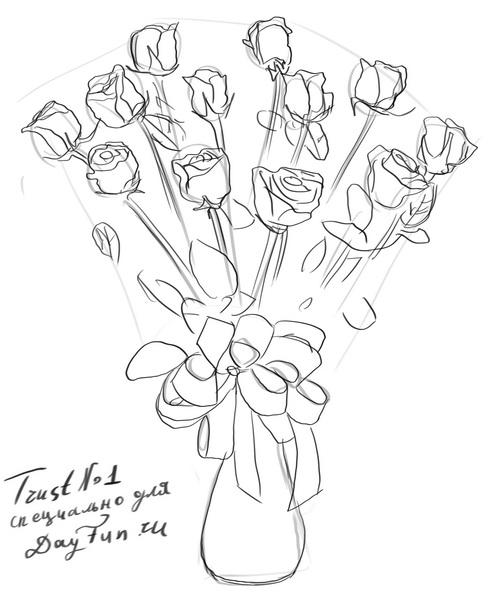 Step five Draw the leaves. There are many of them, they fill almost all the space between the stems. On the vase - vertical lines. Now take a critical look at your drawing and add the missing strokes. We erase auxiliary lines. Now, you can safely paint the bouquet! And you can give your painting as a gift.