Pencil drawing of a family tea party. How to draw a cup of tea
Such a household item as a cup is known to everyone. But not everyone is able to draw it professionally. But this is not at all difficult if you know the basic rules of the process. Do you want to know how to draw a cup step by step? Then keep reading.
Tools and materials
We will draw on paper with a pencil. Accordingly, prepare a sheet of medium-grain drawing paper, several well sharpened simple pencils with varying degrees of hardness so that the finished image is as realistic as possible. Another must-have tool is an eraser to correct possible flaws in the work. And the last thing is a shading stick (if you don’t have a special tool, you can use a regular sheet of paper rolled into a cone).
Sequence of work
Drawing household objects is easiest for artists - you can carefully examine a cup. And then, you don’t have to draw “out of your head” - household items always at hand. Even if you don’t have a suitable model, find a suitable picture on the Internet, print it out, and try to draw the image.
To create any simple drawing, you need to start with the outline. Or you can make your task easier and try to imagine your future drawing in the form of simple geometric shapes: sketch future cup in the form of ovals, circles or rectangles. After a few practical classes you will understand that drawing using this technique is not difficult.

When making the initial sketch, try to draw as thin strokes as possible - most of them will have to be erased.
But you should start not even with this, but with marking the sheet. This way you can understand where exactly your drawing will be located, and whether it makes sense to supplement it with any other image.
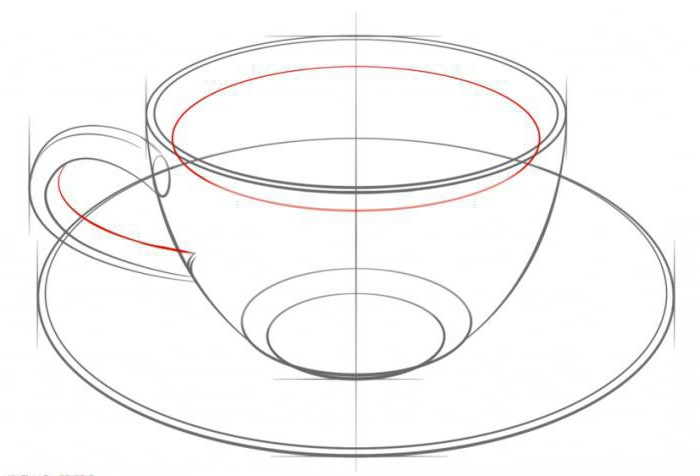
So, let's start drawing. First of all, draw a horizontal oval and draw down from its center vertical line. Then inside the oval we draw another, smaller one.

After this, we begin to draw the outlines of the cup itself. You can choose the form yourself, depending on your preferences. When you are satisfied with the shape, start drawing the main lines, as if drawing an image. After this, you can carefully erase all additional lines. That's all, the sketch is ready, all that remains is to add color to the image. You can make the cup plain, or add geometric or floral patterns, the choice is yours. If you wish, you can complete the background behind the main element of the image.

Now you know how to draw a mug yourself, even without additional outside help. Good luck in your creative explorations!
Drawing a mug is not as easy as it seems. It has its own form, which you need to be able to convey. This will require basic drawing skills and knowledge of perspective. Imagine that the mug is a cylinder. Try to look through it. You will see ovals that are at the bottom and at the top. Also, light and shadow fall on the cylinder, which is darkest at the border. And there are reflexes that form at the junction of an object and paper.
Learn how to draw a mug with a pencil step by step using simple drawing skills. Sharpen your pencils, let's begin!
Drawing details
First of all, outline the main proportions. Draw a line that runs down the center of the mug's cylinder (that is, not including the handle).
Draw two ovals to represent the edges of the mug and saucer. Notice that the oval at the bottom is wider than at the top. This arises due to the nature of perspective. That is, the ovals are not symmetrical.
Inside the top oval, draw another one, 3-5 mm smaller in size. This forms the neck of the cup. Smooth lines show its shape. But what if you get it wrong and you can’t understand why or how?
It's easy to draw a mug with a pencil. To make the lines as even as possible, it is better to draw from top to bottom - it’s more convenient. Guide the pencil firmly. Be sure to sharpen the lead.

- Draw the bottom of the cup to show its volume.
- Afterwards, during the work process, this oval will not necessarily be erased.
- Outline the guideline for the handle, leaving an oval to which it will be attached.
- Draw a small oval inside the other one, which is intended for the saucer (this is important even in how to draw a mug). This will show its thickness. It will be clear that the mug is not standing on a napkin, but has some kind of voluminous plate.

Draw the shape of the handle. Check curved line at the bottom, which will mean that a handle will be attached there. The cup has a stand attached to the bottom. Show this with an oval.

Complete the shape of the handle, and also show another oval inside the cup, which will indicate the level to which it will be filled with the drink.
Draw the details at your discretion, compare the proportions. Erase the guide lines.

Hatching
Drawing light and shadow is the main job. It's worth paying attention to Special attention, if you want to draw a mug step by step. The sketch should take no more than 15 minutes. And to shade correctly, beginners need half an hour. Apply strokes horizontally in a semicircle, then you can easily convey the cylindrical shape and volume of the mug.
Light and shadow
Can't make the image look realistic? How to draw a similar mug, knowledge in drawing light and shadow will help you. The latter may occupy half or less of the image. Also, a shadow can cover an entire object. Its location depends on the lighting.
In high light, the shadow on the subject will be slanted. The cast shadow will lie on the surface closer to horizontal position, but to a vertical one, but still with an inclination in a certain direction.
If the light source is on the side, then the shadow will be vertical on the cylinder and occupy a certain part. And its size will depend on the angle from which you draw. The cast shadow will lie horizontally.
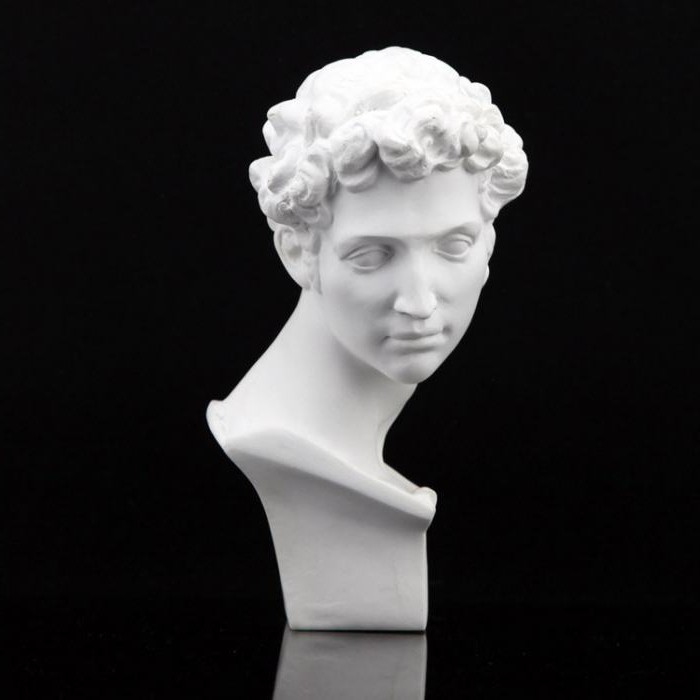
If the light is behind the subject, the shadow will completely cover it. Contrasting outlines will appear. But the gradient and cast shadow will also remain. In this case, it is more difficult to draw - you need to try not to make the cylinder too dark, especially if it is made of plaster. Otherwise, the texture will appear metallic. And instead white another, darker one will be visible. Now imagine how difficult it is to transfer a bust to paper, while drawing a mug is as easy as shelling pears.
Gradation
From light to dark the gradation is more gradual, and from high light gradually increase the tone, which increases the strength of the shadow of the object, and gradually becomes a shadow. IN in this case, the shadow also becomes darker from bottom to top. At the junction with the surface it is the lightest.

The drawing imperfectly represents gradation in which there are no sharp changes from one element to the next. In the base light, shadows usually appear where they come into contrast with the highlights. Also, in any lighting conditions there are gradations. At the junction with light, the shadow is darkest in tone. After this junction, the shadow is softer and darkens again towards the edge of the cylinder, but does not become the heaviest in tone. This knowledge even helps in how to draw a mug, because it also has a cylindrical shape.
Cast shadow
The shadow is not completely horizontal. She walks with an upward slope. But it can be positioned differently, depending on the lighting. The shadow that is closest to the cylinder is the darkest. And it also has a gradient - from the object to the junction with the wall. Shadows soften as you move away from the subject. The shadow also has an outline. When you show it, try to make an outline, not a stroke. The shadow that falls on the wall is darker than even a cylinder.
It’s good to drink something hot in the morning, eat pancakes or cookies. Blessed morning. And the sun shines directly into the eye. Everyone thought I was talking about coffee, but that was not the case. Personally, I'm not a fan of coffee drinks, but what I really love is tea. In this lesson we will talk about how to draw a cup of tea. Tea is so cool that ceremonies are held with its participation traditional holidays. Countries such as England or China are famous for their reverent attitude towards the divine drink. In Russia, tea is almost completely replacing coffee - a hellish drink that brings many diseases and, not often, addiction. Better yet, children, drink milk! (The toilet is nearby). Here are a few for you interesting facts and moments about this drink, in the sense of tea:
- There is a legend that tea grew at the burial site of a Chinese saint. One day he fell asleep while praying, and he hated himself for it, so he cut off his eyelids and never slept during prayer again. In Chinese and Japanese Until now, the words “veki” and “tea” are denoted by one hieroglyph.
- A tea bush is a brilliant investment. The plant does not need special care, it grows under almost normal conditions, and, most importantly, its vitality. One bush can live for more than a hundred years and bear fruit all the time.
- Small but fun fact– tea with lemon is called Russian tea in almost all countries, because it was the Russian people who came up with the idea of drinking tea with lemon. Whether this was done deliberately or simply to get a hangover in the morning is not clear. But it's delicious.
- Often in strange books tea is called a sleeping pill. This is not a myth. He actually has one by-effect, but only if you pour it into yourself tenfold.
You can make yourself some tea and start drawing.
How to draw a cup with a pencil step by step
Step one. Let's mark the location of the spoon, cup and tea bag.  Step two. Outline a cup with a handle, on the left, in a rectangle, add a teaspoon. Don’t forget that we have tea in the cup, and not just ordinary tea, but Russian tea (with lemon) - we draw a tag from the bag on the right and a piece of lemon inside.
  Step three. We outline the sketch with thicker lines, and make the slice of lemon more lifelike.
  Step four. Eraser in hand - and remove the extra lines. We shade the drawing for realism.
  Now all that remains is to buy cookies, waffles, marmalades and other sweets. And while you're enjoying the taste, check out the other tutorials.
Hello comrades!
We have already touched on the topic of “dishes”. They made cups, bowls and even jugs. If you work with paper, then our service includes “dishes” coloring books. You can decorate it with patterns, you can practice finishing drawing the halves symmetrical objects or practice cutting. If the utensil has a handle, then you will have to remember to cut holes in the paper. In general, the topic is rich. And we will also cover various aspects of it. But today we’ll talk not about the outside of the dishes, but about the inside.
Yes, we actually need dishes not (only) for beauty. They store food in it and drink tea from cups, for example. So, if you give the task of cutting out a mug, then often, or rather even often, children, having cut out the handle and the hole in it, then mindlessly cut along the edge of the cup closest to us, cutting off the oval that we depict - what? - internal part.


To give students the opportunity to understand the meaning and purpose of the image of this ellipse, we will give the task to draw tea in a cup. This is where it turns out that children 5-8 years old have no idea how to depict this.
Therefore, we strongly urge: when going through this topic, show everything with a living example. Posters and drawings on the board are good, but independent observations, although they will not lead to quick understanding, will create a precedent.
So let's look at the topic «
How to draw a cup of tea ».


Look at these photos. Strong tea is poured into a cup and mug. Please note: the liquid does not reach the very edges. In life, we also don’t pour it to the brim, otherwise all the tea will spill.
From the side, the projection of a mug or cup is presented on a plane as one geometric figure, when viewed from above, they both represent a circle. At three quarters we will see part of the outer side of the mug and partially inner surface. The most important thing: the horizontal section of the mug and cup from our angle appears as an oval, within which we see the edge of the poured liquid as a segment of an arc PARALLEL to the “upper” arc - the edge of the cup. This is what you should pay attention to. This even arc is the stumbling block. It would seem that nothing is easier, but the guys often just look and don’t see what it all looks like. Within the oval edges, the arc of the edge of the tea is visible! The colored liquid is at the lower limit of this arc and fills this limit WITHOUT GAPS, and DOES NOT GO TO THE TOP. A heavy liquid, being in a vessel, tends immediately
- take the shape of a vessel
- distribute smoothly and evenly.
Let's look at the boundary of the liquid in a conical cup. The closer to the bottom, the smaller (level 1), the higher, the larger the ellipse (2).

In an opaque cup, this ellipse is only partially visible; the invisible part must be mentally completed so as not to miss:

The level of the liquid and the angle at which we look at the cup may be different, but this does not affect the basic rule: the liquid is at the bottom, the arcuate line of the liquid level is PARALLEL to the edge of the vessel.

As for the transparent cup, the rule remains the same. But with a nuance: in a transparent vessel we see ALL THE LIQUID, AND THE ENTIRE LIQUID LEVEL. Accordingly, we also see that edge of the liquid that is spatially closer to us: but we see it through the glass wall of the vessel!

In our auxiliary diagrams, we simplified the task a little by taking it for granted that the walls of the vessel are absolutely transparent and their thickness tends to zero. In reality, of course, everything is more complicated, and on occasion we will try to show how to draw a transparent cup of tea from life. For today we will limit ourselves to this image, we hope that everything will work out correctly for you and, in any case, will give the children a reason to think about it.
Marina Novikova told you how to draw a cup of tea correctly.
Tags: ,
Hi all! Today we will get acquainted with a new lesson step by step drawing, during which we will learn how to draw a cup!
It won't be difficult lesson drawing, but in the end we should get a realistically drawn cup. If you like lessons in realistic style, then a lesson awaits you about . So, let's go!
Step 1
First, let's outline the contours of the bowl itself and the handle, which is very similar to the ear. 
Step 2
Then we will outline top part. This figure will be called an ellipse.

Step 3
We edge the edges of the bowl and outline the bottom. This needs to be done with clear, confident contours. One more thing - we outline the bottom with a border, as in our sample.

Step 4
It's time to work on the handle. Using the outline from the first step, we will outline this element. At this stage, it becomes even more similar to the human ear. By the way, the cup of the Champions League football tournament has a pair of the same handles, for which it is popularly called “eared.”

Step 5
Let's apply shadows to the cup. Perhaps, in today's lesson about what is quite simple, this stage will be the most difficult. First, let's determine where the light source is located, and in our case it is located on the left. Next, we apply shadows - to the right of us is a longitudinal section of the shadow, in which the structure of the shadow itself can be traced very well. By the way, you can read about the structure of the shadow in the sixth step of the lesson about


